Sensata INSIGHTS CRX3108 User manual

8-channel AHD mobile
digital video recorder
Model: CRX3108 | Version 1.1.1 | Last updated 2/16/2023
Installation guide
CRXS
sensatainsights.com
INSIGHTS

2
Sensata INSIGHTS CRXS installation guide
Table of contents Please read this entire guide before installation and use.
Installation guide
CRXS
FPO
Package contents..................................................... 3
Overview .................................................................... 4
Hardware overview .................................................. 5
How to install your CRXS......................................... 7
Accessory camera types ...................................... 10
Power cable and wiring ............................................. 11
Final steps ..................................................................16
Troubleshooting ......................................................17
LED specifications ..................................................18

3
Sensata INSIGHTS CRXS installation guide
GPS antenna module
SSD and decal pack
(removable case) L brackets and rear cable cover Screws
Keys for internal lock
(Turns on device and locks
SSD case in the CRXS unit)
Keys for external lock
(Locks main unit’s front cover)
Camera cable harness
(x2) connects 4 cameras each.
4-pin aviation connector.
Alarm I/O trigger harness and A/V
output for connecting an LCD monitor
Power cable 400mm
Car signal input cable:
left, right, brake, speed (VSS).
Analog input only. (Optional use)
External LTE modem + antenna
(Optional accessory)
External Wi-Fi/LTE modem case
(Optional accessory)
Wire splice clip and velcro sticker BB900 backup power device
Package contents
CRXS digital video recorder (DVR)

4
Sensata INSIGHTS CRXS installation guide
Overview
The Sensata INSIGHTS CRXS is a super HD-capable, in-vehicle CCTV that offers high-denition recording for
up to 8 camera channels. The CRXS provides eet operators with an effective way to monitor and manage their
remote assets while in the eld. In the event of an incident and/or allegation, the CRXS HD mobile will aid in the
investigation process while reducing potential cost and exposure. In-vehicle CCTV delivers actual video footage
in the event of a claim, encourages safer, more fuel-ecient driving, monitors driving behaviors and enhances
the overall safety and security for the driver, the eet operator and other road users.
The solution includes a built-in 3-axis G-sensor, GPS, 8 alarm input triggers, exible and powerful storage using
a solid-state drive (SSD) and SD card backup storage. The CRXS is slim and compact, only 7" x 7" x 2", and is
connected directly to the vehicle’s battery power and ignition for fully automated operation. Optionally, connect
a dashboard-mounted LCD display to provide the driver with a real-time 360º view of the interior and exterior
of the vehicle.
WARNING:
Sensata INSIGHTS installations should be performed by a
qualied individual or installation professional only. Working
with a vehicle’s power system can be dangerous to both you
and your vehicle. This installation is intended only to be a
guide since vehicle designs and power/input sources can
vary signicantly from vehicle to vehicle.
If you need to schedule a professional installation service
in the USA for your Sensata INSIGHTS device(s), please visit
https://sensatainsights.com/contact/request-installation/
and submit the online form.
All cellular-enabled CRXS devices must use the installation
wizard for proper onboarding and activation. Please visit
SmartOPS to register, log in and use the install wizard.

5
Sensata INSIGHTS CRXS installation guide
Removable SSD
Cartridge
Video Out Port
SD Card
DC 12V Power
Control
Buttons
LED Lights
Key Lock
1 2 3 6
7 8 9 10 11 12
45
Hardware overview
Front view
Rear view
1. Power ON delay dip switch
2. USB connector
USB 1: Optional serial connector accessory
USB 2 (blue connector): Connect USB dongle
(3G, LTE, Wi-Fi)
3. Serial ports
Port 1: Connect external device usually used
for system maintenance.
Port 2: Connect external device usually used
to connect EMS alert unit.
4. GPS connector
Connect external device usually allotted for external GPS.
5. Power connector
Use the included power cable bundle for this connection.
The battery cable connects to the battery power (BAT+),
and the ACC cable connects to the ignition (IGN+). The
black wire connects to ground (BAT-).
6. Main power switch
7. Power output
(Output voltage: DC 12V, 1A)
8. AV in (1~4) connector
Cameras 1~4: Video, audio and 12V power supply
9. AV in (5~8) connector
Cameras 5~8: Video, audio and 12V power supply
10. Ethernet connector
Supports network connection
11. Car Signal connector
Use the car signal cable bundle for this connection.
Connect the appropriate car signals to the labeled cables.
12. Digital IO / AV out connector
Digital input 1: Allotted for RPM signal
Digital input 2~8: Connects to other signal inputs such
as panic switch, horn, door open and close, etc.
Digital output 1~2
Audio/video out

6
Sensata INSIGHTS CRXS installation guide
Hardware overview
Side view with mounting brackets
Rear view with secure cover
7
Sensata INSIGHTS CRXS installation guide
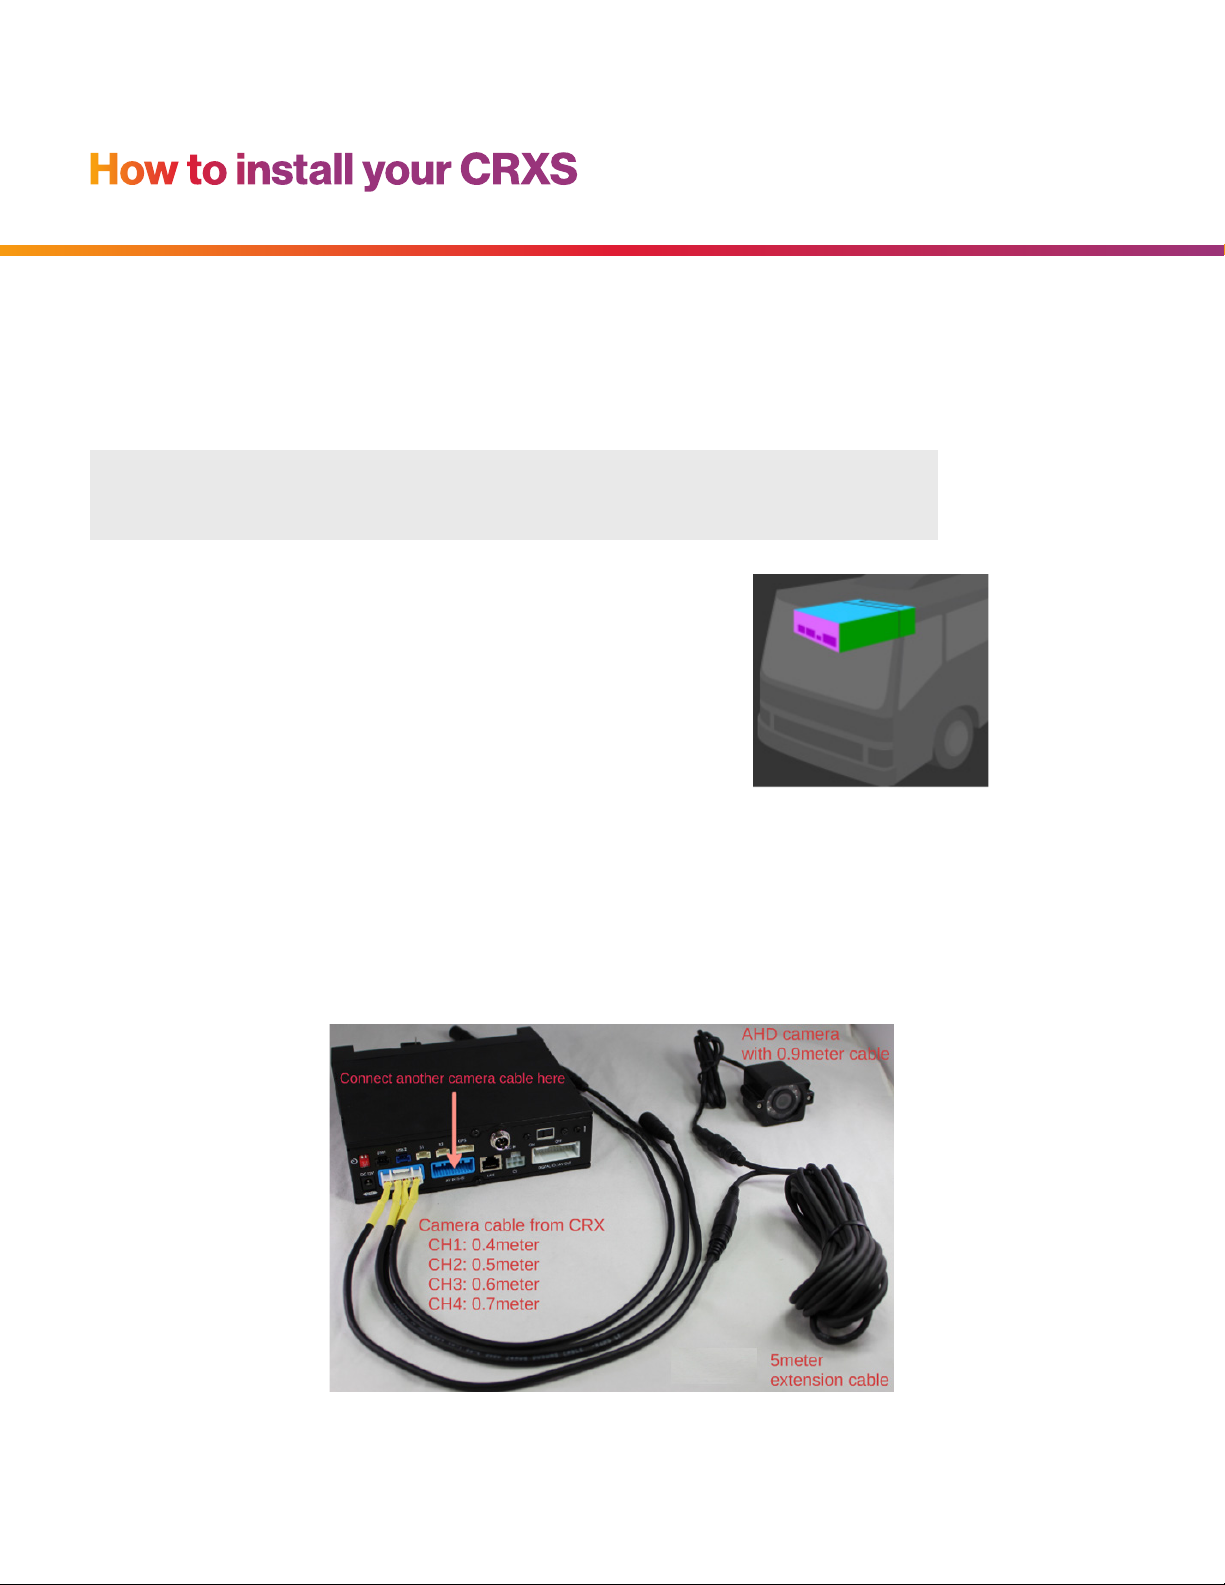
(Purple = rear panel, Blue = top panel)
How to install your CRXS
1. Park the vehicle on a at surface. Turn off the engine before installing the CRXS.
2. Insert the provided SD card into the SD card memory slot, and lock the SD card by sliding the SD locking switch.
3. Insert the CRXS into the locking case. If there isn’t a locking case, use the provided adhesive.
4. Find an installation location for the device and its locking case.
5. The default access adjustments by device position are set as
shown to the right.
6. Before mounting the device, conrm with the customer their desired installation method and placement.
Install all the interior and exterior cameras with 3M dual-sided adhesive or hard mounting screws.
7. All the cameras will be connected to the CRXS recorder via the Camera Input Cable.
NOTE:
Please make sure the surface is clean before applying. The adhesive will not stick well with dust or oil, etc.
8
Sensata INSIGHTS CRXS installation guide
How to install your CRXS
Ch1
Ch2
Ch3
Ch4
Ch5
Ch6
Ch7
Ch8
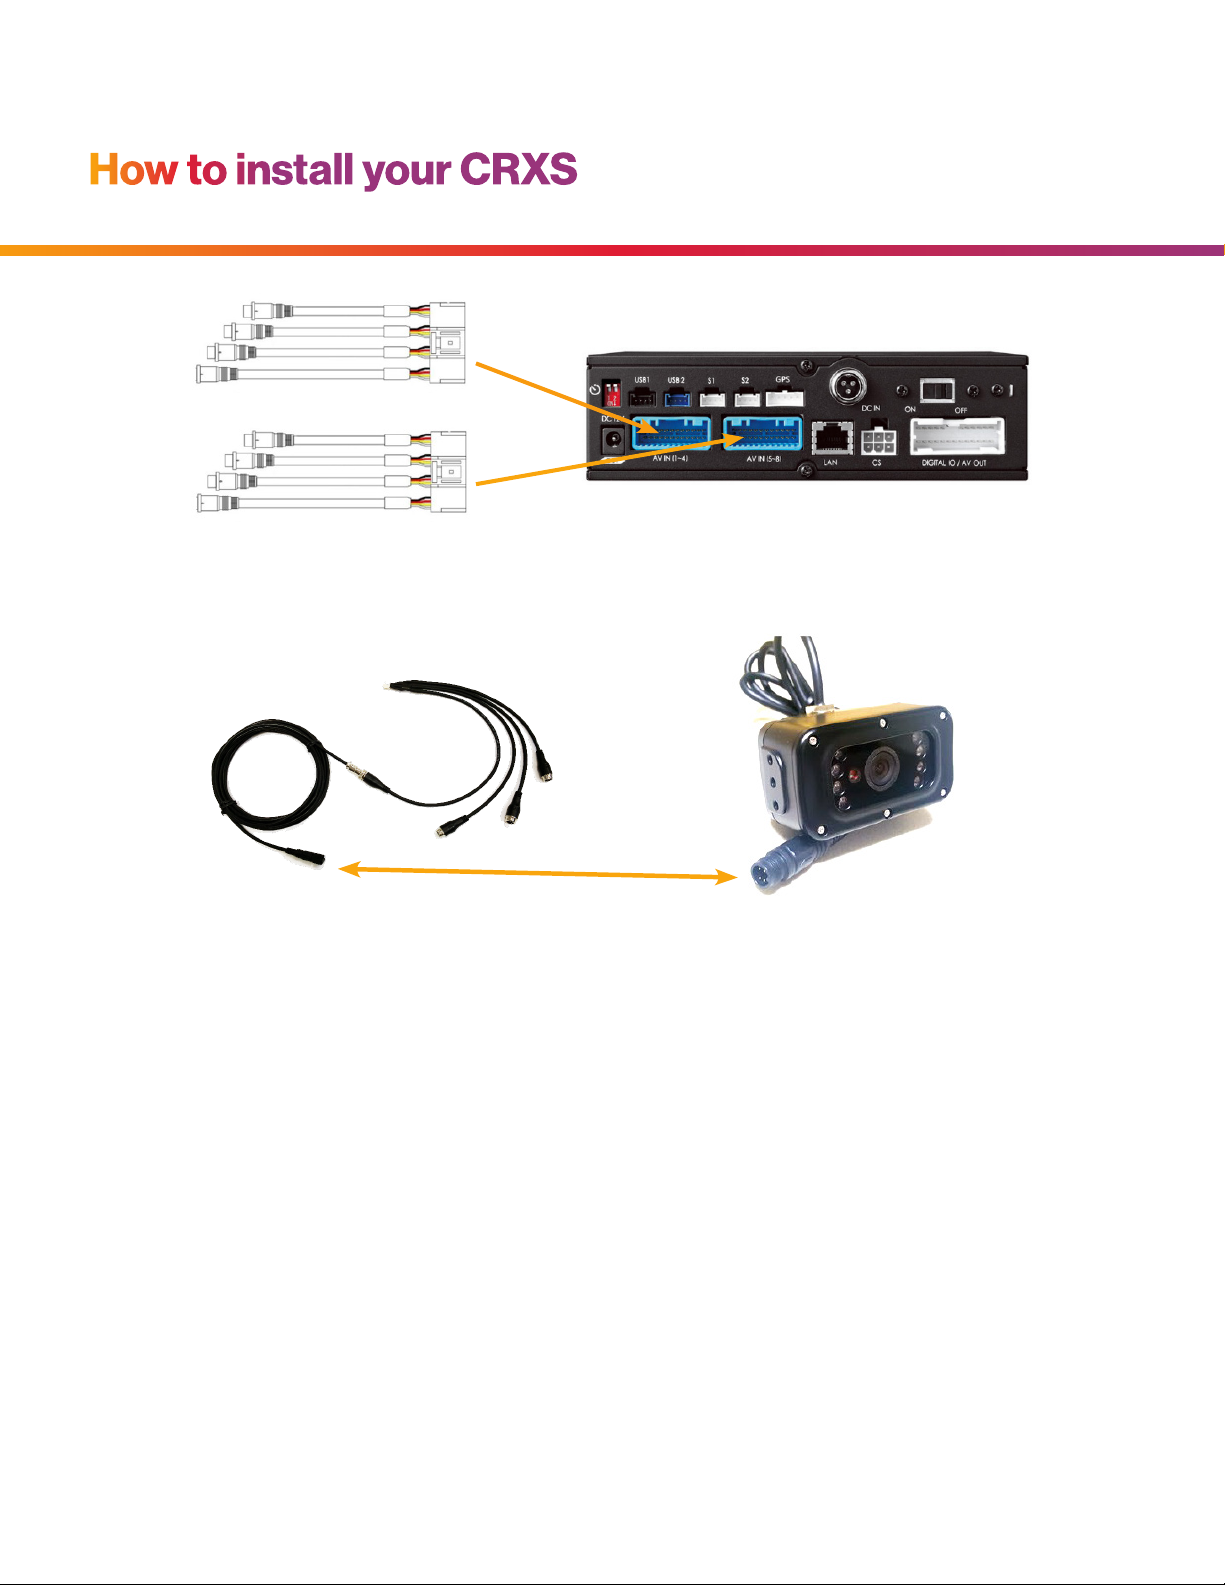
9. Connect all cables to the CRXS recorder. Secure the windshield-mounted camera cables into the
headliner and down the A-pillar.
10. Route the GPS cable up the side panel and on the dashboard, in view of the windshield
(so it can have a view of the sky to acquire GPS signal).
• Activate the product in an area without large buildings to improve GPS reception.
• The temperature ranges for optimum operation of the GPS receiver in your vehicle is -10~50°C.
8. Run the camera cable(s) and secure in headliner and/or other area so no cables are exposed. Use
provided wire clips if necessary.

9
Sensata INSIGHTS CRXS installation guide
How to install your CRXS
GPS reception may be impaired under the following circumstances
1 If there is an object at the end of the GPS antenna
2 If the vehicle has metallic elements on the windshields
3 If equipment generating electromagnetic waves that interfere with the GPS
signal is installed in the vehicle, e.g., other GPS devices such as certain types
of wireless activated alarms, MP3/CD players and camera alarms using GPS
4 If you are using a receiver connected by cable, electric interference
can be avoided by simply changing the location of the receiver (antenna)
5 On heavily overcast or cloudy days or if vehicle is in a covered location such
as under a bridge or raised roadway, in a tunnel, underground roadway or
parking area, inside a building or surrounded by high-rise buildings
6 If GPS signal reception is poor, it may take longer to locate your current
position when the vehicle is moving than when it is stationary
DO NOT ATTACH THE LTE
ANTENNA ONTO A METAL SURFACE.
(Provide a minimum of 5 inches of
separation between the antennas.)
CRXS GPS and LTE antenna properly
installed on the vehicle dash

10
Sensata INSIGHTS CRXS installation guide
Accessory camera types
The CRXS has various accessory camera models available which should be installed in the appropriate
location. A reference guide for the common camera models is below.
Model Image Installation location Notes
SVA055-AM Road + driver-facing dual camera Road-facing camera is 1080p.
Driver-facing camera is 720p.
Driver camera has IR LEDs.
SVA027-A Weatherproof side-mount camera 720p weatherproof camera, IR LEDs
SVA037-A Rear view camera 720p weatherproof camera, IR LEDs
SVA050-A Driver-facing camera 720p, IR LEDs
SVA035-A Outside of vehicle, either side mount
or rear backup view
IP69 weatherproof. Camera module
can rotate 360° and tilt up and down
as needed.
SVA041-AM Road-facing camera 1080p

11
Sensata INSIGHTS CRXS installation guide
Power Specifications
Input: 12V/24V DC 3A
Max Power Consumption: 96W
Power cable and wiring
1. Lay out the power cable roughly where it will run once hidden behind the vehicle’s interior panels. This gives you
an idea of where to route the cable and how much slack to leave on the way down to the vehicle’s power source.
2. Secure the power cable extension into the headliner and down the A-pillar.
3. Route the power cable around the side and behind the rest of the interior panels down toward the fuse box/
power source.
4. Make sure the vehicle is off, then connect the required wires to the vehicle, as shown below in the wiring diagram.
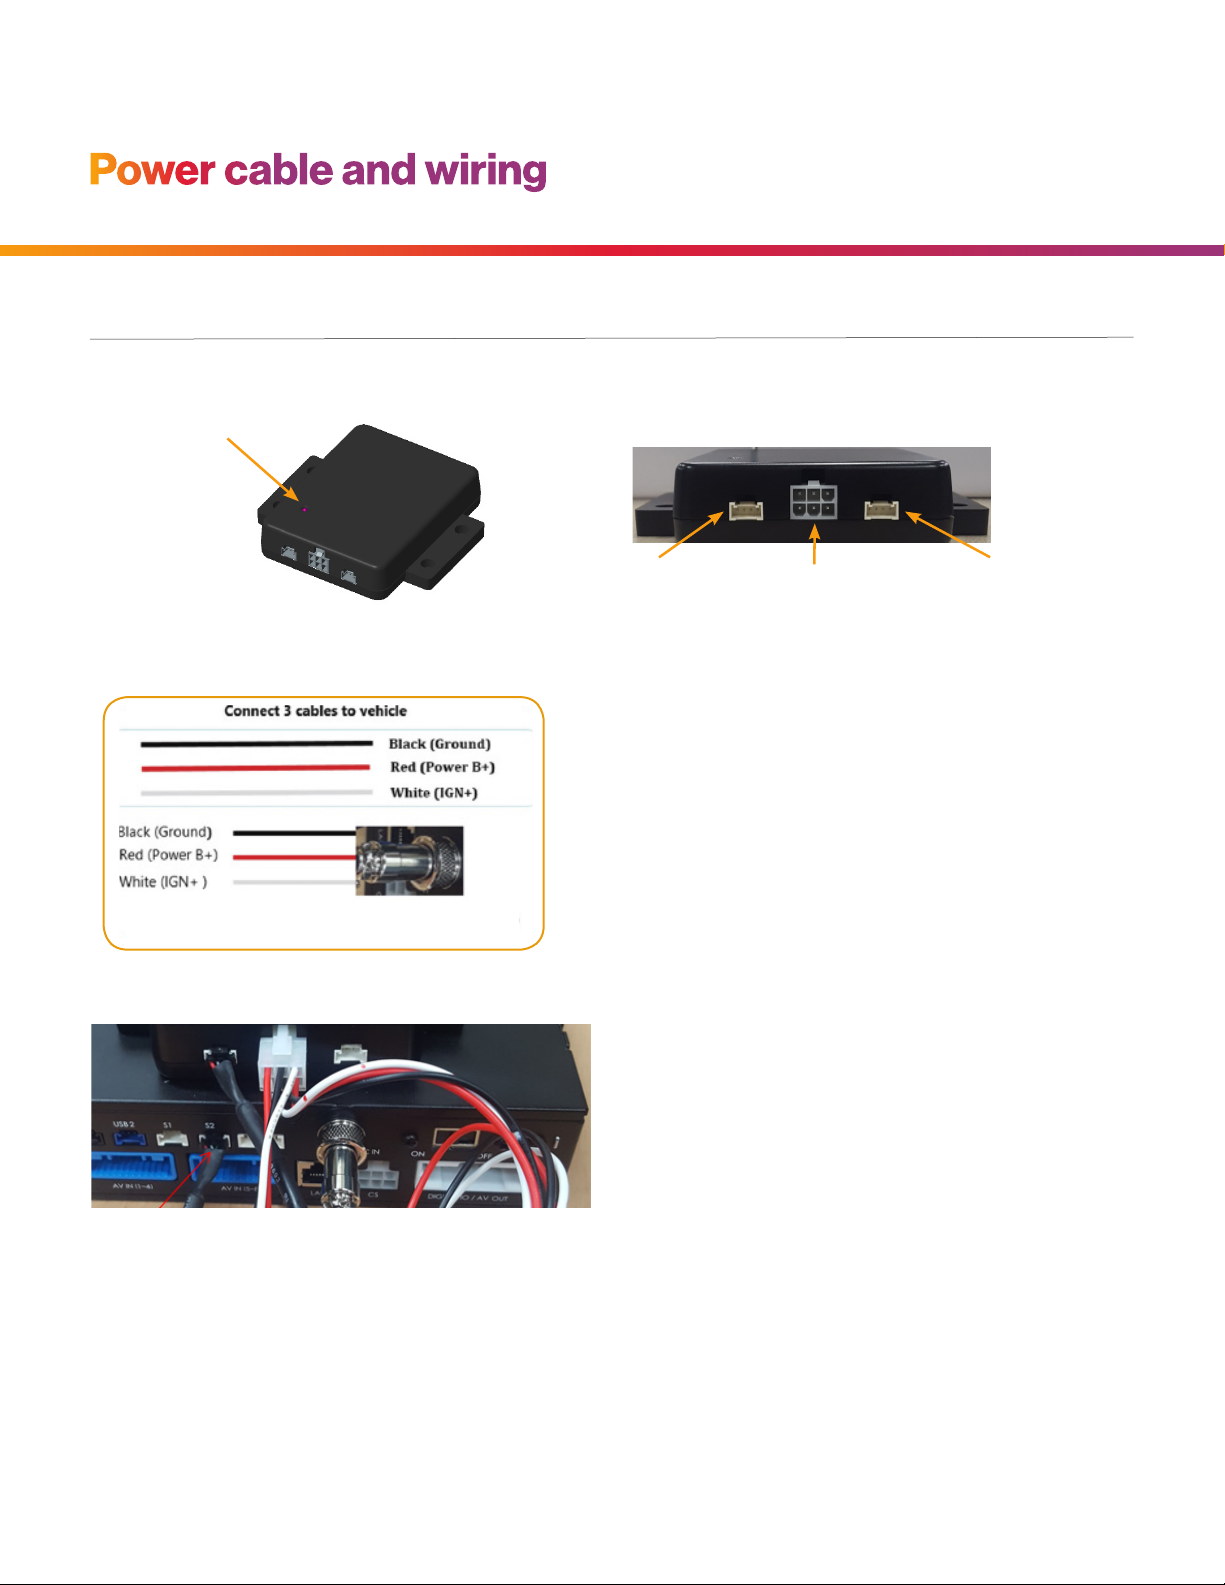
Power connection
Black: Ground: BAT(-)
Red: Power: BAT(+)
White: Ignition (IGN+)
Required
}
12
Sensata INSIGHTS CRXS installation guide
Power cable and wiring
1. Use the included power cable bundle for the power
connection. The battery cable connects to the battery
power (BAT+), and the ACC cable connects to the ignition
(IGN+). The black wire connects to ground (BAT-).
2. Connect DC OUT cable to DC IN port at the CRXS.
3. Connect the included serial cable to the DVR port and
the S2 port at the CRXS.
4. Attach the CRXS-BB900 using the provided double-sided
3M tape. The surface must be clean and dry before you
install. We recommend to install the product behind the
rearview mirror on the front windshield.
Installation process for installing the backup power device
Backup power device
Status LED
RS-232 Serial Cable
for CRXS (connect
to S2 port)
RS-232 Serial Cable
for external device
(pass-through)
Power cable port
(power input/output)
Connect this connector
to CRXS

13
Sensata INSIGHTS CRXS installation guide
Power cable and wiring
1. Install the optional remote control onto the dash next to the steering wheel and within reach of the driver.
2. Connect the red wire to Sensor In #5 on the CRXS wiring harness.
3. Connect the black wire to ground (BAT-).
Remote panic button connection
Digital IO and A/V
14
Sensata INSIGHTS CRXS installation guide
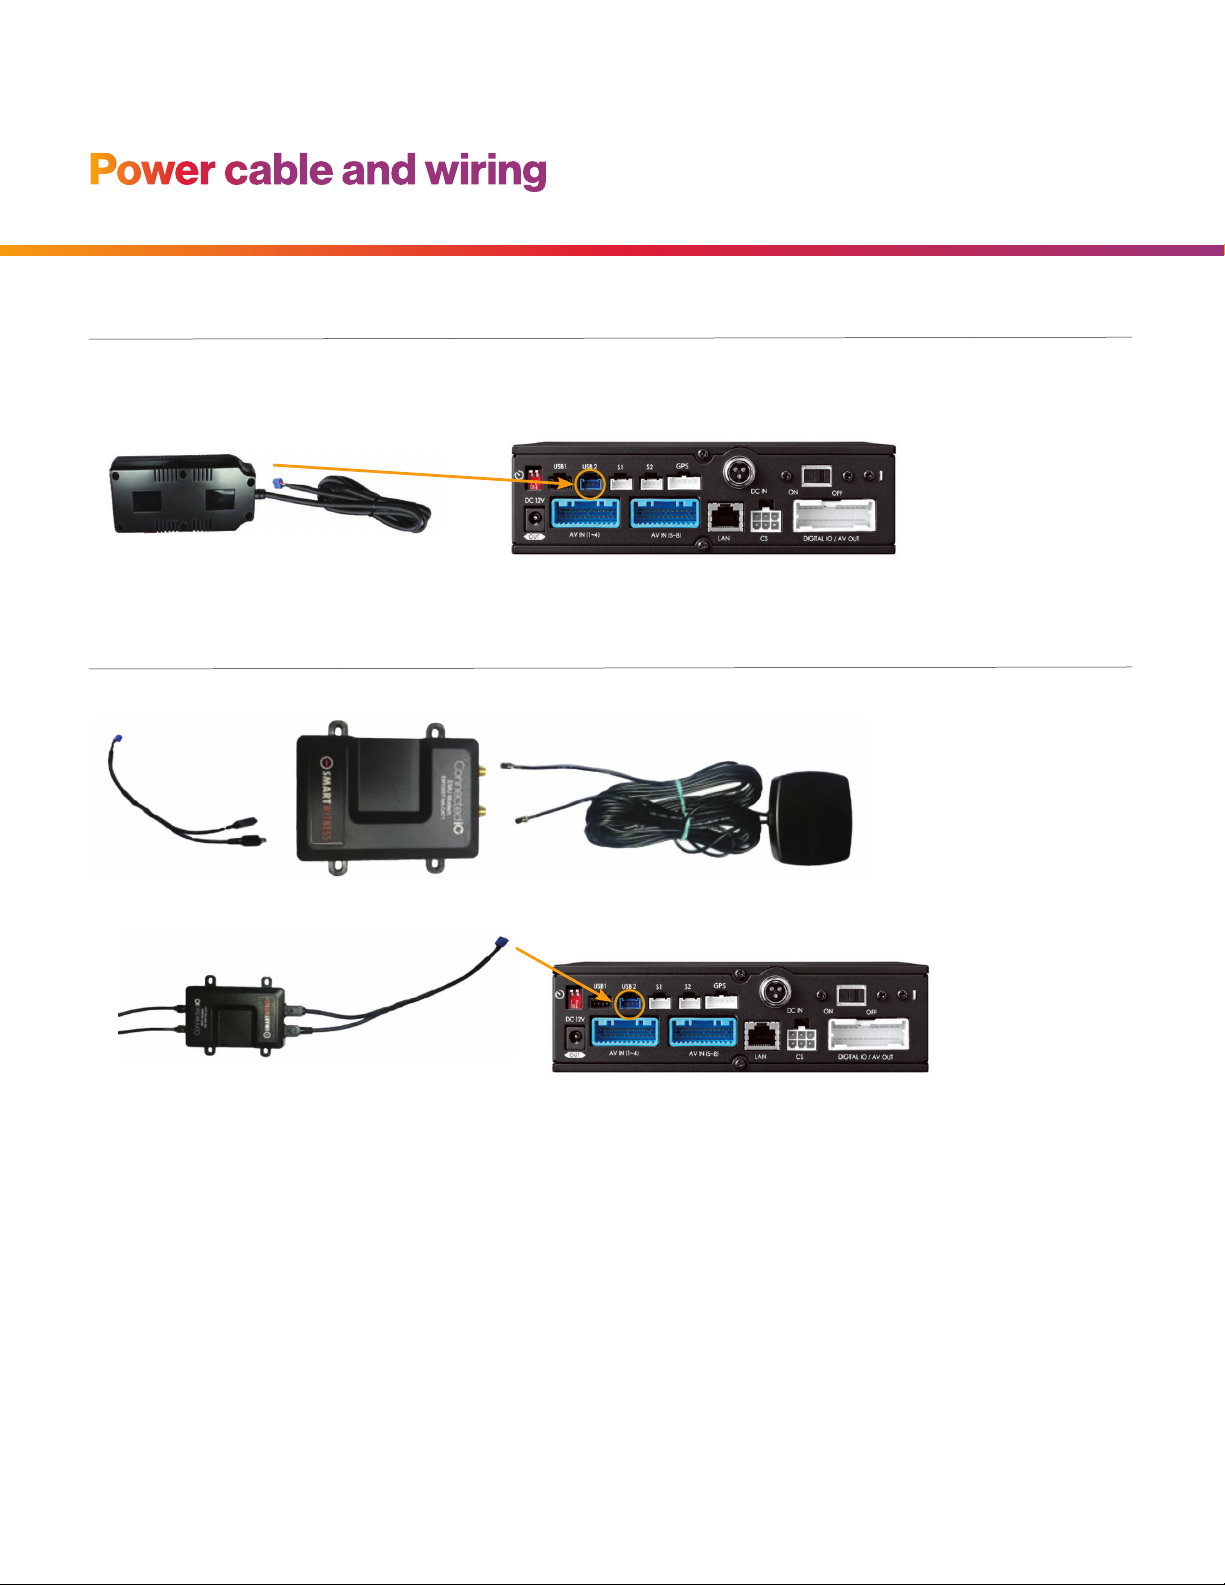
Power cable and wiring
Connect the blue 4-pin Molex connector to the blue “USB 2” port on the rear side of the CRXS.
Wi-Fi or cellular modem connection
CIO LTE modem connection

15
Sensata INSIGHTS CRXS installation guide
Power cable and wiring
If the customer or telematics service provider (TSP) has their own SIM card, then the SIM may rst need to be
inserted. If no SIM is provided, then it may be a Sensata INSIGHTS provided SIM card. In this case, the SIM will
already be inserted.
The LCD monitor is available with an optional video output cable, enabling the display of up to four views.
The following display can be viewed only when the monitor is connected:
1. Connect the RCA male-to-male cable (not included) to the CRXS video output (RCA female) and
LCD V1 input (RCA female).
2. The LCD monitor should be installed in the cab. (Download the LCD monitor guide from SmartOPS.
A printed copy is also included in the LCD package.)
3. Connect the LCD power cable to the vehicle ignition (IGN+) and ground to BAT(-).
SIM card insertion
LCD monitor connection
Top of Unit Bottom of Unit SIM Card Inserted

16
Sensata INSIGHTS CRXS installation guide
Final steps
After installation of the CRXS and accessories into the vehicle, you can lock the main cover of the CRXS using
the external lock keys.
1. When the ignition is powered up, there will be an LED sequence of green, orange and red during the boot-up
process of the CRXS.
2. The POWER LED will illuminate green immediately, and the CRXS will go into system check.
3. Once the device is operational, the REC LED will also illuminate orange. This usually takes about a minute,
but in some cases, the device may need to reboot, which will take about 5 minutes.
4. If the Alarm LED is red, then there is an error. Please contact your supplier or visit support.smartwitness.com
to create a support ticket.
NOTE:
The unit will not start recording immediately after power on. It takes around 30 seconds for the built-in power backup system to charge.
Thereafter, the SD card will be ready to record.

17
Sensata INSIGHTS CRXS installation guide
Troubleshooting
REC LED is off.
• This means that the SSD is not inserted properly into the CRXS.
CRXS Alarm LED is blinking.
• Blinking red LED indicates that one of the connected cameras is not receiving a view signal.
Please check the camera’s connection.
CRXS Alarm LED is solid.
• There may be a problem with the camera connection or data storage device. Please contact your installer.
CRXS LAN LED is blinking or off.
• The SIM card is not registered with the cellular network. Please verify the SIM is inserted correctly.
• If it looks to be inserted correctly, please remove and reinsert the SIM card and try again.
• Cycle power to the unit.

18
Sensata INSIGHTS CRXS installation guide
LED specifications
[POWER]: Solid ON when the CRXS is powered (Green LED).
[REC]: Solid ON when recording (Orange LED).
[ALARM]: Solid ON when there are any failures such as missing camera input,
bad SSD, etc. (Red LED).
[LAN]: Solid ON when connected to the network (Orange LED) and ashing
if network/server error.

19 sensatainsights.com
INSIGHTS © 2023 Sensata INSIGHTS. All Rights Reserved.
Table of contents


