SensioHome Gourmet Professional GPKM01 User manual

INSTRUCTION MANUAL
GOURMET PROFESSIONAL

Thank you for purchasing this gourmet by
sensiohome Kitchen Machine
What can you expect from this product
• A true multi-tasker with a blender, beater, whisk and dough hook attachments for
creating show stopping creations to impress your family and guests.
• 8 speed controls plus pulse setting for maximum versatility.
• A powerful 1200W motor and planetary mixing action for thorough mixing results.
•A large 5.5L stainless steel mixing bowl with easy grip handles and a removable
splash guard for no more messy work surfaces.
SAFETY IS IMPORTANT: To ensure your safety and the safety of others, please ensure you
read the Product Safety and Electrical Safety Information before you operate this
product. Keep these instructions in a safe place for future reference.
TECHNICAL DATA
Model Number: GPKM01
Voltage/Frequency: 220-240V~50/60Hz 1200W
5.5L Stainless steel bowl - Maximum capacity up to 2kg of dough
1.5L Glass Jar Blender – Maximum operation time of 1 minute

Product Safety ...............................................................................................................................2-5
Electrical Safety.............................................................................................................................6-7
Features.................................................................................................................................................8
Before First Use .................................................................................................................................9
Using the Bake and Blend Stand Mixer............................................................................ 9-10
The Accessories..........................................................................................................................10-11
Hints and Tips................................................................................................................................... 12
Cleaning and Maintenance.......................................................................................................... 13
Storage ................................................................................................................................................ 13
Servicing ............................................................................................................................................. 13
Recipes .........................................................................................................................................14-20
Guarantee........................................................................................................................................... 21
Disposal Information..................................................................................................................... 22
Table of Contents

2
When using electrical appliances, basic safety
precautions should be followed including the
following: Read all instructions before you use the
Bake and Blend Stand Mixer for the first time.
IMPORTANT
•Always ensure the appliance is only used by a
responsible adult. It is not intended for use by
persons (including children with reduced
physical, sensory or mental capabilities, or lack of
experience and knowledge, unless they have
been given supervision or instruction concerning
use of the appliances by a person responsible for
their safety.
•Always use this appliance on a stable, level
surface, close to a power socket and out of reach
of children.
SZ3-14423_CRUX004_CRUX_Stand Blender_MPL_IM.indd 2 2017-06-09 3:17 PM
Product Safety

3
•Always ensure that hands are dry before handling
the plug or switching on the appliance.
•Always ensure that when lifting the head into a
vertical position that the head locks into place.
•Always operate the blender with the lid locked
into place and the lid cap firmly closed.
•Always ensure the blending jug is properly
assembled and in place before the speed control
dial is turned on.
•Always allow hot liquid to cool sufficiently before
blending this is to prevent scalding.
•Always ensure the blender is switched off before
removing it from the stand mixer.
•Always carry out regular checks on the appliance
and power cord. Should there
be any signs of damage, do not attempt
to use or repair. This appliance has no user
serviceable parts.
•Always unplug this unit when not in use and
before cleaning.

4
•Always take care when handling the sharp cutting
blades.
•Always allow the appliance to fully cool down
before cleaning or storing.
•Never immerse the appliance, cord or plug into
water or any other liquid. This is to protect
against electrical shock.
•Never use this appliance for other than intended
use. This appliance is for household use only. Do
not use outdoors.
•Never touch moving parts, never touch the whisk,
mixer blade or kneading hook while the appliance
is in operation.
•Never touch the blades inside the blending jug,
they are extremely sharp and will cause injury.
•Never insert hands or utensils in the blending jug
during operation to the risk of severe injury to
persons or damage to the unit.
•Never allow children to use this appliance, close
supervision is necessary when this appliance is in
use near children.

5
•Never let the power cord hang over the edge of
a worktop, touch hot surfaces or become
knotted, trapped or pinched.
•Never place on or near heat sources.
•Never exceed more than 2kg of dough in the
stand mixer, as this will overload the motor.
•Never overfill the blending jug; never fill
ingredients beyond the jar’s MAX line.
•Never place any Kitchen Machine Bake and
Blend Stand Mixer attachments into a
microwave oven.
•Never leave this appliance unattended during
use.
FOR HOUSEHOLD USE ONLY
SAVE THESE INSTRUCTIONS
6
WARNINGS!
Read these instructions thoroughly before using this appliance or
connecting it to the mains supply.
•A 13 amp BS1362 ASTA approved fuse must be fitted.
•This appliance must not be earthed.
•There are no user-serviceable parts inside this appliance. Always
refer servicing to qualified service personnel.
•The mains lead of this product is not replaceable by the user. If
the mains lead is damaged, do not use until the appliance has
been inspected and approved by a qualified electrician.
•Do not allow this product to be exposed to rain or moisture
during use or storage.
Before switching on, make sure that the voltage of your electricity supply is
the same as that indicated on the rating plate. Connecting
it to any other power source may cause damage.
This product may be fitted with a non-re-wireable plug. If it is necessary to
change the fuse in the plug, the fuse cover must be refitted. If the fuse
cover becomes lost or damaged, the plug must not be used until a suitable
replacement is obtained.
If the plug has to be changed because it is not suitable for your socket, or
due to damage, it should be cut off and a replacement fitted. Follow the
wiring instructions shown. The old plug must be disposed of safely
because inserting it into a 13 amp socket could cause electrical hazard.
Electrical Safety
7
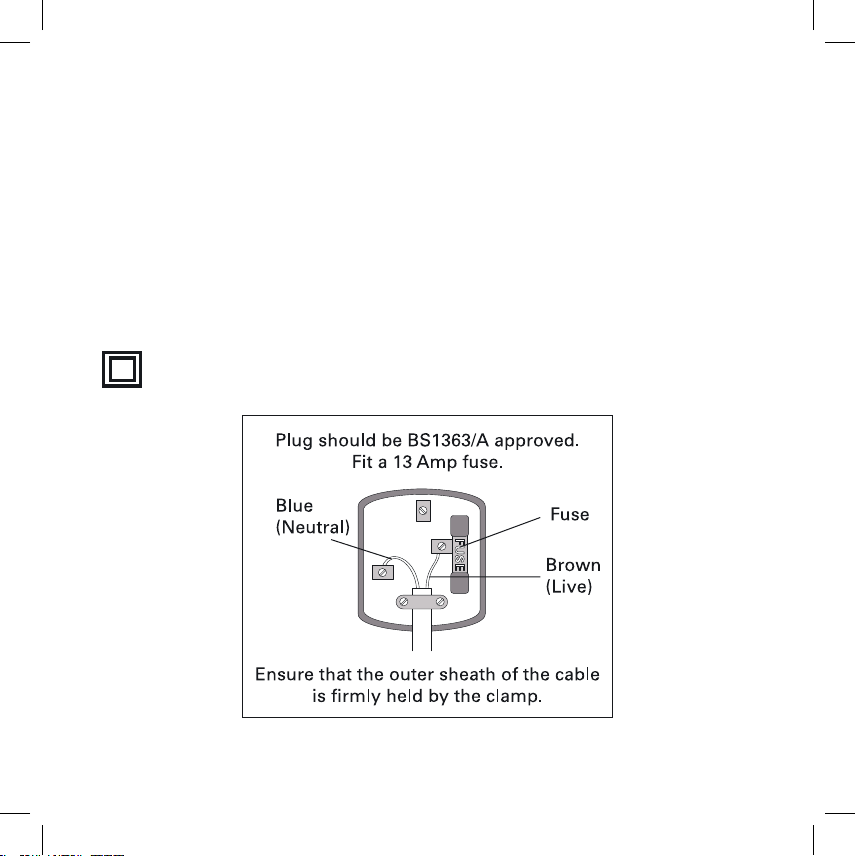
The wires in the power cable of this product are coloured in accordance
with the following code:
Blue = Neutral Brown = Live
If the markings on the terminals of your plug do not correspond to the
colours of the wires in the power cable, proceed as follows:
•The wire which is coloured Blue must be connected to the terminal
which is marked N or coloured Black
•The wire which is coloured Brown must be connected to the terminal
which is marked L or coloured Red.
DO NOT connect any wires to the Earth Terminal.
This symbol indicates that this 2-core appliance is Class II and does
not require an earth connection.

8
Product may vary slightly from illustration
1. Speed Control Dial
2. Head Release Leaver
3. Multifunction head
4. Release button
for cover
5. Power outlet
for blender
6. Cover
7. Cover for mincer
(mincer not supplied)
8. Splashguard
9. Stainless Steel Mixing
Bowl
10. Non-slip feet
11. Whisk
12. Beater
13. Dough Hook
14. Blender Lid
(with removable cap)
15. Glass Jug
16. Blade Collar
Features
2
3
6
4
5
7
8
9
10
11 12 13
14
15
16
1
9
Before using your Kitchen Machine for the first time, remove any packaging material and
promotional labels. You may wish to keep the packaging for future use or storage for your stand
mixer.
Wash the mixer attachments, stainless steel mixing bowl and splashguard, blender and blender
lid in warm soapy water with a soft cloth, taking care with the blender’s sharp blades. Rinse and
dry thoroughly.
Wipe the stand mixer with a soft damp cloth to remove any manufacturing dust.
Before assembling, ensure the speed control dial is turned to the OFF position. The suction feet
underneath the unit are designed to stick to the work surface to prevent the unit from travelling
along the counter. Press these down firmly in place to adhere to the work surface. Connect the
unit to the mains supply.
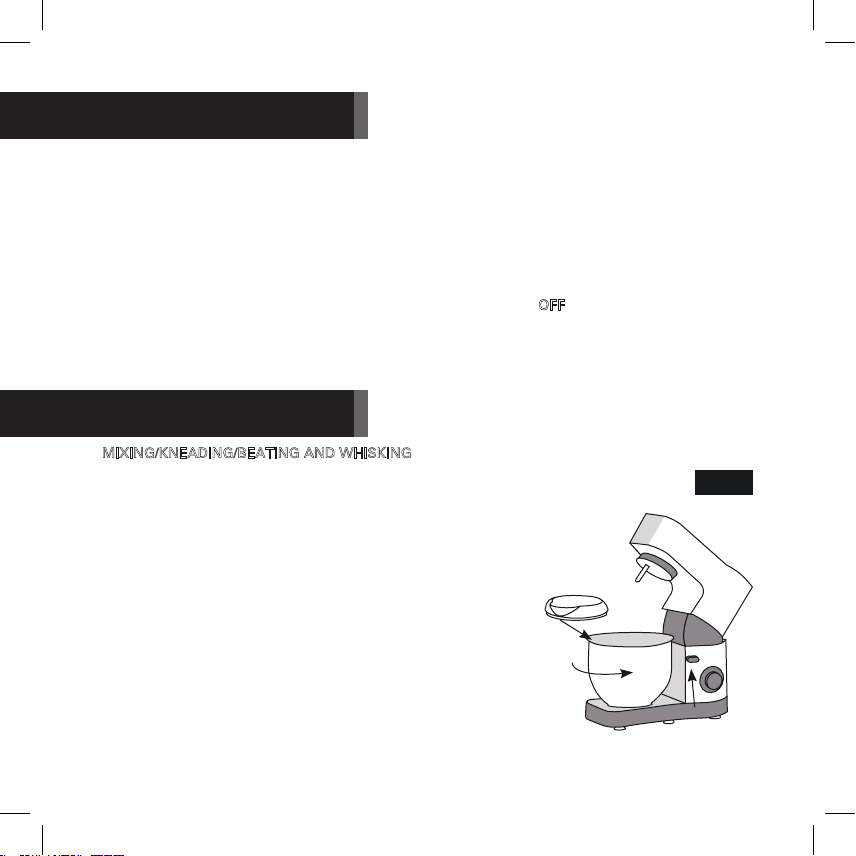
MIXING/KNEADING/BEATING AND WHISKING
The bowl can be used to mix up to 2kg of dough, do not overload as
this will damage the motor.
1. Add the food ingredients to the bowl in accordance with the
recipe, and then open the multifunction head (3) using the
head release leaver (2) until it clicks into position. See Fig 1.
2. Place the mixing bowl (9) on the base, and turn the mixing
bowl to lock it into position. (See Fig 1).
3. Attach the splashguard if using (8), and position the opening
at the front of the appliance see Fig 1. There is a small
indicator on the base that turns from red to green when the
bowl is locked into position correctly.
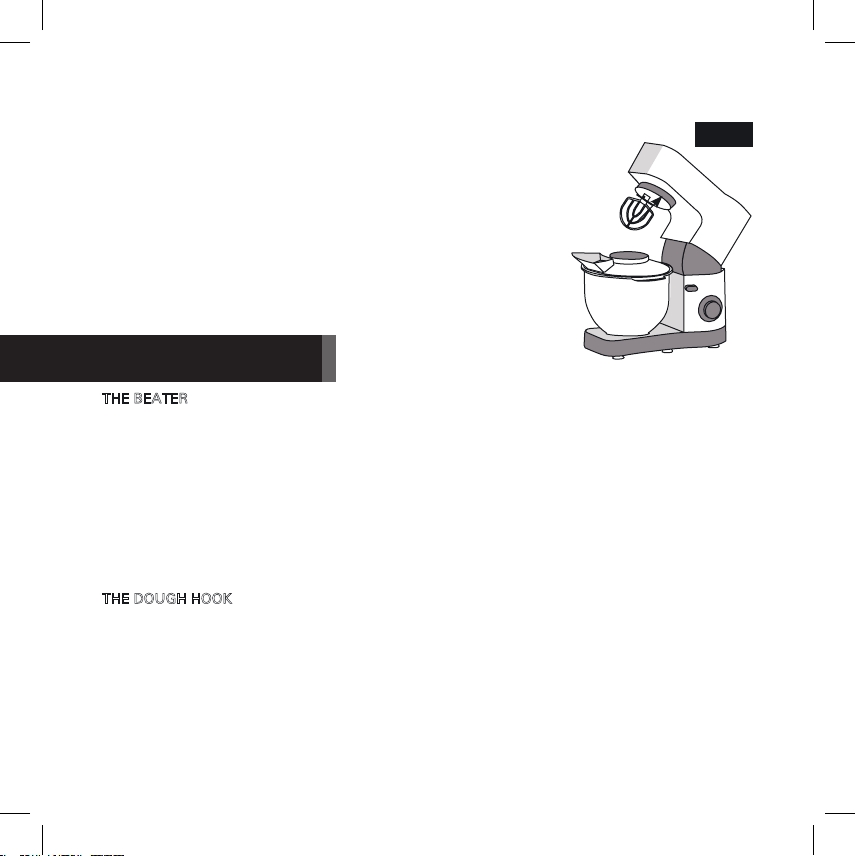
4. Fit the desired accessory either the whisk (11), the beater
12) or the dough hook (13) into the multifunction head,
pushing the shaft of the accessory and rotate to lock
into position see Fig 2.
Fig. 1
Before First Use
Using the Kitchen Machine
10
5. Lower the multifunction head to a horizontal position. Turn the
head-lift leaver (2) anti-clockwise to lower the head, a click should
be heard when it is in position.
6. Insert the power plug into the power socket and turn the speed
control dial (1) to the “P” setting for the pulse option for a burst of
power, or set the speed control dial to the desired position
1-8 depending on your recipe requirements.
7. During preparation, you can add ingredients through the opening
of the splashguard.
8. When finished, turn the speed control dial to the “0” setting. Lift up
the multifunction head by turning the head-lift leaver
(2) anti-clockwise, and remove the mixing bowl by turning to
unlock.
THE BEATER
This is used for making cakes, biscuits, pastry, icing, fillings and mashed potato.
1. Select speed 1 or 2 to start and increase to your desired speed, be careful not to over mix
otherwise your cakes; biscuits or pastry may be dense/tough in texture.
2. You can add additional ingredients such as eggs, dried fruit, nuts or chocolate chips via the
hole in the splashguard without the need to stop the machine.
3. When filling the mixing bowl, please ensure that the maximum quantities are not exceeded.
4. It may be necessary during mixing to stop the machine and lift the multifunction head to
scrape down the bowl to ensure all ingredients are incorporated fully.
THE DOUGH HOOK
This is used for mixing bread, brioche and pizza dough.
1. The recommended maximum capacity is no more than 2kg of dough
2. Start by mixing on a low speed and then increase to speed 2 for about 3 minutes until
stretchy dough has formed and the bowl is clean.
3. Leave the dough to double in size in a warm place. Cover the bowl with some cling film that
has been greased so it does not stick onto the dough. When doubled in size, knock back and
then re-knead by hand and form into your desired shape. Leave to prove and then bake.
The Accessories
Fig. 2

11
THE WHISK
This is used for mixing meringues and cream but is also great for batters, cheesecakes,
mousses and soufflés.
1. For mixing egg whites the minimum recommended egg whites is 2 and maximum is 12.
Select speed 4-6 and whip the egg whites without stopping for about 4 minutes, until stiff.
2. For whipping cream the minimum quantity recommended is 300ml and the maximum is
600ml select speed 6-8 for about 5 minutes.
BLENDING AND MIXING
The blender can be used to prepare up to 1.5L of mixture, do not exceed this or it may leak out
of the lid. Ensure the multifunction head is in a horizontal position and the speed control dial is
in the OFF (0) position. The attachment holder under the multi-function head will move during
blending. It is recommended to blend with the stainless steel bowl securely in position. Do not
touch the moving parts.
1. Remove the cover (6) for the power outlet for the blender (5) by pressing the button (4) on the
side of the multifunction head. This will release the cover, lift it off and set it aside.
2. Add the food (chopped into 2” pieces) to the glass blending jug (15) and add the blending lid
and secure (14).
3. Fit the blender (15) into the blender power outlet (5) and turn it anti-clockwise to lock into
position.
4. Turn the speed control dial to P to pulse the mixture in short bursts or 1-8 depending on your
requirements. – DO NOT OPERATE FOR MORE THAN 1 MINUTE AT A TIME.
5. When the desired consistency has been reached, turn the control dial to (0) and remove the
blender by turning it clockwise.
6. Replace the cover (6) over the power outlet for the blender (5). If this is not in the correct
position the mixer will not operate.

12
GETTING THE BEST FROM YOUR KITCHEN MACHINE
•When making cakes, use butter or margarine at room temperature as this combines with the
sugar easier and you will incorporate more air for a better result.
•When making pastry, it is best to use very cold butter and ice cold water.
•Eggs at room temperature are best for whisking, so take them out of the fridge an hour
before you need to use them.
•Bread dough works best if you add the water first before other ingredients.
•A clean bowl is essential when whisking egg whites, if there is any grease present they will
not increase in volume, wipe half a lemon around the bowl first. Maximum capacity is 12 egg
whites.
•When making bread, if you hear the machine straining, switch the mixer OFF (0) remove half
the dough and mix each half separately.
•It is best not to use the whisk for creaming butter and sugar together as this may damage the
attachment, the beater is recommended for this.
•When whipping cream, use cold cream from the fridge this whips better and is more stable
when whipped, maximum for whipping is 600ml.
•It may be necessary to scrape down the bowl from time to time to ensure even mixing, switch
the machine OFF (0) and lift the multifunction head up.
•When blending, cut the ingredients into bite size pieces (2”) for better mixing.
•Try adding frozen fruit to smoothies; this reduces the need for ice cubes. Frozen fruit is picked
at its peak and is easy to store in the freezer.
•When blending soup, ensure that it has cooled sufficiently to prevent scalding, hold a clean
tea towel over the lid to ensure that it is secure.
•The blender is not suitable for grinding meat, making dough, or blending stones
from fruit.
Hints and Tips

13
1. Before cleaning, please ensure that the speed control dial (1) is at the “0” position and that the
plug has been disconnected from the socket.
2. After use, allow the device to cool down before you start to clean it.
3. To clean the exterior of the unit, use a soft damp cloth and a mild detergent.
4. When cleaning the interior and exterior and splash guard do not use any abrasive detergents
or alcohol.
5. To clean the unit, NEVER submerge it in water or any other liquid.
6. The beater, whisk and dough hook are top rack dishwasher safe. The accessories can also be
cleaned in warm soapy water.
7. The mixing bowl is dishwasher safe the bowl can also be cleaned with warm soapy water. Do
not use any abrasive detergents as it may scratch the cosmetic finish.
8. DO NOT SUBMERGE THE BLENDER IN WATER. To clean, add warm water and a few drops of
washing up liquid. Secure the lid and fit onto the appliance. Turn the control dial to (P) and
give it a few pulses this will clean the blade and the jug. Remove the blender and rinse with
clean running water. Wipe out the inside if needed taking care not to touch the blades. Leave it
to dry. Wash the lid in warm soapy water then rinse and dry.
9. This appliance requires little maintenance. Do not try to repair it yourself. Any servicing
requiring disassembly must be performed by a qualified appliance repair technician.
Store your Kitchen Machine in the original box or in a clean dry place.
If you drop or damage your stand mixer it should not be used until it has been examined by
an authorised service centre or appliance technician. Always refer servicing to qualified service
personnel.
Servicing
Cleaning and Maintenance
Storage

14
Focaccia with Rosemary and Sea Salt
Makes 2 Focaccia loaves
•3tbsp extra virgin olive oil
•275ml tepid water
•400g Italian 00 flour
•100g Strong bread flour
•7g sachet easy blend yeast
•½ heaped teaspoon salt
•100ml extra virgin olive oil
•Few springs of rosemary
•Sea salt flakes (Maldon is good)
METHOD
1. Place the bowl onto the mixer and attach the dough hook and splashguard if using.
2. Add the olive oil and tepid water to the bowl. Add the flours, yeast and salt.
3. Knead on a minimum speed for between 30-45 seconds until dough has formed then increase
the speed slightly for about 3-4 minutes or until the dough is smooth and elastic and leaves
the slides of the bowl clean.
4. Remove the dough from the bowl and form into a ball, place the dough in an oiled bowl and
cover with cling film. Leave this in a warm place for 1-1/2 hours until doubled in size.
5. Knock the dough down and knead again for a few minutes either back in the stand mixer or by
hand on a floured surface. Divide the mixture into two and form into two rounds about 1.5cm
thick. Place these on a baking tray and cover with cling film, leave these to prove for 20-30
minutes, until doubled in size.
6. While the bread is proving, heat the olive oil very gently in a saucepan and add the sprigs of
rosemary (keeping back a few leaves for garnish), remove from the heat and leave to cool, the
rosemary will infuse the olive oil.
7. Heat the oven to 200°C, when the bread has doubled in size, make indentations all over the
bread with your fingers and brush the surface of the bread generously with the infused olive
oil, scatter the remaining rosemary leaves and sprinkle with sea salt.
8. Bake in the oven for 20 minutes until well risen and golden brown and sounds hollow when
tapped underneath. If desired you can drizzle a little more olive oil over the bread before
serving.
Recipes

15
Classic Victoria Sponge with Raspberries and Cream
Serves 8
Everyone’s favourite, the Classic Victoria Sponge. Perfect for afternoon tea or even as a birthday
cake. This uses fresh cream as a filling but if you prefer a sweeter butter cream just substitute it
instead.
•250g butter, very soft butter
•250g golden caster sugar
•4 large free range eggs
•250g self-raising flour
•1 tsp. baking powder
•4 tbsp. good quality raspberry conserve
•400ml double cream
•Handful of fresh raspberries
•Icing sugar to dust
METHOD
1. Pre-heat the oven to 190°C and grease and line 2 x 20cm sandwich tins with baking parchment.
2. Add the butter and sugar to the bowl. Add the beater attachment to the machine and the
splashguard if using.
3. Turn the speed dial to 1-2 for 30 seconds to incorporate the butter and sugar and increase the
speed until the mixture turns from a yellow colour to almost white, you may need to scrape
down the bowl to ensure everything is mixed together.
4. Add the eggs and a heaped spoonful of flour and beat until fully incorporated scraping down
the bowl if necessary. Switch off the control dial.
5. Add the flour and mix to incorporate the flour, when flour has been incorporated, switch off
the machine, do not over-mix.
6. Divide the mixture between the two tins and using a palette knife spread the mixture evenly.
Bake for 20-25 minutes or until they are just firm to touch. Leave to cool slightly then remove
from the tins and leave to cool on a wire rack bottom side down.
7. Clean the mixing bowl and then add the double cream to the bowl, add the whisk attachment
and the splashguard to the machine. Whisk on maximum speed until a soft peak is formed.
8. Spread the cream on top of one of the cakes and sprinkle over the fresh raspberries. Spread
the raspberry conserve on the bottom side of the remaining cake and place on top of the
raspberries and cream.
9. Dust the top of the cake with icing sugar and serve in big slices.

16
•4 large free range eggs
•200g golden caster sugar
•1 tbsp. cornflour
•Pinch of Sea salt
•400ml double cream
•125g mascarpone
•1 tbsp. stem ginger syrup
•1 ball of stem ginger, finely
chopped
Pavlova with Spiced Figs and Ginger cream
This is a wonderful combination of sweet spiced figs with a delicious gooey meringue.
For the Pavlova For the ginger cream For the spiced figs
•8 figs
•1 knob of butter
•1 tbsp. dememara sugar
•½ tsp. ground cinnamon
•2 tbsp. stem ginger syrup
•2 star anise
•½ orange, zest and juice
METHOD
1. Start by making the meringue, whisk the egg whites until they form stiff peaks, then add the
sugar a little at a time until it is completely incorporated, add the salt and cornflour and
continue to whisk until the mixture is glossy.
2. Place a sheet of greaseproof paper onto a large baking tray and spread the meringue out to
the size of an A4 sheet of paper and try and make the sides taller than the middle which
should have a slight dip. Bake in a low oven 130°C/ gas ½ for 1 ½ hours until crisp. Then
remove from the oven and cool. If you are making this the day before turn the oven off and
allow to cool in the oven.
3. Turn the oven up to 180°C/ Gas 8. Slice the figs into quarters. Butter an ovenproof dish
generously, and place the figs into the dish. Sprinkle the sugar and ground cinnamon over the
figs and drizzle over the stem ginger syrup. Place the star anise in between the figs then
squeeze over the juice of half the orange. Bake in the oven for 20 minutes until the figs have
softened and the juice is bubbling. Remove from the oven and allow to cool.
4. To make the ginger cream, beat the double cream until it forms soft peaks, add the
mascarpone, steam ginger syrup and chopped steam ginger and stir it through. Chill until you
are ready to assemble.
5. Carefully remove the Pavlova from the greaseproof paper onto a suitable serving dish. Pile the
cream and spread it over the Pavlova. Arrange the figs over the top and drizzle any juice from
the figs, finish with a scattering of orange zest.

17
Thai inspired Sweet Potato and Coconut Soup
Serves 4-6
The Thai curry paste adds lovely warmth to this delicious soup.
•Drizzle of oil
•1 onion, peeled and roughly chopped
•2 tbsp Thai red curry paste
•1kg sweet potato, peeled and chopped
•2 tsp chopped lemongrass
•1 can full fat coconut milk
•600ml vegetables stock
•10 coriander, stalks only
•3 tsp lime juice
•1 tsp Thai fish sauce (optional)
•Salt and pepper
•To serve: Warmed Naan breads on the side
and garnish with coriander sprigs and
chopped red chilli
METHOD
1. Drizzle a little oil in a large saucepan and add the chopped onion, sauté over a medium heat
until the onion is softened but not browned. Add the curry paste and cook for 1-2 minutes
until fragrant.
2. Add the remaining ingredients in the order listed to the pan and season with salt
and pepper.
3. Cover with a lid and bring to the boil then reduce down to a simmer until the sweet potato is
tender, this should take about 20 minutes. When the sweet potato is tender; turn off the heat
and allow the soup to cool.
4. Blend the soup in batches in the glass blender until thick and creamy. Return the soup to the
pan and re-heat gently. Taste and adjust the seasoning if required.
5. Serve in bowls sprinkled with coriander sprigs and chopped red chilli with warmed Naan
breads on the side.

18
Celeriac and Stilton Soup
Serves 4
This soup is made using celeriac which is a very under rated vegetable, the combination
with apple and stilton is a real winner.
•Knob of butter
•1 tbsp. olive oil
•1 large onion, peeled and quartered
•500g celeriac
•250g potatoes
•Sea salt and freshly ground black pepper
•Handful of thyme sprigs, leaves picked
•900ml vegetable stock
•1 dessert apple, peeled, cored and diced
•Juice of ¼ of a lemon
•Handful of curly leaf parsley, finely
chopped
•100g Stilton, crumbled
•Serve with chunky walnut bread
METHOD
1. Melt the butter and oil in a large pan, add the onion and gently fry for 5-6 minutes
until softened.
2. Peel the celeriac and potatoes and cut into chunks. Add the celeriac and potato to the pan with
some salt and pepper and the thyme leaves. Stir well then pour in the stock. Bring to the boil
and simmer for 20 minutes.
3. Add the diced apple with a squeeze of lemon juice and continue to cook for 5 minutes, until
the celeriac, potato and apple are very soft. Remove from the heat and allow to cool for 30
minutes.
4. Add the soup to the glass blending Jug and secure the lid then blend until smooth you may
have to do this in batches. Return the soup to the pan and adjust the seasoning with lemon
juice, salt and pepper. Reheat gently then stir in the parsley with half of the Stilton.
5. Divide the soup between warm bowls and sprinkle the remaining Stilton over each portion to
serve. Serve with walnut bread on the side.
Table of contents
Popular Mixer manuals by other brands


Behringer
Behringer EUROPOWER PMX2000 user manual

ALLEN & HEATH
ALLEN & HEATH iDR Series manual

Velleman
Velleman PROMIX502N user manual

KitchenAid
KitchenAid K5-A instruction manual

MULTIQUIP
MULTIQUIP EM120S series Operation and parts manual

Montgomery Ward
Montgomery Ward Chef Tested CTSM77 BLACK instruction manual