SENSIT Technologies GASLESS LEAK TRAINER User manual

GASLESS LEAK TRAINER
INSTRUCTION MANUAL
851 Transport Drive
Valparaiso, IN 46383-8432
Phone: 888 473 6748
219 465 2700
Fax: 219 465 2701
Email: info@gasleaksensors.com
Web: www.gasleaksensors.com
SUPPORTS SENSIT GOLD G2-GLT AND TRAK-IT IIIA GLT
GLT Application User Manual SENSIT Technologies, LLC
1
Contents
1GENERAL DESCRIPTION .............................................................................................................................................................2
2PARTS AND ACCESSORIES .........................................................................................................................................................2
2.1 STANDARD ACCESSORIES (INCLUDED).............................................................................................................................. 2
3PRODUCT FEATURES .................................................................................................................................................................3
3.1 TABLET COMPUTER FEATURES ....................................................................................................................................... 3
3.2 PAIRED INSTRUMENT FEATURES ..................................................................................................................................... 3
4OPERATION...............................................................................................................................................................................4
4.1 START-UP................................................................................................................................................................... 4
4.1.1 Multiple Instrument Support................................................................................................................................................6
4.1.2 Pairing a New Instrument ....................................................................................................................................................6
4.2 USER INTERFACE.......................................................................................................................................................... 8
4.3 USERS MENU............................................................................................................................................................ 10
4.4 OQ TEST /REPORTS .................................................................................................................................................. 12
4.4.1 Performing an OQ Test.......................................................................................................................................................12
4.4.2 Generating a Report........................................................................................................................................................... 13
4.5 SETTINGS MENU........................................................................................................................................................ 14
4.5.1 OQ Questions .....................................................................................................................................................................14
4.5.2 Training Module .................................................................................................................................................................14
4.5.3 Trainers .............................................................................................................................................................................. 14
4.5.4 Archived User .....................................................................................................................................................................15
4.5.5 General...............................................................................................................................................................................15
4.6 ABOUT MENU........................................................................................................................................................... 15
5TROUBLESHOOTING ................................................................................................................................................................16
5.1 COMMUNICATION ERROR ........................................................................................................................................... 16
5.1.1 Repairing / Initializing Bluetooth connection................................................................................................................... 16
6SOFTWARE UPDATE ................................................................................................................................................................17
7NOTES .....................................................................................................................................................................................18
GLT Application User Manual SENSIT Technologies, LLC
2
1General Description
The GLT, or Gasless Leak Trainer, is a paired system consisting of a tablet computer (Windows 10 Pro operating system)
and specially modified Sensit instruments with the marking “GLT Gasless Leak Trainer”. The system was designed to
meet the increasing need of training without the use of hazardous gases. The tablet runs a custom application that
communicates with the instrument(s) via Bluetooth. The trainer, using the tablet, has the option to either monitor the
live output of the instrument or send commands that will be displayed on the instrument in real time. This allows the
trainee to experience a realistic training scenario in a completely gas free environment.
The GLT software creates and stores all user and trainer information, and all Operational qualification (OQ) testing and
reports in a database, which allows for well-organized data and easy retrieval and backup.
The Sensit instrument used with the GLT system is a fully functional unit with all of the same features as a standard one,
per the customer’s requested set-up. To use the instrument as normal, it must be in monitoring mode (either by
choosing that option through the GLT software, or by skipping the wait screen during start-up).
Note: Due to the custom GLT software installed, the Surface Pro tablet may contain less storage capacity than stated by
Microsoft Packaging or manufacturing specification.
2Parts and Accessories
NOTE: For information regarding parts and accessories specific to the instrument you are using, see the instrument
manual. The information below only pertains to the tablet.
2.1 Standard accessories (Included)
871-00057 Power Supply for Microsoft Surface Pro 5 Tablet*
360-00482 Bluetooth Adapter Antenna
360-00496 Bluetooth Adapter
360-00499 USB Extension Cable for Bluetooth Adapter
360-00524 Rugged Case for Microsoft Surface Pro 5 Tablet (FJU-00001, Model 1796)
750-00070 GLT Instruction Manual

GLT Application User Manual SENSIT Technologies, LLC
3
3Product Features
The GLT system consists of two main components: the tablet computer and the Sensit gas detection instrument.
3.1 Tablet Computer Features
Class 1 External Bluetooth Module
Custom software that allows communication with the Sensit instrument(s)
Monitoring mode, which allows the instrument to read and display gas and allows the trainer to view readings from
the instrument in real time
Training mode, which allows the trainer to send commands to the instrument
oA more detailed list of these features are given in the user interface section
Training module which provides useful guidelines and information for training purposes
oAbility to add information to each sub-module
Ability to add and save users and trainers (by both name and employee ID number)
Ability to assign instruments to specific users
OQ (operator qualification) testing and reporting, with the ability to customize questions
6 hour battery life (with full brightness setting)
Ability to pair and communicate with more than one instrument at a time (up to a total of 4)
Database backup support
Support for both landscape and portrait orientations.
Physical Identifying features of Microsoft Surface Pro 5 (FJU-00001, Model 1796)
oAdditional front facing camera
oVolume buttons located on top side of tablet next to power button
3.2 Paired Instrument Features
Internal Bluetooth module
Custom software that allows communication with the tablet computer
Identical specifications as a standard instrument, with the exceptions of intrinsic safety approvals and slightly lower
battery life
Same availability of parts and accessories as a standard instrument
Custom laser etched product label/logo to avoid confusion with a standard instrument

GLT Application User Manual SENSIT Technologies, LLC
4
4Operation
4.1 Start-up
1. Power on the tablet by pressing and releasing the power button on the top left corner. “Surface” should appear
and the boot process should start.
2. After Windows has loaded, launch the GLT application if it has not launched automatically. To do so, select the
start menu icon on the lower left corner of the screen. Locate and select the shortcut/icon for the GLT
application.
3. Power on the instrument by pressing and holding the ‘A’ button until the Sensit logo appears.
During the startup process, a screen will be displayed alerting the user to connect the GLT software to
the instrument.
Pressing any button on this screen will skip this process and boot the instrument into monitoring
mode.
If you wish to connect to the GLT software, wait on this screen and proceed to the next step.
After the tablet has been connected, the instrument will continue through the rest of the
startup process.
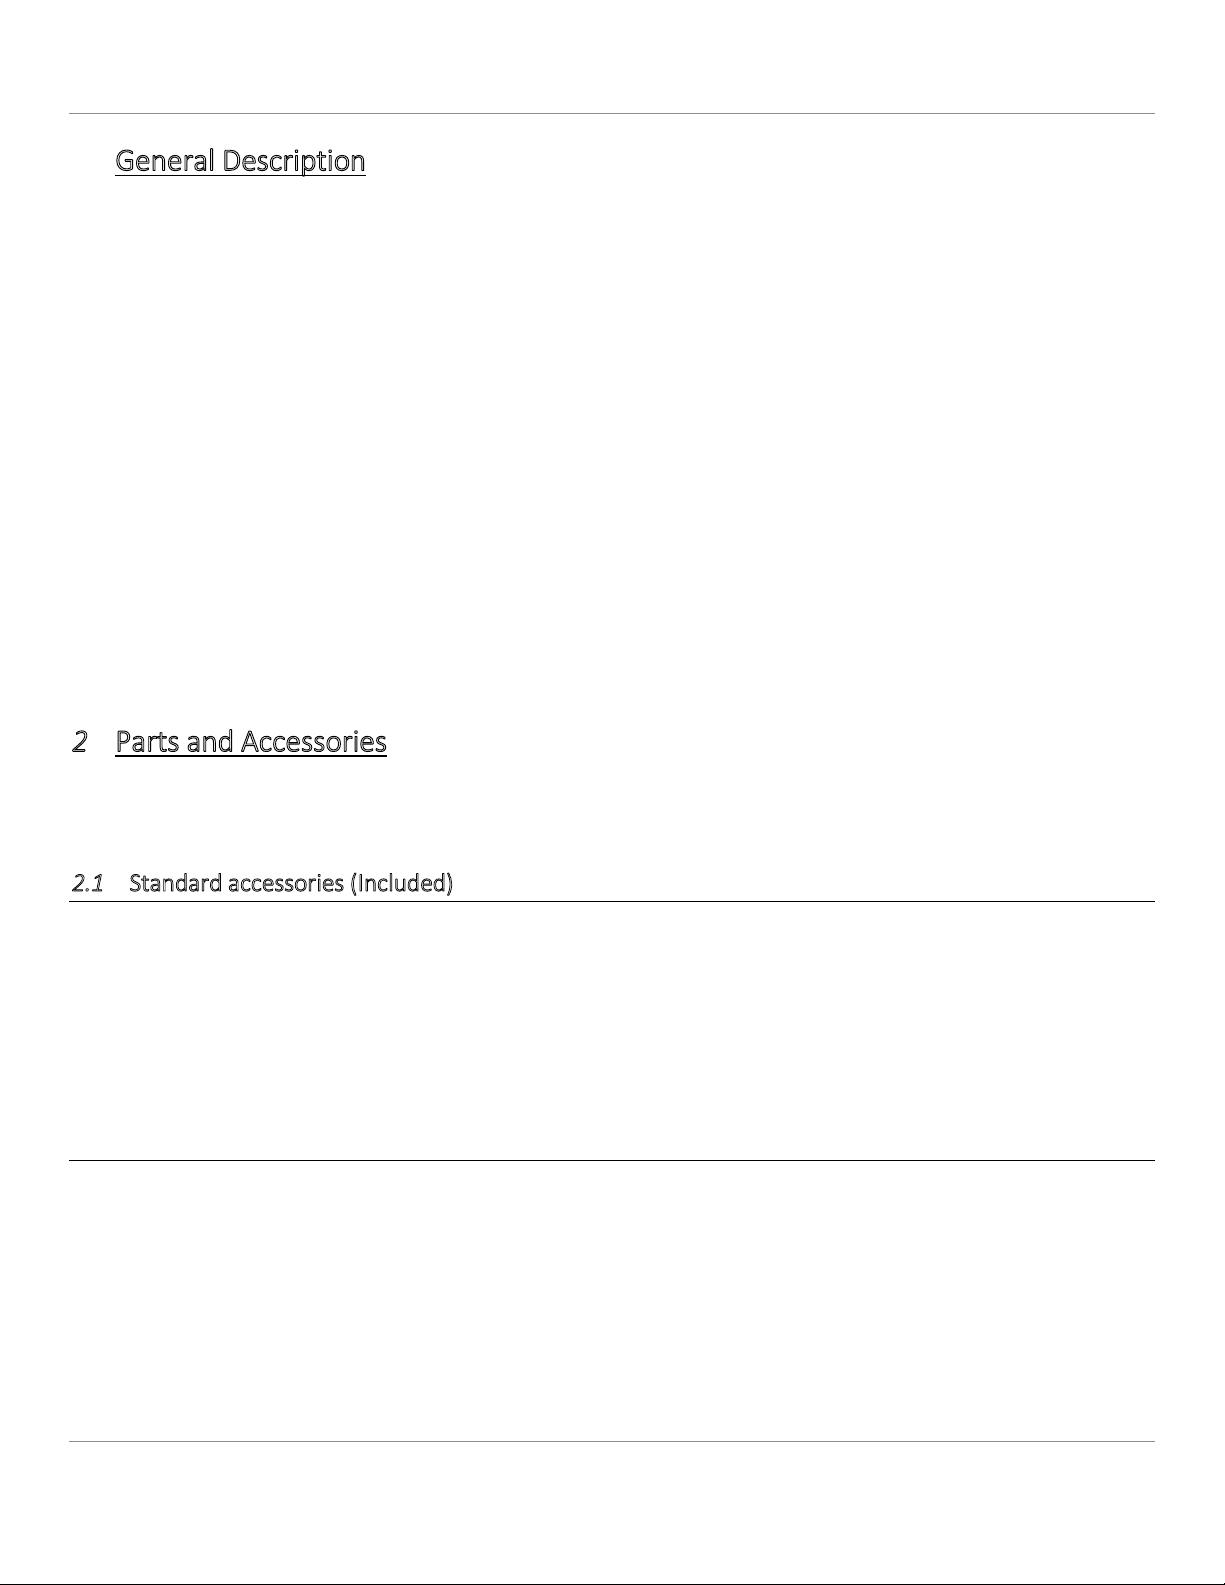
4. In the GLT software, a device list
should be present showing all paired
instruments.
If this is not the case, or if the
instrument you are trying to
connect to isn’t listed, select
the scan icon in the upper right
corner of the application.
If the instrument still isn’t
listed, refer to the
troubleshooting section to
establish or repair Bluetooth
connections.

GLT Application User Manual SENSIT Technologies, LLC
5
5. Locate the instrument you wish to connect to, and select the
connect option. A loading animation should appear to the left.
6. After the two devices have synced, a new set of options will
appear –monitoring and training mode. Select the appropriate
option.
Monitoring mode only allows the trainer to view what is
happening, in real time, on the instrument. The
instrument has the ability to detect and display gas in
this mode. There is no option to send commands.
Training mode allows two way communication. The trainer sees the display of the instrument and may
modify gas readings and other effects. The instrument does not have the ability to detect and display
gas in this mode, only commands and simulated gas readings sent by the trainer.
Note: The instrument must be restarted in order to change between monitoring and training modes.
7. The connection will attempt to establish, and the same loading
animation should appear to the left of the connection options.
8. Once connected, the screen will advance
to the monitoring/training display.
This display is divided up into
two main sections, the interface
and display on the left and the
training module(s) on the right,
and subsections within those.
You can hide the training
modules and expand the user
interface by selecting the
box/arrow icon in the upper right
of the display.
Refer to the user interface
section for a breakdown on the different parts of the UI.
GLT Application User Manual SENSIT Technologies, LLC
6
4.1.1 Multiple Instrument Support
As of GLT software revision 4.06, there is now support for using multiple instruments simultaneously, for a total of up to
4. If there is an attempt to connect a 5th device, the application will alert the user that the maximum number of devices
are connected.
The process for connecting to multiple instruments is no different than a single one. Simply return to the devices menu,
select a new instrument and connect to it, and select either training or monitoring mode.
From the instrument screen, you can switch to a different instrument by clicking on the button on the top of the display
with the appropriate serial number. Each instrument that is active will stay connected unless it is powered off or the “X”
button in the upper right of the screen is selected.
4.1.2 Pairing a New Instrument
If bought as a paired system (tablet and instrument(s) together), there should be no need to pair the instrument to the
tablet as they will come setup that way from the factory. However, if new GLT instruments are purchased without a
tablet, and you wish to pair them to an existing tablet, that will need to be done through the Windows Bluetooth
settings.
NOTE: Due to an issue with Windows 10 Bluetooth Services, there is an additional temporary step that will need to be
done until Windows release a fix.
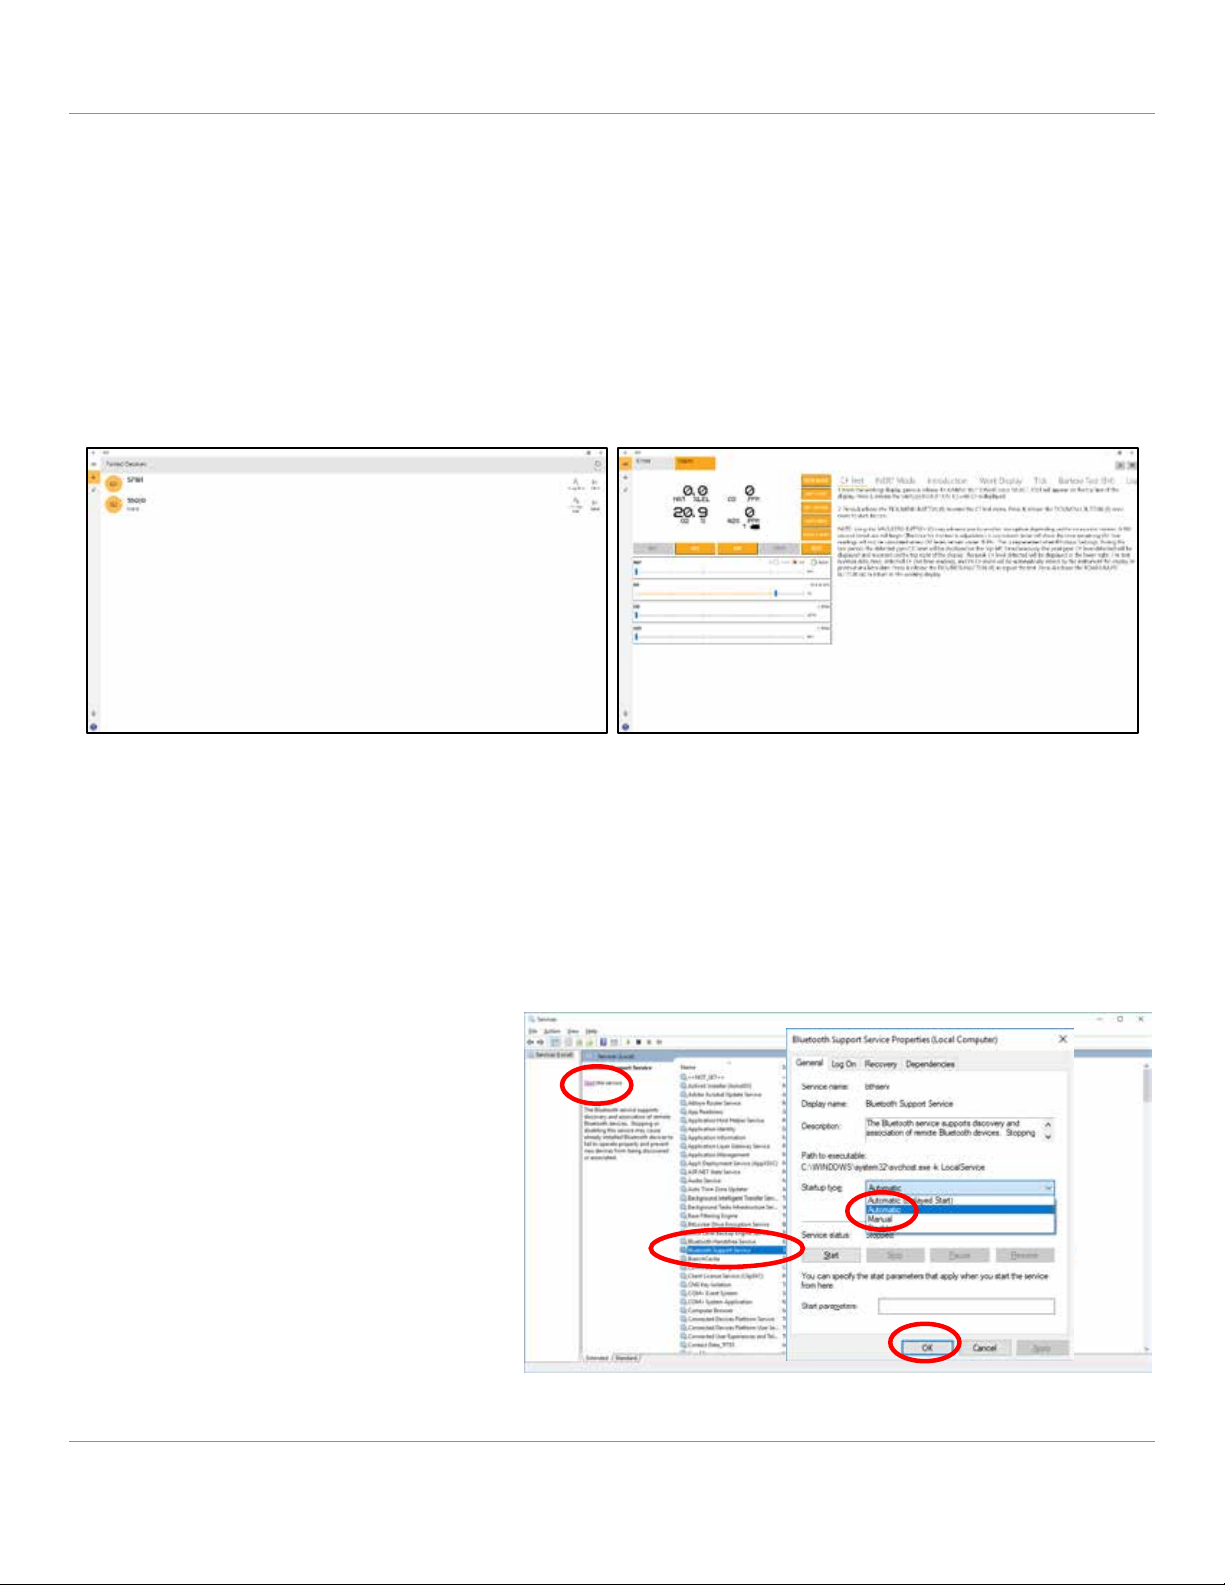
Enabling Bluetooth Support Service
1. From the desktop, open the link labeled
“Services”.
2. Find the service called “Bluetooth
Support Service” and double tap it to
open the properties.
3. From the dropdown box labeled
“Startup type:”, select “Automatic”.
4. Select “OK”.
5. In the services menu, select the option
labeled “Start” in the upper left of the
window.
6. Close the services window.
GLT Application User Manual SENSIT Technologies, LLC
7
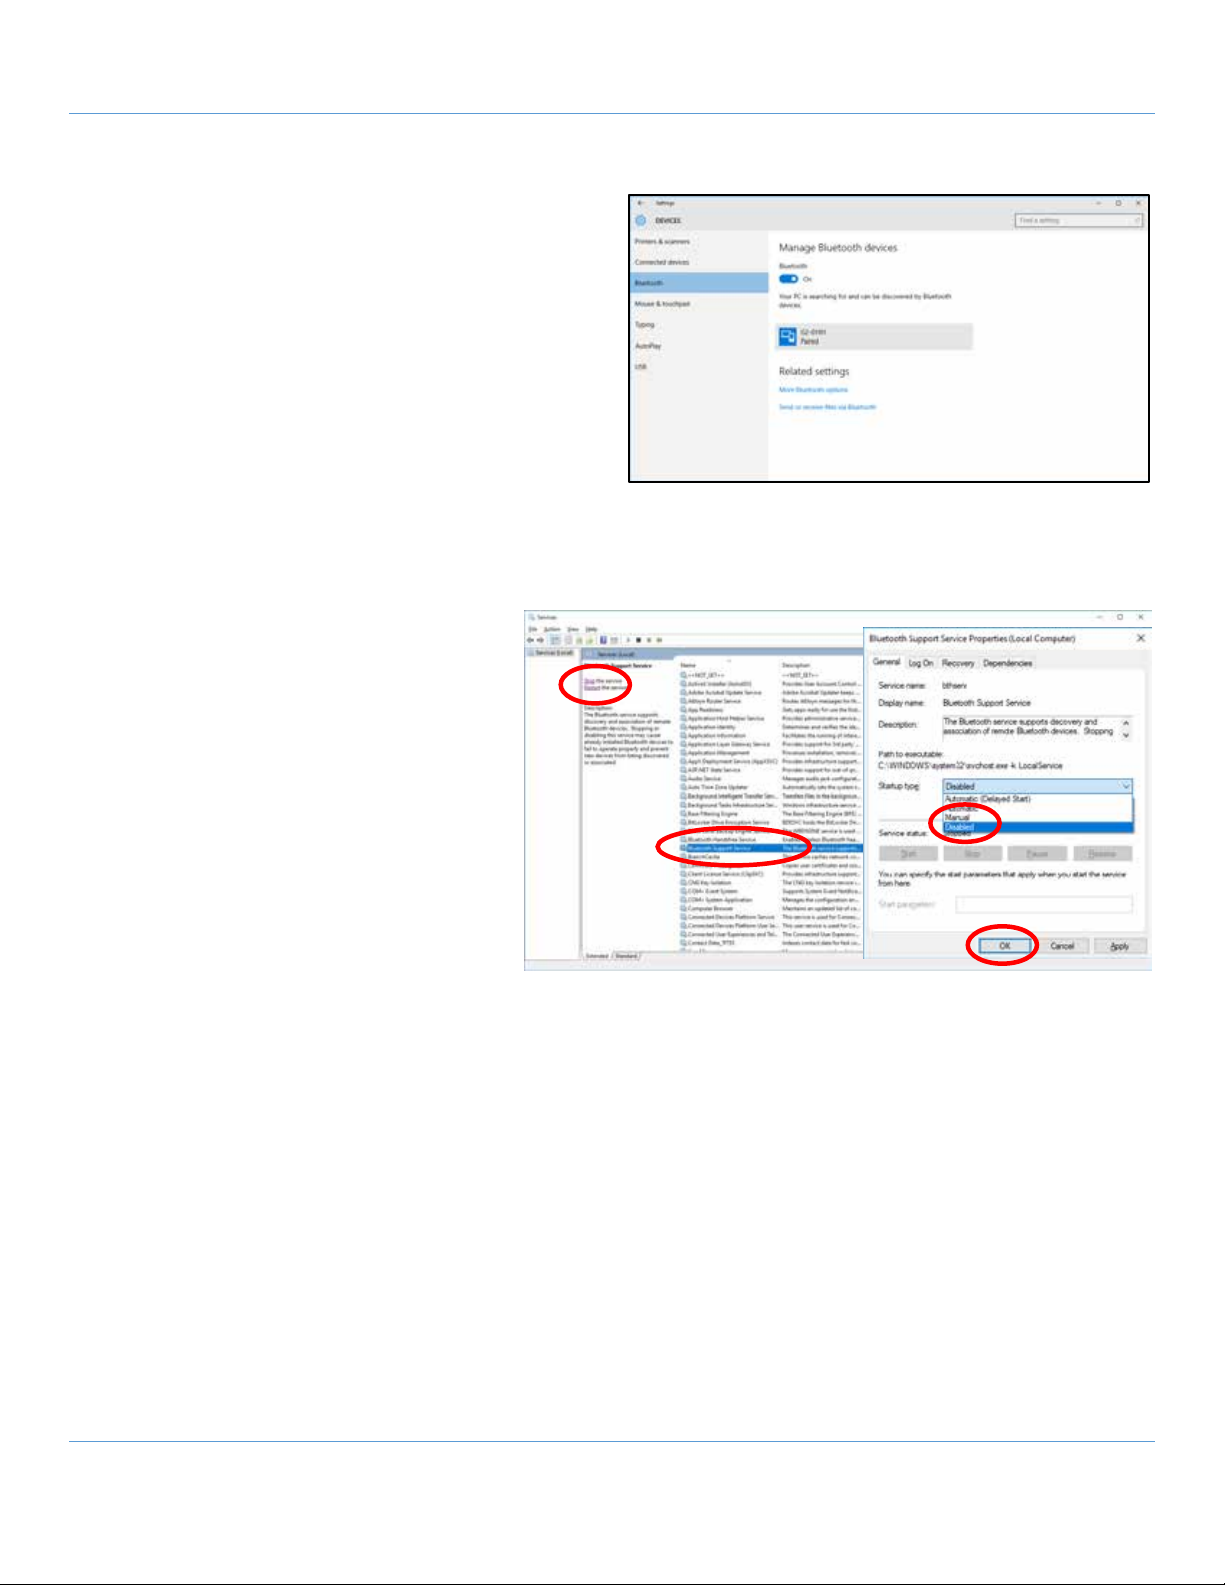
Pairing New Device
7. Select the start menu icon in the lower left of the
screen.
8. Select the Bluetooth settings icon from the middle
of the screen.
9. A list of devices should appear. Select the
appropriate instrument, followed by the ‘pair’
option. In a few moments, the device should
indicate that it is paired. If this is the first time the
instrument is being paired, a dialog box may appear
to confirm the action. Select yes.
10. Select the start menu icon in the lower left of the
screen. Select the GLT app icon from the middle of the screen.
11. Resume the start-up process as normal. Refer to step 4 from section 4.1.
Disabling Bluetooth Support Service
12. From the desktop, open the link labeled
“Services”.
13. Find and highlight the service labeled
“Bluetooth Support Service”.
14. Select the option labeled “Stop” in the
upper left of the window.
15. Double tap the “Bluetooth Support
Service” service to open the properties
window.
16. From the dropdown box labeled
“Startup type:”, select “Disabled”.
17. Select “OK”.
18. Close the services window.
NOTE: If you do not follow the steps to disable the Bluetooth Support Service, you may experience communication
problems when using the GLT application.
GLT Application User Manual SENSIT Technologies, LLC
8
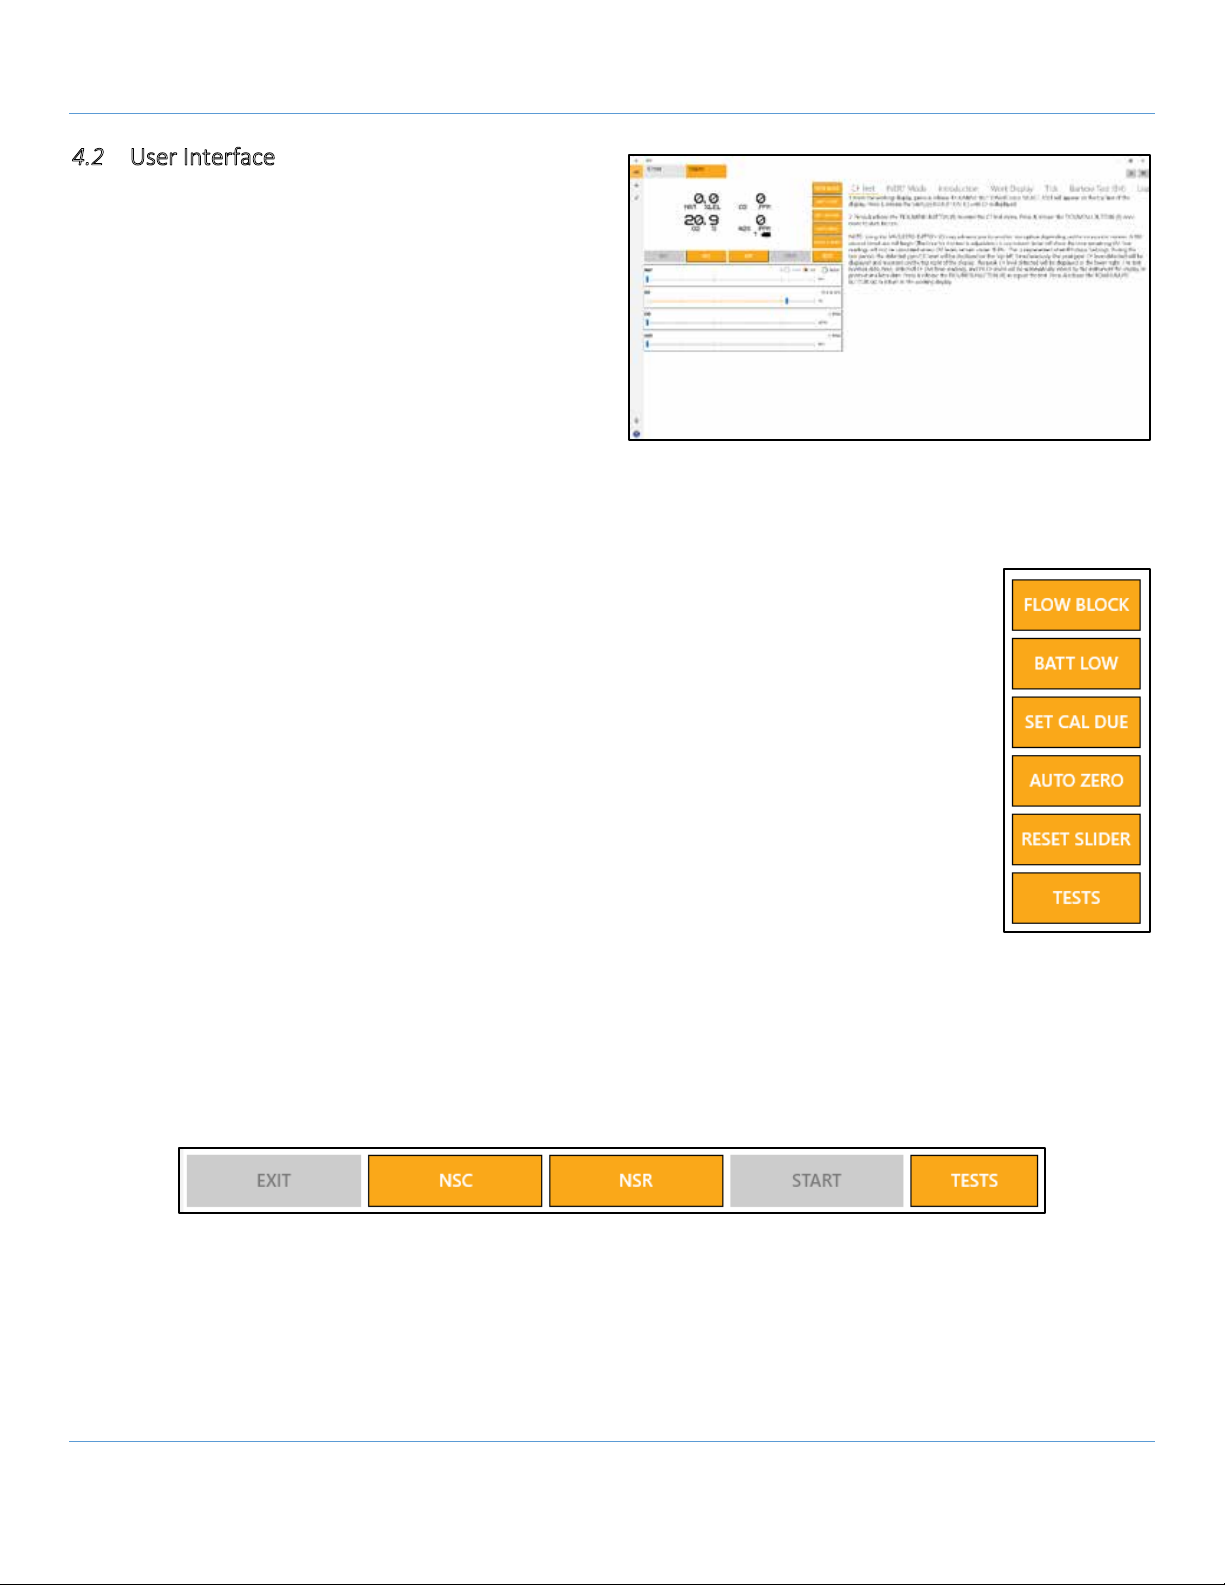
4.2 User Interface
The breakdown of the main user interface is as follows:
Menu bar –options for accessing different sections of
the application. Name, home screen, users menu,
setup, and about. To expand the menu bar, select the
icon with three horizontal lines. This shows the name
of each menu item along with the icon image.
Display –shows information from the display of the
instrument in real time.Any changes made, either by
the trainer or the user (such as entering into a menu) will be displayed. The ‘T’ in the lower right corner next to the
battery indicator shows that the instrument is in training mode. If the unit were in monitoring mode, this would be
denoted by an ‘M’ instead.
Test modes / conditions –allows the trainer to send various commands to the instrument.
NOTE: not available in monitoring mode.
FLOW BLOCK –sends a flow block command to the instrument.
BATT LOW –sends a low battery command/flag to the instrument. A 300 second
countdown will begin.
SET CAL DUE –flags the instrument for calibration due. Upon next restart, the instrument
will display a calibration due message. This can be done during the start-up process to
save time.
AUTO ZERO –sends an auto zero command to the instrument.
RESET SLIDER –resets all slide bars to their default positions (e.g. 0ppm, 0 %V/V, 20.9%
O2). This is specifically useful for O2 as it can be difficult to manually adjust the slider to
20.9%.
EXIT –exits out of any menus the trainer has forced the instrument to enter.
NSC –flags the instrument to show NSC, or non-standard combustible. [Note: must be enabled on
connected instrument]
NSR –flags the instrument to show NSR, or non-standard response. [Note: must be enabled on connected
instrument]
START –begins test selected by the trainer. Also gives further functionality depending on the test, such as
being used as a select/acknowledge button for inert mode testing.

GLT Application User Manual SENSIT Technologies, LLC
9
TESTS –menu to select different test modes. The tests icon must be selected followed by
the appropriate test mode. These options will only be available if they are enabled on the
instrument. For more information on each test mode, refer to the instrument manual,
the GLT training module(s), or contact Sensit.
i. TICK
ii. BARHOLE
iii. CF
iv. PURGE
v. LEAK SEARCH
vi. STAND BY
vii. WDPK
viii. INERT MODE
Slide bars –allows the trainer to change concentrations of gas displayed on the instrument.
NOTE: not available in monitoring mode.
Training module –gives basic information on various displays and test modes, and provides a basic training outline.
Additional information can be added through the settings menu, covered in a later section.
Instrument indicator / disconnect –lists any/all currently connected instruments in the upper left. The ‘x’ icon in the
upper right will disconnect from the instrument when selected.
Hide/expand training module –the box/arrow button in the upper right of the display will hide or expand the
training module.

GLT Application User Manual SENSIT Technologies, LLC
10
4.3 Users Menu
1. On the left side of the application, select the icon
for the Users menu. This menu allows the trainer
to add and remove users, and create and view
reports. A list of created users will be displayed in
order of creation as well as options for each user.
Note: the reports icon will only appear if there are
generated/saved reports for that user.
2. To add a user, select the Add User icon in the upper
right corner of the display.
3. A box will appear, prompting the user to enter an
employee ID and name. After this data has been
entered, select save to add the user. The new user
will appear on the main display in the users menu. Each instrument may be assigned to a user.
4. To edit user information, select the edit icon for the appropriate name.
The same data entry box will appear, allowing the user to update or change the saved information.
5. To delete a user, select the delete icon on the right side of the screen for the appropriate name.
6. The OQ test and reports options will be covered in the next section.
7. Users can be archived from the User menu by completing the following sequence: 1) Press “Select” in the upper
right corner, 2) Select the user to be archived, 3) Press “Archive”. Choose “Yes” when prompted to archive the
user. The chosen user will be removed from the Users menu and added to the Archived User tab in the Settings
menu.
GLT Application User Manual SENSIT Technologies, LLC
11
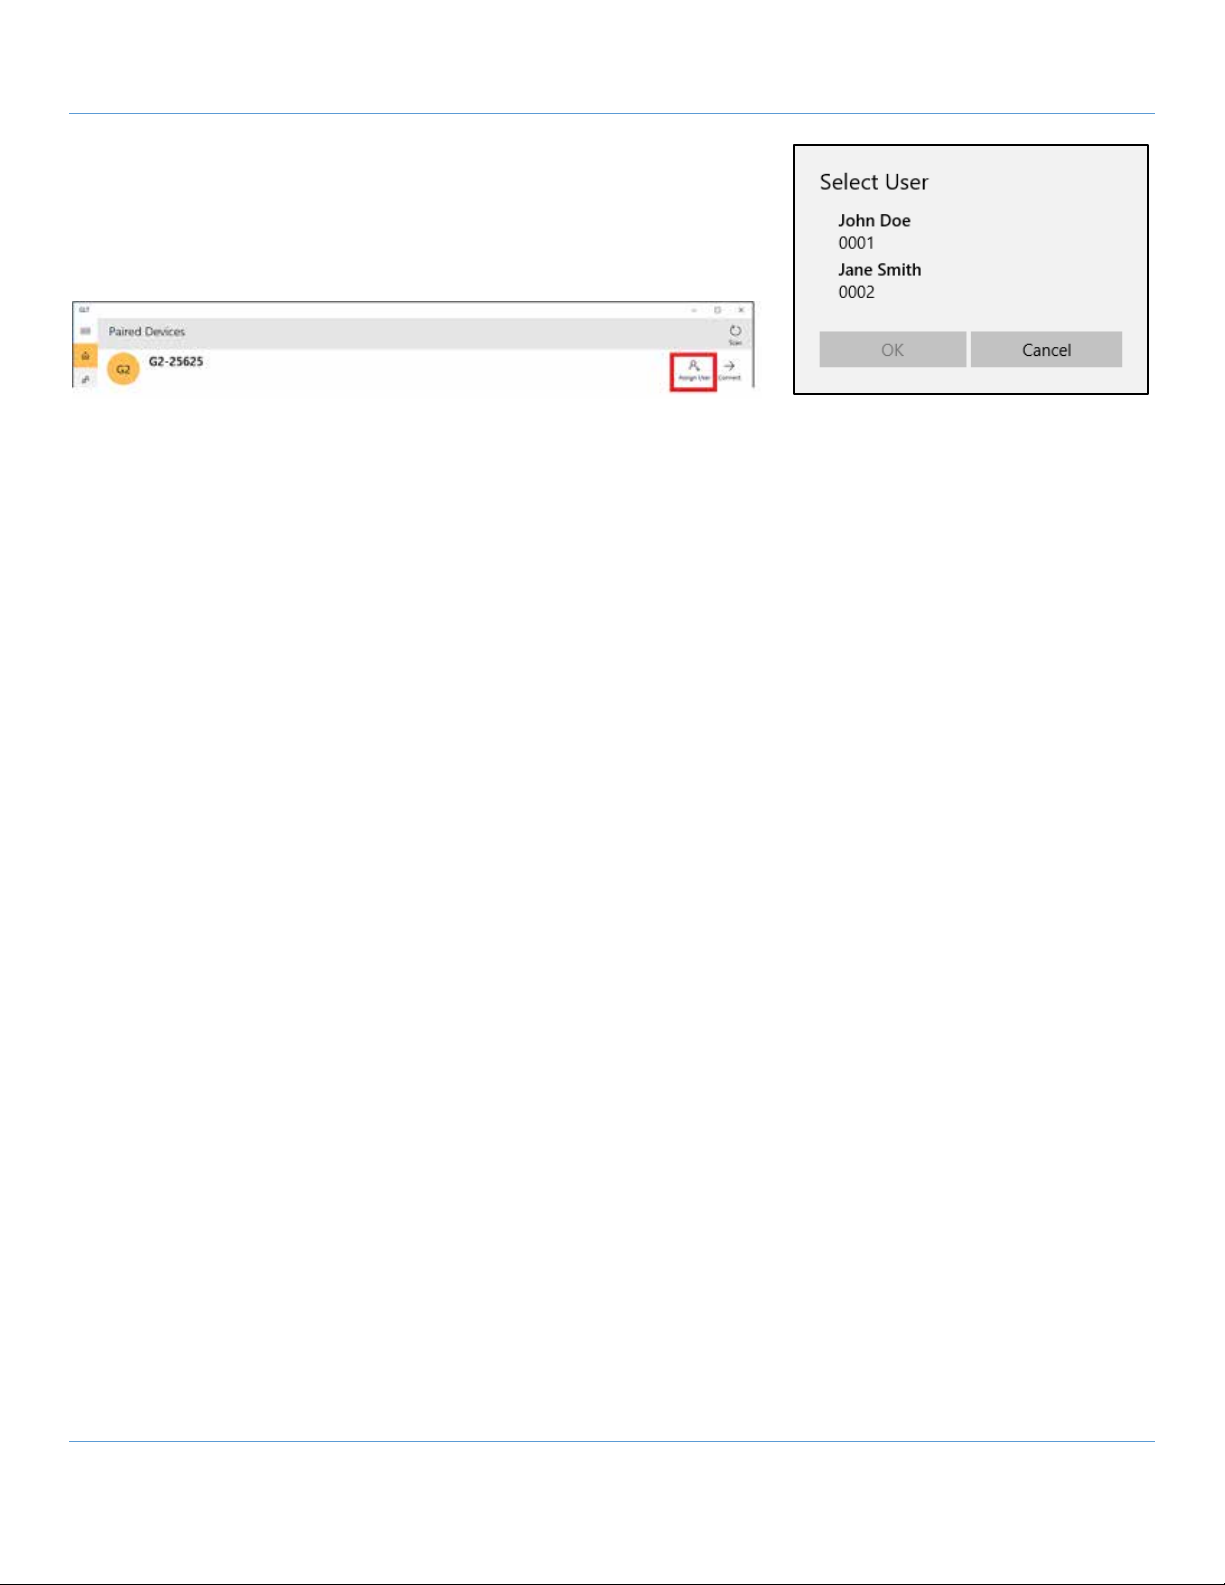
8. Each instrument can be assigned to a user. To do so, select the assign
user icon from the devices screen. A box will appear to select a user.
Select the appropriate user followed by the OK button. The user’s
name will appear under the instrument, and the “Assign User” icon
will be replaced with an “Unassign User” icon.

GLT Application User Manual SENSIT Technologies, LLC
12
4.4 OQ Test / Reports
Operator qualification tests can be done for each user, provided that a trainer profile has been setup. Reports of these
tests can either be saved as drafts temporarily or finalized and permanently stored in the database. Once finalized,
neither the report nor the user profile it is associated with can be deleted. A HTML file of the report can be generated
and these files can be viewed in a browser, printed or
saved as a PDF.
By default, the tests themselves have 14 pre-setup
questions, with possible results of pass, fail, or not
applicable. These questions are fully modifiable and
removable, and new questions can be created. A tally is
kept for each response, and the trainer has the option to
add comments and indicate and overall pass or fail before
saving as a draft or finalizing the test.
4.4.1 Performing an OQ Test
Note: In order to be able to perform an OQ test, the trainer profile must be setup. To do so, refer to the Settings Menu
section, 4.5. Additionally, each test is specific to a user, so the user profile(s) must be setup as well. To do so, refer to
the Users Menu section, 4.3.
1. Navigate to the user menu tab, by selecting the icon on the left side of the application.
2. To the right of each user’s name and ID number will be a set of options, including OQTest and Reports (if any
have been generated).
3. To begin an OQ test, select the icon.
4. The screen will display the test questions on the left side and the
respective answer to the right. (shown above)
5. Answer each question by selecting pass, fail, or N/A. By default, N/A is selected for every question.
6. Once completed, review your answers and the corresponding tally below them.
7. Add any additional comments that might be necessary by selecting the text box and utilizing the on-screen
keyboard.
8. Select the check box next to the word ‘Pass’ to mark the test as a passing grade, or leave it blank to mark it as
failing.
9. If you will need to make adjustments before finalizing, save the test as a draft by selecting the icon.
a. If there is a test currently saved as a draft, the
OQTest icon will appear red in color in the user menu
tab.
10. When the test is complete and will no longer need to be
modified, finalize it by selecting the icon. Select the trainer
from the drop-down list (Note: at least one trainer profile
must exist to finalize a report). Fill out the signatures as
necessary. A Reports icon will now appear next to the
OQTest icon in the user menu tab for that user.

GLT Application User Manual SENSIT Technologies, LLC
13
4.4.2 Generating a Report
1. Once a test has been finalized, a Reports icon will appear next to
the OQTest icon for that user. To generate a report, select the
Reports icon.
2. A list with all reports available for that user will be displayed.
a. Some details will be listed for each, such as the date and time the test
was finalized, and whether or not the result was a pass or fail. The
reports are listed by date and time, in descending order.
3. To generate and view a report, select the HTML icon. The report will be
opened in either Microsoft Edge or whatever the default browser is set to.
4. From there, the report can be printed or saved as a PDF. In Microsoft Edge:
a. Select the triple dot icon in the upper right.
b. Select print.
c. To print the report, in the print menu choose the appropriate printer
and any options as you normally would and select print.
d. To save as a PDF, select Microsoft Print to PDF from the Printer drop
down box and select print.
e. A File Explorer Save As dialog box will appear.
f. Select a destination and file name, and then save.
GLT Application User Manual SENSIT Technologies, LLC
14
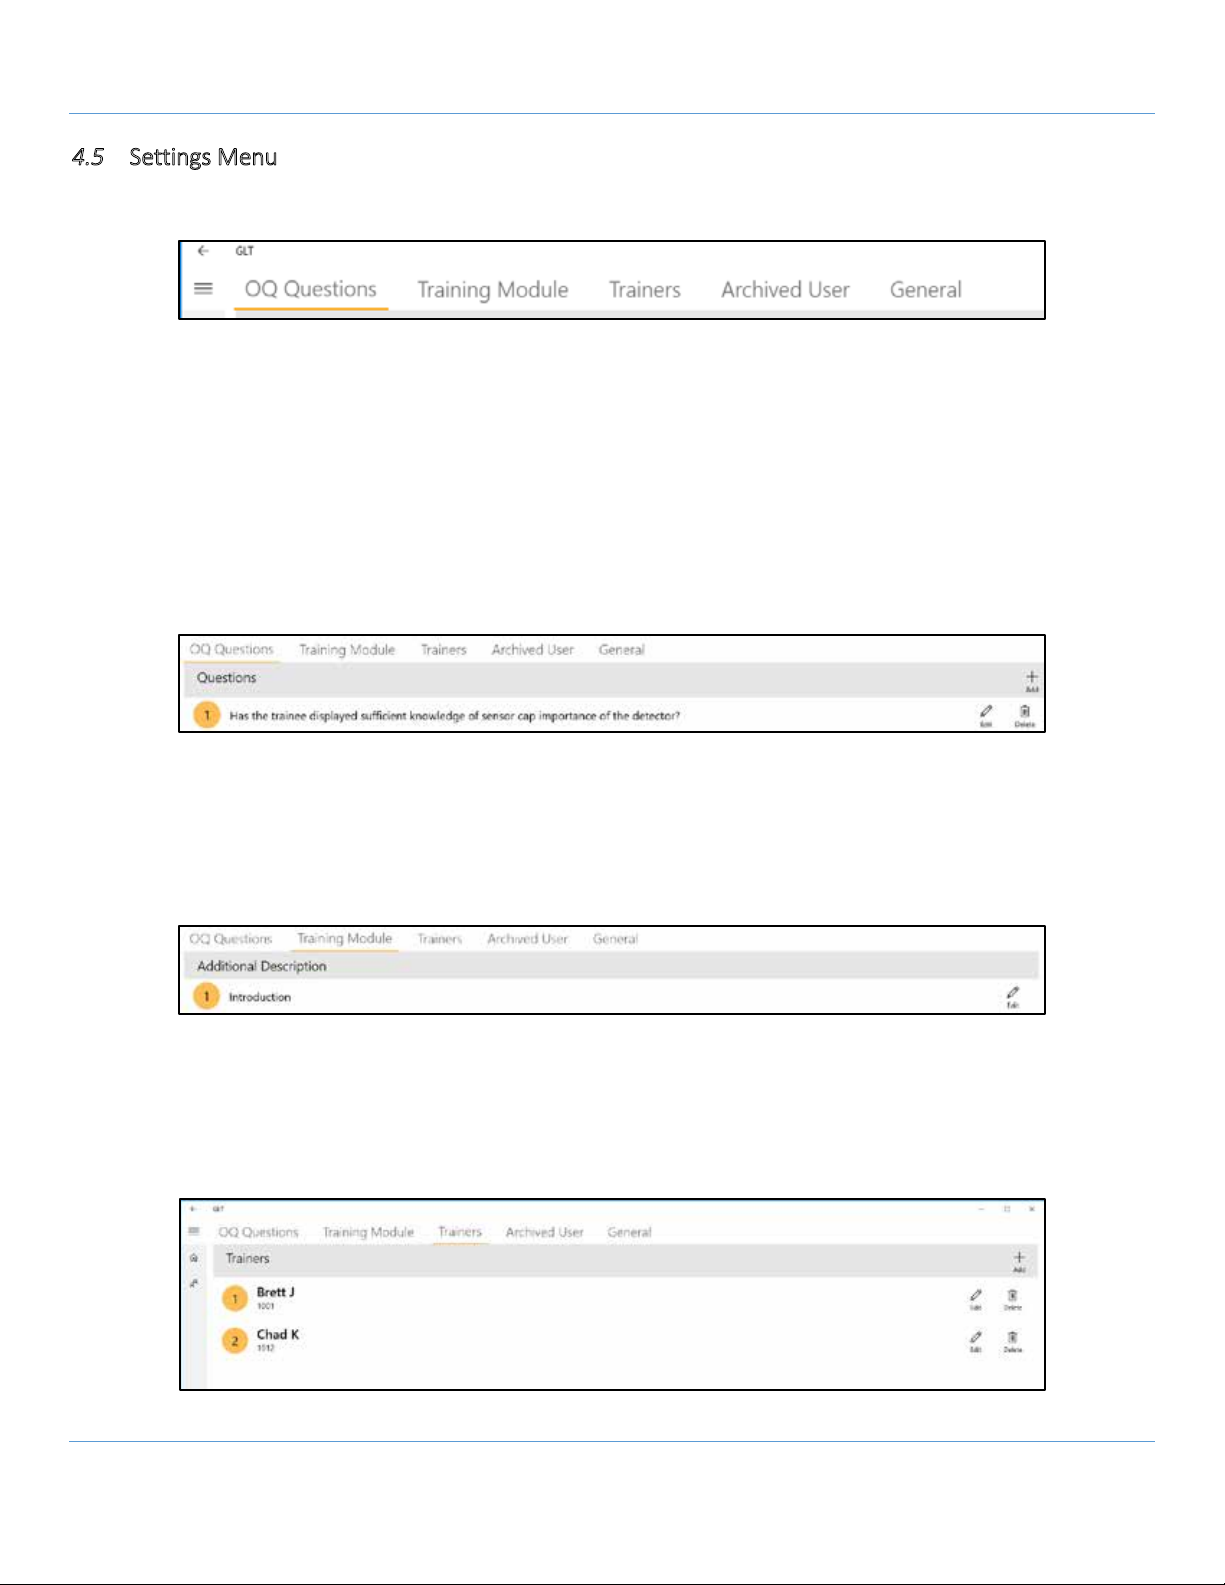
4.5 Settings Menu
To access the settings menu, select the cog icon in the lower left hand corner of the application. The application settings
are divided into different sections, shown as tabs on the top of the display. Select one to open that section.
4.5.1 OQ Questions
In the OQ questions section, each question will be listed, along with edit and delete options to the right. The add button
is located in the upper right. The questions are listed in the order of creation.
1. When the edit icon is selected, a text entry box appears with the current question text. Edit as necessary and hit
save, or cancel to discard any changes.
2. When the delete icon is selected, a dialog box appears asking the user to confirm.
3. When the add icon is selected, a text entry box appears where the question text can be entered. Select save
when done or cancel to discard the question.
4.5.2 Training Module
Addition description can be added to each training module, but unlike the OQ test questions, the original text cannot be
modified or deleted, and no additional training module categories can be created. When the edit icon is selected, a text
entry box will appear. Selecting save will add the text to the existing training module, cancel will discard any additions.
The additions can be modified in the same way, or removed by deleting the text and saving.
4.5.3 Trainers
This menu is where trainer profiles are setup. This process is identical to adding a user. In order to finalize a report, at
least 1 trainer profile must exist.
GLT Application User Manual SENSIT Technologies, LLC
15
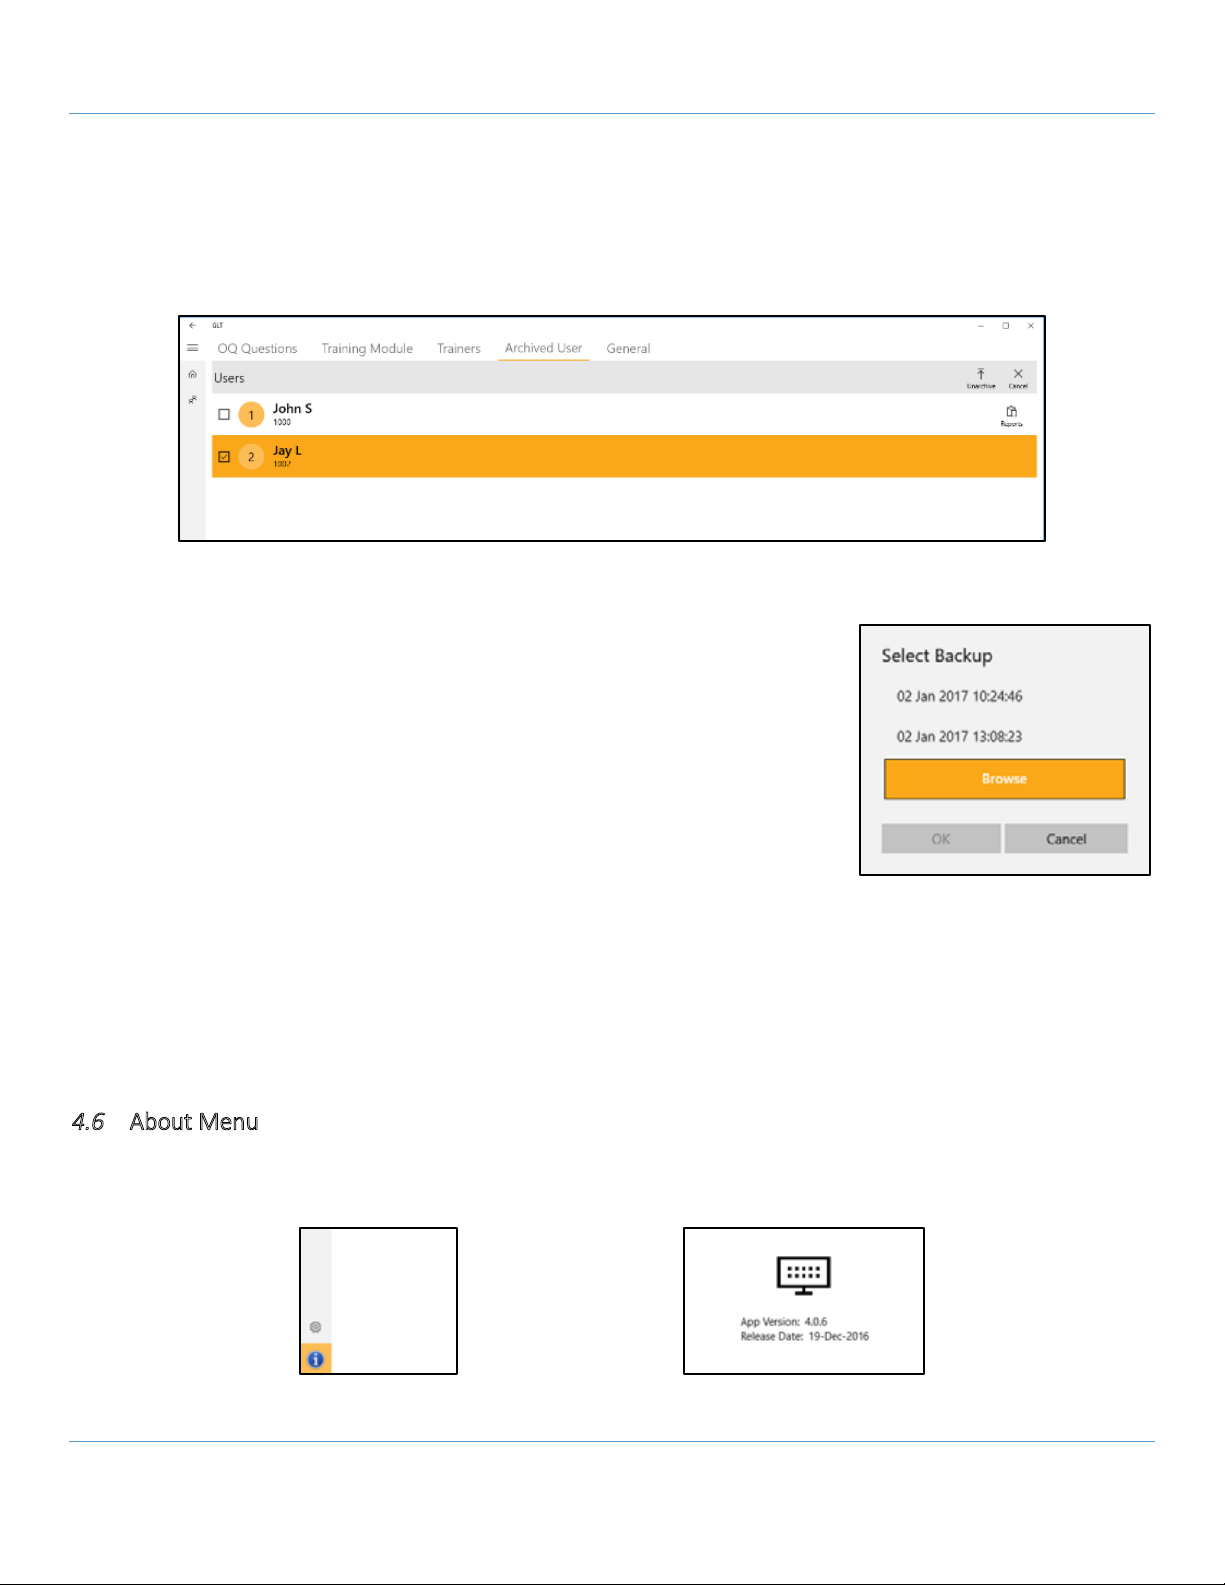
4.5.4 Archived User
This menu allows you to view users that have been archived, view/generate reports for those users (if any exist), and
unarchive them.
To unarchive a user, select the Select button in the upper right, check any/all users that you wish to unarchive, and
select the Unarchive button in the upper right. Confirm the decision by selecting the Yes button.
4.5.5 General
The general tab allows the user to reset the OQ questions to factory default and
backup and restore the SQLite database that the GLT application uses.
Selecting the Backup icon will create a backup of the current database to the default
directory, which will be displayed at the bottom of the screen. To the right is a Go To
Location button. When selected, it will open a File Explorer window in that directory.
The backup will be a data base file (.db) with the following format:
GLTDD_Mon_YYYY_HH_MM_SS, where D, Mon, Y represent the date and H, M, S
represent the time.
Selecting the Restore button will prompt the user to select a backup file, if one has been generated by the application,
or allows the user to browse to a non-default location (through File Explorer).
Note: It is imperative that regular backups are made, both internally on the tablet as well as keeping copies of the
backups on another machine. The backups can be copied to a flash drive, or transferred over a network, the same as
any other file. This is the only way to ensure that important data (such as OQ reports) are not lost.
4.6 About Menu
To access the about menu, select the bottom-most icon on the left side of the application. This menu gives basic
information about the software, namely the revision number and the release date.
GLT Application User Manual SENSIT Technologies, LLC
16
5Troubleshooting
Further sections to be added as necessary.
5.1 Communication Error
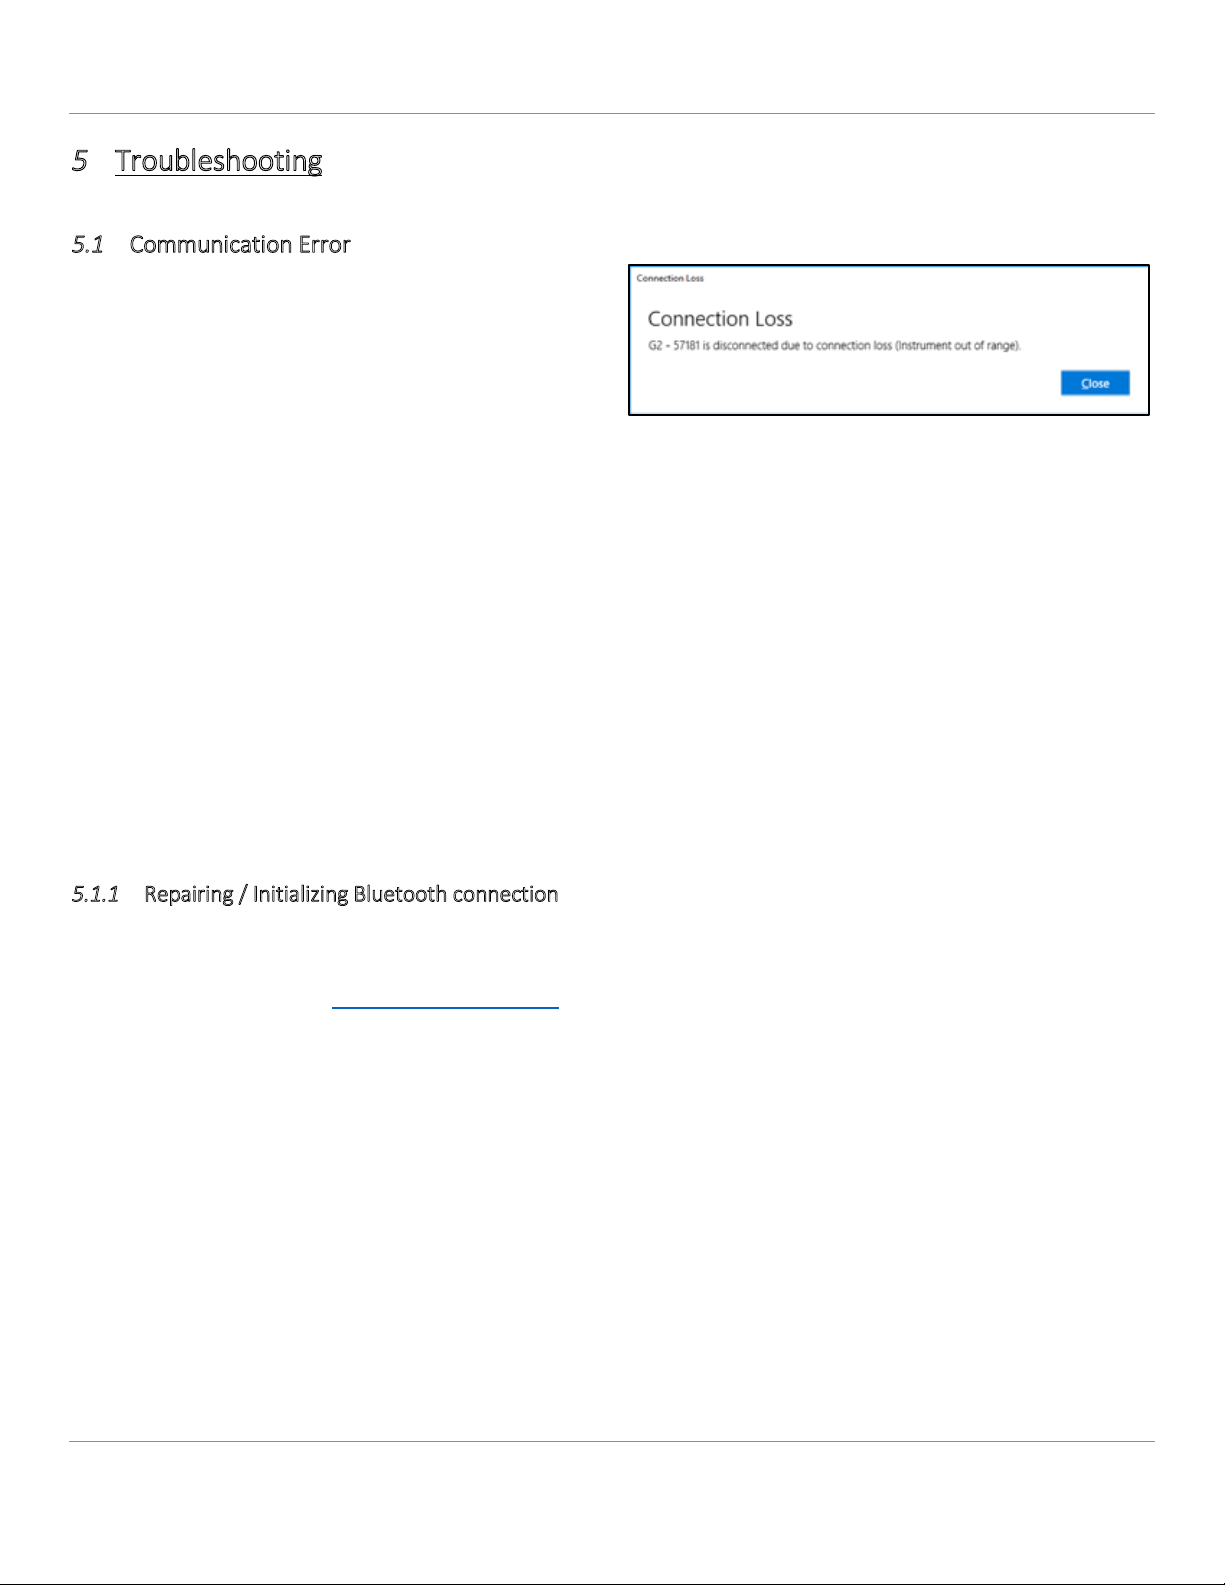
A communication error, either shown by a dialog box or the
application simply returning to the devices screen, indicates
that either the tablet or the instrument has lost
communication and the connection needs to be
reestablished. This could happen for a variety of reasons,
but generally can be attributed to the system being used
outside of the operating specifications. Namely:
1. The tablet and instrument are more than 100ft away from each other.
2. There are a significant amount of line of sight (LOS) breaks.
3. The antenna(s) are being obstructed or covered (such as by the operators hand).
If simply correcting an issue as listed above and trying to reconnect to the instrument through the application does not
work, or a communication error is still being presented, close the application and restart.
To close the application, select the task switching icon in the taskbar at the bottom of the screen. The display should
show all running application. Select the ‘X’ in the upper right corner of the GLT application tile.
To restart the application, select the start menu icon in the taskbar at the bottom of the screen. Select the GLT icon
from the start menu.
If this does not resolve the issue, try to repair/re-initialize the Bluetooth connection (section 5.1.1 below). If this still
does not resolve the issue, contact Sensit for assistance.
5.1.1 Repairing / Initializing Bluetooth connection
In some cases, it may be necessary to re-establish the Bluetooth pairing between the instrument and tablet in order to
resolve a communication issue. To do so:
NOTE: Refer to section 4.1.2 Pairing a New Instrument for instructions on how to enable and disable the Bluetooth
Support Service, which may need to be done in order to remove/pair devices.
1. Un-pair and remove the device from the Windows Bluetooth manager.
a. Open the start menu by selecting the Windows icon in the lower left corner of the screen.
b. Select Bluetooth settings from the start menu icons in the middle of the screen.
c. On the right section of the menu, you should see a list of devices. Select the instrument you are
troubleshooting, and select remove device. This will un-pair and remove the instrument from the device
list.
2. If the instrument is on, power it down and restart it.
a. When the instrument gets to the “WAIT FOR TRAINER” screen, do not press any buttons.
3. On the tablet, wait for the instrument to reappear in the device list.
a. If it does not reappear, close out of the settings menu and re-open it by going back to step 1a.
4. Select the instrument and select the pair option.
5. Wait for the connection to establish. The device should first list as “Connected”, followed by “Paired”.
GLT Application User Manual SENSIT Technologies, LLC
17
6. The Bluetooth connection should now be reestablished. Resume use as normal from the GLT application. If this
does not resolve communication issues, contact Sensit for further assistance.
6Software Update
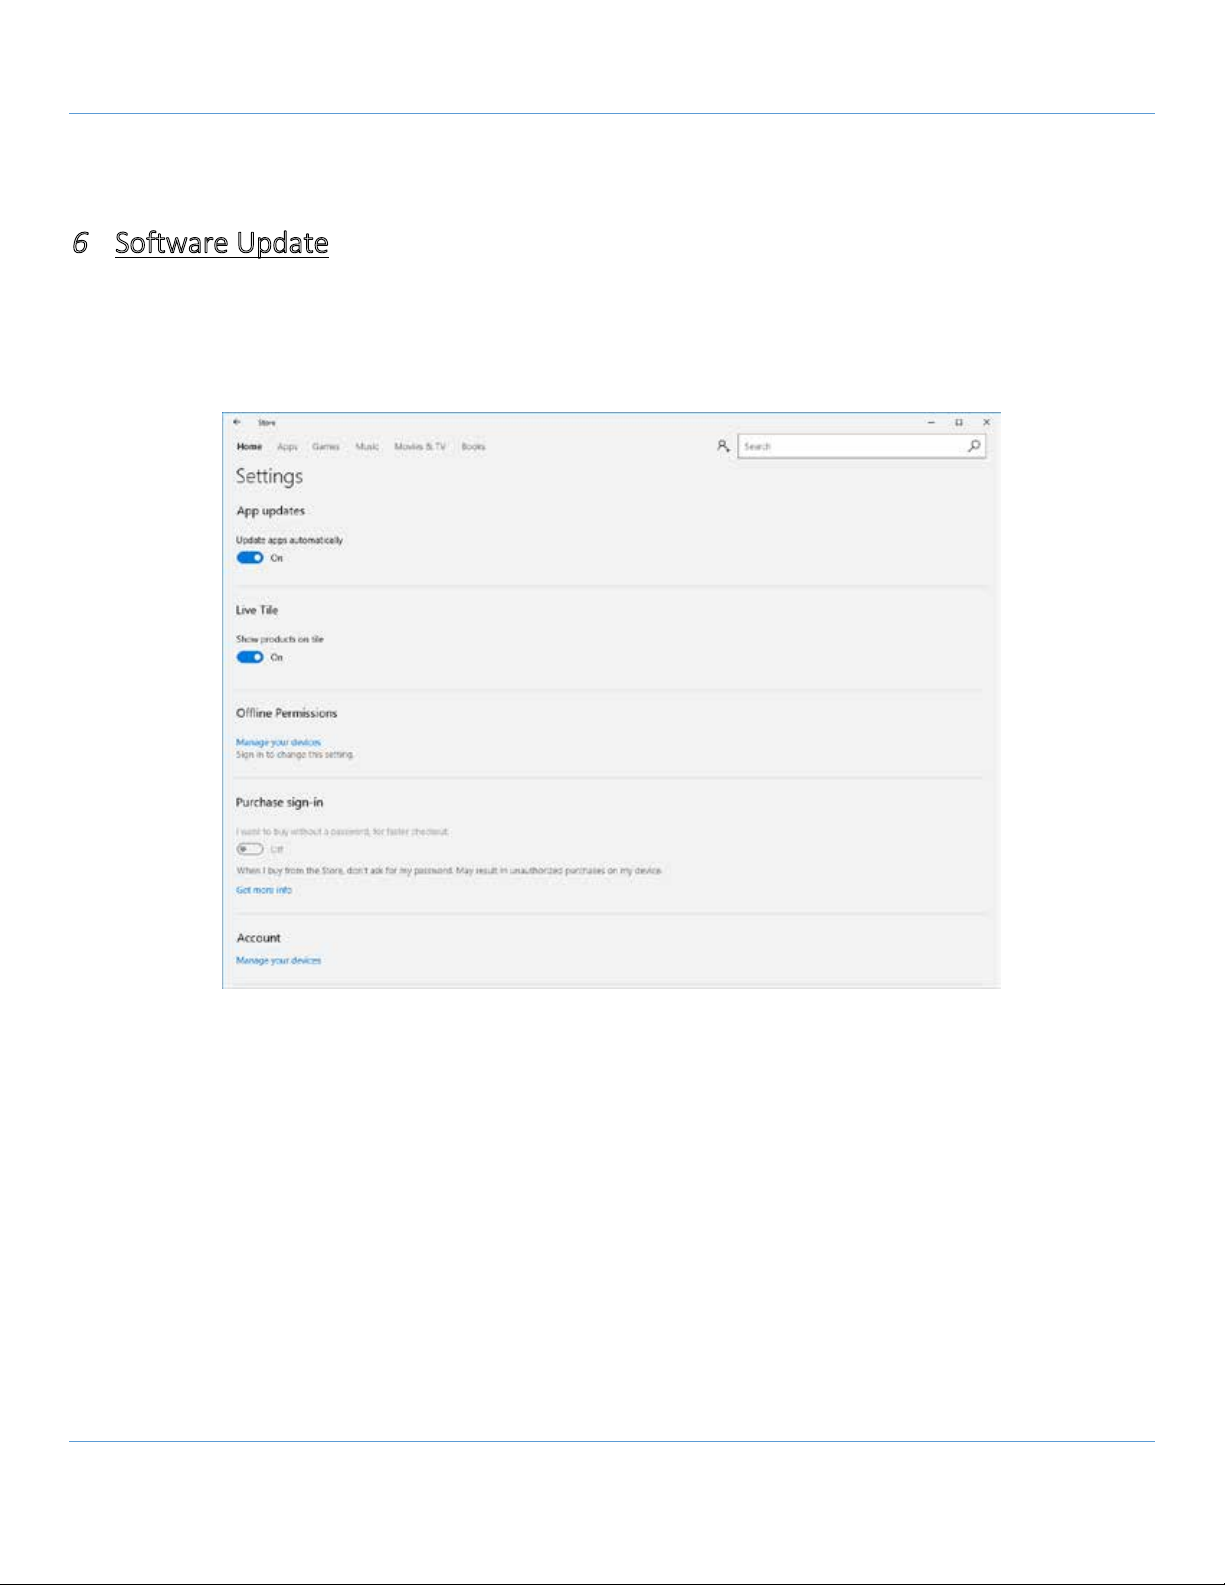
As of software revision 4.0.6, the GLT application may be updated through the Windows Store and does not need to be
sent in to Sensit to be updated.
If your Windows Store is configured with the default setting to automatically update (see screenshot below) , this should
happen in the background when the tablet is on, assuming you have a wifi connection to the internet.

GLT Application User Manual SENSIT Technologies, LLC
18
7Notes

GASLESS LEAK TRAINER INSTRUCTION MANUAL Revised 8/28/2018
Part# 750-00070
Warranty
Your GASLESS LEAK TRAINER Tablet includes a 1 year limited hardware warranty from the manufacturer
(Dell/Microsoft).
This warranty gives you specific legal rights and you may have other rights which vary from state to state.
Sensit Technologies, LLC
851 Transport Drive
Valparaiso, Indiana
46383 USA
Tel: 219/465-2700
Fax: 219/465-2701
Email: info@gasleaksensors.com
Web: www.gasleaksensors.com
GASLESS LEAK TRAINER INSTRUCTION MANUAL
Part # 750-00070 Revision 8-28-18
MADE IN THE USA
WITH GLOBALLY SOURCED COMPONENTS
Table of contents


