SEPTENTRIO ALTUS NR3 User manual

Altus NR3
User Manual

User Manual Revision 1.1
Applicable to version 1.3.0 of the Altus NR3 firmware
December 04, 2017
© Copyright 2000-2017 Septentrio NV/SA. All rights reserved.
Septentrio NV
Greenhill Campus, Interleuvenlaan 15i
3001 Leuven, Belgium
http://www.septentrio.com
support septentrio.com
Phone: +32 16 300 800
Fax: +32 16 221 640
Septentrio
2

CONTENTS
Contents
1Introduction 6
1.1 ALTUS NR3 TECHNICAL CHARACTERISTICS ............................................... 7
1.1.1 GNSS Key Features................................................................ 7
1.2 USER NOTICES ............................................................................... 8
1.2.1 Warranty............................................................................ 8
1.2.2 Support ............................................................................. 9
1.2.3 Notices of compliance ............................................................ 10
1.2.4 Regulatory Information........................................................... 11
1.2.5 Safety information ................................................................ 13
2 Altus NR3 Overview 14
2.1 SHIPPING CASE CONTENTS ................................................................. 14
2.2 OPTIONAL ITEMS ............................................................................ 15
2.3 ALTUS NR3 DESIGN ......................................................................... 16
2.3.1 Front Panel......................................................................... 16
2.3.2 Location of Batteries and SIM card ............................................. 18
2.3.3 Altus NR3 Connector.............................................................. 19
3 Getting started with the Altus NR3 20
3.1 WHAT YOU WILL NEED ...................................................................... 20
3.2 SETTING UP THE ALTUS NR3............................................................... 21
3.2.1 Inserting a micro SIM card ....................................................... 21
3.2.2 Inserting the batteries ............................................................ 21
3.2.3 Switching on the Altus NR3 ...................................................... 21
3.2.4 Switching WiFi on/off............................................................. 22
3.3 CONNECTING TO THE WEB INTERFACE .................................................... 23
4 Configuring the Altus NR3 as a rover 24
4.1 STANDARD ROVER RECEIVER SETTINGS .................................................... 24
4.2 CONFIGURING THE CONNECTION TO A BASE STATION ................................... 26
4.2.1 Connecting via Mobile Internet.................................................. 26
4.2.2 Connection to an NTRIP Caster.................................................. 28
4.2.3 Connecting via Data Call ......................................................... 30
4.2.4 Connecting via an IP address using Mobile Internet ......................... 32
4.2.5 Connecting via WiFi ............................................................... 34
4.3 CONFIGURING DATA OUTPUT OVER BLUETOOTH ......................................... 38
4.3.1 Connect Bluetooth ................................................................ 38
4.3.2 Configuring output of SBF and NMEA data .................................... 39
4.4 ADDITIONAL ROVER SETTINGS ............................................................. 40
4.4.1 Setting the antenna height....................................................... 40
3
CONTENTS
5 Configuring Altus NR3 as a Base station 41
5.1 SETTING THE BASE STATION POSITION .................................................... 41
5.2 CONNECTING THE BASE STATION RECEIVER TO THE ROVER .............................. 43
5.2.1 Connecting via Data Call ......................................................... 43
5.2.2 Connecting via Mobile Internet.................................................. 46
5.2.3 Connecting via WiFi ............................................................... 49
6 Other receiver operations 53
6.1 LOGGING SBF AND NMEA DATA .......................................................... 53
6.1.1 Basic logging configurations..................................................... 53
6.1.2 Advanced Settings for Logging .................................................. 54
6.2 DOWNLOADING LOGGED DATA FROM THE RECEIVER ..................................... 55
6.2.1 Using the Web Interface.......................................................... 55
6.2.2 Using the USB connection ....................................................... 56
6.3 CONFIGURATIONS ........................................................................... 59
6.3.1 Saving the configuration ......................................................... 60
6.3.2 Managing configurations......................................................... 61
6.4 HOW TO CONFIGURE DYNAMICDNS ...................................................... 62
6.5 RESETTING THE ALTUS NR3................................................................ 63
6.6 UPGRADING THE FIRMWARE ............................................................... 64
6.7 HOW TO MANAGE ACCESS TO THE ALTUS NR3 ........................................... 65
6.7.1 SSH key authentication........................................................... 67
6.8 USING THE EXPERT CONSOLE .............................................................. 68
6.9 THE ‘ABOUT’MENU ......................................................................... 69
7 GIS Collection with PinPoint-GIS or other applications 70
7.1 INTRODUCTION ............................................................................. 70
7.2 USING THE ALTUS NR3 ON-BOARD SIMPLE DATA COLLECTOR .......................... 72
7.2.1 Designing a collection project ................................................... 72
7.2.2 Performing a collection........................................................... 74
7.2.3 Downloading collected data ..................................................... 75
7.3 CREATING A MAP ............................................................................ 76
7.4 CONNECTING TO THE INTERNET ........................................................... 78
7.5 USING PINPOINT-GIS WEB ................................................................ 79
7.5.1 Optional: Auto filling of GNSS attributes....................................... 81
7.6 USING THE PINPOINT-GIS APP ............................................................ 84
7.7 USING ESRICOLLECTOR WITH THE ALTUS NR3 .......................................... 87
Appendix A Status icons and front-panel LEDs 90
A.1 STATUS ICONS ON THE WEB INTERFACE .................................................. 90
A.2 FRONT PANEL LEDS........................................................................ 91
Appendix B Batteries 92
B.1 CHARGING ................................................................................... 92
B.1.1 Using the external battery charger ............................................. 92
B.1.2 Using the AC adapter ............................................................. 92
B.1.3 Using the USB adapter ........................................................... 93
B.2 HOT SWAPPING THE BATTERIES AND CHARGING ......................................... 93
Appendix C Point-to-Point connections 94
Appendix D Connecting to the web Interface in Client WiFi mode 95
4


CHAPTER 1. INTRODUCTION
1Introduction
You made an excellent choice buying the Septentrio Altus Network Rover.
Don’t drop the call!
Don’t lose time with dropped calls. Your connection for differential
correction reception is secure with the Altus NR3. It has been designed
with a dual-antenna cell modem to optimize call retention.
Light
Despite its on-board smarts and wireless technologies, the Altus NR3
weighs only 760 grams with a diameter of only 167 mm.
Work all day
The batteries of the Altus NR3 are hot swappable so with two batteries in
the device and two spare, you’ll have more than enough power to see you
through the working day and beyond. The charger and batteries are non
proprietary so it is easy and inexpensive to keep spares.
Use your existing phone or tablet
The Altus NR3 can communicate with any device with a WiFi radio. Simply
connect to the Altus NR3, open your browser and your Altus NR3 is
configured within minutes.
Esri ready
The Altus NR3 has been designed specifically for ArcGIS Online users
to add highly accurate positioning information to their databases using
PinPoint-GIS Web and App: Septentrio’s GIS framework. Alternatively,
you may use the Altus NR3 with industry-leading survey software such as
SurvCE, Field Genius or Digiterra.
Works in any network
The Altus NR3 works within all types of RTK networks. Its auto detect
function is able to detect the correction type!
6

CHAPTER 1. INTRODUCTION
1.1 Altus NR3 Technical Characteristics
448 hardware channels for multi-frequency, all-in-view RTK positioning
Integrated 4G LTE Quad-Band GSM/GPRS/EDGE + HSPA Modem
Integrated WiFi 802.11 b/g/n
Integrated Bluetooth 2.1 + EDR/4.0
Web Interface configuration
Hot-Swap Li-Ion Batteries
Onboard 16 GB Memory
Onboard GIS collection using PinPoint-GIS
With Septentrio’s open architecture philosophy, you have the choice of using data collector
software from MicroSurvey FIELDGenius or Carlson SurvCE.
1.1.1 GNSS Key Features
132 Channels with L1/L2/L2C GPS, GLONASS and SBAS.
RTK, SBAS, DGPS and Standalone positioning modes.
Navigation performance
Horizontal Vertical
Standalone 1.2 m 1.9 m
SBAS (WAAS, EGNOS, MSAS) 0.6 m 0.8 m
DGPS 0.3 m 0.7 m
RTK (Fixed) 0.6 cm + 0.5 ppm 1 cm + 1 ppm
The Altus NR3 can be mounted on a standard survey rod with a 5/8”thread.
7
CHAPTER 1. INTRODUCTION
1.2 User Notices
This section provides information regarding Warranty and Customer Service. Septentrio NV
reserves the right for improvements and changes to this document, products and services
without notice or obligation.
1.2.1 Warranty
Septentrio provides a two-year warranty for the Altus NR3 receiver, free from defects in
materials and workmanship, from the date of sale on the invoice of the original buyer. A
ninety-day warranty is provided for the cables and other accessories. Firmware upgrades
are free for life. Software support is free for one year from date of purchase.
The warranty does not cover:
•Defects due to accidents, abuse, misuse, negligence, abnormal use or any other
non-recommended use.
•Defects due to environmental conditions that do not conform to Altus NR3
specifications.
•Defects due to improper installation or operating procedures.
•Defects due to modifications, alterations, or changes not made in accordance with the
Altus NR3 User Manual and other technical documentation or directly authorized by
Septentrio NV.
•Normal wear and tear use.
•Shipping damage.
•Third party software included with the product, other than the warranty of the original
manufacturer to the extent the manufacturer permits.
Please note that the warranty is void if the Altus NR3 has been tampered
with or opened.
8

CHAPTER 1. INTRODUCTION
1.2.2 Support
For first-line support please contact your Septentrio dealer. For further information, please
consult the Septentrio support website for documentation and firmware upgrades or the
Septentrio Technical Support group:
http://www.septentrio.com
support septentrio.com
Europe
Septentrio NV Phone: +32 16 300 800
Greenhill Campus Fax: +32 16 221 640
Interleuvenlaan 15i, sales septentrio.com
3001 Leuven,
Belgium
North and South America
Septentrio Inc. Phone: +1 310 541 8139
Suite 200, sales septentrio.com
23848 Hawthorne Blvd.
Torrance, CA 90505
USA
Asia-Pacific
Septentrio Phone: +852 9095 5066
Unit 1901, Hua Fu Commercial Building sales septentrio.com
111 Queen’s Road West,
Sheung Wan,
Hong Kong
9
CHAPTER 1. INTRODUCTION
1.2.3 Notices of compliance
CE Notice
Receivers of the Altus NR3 family carry the CE mark and as such
are compliant with the 2004/108/EC-EMC Directive and amendments,
2006/95/EC-Low Voltage Directive, both amended by the CE marking
directive 93/68/EC.
With regards to EMC, these devices are declared as class B, suitable for
residential or business environment.
This device meets the EU requirements (1999/519/EC) and the
International Commission on Non-Ionizing Radiation Protection (ICNIRP)
on the limitation of exposure of the general public to electromagnetic
fields by way of health protection. To comply with the RF exposure
requirements, this equipment must be operated in a minimum of 20 cm
separation distance to the user.
ROHS/WEEE Notice
Altus NR3 receivers comply with European Union (EU) Directive
2002/95/EC on the restriction of the use of certain hazardous substances
in electrical and electronic equipment (RoHS Directive).
Altus NR3 receivers comply with the European Union (EU) Directive
2002/96/EC on waste electrical and electronic equipment (WEEE). The
purpose of this Directive is the prevention of waste electrical and electronic
equipment (WEEE), and in addition, the reuse, recycling and other forms of
recovery of such wastes so as to reduce the disposal of waste. If purchased
in the European Union, please return the receiver at the end of its life to
the supplier from which it was purchased.
10

CHAPTER 1. INTRODUCTION
1.2.4 Regulatory Information
FCC Regulations
This device complies with part 15 of the FCC Rules. Operation is subject to the following
two conditions: (1) This device may not cause harmful interference, and (2) this device must
accept any interference received, including interference that may cause undesired operation.
Changes or modifications not expressly approved by the party responsible for compliance
could void the user’s authority to operate the equipment.
This equipment has been tested and found to comply with the limits for a Class B
digital device, pursuant to part 15 of the FCC Rules. These limits are designed to provide
reasonable protection against harmful interference in a residential installation. This
equipment generates, uses and can radiate radio frequency energy and, if not installed
and used in accordance with the instructions, may cause harmful interference to radio
communications. However, there is no guarantee that interference will not occur in a
particular installation. If this equipment does cause harmful interference to radio or
television reception, which can be determined by turning the equipment offand on, the user
is encouraged to try to correct the interference by one or more of the following measures:
•Reorient or relocate the receiving antenna.
•Increase the separation between the equipment and receiver.
•Connect the equipment into an outlet on a circuit different from that to which the
receiver is connected.
•Consult the dealer or an experienced radio/TV technician for help.
FCC RF Exposure Compliance
This equipment complies with radio frequency (RF) exposure limits adopted by the Federal
Communications Commission for an uncontrolled environment. This equipment should be
installed and operated with minimum distance 20 cm between the radiator and your body.
11

CHAPTER 1. INTRODUCTION
IC Regulations
RSS-Gen 7.1.3
This device complies with Industry Canada license-exempt RSS standard(s). Operation is
subject to the following two conditions:
(1) this device may not cause interference, and
(2) this device must accept any interference, including interference that may cause
undesired operation of the device.
Le présent appareil est conforme aux CNR d’Industrie Canada applicables aux appareils
radio exempts de licence. L’exploitation est autorisée aux deux conditions suivantes:
(1) l’appareil ne doit pas produire de brouillage, et
(2) l’utilisateur de l’appareil doit accepter tout brouillage radioélectrique subi, même si
le brouillage est susceptible d’en compromettre le fonctionnement.
IC RF Exposure Compliance (MPE)
This equipment complies with IC RSS-102 RF exposure limits set forth for an uncontrolled
environment. This equipment should be installed and operated with minimum distance
20 cm between the radiator and your body.
Déclaration d’exposition aux radiations
Cet équipement est conforme aux limites d’exposition aux rayonnements IC établies pour un
environnement non contrôlé. Cet équipement doit être installé et utilisé avec un minimum
de 20 cm de distance entre la source de rayonnement et votre corps.
12

CHAPTER 1. INTRODUCTION
1.2.5 Safety information
Statement 1/WARNING: IMPORTANT SAFETY INSTRUCTIONS
This warning symbol means danger and indicates that you are in a
situation that may result in body injury and physical damage. Before you
work on any equipment, be aware of the hazards involved with electrical
circuitry and familiarize yourself with standard practices for preventing
accidents. Use the statement number provided at the beginning of each
warning to locate its translation in the translated safety warnings that
accompanied this device.
Statement 2/WARNING: The power supply provided by Septentrio should
not be replaced by another.
Statement 3/WARNING: Ultimate disposal of this product should be
handled according to all national laws and regulations.
Statement 4/WARNING: The equipment and all the accessories included
with the product may only be used according to the specifications in the
delivered release note, in the manual and in all other documents delivered
with the receiver.
Statement 5/WARNING: Never place the equipment or its batteries in an
environment where the specified maximum storage temperature can be
exceeded.
Statement 6/WARNING: The outside of the instrument may be cleaned
using a clean, lightly dampened cloth. Do not use any cleaning liquids
containing alcohol, methylated spirit, ammonia etc.
13
CHAPTER 2. ALTUS NR3 OVERVIEW
2 Altus NR3 Overview
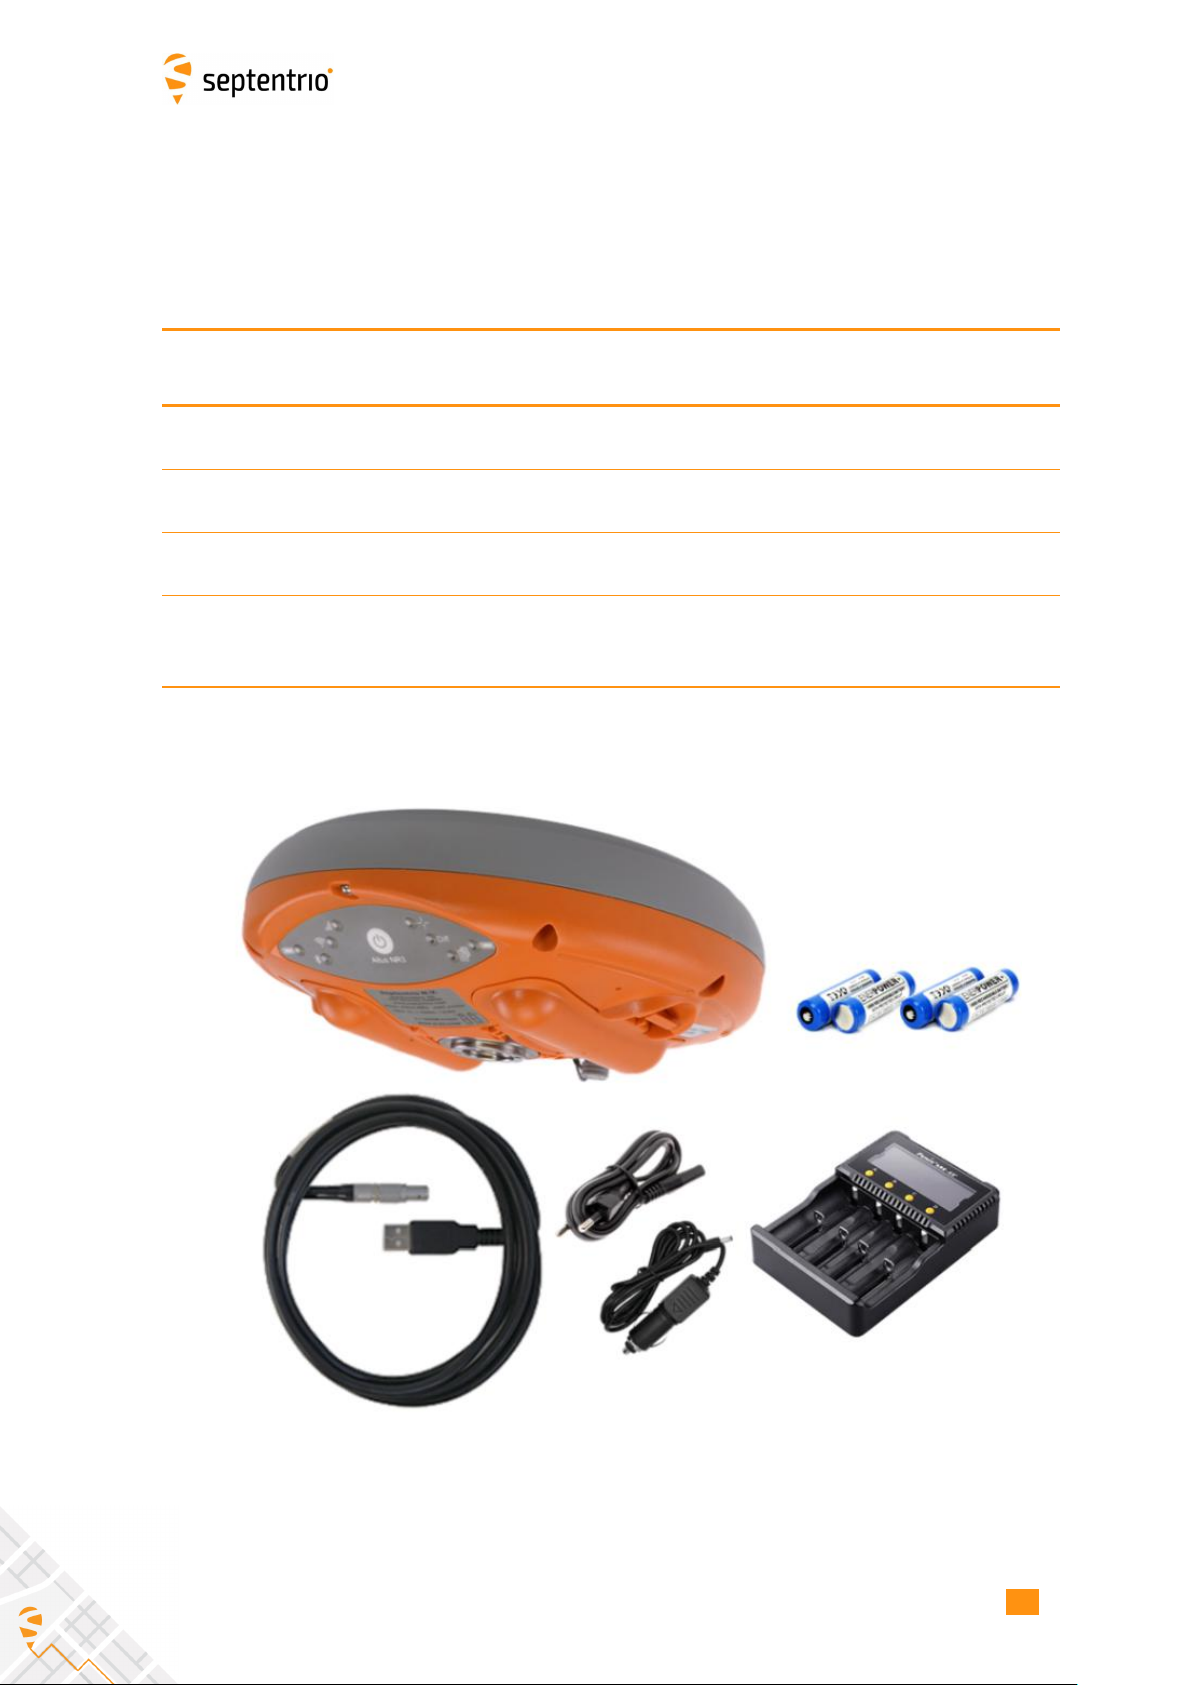
2.1 Shipping case contents
One Altus NR3 system includes the following items:
Item Purpose
(Part Number)
Altus NR3
(410222)
GNSS network rover for survey and GIS
applications
USB Cable
(214100) Configuration via USB
Four Li-Ion Batteries
(215344) Powering the Altus NR3
Battery Charger
(EU:215498, UK:215499, AU:215500, US:215501)
4-channel external battery charger with
cable connections to both wall plug
and cigarette lighter
Figure 2-1: Standard items included with Altus NR3 delivery
14
CHAPTER 2. ALTUS NR3 OVERVIEW
2.2 Optional items
Item Purpose
(Part Number)
CBL_Altus_NR3_COM
(214995)
DB9 Serial RS232 Male connector ideal
for external radio communication
CBL_Altus_NR3_COM_PWR
(214969)
DB9 Serial RS232 Female connector
and open-ended power connector
(supply range: 9-30 VDC)
NMEA-BT-NR3
(215258)
Bluetooth to bluetooth dongle for iOS
support with Altus NR3 (ideal for usage
with Collector for ArcGIS)
AC wall adapter
(EU:214870, UK:214871, AU:214872, US:214873)
110-230V to 12 V adapter/wall charger
with power cord for Altus NR3
15
CHAPTER 2. ALTUS NR3 OVERVIEW
2.3 Altus NR3 design
2.3.1 Front Panel
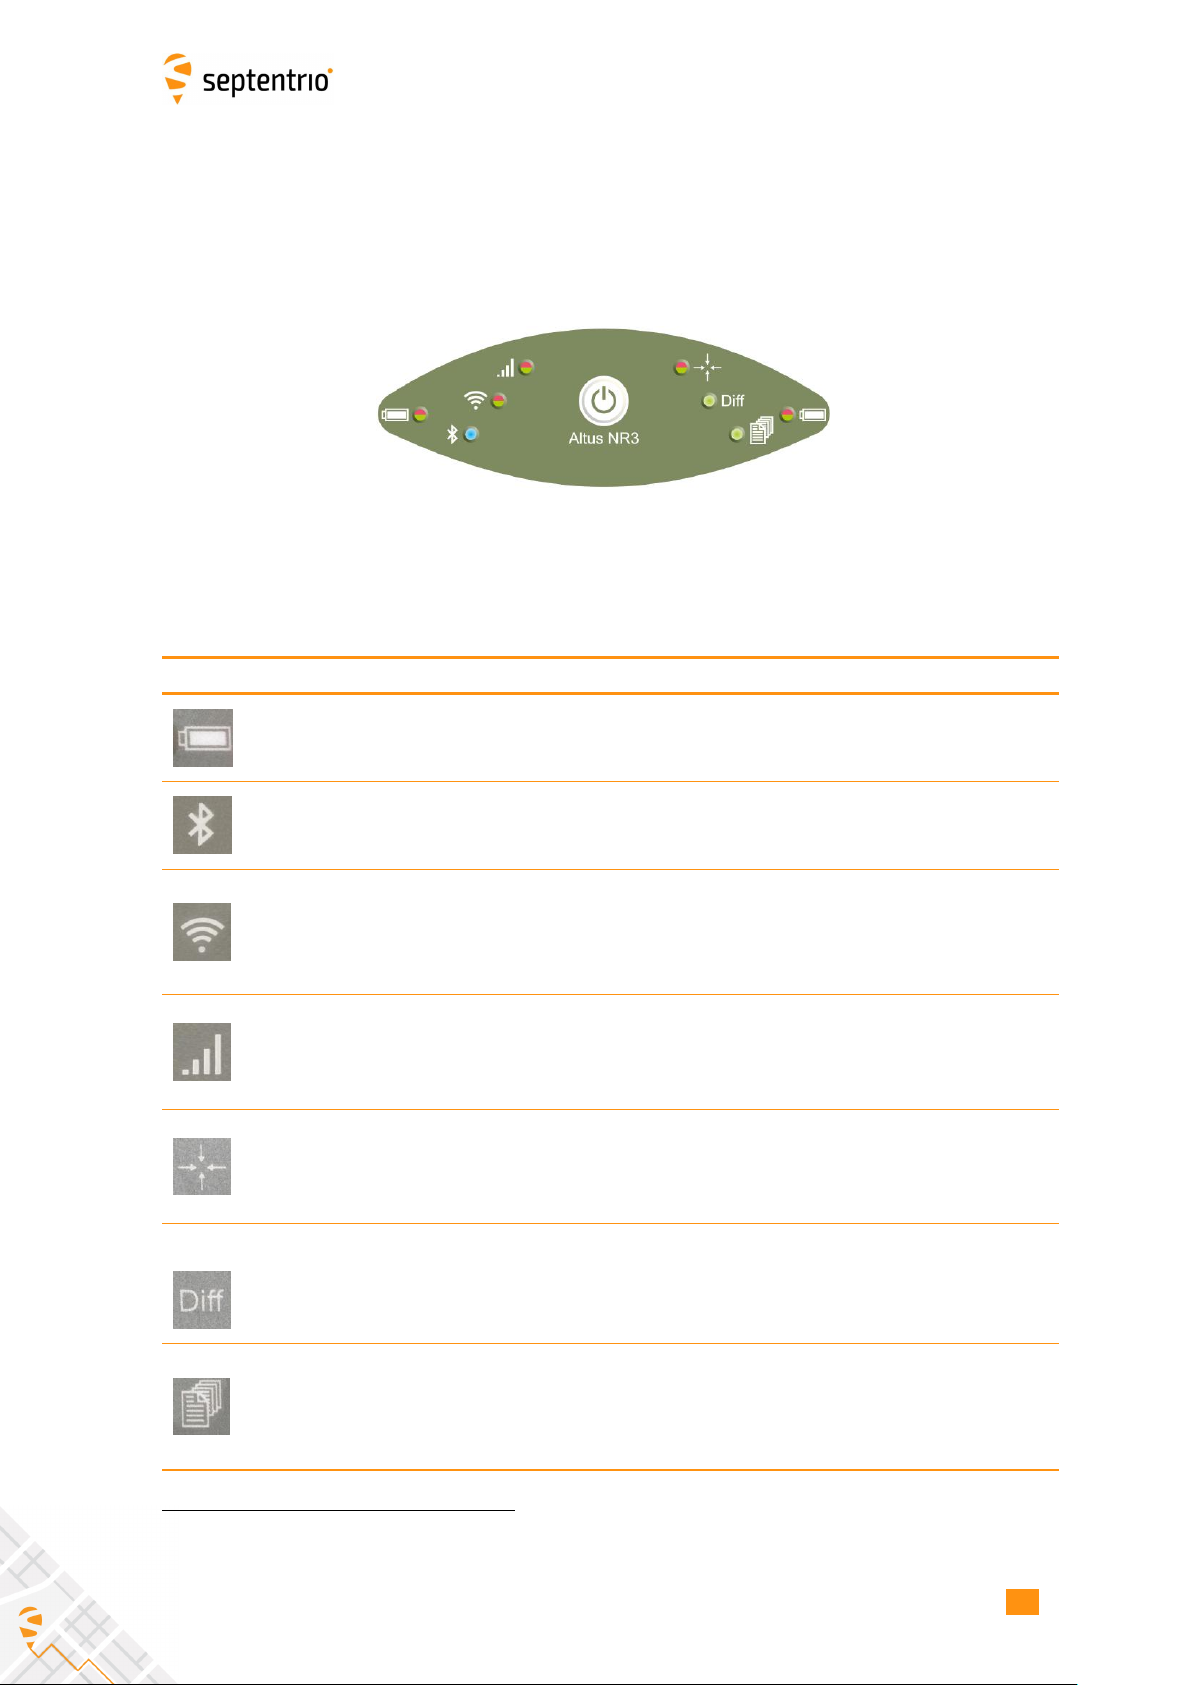
The Altus NR3 has an intuitive front panel with status LEDs and a central power button.
Figure 2-2: Altus NR3 Front Panel
The table below provides an overview of the LED indicators. A complete description of their
behaviour can be found in Section A.2.
Function Indication
Battery Power Level
Battery Power level (Green to Red)
solidly lit = battery is in use,
blinking = battery is not in use
Bluetooth status
Bluetooth is off(not lit),
Bluetooth is on and discoverable (blinking blue)1,
Bluetooth is connected to an external device (blue)
WiFi On/OffWiFi On (Green) or
Off(not lit)
Cellular Modem Status
The cellular modem is not in use (not lit),
connecting (orange),
connected (green) or
there is an error in the connection (red)
Position Mode
The reported position is RTK Fixed (green),
Stand alone (red),
any other mode (orange) or
no position can be calculated (not lit)
Differential Corrections
Differential Corrections are being received (Green) or
differential Corrections are not being received (not lit)
Data Logging Logging is disabled (not lit),
active (green)
1There may be many devices paired with the receiver but the LED will only be continuously ON when the
emulated serial port is open.
16


CHAPTER 2. ALTUS NR3 OVERVIEW
2.3.2 Location of Batteries and SIM card
•The Altus NR3 contains two battery bays. The positive contact for the batteries is that
nearest to the front label.
•The SIM card slot is located under the left battery bay and has a watertight cover.
•Only a micro SIM card will fit into the slot.
Figure 2-3: Underside of the Altus NR3 indicating the location of the SIM card slot
Closing the battery door
Figure 2-4: Closing the battery door
•Press firmly at the position indicated by the grey arrow to lock the battery door.
•The battery door is only latched after a firm click is heard.
18

CHAPTER 2. ALTUS NR3 OVERVIEW
2.3.3 Altus NR3 Connector
The Altus NR3 has one 9-Pin Lemo connection socket on its underside as shown in Figure 2-5.
When connected to the AC Adapter2, this will power the device and charge any batteries
that are inside. Connecting the USB cable allows for communication with the Altus NR3 and
transfer of logged data files.
Figure 2-5: Altus NR3 Port 1 Connection
2The AC Adapter is an optional item
19
CHAPTER 3. GETTING STARTED WITH THE ALTUS NR3
3 Getting started with the Altus NR3
3.1 What you will need
An Activated Micro SIM Card
•In some countries a PIN and PUK code are required to use the SIM card. If so, make
sure you have the codes at hand.
•To establish a data connection, an Access Point Name (APN), user name and password
are needed. If you do not have this information, you need to request it from the
telecom provider.
An active RTK (NTRIP or TCP/IP) service
•A subscription for a (NTRIP or TCP/IP) correction service or an Altus NR3 Base receiver
for getting corrections (not applicable for Altus NR3 M or Altus Base models)
Charged Batteries
•Make sure you have two charged batteries.
•Empty batteries may take three to four hours to charge.
An Altus NR3 Wall Charger
•As an alternative you can power the Altus NR3 using the wall charger when configuring
the Altus NR3.
A WiFi or USB connection to a phone, tablet or computer
•A WiFi enabled device can be used to configure the Altus NR3 using the Web Interface.
•Any device with a USB port can also be used to connect via the Web Interface and
configure the Altus NR3.
An ArcGIS Online subscription for the PinPoint-GIS
•Using Septentrio’s PinPoint-GIS Web you will be able to perform GIS data collection
which synchronizes directly with ArcGIS Online.
•For subscriptions to ArcGIS Online please visit https://www.arcgis.com
20
Other manuals for ALTUS NR3
2
Table of contents
Other SEPTENTRIO Network Router manuals


Popular Network Router manuals by other brands


Cisco
Cisco RV016 - Small Business - 10/100 VPN Router user guide

Sollae Systems
Sollae Systems CSE-H55N2 user manual

ratiotec
ratiotec CONNECT Box Pro instruction manual

Alcatel-Lucent
Alcatel-Lucent Service Aggregation Router 7705 manual

D-Link
D-Link xStack DGS-3200-10 user guide

Siemens
Siemens 4100 Series user guide