ServiceMaster 56113010 Operating instructions

7/11 revised 4/2016 FORM NO. 56091038 REV G
INFORMATION AND
OPERATING
INSTRUCTIONS
INFORMATION ET
DIRECTIVES
D’UTILISATION
MODEL: 5
6113010
A-English
B-Français
Owner’s Manual: 19630
Title: PEX 500-SM
Serial number:________________
ServiceMaster Clean
3839 Forest Hill Irene Road
Memphis, TN 38125
800-756-5656 Option 3
Date: November 2013
Revision: G
ServiceMaster® Manual
Copyright 2013 by
ServiceMaster Clean
All rights reserved

A-2 / ENGLISH
A-2 - FORM NO. 56091038 - PEX 500-SM
TABLE OF CONTENTS
Page
Introduction................................................................................... A-3
Parts and Service ........................................................................... A-3
Nameplate ...................................................................................... A-3
Uncrating the Machine.................................................................... A-3
Cautions and Warnings .................................................................. A-4
Grounding Instructions ................................................................... A-5
Know Your Machine.............................................................A-6 – A-7
Know Your Switch Plate.................................................................. A-8
Preparing the Machine for Use.................................................... A-9
Operating the Machine.................................................... A-10 – A-11
After Use
After Using the Machine ............................................................... A-12
Maintenance
Maintenance Schedule................................................................. A-12
Power Cord Maintenance............................................................. A-12
Troubleshooting............................................................................ A-13
Technical Specifications ............................................................... A-13
SECTION II – Parts List ..................................................................27
Decal System ..............................................................................28-29
Pallet System 500-1 ....................................................................30-31
Pallet System 500-2 ....................................................................32-33
Recovery System .............................................................................34
Solution System................................................................................35
Wiring Diagram............................................................................36-37
Options & Accessories...................................................................... 37
IMPROPER USE OF THE MACHINE WILL VOID THE WARRANTY
CAUTION: DO NOT OPERATE MACHINE UNTIL YOU HAVE READ
ALL SECTIONS OF THIS INSTRUCTION MANUAL

ENGLISH / A-3
FORM NO. 56091038 - PEX 500-SM - A-3
INTRODUCTION
This manual will help you get the most from your ServiceMaster™carpet extractor. Read it thoroughly before operating the machine.
This product is intended for commercial use only.
PARTS AND SERVICE
Repairs, when required, should be performed by your Authorized ServiceMaster Service Center, who employs factory trained service personnel, and
maintains an inventory of ServiceMaster original replacement parts and accessories.
Call the SERVICEMASTER DEALER named below for repairs or service. Please specify the Model and Serial Number when discussing your
machine.
MODIFICATIONS
Modifications and additions to the cleaning machine which affect capacity and safe operation shall not be performed by the customer or user without
prior written approval from the manufacturer. Unapproved modifications will void the machine warranty and make the customer liable for any resulting
accidents.
NAMEPLATE
The Model Number and Serial Number of your machine are shown on the Nameplate, located on the rear base of the machine. This information is
needed when ordering repair parts for the machine. Use the space below to note the Model Number and Serial Number of your machine for future
reference.
MODEL ________________________________________________
SERIAL NUMBER________________________________________
UNCRATING THE MACHINE
Carefully unpack and inspect your PEX 500-SM for shipping damage. Each machine is tested and inspected before shipping. Any shipping
damage incurred is the responsibility of the carrier. You should notify the carrier immediately if you notice damage to the box or to the machine or
parts.
WARNING!
The Products sold with this Manual contain or may contain chemicals that are known to certain governments (such as the State of
California, as identified in its Proposition 65 Regulatory Warning Law) to cause cancer, birth defects or other reproductive harm. In
certain locations (including the State of California) purchasers of these Products that place them in service at an employment job site
or a publicly accessible space are required by regulation to make certain notices, warnings or disclosures regarding the chemicals
that are or may be contained in the Products at or about such work sites. It is the purchaser’s responsibility to know the content
of, and to comply with, any laws and regulations relating to the use of these Products in such environments. The Manufacturer
disclaims any responsibility to advise purchasers of any specific requirements that may be applicable to the use of the Products in
such environments.
revised 7/12

A-4 / ENGLISH
A-4 - FORM NO. 56091038 - PEX 500-SM
IMPORTANT SAFETY INSTRUCTIONS
This machine is only suitable for commercial use, for example in hotels, schools, hospitals, factories, shops and offices
other than normal residential housekeeping purposes.
When using any electrical appliance, basic precautions should always be followed, including the following:
NOTE: Read all instructions before using this machine.
WARNING!
To reduce the risk of fire, electric shock, or injury:
•This machine is not intended for use by persons (including children) with reduced physical, sensory or mental capabilities, or lack
of experience and knowledge.
•Do not leave the machine unattended when it is plugged in. Unplug the unit from the outlet when; not in use, before cleaning the
machine, prior to servicing or performing any maintenance on the machine, and when replacing parts or converting the machine
to another function.
•To avoid electric shock, do not expose to rain or snow. Store and use machine indoors only, store in a heated location. Do not
let the machine or wand freeze.
•Do not allow to be used as a toy. Close attention is necessary when used near children.
• High pressure cleaners shall not be used by children or untrained personnel.
•Use only as described in this manual. Use only the manufacturer’s recommended attachments.
•Never add water over 130º F/54º C to the solution tank.
•Always use a defoamer when foaming occurs to prevent vacuum motor damage.
•Do not let the pump run dry.
•Do not use with damaged cord or plug. If the machine is not working as it should, has been dropped, damaged, left outdoors or
dropped into water, return it to a service center.
•Turn off all controls before unplugging.
•Do not pull by the cord, use the cord as a handle, close a door on the cord, or pull the cord around sharp edges or corners. Do
not run the machine over the cord. Keep the cord away from heated surfaces. To unplug, grasp the plug, not the cord.
•Do not handle the plug, the cord or the machine with wet hands.
•Extension cords must be 12/3 and no longer than 50 feet. Replace the cord or unplug immediately if the ground prong becomes
damaged.
•Connect to a properly grounded outlet only.
•Do not put any object into openings. Do not use with any opening blocked; keep free of dust, lint, hair, and anything that may
reduce air flow.
•Keep loose clothing, hair, fingers, and all parts of body away from openings and moving parts.
•Do not pick up anything that is burning or smoking, such as cigarettes, matches, or hot ashes, or any health endangering dusts.
Do not use to pick up flammable or combustible liquids such as gasoline or use in areas where they may be present.
• Risk of explosion – Do not spray flammable liquids.
•Use extra care when cleaning on stairs.
• Wear gloves or use rags when removing quick disconnects to prevent burns.
•Liquid ejected at the spray nozzle could be dangerous as a result of its temperature, pressure, or chemical content.
• High pressure jets can be dangerous if subject to misuse. The jet must not be directed at persons, live electrical equipment or
the machine itself.
• Do not use the machine within range of persons unless they wear protective clothing.
• Do not direct the jet against yourself or others in order to clean clothes or foot-wear.
• High pressure hoses, fittings and couplings are important for the safety of the machine. Use only hoses, fittings and couplings
recommended by the manufacturer.
• To ensure machine safety, use only original spare parts from the manufacturer or approved by the manufacturer.
• Water that has flown through backflow preventers is considered to be non-potable.
• Do not use the machine if a supply cord or important parts of the machine are damaged, e.g. safety devices, high pressure
hoses, trigger gun.
revised 7/12

ENGLISH / A-5
FORM NO. 56091038 - PEX 500-SM - A-5
120VAC GROUNDING INSTRUCTIONS
This appliance must be grounded. If it should electrically malfunction, grounding provides a path of least resistance for electric current to reduce
the risk of electric shock. This appliance is equipped with a cord having an equipment-grounding conductor and grounding plug. The plug must be
plugged into an appropriate outlet that is properly installed and grounded in accordance with all local codes and ordinances.
DANGER!
Improper connection of the equipment-grounding conductor can result in a risk of electric shock. Check with a qualified
electrician or service person if you are in doubt as to whether the outlet is properly grounded. Do not modify the plug
provided with the appliance. If it will not fit the outlet, have a proper outlet installed by a qualified electrician.
This appliance is for use on a nominal 120-volt circuit, and has a grounding plug that looks like the plug illustrated in Figure 1 below. A temporary
adapter illustrated in Figures 2 and 3 may be used to connect this plug to a 2-pole receptacle as shown in Figure 2 if a properly grounded outlet is
not available. The temporary adapter should be used only until a properly grounded outlet (Figure 1) can be installed by a qualified electrician. The
green-colored rigid ear, tab, or the like extending from the adapter must be connected to a permanent ground such as a properly grounded outlet box
cover. Whenever the adapter is used, it must be held in place by a metal screw. Grounding adapters are not approved for use in Canada.
Replace the plug if the grounding pin is damaged or broken.
The Green (or Green/Yellow) wire in the cord is the grounding wire. When replacing a plug, this wire must be attached to the grounding pin only.
Extension cords connected to this machine should be 12 gauge, three-wire cords with three-prong plugs and outlets. DO NOT use extension cords
more than 50 feet (15 m) long.
WARNING!
• If an extension cord is used, the plug and socket must be of watertight construction.
• Inadequate extension cords can be dangerous.
PLEASE NOTE: FOR NORTH AMERICA ONLY
Grounding Pin
Tab for Grounding Screw
Adapter
Adapter
Metal Screw
FIGURE 1 FIGURE 2 FIGURE 3
Grounded Outlet Box
Grounded Outlet
revised 11/13

A-6 / ENGLISH
A-6 - FORM NO. 56091038 - PEX 500-SM
KNOW YOUR MACHINE
1 Solution Hose Quick Disconnect
2 Solution Tank Fill Opening
3 Vacuum Hose Barb
4 Drain Hose
5 Handles
6 Roller Balls
7 Wheel
8 Castor
9 Solution Filter
10 Recovery Tank Shutoff Float

ENGLISH / A-7
FORM NO. 56091038 - PEX 500-SM - A-7
KNOW YOUR MACHINE (CONTINUED)
11 Recovery Tank Lid
12 Switch Plate
13 Wand Storage Clip
14 Pressure Adjustment Knob
15 Pressure Gauge
16 Pressure Relief Valve
17 Cord Retainer Straps (four)
18 Hour Meter (Optional)
19 Wand Retainer Bracket
20 Pigtail Power Cords
21 Hose Hangers (two)
11
12
15
20
14
21
19
17
13
16
18

A-8 / ENGLISH
A-8 - FORM NO. 56091038 - PEX 500-SM
KNOW YOUR SWITCH PLATE
A Solution Pump Switch - This switch turns the solution pump ON and OFF.
B Vacuum Switch - This switch turns the first of the two vacuum motors ON and OFF.
C Vacuum Switch - This switch turns the second of the two vacuum motors ON and OFF.
D Circuit Indicator - When this light is on, it indicates that the two cords are on a separate circuit.
CAUTION!
The circuit breaker in the wall panel can trip if both cords are on the same circuit.
E Heat Switch - This three position switch controls the water temperature. Position (I) is low temperature, Position (O) is OFF and Position (II) is
high temperature.
ABCDE

ENGLISH / A-9
FORM NO. 56091038 - PEX 500-SM - A-9
PREPARING THE MACHINE FOR USE
1Inspect the machine, hoses, and cleaning tools for cleanliness and completeness.
2Screw the Recovery Tank Lid (11) closed. Ensure the drain cap is closed tightly.
3Pre-spray spots and heavy traffic areas before extracting with the detergent of your choice. Mix the pre-spray according to the detergent
manufacturer’s directions.
4Fill the solution tank with clear water (12 gal. / 45.5 L capacity). If desired, add a detergent or rinse of your choice (we recommend a
CRI approved detergent). If you choose to add a detergent to the solution tank, be sure to mix well, and always follow the use & dilution
instructions on the detergent label. Only use a detergent with a pH between 5 and 10. Although this machine is designed to supply instant
hot water, the addition of warm water to the solution tank would increase heater efficiency. Never use water above 130º F/54º C in the
solution tank.
CAUTION!
Use low-sudsing, liquid detergents designed for carpet extraction.

A-10 / ENGLISH
A-10 - FORM NO. 56091038 - PEX 500-SM
OPERATING THE MACHINE
1Follow the instructions in the Preparing the Machine for Use section of this manual.
2Turn off all the switches. Plug the power cords into properly grounded outlets. Do not connect both cords to the same outlet; the green,
Circuit Indicator Light (D) on the switch plate should light up. If the indicator light does not come on, try different outlets until it does. “Do not
connect both cords to the same outlet.”
3Attach the priming hose to the machine and place the open end into the solution tank.
4Turn ON the solution pump (A) and let it run until the pump is fully primed (approximately 30 seconds to 1 minute). Once the pump is primed,
turn off the pump and remove the priming hose.
5Connect a solution line to the Solution Hose Quick Disconnect (1). Attach the other end of the solution line to the cleaning tool.
NOTE: If there is pressure built up in the solution lines, it may be difficult to connect a solution line to the Quick Disconnect (1). If this is the case
place the Pump Switch (A) into the OFF (O) position. Momentarily turn the Pressure Relief Valve (16) from the green “checkmark” position to
the red “X” position and back again to the green “checkmark” position, this will relieve the pressure to allow a solution line to be connected to
the quick disconnect port.
CAUTION!
Always operate the machine with the Pressure Relief Valve set to the Green “checkmark” position to avoid possible damage.
6Connect a vacuum hose to the Vacuum Hose Barb (3). Attach the other end of the vacuum hose to the cleaning tool.
7To use heated water for cleaning, press the Heat Switch (E) into either the Low Temperature position (I) or the High Temperature position (II).
Wait two minutes for the heat exchanger to reach temperature.
8Press the Pump Switch (A) to ON (I).
9Press the Vacuum Switches (B &C) to ON (I). The machine can be used with only one vacuum motor running for less suction i.e. cleaning
upholstery.
10 Spray through your tool a few times to fill the lines with solution. Begin cleaning.
11 To adjust the solution spray pressure; rotate the Pressure Adjustment Knob (14) clockwise to increase pressure and counterclockwise to
decrease pressure. The pump spraying pressure will be observable at the Pressure Gauge (15) while spraying. Make sure the cleaning tool is
spraying when adjusting the pressure, otherwise the pressure reading will be inaccurate.
12 Watch the fluid entering the Recovery Tank Lid (11). If there is a large amount of suds in the recovery tank, add a defoamer chemical to the
recovery tank.
CAUTION!
• Empty the recovery tank before the fluid or foam enters the vacuum motor.
• If foam or liquid escapes from the machine, switch off immediately.
CAUTION!
Always make sure the float is clean and travels freely before turning on the machine. A float that is stuck will cause the
vacuum motor to suck in water, resulting in vac motor damage.
13 The recovery tank has a Recovery Tank Shutoff Float (10) to block the vacuum system when the recovery tank is full. You can tell when the
float closes by the sudden change in the sound of the vacuum motor. When the float closes, the recovery tank must be emptied. The machine
can continue to dispense solution, but will not pick up water with the float closed.
14 Monitor the water level in the solution tank. Do not let the pump run dry. When the solution tank gets low, turn off the pump and the vacuum
motor(s), refill the solution tank with water and the proper ratio of cleaning detergent. Empty the recovery tank and continue cleaning.
15 When the operator has completed the job; vacuum all unused solution from the solution tank into the recovery tank, turn off the pump, vacuum
motor(s) and heat exchanger. Unplug the machine.
16 Push the machine to a designated waste water “DISPOSAL SITE” and empty the recovery tank. To empty, loosen the Velcro strap retaining the
Recovery Tank Drain Hose (4) into its side storage location, then remove the plug (hold the end of the hose above the water level in the tank to
avoid sudden, uncontrolled flow of waste water).
17 Follow the instructions in the After Using the Machine section of this manual.

ENGLISH / A-11
FORM NO. 56091038 - PEX 500-SM - A-11
OPERATING THE MACHINE
15
ABCDE
14
4
1
3
11
10
16

A-12 / ENGLISH
A-12 - FORM NO. 56091038 - PEX 500-SM
AFTER USING THE MACHINE
1To empty the solution tank, open Solution Tank Fill Opening (2) and vacuum out all unused solution into the recovery tank using the vacuum
hose. Rinse the tank with clean water.
2Turn all the Power Switches (A, B, C & E) to OFF (O). Unplug the Power Cords (20). Coil the cords and secure them to the rear of the machine
using the four Cord Retainer Straps (17).
3To empty the recovery tank, loosen the Velcro strap retaining the Recovery Tank Drain Hose (4) into its side storage location. Direct the hose to
a designated waste water “DISPOSAL SITE” and remove the plug (hold the end of the hose above the water level in the tank to avoid sudden,
uncontrolled flow of waste water). Rinse the tank with clean water. Inspect the drain hose; replace if kinked or damaged.
4Disconnect the solution and vacuum hoses from the machine, at the Solution Hose Quick Disconnect (1) and Vacuum Hose Barb (3) respectively.
Flush the vacuum hose with warm water to wash any debris out of the vacuum hose and cleaning tool. Inspect them for damage. Fold down
the Hose Hangers (21) and the hoses can be wrapped around the machine for storage. Set the wand on the Wand Retainer Bracket (19) and
secure to the back of the machine at the Wand Storage Clip (13).
5Wipe the machine with a damp cloth. Do not use abrasive chemicals or solvents.
6Perform any required maintenance before storage.
MAINTENANCE SCHEDULE
MAINTENANCE ITEM Daily Weekly Yearly
Check / Clean Tanks & Hoses •
Check / Clean Recovery Tank Shut-Off Float •
Clean Extraction Wand/Tool •
Inspect & Clean Solution Filter •
*Check Carbon Brushes •
* Have a ServiceMaster service technician check the vacuum motor carbon brushes once a year or after 300 operating hours. Check the pump motor
carbon brushes every 500 hours or once a year.
IMPORTANT!
Motor damage resulting from failure to service the carbon brushes is not covered under warranty. See the Limited Warranty
Statement.
7Store the machine indoors in a clean, dry place with the recovery tank lid open. Keep from freezing.
POWER CORD MAINTENANCE
Once a week (or more often if necessary), check the power cords for cracked or damaged insulation, exposed wires in the cord or plug, and damaged
or missing ground pin. Repair or replace damaged cord or plug immediately.

ENGLISH / A-13
FORM NO. 56091038 - PEX 500-SM - A-13
TROUBLESHOOTING:
IF THIS OCCURS CHECK THIS
NO SPRAY
Solution tank is empty, or filter is plugged.
Clogged spray tip(s).
Pump not running or not primed.
Valve on wand not operating.
Solution hose not completely connected to hose or to machine.
LOW PUMP PRESSURE Check to see that the pressure relief valve is fully seated in the green checkmark “operating” position
(500 models only).
PUMP DOES NOT RUN
This pump motor runs on AC voltage, so it should start running as soon as you turn on the switch. If the
pump motor does not start running, check the wiring to the switch and to the motor. Check the switch to
see if it is “open”.
LOW SUCTION
Debris is plugging cleaning tool or vacuum hose.
Drain hose cap is not completely closed.
Recovery tank lid is not seated or gasket is damaged.
NO SUCTION
Ball in the float is blocking air flow. Turn off the vacuum so the ball will drop down, or the recovery tank
is full and needs to be emptied.
No power to motor(s).
Test the switches.
Test the vacuum motors.
LOW HEAT
Spraying too long. Try spraying for 12-15 seconds, or about three strokes.
Heat exchanger needs to be flushed.
Wrong tool being used. Too much water passing through. Longer hose or larger diameter hose, than
standard.
NO HEAT
Heat is not turned on. The green circuit indicator light must be on.
No power in the wall outlet - check to see if the breaker has tripped.
Call your distributor for additional help.
TECHNICAL SPECIFICATIONS (as installed and tested on the unit)
Model PEX™500
Model No. 56113010
Voltage/frequency 120 V / 60 Hz
Rated Current 15 Amp
Protection Class (electrical) Class 1
Sound Pressure Level
(IEC 60704-2-1)
68.7 dB LpA, 3 dB
KpA
Total Weight 110 lbs. (49.8 kg)
Solution Tank Capacity 12 gal (45.5 L)
Recovery Tank Capacity 10 gal (37.8 L)

B-2 / FRANÇAIS
B-2 - FORM NO. 56091038 - PEX 500-SM
TABLE DES MATIÈRES
Page
Introduction................................................................................... B-3
Pièces et service après-vente ........................................................ B-3
Plaque d’identification..................................................................... B-3
Déballage de la machine................................................................ B-3
Consignes de prudence et de sécurité........................................... B-4
Instructions de mise à la terre ........................................................ B-5
Apprenez à connaître votre machine............................... B-6 — B-7
Apprenez à connaître votre plaque d’interrupteurs ........................ B-8
Préparation de la machine........................................................... B-9
Fonctionnement de la machine...................................... B-10 – B-11
Après utilisation
Après utilisation de la machine..................................................... B-12
Maintenance
Calendrier d’entretien ................................................................... B-12
Maintenance du cordon d’alimentation......................................... B-12
Dépannage................................................................................... B-13
Spécifications techniques............................................................. B-13
SECTION II - Liste de pièces..........................................................27
UNE UTILISATION INCORRECTE DE LA MACHINE ANNULERA LA GARANTIE
ATTENTION : N’UTILISEZ PAS LA MACHINE AVANT D’AVOIR LU
TOUTES LES SECTIONS DU PRÉSENT MANUEL

FRANÇAIS / B-3
FORM NO. 56091038 - PEX 500-SM - B-3
INTRODUCTION
Ce mode d’emploi vous permettra d’exploiter au maximum les fonctionnalités de votre extracteur ServiceMaster ™. Lisez-le donc attentivement
avant d’utiliser votre machine.
Ce produit est uniquement destiné à un usage commercial.
PIECES ET SERVICE APRES-VENTE
Si nécessaire, les réparations doivent être effectuées par votre centre de service ServiceMaster agréé. Ce dernier emploie du personnel formé en
usine et maintient un inventaire des pièces de rechange et des accessoires originaux ServiceMaster.
Pour tout entretien ou réparation, contactez le REVENDEUR SERVICEMASTER mentionné ci-dessous. Veuillez spécifier le modèle et le numéro
de série de votre machine dans toute communication sur votre machine.
ALTÉRATIONS
Les altérations et ajouts d’éléments à la machine de lavage, qui affectent ses capacités et son fonctionnement sécurisé, ne doivent pas être réalisés
sans le consentement préalable et écrit du fabricant. Toute altération non approuvée annulera la garantie de la machine. En outre, le client sera
entièrement responsable des accidents associés.
PLAQUE D’IDENTIFICATION
Le modèle et le numéro de série de votre machine figurent sur la plaque d’identification située derrière, à la base de la machine. Ces informations
sont nécessaires lors de la commande de pièces détachées pour votre machine. Utilisez l’espace ci-dessous pour consigner ces renseignements
en vue d’une utilisation ultérieure.
MODELE
NUMERO DE SERIE
DEBALLAGE DE LA MACHINE
Déballer et inspecter soigneusement votre PEX 500-SM pour vérifier si elle a été endommagée durant l’expédition. Chaque machine est essayée et
inspectée avant son expédition. Le transporteur est responsable de tout dommage arrivé lors du l’expédition. Vous devez le signaler au transporteur
si vous constatez des dommages à la boîte ou à la machine ou aux pièces.
AVERTISSEMENT !
Les Produits vendus avec le présent manuel contiennent ou peuvent contenir des produits chimiques reconnus par certains gouvernements
(comme l’État de Californie, par le biais de la proposition de loi d’avertissement réglementaire 65) comme provoquant des cancers, des anomalies
congénitales et autres dangers pour la reproduction. Dans certains endroits (comme l’État de Californie), les acheteurs de ces Produits, qui les
utilisent sur un lieu de travail ou dans un espace public, ont l’obligation d’apposer certains avis, avertissements ou informations concernant les
produits chimiques qui sont ou peuvent être contenus dans les Produits dans ces lieux ou aux alentours de ces lieux de travail. Il incombe à
l’acheteur de connaître les dispositions de, et de respecter, toutes les lois et réglementations ayant attrait à l’utilisation de ces Produits au sein
de tels environnements. Le Fabricant rejette toute responsabilité d’informer les acheteurs concernant des exigences spécifiques qui peuvent
s’appliquer à l’utilisation des Produits dans de tels environnements.
revised 7/12

B-4 / FRANÇAIS
B-4 - FORM NO. 56091038 - PEX 500-SM
CONSIGNES DE SECURITE IMPORTANTES
Cette machine est conçue uniquement pour une utilisation commerciale, comme dans des hôtels, des écoles, des
hôpitaux, des usines, des magasins et des bureaux, tout ce qui ne concerne pas les travaux ménagers.
Lorsque vous utilisez un appareil électrique, certaines règles de base doivent toujours être observées, notamment celles
énoncées ci-après :
Lire toutes les instructions avant d’utiliser l’appareil.
ATTENTION!
Afin de réduire les risques d’incendie, de décharge électrique ou de blessure :
•L’utilisation de cette machine n’est pas destinée aux personnes (notamment les enfants) qui souffrent de capacités physiques,
sensorielles ou mentales diminuées, ou d’un manque d’expérience et de connaissances.
•Ne laissez pas la machine sans surveillance quand elle est branchée. Débranchez l’unité de la prise murale quand elle n’est pas
utilisée, avant un nettoyage de la machine, avant un entretien ou une maintenance de la machine, et avant le remplacement
d’une pièce ou la transformation de la machine pour une autre tâche.
•Afin d’éviter tout risque de choc électrique, n’exposez pas la machine à la pluie ou à la neige. Rangez et utilisez cette machine
uniquement à l’intérieur, dans un endroit chauffé. Ne laissez pas la machine ou la lance geler.
•Cet appareil ne doit pas être utilisé comme un jouet. Faites très attention lorsque l’appareil est utilisé à proximité d’enfants.
• Les nettoyeurs à haute pression ne doivent pas être utilisés par des enfants ou des personnes non qualifiées.
•Utilisez cet appareil uniquement comme décrit dans le présent manuel. Utilisez uniquement les accessoires recommandés par le
fabricant.
•N’ajoutez jamais une eau à plus de 54°C dans le réservoir de solution.
• Utilisez toujours un agent anti-mousse en cas de moussage pour éviter d’endommager le moteur.
• Ne laissez pas la pompe tourner à vide.
•N’utilisez pas l’appareil si le cordon ou la prise sont endommagés. Si la machine ne fonctionne pas correctement, si elle est
tombée, endommagée, restée à l’extérieur, voire même lâchée dans l’eau, renvoyez-la dans un centre de service.
•Coupez toutes les commandes avant de débrancher l’appareil.
•Ne tirez pas l’appareil par le cordon électrique. N’utilisez pas non plus le cordon comme une poignée et ne l’enroulez pas autour
d’objets pointus ou tranchants. Évitez également de refermer une porte sur le cordon. Évitez de faire rouler la machine sur le
cordon. Le cordon doit rester loin de toute surface chauffée. Pour débrancher la machine, saisissez la prise et non le cordon.
•Ne manipulez pas la prise, le cordon ou la machine avec les mains humides.
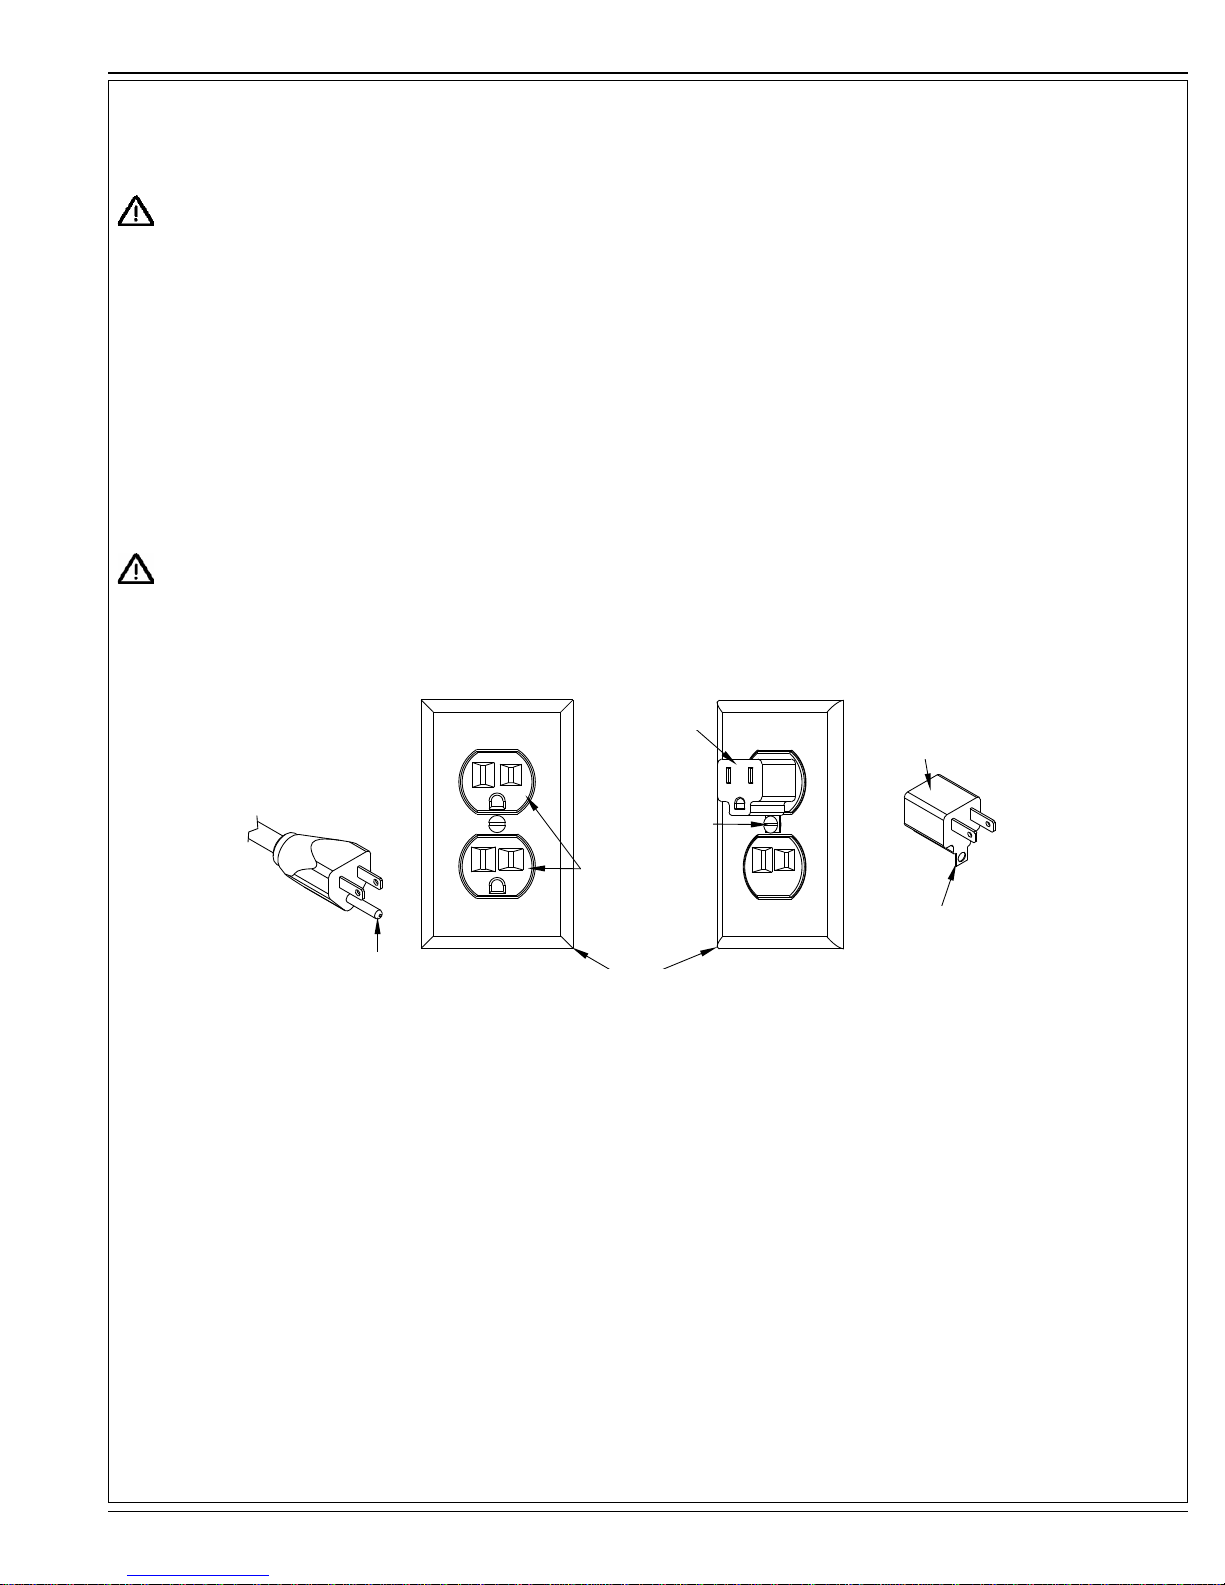
•La longueur des rallonges doit être de 1 à 15 m maximum. Remplacez ou débranchez immédiatement le cordon si le conducteur
de terre est endommagé.
•Branchez uniquement l’appareil à une prise correctement mise à la terre.
•N’introduisez aucun objet dans les orifices de l’appareil. N’utilisez pas l’appareil si l’un de ses orifices est bloqué. Conservez à
l’abri des poussières, cheveux, peluches, etc., qui risquent de réduire le débit d’air.
•Évitez que des cheveux, doigts ou vêtements amples ne soient entraînés dans les parties mobiles de la machine ou pris dans
une de ses ouvertures.
•N’aspirez aucun objet brûlant ou fumant, tel que des cigarettes, des allumettes, des cendres chaudes, ni aucune poussière
nuisible à la santé. N’utilisez pas la machine pour ramasser des liquides inflammables ou combustibles, tels que de l’essence,
ou à proximité de telles substances.
• Risque d’explosion – Ne pulvérisez pas des liquides inflammables.
•Faire très attention en nettoyant des escaliers.
• Pour éviter des brûlures, portez des gants ou utilisez des chiffons pour desserrer les raccords rapides.
•Tout liquide éjecté du gicleur peut être dangereux en raison de sa température, de sa pression ou de sa nature chimique.
• Les jets à haute pression peuvent être dangereux s’ils sont mal utilisés. Le jet ne doit pas être dirigé vers une personne, un
équipement électrique actif ou la machine elle-même.
• N’utilisez pas la machine à proximité de personnes sauf si ces dernières portent des vêtements de protection.
• Ne dirigez pas le jet vers d’autres personnes ou vous-même afin de nettoyer des vêtements ou des chaussures.
• Les tuyaux, raccords et accouplements à haute pression sont importants pour la sécurité de la machine. Utilisez uniquement des
tuyaux, raccords et accouplements recommandés par le fabricant.
• Pour assurer la sécurité de la machine, utilisez uniquement des pièces de rechange d’origine ou approuvées par le fabricant.
• L’eau qui a traversé des disconnecteurs hydrauliques est considérée comme non potable.
• N’utilisez pas la machine si un cordon électrique ou des pièces importantes sont endommagés, ex. dispositifs de sécurité, tuyaux
à haute pression, pistolet à gâchette, etc.
revised 7/12

FRANÇAIS / B-5
FORM NO. 56091038 - PEX 500-SM - B-5
INSTRUCTIONS VISANT LA MISE À LA TERRE (120VAC)
Cet appareil doit être mis à la terre. En cas de défaillance ou de panne éventuelles, la mise a la terre fournit au courant un chemin de moindre
résistance qui réduit le risque de choc électrique. Cet appareil est pourvu d’un cordon muni d’un conducteur de terre et d’une fiche avec broche de
terre. La fiche doit être branchée dans une prise appropriee correctement installée et mise à la terre conformément aux règlements et ordonnances
municipaux.
AVERTISSEMENT!
Un conducteur de terre mal raccordé peut entraîner un risque de choc électrique. Consulter un électricien ou un technicien
d’entretien qualifié si vous n’êtes pas certain que la prise est correctement mise à la terre. Ne pas modifier la fiche fournie
avec l’appareil - si elle ne peut être insérée dans la prise, faire installer une prise adéquate par un électricien qualifié.
Cet appareil est destiné à un circuit de 120 V et est muni d’une fiche de terre semblable à celle illustrée par le croquis 1. Un adaptateur temporaire
semblable à celui illustré par le croquis 2 et C peut être utilisé pour brancher cette fiche à une prise bipolaire comme l’illustre le croquis 2 si une
prise avec mise à la terre n’est pas disponible. L’adaptateur temporaire devrait etre utilisé seulement jusqu’à ce qu’une prise avec mise à la terre soit
installée par un électricien qualifié. L’oreille rigide ou le crochet ou autre dispositif semblable, de couleur verte, prolongeant l’adaptateur doit Iêtre
raccordé à un élément correctement mis à la terre comme le couvercle d’une boîte de sortie mise à la terre. L’adaptateur doit être fixé par une vis
métallique. Note: Au Canada, I’utilisation d’un adaptateur temporaire n’est pas autorisée par le Code canadien de l’électricité.
Remplacez la prise si la prise de terre est abîmée ou cassée.
Le fil Vert (ou Vert/Jaune) dans la ganse est le fil de terre. Lors du remplacement d´une prise, ce fil doit être raccordé à la prise de terre uniquement.
Les ralonges connectées à cette machine doivent avoir 12 mesures, trois ganses de fil ayant trois fiches masculines féminines tree-prong plugs
and outlets. N´UTILISEZ PAS de ralonge de plus de 15 m (50 pieds) de long.
AVERTISSEMENT !
• Si une rallonge est utilisée, la prise de la rallonge et la prise murale doivent être étanches.
• Des rallonges électriques inappropriées peuvent être dangereuses.
VEUILLEZ NOTER: CES INSTRUCTIONS CONCERNENT UNIQUEMENT L’AMÉRIQUE DU NORD
Borne de Terre
Adaptateur
Adaptateur
Vis Metallique
FIGURE 1 FIGURE 2 FIGURE 3
Socle de Prise
de Terre
Patte Pour Vis de
Mise a la Terre
Prise de Terre
revised 11/13

B-6 / FRANÇAIS
B-6 - FORM NO. 56091038 - PEX 500-SM
APPRENEZ À CONNAÎTRE VOTRE MACHINE
1 Raccord rapide du tuyau de solution
2 Goulot de remplissage du réservoir de solution
3 Raccord fileté du tuyau d’aspiration
4 Tuyau de vidange
5 Poignées
6 Billes roulantes
7 Roue
8 Roulette
9 Filtre de solution
10 Système de fermeture à flotteur du réservoir de récupération

FRANÇAIS / B-7
FORM NO. 56091038 - PEX 500-SM - B-7
APPRENEZ À CONNAÎTRE VOTRE MACHINE (SUITE)
11 Couvercle du réservoir de récupération
12 Plaque d’interrupteurs
13 Clip de rangement de la lance
14 Bouton de réglage de la pression
15 Manomètre
16 Clapet de décharge
17 Attaches de retenue des cordons (quatre)
18 Horomètre (optionnel)
19 Support de retenue de la lance
20 Cordons électriques
21 Supports de tuyau (deux)
11
12
15
20
14
21
19
17
13
16
18

B-8 / FRANÇAIS
B-8 - FORM NO. 56091038 - PEX 500-SM
APPRENEZ À CONNAÎTRE VOTRE PLAQUE D’INTERRUPTEURS
A Interrupteur de la pompe de solution – Cet interrupteur active et désactive la pompe de solution.
B Interrupteur d’aspiration – Cet interrupteur active et désactive le premier des deux moteurs d’aspiration.
C Interrupteur d’aspiration – Cet interrupteur active et désactive le second des deux moteurs d’aspiration.
D Indicateur de circuit – Quand ce voyant est allumé, il indique que les deux cordons sont branchés à des circuits séparés.
ATTENTION !
Le disjoncteur situé dans le mur peut se déclencher si les deux cordons sont sur le même circuit.
E Interrupteur de chaleur – Cet interrupteur à trois positions contrôle la température de l’eau. La position (I) correspond à la basse température,
la position (O) indique l’arrêt et la position (II) correspond à la haute température.
ABCDE
This manual suits for next models
1
Table of contents
Languages:
Other ServiceMaster Floor Machine manuals
Popular Floor Machine manuals by other brands

Amano
Amano Pioneer Eclipse PE420BU Operator's manual

SAINT-GOBAIN ABRASIVES
SAINT-GOBAIN ABRASIVES NORTON clipper CS 451 P14 Kohler operating instructions

FIORENTINI
FIORENTINI I32NEW user manual

Crescent
Crescent SC6500 Operator's manual

BETCO
BETCO Optima QT E12317-00 Operator's manual

BETCO
BETCO PB21-11 Operator's manual

Nilfisk-Advance
Nilfisk-Advance SR 1100 P/B Service manual

Tornado Karcher
Tornado Karcher EB 30/1 manual

Topfloor
Topfloor TF100R-TRS Operator's manual

Edic
Edic Polaris 1200 owner's manual

Superabrasive
Superabrasive LAVINA ELITE Series user manual

Jon-Don
Jon-Don PE500 Safety, operation and maintenance manual with parts list