SEVVA SMART PANEL HEATER User manual

SMART PANEL HEATER
Manual

DESCRIPTION
Always keep your bedroom, living room or outdoor toilet at the desired temperature with the Smart Panel Heater! For example, let it
start heating before you wake up, or stop heating when the sun goes down. Make heating as smart as you want with
self-programmed schedules.
CONTENTS
1 Smart Panel Heater
2 base
6 plug
8 M4*8mm screws
6 M4*35mm screws
1 remote control
4 mounting bracket
1 operating manual
USER MANUAL
1. INSTALL THE SMART LIFE APP
1. Download the Smart Life app for iOS or Android for free.
2. Open the Smart Life app and tap ‘Register’ or log in with an existing account.
3. Read the privacy policy and tap ‘Agree’ to continue.
4. Please enter your e-mail address to receive a verification code, which will be sent to the e-mail address provided.
5. Enter the verification code to proceed to the next screen.
6. Choose a secure password and tap the button to complete your registration.
7. Go to ‘Account’ and tap ‘Family management’ to set up your smart home. Enter a name for your smart home and select which
rooms you want to add.
8. Tap ‘Done’ to complete the installation.
2. ADD THE SMART PANEL HEATER TO THE APP
The Smart Panel Heater can be added in two different ways:
a) By scanning the QR code
b) Manually
A) Scanning the Qr Code
1. Switch on the Smart Panel Heater.
2. Make sure your smartphone is connected to your Wi-Fi network*.
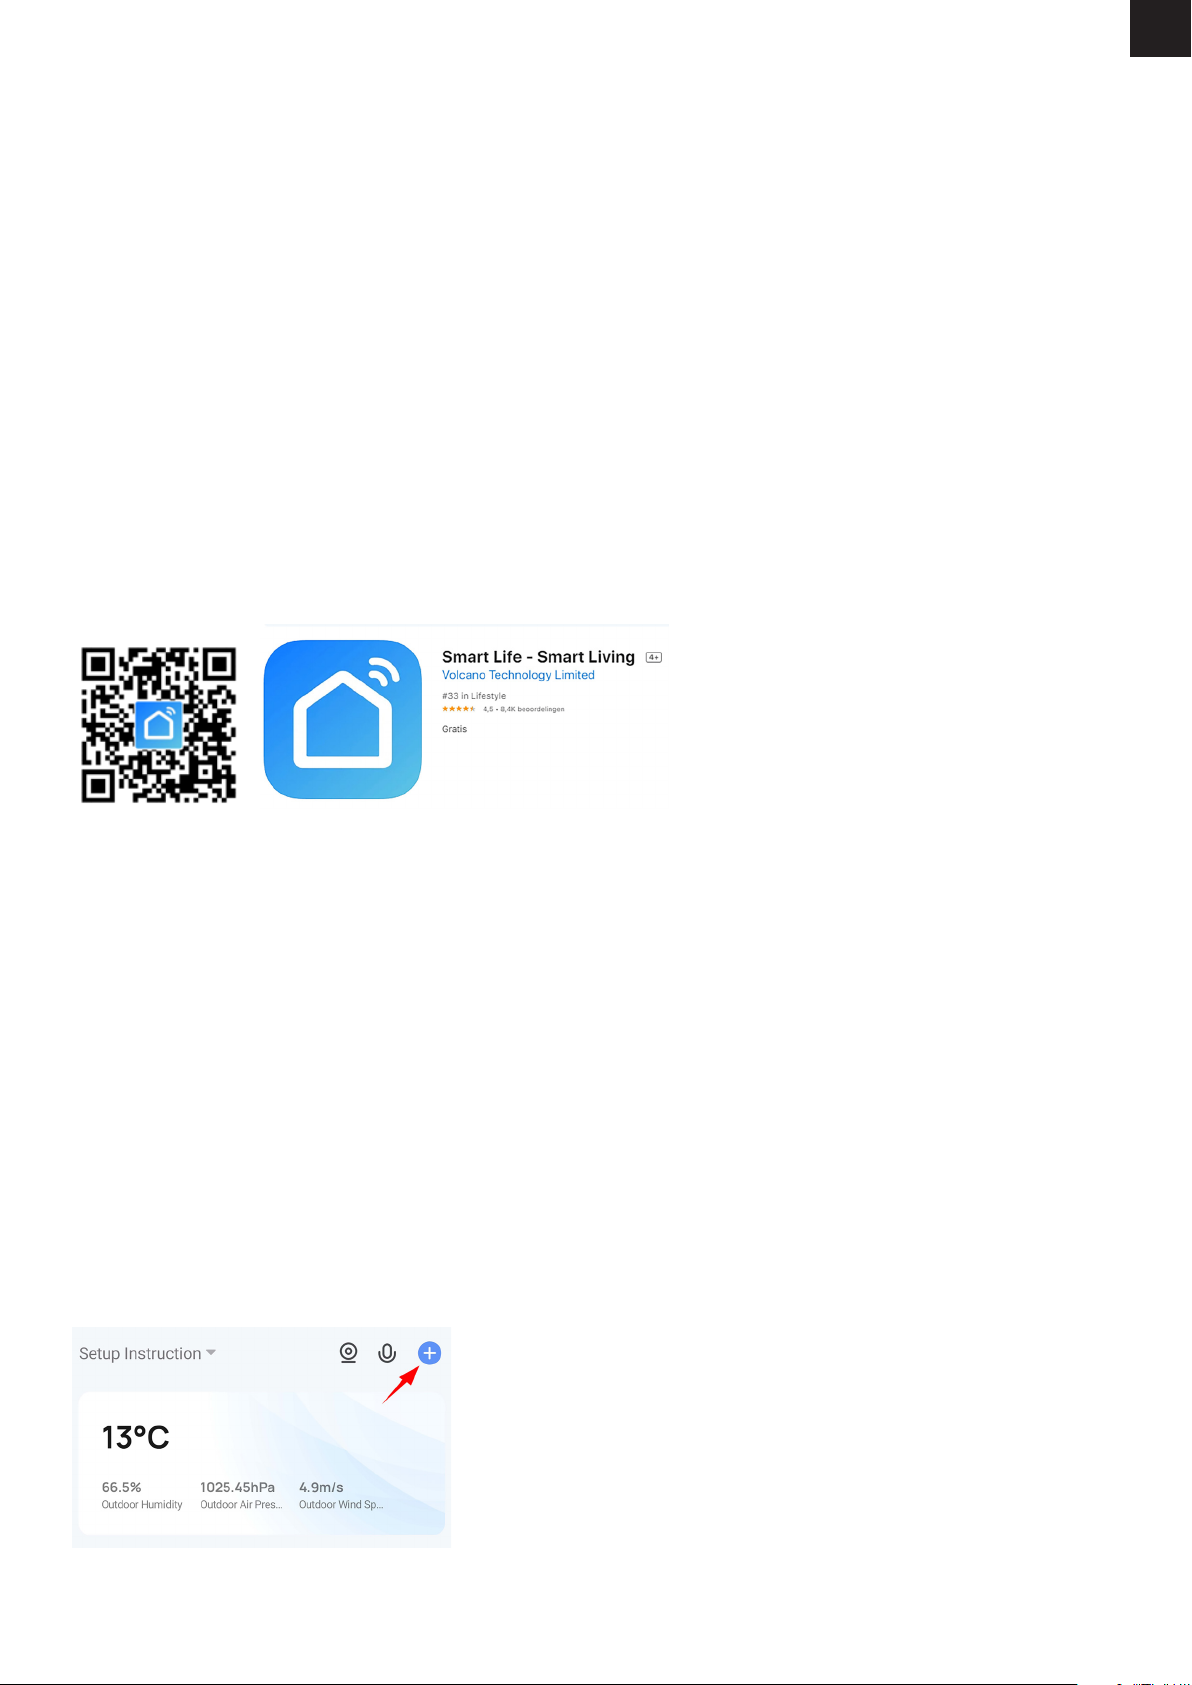
3. Open the Smart Life app and tap ‘+’ to select the device you want to add.
4. Open the Smart Life app and press the plus sign in the top right of the main screen to add a device:
TECHNICAL SPECIFICATIONS
Power
Power supply
Frequentie
Nominal heat prod.
Dimensions
Net weight
2000W
210240V
50~60Hz
2 kW
78 47 cm
8 kg
1. Install the Smart Life app
2. Add the Smart Panel Heater to the app
3. Install the Smart Panel Heater
4. The control panel
5. Using smart functions
6. Problems and solutions
EN

5. And then press the square with the dash in it on the top right:
6. Your phone’s camera will open, then scan the following qr code with your phone to add the Smart Panel Heater:
7. Follow the steps in the app to complete the installation.
8. If the Panel Heater does not flash quickly, reset it by putting it in standby mode and pressing the power button for 5 seconds.
B) Manually adding the Smart Panel Heater
1. Switch on the Smart Panel Heater.
2. Make sure your smartphone is connected to your Wi-Fi network.
3. Open the Smart Life app and tap ‘+’ to select the device you want to add.
4. Select “small household appliances”.
5. Select “heating (wifi)”.
6. Follow the steps in the app to complete the installation.
3. INSTALL THE SMART PANEL HEATER
Before installation, check that all parts are complete and the product is intact.
The Smart Panel Heater can be installed free-standing or on the wall.
Freestanding installation
If you want to use the electric heater as a free-standing unit, mount it with the feet provided and follow the instructions below.
Ensure that the heater is mounted on a flat, stable and clean surface.
1. Turn the product upside down on a soft cotton cloth or carpet to avoid damage.
2. Attach the feet to the bottom of the heating element with the screws provided. Align the holes in the foot with the holes in the feet,
insert the screws through the holes and tighten them with a screwdriver.
Installation on the wall
1. Take 4 brackets, 6 plugs and 6 screws from the box, and attach 2 brackets to the wall according to the distances between the
holes of the bracket, as shown in the illustration below. Use the included measuring template to easily drill the holes in the right
position
EN
EN
2. Attach 2 brackets to the bottom of the product, as shown in the picture below.
3. Hold the side of the Smart Panel Heater, look at the position of the wall slot of the back cover, and slide the wall to the top of the
slot.
Note: Before drilling, make sure that there are no cables or other pipes on or in the wall in order to prevent damage. Remember that
the screws must be firmly and securely seated in the wall to ensure safe installation of the electric heater on the wall. Observe the
safe distance below.
During installation, ensure that the heating element is placed at a safe distance from flammable materials, gas and water.
When installed on the wall, the installation height must be more than 15 cm from the ground and at least 50 cm from the ceiling.
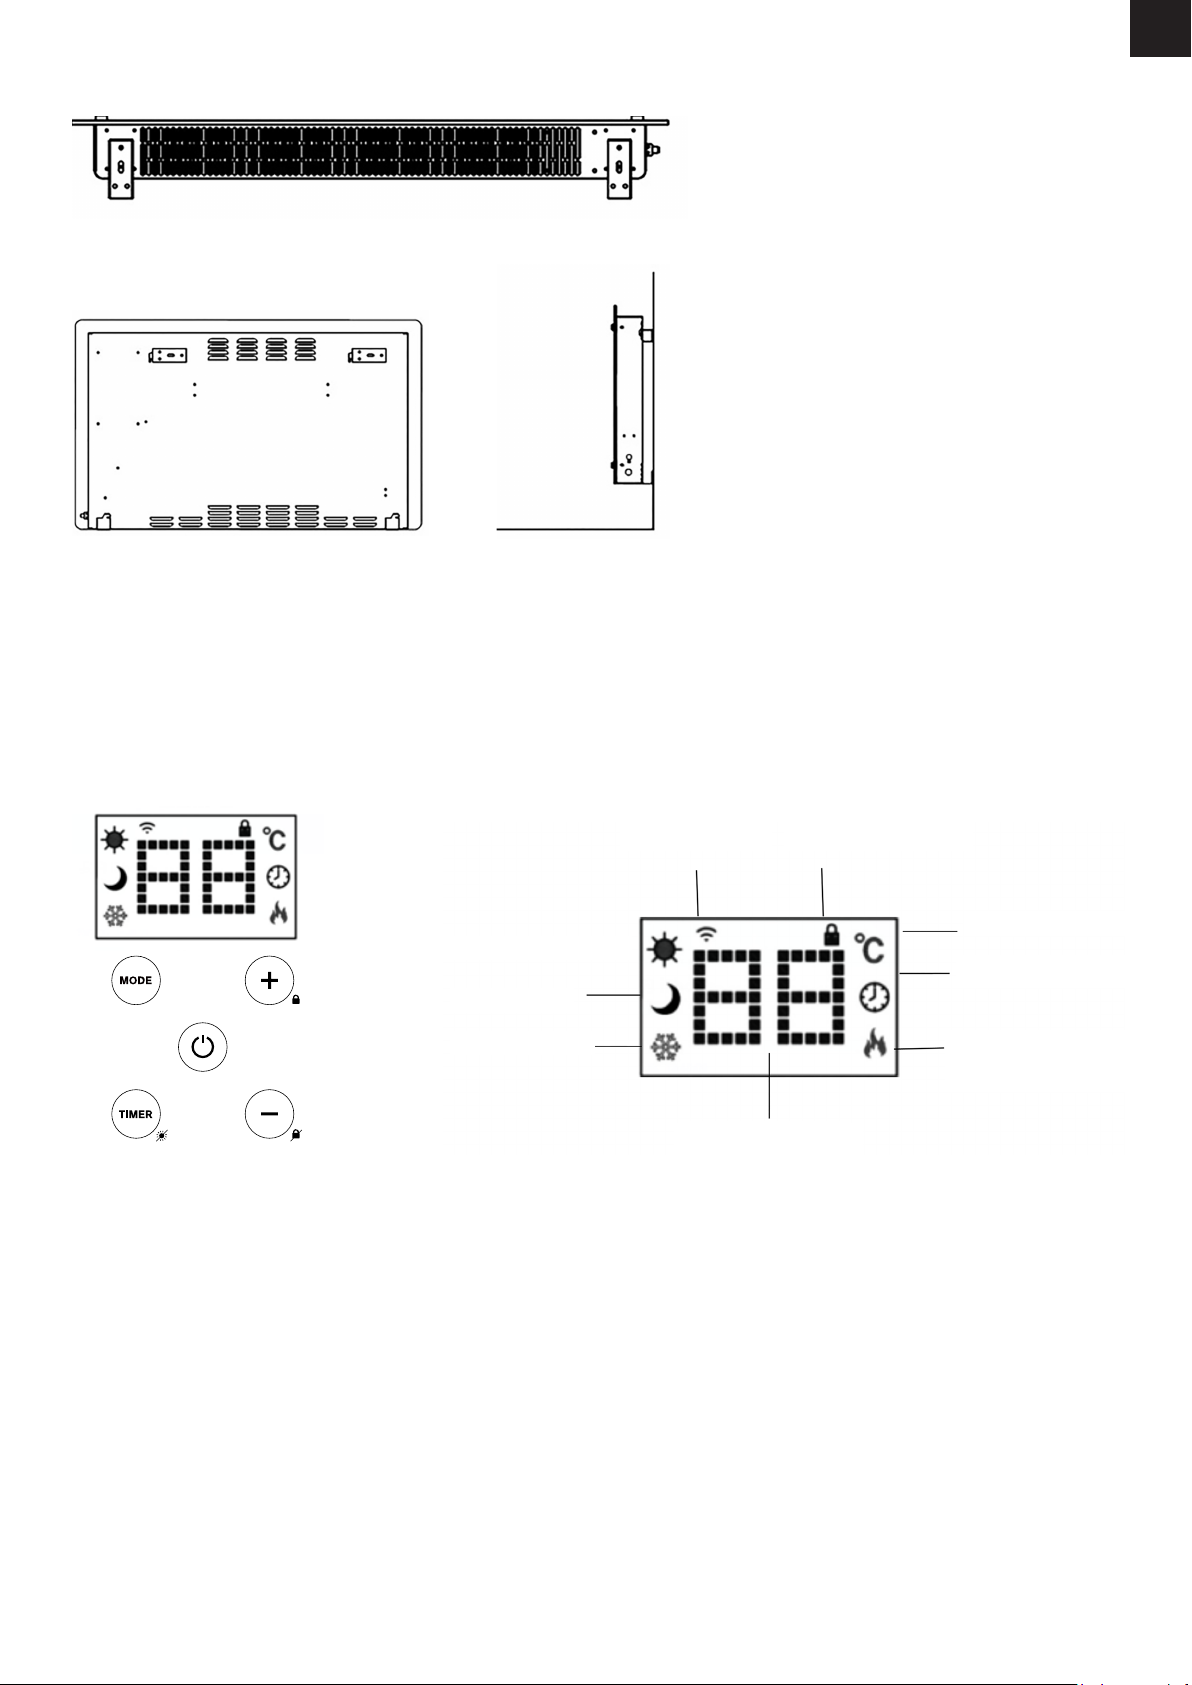
4.THE CONTROL PANEL
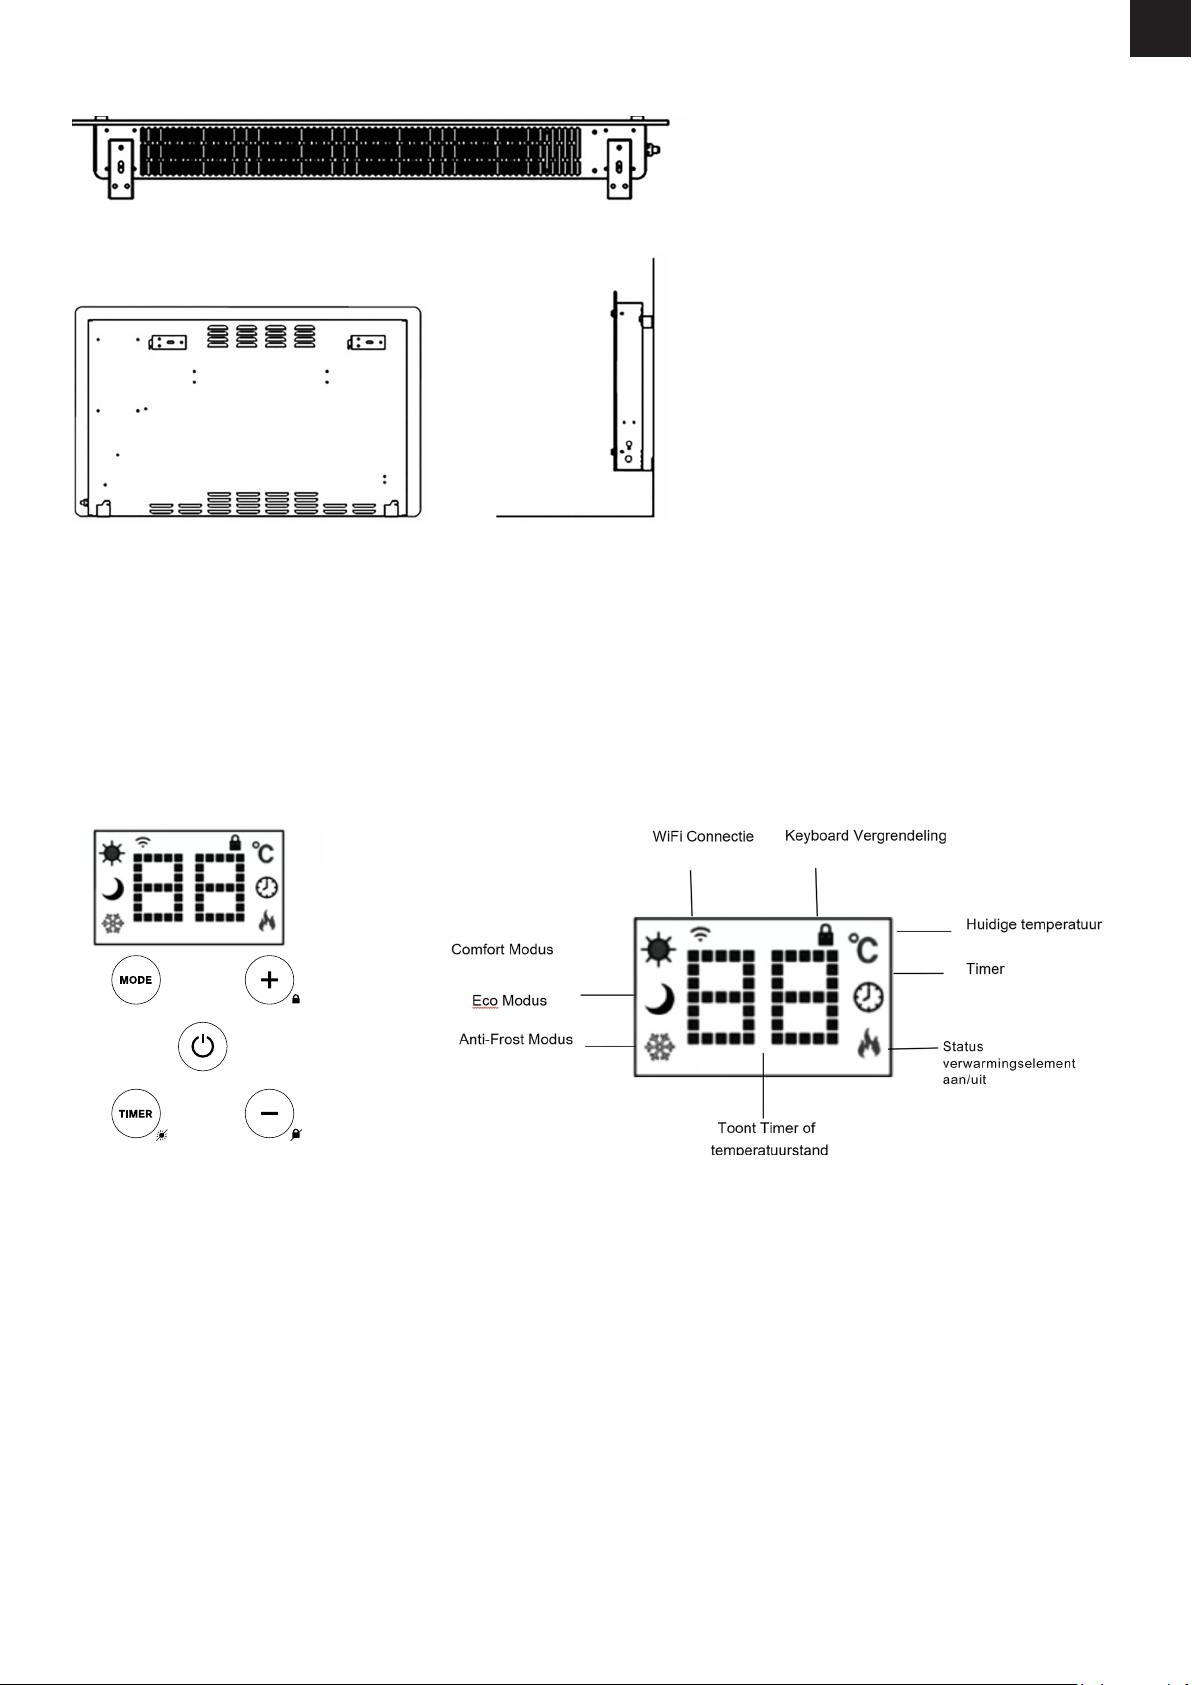
4.1 Switching on and off
The heater emits a beep when it is switched on. The heater will start in standby mode, displaying the WiFi symbol and the current
temperature of the room.
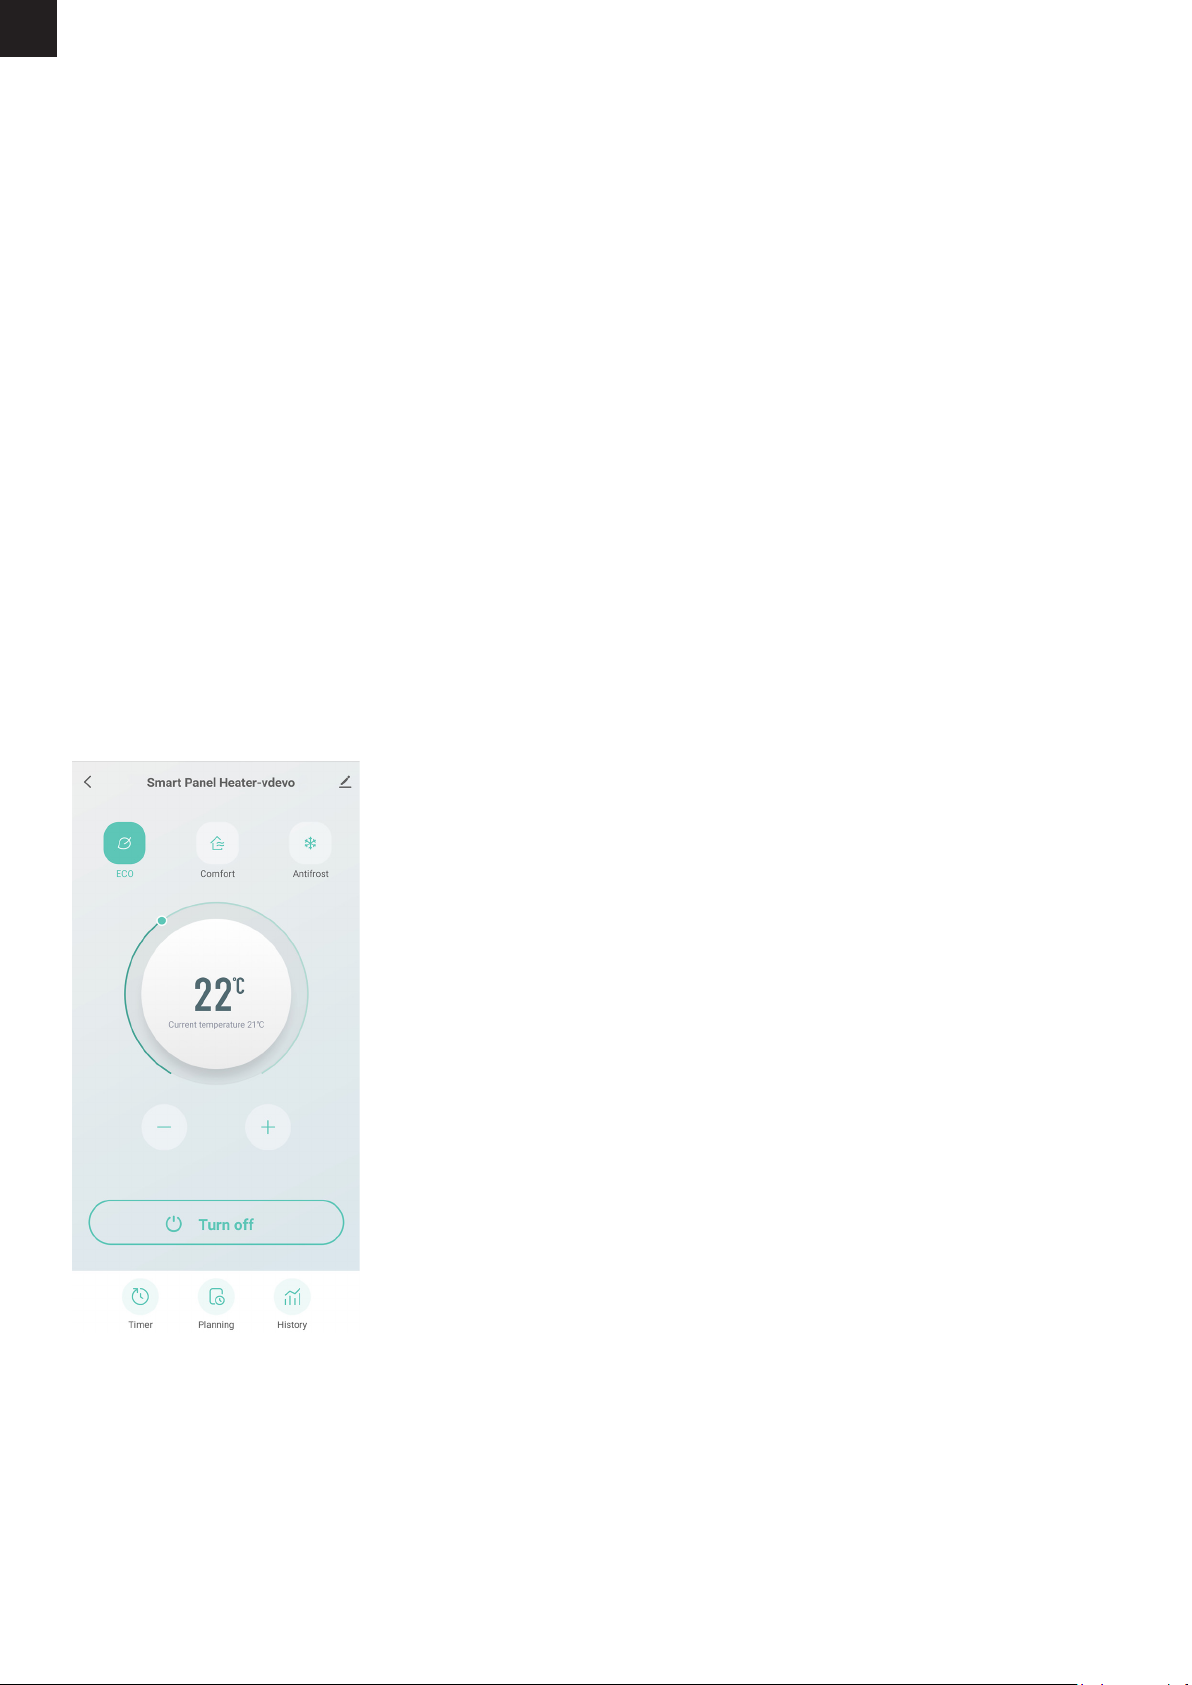
Press the ON/OFF button. You see the heating icon and the ECO mode icon. This means that the device is in ECO mode.
4.2 Changing the heating mode
To change the heating mode, press the MODE button to cycle through the modes: ECO mode, Comfort mode and Anti-freeze mode.
The mode icons will flash as you go through them. After a few seconds the icon will stop flashing and the heater will start heating in
that mode.
4.3 Setting the desired temperature
The set temperature of Eco mode and Comfort mode can be adjusted with the UP and DOWN buttons. The temperature range is
from 5°C to 50°C. In Antifreeze mode, the Smart Panel Heater will ensure that the temperature always remains above 5°C.
4.4 Timer for switching off
To set the timer, press the TIME button while the heater is in heating mode. The timer range is 1 - 24 hours. The numbers will flash
during the setting process and then the display will return to heating mode. The timer icon on the display indicates that the timer has
been set. The heater will continue to heat until the set time has elapsed.
EN
Comfort mode
Keyboard Lock
Heating element
status on/o
Current temperature
Timer
Eco mode
Anti-Frost mode
Shows timer or
temperature setting
Wi-Fi Connection
4.5 Time for switching on
To schedule your heating to turn on later, press the TIME button in standby mode. U. The delay range is 1 - 24 hours. The numbers
will flash during the setting process and then the display will return to heating mode. The timer icon on the display indicates that the
timer has been set. The heater will be switched on when the delay has elapsed.
4.6 Child lock
To activate the padlock, press and hold the UP button. The padlock icon will appear on the screen and the control panel will be locked. To unlock,
press and hold the DOWN button. The padlock icon will disappear, indicating that all buttons can be used again.
4.7 Switching off the display
Pressing and holding the time button will turn off the display illumination. Press any button later to turn the display back on. When the display is off,
the Smart Panel Heater can still be operated via the app, but it will not make any sound when changing settings.
4.8 Remote control
The remote control button and functions are all the same, but the buttons on the remote control do not have a “hold” function. The
range of the remote control is 2 metres.
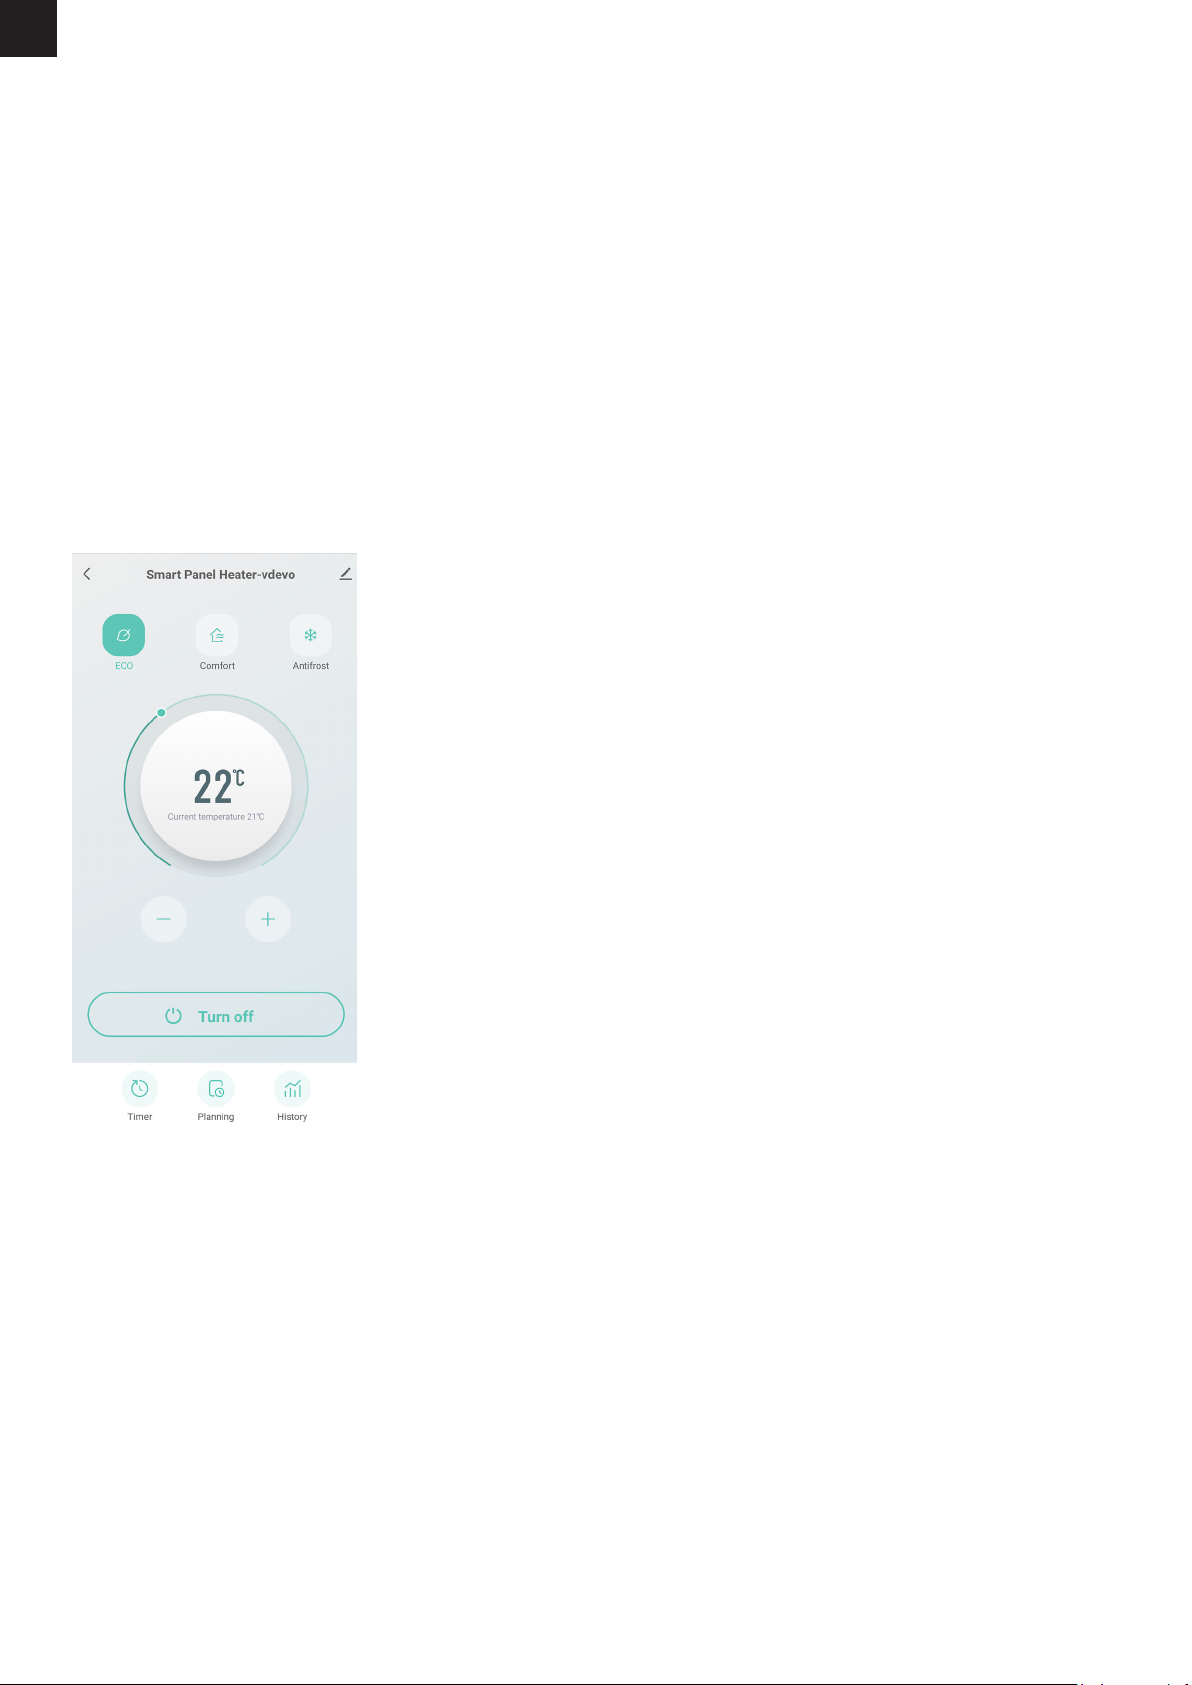
5. USING SMART FUNCTIONS
The same actions can be performed in the Smart Life app as on the control panel.
In addition, smart scenarios can be set, which allow the device’s settings to be adjusted when various conditions are met. For
example, weather conditions that require the device to be on or off, or sunrise or sunset that require the device to be on or off. You
can also create scenarios in which the device works together with other Smart Home devices that you have added to the Smart Life
app.
EN

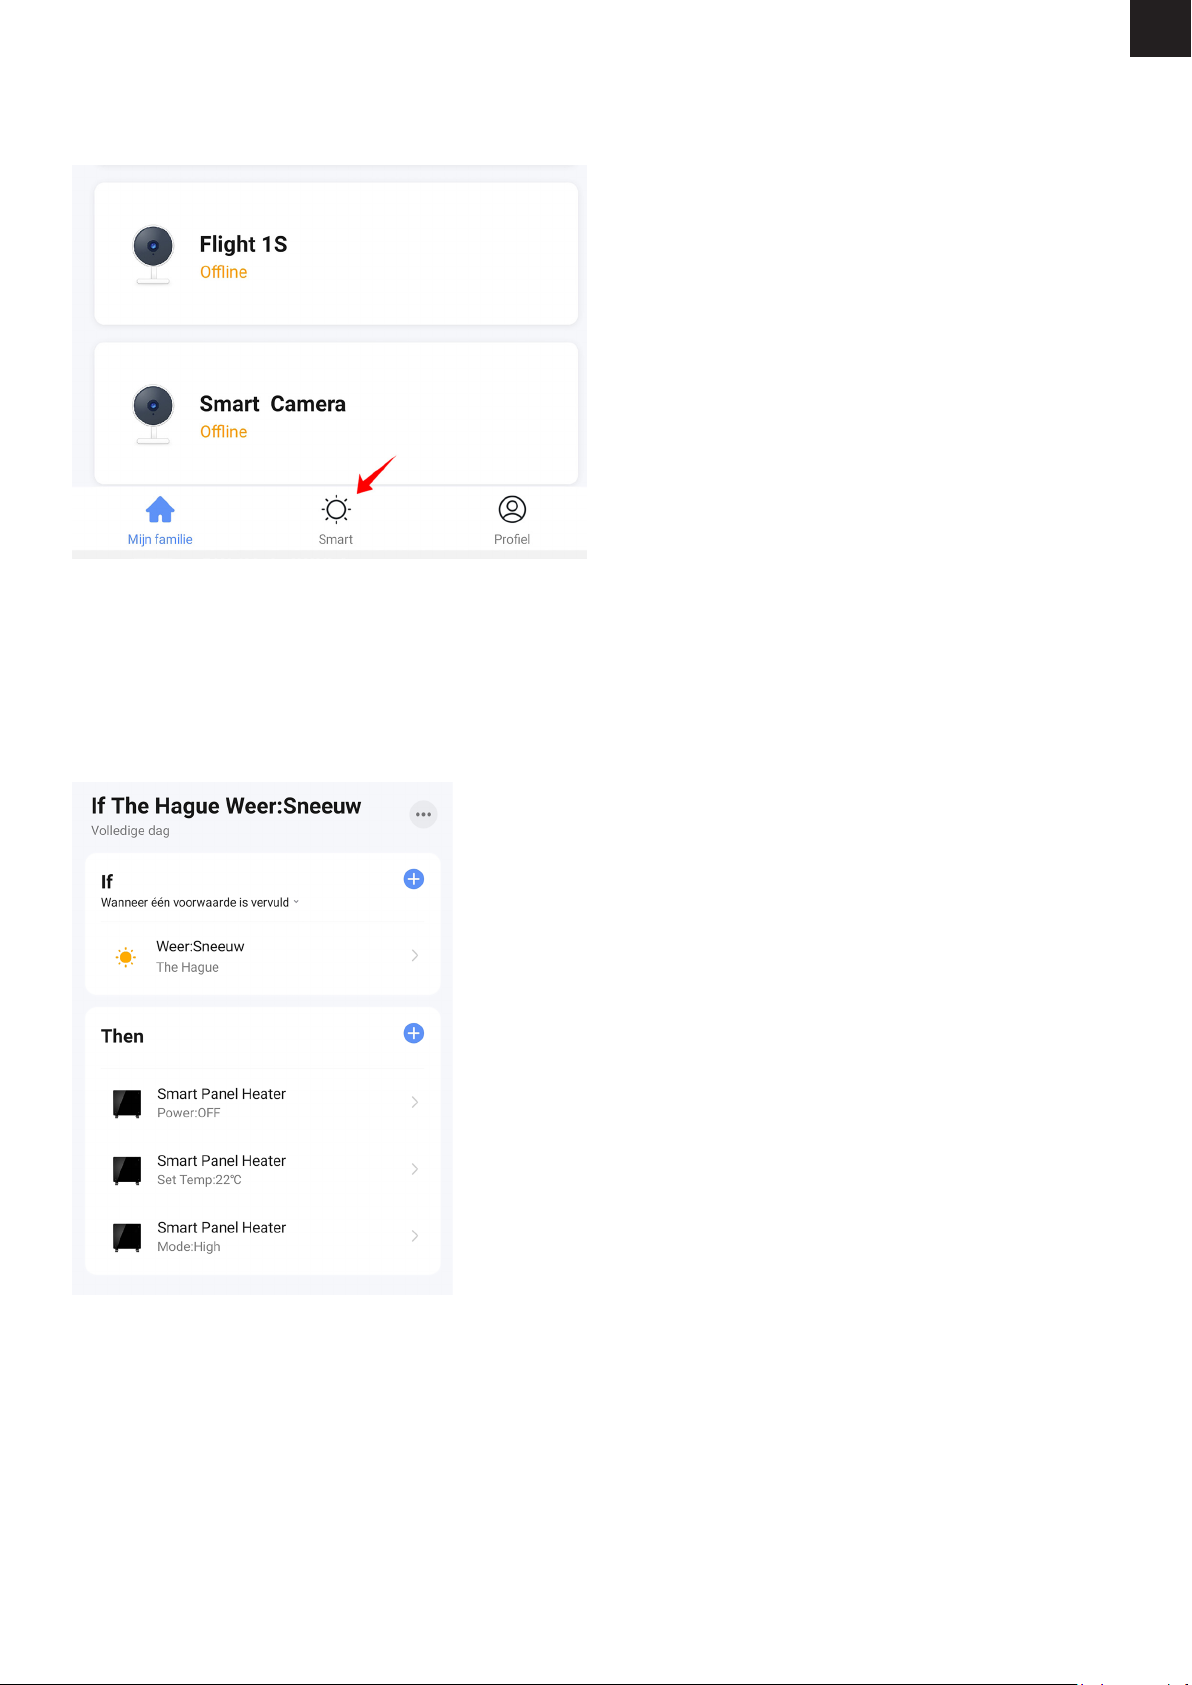
Creating a scenario
1. Go to the main screen of the Smart Life app
2. Press “Smart” at the bottom
3. Then press the plus sign in the top right corner to create a new scenario.
A scenario consists of the following components
1. The conditions that the scenario must fulfil (e.g. 10 a.m., sunrise, when another device turns on).
2. The device that should do something (e.g. the Smart Panel Heater).
3. The action to be performed by the unit (e.g. switch off, switch on, set another temperature).
4. (optional) Additional follow-up actions (e.g. pause, switch off again, adjust temperature).
An example is shown below:
SAFETY TIPS
1. Do not allow bare skin to come into contact with the surface of the device during operation: risk of burns.
2. The heating element is suitable for indoor use only. Do not use it outdoors.
3. Do not use the heating element near flammable or explosive materials: fire or explosion hazard.
4. It is strictly forbidden to insert any objects into the protective grille of the heating unit as there is a danger of electric shock.
5. Remove the plug from the socket if the heating device is not used for a long time.
6. Never cover the heater. If you cover the heating element, you risk overheating and causing a fire.
7. This device is not intended for use in bathrooms, washrooms or similar places where moisture can occur. Never place the heating
element in a place where it may fall into a bathtub or other water container.
EN

CLEANING
Always disconnect the appliance and allow it to cool down completely before carrying out maintenance. Use a hoover to remove
dust on grilles. Clean the outside of the unit with a damp cloth and then dry it with a dry cloth. Never immerse the appliance in water
or allow water to drip into it.
STORAGE
Always disconnect the unit, let it cool down completely and clean it before storing it. If you are not going to use the unit for a long
time, put the unit and the instructions back in the original box and store it in a dry and ventilated place. Do not place heavy objects
on the box during storage as this may damage the appliance.
6. PROBLEMS AND SOLUTIONS
Problem: The Smart Panel Heater does not turn on.
Cause: Device is tilted.
Solution: Install the device in an upright position. It has a sensor that switches it off if it is tilted or falls over.
Problem: The Smart Panel Heater does not connect to my network.
Cause: Wifi netwerk is Dual Band van 5GHz.
Solution: Change the settings of your router so that your network only transmits 2.4GHz. If necessary, switch off Dual band
temporarily or rename the 5GHz network.
Problem: The Smart Panel Heater does not connect to my network.
Cause: The Smart Panel Heater is not in pairing mode.
Solution: Reset the Smart Panel Heater by pressing and holding the power button for 5 seconds.
EN
BESCHRIJVING
Hou altijd uw slaapkamer, woonkamer of buitentoilet op de gewenste temperatuur met de Smart Panel Heater! Laat hem
bijvoorbeeld beginnen met verwarmen voor u wakker bent, of stoppen met verwarmen als de zon onder gaat. Maak het verwarmen
net zo slim als u wilt met zelf geprogrammeerde schema’s.
INHOUD
1x Smart Panel Heater
2x voetje
6x plug
8x M4*8mm schroeven
6x M4*35mm schroeven
1x afstandsbediening
4x bevestigingsbeugel
1x gebruiksaanwijzing
GEBRUIKSAANWIJZING
1. INSTALLEER DE SMART LIFE APP
1. Download gratis de Smart Life app voor iOS of Android.
2. Open de Smart Life app en tik op ‘Registreren’ of log in met een bestaand account.
3. Lees het privacybeleid en tik op ‘Akkoord’ om door te gaan.
4. Vul uw e-mailadres in om een verificatiecode te ontvangen, deze wordt verstuurd naar het opgegeven e-mailadres.
5. Vul de verificatiecode in om door te gaan naar het volgende scherm.
6. Kies een veilig wachtwoord en tik op de knop om uw registratie te voltooien.
7. Ga naar ‘Account’ en tik op ‘Familiebeheer’ om uw smart home in te stellen. Voer een naam in voor uw smart home en selecteer
welke kamers je wilt toevoegen.
8. Tik op ‘Gereed’ om de installatie te voltooien.
2. VOEG DE SMART PANEL HEATER TOE AAN DE APP
De Smart Panel Heater kan op twee verschillende manieren toegevoegd worden:
a) Door de QR code te scannen
b) Handmatig
A) De Qr code scannen
1. Schakel de Smart Panel Heater in.
2. Zorg ervoor dat uw smartphone is verbonden met je wifi-netwerk*.
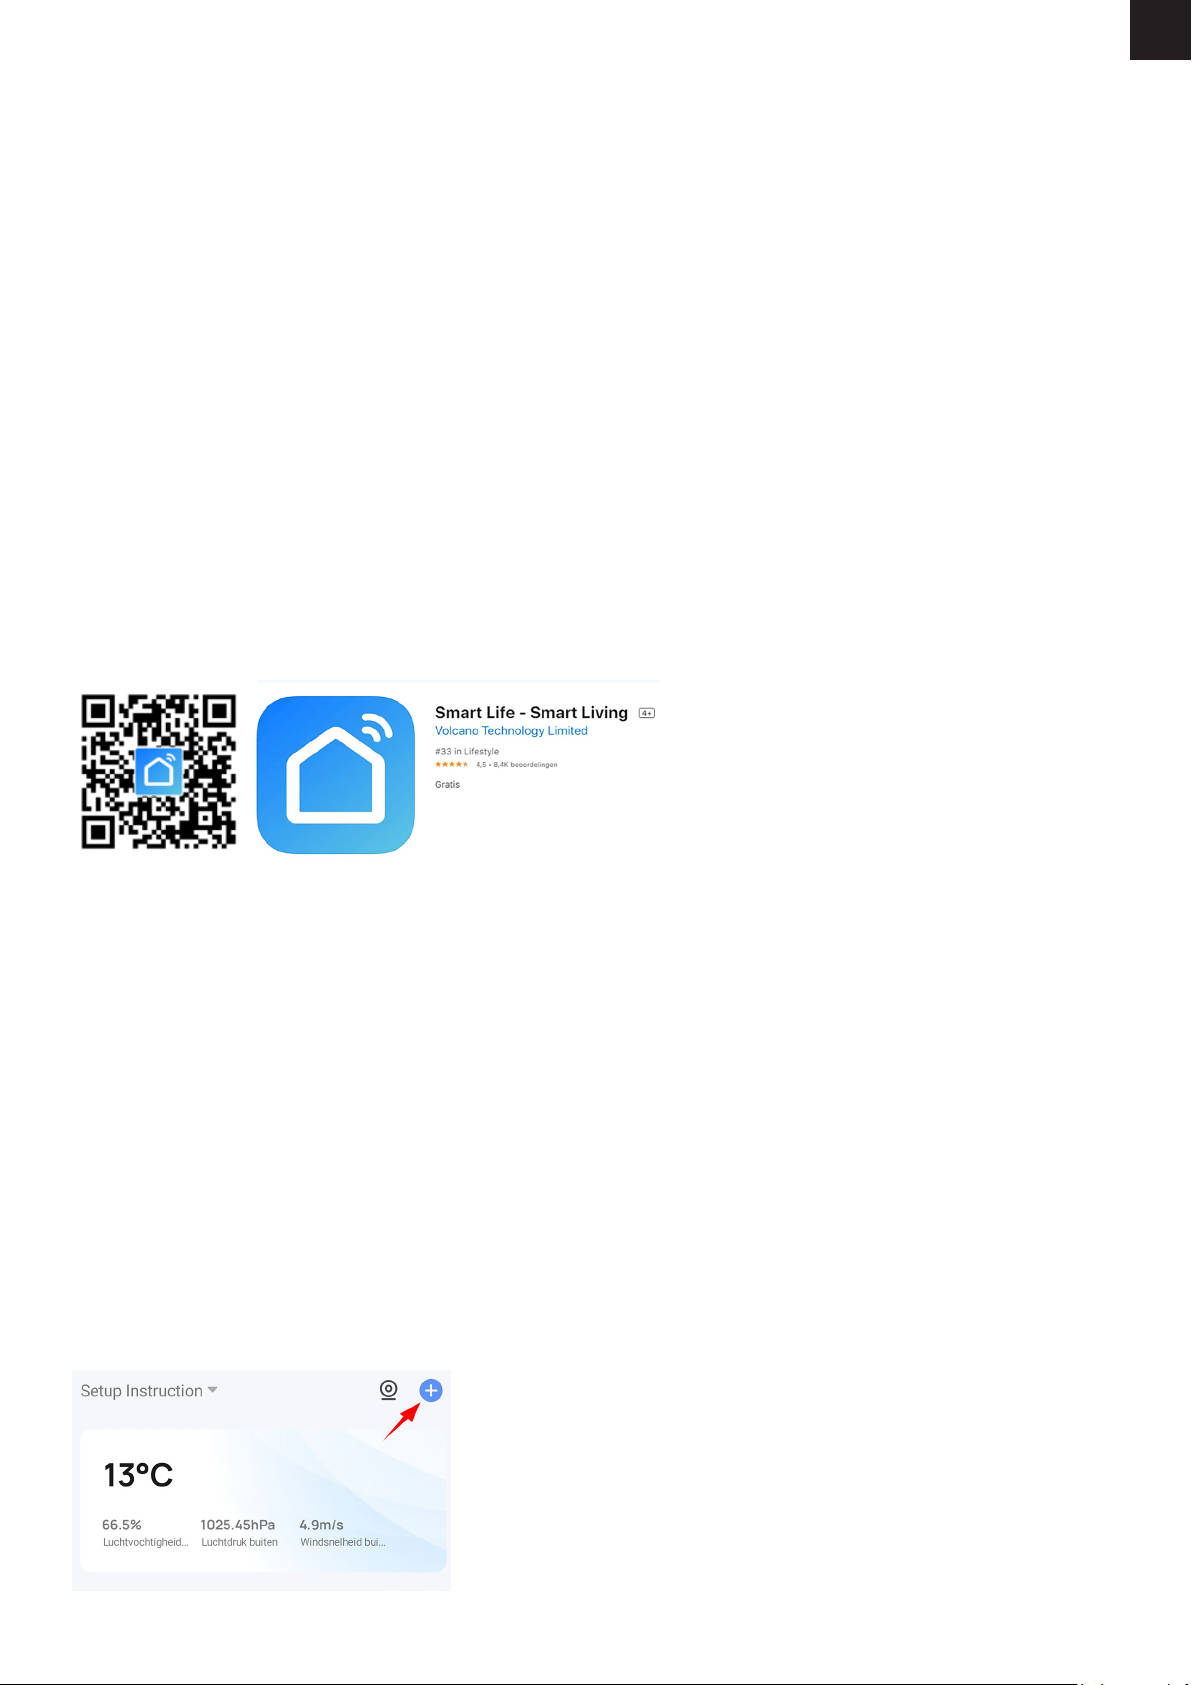
3. Open de Smart Life app en tik op ‘+’ om het apparaat te selecteren die u wilt toevoegen.
4. Open de Smart Life app en druk in rechtsboven het hoofdscherm op het plusje om een apparaat toe te voegen:
TECHNISCHE SPECIFICATIES
Vermogen
Voeding
Frequentie
Nominale hitte prod.
Afmetingen
Netto gewicht
2000W
210240V
50~60Hz
2 kW
78 47 cm
8 kg
1. Installeer de Smart Life app
2. Voeg de Smart Panel Heater toe aan de app
3. Installeer de Smart Panel Heater
4. Het bedieningspaneel
5. Slimme functies gebruiken
6. Problemen en oplossingen
NL
NL
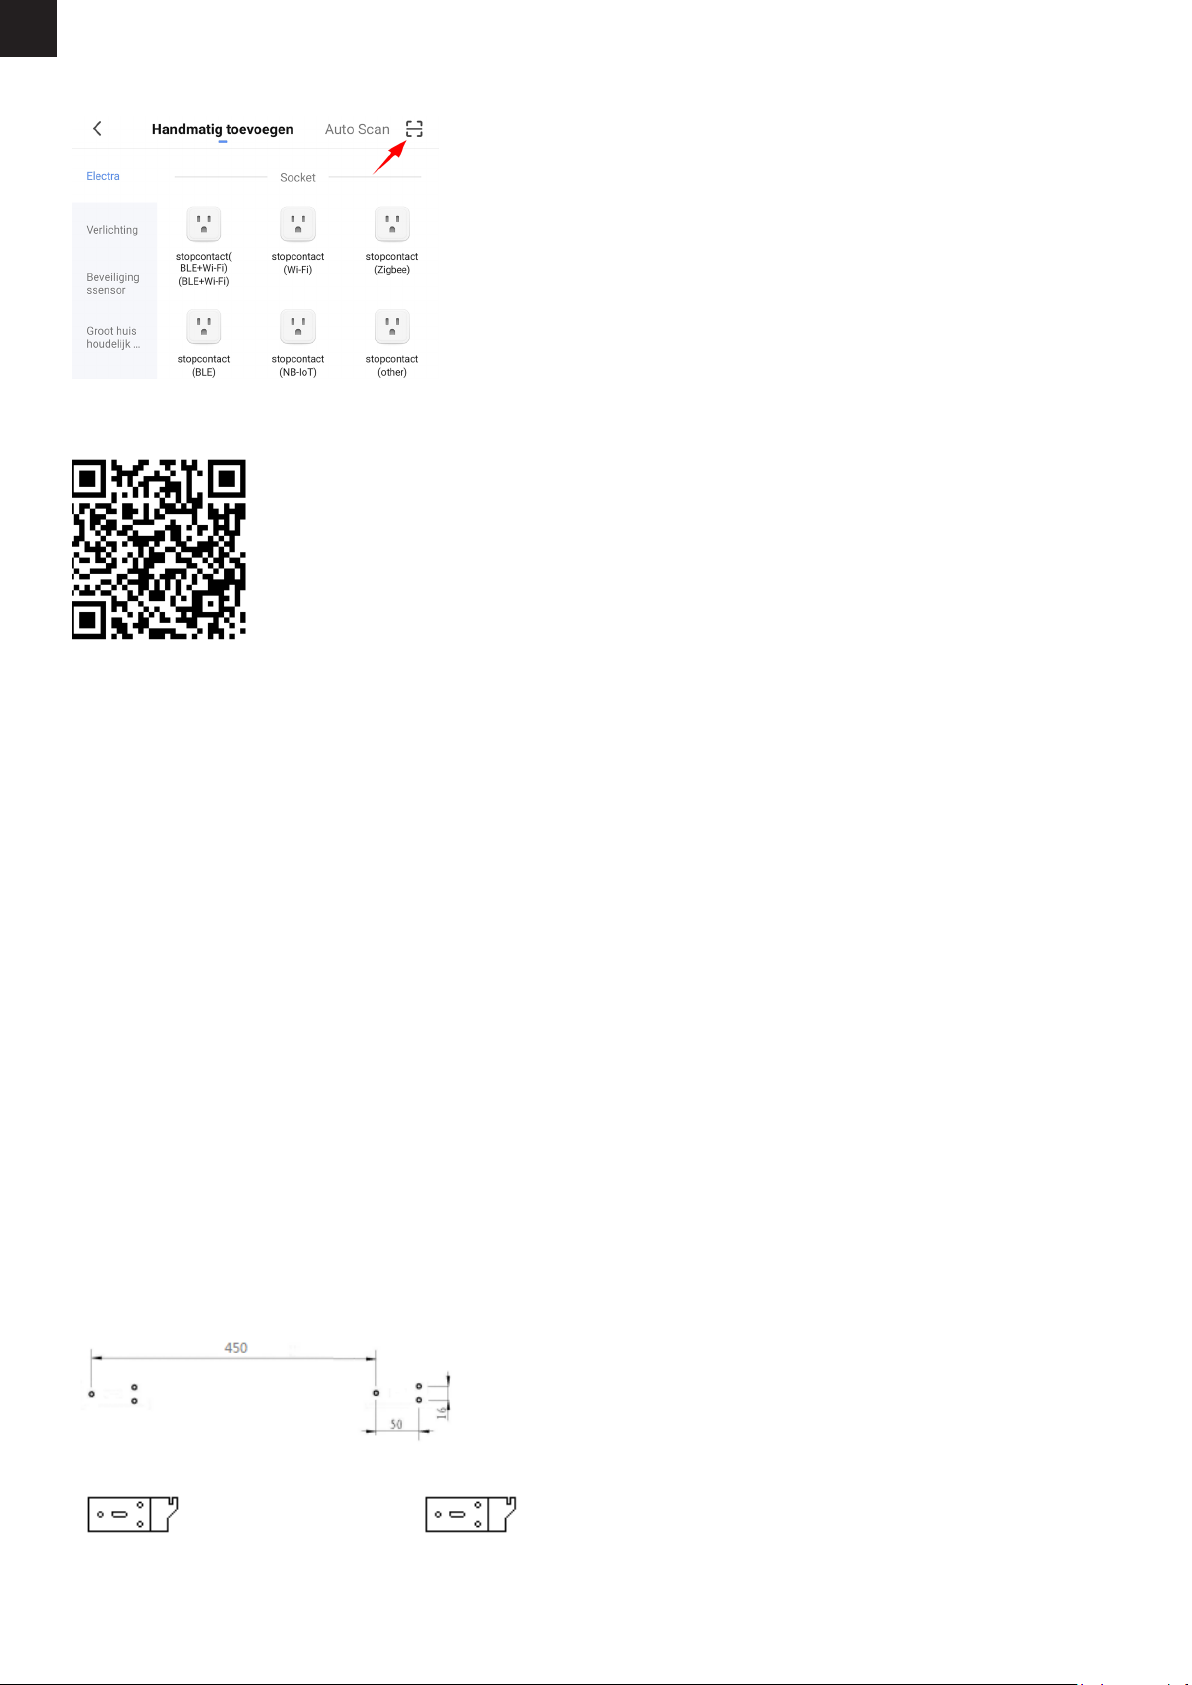
5. En druk vervolgens rechtsboven op het vierkantje met het liggende streepje er in:
6. De camera van uw telefoon opent zichzelf dan, scan dan met uw telefoon de volgende qr code om de Smart Panel Heater toe te
voegen:
7. Volg de stappen in de app om de installatie af te ronden.
8. Als de Panel Heater niet snel knippert, reset het dan door het in standby modus te zetten en de aan/uit knop 5 seconden
ingedrukt te houden.
B) Handmatige de Smart Panel Heater toevoegen
1. Schakel de Smart Panel Heater in.
2. Zorg ervoor dat je smartphone is verbonden met je wifi-netwerk.
3. Open de Smart Life app en tik op ‘+’ om het apparaat te selecteren die je wil toevoegen.
4. Selecteer “kleine huishoudelijke apparaten”.
5. Selecteer “heater (wifi)”.
6. Volg de stappen in de app om de installatie af te ronden.
3. INSTALLEER DE SMART PANEL HEATER
Controleer voor de installatie of alle onderdelen compleet zijn en het product intact is.
De Smart Panel Heater kan vrijstaand of aan de muur geïnstalleerd worden.
Vrijstaande installatie
Als u de elektrische verwarmer vrijstaand wilt gebruiken, monteer hem dan met de bijgeleverde voetjes en volg daarbij de
onderstaande aanwijzingen op. Zorg ervoor dat het verwarmingselement op een vlakke, stabiele en schone ondergrond wordt
gemonteerd.
1. Zet het product ondersteboven op een zachte katoenen doek of tapijt om beschadigingen te voorkomen.
2. Bevestig de voetjes aan de onderkant van het verwarmingselement met de bijgeleverde schroeven. Lijn de gaten in de voet uit
met de gaten in de voetjes, steek de schroeven door de gaten en draai ze vast met een schroevendraaier.
Installatie aan de muur
1. Neem 4 beugels, 6 pluggen en 6 schroeven uit de doos, en bevestig 2 beugels aan de muur volgens de afstanden tussen de
gaten van de beugel, zoals afgebeeld in de onderstaande afbeelding.
montage gat voor 2000W & 2200
NL
2. Bevestig 2 beugels aan de onderkant van het product, zoals afgebeeld in de onderstaande afbeelding.
3. Houd de zijkant van de Smart Panel Heater vast, kijk naar de positie van het muurgat van de achterklep, en schuif de muur naar
de bovenkant van de gleuf.
Opmerking: Voordat u gaat boren, moet u ervoor zorgen dat er zich geen kabel of andere leidingen op of in de muur bevinden,
om schade te voorkomen. Vergeet niet dat de schroeven vast en stevig in de muur moeten zitten om een veilige installatie van de
elektrische verwarmer aan de muur te garanderen. Houd rekening met de hieronder vermelde veilige afstand.
Houd er tijdens de installatie rekening mee dat het verwarmingselement op voldoende veilige afstand worden geplaatst van
brandbare materialen, gas en water.
Bij installatie aan de muur moet de installatiehoogte vanaf de grond meer dan 15 cm bedragen en ten minste 50 cm van het
plafond.
4. HET BEDIEDINGSPANEEL
4.1 In- en uitschakelen
De verwarmer geeft een pieptoon als hij wordt ingeschakeld. De verwarming start in de stand-by modus, met weergave van het
WiFi-symbool en de huidige temperatuur van de ruimte.
Druk op de ON/OFF knop. U ziet het verwarmingsicoon en het ECO-modusicoon. Dit betekent dat het apparaat in de ECO-modus
staat.
4.2 Verwarmingsmodus aanpassen
Om van verwarmingsmodus te veranderen, drukt u op de MODE-toets om de modi te doorlopen: ECO-stand, Comfort-stand en
Antivries-stand. De modusiconen knipperen terwijl u ze doorloopt. Na een paar seconden stopt het icoon met knipperen en zal het
verwarmingselement in die stand gaan verwarmen.
4.3 Gewenste temperatuur instellen
De ingestelde temperatuur van de Eco-stand en de comfort-stand kan worden aangepast met de OP en NEER toetsen. Het
temperatuurbereik loopt van 5°C tot 50°C. In de Antivries-stand zal de Smart Panel Heater zorgen dat de temperatuur altijd boven
de 5°C blijft.
4.4 Timer voor uitschakelen
Om de timer in te stellen, drukt u op de TIJD-knop terwijl het verwarmingselement in de verwarmingsmodus staat. Het timerbereik
is 1 - 24 uur. De cijfers knipperen tijdens het instellen en daarna keert het scherm terug naar de verwarmingsmodus. Het
timericoon op het scherm geeft aan dat de timer is ingesteld. Het verwarmingselement blijft verwarmen tot de ingestelde tijd
verstreken is.
4.5 Timer voor inschakelen
Om te plannen dat uw verwarming later wordt ingeschakeld, drukt u op de TIJD-knop in de stand-bystand. U. Het bereik van de
vertraging is 1 - 24 uur. De cijfers zullen knipperen tijdens het instellen en daarna zal het scherm terugkeren naar de verwarmings-
modus. Het timericoon op het scherm geeft aan dat de timer is ingesteld. De verwarming wordt ingeschakeld wanneer de vertra-
ging is verstreken.
4.6 Kinderslot
Om het kinderslot in te schakelen, houdt u de toets UP ingedrukt. Het hangsloticoon verschijnt op het scherm en het bedie-
ningspaneel wordt vergrendeld. Om te ontgrendelen, houdt u de omlaag-knop ingedrukt. Het hangslotpictogram zal verdwijnen,
wat aangeeft dat alle knoppen weer kunnen worden gebruikt.
4.7 Display uitschakelen
De tijd knop ingedrukt houden zal de verlichting van het display uitschakelen. Druk later op een willekeurige knop om het display
weer aan te zetten. Als het display uit staat kan de Smart Panel Heater nog via de app bedient worden, maar zal het geen geluid
maken bij het wijzigen van instellingen.
4.8 Afstandsbediening
De afstandsbedieningsknop en de functies zijn allemaal hetzelfde, maar de knoppen op de afstandsbediening hebben geen
“ingedrukt houden” functie. Het bereik van de afstandsbediening is 2 meter.
5. SLIMME FUNCTIES GEBRUIKEN
In de Smart Life app kunnen dezelfde acties uitgevoerd worden als op het bedieningspaneel.
Daarnaast kunnen er nog slimme scenario’s ingesteld worden, waarmee de instellingen van het apparaat aangepast kunnen
worden als er aan verschillende voorwaardes voldaan wordt. Denk hierbij aan weerscondities waarbij het apparaat aan of uit moet,
of zonopgang of -ondergang waarbij het apparaat aan of uit moet. Ook kunt u scenario’s maken waarbij het apparaat samenwerkt
met andere Smart Home apparatuur die u toegevoegd heeft aan de Smart Life app.
NL
Scenario maken
1. Ga naar het hoofdscherm van de Smart Life app
2. Druk onderaan op “Smart”
3. Druk vervolgens rechtsboven op het plusje om een nieuw scenario aan te maken.
Een scenario bestaat uit de volgende onderdelen
1. De voorwaarden waar het scenario aan moet voldoen (e.g. 10 uur ’s ochtends, zonsopgang, als een andere apparaat aan gaat).
2. Het apparaat dat iets moet doen (e.g. de Smart Panel Heater).
3. De actie die het apparaat moet uitvoeren (e.g. uitgaan, aangaan, een andere temperatuur instellen).
4. (optioneel) Extra vervolg acties (e.g. een pauze, weer uitschakelen, temperatuur aanpassen).
Een voorbeeld ziet u hieronder:
VEILIGHEIDTIPS
1. Laat tijdens het gebruik geen blote huid in aanraking komen met het oppervlak van het apparaat: risico op brandwonden.
2. Het verwarmingselement is alleen geschikt voor gebruik binnenshuis. Gebruik hem niet buitenshuis.
3. Gebruik het verwarmingselement niet in de buurt van ontvlambare of explosieve materialen: brand- of explosiegevaar.
4. Het is ten strengste verboden voorwerpen in het beschermrooster van het verwarmingstoestel te steken: gevaar voor elektrische
schokken.
5. Haal de stekker uit het stopcontact als het verwarmingsapparaat lange tijd niet wordt gebruikt.
6. Dek de verwarming nooit af. Als u het verwarmingselement afdekt, riskeert u oververhitting en brand.
7. Dit apparaat is niet bedoeld voor gebruik in badkamers, wasruimten of soortgelijke plaatsen waar vocht kan voorkomen. Plaats
het verwarmingselement nooit op een plaats waar het kan vallen in een badkuip of ander waterreservoir.
NL

REINIGING
Koppel het apparaat altijd los en laat het volledig afkoelen voordat u onderhoud uitvoert. Gebruik een stofzuiger om stof op
roosters te verwijderen. Maak de buitenkant van het toestel schoon met een vochtige doek en droog het daarna af met een droge
doek. Dompel het apparaat nooit onder in water en laat er ook geen water in druppelen.
OPBERGEN
Koppel het apparaat altijd los, laat het volledig afkoelen en maak het schoon voordat u het opbergt. Als u het apparaat lange
tijd niet gebruikt, doe het apparaat en de gebruiksaanwijzing dan terug in de originele doos en bewaar het op een droge en
geventileerde plaats. Plaats tijdens het opbergen geen zware voorwerpen op de doos, omdat dit het apparaat kan beschadigen.
6. PROBLEMEN EN OPLOSSINGEN
Probleem: De Smart Panel Heater gaat niet aan.
Oorzaak: Apparaat is gekanteld.
Oplossing: Installeer het apparaat rechtop. Het heeft een sensor waarmee het zichzelf uitschakelt als het schuin
komt te staan of omvalt.
Probleem: De Smart Panel Heater maakt geen connectie met mijn netwerk.
Oorzaak: Wifi netwerk is Dual Band of 5GHz.
Oplossing: Verander de instellingen van uw router, zodat uw netwerk enkel 2,4GHz uitzend. Schakel eventueel de Dual band
tijdelijk uit, of geef het 5GHz netwerk een andere naam.
Probleem: De Smart Panel Heater maakt geen connectie met mijn netwerk.
Oorzaak: De Smart Panel Heater staat niet in koppel modus.
Oplossing: Reset de Smart Panel Heater door de powerknop 5 seconden ingedrukt te houden.
NL


© 2021, Sevva. All rights reserved.
www.sevva.nl
Made in China

Table of contents
Languages:
Popular Heater manuals by other brands


GÜDE
GÜDE GIH 900 Translation of the original operating instructions

Detroit Radiant Products
Detroit Radiant Products AVS Series installation manual

Sunbeam
Sunbeam SCH4062 owner's guide

Toyotomi
Toyotomi Radiant 40 Type C user guide

Chromalox
Chromalox CKH Installation, operation and maintenance

Dimplex
Dimplex OFC1205 Installation and operating instructions


