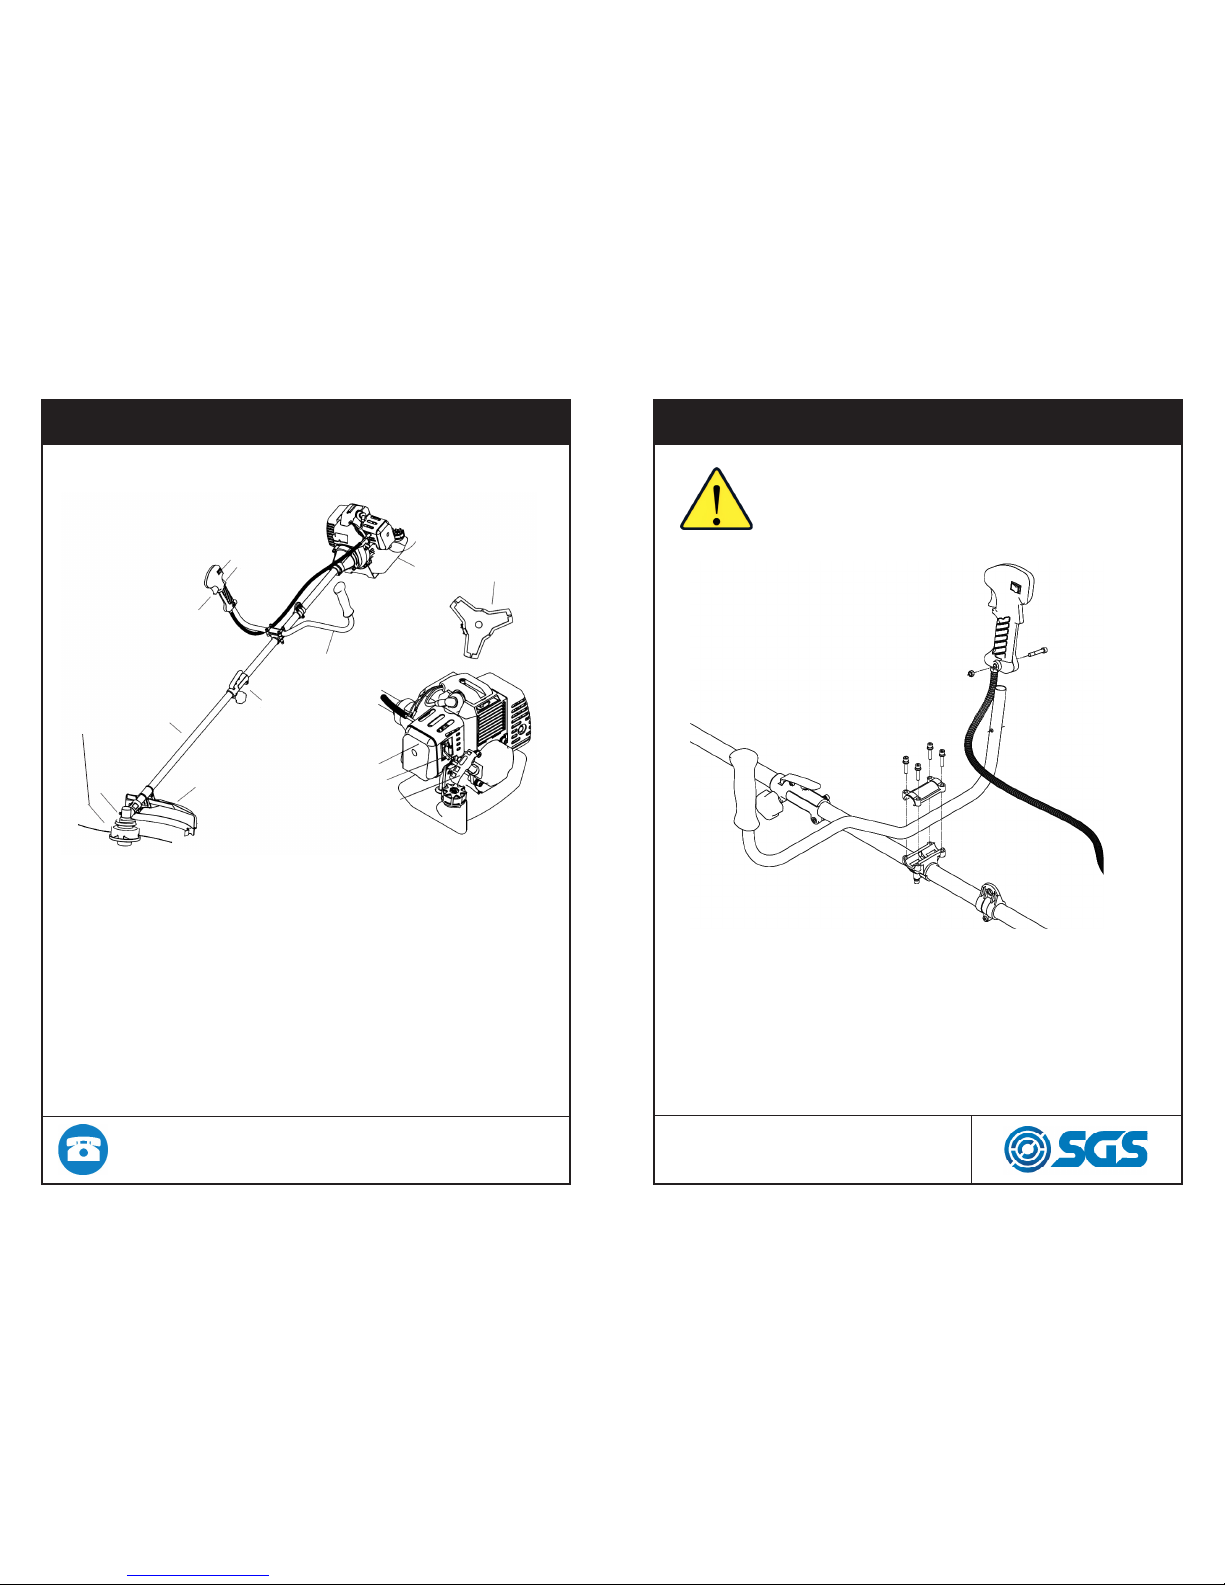
SGS GPS520 User manual

FOR YOUR SAFETY
PLEASE READ THESE INSTRUCTIONS CAREFULLY
AND RETAIN THEM FOR FUTURE USE.
OWNER’S MANUAL
52CC PETROL TRIMMER

PAGE 3
PAGE 2
FOR SAFE OPERATION
Read operator’s instruction book before
operating this machine. Read, understand
and follow all warnings.
Wear head, eye and ear protection.
Use suitable work-wear to protect yourself.
Watch out for thrown objects & ricochets
The operator of the machine must ensure,
while working, that no persons or animals
come closer than 50 feet (15 meters).
FOR SAFE OPERATION
GLOVES
Gloves should be worn when necessary, e.g., when
fitting cutting attachments.
HEARING PROTECTION
Wear hearing protection that provides adequate
noise reduction.
EYE PROTECTION
Always wear approved eye protection. If you use a
visor then you must also wear approved protective
goggles. Approved protective goggles must com-
ply with your countries relevent safety standard.
BOOTS
Wear sturdy, non--slip boots.
CLOTHING
Wear clothes made of a strong fabric and
avoid loose clothing that can catch on twigs and
branches. Always wear heavy, long pants. Do not
wear jewellery, shorts sandals or go barefoot. Se-
cure hair so it is above shoulder level.
WWW.SGS-ENGINEERING.COM
CALL FOR ASSISTANCE: 01332 576 850

PAGE 5
PAGE 4
FOR SAFE OPERATION
The only accessories you can operate with this en-
gine unit are the cutting attachments we recommend.
Never use wire, rope, string, etc.
Never use the machine if you are tired, if you have
drunk alcohol, or if you are taking medication that
could affect your vision, your judgment or your
coordination.
Never use the machine in extreme weather conditions
such as severe cold, very hot and/or humid climates.
Never use a machine that has been modified in any
way from its original specification.
Wear personal protective equipment.
Never use a machine that is faulty. Carry out the
checks, maintenance and service instructions de-
scribed in this manual. Some maintenance and service
measures must be carried out by trained and qualified
specialists.
The machine is only designed for trimming grass.
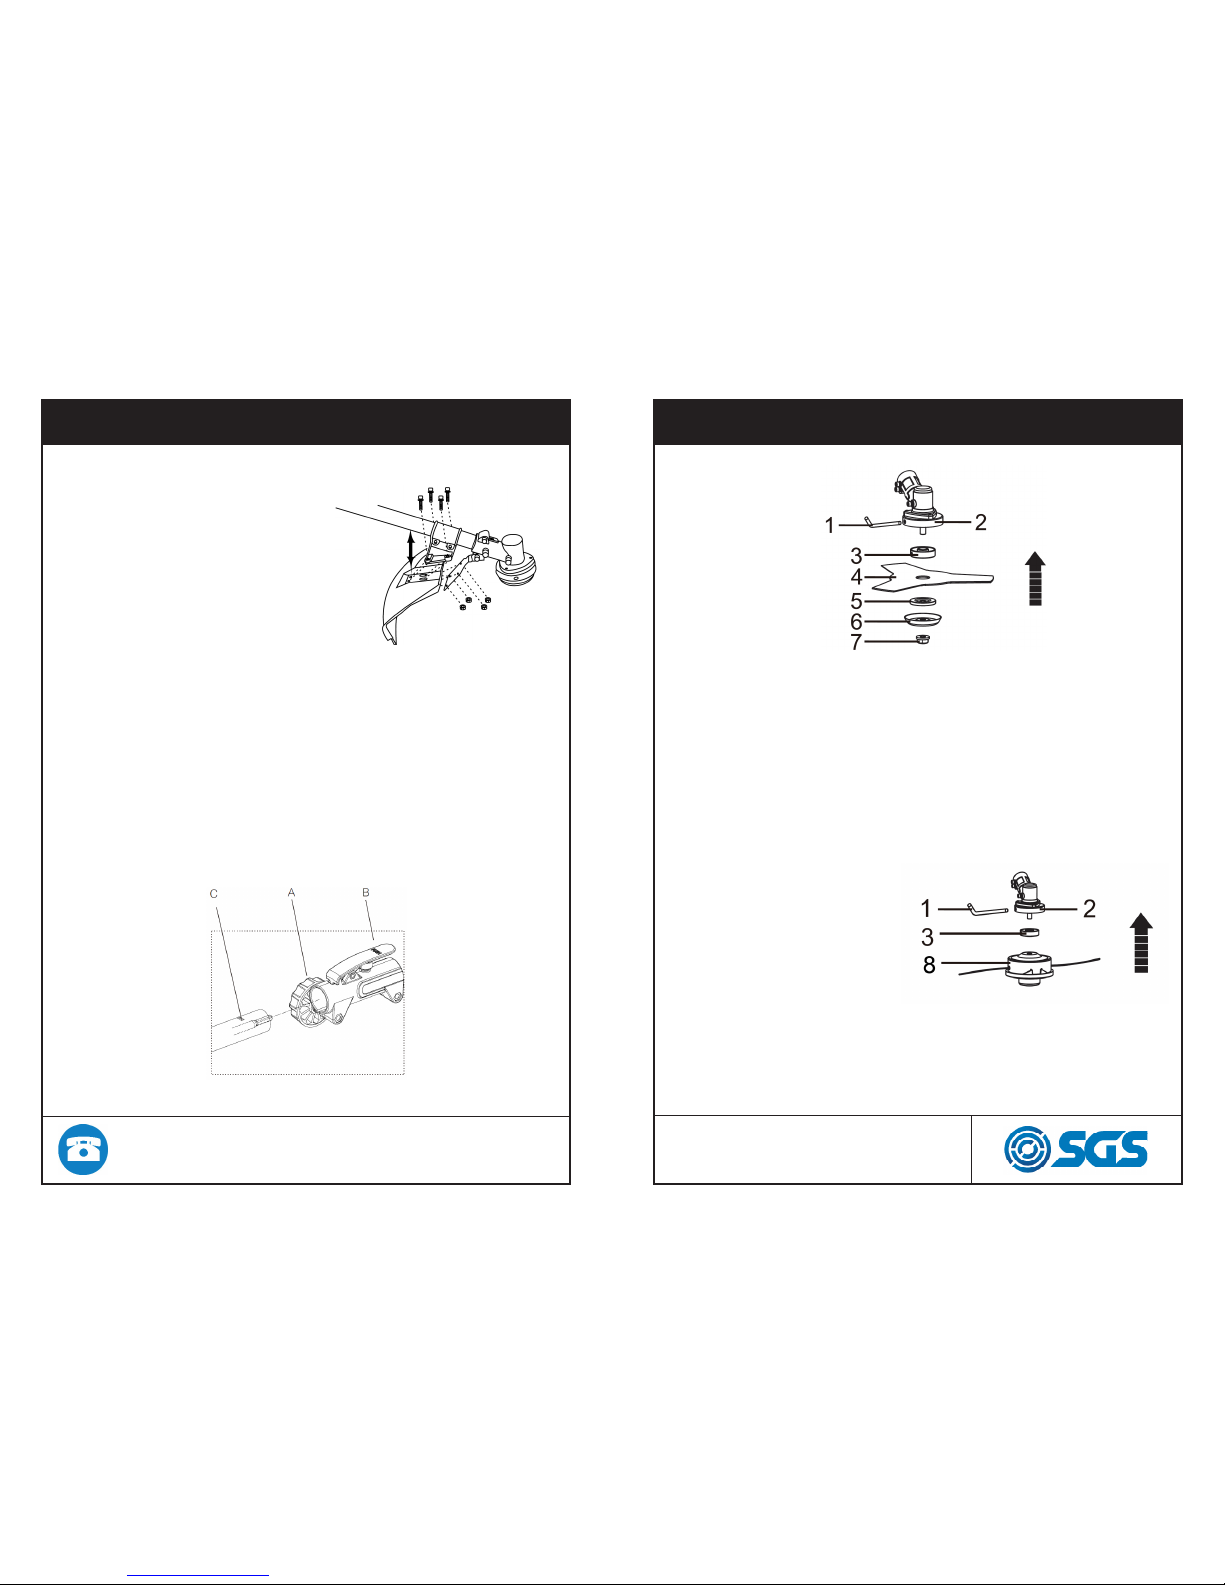
FOR SAFE OPERATION
All covers and guards must be fitted before starting.
Make sure the spark plug cap and lead are not dam-
aged. Otherwise you could get an electric shock.
The machine operator must ensure that no people
or animals come closer than 50 feet (15 meters) while
working. Stay clear of spinning line.
Secure or remove loose clothing or clothing with
loosely hanging ties, straps, tassels, etc. They can be
caught in moving parts.
Being fully covered also helps protect you from debris
and pieces of toxic plants thrown by spinning line.
Always keep the engine on the right hand side of your
body. Hold the unit firmly with both hands.
Keep trimmer head below waist level.
Keep handles free of oil and fuel.
WWW.SGS-ENGINEERING.COM
CALL FOR ASSISTANCE: 01332 576 850

PAGE 7
PAGE 6
COMPONENTS LOCATION DIAGRAM
Primer
bulb
Air filter cover
Choker lever
Pull start
3 teeth
blade
Handle
Throttle
control
On/off switch
Throttle
trigger
Split shaft
connector
Fuel
tank
Shaft
Attachment
guard
Gear
case
Nylon
spool
Installing handle
1. Loosen the 4 bolts on the upper cap and insert the handle.
Retighten the bolts.
2. Put the handle assembly into the bracket and put the upper
cap over it. Tighten the cap securely.
3. Insert the right handle into the switch assembly and
tighten with bolt and nut.
ASSEMBLY
Make sure unit is assembled correctly as shown
in this manual. Be sure to follow all the assembly
instructions.
WWW.SGS-ENGINEERING.COM
CALL FOR ASSISTANCE: 01332 576 850

PAGE 9
PAGE 8
ASSEMBLY
Fitting cutting attachment guard
Attach the cutting attachment
with the bolts combined
to the cutting attachment,
as illustrated to the right
Connecting the shaft
To connect the working shaft to the main shaft with a coupler
1. Loosen the Locking Knob (A) counterclockwise so the working
shaft can be inserted into the tube coupler.
2. Press the Push Button(B) and gently rotate the working shaft
back and for th while inserting to make sure the drive shafts
placed in position.
3. Release the Push Button to lock the hole (C) of the working
shaft tube. The Push Button is connected to a spring-loaded
detent that can snap the working tube in position
4. Turn the Locking Knob clock-wise to secure the connection.
ASSEMBLY
Installing blade
1. Insert the allen key (1) into the of the gear case (2) and
plate (3) so as to fasten the axle.
2. Mount the blade (4) and the washer (5) onto the axle.
3. Mount the washer (6) and the nut (7). Fasten tightly anti
clockwise.
Installing trimmer head
1. Insert the allen key (1)
into the hole of gear case
(2), and plate (3) so as to
fasten the axle.
2. Mount the trimmer head
(8), by turning it anti-clock-
wise.
3. Fasten the trimmer head
(8), tightly before use.
WWW.SGS-ENGINEERING.COM
CALL FOR ASSISTANCE: 01332 576 850

PAGE 11
PAGE 10
ASSEMBLY
Balancing the strimmer
1. Put the harness on and attach your strimmer to it.
2. Slide clamp up and down, till you feel comfortable with how
the strimmer balances, and how you can manoeuvre it whilst
working.
Make sure the strimmer unit is off, whilst doing
this procedure, to ensure accurate balancing.
• Always use a fuel container with an anti-spill valve.
• Never refuel the machine while the engine is running.
• Always stop the engine and let it cool for a few minutes be-
fore refilling with mixed fuel.
• Make sure there is plenty of ventilation when refilling or mix-
ing fuel (petrol and 2--stroke oil).
• Move the machine at least 10 feet (3 meters) from the refu-
eling point before starting it.
Never start the machine:
• If you have spilt fuel on it. Wipe off the spillage and allow
remaining fuel to evaporate.
• If you have spilt fuel on yourself or your clothes, change your
clothes. Wash any part of your body that has come in contact
with fuel. Use soap and water.
• If the machine is leaking fuel. Check regularly for leaks from
the fuel cap and fuel lines.
• Avoid all skin contact with fuel. Fuel is a skin irritant.
FUEL SAFETY
WWW.SGS-ENGINEERING.COM
CALL FOR ASSISTANCE: 01332 576 850

PAGE 13
PAGE 12
FILLING WITH OIL AND FUEL
FILLING THE UNIT
Untwist and remove the fuel cap. Rest the cap on a dust-
less place. Put mixed fuel into the fuel tank to 80% of the full
capacity. Fasten the fuel cap securely and wipe up any fuel
spillage around the unit.
1. Select bare ground for filling with fuel.
2. Move at least 10 feet (3 metres) away from the fuel
filling point before starting the engine.
3. Stop the engine before refilling the unit with fuel. At that time,
be sure to sufficiently agitate the mixed fuel in the
container.
MIXING THE OIL AND FUEL
HOW TO MIX FUEL
Petrol is flammable. Avoid smoking or bringing
any flame or sparks near fuel. Make sure to stop the engine and
allow it cool before refilling the unit. Select outdoor bare ground
for filling with fuel and move at least 3 m (10 ft) away from the
fuel filling point before starting the engine.
Your strimmer runs off a mix of semi-synthetic 2-stroke oil and
unleaded petrol (40:1). Our petrol tools come with a measuring
jug with guide lines.
Find the side marked 40:1, add your petrol to the first line and
your 2-stroke oil to the second. Replace the jugs lid and shake
the mixture for around a minute.
WWW.SGS-ENGINEERING.COM
CALL FOR ASSISTANCE: 01332 576 850

PAGE 15
PAGE 14
FILLING WITH OIL AND FUEL
FOR YOUR ENGINE LIFE, AVOID:
1. FUEL WITH NO OIL (RAW PETROL) – It will cause severe
damage to the internal engine parts very quickly.
2. ‘GASOHOL’ – It can cause deterioration of rubber and/orplas-
tic parts and disruption of engine lubrication.
3. OIL FOR 4-STROKE ENGINE USE – It can cause spark plug
fouling, exhaust port blocking, or piston ring sticking.
4. Mixed fuels which have been left unused for a period of one
month or more may clog the carburetor and result in the en-
gine failing to operate properly.
5. In the case of storing the product for a long period of time,
clean the fuel tank after rendering it empty. Next, start the
engine and empty the carburettor of the composite fuel.
6. In the case of scrapping the used mixed oil container, scrap it
only at an authorized repository site.
PRIME THE STRIMMER
Press the priming bulb 5 to 8 times. This will help the strimmer
start with less pulls of the starter cord. If you can’t see fuel enter-
ing the priming bulb please contact SGS.
Move the strimmers switch to the On (I) position.
WWW.SGS-ENGINEERING.COM
CALL FOR ASSISTANCE: 01332 576 850

PAGE 17
PAGE 16
SET THE CHOKE
For a cold engine, move the choke to the “Start” posi-
tion (closed). Squeeze the throttle lever once.
When re-starting the strimmer (warm engine) you can
move the choke straight into the “Run” position (open).
START THE STRIMMER
Place the strimmer on the ground so the pull start is facing
up towards you. Make sure the cutting attachment is not
touching the ground or might catch on any other object.
Firmly hold the neck of the strimmer with your left hand
and the pull start assembly with your right. The strimmer
should start within 3-5 pulls on a new or cold engine. Slowly
pull the starting rope with your right hand until you feel the
resistance of the rope. Now, pull the pull start hard several
times until the engine fires and starts.
Pull the rope up as vertically as you can. Don’t let the rope
drag on the casing of the strimmer.
WWW.SGS-ENGINEERING.COM
CALL FOR ASSISTANCE: 01332 576 850

PAGE 19
PAGE 18
OPEN THE CHOKE
Once the machine is running, move the choke to the “Run”
position (open)/ Squeeze the throttle to rev the strimmer
and then let your machine idle for a 30- 40 seconds. Your
strimmer should now be ready to use.
TROUBLESHOOTING
If your strimmer hasn't started using the standard start-
ing procedure, there's a a couple of things you can quickly
check and try.
Checking the Fuel Mix
The most common problem with a strimmer not starting is
that there's a problem with the fuel mix. Double check that
you've used 40 parts fresh unleaded petrol to 1 part 2-stroke
oil (40:1). Check the petrol you've used isn't stale.
Adjusting the Carburetor
Your strimmer needs a balanced combination of air and fuel
reaching the carburetor. This balance needs to be consistent
at all times otherwise your chainsaw will bog down when try-
ing to start, and then die. If you hear the engine bog when
you pull the trigger, the carburetor needs adjusting via the
carb adjustment screw.
WWW.SGS-ENGINEERING.COM
CALL FOR ASSISTANCE: 01332 576 850

PAGE 21
PAGE 20
ADJUSTING THE CARBURETOR
Locate the adjustment screw on your machine
Wind the carb screw all the way in (clockwise).
Wind the carb screw 1.5 - 2 turns anti-clockwise.
Restart the starting procedure
This is the most common set up for the carburetor, however
you can fine tune it depending on how your strimmer is run-
ning:
Erratic idling behaviour or poor acceleration - the engine
needs more fuel so turn the adjustment screw anticlockwise
until the engine runs and accelerates smoothly.
Excessive exhaust smoke when idling - the engine is run-
ning too rich, so you need more air reaching the carburetor.
Turn the adjustment screw clockwise until the engine speed
drops. Now check that the engine still accelerates smoothly
when you apply the throttle.
CHECK FOR ENGINE FLOODING
There's a chance that if you've over used the pull start
mechanism, you may have flooded the two-stroke engine.
This is very simple to check and fix.
Open up the casing and remove the black lead that covers
the plug.
If the spark plug is damp with fuel then the engine is flood-
ed. Remove the plug, and allow the excess fuel to evapo-
rate.
Replace the plug and follow the usual starting procedure.
WWW.SGS-ENGINEERING.COM
CALL FOR ASSISTANCE: 01332 576 850

PAGE 23
PAGE 22
CHECKING FOR A SPARK
To find out whether the sparkplug of your strimmer is pro-
ducing a spark, expose and remove the sparkplug as per
the previous page.
Pull the spark plug wire off the plug and remove the spark
plug with the wrench included in your toolkit.
Place the sparkplug back into the spark plug wire.
Hold the boot end of the sparkplug wire with your hand and
place the electrode tip against a metal surface.
Make sure your tool is switched on. Using your other hand
(or with the help of another person) pull the starter cord
quickly. If the ignition is working correctly you should see
blue sparks where the plug is touching the metal surface.
If you don’t see a spark you can contact our customer ser-
vice team
CHECKING THE FUEL TANK FILTER
Check the Tank Filter
If you can’t see fuel in the priming bulb, there’s a good
chance your tank filter is blocking the fuel mix from mov-
ing to the engine.
Open up the fuel tank
Dislodge the fuel filter from the neck of the tank (you
might find this easier if you drain the fuel and remove the
blue lid)
Restart the starting procedure
If you're still struggling to start your SGS strimmer after
following the troubleshooting please contact us/
If you are still having trouble with your strimmer,
then contact us using these methods:
Call: (+44) 01332 576 850
E-mail: [email protected]
SGS Engineering UK Ltd
West Side Park,
Belmore Way, Raynesway,
Derby, DE21 7AZ.
WWW.SGS-ENGINEERING.COM
CALL FOR ASSISTANCE: 01332 576 850

PAGE 25
PAGE 24
WORK TECHNIQUES
Basic working techniques
Always slow the engine to idle speed after each working opera-
tion. Long periods at full throttle without any load on the engine
can lead to serious engine damage. It is recommended that the
engine not be operated for longer than 1 minute at full throttle
with no load.
Grass trimming using a trimmer head
Hold the trimmer head just above the ground at an angle. It is the
end of the trimmer line that does the work. Let the trimmer line
work at its own pace. Never press the trimmer line into the area to
be cut.
The trimmer line can easily remove grass and weeds up against
walls, fences, trees and borders, however it can also damage sen-
sitive bark on trees and bushes, and damage fence posts.
WORK TECHNIQUES
Reduce the risk of damaging plants by shortening the trimmer
line to 4-4 1/2 inches (10-12 cm) and reducing the engine speed.
When trimming you should use less than full throttle so that the
trimmer line lasts longer and to reduce the wear on the trimmer
head.
Clearing
The clearing technique removes all unwanted vegetation. Keep
the trimmer head just above the ground and tilt it. Let the end
of the trimmer line strike the ground around trees, posts, statues
and the like. CAUTION! This technique increases the wear on
the trimmer line.
The trimmer line wears quicker and must be fed forward more
often when working against stones, brick, concrete, metal fenc-
es, etc., than when coming into contact with trees and wooden
fences.
WWW.SGS-ENGINEERING.COM
CALL FOR ASSISTANCE: 01332 576 850

PAGE 27
PAGE 26
WORK TECHNIQUES
Cutting
The trimmer is ideal for cutting grass that is difficult to reach us-
ing a normal lawn mower. Keep the trimmer line parallel to the
ground when cutting. Avoid pressing the trimmer head against
the ground as this can ruin the lawn and damage the tool.
Do not allow the trimmer head to come constantly into contact
with the ground during normal cutting. Constant contact of this
type can cause damage and wear to the trimmer head.
Sweeping
The fan effect of the rotating line can be used for quick and easy
clearing up. Hold the trimmer line parallel to and
above the area to be swept and move the tool to and fro.
When cutting and sweeping you should use full throttle to
obtain the best results.
MAINTENANCE
Make sure to maintain the machine in good working
condition, carry out regular maintenance of the machine after
each use and before storage.
Any breach of adequate maintenance reduces the life of the
machine and increases the risk of breakdowns and accidents.
To preserve the security system throughout the life of the ma-
chine, it is important to perform maintenance and proper clean-
ing, DO NOT use non-compliant replacement parts and DO
NOT dismantle the machine yourself or change the security
features.
Make sure that the engine has stopped and is
cool before performing any service to the ma-
chine. Contact with moving a cutting head or hot
muffler may result in a personal injury.
The air filter, if clogged, will
reduce the engine performance.
Check and clean the filter ele-
ment in warm, soapy water as
required. Dry completely be-
fore installing. If the element is
broken or shrunk, replace with a
new one. Air
filter
AIR FILTER
WWW.SGS-ENGINEERING.COM
CALL FOR ASSISTANCE: 01332 576 850

PAGE 29
PAGE 28
MAINTENANCE
FUEL FILTER
When the engine runs
short of fuel, check the
fuel cap and the fuel filter
for blockage.
Fuel filter
SPARK PLUG
Starting failure and misfir-
ing are often caused by a
fouled spark plug. Clean
the spark plug and check
that the plug gap is in
the correct range. For a
replacement spark plug,
use the correct type.
If waste gets stuck and
causes blockages around
the intake air cooling
vent or between the
cylinder fins, it may cause
the engine to overheat,
and that in turn may
cause mechanical failure
on the part of the
brushcutter. Make sure it
is cleaned regularly.
MAINTENANCE
Cylinder
Intake air
cooling
vent (back)
CLEARING BLOCKAGES
AFTER EVERY 100 HOURS OF USE
1. Remove the muffler, insert a
screwdriver into the vent, and
wipe away any carbon build up.
Wipe away any carbon build up
on the muffler exhaust vent and
cylinder exhaust port at the same
time.
2. Tighten all screws, bolts, and
fittings.
3. Check to see if any oil or grease has worked its way in be-
tween the clutch lining and drum, and if it has, wipe it away
using spirits.
Muffler cleaning
WWW.SGS-ENGINEERING.COM
CALL FOR ASSISTANCE: 01332 576 850

PAGE 31
PAGE 30
REFILLING TRIMMING LINE TRANSPORTING THE STRIMMER
When you finish using the strimmer in one location
and wish to continue work in another spot, turn off
the engine, lift up the unit and carry it, paying at-
tention to the hot engine.
Be careful not to spill any fuels during
transportation to another spot.
When transporting the unit over long
distances, ensure the engine is cool to the touch,
and that any fluids cannot spill out.
WWW.SGS-ENGINEERING.COM
CALL FOR ASSISTANCE: 01332 576 850

PAGE 33
PAGE 32
This section describes the machine’s safety equipment, its pur-
pose, and how checks and maintenance should be carried out to
ensure that it operates correctly.
The life span of the machine can be reduced and the risk of ac-
cidents can increase if machine maintenance is not carried out
correctly and if service and/or repairs are not carried out profes-
sionally. If you need further information please contact us at SGS
Engineering.
Stop switch
Make sure the engine stops when you push and hold the stop
switch.
FOR SAFE OPERATION
Never use a machine that has faulty safety equip-
ment! Carry out the inspection, maintenance and
service routines listed in this section. If your ma-
chine fails any of these checks, contact your service
agent to get it repaired.
FOR SAFE OPERATION
WARNING: Never use a cutting attachment
without an approved guard.
Use of incorrectly wound trimmer line or an incorrect cutting at-
tachment increases the level of vibration.
WARNING: Overexposure to vibration can lead to circulatory
damage or nerve damage in people who have impaired circula-
tion. Contact your doctor if you experience symptoms of overex-
posure to vibration. Such symptoms include numbness, loss of
feeling, tingling, pricking, pain, loss of strength, changes in skin
colour or condition.
WWW.SGS-ENGINEERING.COM
CALL FOR ASSISTANCE: 01332 576 850
Cutting attachment guard
This guard is intended to prevent
loose objects from being thrown
towards the operator. The guard also
protects the operator from accidental
contact with the cutting attachment.
Ensure that the guard is undamaged
and is not cracked. Replace the guard
if it has been exposed to impact or is
cracked.

PAGE 34 PAGE 35
FOR SAFE OPERATION
Muffler
The muffler is designed to reduce the noise
level and to direct the exhaust gases away
from the operator.
CAUTION! Muffler is fitted with a catalytic
converter designed to reduce exhaust gas
emissions.
For mufflers, it is very important that you follow the instructions
on checking, maintaining, and servicing your machine. See
Checking, maintaining and servicing the machine’s safety equip-
ment section.
CAUTION: Mufflers fitted with catalytic
converters get very hot during use and remain
so for some time after stopping. This also
applies at idle speed. Contact can result in burns
to the skin.
Never use a machine that has a faulty muffler.
Regularly check that the muffler is securely attached to the ma-
chine. The muffler on this unit is equipped with a special spark
arrestor mesh. The mesh should be checked and, if necessary,
cleaned by a servicing dealer. A blocked mesh will cause the
machine to overheat, which can lead to serious damage.
FOR SAFE OPERATION
This section describes how to choose and maintain your cutting
equipment in order to:
• Obtain maximum cutting performance.
• Extend the life of the cutting equipment.
General rules
1. Only use cutting attachments with the guards SGS
Engineering recommend!
2. Check the cutting attachment for damage or cracks. A damaged
cutting attachment should always be replaced.
WWW.SGS-ENGINEERING.COM
CALL FOR ASSISTANCE: 01332 576 850
WWW.SGS-ENGINEERING.COM
CALL FOR ASSISTANCE: 01332 576 850

PAGE 37
PAGE 36
FOR SAFE OPERATION
Never use a machine with faulty safety equipment.
The machine’s safety equipment must be checked
and maintained as described in this section.
Trimmer head
• Only use the recommended cutting attachments as stated by
SGS Engineering.
• Smaller machines generally require small trimmer heads and
vice versa. This is because when clearing using trimmer line,
the engine must throw out the trimmer line radially from the
trimmer head, and overcome the resistance of the grass be-
ing cleared.
• The length of the trimmer line is also important. A longer
trimmer line requires greater engine power than a shorter
trimmer line of the same diameter.
• Make sure that the cutter on the trimmer guard is intact. This
is used to cut the trimmer line to the correct length.
• To increase the life of the trimmer line it can be soaked in
water for a couple of days. This will make the line tougher
and last longer.
Transporting and storage
• Store and transport the machine and fuel so that there is no
risk of any leakage or fumes coming into contact with sparks or
naked flames, for example, from electrical machinery, electric
motors, electrical relays/switches or boilers.
• When storing and transporting fuel always use approved con-
tainers intended for this purpose.
• When storing the machine for long periods the fuel tank must
be emptied. Contact your local authority to find out where to
dispose of excess fuel.
• Ensure the machine is cleaned and that a complete service is
carried out before long-term storage.
FOR SAFE OPERATION
WARNING: Take care when handling fuel.
Bear in mind the risk of fire, explosion and
inhaling fumes.
WWW.SGS-ENGINEERING.COM
CALL FOR ASSISTANCE: 01332 576 850

PAGE 38
PARTS DIAGRAM PARTS LIST
No Part name Code Qty No Part name Code Qty
1Screw M10 900802 1 30 Gasket ø6xø12x1.5 904320 1
2Cover 904292 1 31 Lock net 904321 1
3Plate 904293 1 32 Quick connect 904322 1
4Blade sheath 904294 1 33 Bolt M6x30 903949 1
53 teeth blade SSTBLADE1 1 34 Bolt M4x16 904324 1
6Plate 904296 1 35 Bolt M5x10 901696 1
7Bolt M5x10 901696 3 36 Location plate 904326 1
8Cover 904298 1 37 Spring 904327 1
9Snap ring ø32 904299 1 38 Connector 904328 1
10 Bearing 6002 904300 1 39 Throttle assembly 904329 1
11 Spline shaft 904301 1 40 Bolt M6x20 904201 4
12 Driven gear 904302 1 41 Upper plate branket 904331 1
13 Bearing 6000 904619 3 42 Handle bracket 904332 1
14 Gearcase 904304 1 43 Rubber 904333 2
15 Grease fitting 904305 1 44 Bracket Seat 904334 1
16 Bolt M5x25 901958 1 45 Oil Bearing 904335 6
17 Bolt M5x12 904074 1 46 Drive Shaft 904336 2
18 Driving Gear 904308 1 47 Pipe 904337 1
19 Ring ø10 904309 2 48 Harness hanger 904338 1
20 Snap ring ø26 904310 3 49 Connection Tube 904339 1
21 Grease fitting 904311 1 50 Snap ring ø45 904340 1
22 Screw ST4x8 904312 3 51 Anti-vibration rubber 904341 1
23 Small Blade 904313 1 52 Bolt M6x30 903949 4
24 Shield Rim 904314 1 53 Housing 904343 1
25 Guard 904315 1 54 Ring ø15 904344 1
26 Guard Bracket 904316 1 55 Bearing 6202 904004 1
27 Bolt M6x25 902554 4 56 Snap ring ø35 904346 1
28 Nut M6 904048 1 57 Drum 904347 1
29 Nut M4 904178 1 58 Engine 904348 1
WWW.SGS-ENGINEERING.COM
CALL FOR ASSISTANCE: 01332 576 850
Table of contents
Other SGS Trimmer manuals
Popular Trimmer manuals by other brands

Echo
Echo SRM - 311 Operator's manual

GreenWorks Pro
GreenWorks Pro ST60L00 owner's manual

Dolmar
Dolmar MS-20 C Spare parts list

Black & Decker
Black & Decker ST4500 instruction manual

Craftsman
Craftsman WEEDWACKER 358.791010 Operator's manual

Craftsman
Craftsman GASOLINE WEEDWACKER 358.791031 Operator's manual