Shadesign SHADEONE Twister-Sail Owner's manual

V 1805.01 VALID FROM MAY 2018
SHADEONE® Twister-Sail
Crank-operated height adjuster
Installation, Operation, Maintenance & Care
All information contained in this document was provided by the
manufacturer of the components for this particular model. As a
fabricator/distributor, Retractableawnings.com Inc. claims no
liability with respect to these documents as we are not
engineers and did not complete any of the information,
engineering or calculations in this document.
All measurements in this document are metric. To convert from
metric (meters, centimeters and millimeters) to imperial (feet
and inches) visit this website:
http://www.onlineconversion.com/length_common.htm

Contents
SHADEONE® INSTALLATION GUIDE
SHADEONE® OPERATING INSTRUCTIONS
1. SAFETY INSTRUCTIONS AND WARNINGS INSTALLATION INFORMATION
1.1 General safety instructions .................................................... Page 04
2. INSTALLING THE CRANKOPERATED HEIGHT ADJUSTER
2.1 List of components for crank-operated height adjuster ........................ Page 04
2.2 Installing the crank-operated height adjuster .................................. Page 05
2.2.1 Preparing for installation and installation requirements ................. Page 05
2.2.2 Attaching the tension cable ............................................ Page 06
2.2.3 Tensioning the Twister-Sail ............................................. Page 06
2.2.4 Attaching restraint cables to the tension cables ......................... Page 06
2.3 Commissioning ................................................................ Page 07
2.4 Disassembly ................................................................... Page 07
3. BASIC INFORMATION ...................................................................... Page 08
4. INTENDED USE ............................................................................. Page 09
5. PERATING THE TWISTERSAIL
5.1 Unrolling the Twister-Sail using the crank-operated height adjuster ............ Page 09
5.2 Rolling up the Twister-Sail using the crank-operated height adjuster ........... Page 09
5.3 General information about the Twister-Sail with crank-operated height adjuster Page 10
CONTENTS

3
SHADEONE® GUIDE TO CARE AND MAINTENANCE
6. CLEANING AND CARE ...................................................................... Page 11
7. MAINTENANCE AND REPAIR ............................................................... Page 11
EXPLANATION OF SYMBOLS: SAFETY INSTRUCTIONS AND IMPORTANT INFORMATION
This symbol indicates essential product information for the person
installing the Twister-Sail.
This symbol indicates deviations from the standard SHADEONE® Twister-Sail
installation process.
This symbol indicates essential information that is important for the safety
of individuals or for the functionality of the Twister-Sail.
SAFETY INSTRUCTIONS AND WARNINGS; INSTALLATION INFORMATION1.
1.1 GENERAL SAFETY INSTRUCTIONS
Disregarding the applicable instructions for installation and/or operation could endanger the
individuals involved.
It is very important that the installation and operating instructions are observed.
Disregarding these instructions absolves the manufacturer of liability.
Country-specic legal requirements regarding occupational health and safety and accident
prevention must be observed. In particular, work undertaken at great heights calls for
specialised personal protection. The instructions provided on the product and its packaging
must be observed.
INSTALLATION GUIDE
INSTALLING THE CRANKOPERATED HEIGHT ADJUSTER2.
This installation guide is intended to be an addendum to the installation guide for the
SHADEONE® Twister-Sail. This is because integrating the crank-operated height adjuster
results in minor changes to the Twister-Sail’s installation process.
Deviations from the standard SHADEONE® Twister-Sail installation process shall be marked
using the information note Deviation.
2.1 LIST OF COMPONENTS FOR CRANKOPERATED HEIGHT ADJUSTER
• Column(s) with integrated height adjuster
• Hand crank for operating the height adjuster
5
2.2 INSTALLING THE CRANKOPERATED HEIGHT ADJUSTER
Below are the chapter titles that feature deviations from the standard SHADEONE® Twister-Sail
installation guide.
2.2.1 INSTALLATION INSTRUCTIONS AND RESTRICTIONS
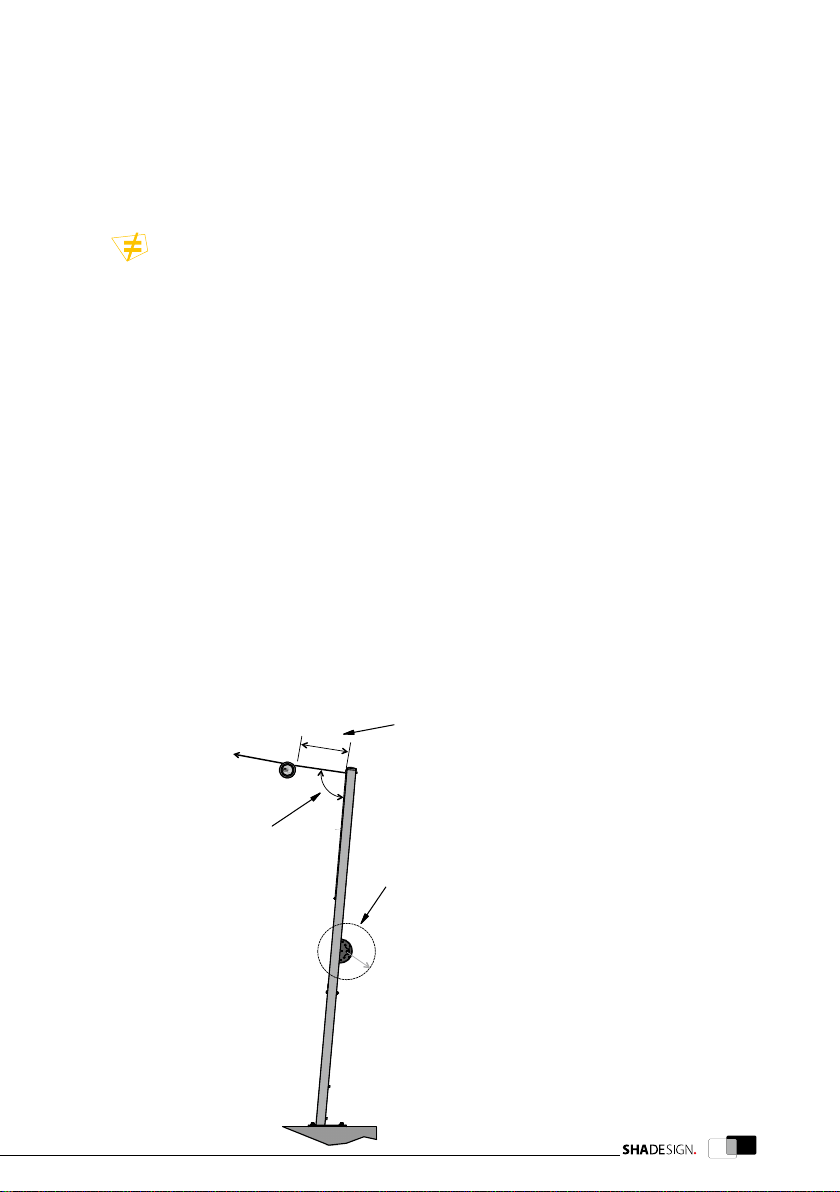
Deviation: (Additionally, see diagram below)
• Positioning of height-adjustable column (and its secondary tensioning element):
Minimum distance from the front edge of the cylinder when the fabric screen is rolled
out completely to the pulley head of the tensioning elements: at least 30 cm!
• The angle of the direct line from the top of the column to the wall-mounting point for
the fabric screen and the column axis must be between 85° and 105°! (Example: If the
column is vertical, the maximum angle of the fabric screen’s incline is 15°)
• Crankshaft: The area within a 25 cm radius of the crankshaft is required in order to operate
the height adjuster. There should be no obstructions in this area – choose the height of
the crankshaft accordingly!
The tensioning elements [normal tensioning elements and those for the height-adjustable
column(s)] are installed in line with the Twister-Sail SHADEONE® installation guide, using
appropriate xing materials. The Twister-Sail is installed by following the SHADEONE® Twister-
Sail installation guide, up to and including the point where the columns or wall-mounted
tensioning units are set up.
REQUIREMENTS FOR INSTALLING THE TWISTERSAIL WITH CRANKOPERATED
HEIGHT ADJUSTER PLEASE CONSIDERTHESE BEFORE BEGINNINGTHE INSTALLATION
PROCESS
POSITIONING:
Positioning of height-adjustable column (and its
secondary tensioning element): Minimum distance
between the front edge of the cylinder when the fabric
screen is rolled completely out to the front edge of the
top of the column: at least 30 cm!
CRANKSHAFT:
The area within a 25 cm radius of the crankshaft is
required in order to operate the height adjuster. There
should be no obstructions in this area.
#$%
#
#
min. 30 cm
INCLINE:
The angle of the direct
line from the top of
the column to the
wall-mounting point
for the fabric screen
and the column axis
must be between 85°
and 105°!

2.2.3 TENSIONING THE TWISTERSAIL
Deviation: For any installation of a height-adjustable column, before beginning to tension
the tension cable using the tensioning crank, the hand crank that is embedded inside the
crank housing should be turned in order to raise the tension cable until it stops at the very
top. In doing so, the tension cable will slacken to a greater or lesser degree, depending on
the installation situation. From this point, the tensioning crank is turned anti-clockwise to re-
tension the tension cable so that it is no longer slack. This position is used as the zero point for
the following values for the number of crank turns. You can now continue to follow the steps
in the SHADEONE® Twister-Sail installation guide regarding tensioning.
Deviation: The values for the number of crank turns is dierent for height-adjustable columns.
Using the zero point that was established previously for counting the number of crank turns,
the basic pre-tensioning value is 45 turns and the maximum number of turns is 100. You can
now continue the installation by following the steps in the SHADEONE® Twister-Sail installation
guide up to the point of attaching the restraint cables.
2.2.4 ATTACHING RESTRAINT CABLES TO THE TENSION CABLES
Deviation: For this step, the Twister-Sail not only needs to be fully rolled out but the tension
cable also needs to be raised to the very top.
You can now continue to follow the steps in the SHADEONE® Twister-Sail installation guide up
to the point of commissioning.
INSTALLATION GUIDE
2.2.2 ATTACHING THE TENSION CABLE
Deviation: Whenever a height-adjustable column is installed, the hand crank that is embedded
inside the crank housing should be used to lower the tension cable until it stops at the very
bottom. From this point, follow the SHADEONE® Twister-Sail installation guide and continue
with the steps for attaching the tension cable up to the point of tensioning of the Twister-Sail.
7
2.3 COMMISSIONING
Before commissioning the Twister-Sail, remove all items (e.g. ladders, tools, etc.) that are in or
below the Twister-Sail’s range of movement.
During the test runs, nobody should be in this area due to the danger caused by potential
malfunctions.
Deviation: Before the Twister-Sail is rolled out, always ensure that the tension cables
for the height-adjustable columns are raised to the very top. The tension cables for the
height-adjustable columns can only be lowered using the hand crank once the Twister-
Sail has been rolled out completely.
When the cylinder is rolled up, the tension cables for the height-adjustable columns are not to
be lowered. This could otherwise lead to the height-adjustable columns being overloaded and
permanently damaged, and the Twister-Sail could also be damaged!
Deviation: Before the Twister-Sail is rolled up, it is important to check that the tension
cables for the height-adjustable columns are raised to the very top. The Twister-Sail
should only be rolled up if this condition is met.
If the tension cables for the height-adjustable columns are in their lowered state and the
Twister-Sail is rolled up, this can lead to the height-adjustable columns being overloaded and
permanently damaged, and the Twister-Sail could also be damaged!
The deviations and instructions in this chapter are to be expressly communicated to the
user or end customer so as to prevent malfunctions and damage.
2.4 DISASSEMBLY
Ensure that there are no unauthorised persons in the area around the Twister-Sail.
Disassemble the Twister-Sail by following the assembly instructions in reverse.
(Important: Use the cylinder clamps!)

OPERATING INSTRUCTIONS
BASIC INFORMATION3.
Thank you for buying a crank-operated height adjuster for the SHADEONE® Twister-Sail from
shadesign.
In order for your product to operate for a long time and without any faults, careful attention
must be given to these operating instructions. It is important to follow these instructions in
order to ensure the safety of the individuals involved. It is important that the instructions in the
operating instructions document are observed.
Disregarding these instructions absolves the manufacturer of liability.
Please also observe any instructions provided on the product and its packaging. We request
that you retain these instructions for the system’s installation, operation, maintenance and care,
and that you pass them on to the new owner if you should happen to sell it.
These instructions are an addendum to the instructions for the standard version of the
SHADEONE® Twister-Sail and they focus on the crank-operated height adjuster that has been
installed.
Operating instructions
SHADEONE®Twister-Sail

9
INTENDED USE4.
The shadesign crank-operated height adjuster is rst and foremost intended as a product
to adjust the height of the shadesign Twister-Sail. Any dierent or additional uses shall be
deemed as contrary to the intended use. The manufacturer assumes no liability for damages
resulting from such uses. No modications, additions or alterations may be made to the
system without the permission of the manufacturer. Defective system components must
be replaced immediately. Only the manufacturer’s original replacement parts may be used.
There is no guarantee that components from other manufacturers have been designed and
manufactured to bear sucient loads and comply with safety standards. Placing additional
loads on the Twister-Sail’s crank-operated height adjuster by hanging objects onto it can lead
to the system being damaged or falling down and is therefore not permitted. Installation and
maintenance work must only be carried out by qualied specialists.
5.2 ROLLING UP THE TWISTERSAIL
USING THE CRANKOPERATED HEIGHT ADJUSTER
Before the Twister-Sail is rolled up, it is important to check that the tension cables for
the height-adjustable columns are raised to the very top. The Twister-Sail should only
be rolled up if this condition is met.
If the tension cables for the height-adjustable columns are in their lowered state and the
Twister-Sail is rolled up, this can lead to the height-adjustable columns being overloaded and
permanently damaged, and the Twister-Sail could also be damaged!
OPERATING THE TWISTERSAIL5.
5.1 UNROLLING THE TWISTERSAIL
USING THE CRANKOPERATED HEIGHT ADJUSTER
Before the Twister-Sail is rolled out, always ensure that the tension cables for the
height-adjustable columns are raised to the very top. The tension cables for the height-
adjustable columns can only be lowered using the hand crank once the Twister-Sail has
been rolled out completely.
When the cylinder is rolled up, the tension cables for the height-adjustable columns are not to
be lowered. This can lead to the height-adjustable columns being overloaded and permanently
damaged, and the Twister-Sail could also be damaged!

5.3 GENERAL INFORMATION ABOUT THE TWISTERSAIL
WITH CRANKOPERATED HEIGHT ADJUSTER:
The Twister-Sail may only be operated by people who have been briefed or who have read
and understood these operating instructions. Particular caution is required regarding people
who are unable to properly assess the risks arising from incorrect use. Never let children play
with the operating units! If required, mount the pull-cord tting somewhere they will not be
able to reach.
Twister-Sails by shadesign should only be operated if checks have been made to ensure that
there are no obstacles in the Twister-Sail’s range of movement.
Do not touch the tension cable while the Twister-Sail is rolling out! Things can become trapped
in moving parts, which poses a risk of injury.
Only use appropriate and approved ladders or other climbing aids when maintaining, repairing
and cleaning the system. Climbing aids must not be leant against or secured to any Twister-Sail
components. Ensure that any climbing aids are stable and have sucient grip. Never hold onto
the system – this could result in injuries and falls! The Twister-Sail fabric screen and the tension
cable are exible and can buckle and/or give way.
For safety reasons, please ensure that the system is not accidentally operated while work is
underway on the system. It should be made clear – by placing an appropriate sign next to
the pull-cord tting – that work is underway on the system and that it must not be operated.
In frosty conditions, there is the danger that the formation of ice will cause the rolled up fabric
screen to freeze solid. If this happens, the system should never be violently tugged! The system
should only be operated again once it rolls down when the pull-cord is simply let up.
Foreign bodies or heavy soiling on the fabric screen must be removed immediately, since they
risk causing damage to or ruining the Twister-Sail.
If the weather is windy, very rainy or snowy, the Twister-Sail must be rolled up in order to
protect it from potential damage. For this reason, the Twister-Sail should not be left rolled out
during periods of absence either.
If the Twister-Sail is being uninstalled or replaced, please refer to the applicable disposal
regulations.
If you should happen to give away or sell the system, it is important that you also pass on these
instructions for its installation, operation, maintenance and care.
If the fabric screen gets damp or even wet, the Twister-Sail should be rolled out as soon as
possible so that it can dry (risk of formation of mould and black spots, which risks damaging
the fabric and its seams).
OPERATING INSTRUCTIONS

11
MAINTENANCE AND REPAIR7.
Safe use of the Twister-Sail is only possible if the system is regularly inspected and maintained.
No lubricants or sprays are to be used near the cylinder or near any plastic components.
The Twister-Sail has restraint cables at both tensioning elements. A restraint cable temporarily
prevents any loss of function and the associated consequences that would arise if the Twister-
Sail’s tension cable snapped (e.g. due to mechanical damage or wear). If the tension cable
were to snap, the restraint cable would assume its load-bearing function until it was possible
to replace the defect tension cable.
You can tell that a tension cable has snapped if the restraint cable has assumed the load and
if the cylinder is suddenly hanging unusually low. The Twister-Sail should now be immediately
rolled up and should not be used until it has been repaired by a specialist. Both the tension
cable and the restraint cable that was used must be replaced!
The Twister-Sail must be regularly inspected for signs of wear and damage to the fabric screen,
operating cord, tension cable and restraint cable. If any damage is identied, the repair should
be undertaken by a specialist or a suitable service supply company. Twister-Sails that are in
need of repair must not be used.
CLEANING AND CARE6.
Use appropriate climbing aids!
No Twister-Sail system components or cover plates should be opened or removed during
cleaning and care. If necessary, contact a specialist company.
Severe accumulation of dirt can lead to the system becoming sti or being damaged, and it
reduces the lifespan of the product. You should therefore regularly remove any dirt adhering
to the fabric screen.
Do not use pressure washers, scouring agents or scouring sponges for cleaning the fabric
screen! Do not use solvents such as alcohol or petrol!
Cleaning the product:
A soft brush or a hand brush can be used to remove dirt from the Twister-Sail. Clean the fabric
screen with a mild liquid detergent and rinse thoroughly with cold water. TheTwister-Sail frame
can be cleaned with a standard cleaning product and wiped down with a damp cloth.
The fabric screen must be allowed to dry after being cleaned.
GUIDE TO CARE AND MAINTENANCE
Guide to care and maintenance
SHADEONE®Twister-Sail

No liability is assumed for changes, mistakes or printing errors
SHADESIGN GmbH
Bruckmühler Straße 29 | D - 83052 Bruckmühl - Heufeld
Phone: +49 (0) 8061 989 45 - 0 | Fax: +49 (0) 8061 989 45 - 99 | info@shadesign.com | www.shadesign.com
Table of contents
Other Shadesign Accessories manuals


