Sharp 14MR10 User manual

1
CONTENTS
PAGE
• IMPORTANT INFORMATION ....................... 2
• Supplied Accessories ................................. 2
• IMPORTANT SAFEGUARDS ........... 3~ 4
• Before Operating Your Television .............. 5
• Antenna Connections ..................... 5~ 6
• Quick Reference Control Operation ........... 7
• EZ SETUP during First Use ........................ 8
• Demo Mode .................................................. 9
• Accessing the MAIN MENU screen
without Remote Control ............................ 9
• Language .................................................... 10
• Sleep Timer ................................................. 10
• Video Adjust ............................................... 11
• Closed Caption .......................................... 12
• Energy Save ............................................... 13
• Set Up ........................................... 14 ~ 17
EZ SETUP ................................................ 14
Channel Setting ........................ 15 ~ 17
Blue Screen ............................................ 17
•
Using the Video and Audio Input Jacks .....
18
•
Specifications ...............................................
19
• Before Calling for Service ......................... 20
• Calling for Service ..................................... 20
COLOR TELEVISION
OPERATION MANUAL
7399 GJ
READ THIS OPERATION MANUAL COMPLETELY BEFORE OPERATING THIS
PRODUCT.
MODEL
14MR10
A
s an
E
NERGY
S
TAR
®
P
artner, SHARP has determined that this product meets the
E
NERGY
S
TAR
®
guidelines for energy efficiency.
E
NERGY
S
TAR
®
is a
U.S.
registered
trademark.
01-07 14MR10 [E].p65e 9/5/01, 7:11 PM1

2
TV
Welcome to the SHARP Family. We are pleased that you are now the owner of a SHARP Color Television
–built for outstanding quality, reliability and performance.
Every SHARP Color Television set is tuned and adjusted for proper color and sound, and has passed
through the most stringent quality control tests at the factory. We have prepared this OPERATION MANUAL
so that you may adjust the picture and color to your personal viewing preference.
We sincerely hope that you receive the greatest satisfaction and enjoyment from your new SHARP Color
Television set for years to come.
Please read these instructions carefully, and keep them handy for your future reference.
IMPORTANT
To aid reporting in case of loss or theft, please record the TV’s
model and serial numbers in the space provided. The numbers
are located at the rear of the TV.
Size AA
Dry Batteries
Infrared Remote Control
Part Number : RRMCG1339CESB
IMPORTANT INFORMATION
WARNING: TO REDUCE THE RISK OF FIRE OR ELECTRIC SHOCK, DO NOT
EXPOSE THIS APPLIANCE TO WET LOCATIONS.
Model No.:
Serial No.:
CAUTION: TO REDUCE THE RISK OF
ELECTRIC SHOCK,
DO NOT REMOVE COVER (OR BACK).
NO USER-SERVICEABLE PARTS INSIDE.
REFER SERVICING TO QUALIFIED SERVICE
PERSONNEL.
The lightning flash with
arrowhead within a triangle is
intended to tell the user that
parts inside the product are a
risk of electric shock to
persons.
The exclamation point within a
triangle is intended to tell the
user that important operating
and servicing instructions are
in the papers with the
appliance.
Supplied Accessories
“Dipole”Antenna
300/75 ohm
Adaptor
WHAT IS ENERGY STAR ®
TVs and VCRs use energy both when they are on and when they are off. Americans spend more than $1
billion a year on energy consumed by TVs and VCRs when they are not in use. The new ENERGY
STAR ®models will reduce that energy “leakage”by up to 75 percent. Ultimately, this will mean more than
$500 million a year in energy savings for consumers.
The energy savings will help reduce the burning of fossil fuels and the related carbon dioxide pollution
that contributes to global warming. If every American family replaced their TVs and VCRs with ENERGY
STAR ®models, it would reduce carbon dioxide emissions by five million tons every year —equivalent to
eliminating the pollution from more than one million cars.
By using ENERGY STAR ®products, you will save money on your electric bills and use less energy. That
makes good economic sense and it’s good for our environment.
01-07 14MR10 [E].p65e 9/5/01, 7:11 PM2

3
CAUTION: Please read all of these instructions before you operate your television and save
these instructions for later use.
Electrical energy can perform many useful functions. This unit has been engineered and manufactured to
assure your personal safety. BUT IMPROPER USE CAN RESULT IN POTENTIAL ELECTRICAL SHOCK
OR FIRE HAZARDS. In order not to defeat the safeguards incorporated in this equipment, observe the
following basic rules for its installation, use and servicing.
1. Unplug this television equipment from the wall outlet before cleaning.
2. Do not use liquid cleaners or aerosol cleaners. Use a damp cloth for cleaning.
3. Do not use attachments not recommended by the television equipment manufacturer as they may
cause hazards.
4. Do not use this television equipment near water —for example, near a bathtub, washbowl, kitchen sink
or laundry tub, in a wet basement, or near a swimming pool, etc.
5. Do not place this equipment on an unstable cart, stand, or table. The television equipment may fall,
causing serious injury to a child or an adult, and serious damage to the equipment.
Use only with a cart or stand recommended by the manufacturer or sold with the
television equipment.
Television equipment and cart combination should be moved with care. Quick stops,
excessive force, and uneven surfaces may cause the equipment and cart combination
to overturn.
6. Wall or shelf mounting should follow the manufacturer’s instructions, and should use a mounting kit
approved by the manufacturer.
7. Slots and openings in the cabinet and the back or bottom are provided for ventilation, and to insure
reliable operation of the television equipment and to protect it from overheating, these openings must
not be blocked or covered. This television equipment should not be placed in a built-in insulation such
as a bookcase unless proper ventilation is provided.
8. The openings should never be covered with a cloth or other material, and the bottom openings should
not be blocked by placing the television equipment on a bed, sofa, rug, or other similar surface. This
television equipment should never be placed near or over a radiator or heat register.
9. This television equipment should be operated only from the type of power source indicated on the
marking label. If you are not sure of the type of power supplied to your home, consult your television
dealer or local power company.
For television equipment designed to operate from battery power, refer to the operating instructions.
10. Do not allow anything to rest on the power cord. Do not locate this television equipment where the cord
will be abused by persons walking on it.
11. As a safety feature, television equipment is equipped with a 2-wire polarized plug blade bigger than
the other). The 2-wire polarized plug will fit only one way into the power outlet.
If the plug does no fit, ask your elecrician to replace your obsolete outlet. Do not modify the plug and
defeat this safety feature.
12. Follow all warnings and instructions marked on the television equipment.
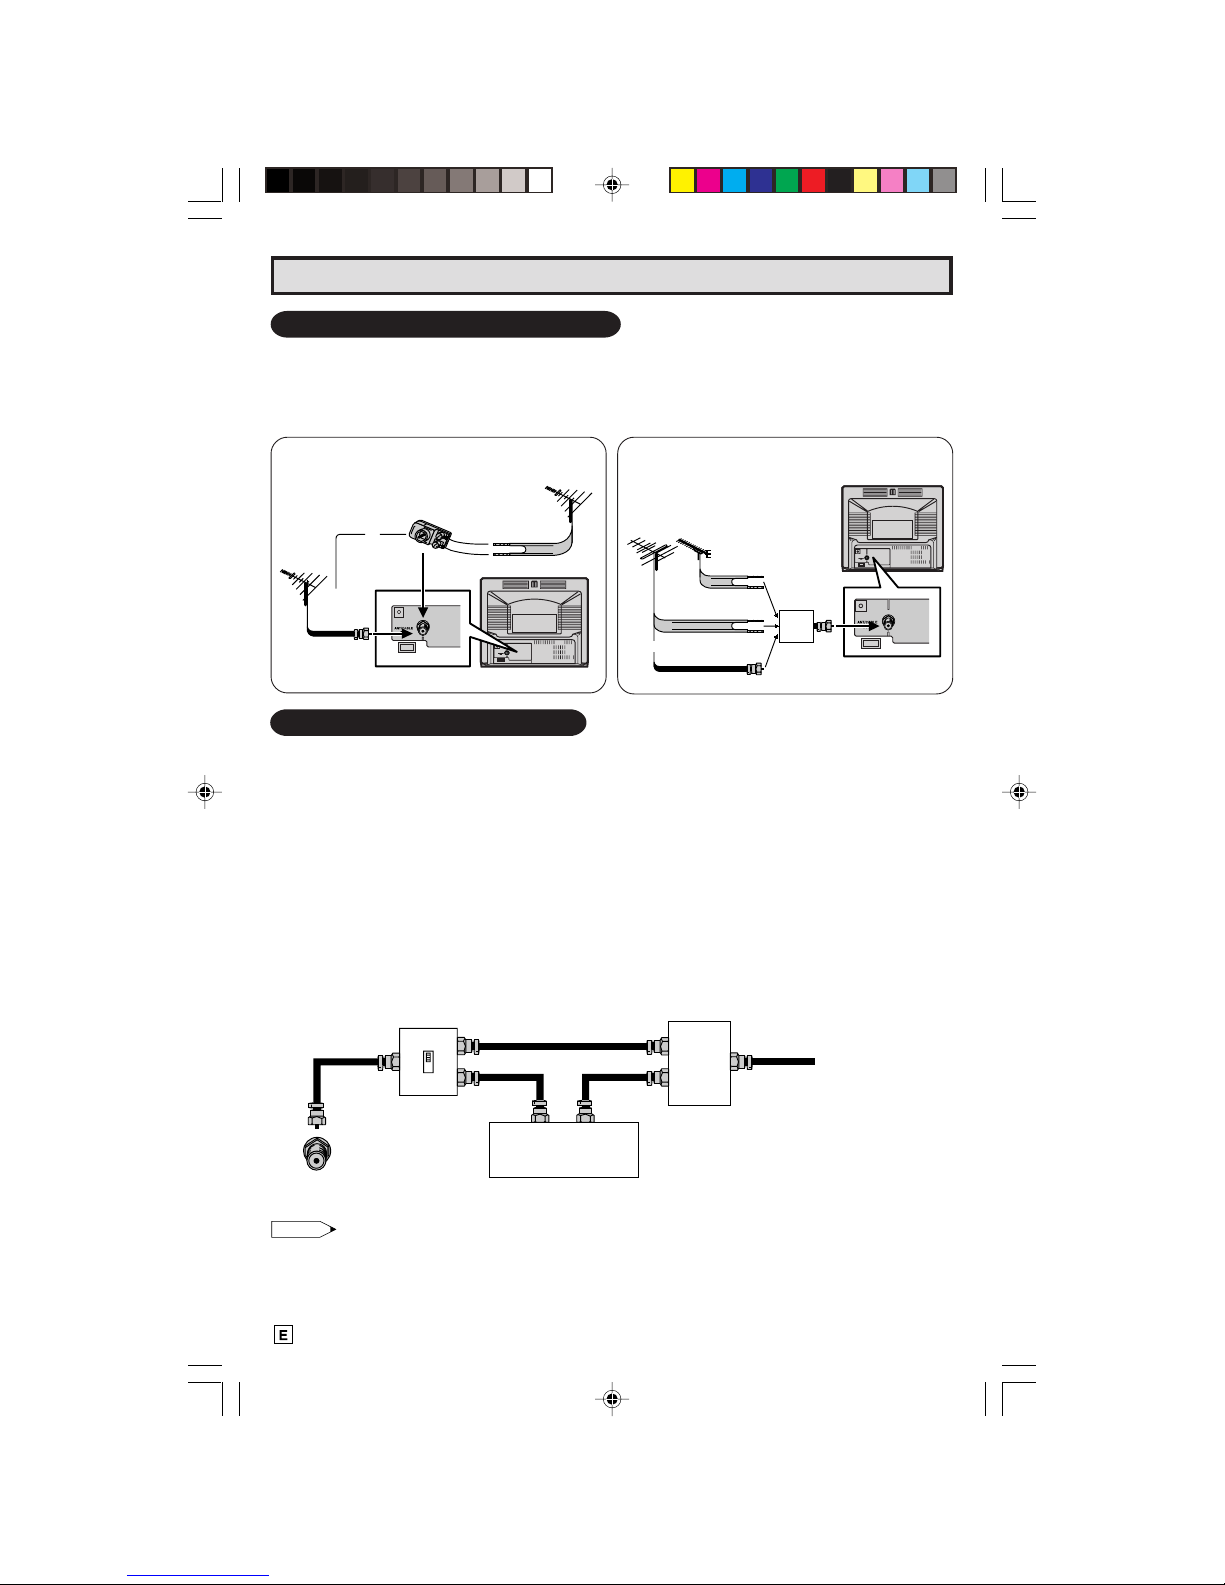
13. If an outside antenna is connected to the television equipment, be sure the antenna system is grounded
so as to provide some protection against voltage surges and built-up static charges.
IMPORTANT SAFEGUARDS
01-07 14MR10 [E].p65e 9/5/01, 7:11 PM3

4
EXAMPLE OF ANTENNA GROUNDING
ACCORDING TO NATIONAL ELECTRICAL CODE.
ANTENNA LEAD-IN WIRE
GROUND CLAMP
ANTENNA DISCHARGE UNIT
GROUND CLAMPS
14. For added protection for this television equipment during a lightning storm, or when it is left unattended
and unused for long periods of time, unplug it from the wall outlet and disconnect the antenna. This
will prevent damage to the equipment due to lightning and power-line surges.
15. An outside antenna system should not be located in the vicinity of overhead power lines or other electric
light or power circuits, or where it can fall into such power lines or circuits. When installing an outside
antenna system, extreme care should be taken to keep from touching such power lines or circuits as
contact with them might be fatal.
16. Do not overload wall outlets and extension cords as this can result in fire or electric shock.
17. Never push objects of any kind into this television equipment through cabinet slots as they may touch
dangerous voltage points or short out parts that could result in a fire or electric shock. Never spill liquid
of any kind on the television equipment.
18. Do not attempt to service this television equipment yourself as opening or removing covers may
expose you to dangerous voltage or other hazards. Refer all servicing to qualified service personnel.
19. Unplug this television equipment from the wall outlet and refer servicing to qualified service personnel
under the following conditions:
A. When the power cord or plug is damaged or frayed.
B. If liquid has been spilled into the television equipment.
C. If the television equipment has been exposed to rain or water.
D. If the television equipment does not operate normally by following the operating instructions. Adjust
only those controls that are covered by the operating instructions as improper adjustment of other
controls may result in damage and will often require extensive work by a qualified technician to
restore the television equipment to normal operation .
E. If the television equipment has been dropped or the cabinet has been damaged.
F. When the television equipment exhibits a distinct change in performance —this indicates a need
for service.
20. Upon completion of any service or repairs to this television equipment, ask the service technician to
perform routine safety checks to determine that the television is in safe operating condition.
21. When replacement parts are required, be sure the service technician has used replacement parts
specified by the manufacturer that have the same characteristics as the original part. Unauthorized
substitutions may result in fire, electric shock, or other hazards.
GROUNDING CONDUCTORS
ELECTRIC
SERVICE
EQUIPMENT
POWER SERVICE GROUNDING ELECTRODE
SYSTEM
IMPORTANT SAFEGUARDS (Continued)
01-07 14MR10 [E].p65e 9/5/01, 7:11 PM4

5
Location
•For normal operation, your TV should be located in an area of the room where cool adequate ventilation
is provided. Do not place the back of the television set in a place where free airflow will be restricted.
•Any magnetic force may disturb the color picture. Make sure that magnets, electric clocks, toys using
magnets or any other magnetic substance, such as iron are kept well away from the TV set.
Power
Your TV operates on 120 Volts, 60 Hz (normal household current).
Note:
•If the set will not be used for a long period, such as during a vacation, unplug the set from the wall
outlet to economize power. (If the TV set is plugged in, a slight current still flows, even with the
POWER BUTTON in the OFF position.)
•Lines and other noise may appear in TV broadcast images when an FM tuner or radio is located near
the TV and both radio and TV broadcasts are being received. Should such noise appear, turn off
either the TV or the radio.
•If you are listening to an AM broadcast, turn the TV off. AM broadcast signals may not be received
due to interference from the TV.
LBefore using the television, prepare the Remote Control
To use the remote control, insert batteries first.
Insert the batteries
•With your thumb nail, pull up the slit as indicated by the arrow to remove the back cover. Insert two
batteries (size “AA”). Be sure to match the battery e/dterminals with the e/dmarks inside the
compartment.
Antennas
•The antenna requirements for good color television reception are more important than those for
black & white television reception. For this reason, a good quality outdoor antenna is strongly
recommended.
Before Operating Your Television
Battery
Cover
Pull up
Antenna Connections
INDOOR ANTENNA CONNECTION
•The first thing to do after unpacking your TV set is to plug the “telescopic dipole”antenna into the set
as shown in the illustration. Push the antenna as far as it will go into the socket until it snaps into
position. (Should you want to remove the antenna, pull it up.)
•Connect the indoor antenna cable to the COAXIAL CABLE CONNECTOR on the rear of the TV set.
COAXIAL CABLE
CONNECTOR
01-07 14MR10 [E].p65e 9/5/01, 7:11 PM5

6
75-ohm
coaxial
cable
300-ohm
twin-lead
VHF/UHF
ANTENNA
VHF/UHF ANTENNA
REAR OF TV
300/75-ohm
ADAPTOR
or
300-ohm
twin-lead
300-ohm
twin-lead
75-ohm coaxial
cable
IN OUT
VHF
ANTENNA
UHF
ANTENNA
COMBINER
(not supplied)
or
REAR OF TV
OUT
A
IN
B
A. Combination VHF/UHF Antennas
OUTDOOR ANTENNA CONNECTION
•Use one of the following two diagrams if you connect an outdoor antenna.
A: Using a VHF/UHF combination outdoor antenna.
B: Using separate VHF and/or UHF outdoor antenna.
•Connect an outdoor antenna cable lead-in to the COAXIAL CABLE CONNECTOR on the rear of the
TV set.
CABLE TV (CATV) CONNECTION
•A 75 ohm coaxial cable connector is built into the set for easy hookup. When connecting the 75 ohm
coaxial cable to the set, screw the 75 ohm cable to the COAXIAL CABLE CONNECTOR.
•Some cable TV companies offer “premium pay channels”. Since the signals of these premium pay
channels are scrambled, a cable TV converter/descrambler is generally provided to the subscriber by
the cable TV company. This converter/descrambler is necessary for normal viewing of the scrambled
channels. (Place your TV on channel 3 or 4, typically one of these channels is used. If this is unknown,
consult your cable TV company.) For more specific instructions on installing cable TV, consult your
cable TV company. One possible method of utilizing the converter/descrambler provided by your
cable TV company is explained below.
Please note: RF switch equipped with position A/B (not provided) is required.
“A”position on the RF switch (not supplied) : You can view all unscrambled channels using the TV’s
channel keys.
“B”position on the RF switch (not supplied) : You can view the scrambled channels via the converter/
descrambler using the converter’s channel keys.
Note:
•Consult your SHARP Dealer or Service Center for the type of splitter, RF switch or combiner that
might be required.
B. Separate VHF/UHF Antenna
Antenna Connections (Continued)
Cable TV converter/
descrambler
(not supplied)
Two-set
signal
splitter
(not
supplied)
Cable TV Line
RF switch (not supplied)
OUT IN
01-07 14MR10 [E].p65e 9/5/01, 7:11 PM6

7
TV
Quick Reference Control Operation
Infrared Transmitter Window
INPUT
Press →Switch to external video input
mode.
Press again →Switch to TV mode.
See page 18.
CHANNEL UP/DOWN
(8) Selects next higher channel.
(9) Selects next lower channel.
•
See pages 15 ~ 17 for channel
presetting.
•Moves the “ ” mark of the MENU
screen.
MENU
Press →Accesses MAIN MENU.
Press again →Exits MAIN MENU.
DISPLAY
Press →Displays receiving channel for
4 seconds.
Press again →Removes display.
•Temporarily displays receiving
channel when in Closed Caption
mode.
LLocation of Controls
Front Panel
VIDEO/AUDIO-IN TERMINALS
CHANNEL UP/DOWN
(8) Selects next higher channel.
(9) Selects next lower channel.
SENSOR AREA FOR
REMOTE CONTROL
VOLUME UP/DOWN
(+) Increases sound.
(–) Decreases sound.
POWER
Press →On.
Press again →Off.
Basic Remote Control Functions
Quick Reference Control Operation
POWER
Press →On.
Press again →Off.
REMOTE KEYPAD
Accesses any channel from keypad.
FLASHBACK
Returns to previous channel.
VOLUME UP/DOWN
(+) Increases sound.
(–) Decreases sound.
•In menu mode, changes or selects
the TV adjustments.
MUTE
Press →Mutes sound.
Press again →Restores sound.
•CLOSED CAPTION appears when
sound is muted.
Press →Accesses MAIN MENU.
Press again →Exits MAIN MENU.
MENU
01-07 14MR10 [E].p65e 9/5/01, 7:11 PM7

8
ENGL I SH
ESPAÑOL
FAVORABIDIOMA LE
ENGL I SH
ESPAÑOL
LANGUAGSELECT E
OR CAB LE .
TSART SETUP?ZE
ANTENNCONNECT A
YE : VOL+
VOL –
S
NO :
AU
18
TO RGGAMM I NORP
WA I TPLE EAS
VOL –
TSOP:
2
LWhen you turn on the TV for the first time, it will automatically
memorize the broadcast channels.
Please perform the following instructions before you pressing
the power button.
(1) Insert the batteries into the remote control. (See page 5)
(2) Connect the antenna cable to the TV set. (See pages 5~ 6)
(3) Plug in the AC POWER cord to the wall outlet.
1Press the
POWER
button on the TV set or on the Remote Control
to turn on the TV. The SELECT LANGUAGE mode will be displayed.
2Press
CH
UP
(
8
)
or
DOWN
(
9
)
to select “ENGLISH”or “SPANISH
(ESPAÑOL)”. Then press
MENU
to set LANGUAGE.
3Press
VOL
(+)
or
(–)
to access EZ SETUP mode.
4Press
VOL
(+)
.
The tuner will automatically search for the
broadcast and cable TV channels. (The CH No.
will automatically increase when it appears.)
If you want to stop the EZ SETUP process once it
has started, press
VOL
(–)
and it will be cancelled.
If you want to SET UP again, please refer to page
14 on SET UP.
To cancel EZ SETUP
Press
VOL
(–)
.
5Once EZ SETUP is completed, the smallest channel number
memorized will be displayed.
Note:
•If EZ SETUP does not memorize all the channels in your region, please refer to page 15 for more
information on manual memorizing the channels using CHANNEL SETTING.
•It may be difficult to PRESET when the broadcast signals are weak, the channel cycle frequency is
incorrect or frequency jamming is occuring around the area. Please refer to pages 15 ~ 17 for
more information on manual memorizing the channels using CHANNEL SETTING.
EZ SETUP during First Use
(Remote Control)
POWER
CHANNEL
UP (8)/
DOWN (9)
MENU
VOLUME
(+)/(–)
(SELECT LANGUAGE mode)
(On the Set)
(EZ SETUP mode)
→
08-09 14MR10 [E].p65e 28/5/01, 11:31 AM8

9
Demo Mode
•To quickly learn more about the TV set, press and hold for more than
three seconds
MENU
or both
CH
UP
(
88
88
8
)
and
DOWN
(
99
99
9
)
on the TV
set. The TV set will go into DEMO mode and briefly explain the various
features.
•To cancel DEMO mode, again press
MENU
or both
CH
UP
(
88
88
8
)
and
DOWN
(
99
99
9
)
on the TV set.
Example:
DEMO mode display
(On the Set)
CHANNEL
UP
(
88
88
8
)/
DOWN
(
99
99
9
)
buttons
S
i
e
m
p
r
e
S
i
e
m
p
r
e
M
e
j
o
r,
Sha r p
Accessing the MAIN MENU screen without Remote Control
•If you misplaced your Remote Control you can still access most settings
via the MAIN MENU screen when you press
MENU
or both
CH
UP
(
88
88
8
)
and
DOWN
(
99
99
9
)
on the TV set.
•Some features of your TV set will not be accessible without the Remote
Control. If you lost your Remote Control, contact a Sharp Service
Center for a replacement.
or
MENU
button
(On the Set)
CHANNEL
UP
(
88
88
8
)/
DOWN
(
99
99
9
)
buttons
or
MENU
button
08-09 14MR10 [E].p65e 9/5/01, 7:11 PM9

10
TIMER
VIDEO ADJUST
CAPT I ONCLOSED
ENERGY SAVE
SET UP
VIDEO ADJUST
CAPT I ONCLOSED
ENERGY SAVE
SET UP
TIMER
BL E SCREENU
AGE
TINGCH SET
LANGU
ENGL I SH
ESPAÑOL
LANGUAGE
VIDEO ADJUST
CAPT I ONCLOSED
ENERGY SAVE
SET UP
TIMER
SL EP T IMERE
120 RE AIMN
ENGL I SH
ESPAÑOL
IDIOMA
Sleep Timer
LYou can preset your television to turn off automatically in increments of 30, 60, 90 or 120
minutes.
1Press
MENU
to access MAIN MENU screen.
2Press
VOL
(+)
or
(–)
to access sleep timer mode.
3Press
VOL
(+)
or
(–)
to set a sleep time of 30, 60, 90 or 120 minutes.
4Press
MENU
to exit.
Note:
•To turn off the Sleep Timer, repeat the above SLEEP TIMER steps and select “– ––REMAIN”during
step 3.
(MAIN MENU screen)
(LANGUAGE change mode)
(MAIN MENU screen)
→
→
Language
LThe language for the ON SCREEN DISPLAY can be set to ENGLISH or SPANISH.
LSetting the ON SCREEN DISPLAY Language.
1Press
MENU
to access MAIN MENU screen.
2Press
CH
UP
(
8
)
or
DOWN
(
9
)
to move the “ ” mark to “SET UP”.
3Press
VOL
(+)
or
(–)
to access SET UP mode, then press
CH
UP
(
8
)
or
DOWN
(
9
)
to move the “ ” mark to “LANGUAGE”.
4Press
VOL
(+)
or
(–)
to access LANGUAGE change mode.
5Press
CH
UP
(
8
)
or
DOWN
(
9
)
to select “ENGLISH”or “SPANISH
(ESPAÑOL)”.
6Press
MENU
to exit.
(SET UP mode)
(TIMER SET mode)
→
10-11 14MR10 [E].p65e 28/5/01, 1:23 PM10

11
VIDEO ADJUST
CAPT I ONCLOSED
ENERGY SAVE
SET UP
TIMER
PICTURE TINT COLOR
SHARP
FAVORITE COLOR
RESET
: CH DOWN (9)
: CH UP (8)
BRIGHT
ICTUR
E
–+
P50
1Press
MENU
to access MAIN MENU screen.
2Press
CH
UP
(
8
)
or
DOWN (
9
)
to move the “ ” mark to “VIDEO
ADJUST”.
3Press
VOL
(+)
or
(–)
to access PICTURE adjust mode.
4Press
CH
UP
(
8
)
or
DOWN (
9
)
to select the desired mode.
(Refer to the diagram below.)
5Press
VOL (+)
or
(–)
to adjust the setting.
6Repeat steps 4to 5to adjust other settings.
7Press
MENU
to exit.
(PICTURE adjust mode)
VOL UP (+)
increase contrast
VOL DOWN (–)
decrease contrast
(MAIN MENU screen)
VOLUME
(+)/(–)
CHANNEL
UP (8)/
DOWN (9)
MENU
Selected VOL UP (+) button VOL DOWN (–) button
item
PICTURE To increase contrast To decrease contrast
TINT To make skin tones greenish To make skin tones purplish
COLOR To increase color intensity To decrease color intensity
BRIGHT To increase brightness To decrease brightness
SHARP To increase sharpness To decrease sharpness
FAVORITE To choose a RED, BLUE or STANDARD COLOR TONE.
COLOR
RESET To return all adjustments to factory preset levels.
Description of Adjustment Items
Video Adjust
→
ICTUR
E
–+
P50
10-11 14MR10 [E].p65e 9/5/01, 7:12 PM11

12
LHOW TO SET CLOSED CAPTION
• Your TV is equipped with an internal Closed Caption decoder. “Closed
Caption” is a system which allows you to view conversations, narration,
and sound effects in TV programs and home videos as subscript on
your TV screen as shown on the right.
• Not all the programs and videos will offer closed caption. Please look
for the “ ” symbol to ensure that captions will be shown.
• Closed Caption broadcast can be viewed in two modes: CAPTION
and TEXT. For each mode, two channels are available, CH1 and CH2:
The [CAPTION] mode subscripts dialogues and commentaries of TV
dramas and news programs while allowing clear view of the picture.
The [TEXT] mode displays over the picture other various information
(such as TV program schedule, weather forecast, etc.) that is
independent of the TV programs.
1Press
MENU
to access MAIN MENU screen.
2Press
CH
UP
(
8
)
or
DOWN
(
9
)
to move the “ ” mark to “CLOSED
CAPTION”.
3Press
VOL
(+)
or
(–)
to access “CLOSED CAPTION”.
4Press
CH
UP
(
8
)
or
DOWN
(
9
)
to move the “ ” mark to either
“MODE”or “DATA”.
5Press
VOL
(+)
or
(–)
to change the CLOSED CAPTION setting.
6Press
MENU
to exit.
Note:
•If a broadcast has CLOSED CAPTION and the
MUTE
button is pressed, the set enters [CAPTION]
mode automatically. Pressing
MUTE
again will return the set to its previous condition.
•Closed Caption may malfunction (white blocks, strange characters, etc.) if signal conditions are poor
or if there are problems at the broadcast source. This does not necessarily indicate a problem with
your TV.
•If any button is pressed to call up the ON SCREEN DISPLAY while viewing a CLOSED CAPTION
broadcast, the closed captions will disappear momentarily.
•When viewing in TEXT mode, if no TEXT broadcast is being received, for some programs the screen
may become dark and blank. Should this occur, set the Closed Caption mode to “OFF”.
Closed Caption
(MAIN MENU screen)
(CLOSED CAPTION setting mode)
MODE : DATA :
→
VOLUME
(+)/(–)
CHANNEL
UP (8)/
DOWN (9)
MENU
TI ERM
V I DEO ADJUST
CAPT I ONCLOSED
ENERGY SAVE
SET UP
CAPT I ONCLOSED
MOD E : C A P
DATA : CH 1
TION
CAPT I ONCLOSED
MOD E : C A P
DATA : CH 1
TION
CAPT I ONCLOSED
MOD E : C A P
DATA : CH 1
TION
CH 1
CH 2
CAPTION
TEXT
OFF
12 14MR10 [E].p65e 9/5/01, 7:13 PM12

13
→
:OFF
EN REGYSAVE
:ON
EN REGYSAVE
Energy Save
(MAIN MENU screen)
(ENERGY SAVE select mode)
V I DEO ADJUST
CAPT I ONCLOSED
ENERGY SAVE
SET UP
TIMER
LThis feature lets you lower the power consumption of your TV
set which in turn saves you money and minimizes the impact on
the environment. When this feature is turned on, it reduces the
brightness of the TV to a level that consumes approximately 20%
less energy than when the feature is turned off.
The reduction in brightness will be less noticeable under low
room lighting conditions.
1Press
MENU
to access MAIN MENU screen.
2Press
CH UP
(
8
)
or
DOWN
(
9
)
to move the “ ” mark to
“ENERGY SAVE”.
3Press
VOL (+)
or
(–)
to access ENERGY SAVE select mode.
4Press
VOL (+)
or
(–)
to select “ON”.
5Press
MENU
to exit.
VOLUME
(+)/(–)
CHANNEL
UP (8)/
DOWN (9)
MENU
13-17 14MR10 [E].p65e 9/5/01, 7:14 PM13

14
V I DEO ADJUST
CAPT I ONCLOSED
ENERGY SAVE
SET UP
TIMER
LA GUAGEN
BL E NSCREEU
CH SE T T I NG
AI /CABLER
EZ SE PTU
CH SEARCH
CH MEMORY
OR CA B L E .
TSART SETUP?ZE
ANTENNCONNECT A
YE : VOL+
VOL –
S
NO :
AU
18
TO RGGAMM I NORP
WA I TPLE EAS
VOL –
TSOP:
2
LEZ SETUP
By operating the channel preset functions, you can preset your
TV to the desired channels for viewing.
1Press
MENU
to access MAIN MENU screen.
2Press
CH
UP
(
8
)
or
DOWN
(
9
)
to move the “ ” mark to “SET
UP”.
3Press
VOL
(+)
or
(–)
to access SET UP mode, then press
CH UP
(
8
)
or
DOWN
(
9
)
to move the “ ” mark to “CH SETTING”.
4Press
VOL
(+)
or
(–)
to access CH SETTING mode.
5Press
VOL
(+)
or
(–)
to access EZ SETUP mode.
6Press
VOL
(+)
.
The tuner will automatically search for the
broadcasting and cable TV channels. (The CH No.
will automatically increase when it appears.)
If you want to stop the EZ SETUP process once it
has started, press
VOL
(–)
. Search will be
canceled.
To cancel EZ SETUP
Press
VOL
(–)
.
7Once EZ SETUP is completed, the smallest channel number
memorized will be displayed.
(MAIN MENU screen)
(SET UP mode)
Set Up
→
VOLUME
(+)/(–)
CHANNEL
UP (8)/
DOWN (9)
MENU
REMOTE
KEYPAD
(EZ SETUP mode)
(CH SETTING mode)
→
13-17 14MR10 [E].p65e 9/5/01, 7:14 PM14

15
V I DEO ADJUST
CAPT I ONCLOSED
ENERGY SAVE
SET UP
TIMER
LA GUAGEN
BL E NSCREEU
CH SE T T I NG
H SEARCH
AI /CABLER
EZ SETUP
C
HMEMORYC
AI
ABLE STD
R
AI /CABLER
C
ABLE HRCC
ABLE I RCC
AIR CABLE STD CABLE HRC CABLE IRC
→
LCHANNEL SETTING
If EZ SETUP does not memorize all the channels in your region, follow the instructions below
to manually memorize the channel.
1Press
MENU
to access MAIN MENU screen.
2Press
CH
UP
(
8
)
or
DOWN
(
9
)
to move the “ ” mark to “SET
UP”.
3Press
VOL
(+)
or
(–)
to access SET UP mode.
4Press
CH
UP
(
8
)
or
DOWN
(
9
)
to move the “ ” mark to “CH
SETTING”.
5Press
VOL
(+)
or
(–)
to access CH SETTING mode.
6Press
CH
UP
(
8
)
or
DOWN
(
9
)
to move the “ ” mark to the
“AIR/CABLE”, then press
VOL
(+)
or
(–)
to access AIR/CABLE
mode.
7Press
CH
UP
(
8
)
or
DOWN
(
9
)
to move the “ ” mark to the
desired mode.
8Press
MENU
to exit.
Note:
•Receivable channels of your TV set are:
AIR channels: CABLE channels:
VHF: 2 through 13. 1 (HRC and IRC mode only)
UHF: 14 through 69. 2 through 125 (STD, HRC and IRC)
Set Up (Continued)
(CH SETTING mode)
(SET UP mode)
(AIR/CABLE mode)
(MAIN MENU screen)
→
→
H SEARCH
AI /CABLER
EZ SETUP
C
HMEMORYC
(CH SETTING mode)
13-17 14MR10 [E].p65e 9/5/01, 7:14 PM15

16
AI /CABLER
EZ SE PTU
CH SEARCH
CH MEMORY
2
AR +T:
TO –P:
AIR
CH SEARCH
ST
S
1
AI /CABLER
EZ SE PTU
CH SEARCH
CH MEMORY
Set Up (Continued)
→
(START)
(STOP)
or
LSaving broadcast TV channels into memory.
1.1 Press
MENU
to access MAIN MENU
screen, then press
CH
UP
(
8
)
or
DOWN
(
9
)
to move the “ ” mark to “SET UP”.
1.2 Press
VOL
(+)
or
(–)
to access SET UP
mode, then press
CH
UP
(
8
)
or
DOWN
(
9
)
to move the “ ” mark to “CH
SETTING”.
1.3 Press
VOL
(+)
or
(–)
to access CH
SETTING mode.
1.4 Press
CH
UP
(
8
)
or
DOWN
(
9
)
to move
the “”mark to “CH SEARCH”, then press
VOL
(+)
or
(–)
to access CH SEARCH
mode.
START
2.1 Press
VOL
(+)
. The tuner will search
through all available channels in your area
and add them into the TV’s memory.
STOP
2.2 Press
VOL
(–)
. CH SEARCH will stop at
the current channel and will not add any
higher channels.
2.3 Press
MENU
to exit.
Note:
LAdding weak or additional channels or erasing unwanted channels from TV memory.
1.1 Press
MENU
to access MAIN MENU
screen, then press
CH
UP
(
8
)
or
DOWN
(
9
)
to move the “ ” mark to “SET UP”.
1.2 Press
VOL
(+)
or
(–)
to access SET UP
mode, then press
CH
UP
(
8
)
or
DOWN
(
9
)
to move the “ ” mark to “CH
SETTING”.
1.3 Press
VOL
(+)
or
(–)
to access CH
SETTING mode, then press
CH
UP
(
8
)
or
DOWN
(
9
)
to move the “ ” mark to “CH
MEMORY”.
2.1 Press
VOL
(+)
or
(–)
to access CH
MEMORY.
2.2 Use
CH
UP
(
8
)
or
DOWN
(
9
)
or
REMOTE
KEYPAD
to select each desired channel
to add or erase.
2.3 Press
VOL
(+)
to add a channel to the TV’s
memory or press
VOL
(–)
to erase a
channel from the TV’s memory.
(CH SETTING mode)
(CH SETTING mode)
→
→
→
(CH SEARCH mode)
→
→
•If you press
VOL
(+)
again while in the CH SEARCH mode, auto-program will start again, and the
previously memorized channels will be lost.
13-17 14MR10 [E].p65e 9/5/01, 7:14 PM16

17
V I DEO ADJUST
CAPT I ONCLOSED
ENERGY SAVE
SET UP
TIMER
LA GUAGEN
BL E NSCREEU
CH SE T T I NG
:OFF
BL EUSCREEN
:ON
BL EUSCREEN
D+:
AIR
CHMEMORY
ADTO
2
1
E–:
AIR
CH MEMORY
ESTO AR
21
LBLUE SCREEN
Automatically turns the screen blue if a broadcast signal is not
received (e.g. when a TV station closes down). After 15 minutes
of non-reception, the TV set turns off.
1Press
MENU
to access MAIN MENU screen.
2Press
CH
UP
(
8
)
or
DOWN
(
9
)
to move the “ ” mark to “SET
UP”.
3Press
VOL
(+)
or
(–)
to access SET UP mode.
4Press
VOL
(+)
or
(–)
to access BLUE SCREEN select mode.
5Press
VOL
(+)
or
(–)
to select “ON”.
6Press
MENU
to exit.
Note:
•Poor reception due to weak signals, or too much noise might activate the BLUE SCREEN function
despite the presence of a broadcast signal. To continue watching TV under these conditions, switch
the BLUE SCREEN “OFF”.
→
(MAIN MENU screen)
Set Up (Continued)
VOLUME
(+)/(–)
CHANNEL
UP (8)/
DOWN (9)
MENU
(SET UP mode)
(BLUE SCREEN select mode)
2.4 Press
MENU
to exit.
VOL
(+)
To add channel 12 to the
TV memory
VOL
(–)
To erase channel 12 from
the TV memory
(CH MEMORY
memorized channel)
(CH MEMORY
unmemorized channel)
13-17 14MR10 [E].p65e 28/5/01, 11:37 AM17

18
Using the Video and Audio Input Jacks
LConnecting video equipment for playback of video material.
• When the television is connected to video equipment as shown below, the material being played
back on the video equipment can be seen on the television screen.
VIDEO EQUIPMENT
Connecting video device equipped with video output terminals.
(Front connection
terminals of TV)
To VIDEO OUTPUT
To AUDIO OUTPUT
LTo watch video material playback.
• Press the Remote’s
INPUT
button to select the VIDEO INPUT mode for the video equipment you
wish to play.
• The external VIDEO INPUT mode will change as follows each time the
INPUT
button is pressed.
• INPUT mode can be selected by pressing either the
CH
UP
(
8
)
on the TV remote control when the
TV is set to the highest channel stored in memory, or by pressing the
CH
DOWN
(
9
)
when it is set to
the lowest channel.
Note:
• When connecting video or audio equipment to the television, be sure that the power is turned off in
order to prevent damage to either the television or the equipment being connected.
• Audio-visual material may consist of copyrighted works which must not be recorded without the
authority of the owner of the copyright. Please refer to relevant laws in your country.
• For detailed information on the connection and use of auxiliary equipment, refer to the instruction
manuals of the equipment being used.
• The connection cords can be obtained from your local video store.
AIR
or
CABLE
INPUT
(Front)
DVD
CAMCORDER
TV GAME
VCR
FWDREV
CONNECTIONS
18 14MR10 [E].p65e 9/5/01, 7:15 PM18

19
Specifications
MODEL
Receiving System
Reception Channels
AIR
CATV
Channel Tuning
Antenna Input Impedance
Screen Size
Terminals
Sound Output
Power Source
Power Consumption
Dimensions
Weight (approx.)
VHF
UHF
14MR10
NTSC
2-13 ch
14-69 ch
1-125 ch
181-channel Reception PLL tuning system
VHF/UHF 75 ohm Unbalanced
14˝ Diagonally Measured
Audio/Video input x 1 (Front x 1)
1.0 W (MAX)
AC 120 V, 60 Hz
53 W
141/32˝ (W) x 1211/16˝ (H) x 1421/32˝ (D)
[355.5 mm (W) x 322.0 mm (H) x 372.0 mm (D)]
18.7 lbs. (8.5 kg)
• Design and specifications are subject to change without notice.
19-20 14MR10 [E].p65e 9/5/01, 7:16 PM19

20
Calling for Service
In Mexico:
Sharp Electronics Corporation
Sucursal en México
Col. Ampliación Asturias
México D.F. 06890
Tel. : 57 16 90 00
Internet : www.sharp.com.mx
e-mail: [email protected]
In other Latin American Countries:
Sharp Electronics Corporation
6100 Blue Lagoon Drive Suite 230
Miami, Florida 33126 USA
Tel. : (305) 264-2277
Internet : www.SiempreSharp.com
Printed in Mexico
TINS-7399GJZZ
01P06-MMP
Before Calling for Service
Check these items and see if you can correct the trouble with a slight adjustment of the controls.
POSSIBLE REMEDY
Try a new channel, if OK, then there
is possible station trouble.
Is TV plugged in? Power at outlet?
Is TV’s POWER button on?
Is antenna connected to terminal on
the back of the set?
If outside antenna is being used,
check for broken wire.
Check for local interference or
external electrical noise.
Turn off with POWER button and then
turn it on after about a minute.
Adjust COLOR control.
Adjust PICTURE control.
Check external Video/Audio products:
look for loose/broken connection
leads. (Refer to page 18)
Check batteries of Remote Control.
Are audio cables connected firmly?
Check the volume level.
Change Closed Caption mode to
“OFF” / Energy Save mode to “OFF”.
Unplug the TV and plug it in again
after 2 minutes or longer.
XXXXX XX X XX XXXX XXX
XXXXXXX X XXXXXXXXX
X X XXXXXX XXXXXXXXX
XXXXX XX X XX XXXXXXX
XXXXXXXXXXXXXX XX X
XXXXXXX X XXXXXXXXX
X X XXXXXX XXXXXXXX X
X X XXXXX X XXXXXXXX X
XXXXXXX X XXXXXX XXX
XXXXX XX X XX XXXX XX X
X X XXXXX X XXXXXXXX
X X XXXXX X XXXXXXXXX
XXXXX XX X XXXXXX XX X
PROBLEM
No Playback of VCR and Disc
Player
No Picture or Sound from
External Video/Audio Products
Remote Control Doesn’t Work
Bars on Screen
Picture Distorted
Picture Rolls Vertically
No Color
Poor Reception on Some
Channels
Weak Picture
Lines or Streaks in Picture
Ghosts in Picture
Picture Blurred
Sound OK, Picture Poor
Picture OK, Sound Poor
No Picture or Sound
Dark and Blank Picture
External Electrical Noise
Interfering with TV’s Operation
Respuestas Inmediatas
QUICK SERVICE
CHECK LIST
SHARP CORPORATION
19-20 14MR10 [E].p65e 29/5/01, 11:17 AM20
Table of contents
Languages:
Other Sharp CRT TV manuals

Sharp
Sharp 32R-S60 User manual

Sharp
Sharp VT-3700S Assembly instructions

Sharp
Sharp DV-3760S User manual

Sharp
Sharp 54DS-03S User manual

Sharp
Sharp DV-25071S User manual

Sharp
Sharp 37DT-25H User manual

Sharp
Sharp 37FM-11H User manual

Sharp
Sharp 59CS-03IR User manual

Sharp
Sharp 32LF-94EC User manual

Sharp
Sharp 51DS-03H User manual

Sharp
Sharp 14LT-45C User manual

Sharp
Sharp EL-334TB - EL-334TB Semi-Desktop Basic... User manual

Sharp
Sharp 32U-S60B User manual

Sharp
Sharp 15JF-26H User manual

Sharp
Sharp 72FF-57E User manual

Sharp
Sharp 59CS-03H User manual

Sharp
Sharp 27F640 User manual

Sharp
Sharp MX-2610N User manual

Sharp
Sharp 37AM-23S User manual

Sharp
Sharp CV-4045S User manual