Shearwater GF Computer User manual

Shearwater GF
Computer
DANGER
This computer is capable of calculating deco stop requirements. These calculations
are at best a guess of the real physiological decompression requirements. Dives
requiring staged decompression are substantially more risky than dives that stay well
within no-stop limits.
Diving with rebreathers and/or diving mixed gasses and/or
performing staged decompression dives and/or diving in overhead
environments greatly increases the risk of scuba diving.
You really are risking your life with this activity.
WARNING
This computer has bugs. Although we haven’t found them all yet, they are there. It is
certain that there are things that this computer does that either we didn’t think about,
or planned for it to do something different. Never risk your life on only one source of
information. Use a second computer or tables. If you choose to make riskier dives,
obtain the proper training and work up to them slowly to gain experience.
This computer will fail. It is not whether it will fail but when it will fail. Do not depend
on it. Always have a plan on how to handle failures. Automatic systems are no
substitute for knowledge and training.
No technology will keep you alive. Knowledge, skill, and practiced procedures are
your best defense. (Except for not doing the dive, of course.)

Overview
Features
•Depth, time and oxygen sensor display
•Buhlmann algorithm with gradient factors conservatism
•Imperial and metric displays
•Two set points, each of which can be set between .4 and 1.4
•A menu system that adapts to diving status
•Automatic turn off after 30 minutes on the surface
•Depth sensor to rated to 450 feet
•Any combination of oxygen, nitrogen, and helium
•Open and closed circuit, switchable during a dive
•5 CC and 5 OC gasses
•Gasses can be changed and added during a dive
•CNS tracking
• No lockout
• Automatic setpoint switching (configurable)
• Battery life of over 500 hours of diving or years of standby
• Backup battery to allow battery change without losing tissues
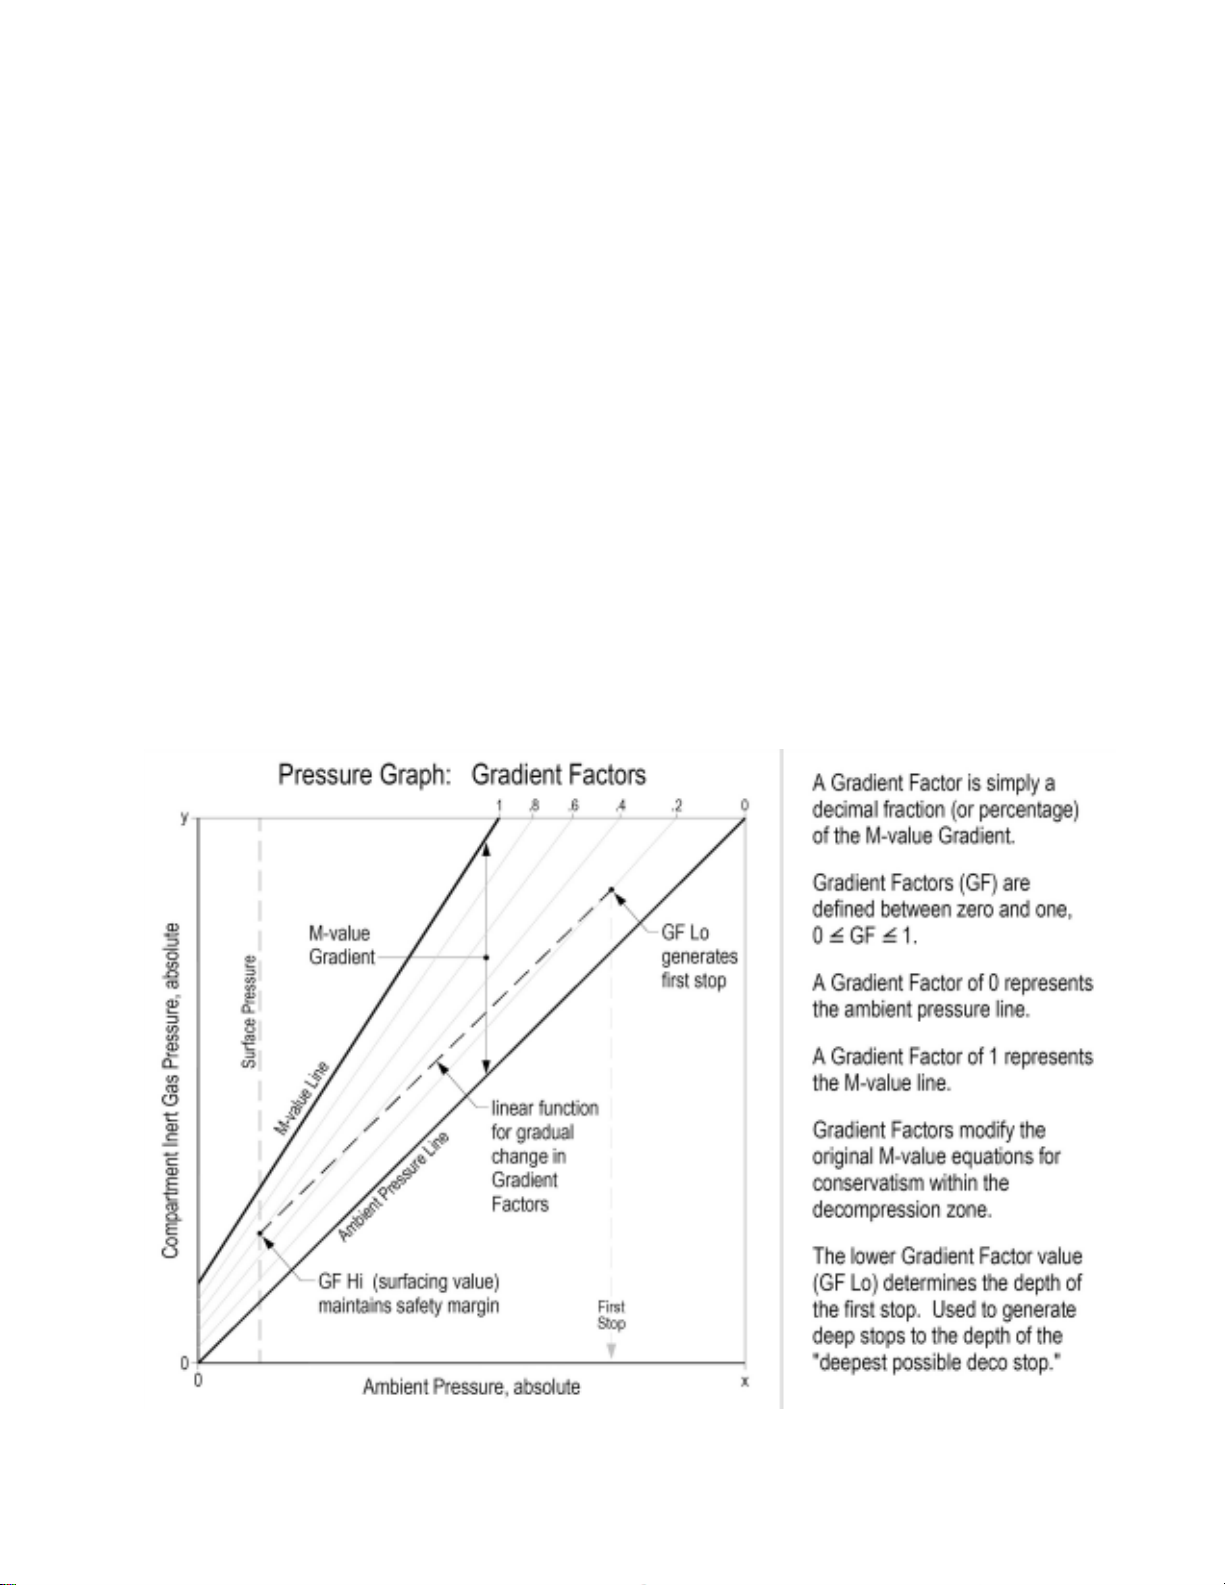
Decompression and Gradient Factors
The basic decompression algorithm used for the computer is Buhlmann ZHL-16C. It
has been modified by the use of Gradient Factors that were developed by Erik Baker.
We have used his ideas to create our own code to implement it. We would like to give
credit to Erik for his work in education about decompression algorithms, but he is in no
way responsible for the code we have written.
The computer implements Gradient Factors by using levels of conservatism. The
levels of conservatism are pairs of number like 30/85. For a more detailed explanation
of their meaning, please refer to Erik Baker’s excellent articles: Clearing Up The
Confusion About “Deep Stops” and Understanding M-values. The articles are readily
available on the web. You might also want to search for “Gradient Factors” on the
web.
The default of the system is 30/85. The system provides several settings that are
more aggressive than the default.
DO NOT USE THIS SYSTEM UNTIL YOU ARE SURE
YOU UNDERSTAND THE SETTINGS.
Graph from Erik Baker’s “Clearing Up The Confusion About Deep Stops”

Display
The display has five areas. There are two title areas
and three data display areas.
Across the top line is the title for the first row of
information. This area only changes during the
display of the dive log. The first data area shows
depth, battery warning, dive time, ascent rate, first
stop depth, and first stop time. It is showing a depth
of 34.7 meters, a low battery alarm, 15 minute dive
time, a 6 meter per minute ascent rate, and a stop at
24 meters for 1 minute.
The low battery indicator flashes when it is on.
The ascent rate indicator shows 6 levels of ascent rate. Each block represents either
10 fpm or 3 mpm. When the ascent rate is greater than 6 units, the whole block will be
filled in, and it will flash.
If you are above the indicated stop depth, the stop depth will flash.
The next line has the three O2 sensor readings. They will show in PPO2 normally, but
if both buttons are pushed together, the display will switch to mV for a few seconds. If
a sensor is voted out, it will display the current value, but it will flash and the value will
not be considered in the average PPO2.
The next area is the title for the bottom line. This title changes frequently in the menu
system to provide additional information about the bottom line. The last line shows
that the computer is in closed circuit (CC) mode with a gas containing 21% oxygen and
0% helium.
If there is a gas programmed in the current mode (OC or CC) that would normally be
used at the current depth, the system will flash the gas contents to remind you to either
switch gases, or remove the gas if you aren’t using it.
The no decompression limit (NDL) is zero since we are in decompression, and the
time to surface (TTS) is 15 minutes.
The computer works in both metric and imperial for depths and temperatures. The
depth shows a decimal point when the depth is between 0 and 99 meters. It shows no
decimal point if the display is set to feet.
Buttons
Two buttons control the system. The functions can be summarized as follows:
The left button (MENU) is used to scroll through the menu or increment the display.
When the “Switch Setpoint” menu item is displayed, MENU will move to the “Select
Gas” menu item.
In the “Select Gas” menu, MENU increments the gas number.
The right button (SELECT) is used to accept the current choice. In some cases that
means save the current value, in others, it means execute the command. For
example, when a gas is displayed in the “Select Gas” menu, SELECT will select the
displayed gas. When the “Switch Setpoint” menu is displayed, SELECT will switch the
setpoint.
There are several other button pushes that the system recognizes.
To turn the computer on, press MENU then immediately press SELECT.
When the system is not in a menu, pushing SELECT will bring up information displays
with various dive status information.
Pushing both buttons at any time will change the PPO2 display to a millivolt (mV)
display. The mV display is not subject to calibration. It displays the raw mV on the
sensor without regard to whether the sensor is calibrated or whether is has been voted
out.

MENU
•In the menu system, the menu button moves to the next menu or increments
the current number
•When the computer is off, pressing MENU and then immediately pressing
SELECT will turn the computer on.
SELECT
•In the menu system, the confirm button saves the current value or executes the
command.
•Out of the menu system, the confirm button brings up information displays.
BOTH BUTTONS
•Pushing both buttons at any time changes the PPO2 display to the mV display.
The computer works in both metric and imperial for depths and temperatures. The
depth shows a decimal point when the depth is between 0 and 99 meters. No decimal
point is shown if the display is set to feet or if the depth is greater than 99 meters.
Menu
The system is designed to make the selection of the common operational functions
while diving easy. The menu selections are separated into two sets. The “Operation”
menu is to provide easy access to commonly used functions. The “Setup” menu is to
change system settings.
The system will continue to read the sensors and update the sensor display while you
are in the menu system.

If no buttons are pushed for a few minutes, the menu system will time-out. Anything
that had been previously saved will be retained. Anything that was in the middle of
editing will be discarded.
The menu structure is below:
•Turn Off
•Calibrate
•Switch Setpoint
•Select Gas
•Switch to Open Circuit
•Dive Setup
oEdit Low Setpoint
oEdit High Setpoint
oDefine Gasses
oExtenal PPO2 On/Off
•Dive Log
oDisplay Log
oUpload Log
•System Setup
oAuto SP Switch
oSet Conservatism
oSwitch to Feet/Meters
oSet Backlight Time-out
oSet Backlight Brightness
oSet Time
oSet Date
Some menu items are not applicable in some operating modes.
The status screens are:
•Max depth, CNS, setpoint and average PPO2
•Diluent PPO2 and Conservatism setting
•Water temperature, loop temperature and voltage
•Date and Time
•Surface interval
•Serial Number, Model, and Version
Basic Setup
Before using the computer there are several things that need to be configured. This is
not an exhaustive list of the pre-requisites for diving the system, but a suggestion of
key tasks.

In the System Setup menu, select the Auto SP Switch parameters, and set the units to
your preference.
Enter the gasses that you will use for the closed circuit portion of your dive, and enter
the gasses for open circuit bailout.
The system will use the closed circuit gasses that are available in the order of oxygen
content during the Time To Surface (TTS) calculation. The system will use to the next
available gas that has a PPO2 of less than 1.0 for closed circuit diving.
If the system is switched to open circuit during a dive, the system will calculate the
TTS based on the configured open circuit gasses that are available. It will use the next
available gas that has a PPO2 of less than 1.6 for open circuit diving.
NOTE: These gasses are used automatically only for TTS calculations. The gas used
to calculate the current tissue load and the current ceiling is always the gas actually
selected by the diver.
Calibrate the oxygen sensors.
Example Dive
This is an example of the displays that might be seen on a dive.
This example shows a complicated dive with multiple CC gasses and multiple OC bail-
out gasses. A normal, single diluent CC dive wouldn’t have any button pushes at all,
so there wouldn’t be much to show.
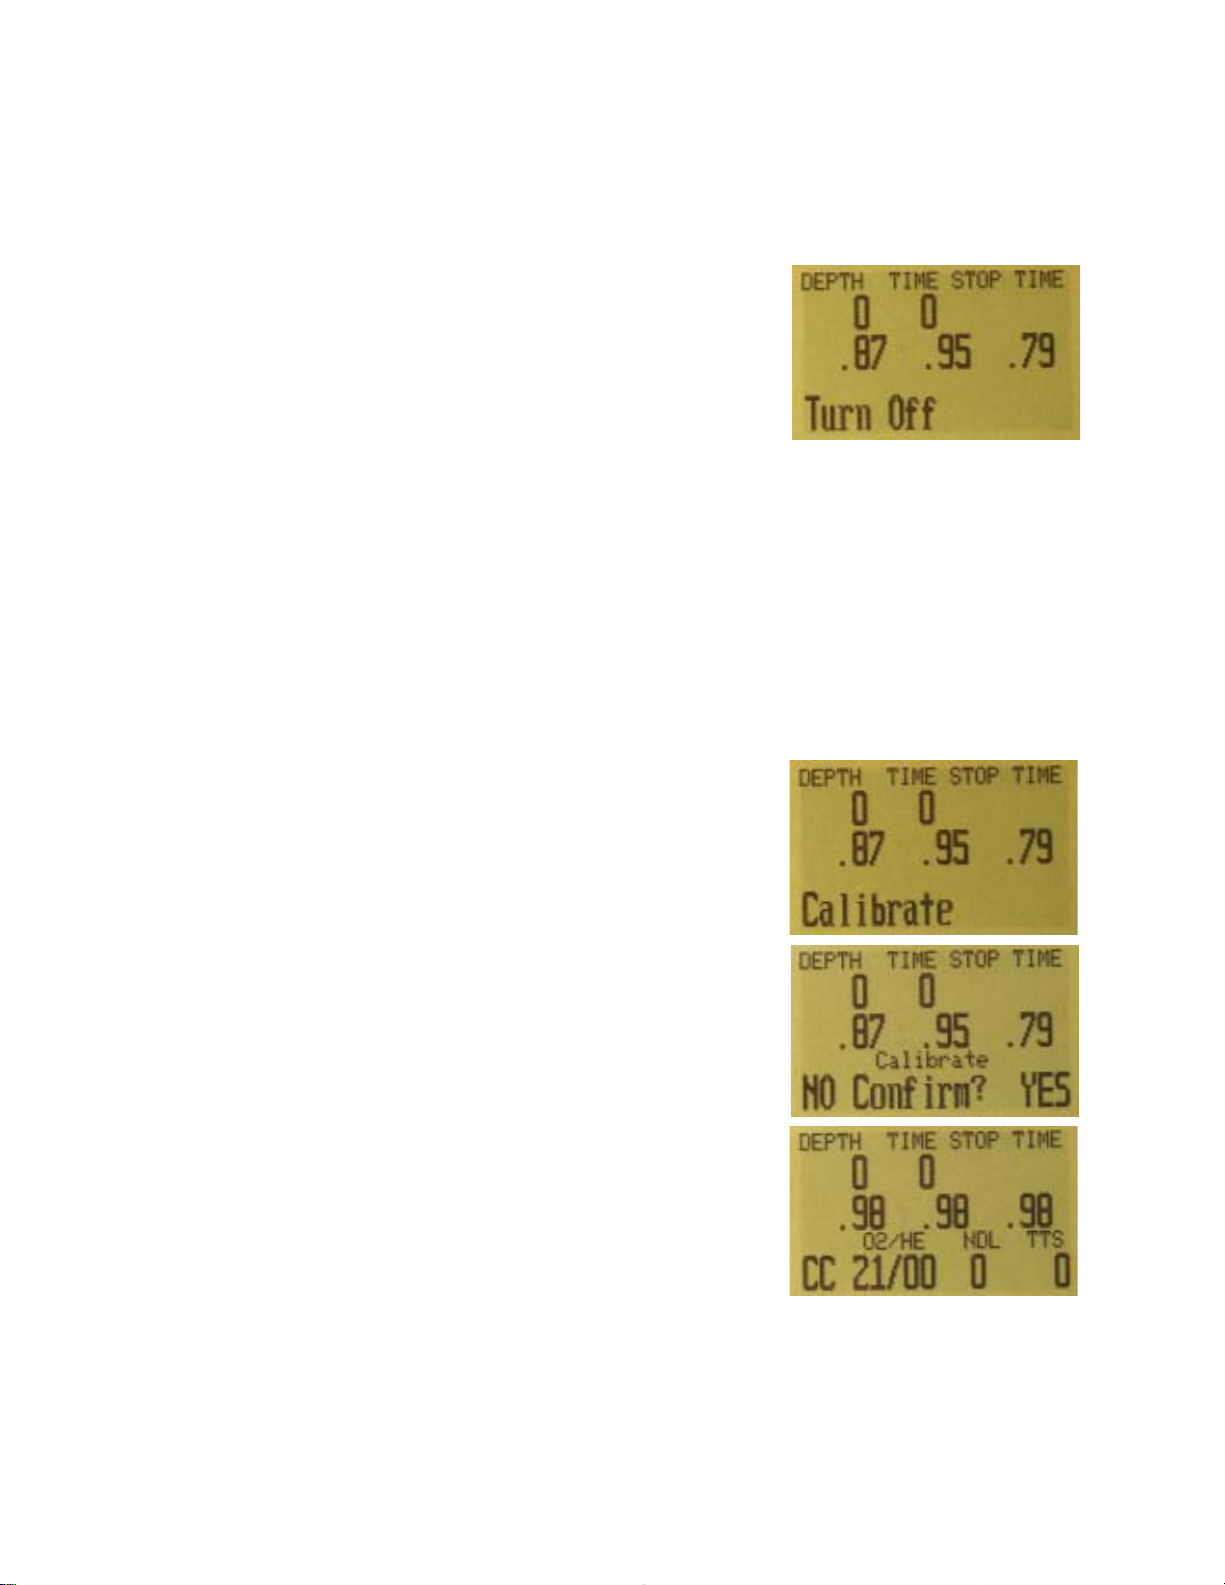
The first step is to calibrate. Since we are on the surface and not diving, MENU will
bring up “Turn Off”, then “Calibrate.” Once the loop is flushed with oxygen, CONFIRM
will bring up the confirmation display, and another CONFIRM will calibrate.
Next, we check the closed circuit gasses that we have programmed.
Entering the gas selection function by pressing CONFIRM with the “Select Gas” menu
item showing, will display the first CC gas that is available. MENU will increment to the
next gas available. Another MENU takes us back to the “Select Gas” menu item.
Those are the only two gasses configured.
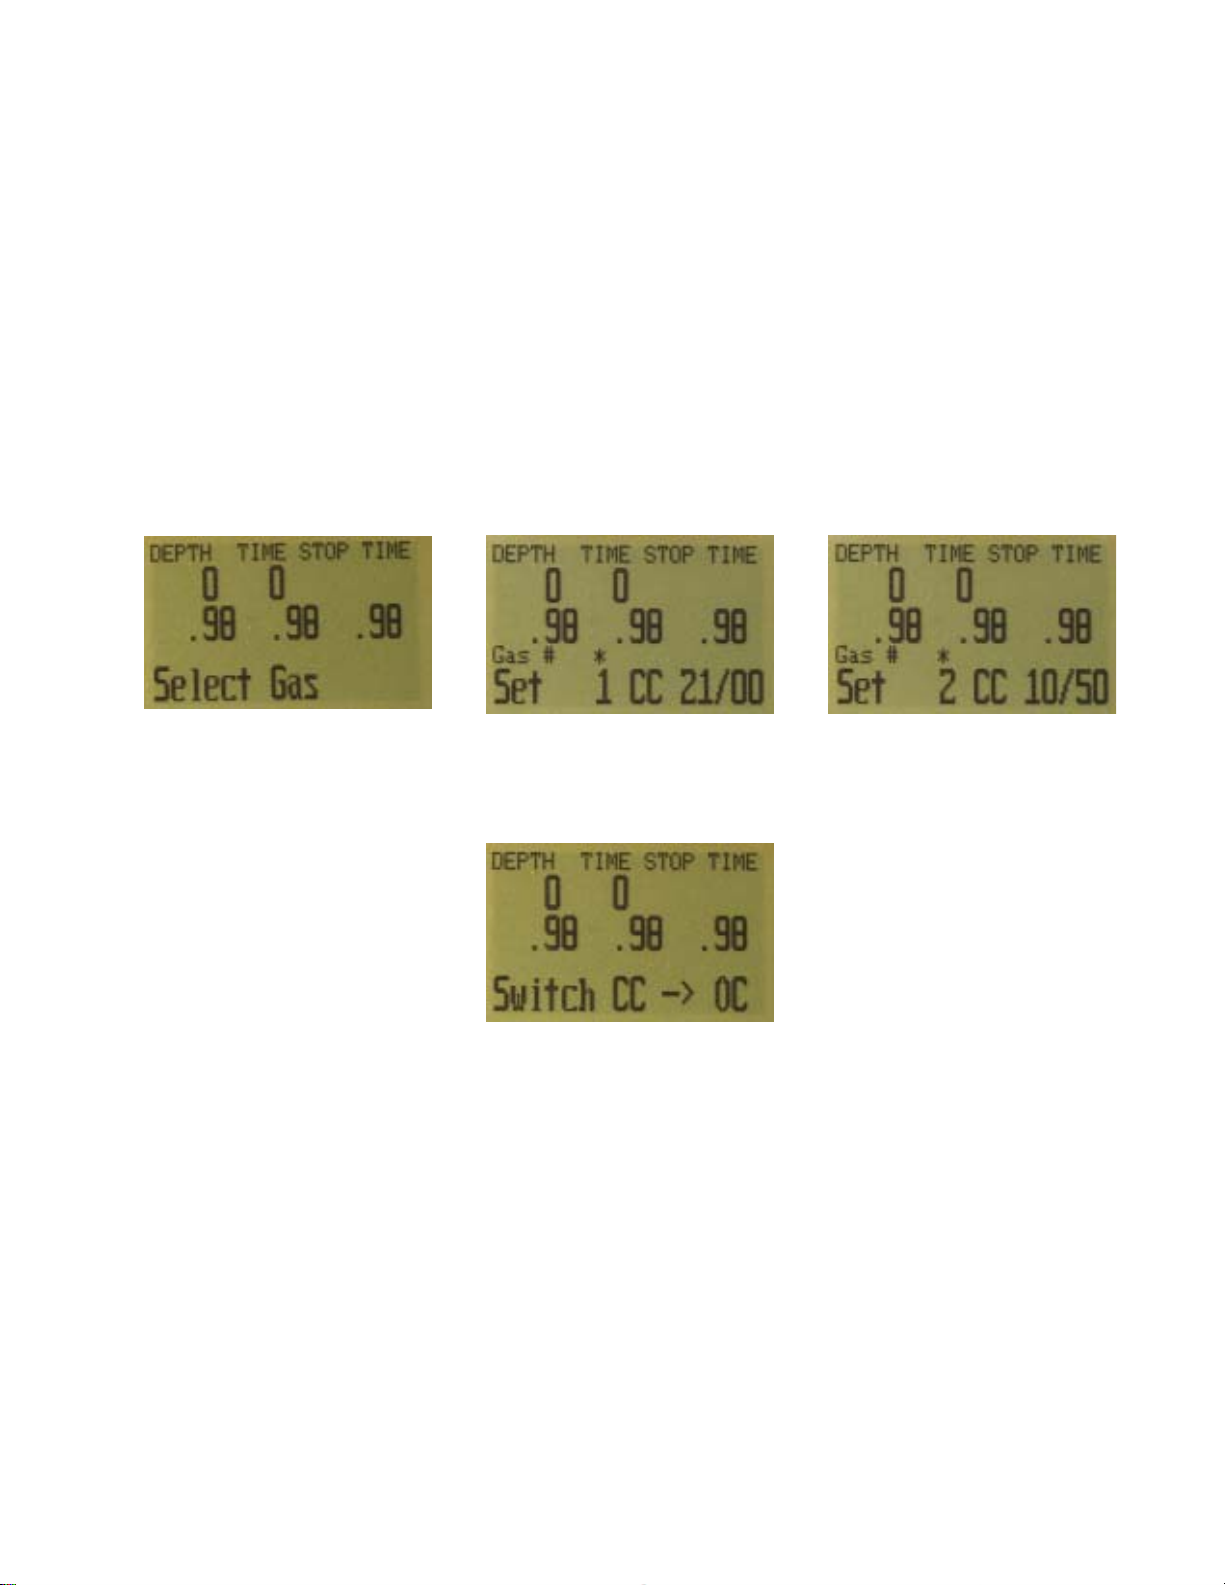
The system will use both of these gasses for our dive when calculating the TTS. It
assumes a diluent switch at a PPO2 of 1.0. That means that it will assume that you
have switched to an air diluent at 124 feet.
This is only for TTS. The computer will aways use the currently selected gas for tissue
loading calculations.
Then we switch to open circuit to look at our bail-out gasses. Flipping through the
gasses with CONFIRM shows that we have three gasses available. (Whether they are
appropriate gasses is a subject for one of the web forums.)
Flipping through the gasses available in the “Select Gas” menu item shows that we
have three open circuit gasses available.
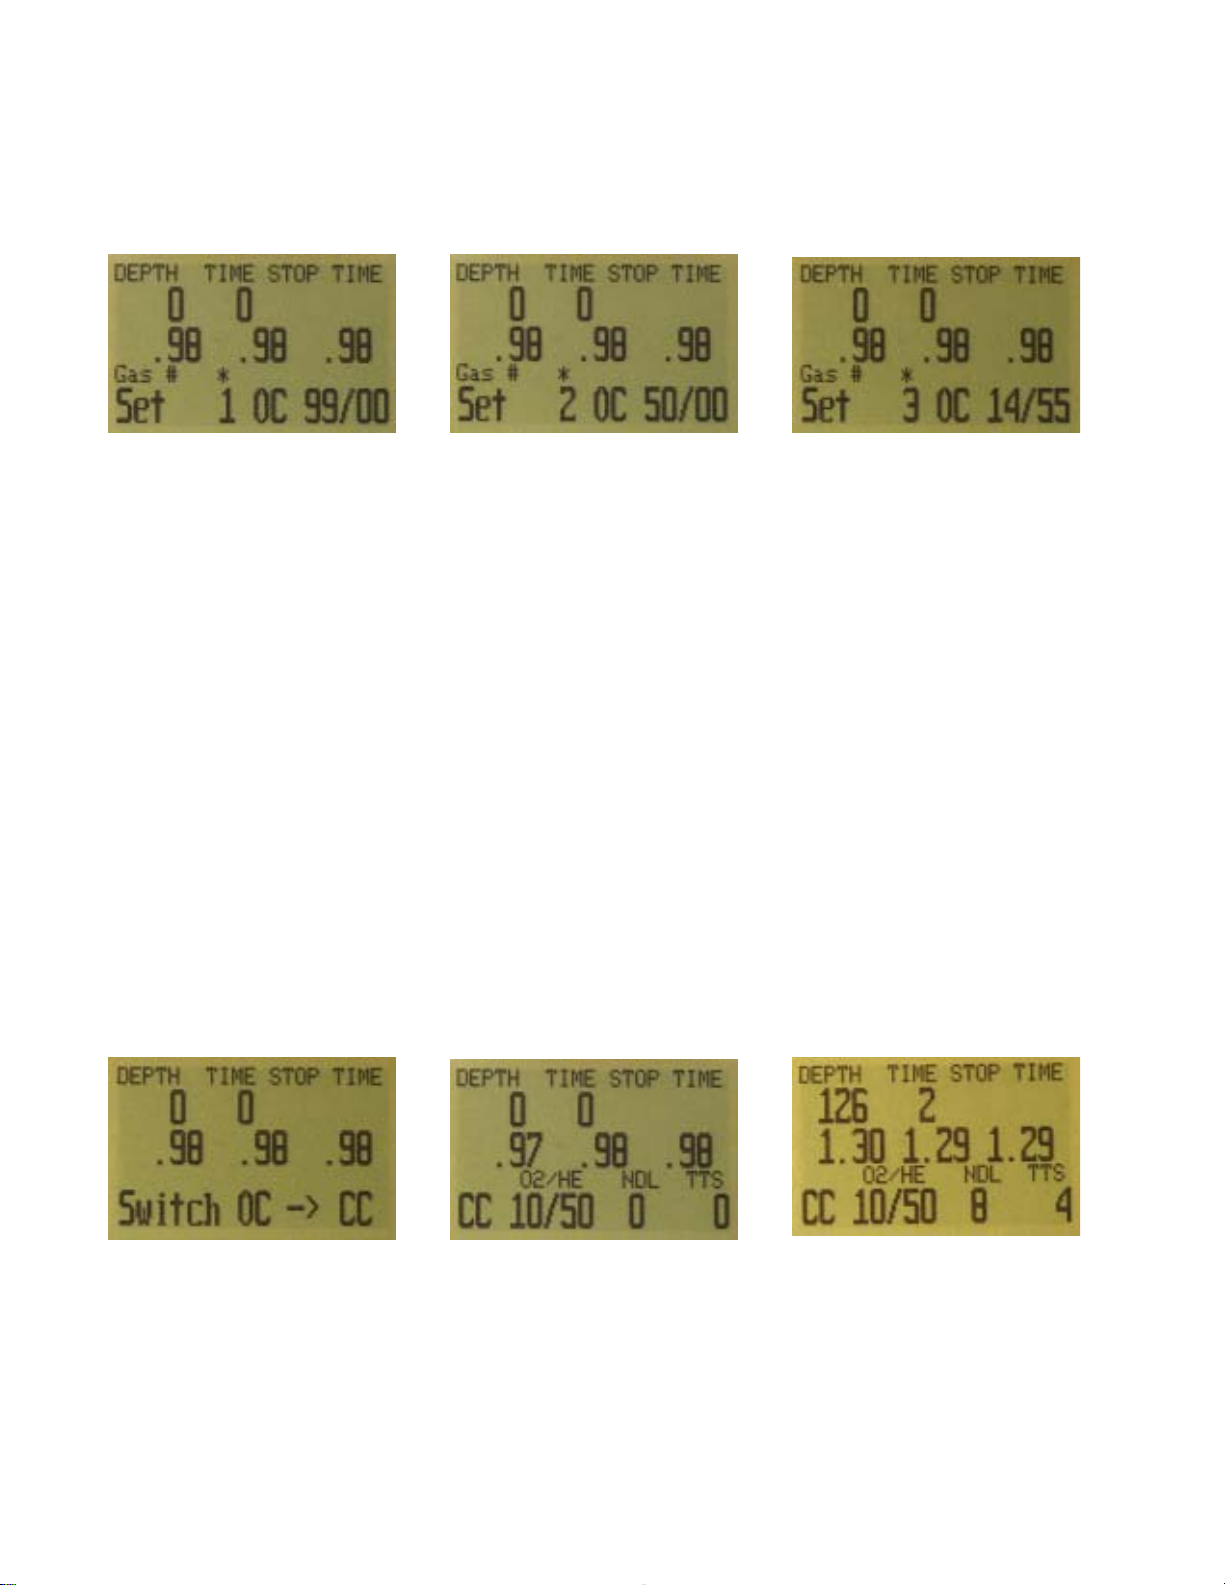
These are the gasses that will be used to estimate TTS in the event that you switch to
open circuit during a dive. The computer will assume that you will switch gasses when
the PPO2 of the next available gas is less than 1.6.
Automatic decisions of when to switch gasses for the TTS calculation means that it is
very easy to set up your CC and OC gasses. There is no need to enter a depth or a
PPO2 to switch point. There is no need to keep track of which gasses are turned on
and of in which mode.
If a gas is available in the CC gas list it will be used in CC, and it will be used at an
appropriate depth. The same is true for OC. It is always configured correctly if you
actually have the gasses you have created.
If it is necessary to switch to OC while diving, 4 button pushes will do it. You will be
switched to OC and will be using the gas that has the highest PPO2 less than 1.61.
Your OC gas list is likely very different from your diluent gas list, but all of the OC
gasses are automatically selected and available.
Now switch back to closed circuit and start the dive.
We have reached a depth now that will incur decompression soon. The NDL is 8
minutes, and the TTS is 4 minutes.
The computer has automatically switched to the high setpoint. This can be disabled if
automatic setpoint switching isn’t required.
We are now at our maximum depth. Our first stop is at 90 feet.

The diver is ascending to the 90 foot stop. Note the
ascent rate indicator showing a 20 fpm / 4 mpm
ascent rate. During the 7 minute ascent, the diver
ascended slower than was predicted, and now there is
a 100 foot stop.
But the diver missed the stop, and has ascended to 95
feet. At this point, the stop depth is flashing to show
that the depth is above the recommended stop.
The diver switches to the other programmed CC gas,
air.
At 60 feet we switch to open circuit bailout. The
switch requires 4 button pushes.
The system automatically choses the best gas it can
find for the depth. It picks %50 in this case.
At 20 feet, we switch to oxygen.
Menu Reference
Turn Off
The “Turn Off” item puts the computer to sleep. This
menu item will only appear if the water contacts are
dry.
The computer never really turns off; it just goes to
sleep and blanks the display. While sleeping, the
screen is blank, but the tissue contents are maintained
for repetitive diving.
To turn the computer on again, push MENU then
immediately push SELECT. The computer will come
on again. The “Turn Off” menu item will not appear
during a dive.
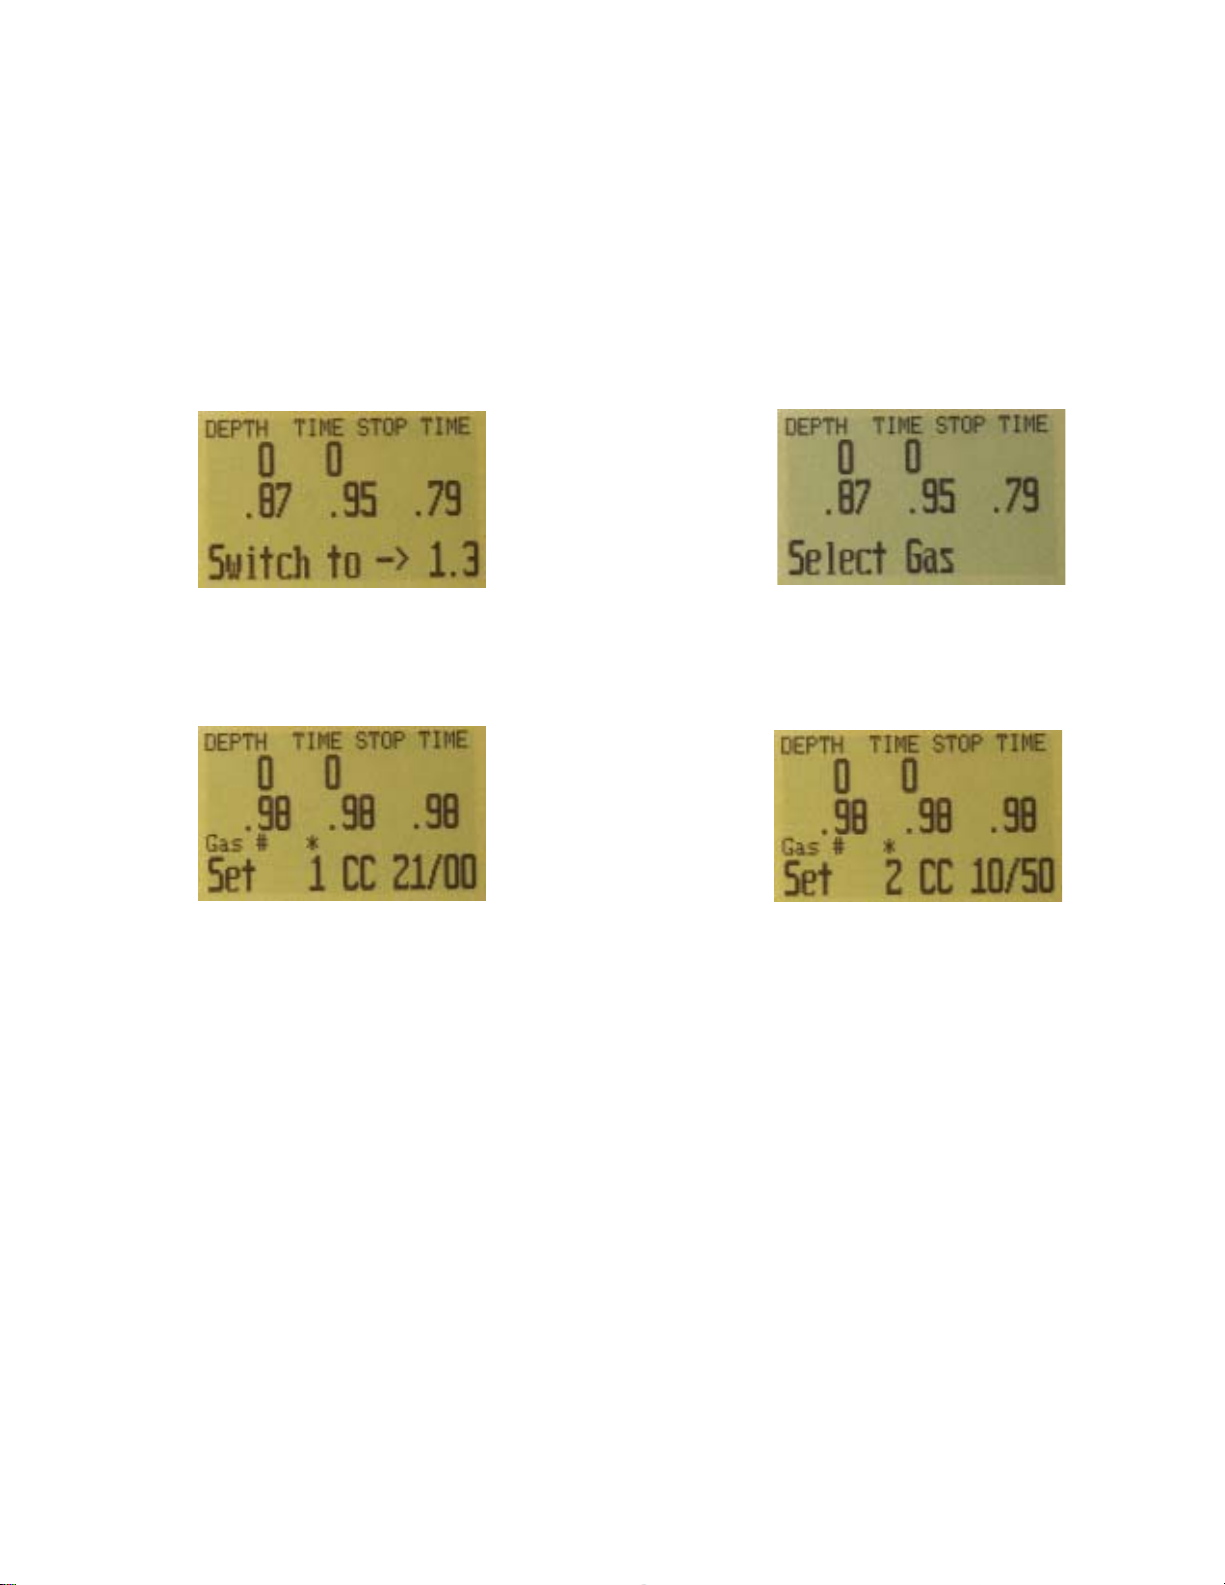
Calibrate
This will calibrate the sensor displays to oxygen.
Your instructor will train you in the procedure to flood
your loop with pure oxygen in order to get a good
calibration.
Once the loop is full of pure oxygen, SELECT with
“Calibrate” in the display, and the confirmation
message will display.
Pressing the MENU button will prevent the calibration.
Pressing SELECT will calibrate the sensor displays.
The displays should now all read .98.
The system calibrates to a .98 partial pressure of
oxygen. This is to compensate for the difficulty in
completely filling the loop with 100% oxygen and also
to allow for water vapour.
The “Calibrate” menu item will not display during a
dive.
Switch Setpoint
The setpoint display will display the setpoint that isn’t
selected. At power up, the computer will always select
the low setpoint, so the first time the setpoint display is
selected, it will show “Switch .7 ->1.3.” The 1.3 will be
replaced by your high setpoint value.
If the computer is currently using the high setpoint, it
will display “Switch 1.3 -> .7.” When SELECT is
pushed with either of these displays, the displayed
setpoint will be selected.

During a dive, the “Switch Setpoint” menu item will be
the first item displayed. The “Turn Off” and “Calibrate”
displays are disabled.
Select Gas
This menu item allows you to pick a gas from the
gasses you have created. The selected gas will be
used either as the diluent in closed circuit mode, or the
breathing gas in open circuit mode.
Just like the FM stations are selected when your radio
is in FM mode, the closed circuit gasses are available
in the closed circuit mode. When you switch to open
circuit, the gasses available will be open circuit
gasses.
Gasses are always sorted from most to least oxygen
content.
Press the “Confirm” button when “Select Gas” is
displayed, and the first available diluent will be
displayed.
Use the MENU button to increment the diluent to the
one you want, then press the “Confirm” button to
select that diluent.
If you increment past the number of gasses available,
the display will fall back out to the “Select Gas” display.
Use the “Confirm” button to select a gas. The bottom
line of the display shows the selected gas.

Switch to OC/CC
Depending on the current computer setting, this
selection will show as either “Switch CC -> OC” or
“Switch OC -> CC.”
Pressing SELECT will select the displayed mode for
decompression calculations. When switching to open
circuit while diving, the most appropriate open circuit
gas will become the breathing gas for calculations.
At this point, the diver may want to switch to a different
gas, but since the diver may have other things to deal
with, the computer will make a “best guess” of which
gas the diver would choose.
Dive Setup
Selecting any of the above items will process that
setting, and drop out of the menu. If nothing is
previously selected, the “Dive Setup” menu will be
shown.
Pressing SELECT will enter the setup sub-menu.
Pressing the MENU button will move on to the Dive
Log on the surface. While diving, the Dive Log and
System setup are not available, and pushing the Menu
button will exit the menu system.
Low Setpoint
This item allows you to set the low setpoint value. It
will display the currently selected value. Values from
0.4 to 1.4 are allowed.
Press the “Confirm” button when “Low SP” is
displayed and the edit SELECTdisplay will be shown.
It is set at the lowest valid value for setpoint, .4.
A press of MENU will increment the setpoint.
Another press of MENU will increment it again.
If SELECT is pushed, the currently
displayed setpoint will be selected, and the display will
return to the “Low SP” menu item.
If the highest allowable value, 1.4, has been passed,
the menu will also revert to “Low SP” without changing
the original setting.

High Setpoint
The high setpoint function works exactly like the low
setpoint function.
Define Gas
The function allows you to set up 5 gasses in Closed
Circuit and 5 gasses in Open Circuit. You must be in
Open Circuit to edit open circuit gasses, and you must
be in Closed Circuit to edit closed circuit diluents. For
each gas, you can select the percentage of oxygen
and helium in the gas.
Pushing SELECT when “Define Gas” is displayed
presents the function to define gas number 1.
Pushing the MENU button will display the next gas.
Pushing SELECT will allow you to edit the current gas.
The gas contents are edited one digit at a time. The
asterisk will show you the digit being edited.
Pushing SELECT saves the current digit and moves to
the next digit.
Each push of the MENU button will increment the digit
being edited. When the digit reaches 9, it will roll over
to 0.
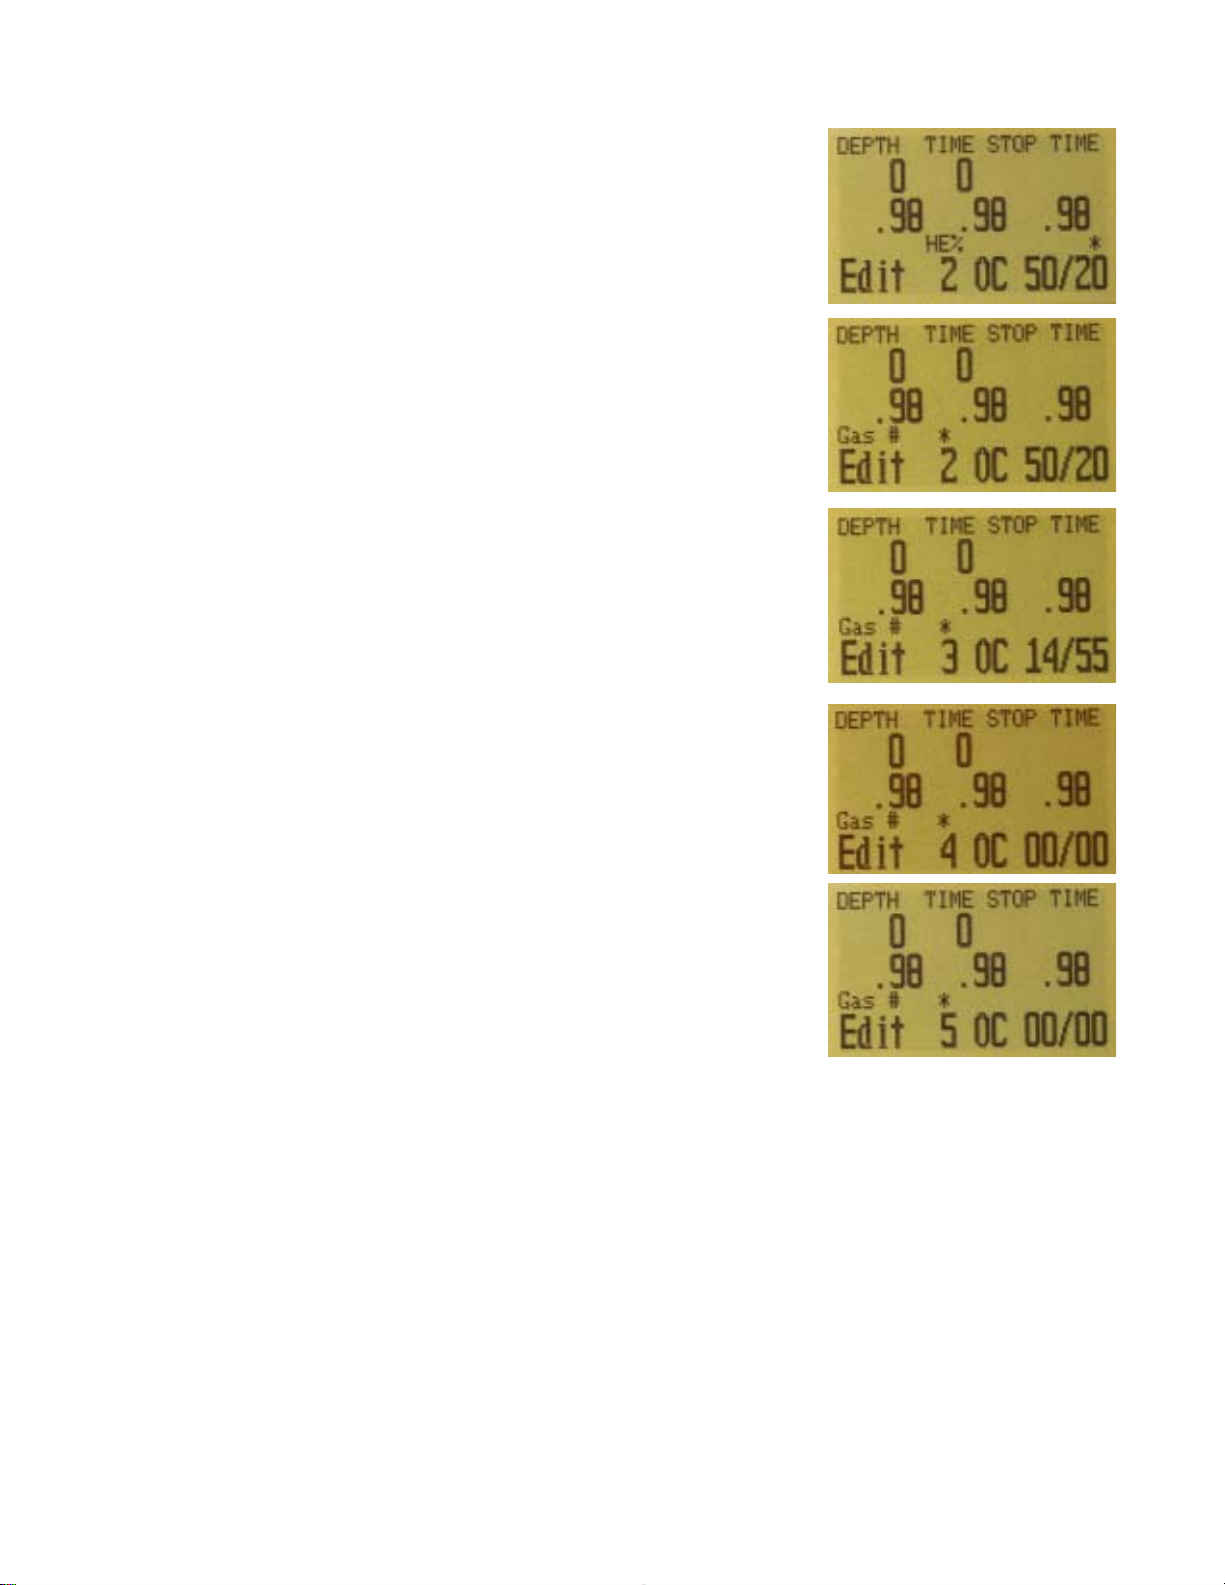
Pushing SELECT will lock in the current digit, and
move on to the next digit.
Pushing SELECT on the last digit will finish editing
that gas, and bring you back to the gas number.
Any gasses that have both oxygen and helium set to 0
will not be displayed in the “Select Gas” function.
Pushing MENU will continue to increment the gas
number.
The computer will display all gas entries available to
allow you to enter new gasses.
Pressing MENU one more time when the fifth gas is
displayed will return you to the “Define Gas” menu
item.
VERY IMPORTANT
If you have programmed a gas in the current mode
(OC or CC), it will be used in the TTS and time at stop
calculations. While this won’t result in wrong ceilings,
it will cause the predicted times to be wrong. For
example, if you have programmed a switch to O2
diluent in CC mode, the system will assume that you
are going to switch and will predict that the time at the
appropriate stop will use that diluent.
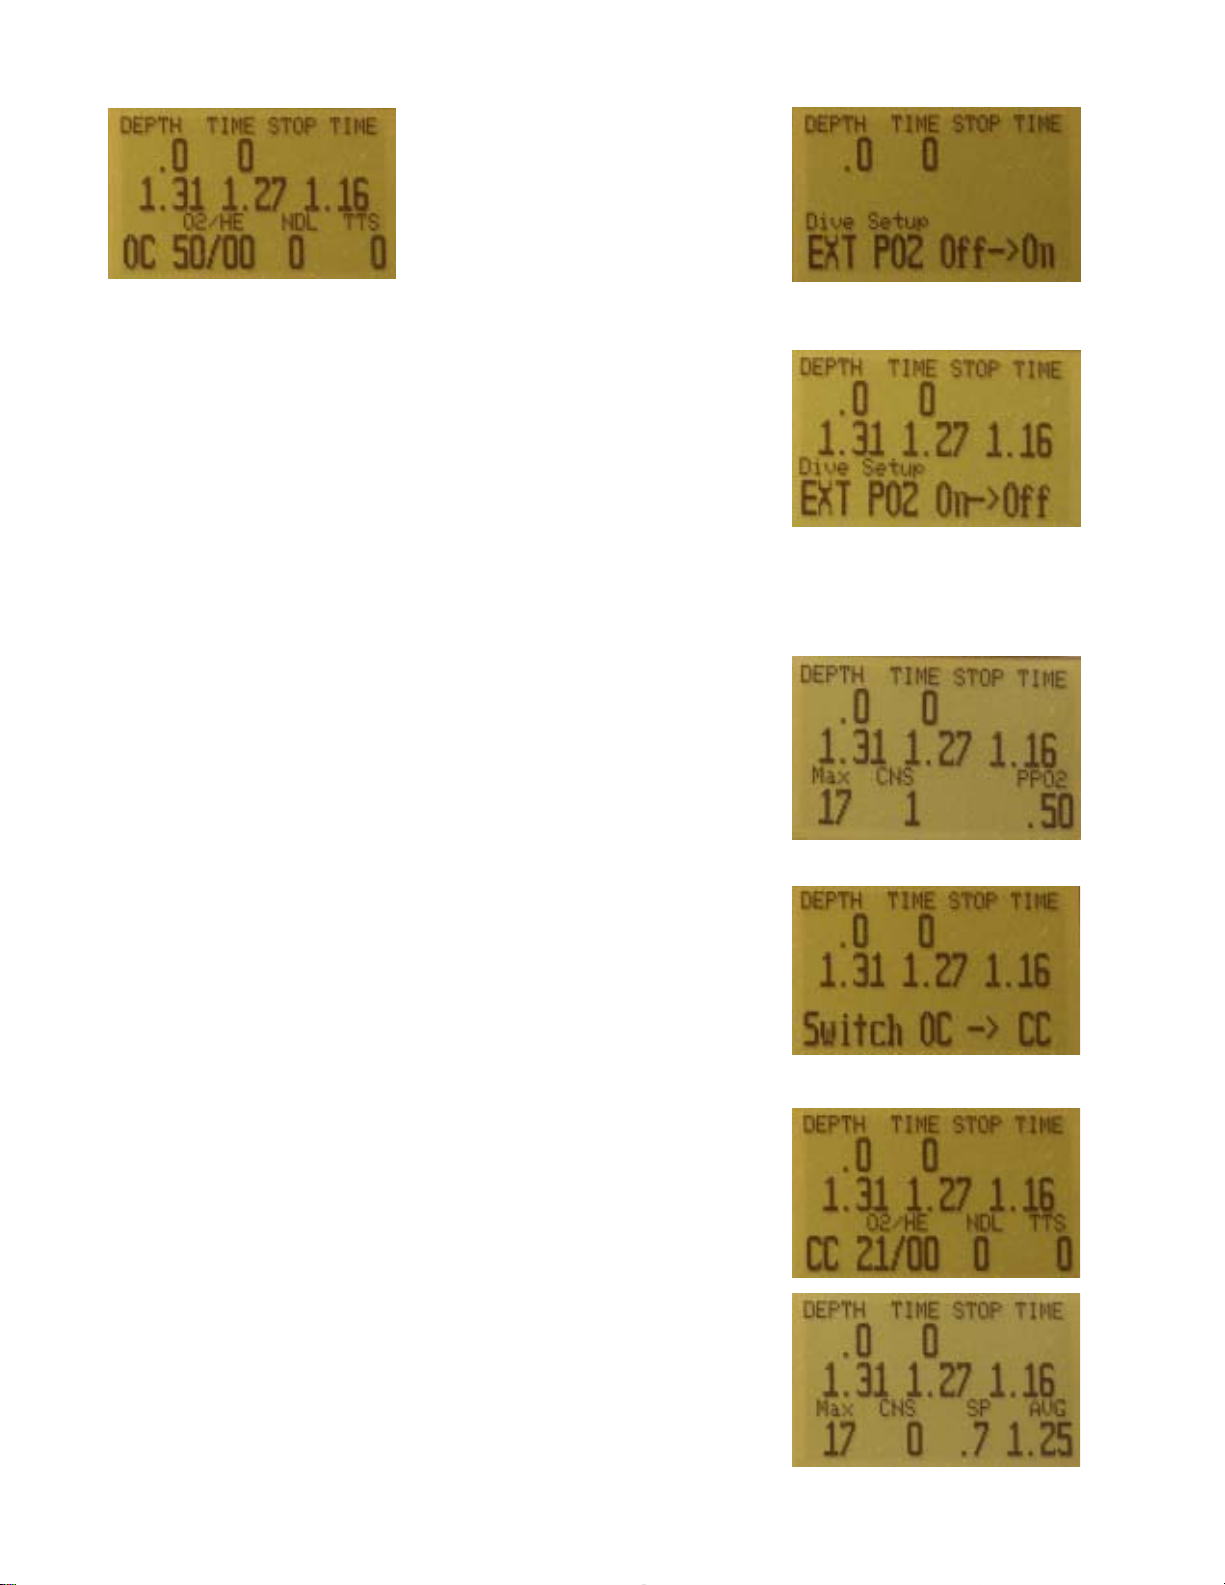
The next menu item is used to turn external ppo2
monitoring on and off. By default, external monitoring
is turned off. To turn it on, select this menu item.
Now the ppo2 of the the three sensors is displayed. In
the displayed screens, we have three sensors and
they have been calibrated at some point.
This system is plugged into three sensors and is the
primary display for the system.
Note that since we are in Open Circuit mode, that the
ppo2 used to calculate decompression is still the ppo2
of the selected gas at the current depth.
If we switch to Closed Circuit, the ppo2 used for
calculation is now the average of the three sensors.
Voting logic will apply and any sensors that are voted
out will be flashing.
In this case, the sytem is using a ppo2 of 1.25 to
calculate decompression and CNS toxicity.
Table of contents


 Service guide")


