SHENGYA CD-3.8 User manual

使用说明书 / User's Manual
中山市声雅音响电器有限公司
地址:广东省中山市小榄镇民安南路广进横街8号
电话:0760-22109328/22109821
传真:0760-22109328
邮箱:[email protected]om
www.shengya-audio.com
ZHONGSHAN SHENGYA AUDIO ELECTRONIC CO.,LTD
Address:No.8,Guangjin Heng Street,Min'an South Road,
Xiaolan Town,Zhongshan City,Guangdong Province
Tel:0760-22109328/22109821
Fax:0760-22109328
E-mail:[email protected]om
因产品改进,规格及外观如有小许变化,恕不另行通知,最终解释权归声雅音响电器有限公司所有。
CD-3.8
高级激光唱机
Compact Disc Player
声雅微信公众号
ShengYa WeChat
Official Accounts
声雅微信客服号
ShengYa WeChat
Customer service
VER: S2.0

中文
目录
CONTENTS 感谢
感谢您购买声雅音响的 Hi-Fi 产品 !
我们相信,对高品位音响产品的不懈追求,是我们的责任,也是您的理想。
为使CD-3.8高级激光唱机更好地发挥它的性能,给你带来更大的乐趣,我们建议您在连
接及操作本系统之前,认真阅读本说明书。
安全警告
警告:为防止起火或触电事故,请不要让机器暴露在雨中或潮湿环境里。机内有危
险的高电压配件,因而不要打开机盖维修时只可委托给合资格的维修人员。
危险电压:为减少电击危险,请勿擅自拆卸盖子(或后板)。
请注意:装置内部并无用户自行检修的零部件,需要检修时,请委托经销商或合资
格的人员。
设备仅适用于热带气候条件下安全使用,最高操作温度为45°C;
设备仅适用于海拔5000m及以下地区安全使用;
设备使用器具耦合器作为断接装置;
01
02
03
04
05
08
09
12
13
14
性能特点························································
前面板功能····················································
顶面板功能····················································
后面板功能····················································
遥控器····························································
使用须知························································
操作说明························································
注意事项························································
故障指导························································
技术参数························································
中文 EN
CHARACTERISTICS ·······································
FRONT PANEL FUNCTION ····························
TOP PANEL FUNCTION ·································
BACK PANEL FUNCTION ·······························
REMOTE CONTROL ·······································
USAGE NOTICE ··············································
INSTRUCTIONS ··············································
PRECAUTIONS ···············································
FAULT GUIDANCE ·········································
PARAMETERS ················································
16
18
19
20
21
24
25
28
29
31

0201
性能特点 前面板功能
CD-3.8 是从原来 CD-3.5 基础上改良而成的升级产品;本机优化了机芯装配工艺,使其读碟准确度大
幅提升,使声音信息量和声音密度得到显著的提升,音场定位更加精准。
采用了飞利浦专业高性能 VAM1202 机芯,配以高集成 CD 7-II 数字伺服 IC,使本机具有读碟准确,纠
错能力强 , 防震性能好等优点。
数字、模拟转换芯片为美国 Burr-Brown 公司最新解码芯片 PCM 1792。该芯片具有 24bit 转换精度和
192KHz 取样频率,能够准确地还原音乐的每个细节,另外为确保转换精度,还特别采用了独立有源时钟。
模拟信号放大采用美国 Burr-Brown 公司高精度、高速运放 OPA627 和OPA 2134 以及 OPA 2604。同
时配以著名三阶 GIC 低通滤波器,能够有效滤除数字信号的干扰噪声,使音频信号更加纯净。
本机设有晶体管音频输出与电子管音频输出两种输出选择;以方便用户根据不同的器材或软件选择
其中一种输出模式聆听。
晶体管音频输出采用高级运放 0PA2604,低频深沉有力、音场宽广、动态强大。电子管音频输出采用进
口发烧级电子管,音色表现优美动听 , 人声厚润温暖,中高音细腻柔和。
模拟电源由一只高磁通、低漏磁环形变压器供电。数字,机芯电源亦由另一只独立的环形变压器负责
供应,保证电路各个部分互不干扰。
电子管与场效应管混合型精密高压稳压电源,电压稳定性极高。交流纹波系数极低,音色表现更有“胆
味”,对音色所产生的好处更显著。
XLR 和RCA 端子都采用镀金进口高级品,保证音质优美表现之余还经久耐用,电源线为美国制 XLO(至
高牌 ) 高级线材,对音场定位、深度、宽度、空气感、控制力都有很好帮助。
本机机箱与功放机箱同一设计理念,三点式落地脚对机箱平衡性和外力振动衰减都有正面效果;全
铝合金结构机箱还可有效降低其谐振频率,使音质纯静度有所提高。
3
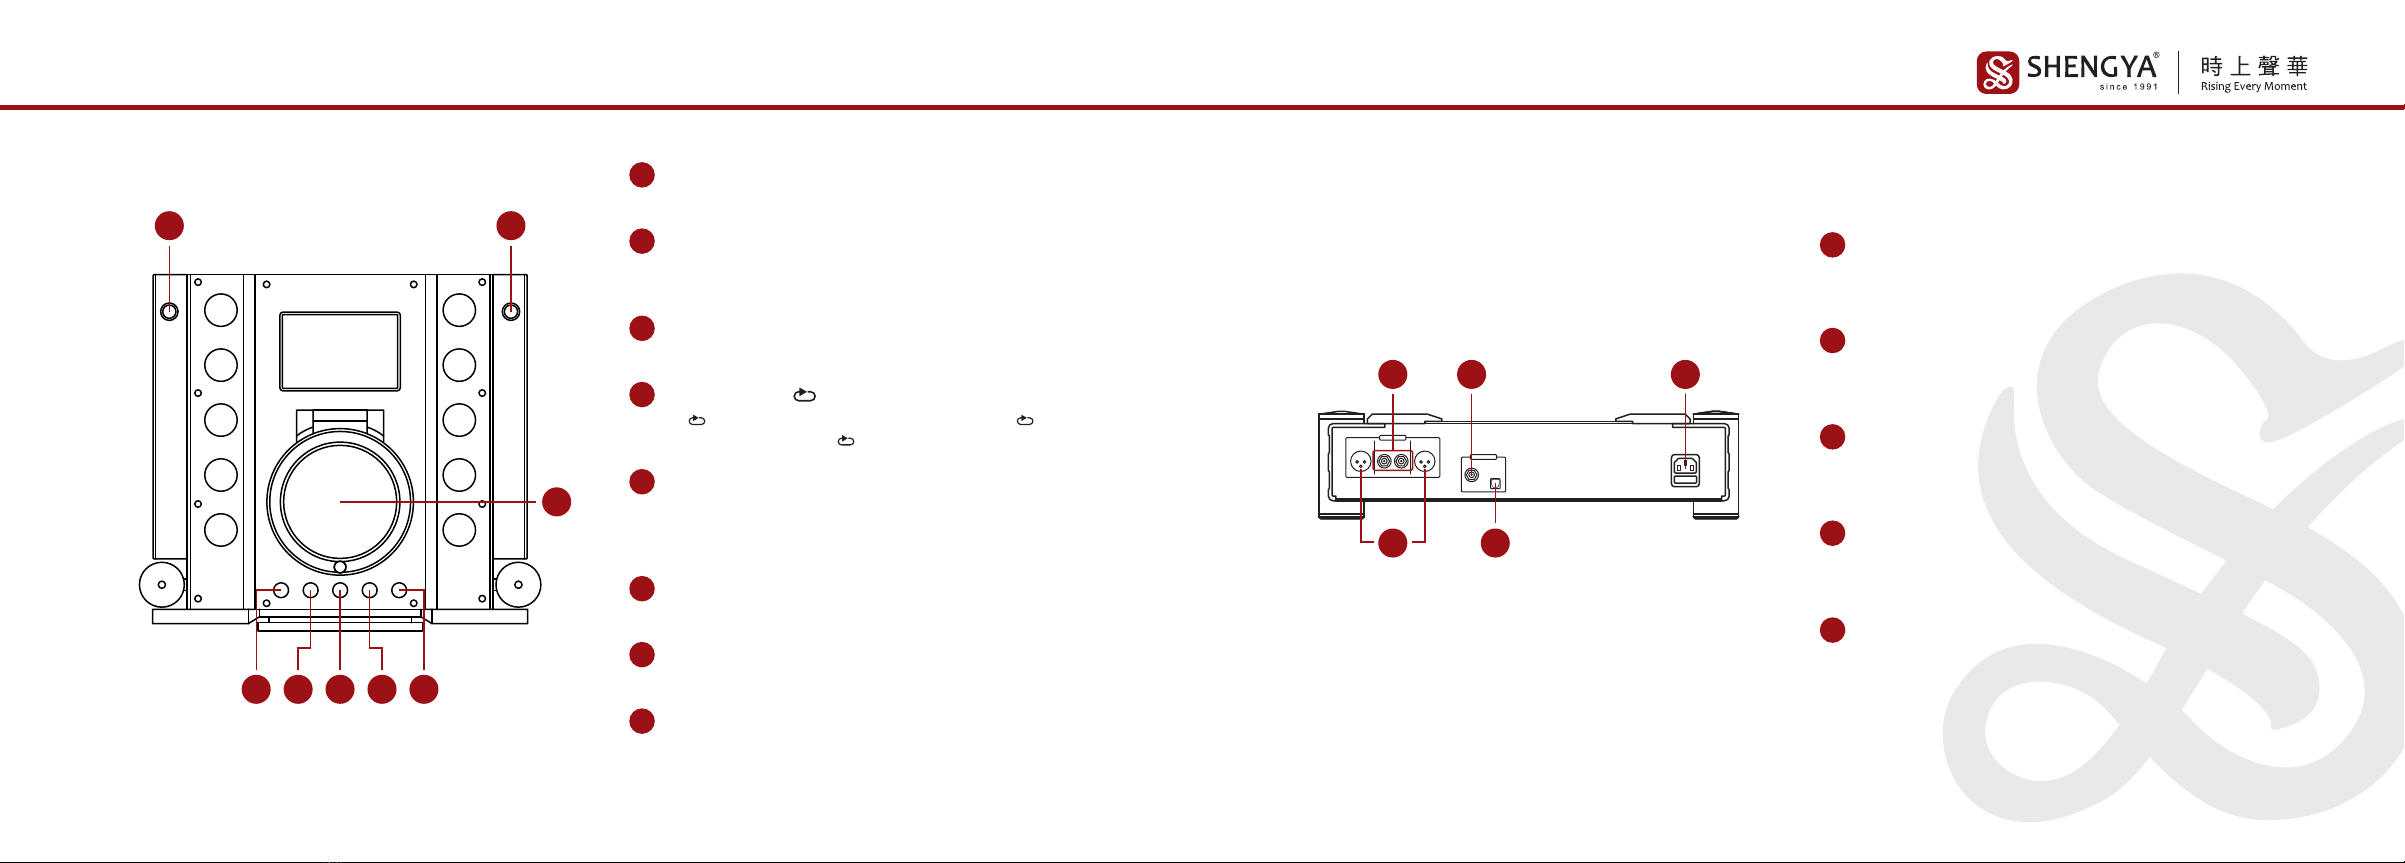
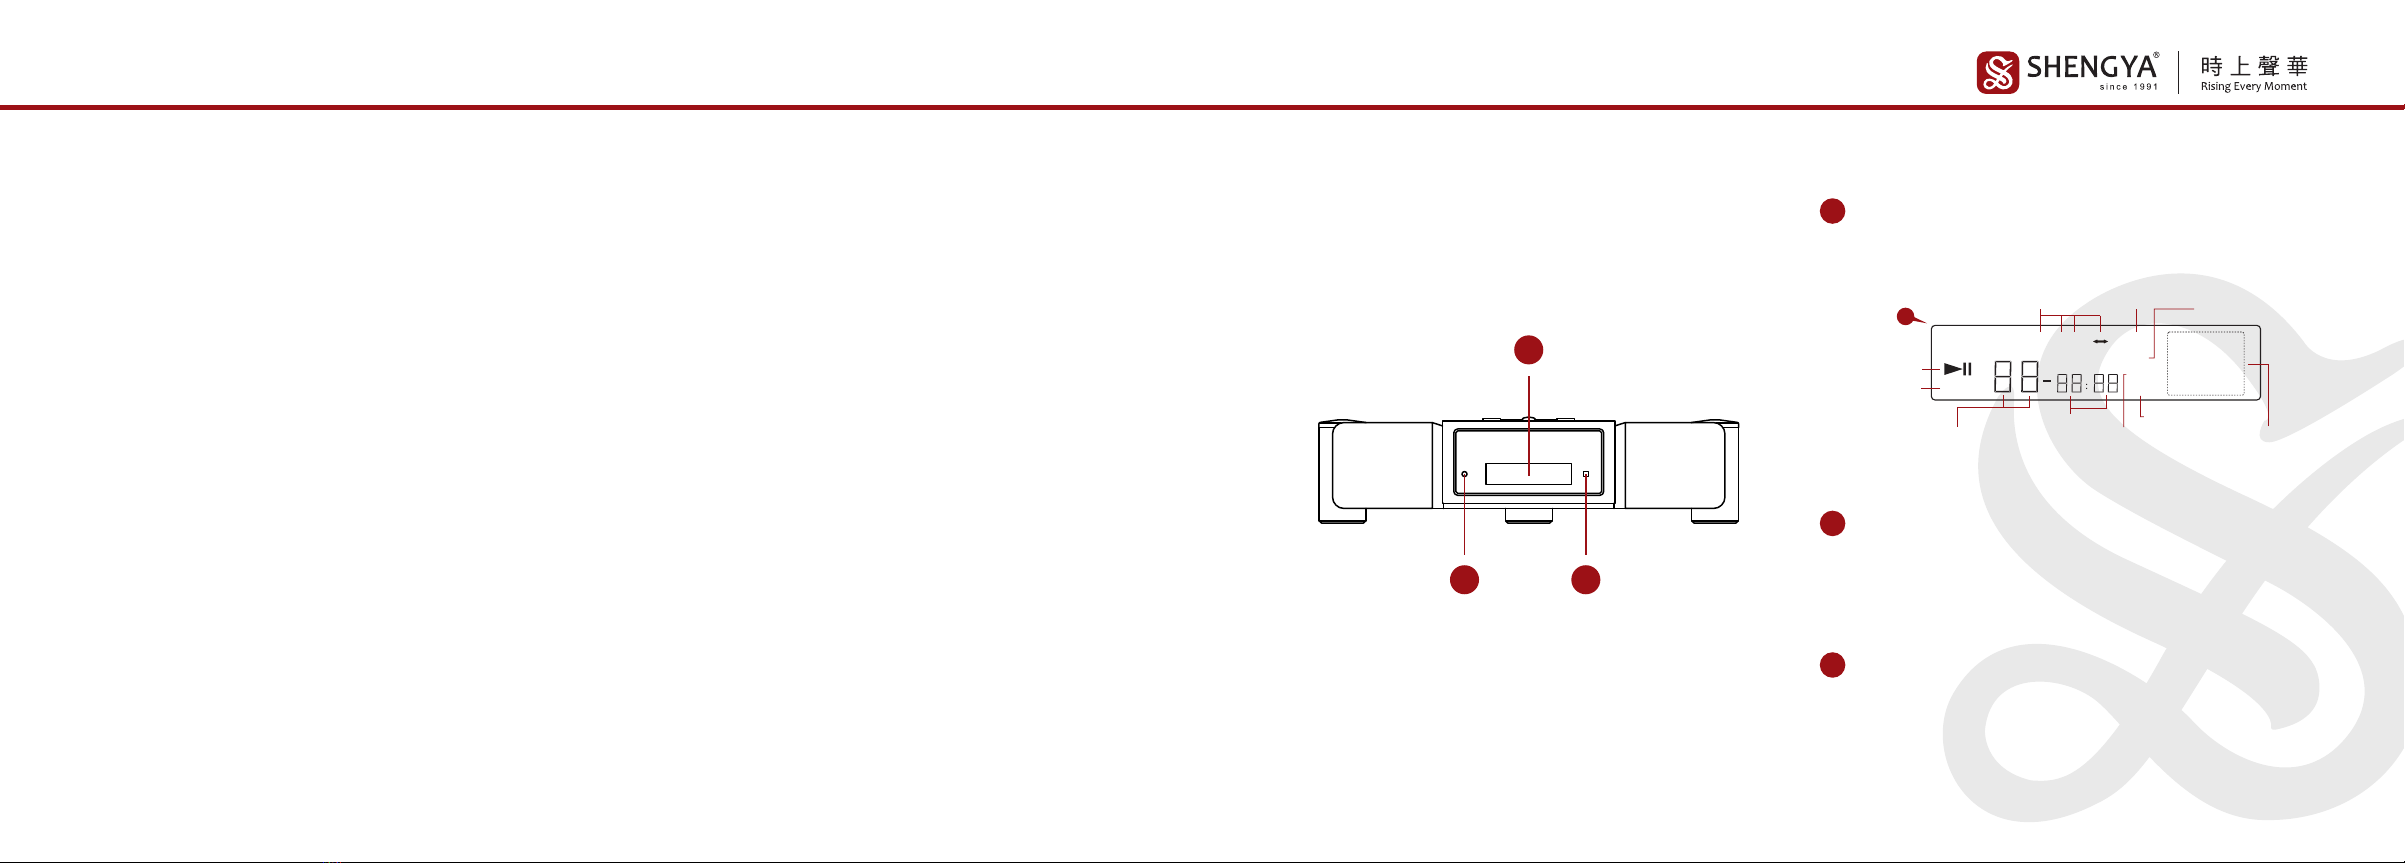
遥控接收器
接收遥控器发出的红外线遥控指令信号。
状态指示灯
当电源接通后,指示灯开始闪烁,约20秒后闪烁停止,机器进入工作
状态。
2
1显示屏
显示电源接通/关闭状态,曲目序号,播放时间及当前操作状态等信
息。
4
8
12
16
3
7
11
15
2
6
10
14
1
5
9
13
PGM
RAN
INTRO
OVER
REPEAT 1 ALL A B
REMAIN
MIN SEC
重复指示 编程播放 随机播放
播放中曲目序号 播放曲目时间 唱片十秒浏览
曲目序号溢出指示
曲目序号
播放/暂停
曲目剩余时间
1
1
23
0403
顶面板功能 后面板功能
电源开关按钮
此开关用于接通或切断整机交流电源。
1
输出选择开关
开关按下时机器以电子管音频输出,开关复位时机器以晶体管音
频输出。
2
停止按键( ■ )
为停止播放唱片的按键。
6
曲目跳选按键( ▏◀◀)
按“ ▏◀◀ ”一次, 前放一首曲目。
7
曲目跳选按键(▶▶▏)
按“ ▶▶▏”一次, 后放一首曲目。
8
唱片仓
用来放入激光唱片。
3
重复播放按键( )
按“ ”键一次为重复播放当前播放的一首曲目;按“ ”键两次;为
重复播放全唱片曲目;按“ ”键三次为取消重复播放功能。
4
播放/暂停按键( ▶▏▏)
按此键可从唱片的第一首曲目开始顺序播放(直至播放到最后一
首曲目为止),再按此键一次为暂停曲目播放, 如再按此键一次为继
续播放。
5
4光纤数码输出端子
数码音频输出端子用于连接数/模解码器。
1不平衡音频输出端子
此端子用于连接音频放大器的不平衡音频输入端子
平衡音频输出端子
此端子用于连接音频放大器的平衡音频输入端子。
2
5带交流电源保险丝的电源插座
此电源插座用作连接交流电源, 保险丝在电源插座下部, 更换保险
丝时一定要将电源线拔下方可更换。
同轴数码输出端子
数码音频输出端子用于连接数/模解码器。
3
13
24
5
3
48
65 7
12

0605
遥控器遥控器
注意:
1.遥控器不应靠近过热或过潮之处,更不应受阳光直射或强光照射。
2.遥控器请勿受到强烈碰撞或从高处跌下,否则会损坏遥控器使其不
能正常工作。
3.请使用CR2032扭扣电池;勿混用新旧或不同型号的扭扣电池。
4.当遥控器长期不用时,请将电池取出,请勿将电池投入火中。
5.如果电池爆裂,请清洗并擦干电池舱,然后再装入新的电池。
6.正常使用情况下,每6个月更换电池一次。
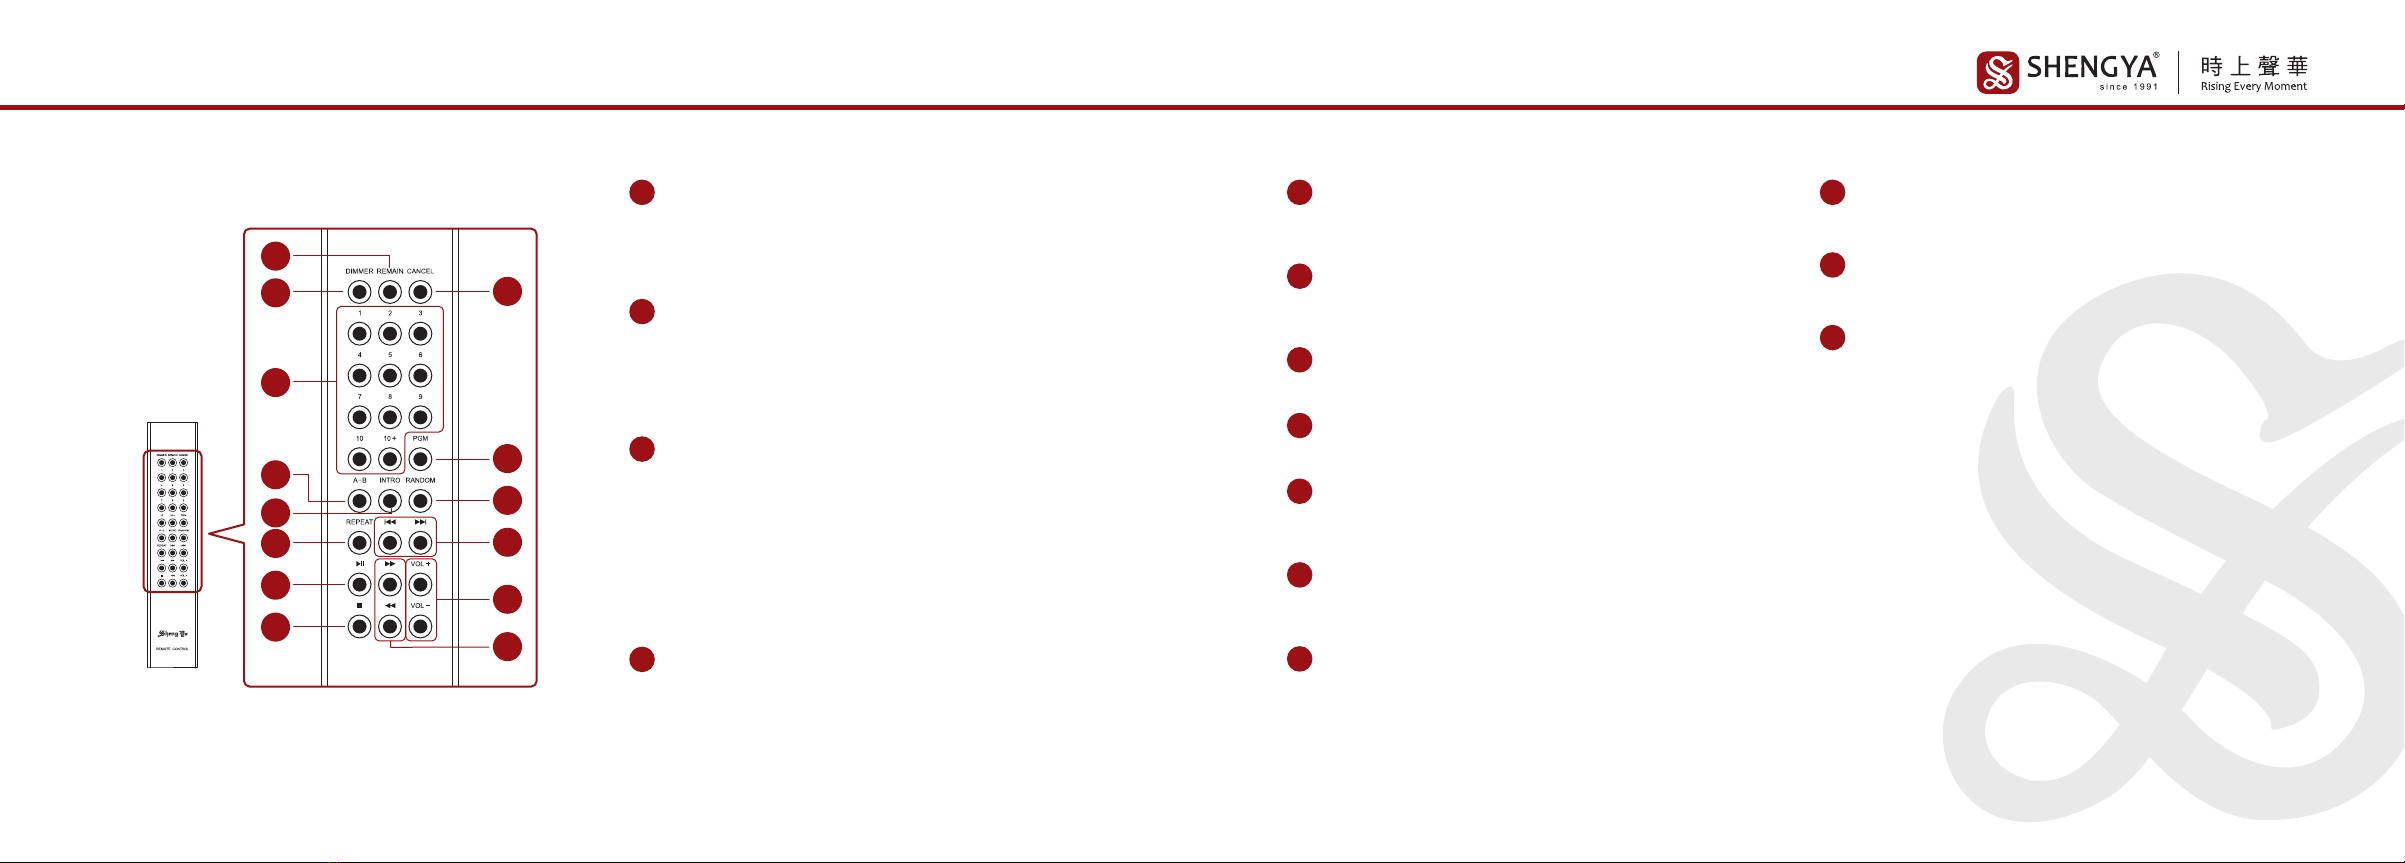
曲目跳选按键(NEXT ▶▶▏, BACK ▏◀◀)
和面板功能说明相同。
12
音量控制按键(VOLUME)
和面板功能说明相同。
13
快速搜索键(▶▶ /◀◀)
按一次“ ▶▶ ”键当前正在播放的曲目向后快速搜索,按一次“ ◀◀ ”
键当前正在播放的曲目向前快速搜索。
14
剩余时间显示按键(REMAIN)
按一次该按键显示当前播放单曲的剩余时间;再按一次显示当前
播放整张唱片的剩余时间;再按一次回复原来显示。(第09页详细说明)
1
显示屏亮度按键(DIMMER)
该按键用于调整显示屏的亮度。电源接通时亮度最大,按下一次该
按键,亮度减弱,再按一次显示屏熄灭,按第三次时,亮度恢复到正
常的亮度。
2
A-B 片段重复按键(A-B)
在正常播放时,按下此按键待播放到您想重复的曲目内容时,按此
按键则会播放(A起始点到B终止点)之间的曲目片段,再按此键本
功能取消。(第11页详细说明)
4
数字选择按键(1-10,10+)
1-10数字按键为曲目直选按键,按数字直选按键可以直接选择曲
目播放;当被选择的曲目超过10时,按一次10+按键,再按1-10任一
数字按键,就可以选择到编号超过10曲目;当曲目超过20首时连续
按两下10+按键,再按1-10任一数字按键,就可以选择到编号超过
20曲目。(例:选择第18首歌曲,先按10+键,再按8;就能欣赏到第18首歌曲。)
3
曲首十秒扫描(INTRO)
按该按键, 将播放中唱片每首曲目的曲首进行十秒浏览播放。
(第09页详细说明)
5
重复播放按键(REPEAT)
该按键可选择单曲或全部曲目循环播放。(第10页详细说明)
6
播放/暂停按键(PLAY/PAUSE ▶▏▏)
和面板功能说明相同。
7
停止按键(STOP ■)
和面板功能说明相同。
8
编程取消按键(CANCEL)
在编曲过程中按此按键可逐首清除当前输入的曲目。
9
编程播放按键(PGM)
此按键为编程曲目播放。(第11页详细说明)
10
随机播放按键(RANDOM)
按一次该按键,唱机进入随机播放状态,再按一次后取消随机方
式;(以后转为顺序播放方式)。(第10页详细说明)
11
1
2
3
4
5
6
7
8
9
10
11
12
13
14
0807
使用须知遥控器
遥控器
遥控感应器
使用操作
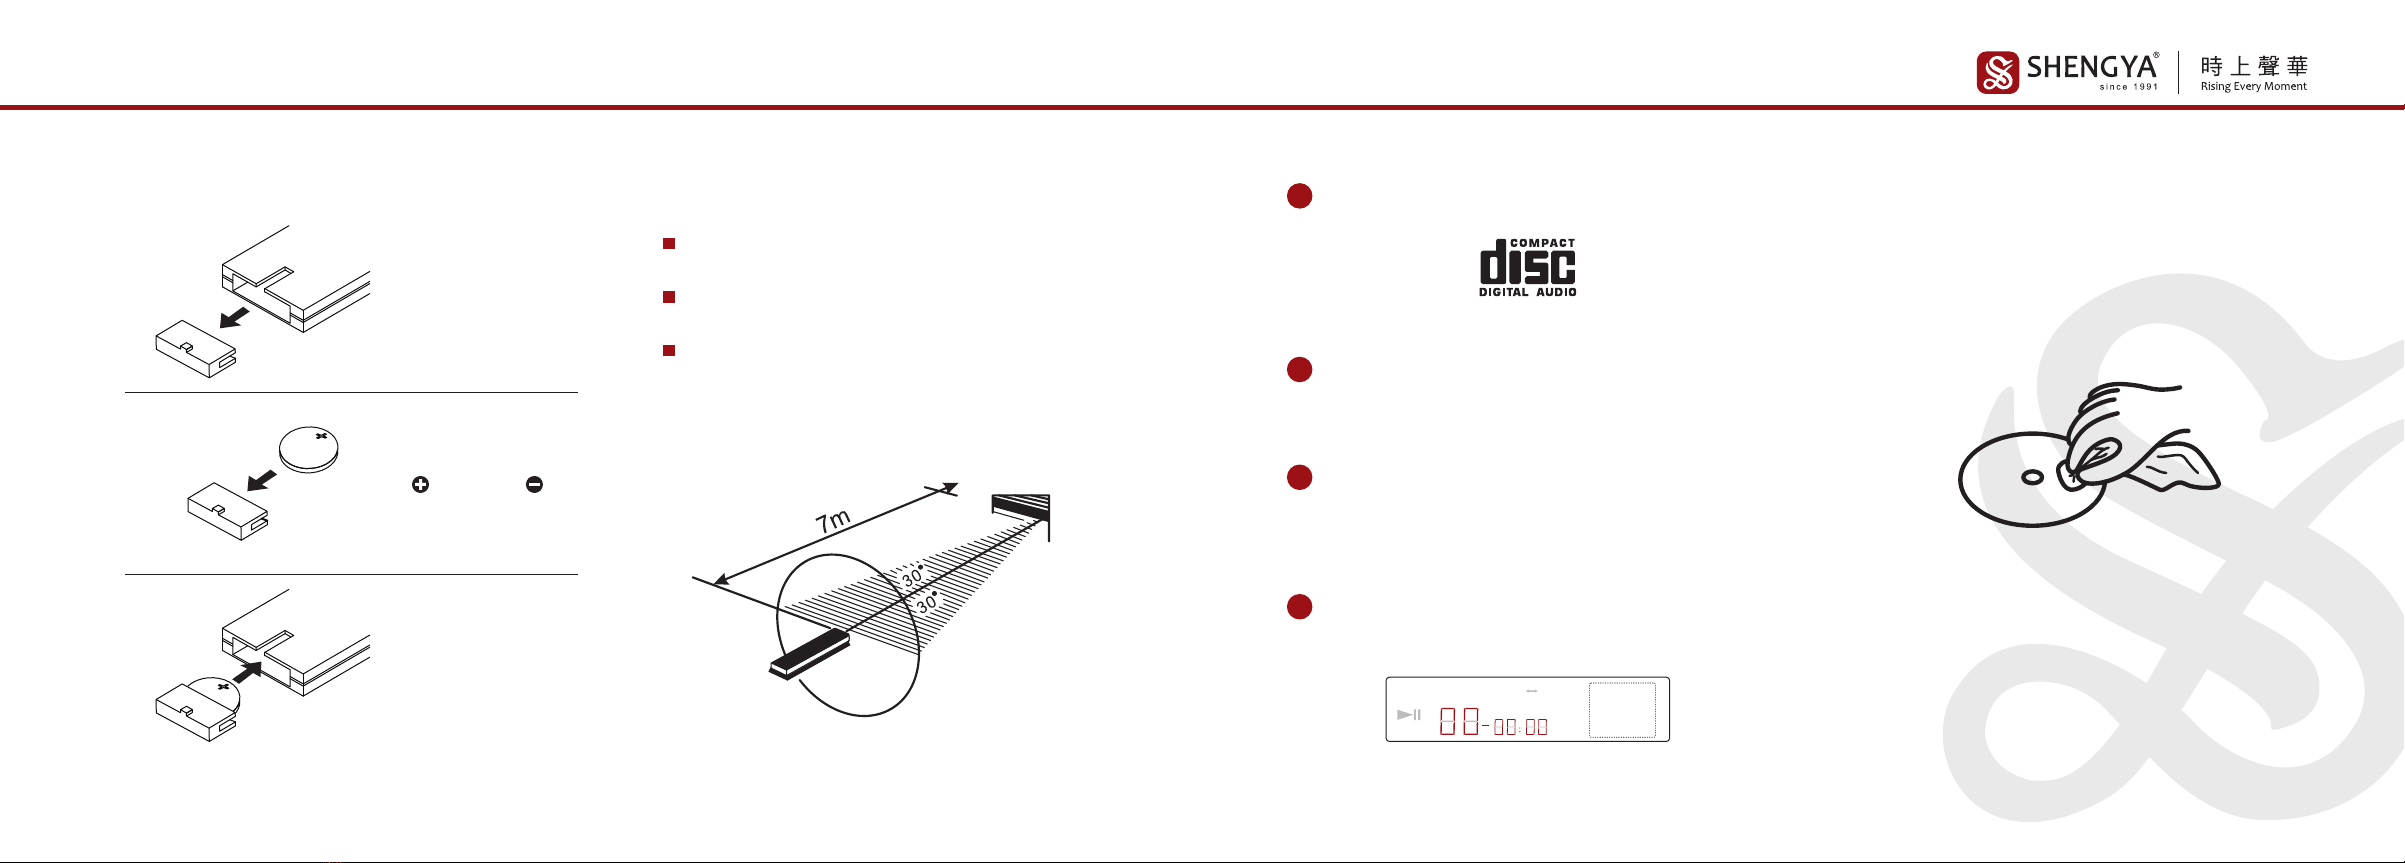
遥控器有效距离大约7米之内。
遥控器的接收角度为30度之内。
不可将机器的遥控感应器置于阳光或强光直射之
下;因这会导致遥控器无法操作。
推出电池盒
装入电池盒
将纽扣电池插入电池
盒, (正)极向上 (负)
极向下
1
2
3
使用准备
注意:
1.唱片仓只能放置唱片其它任何东西不能放置;
2.打开时手执唱片边缘,小心放入中心位置;
3.当不使用时,请将唱片仓处于关闭状态,以防灰尘污染激光头。
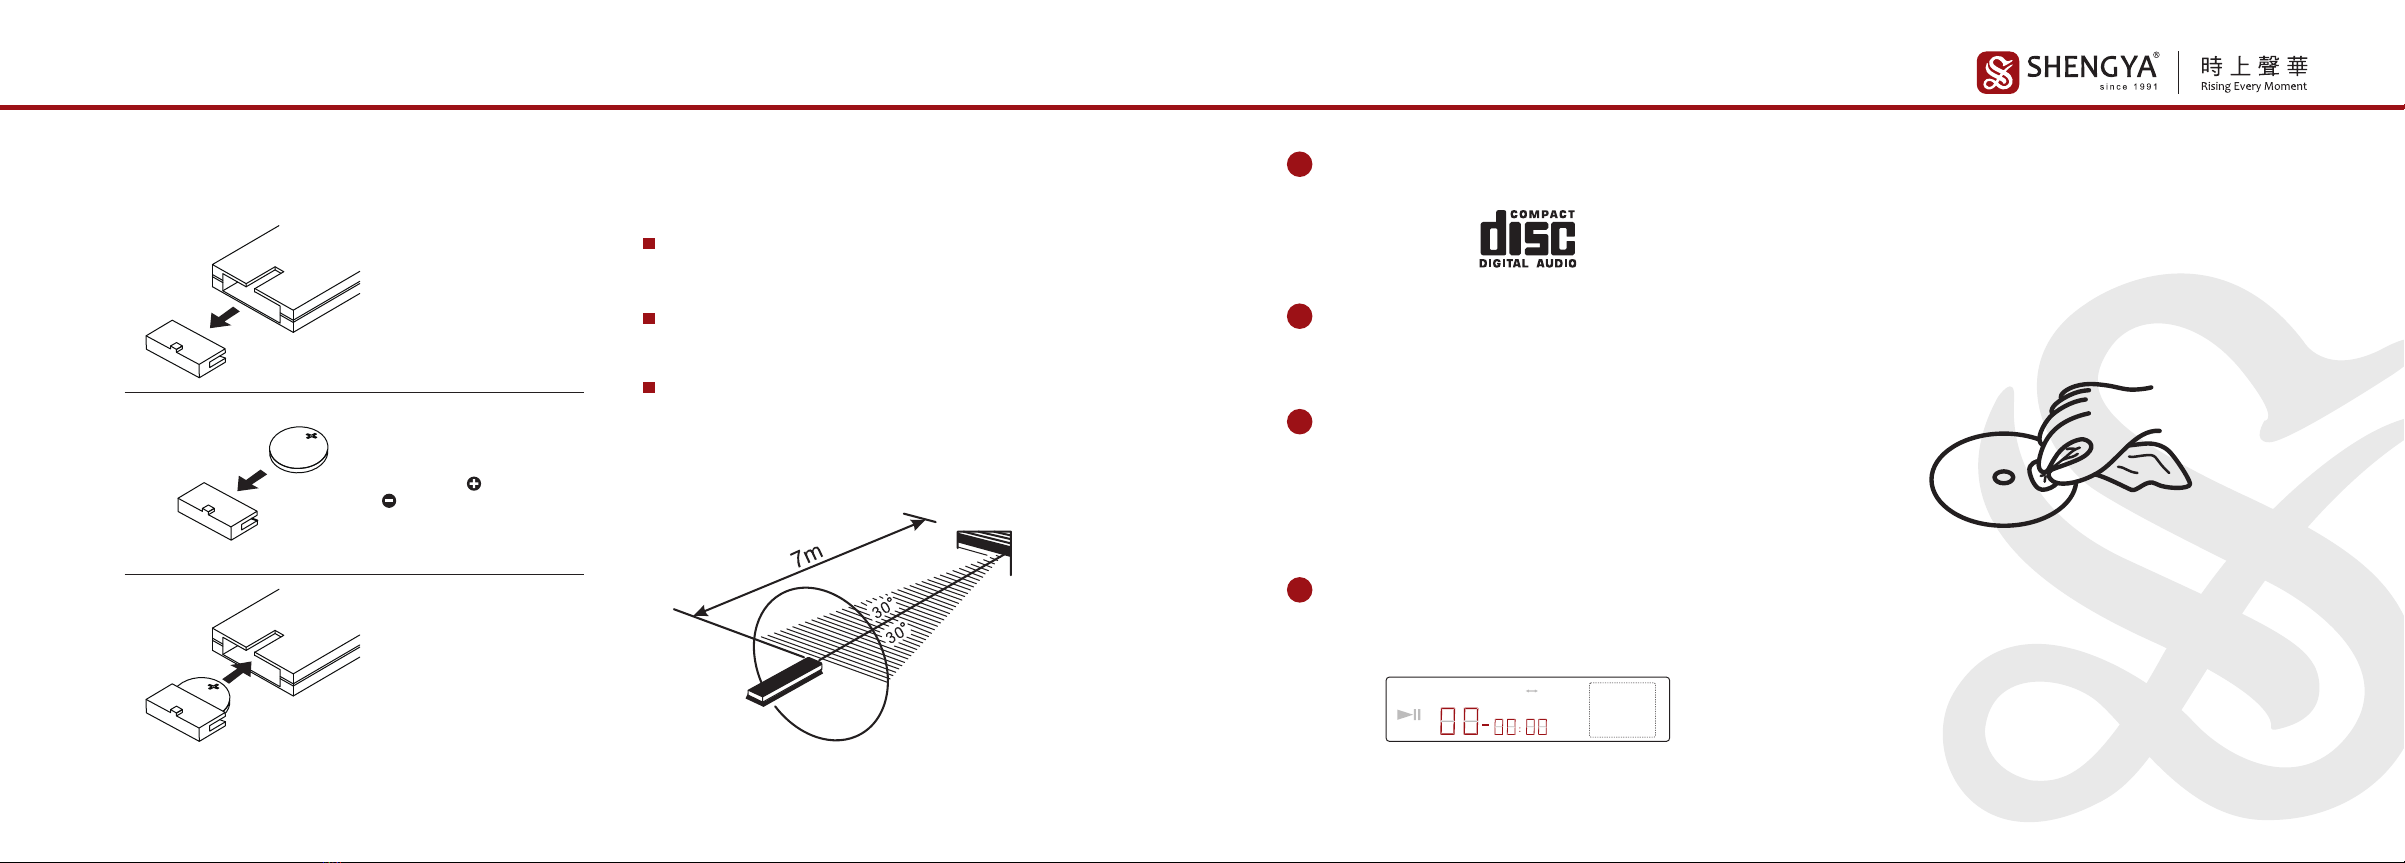
唱片保养
要去除唱片录音面上灰尘或手指印,请使用硅酮布擦拭。
擦拭唱片时,应从唱片中心向边缘直线方向进行擦拭。
(切勿用酒精或抗电液等挥发性化学液体擦拭唱片)
2按电源开关接通电源;状态指示灯闪烁,经过23秒后
停止闪烁,机器进入工作状态。
3手动向上打开唱片仓上盖,小心放入唱片;把唱片压
片放置中心上,然后将唱片仓上盖向下关闭,机器自
动进入搜索唱片信息状态。
1本机使用的唱片为“8CM”或“ 12CM”小型圆盘式激光
唱片;其标识如下图:
4唱片搜索完后,显示窗会显示出该唱片的曲目总数和
播放总时间。(超过16首歌曲,显示屏有“OVER”红色字体显示,显
示屏如下图所示:)
4
8
12
16
3
7
11
15
2
6
10
14
1
5
9
13
PGM
RAN
INTRO
OVER
REPEAT 1 ALL A B
REMAIN
MIN SEC
1009
操作说明 操作说明
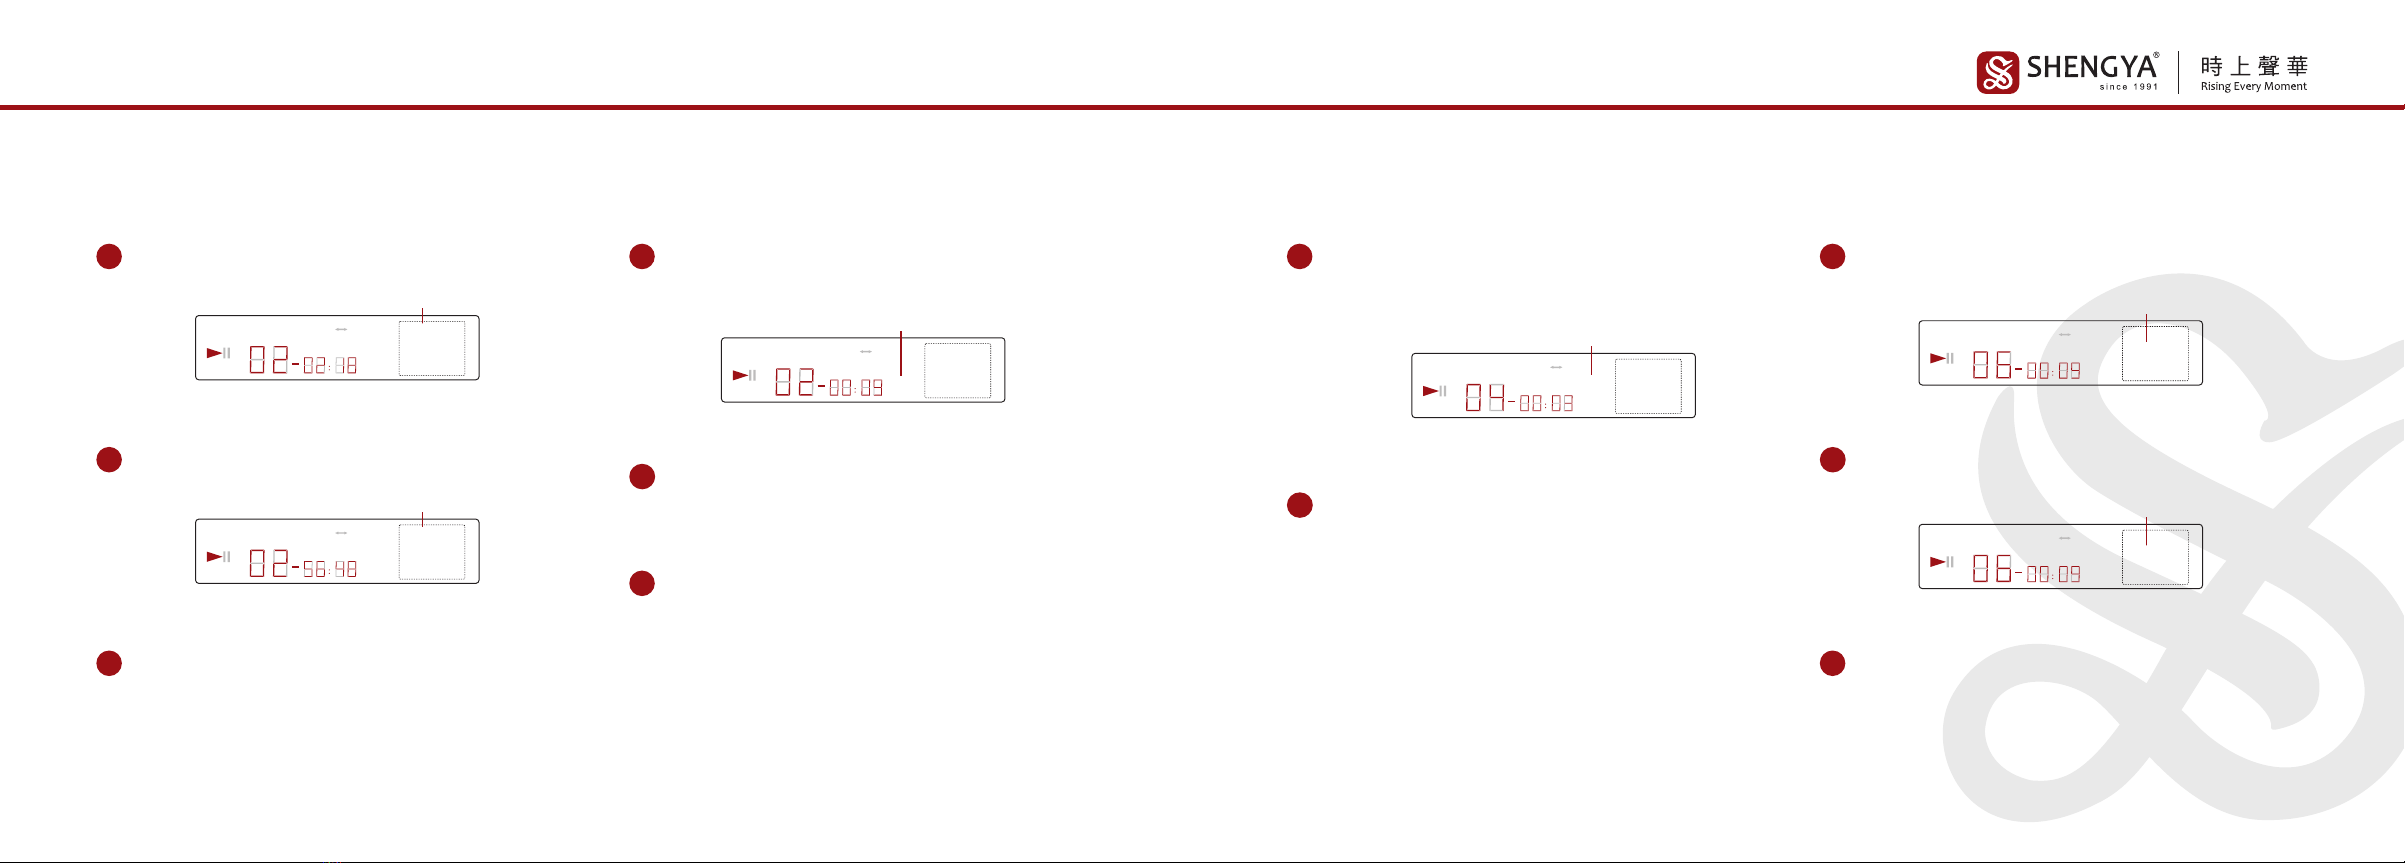
一.曲目剩余时间显示(REMAIN):
3再按一次回复单曲播放时间。
1按遥控器上的“REMAIN”键一次显示屏上显示当前播
放单曲的剩余时间。 显示屏如下图所示:
4
8
12
16
3
7
11
15
2
6
10
14
1
5
9
13
PGM
RAN
INTRO
OVER
REPEAT 1 ALL A B
REMAIN
MIN SEC
闪烁
2再按一次显示当前播放整张唱片的剩余时间,显示屏
如下图所示:
4
8
12
16
3
7
11
15
2
6
10
14
1
5
9
13
PGM
RAN
INTRO
OVER
REPEAT 1 ALL A B
REMAIN
MIN SEC
闪烁
二.浏览模式(INTRO):
4
8
12
16
3
7
11
15
2
6
10
14
1
5
9
13
PGM
RAN
INTRO
OVER
REPEAT 1 ALL A B
REMAIN
MIN SEC
显示
1按遥控器上的“INTRO”键,可执行曲首顺序浏览功能,
显示屏上显示“INTRO”,机器会播放每首曲目开始的
十秒钟内容。显示屏如图示:
2
取消浏览模式可有如下选择:
按遥控器上的“ INTRO ”键 。
3浏览到喜爱的一首曲目,想立刻欣赏;可作以下选择:
(浏览功能取消)
a.按遥控器上该曲目的数字编号;
b.按面板或遥控器上的“ ▶▏▏”键 。
三.随机播放功能(RANDOM):
1在停机状态按“RANDOM”键,显示屏上显示“RAN”字
体表示已进入随机播放状态,机器会随机选取一首曲
目开始播放,后续的曲目也都是任意选取的。显示屏
如下图所示:
4
8
12
16
3
7
11
15
2
6
10
14
1
5
9
13
PGM
RAN
INTRO
OVER
REPEAT 1 ALL A B
REMAIN
MIN SEC
显示
2
取消随机播放功能可有如下选择:
a.按遥控器上曲目的数字键;
b.按遥控器“ RANDOM ”键 。
四.重复播放(REPEAT):
3再按遥控器上的“REPEAT”键一次,取消重复播放功能。
1如要连续重复播放当前曲目,按遥控器上的“REPEAT”
键一次,显示屏显示“REPEAT 1”,显示屏如下图所示:
4
8
12
16
3
7
11
15
2
6
10
14
1
5
9
13
PGM
RAN
INTRO
OVER
REPEAT 1 ALL A B
REMAIN
MIN SEC
闪烁
2
如要连续顺序播放当前唱片所有曲目,则再按遥控器
上的
“
REPEAT
”
键一次,显示屏显示
“
REPEAT ALL
”
,显
示屏如下图所示:
4
8
12
16
3
7
11
15
2
6
10
14
1
5
9
13
PGM
RAN
INTRO
OVER
REPEAT 1 ALL A B
REMAIN
MIN SEC
闪烁
1211
操作说明 注意事项
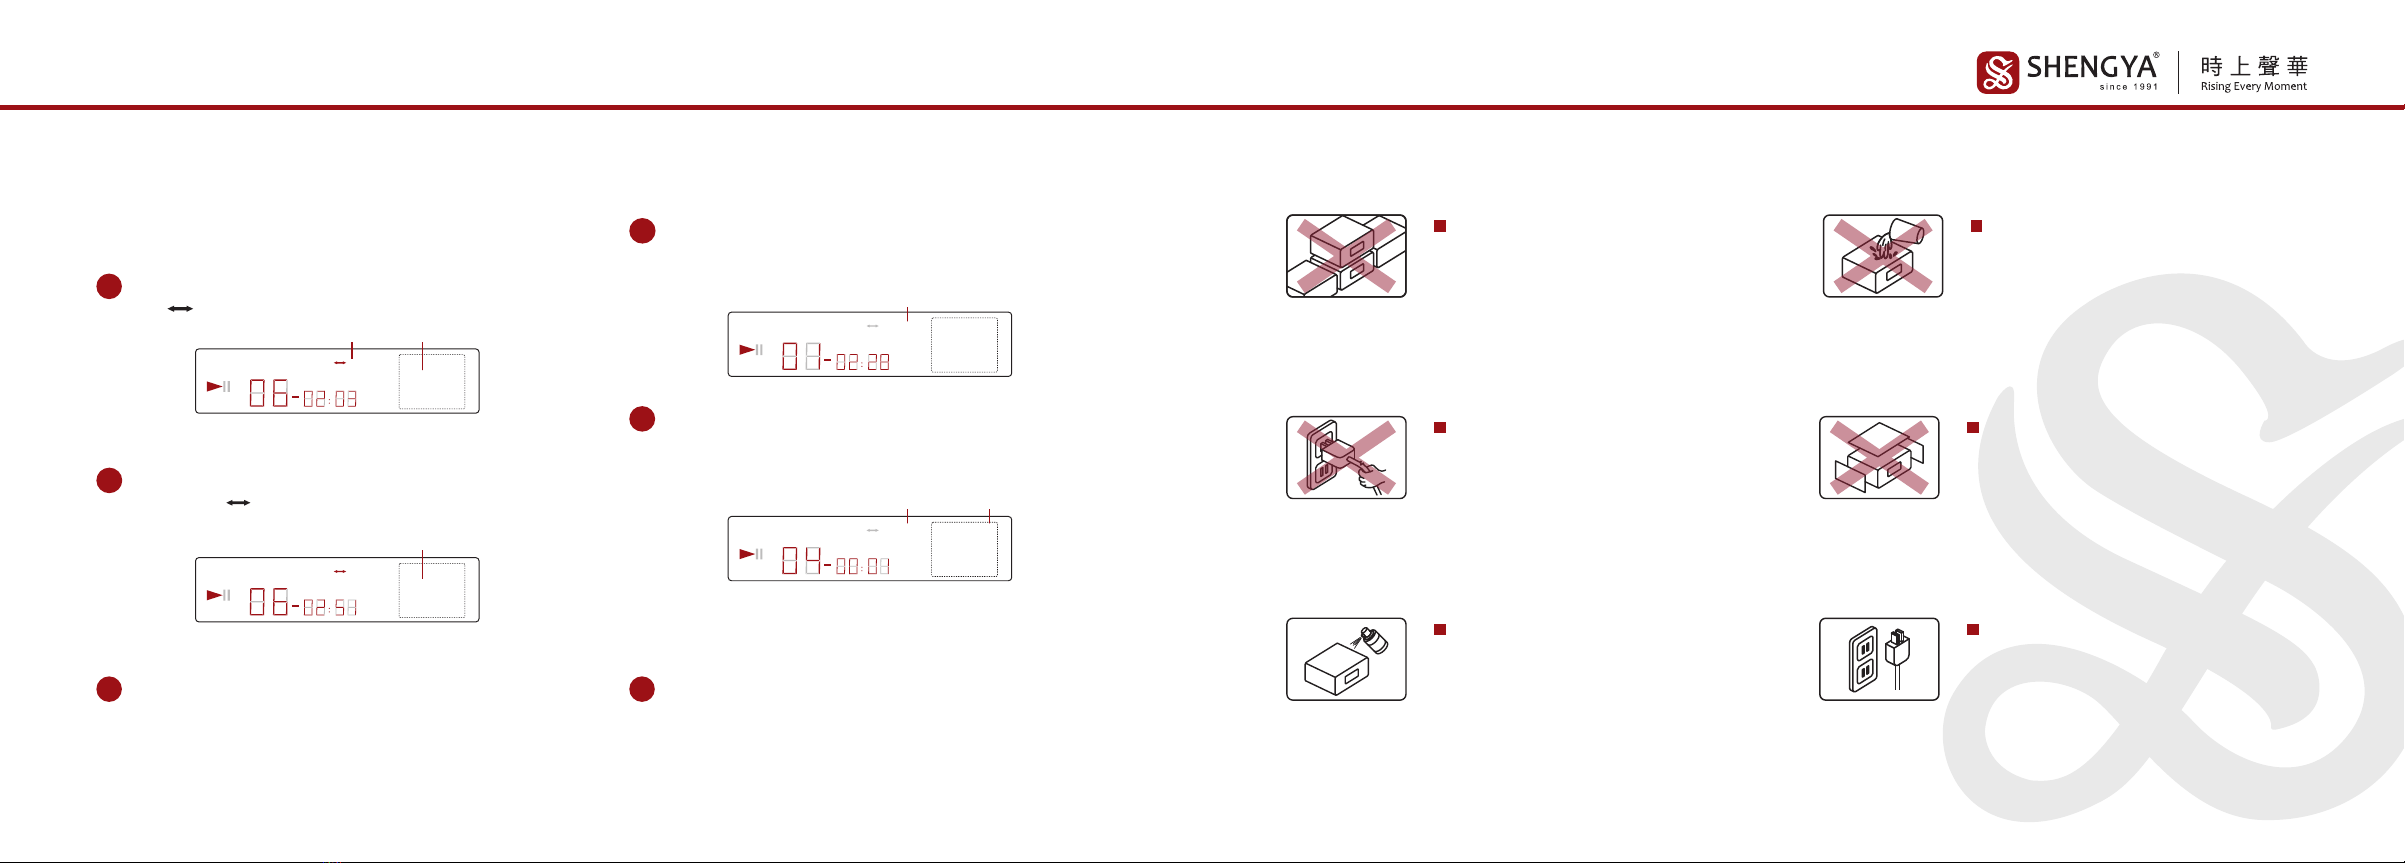
当您一段长时间不使用本机时请将
电源线从插座拔下。
不要随便拆开机壳拔弄内部器件,这
样会有触电危险。
清洁机壳时,请勿使用具有强烈挥发
性有机溶剂(如汽油,苯等)洗擦机面
机壳,应用柔软干净的布轻擦。
请将本机放置于通风良好以及干燥
的地方工作,不要放置在阳光直接照
射或靠近热源地方;并注意支承机器
的柜台四周要有一定空间,10cm内
无任何障碍物;以便机器通风散热。
机器上不能放置带液体的容器(如花
瓶、水杯、油瓶等),更不可将任何类
型的液体洒入机器内,这会造成短路
或漏电事故。
使用电源时请手执插头绝缘部分插
入或拔下电源插座,不要直接扯电源
线。
五.片段欣赏(A-B): 六.编程播放(PGM):
3如需取消该功能,再按一次遥控器上的“A-B”键即可。
1在片段的起始点按遥控器上的“A-B”键,显示屏上显
示“ A B”,显示屏如下图所示:
4
8
12
16
3
7
11
15
2
6
10
14
1
5
9
13
PGM
RAN
INTRO
OVER
REPEAT 1 ALL A B
REMAIN
MIN SEC
闪烁闪烁
2
播放至片段的结束点时,再按遥控器上的“A-B”键 ,显
示屏显示“A B”则该片段会重复播放,显示屏如下图
所示:
4
8
12
16
3
7
11
15
2
6
10
14
1
5
9
13
PGM
RAN
INTRO
OVER
REPEAT 1 ALL A B
REMAIN
MIN SEC
闪烁
如果您对唱片内容的某一片段比较欣赏,假定此片段开
始点为A,结束点为B,则按如下方法可重复欣赏该片段:
3清除编程内容可有如下选择:
a.将仓盖打开或关闭;
b.当用电源开关关机时,或电源中断时。
4
8
12
16
3
7
11
15
2
6
10
14
1
5
9
13
PGM
RAN
INTRO
OVER
REPEAT 1 ALL A B
REMAIN
MIN SEC
闪烁显示
1
编程播放曲目时,先按“
■
”键将机器停止播放,再按
遥控器上“PGM”键一次进入编程状态,显示屏曲目
序号全部隐藏,显示屏如下图所示:
4
8
12
16
3
7
11
15
2
6
10
14
1
5
9
13
PGM
RAN
INTRO
OVER
REPEAT 1 ALL A B
REMAIN
MIN SEC
闪烁显示
2
按遥控器数字选择按键输入要播放的曲目序号,再按
一 下“ PGM”键确认,最后一个编程曲目输入后;按
“ ▶▏▏”键即进入编程播放。(注:最大编程范围为20首曲目。)
例:你想听 4、6、9 首歌曲并希望以 4、6、9 的顺序播放;请按 “ PGM ”键, 再按 4 → PGM
→ 6 → PGM → 9 → PGM,然后按“
▶▏▏
”键即可开始编程播放。(这种播放方式是重复
播放进行);显示屏如上图所示:

1413
故障指导 技术参数
原因 解决方法
1.电源线没接好
2.交流保险管熔断
3.电源开关未按下
1.唱片装反
2.唱片滑伤或变形
1.音频信号线连接不好
2.功放机的音量在最小位置
1.装好唱片(唱片标签面应向上)
2.更换唱片
1.接好音频信号线
2.将功放机的音量徐徐增大
1.接好电源线
2.请合格维修人员更换保险管
3.按下电源开关
1.PGM 编程按键没有按下
2.“ ▶▏▏”播放按键没有按下
1.按一下 PGM 按键直到 PGM 灯亮
2.按一下“ ▶▏▏”播放按键
1.激光唱机安放位置不平或播放中机器受振动
2.唱片很脏、滑伤
1.将激光唱机安放到平稳位置
2.清洁或更换唱片
1.信号线接触不良或插得不够深入
2.信号线不良
1.插紧信号线或用力把插头插入
2.更换信号线
异常现象
声音伴有很大
交流声(嗡嗡声)
遥控器失灵
1.遥控器没有对准功放机遥控接收器
2.遥控器距离功放机太远
3.有物体阻挡在遥控器与功放机之间
4.遥控器中的电池耗尽
1.将遥控器指向功放机
2.在7米之内使用遥控器
3.将阻挡物体拿走
4.换上新电池
电源按钮按下
机器没有启动
唱片装入播放,
但听不到声音
唱片在播放,但听不
到声音或声音很小
REAPEAT 1/ALL重复按键的
REAPEAT 1被选择
将重复按键连续按二次,使回复到
平常播放状态
仅仅单一的一首
曲目能被播放
程序不可能再生
搜索不到唱片
或声音不连续
2.频率响应 ································ : 10Hz-20kHz±0.5 dB
1.音频输出电平 ························· : 2.5 V
5.谐波失真 ································ : <0.003%
6.声道分离度 ···························· : >90 dB
3.动态范围 ································ : ≥100 dB
4.信噪比 ···································· : >95 dB
晶体管音频输出:
: 20Hz-20kHz±0.5 dB
: 2.5 V
: <0.005%
: >90 dB
: ≥100 dB
: >94 dB
电子管音频输出:
2.频率响应 ································
1.音频输出电平 ·························
5.谐波失真 ································
6.声道分离度 ····························
3.动态范围 ································
4.信噪比 ····································
1.体积(W×H×D) ·························· : 446×120×420 (mm)
2.重量 ········································ : 13.5 kg
规格:
本公司产品保养维修委托当地经销商负责联络接洽。
我公司产品奉行不断改进与更新,产品规格及指标如有变更,恕不另行通知。
如有对本说明书不解之处,请向零售商咨询,或直接向本公司查询。
本产品的执行标准 :GB8898、GB15860、Q/SHYAO1-1997
1615
EN
CHARACTERISTICS
Thank you for purchasing Hi-Fi products of Shengya Audio!
We believe that the unremitting pursuit of high-quality audio products is our responsibility
and your ideal.
In order to make CD-3.8 (Compact Disc Player)better performance and bring you greater
pleasure, we recommend that you read this manual carefully before connecting and operating
the system.
GRATITUDE
Warning: In order to prevent fire or electric shock, please do not expose the
machine to rain or humid environment. There are dangerous high-voltage accesso-
ries in the machine, so do not open the machine cover and only entrust it to qualified
maintenance personnel.
Dangerous voltage: In order to reduce the risk of electric shock, please do not
remove the cover (or rear panel)without authorization.
Note: There are no user-overhauled parts inside the device. When overhauling is
required, please entrust the dealer or qualified personnel.
The equipment is only suitable for safe use in tropical climates, with a maximum operating temperature of 45°C;
The equipment is only suitable for safe use in areas with an altitude of 5000m and below;
The equipment uses an appliance coupler as a disconnect device.
SAFETY WARNING
CD-3.8 is an upgraded product improved on the basis of the original CD-3.5; this
machine optimizes the assembly process of the movement, which greatly improves
the accuracy of reading discs, and significantly improves the volume of sound
information and sound density. Positioning is more precise.
Using Philips professional high-performance VAM1202 movement, coupled with
highly integrated CD 7-II digital servo IC, so that CD-1has the advantages of accurate
decoding, strong error correction ability, and stability.
The digital and analog converterchip is the latest decoding chip PCM 1792 from
Burr-Brown Company in the United States. The chip has 24bit converteraccuracy and
192KHz sampling frequency, which can accurately restore every detail of music. In
addition, to ensure converteraccuracy, an independent active clock is especially used.
The analog signal amplification adopts the high-precision, high-speed operational
amplifier OPA627 and OPA2134 and OPA2604 of Burr-Brown Company of the United
States. At the same time, it is equipped with a well-known third-order GIC low-pass
filter, which can effectively filter out the interference noise of the digital signal and
make the audio signal more pure.
This CD-1 CD playerhas two output options: transistor audio output and tube audio
output; it is convenient for users to choose one of the output modes according to
1817
FRONT PANEL FUNCTIONCHARACTERISTICS
different equipment or software.
Transistor audio output adopts high-precision, high-speed operational amplifier
OPA2604, which has deep and powerful low frequency, wide sound field and powerful
dynamics. The tube audio output adopts the Imported fever-grade tube, which has
beautiful and pleasantsound, especiallythenatural and warm vocal.
The analog power supply is powered by a high-flux, low-leakage toroidal
transformer. The digital and movement power is also supplied by another independent
toroidal transformer to ensure that all parts of the circuit do not interfere with each
other.
Tube and field effect hybrid precision high-voltage stabilized power supply, with
extremely high voltage stability. The extremely lowAC ripple coefficient benefits to the
sound significantly.
XLR and RCA terminals are Gold-plated imported high-end products, to ensure
beautiful sound quality and durable performance. The power cord is XLO high-quality
wire, which is suitable for sound field positioning, depth, width, and control.
The three sharp foot have a positive effect on the balance of the unit and the
attenuation of external force vibration; the all-aluminum structure can also effectively
reduce its resonant frequency and improve sound quality and quietness.
STATUS INDICATOR
When the power is turned on, the indicator light starts to flash,
and the flashing stops after about 20 seconds, and the machine
enters the working state.
2
4
8
12
16
3
7
11
15
2
6
10
14
1
5
9
13
PGM
RAN
INTRO
OVER
REPEAT 1 ALL A B
REMAIN
MIN SEC
Repeat
Instructions Program
Play Shuffle
Playback
The Number Of The
Track Being Played
Play Track Time
Record Ten
Seconds To Browse
Track Number
Overflow Indication Track
Number
Play/Pause
Remaining Time
Of The Track
1
1SCREEN
Display power on/off status,track number,playing time and current
operating status and other information.
3REMOTE CONTROL RECEIVER
Receive the infrared remote control command signal sent by the
remote control.
1
23

2019
BACK PANEL FUNCTIONTOP PANEL FUNCTION
04/ BACK PANEL FUNCTION03/ TOP PANEL FUNCTION
POWER
This button is used to turn on or off the AC power supply of the
whole machine.
1
TUBE/FET
When the switch is pressed, the machine will output with tube
audio, and when the switch is reset, the machine will output with
transistor audio.
2
RECORD WAREHOUSE
Used to put in compact discs.
3
REPEAT()
Press the " " key once to repeatedly play the currently playing
track; press the " " key twice; to repeat the entire album track;
press the " " key three times to cancel the repeat playback
function.
4
PLAY/PAUSE( ▶▏▏)
Press this button to play sequentially from the first track of the
record (until it reaches the last track), press this button again to
pause the track playback, and press this button again to continue
playing.
5
STOP( ■ )
It is the button to stop playing the record.
6
TRACK SKIP BUTTON(▶▶▏)
Press "▶▶▏" once, and then play a track.
8
TRACK SKIP BUTTON(▏◀◀)
Press " ▏◀◀ " once to play a track before.
7
1RCA OUTPUT TERMINAL
This terminal is used to connect the RCA audio input terminal of
the audio amplifier
3
The digital audio output terminal is used to connect a digital/analog
decoder.
COAXIAL OUTPUT TERMINAL
2XLR OUTPUT TERMINAL
This terminal is used to connect the XLR audio input terminal of the
audio amplifier.
4OPTICAL OUTPUT TERMINAL
The digital audio output terminal is used to connect a digital/analog
decoder.
POWER SOCKET WITH AC POWER FUSE
This power socket is used to connect to AC power. The fuse is at
the bottom of the power socket. When replacing the fuse, be sure
to pull out the power cord to replace it.
5
3
48
6
57
12
13
24
5
2221
REMOTE CONTROLREMOTE CONTROL
Function Description
NEXT/BACK (▶▶▏/ ▏◀◀)
Same as the panel function description.
12
VOLUME
Same as the panel function description.
13
QUICK SEARCH KEY (▶▶ /◀◀)
Press the “▶▶” key once to quickly search the track currently being
played back, and press the “◀◀” key once to quickly search the track
currently being played forward.
14
NOTE:
1.The remote control should not be near overheated or humid places,and
should not be exposed to direct sunlight or strong light.
2.Do not subject the remote control to strong collisions or fall from a high
place, otherwise it will damage the remote control and make it impossible
normal work.
3.Please use CR2032 button batteries; do not mix new and old button
batteries or different types of button batteries.
4.When the remote control is not used for a long time, please take out the
battery and do not throw the battery into the fire.
5.If the battery bursts, please clean and wipe the battery compartment dry,
and then install a new battery.
6.Under normal use, replace the battery every 6 months.
REMAIN
Press this button once to display the remaining time of the currently
playing single; press again to display the remaining time of the
current playing of the entire album; press again to restore the
original display.(Detailed description on page 25)
1
DIMMER
This key is used to adjust the brightness of the display. When the
power is turned on, the brightness is maximum. Press the button
once to reduce the brightness, press it again to turn off the display,
and press it for the third time, the brightness returns to normal
brightness.
2
Number Buttons(1-10,10+)
The 1-10 number buttons are the direct track selection buttons.
Press the number direct selection buttons to directly select the
track to play; when the selected track exceeds 10, press the 10+
button once, and then press any number button 1-10 to select the
number. More than 10 tracks; when there are more than 20 tracks,
press the 10+ button twice, and then press any number button from
1 to 10, you can select the track with the number exceeding 20.
(Example: To select the 18th song, first press the 10+ key, then
press 8; you can enjoy the 18th song.)
3
A-B
In normal playback, press this button to wait until the content of the
track you want to repeat is played, press this button to play the track
segment between (A start point to B end point),and then press this
button to cancel the function.(Detailed description on page 27)
4
STOP ( ■ )
Same as the panel function description.
8
CANCEL
Press this button during the arrangement process to clear the
currently input tracks one by one.
9
PGM
This button is used to play the programmed tracks.
(Detailed description on page 27)
10
RANDOM
Press this button once, the player will enter the random playback
state, and press it again to cancel the random mode; (afterwards, it
will switch to the sequential playback mode).
(Detailed description on page 26)
11
INTRO
Press this button to browse and play the track of each track in the
playing record for ten seconds.(Detailed description on page 25)
5
This button can select a single track or all tracks to be played in a loop
(Detailed description on page 26)
REPEAT
6
PLAY/PAUSE (▶▏▏)
Same as the panel function description.
7
1
2
3
4
5
6
7
8
9
10
11
12
13
14
2423
USAGE NOTICEREMOTE CONTROL
2Press the power switch to turn on the power; the status
indicator flashes and stops flashing after 23 seconds,
and the machine enters the working state.
3Open the upper cover of the record compartment man-
ually upwards, and put the record carefully; place the
record press on the center, then close the upper cover of
the record compartment downwards, the machine will
automatically enter the state of searching for record
information.
1The record used by this machine is a "8CM" or "12CM"
compact disc compact disc; its logo is as shown in the
figure below:
4After the album search is completed, the display window
will show the total number of tracks and the total
playing time of the album. (More than 16 songs, the display
shows "OVER" in red font, the display is as shown in the figure below:)
4
8
12
16
3
7
11
15
2
6
10
14
1
5
9
13
PGM
RAN
INTRO
OVER
REPEAT 1 ALL A B
REMAIN
MIN SEC
Record Maintenance
To remove dust or fingerprints on the recording surface
of the record, please wipe it with a silicone cloth. When
wiping the record, wipe from the center of the record to
the edge in a straight line.(Do not wipe the record with volatile
chemical liquids such as alcohol or anti-electrolyte)
NOTE:
1. The record compartment can only store records and nothing else can be
placed;
2. Hold the edge of the record when opening it, and place it in the center
carefully;
3. When not in use, please close the disc compartment to prevent dust
from polluting the laser head.
Introducing the battery box
Insert the battery box
Insert the coin cell battery into
the battery box, (positive)pole
up; (negative)pole down
1
2
3
Preparation
Remote
Control
Remote Control
Receiving
Use Operation
The effective distance of the remote control is about
7 meters.
The receiving angle of the remote control is within 30
degrees.
Do not place the remote control sensor of the machine
under direct sunlight or strong light; this will cause the
remote control to fail to operate.

2625
INSTRUCTIONSINSTRUCTIONS
Track Remaining Time Display(REMAIN):
3Press again to restore the single play time.
1Press the "REMAIN" button on the remote control once
to display the remaining time of the single currently
playing on the display. The display screen is shown in
the figure below:
4
8
12
16
3
7
11
15
2
6
10
14
1
5
9
13
PGM
RAN
INTRO
OVER
REPEAT 1 ALL A B
REMAIN
MIN SEC
FLASHING
2Press again to display the remaining time the entire
record, the display screen is as shown in the figure below:
4
8
12
16
3
7
11
15
2
6
10
14
1
5
9
13
PGM
RAN
INTRO
OVER
REPEAT 1 ALL A B
REMAIN
MIN SEC
FLASHING
Browse Mode(INTRO):
4
8
12
16
3
7
11
15
2
6
10
14
1
5
9
13
PGM
RAN
INTRO
OVER
REPEAT 1 ALL A B
REMAIN
MIN SEC
DISPLAY
1Press the "INTRO" button on the remote control to
perform the song sequence browsing function,"INTRO"
is displayed on the display, and the machine will play
the ten-second content at the beginning of each song.
The display screen is as shown in the figure:
2
The following options are available for canceling the
browsing mode:
Press the "INTRO" button on the remote control.
3Browse to a favorite track and want to enjoy it
immediately; you can make the following choices:
(Browse function canceled)
a. Press the number of the track on the remote control;
b. Press the " ▶▏▏" key on the panel or remote control.
Shuffle Function(RANDOM):
1Press the "RANDOM" button in the stopped state, the
font "RAN" on the display shows that it has entered the
random play state,the machine will randomly select a
track to start playing,and the subsequent tracks are
also selected arbitrarily.The display screen is shown in
the figure below:
4
8
12
16
3
7
11
15
2
6
10
14
1
5
9
13
PGM
RAN
INTRO
OVER
REPEAT 1 ALL A B
REMAIN
MIN SEC
DISPLAY
2
To cancel the random play function, you have the
following options:
a. Press the number key of the track on the remote control;
b. Press the "RANDOM" button on the remote control.
Repeat Play(REPEAT):
3Press the "REPEAT" button on the remote control again
to cancel the repeat playback function.
1To play the current track continuously and repeatedly,
press the "REPEAT" button on the remote control once,
the display shows "REPEAT 1", and the display is as
shown in the figure below:
4
8
12
16
3
7
11
15
2
6
10
14
1
5
9
13
PGM
RAN
INTRO
OVER
REPEAT 1 ALL A B
REMAIN
MIN SEC
FLASHING
2
If you want to play all the tracks of the current album in
sequence, press the "REPEAT" button on the remote
control again, the display shows "REPEAT ALL",and the
display is as shown in the figure below:
4
8
12
16
3
7
11
15
2
6
10
14
1
5
9
13
PGM
RAN
INTRO
OVER
REPEAT 1 ALL A B
REMAIN
MIN SEC
FLASHING

2827
PRECAUTIONSINSTRUCTIONS
Fragment Appreciation(A-B):
3To cancel this function, press the "A-B" button on the
remote control again.
2
When playing to the end of the segment, press the "A-B"
button on the remote control again, the display shows
"A B" and the segment will be played repeatedly, as
shown in the following figure on the display:
4
8
12
16
3
7
11
15
2
6
10
14
1
5
9
13
PGM
RAN
INTRO
OVER
REPEAT 1 ALL A B
REMAIN
MIN SEC
FLASHING
1Press the "A-B" button on the remote control at the
beginning of the clip, and "A B" will appear on the
display, as shown in the figure below:
4
8
12
16
3
7
11
15
2
6
10
14
1
5
9
13
PGM
RAN
INTRO
OVER
REPEAT 1 ALL A B
REMAIN
MIN SEC
FLASHINGFLASHING
If you appreciate a certain segment of the album content,
assuming that the start point of the segment is A and the
end point is B, you can listen to the segment repeatedly as
follows:
Program Play(PGM):
3The following options are available for clearing
programming content:
a. Open or close the cover;
b. When shutting down with the power switch, or when the power is
interrupted.
4
8
12
16
3
7
11
15
2
6
10
14
1
5
9
13
PGM
RAN
INTRO
OVER
REPEAT 1 ALL A B
REMAIN
MIN SEC
FLASHING
1
When programming a track, first press the "■" key to
stop the machine, and then press the "PGM" key on the
remote control once to enter the programming state.
The track numbers on the display screen are all hidden,
and the display screen is as shown in the figure below:
4
8
12
16
3
7
11
15
2
6
10
14
1
5
9
13
PGM
RAN
INTRO
OVER
REPEAT 1 ALL A B
REMAIN
MIN SEC
FLASHINGDISPLAY
2
Press the number selection button of the remote
control to input the number of the track to be played,
and then press the "PGM" button to confirm. After the
last programmed track is input; press the "▶▏▏" button
to enter the programming playback.(Note:The maximum
programming range is 20 tracks.)
Example: You want to listen to 4, 6, and 9 songs and want to play in the order of 4,
6, and 9; please press the "PGM" button, then press 4 → PGM→ 6 → PGM → 9 →
PGM, and then press "▶▏▏" key to start programming playback. (This playback
method is repeated playback); The display screen is as shown in the figure above:
Please unplug the power cord from
the socket when you are not using
the machine for a long time.
Do not disassemble the casing and
try to get the internal components,
otherwise there will be a risk of
electric shock.
When cleaning the cabinet, do not
use strong volatile organic solvents
(such as gasoline,benzene,etc.)to
clean the cabinet on the surface of
the machine.Use a soft,clean cloth
to wipe gently.
Please place the machine in a
well-ventilated and dry place for
work.Do not place it in direct sun-
light or close to a heat source;and
pay attention to a certain space
around the counter supporting the
machine,without any obstacles
within 10cm;to allow the machine
to ventilate and dissipate heat.
Do not place containers with liquids
(such as vases,water cups, oil bot-
tles,etc.)on the machine, and do
not spill any type of liquid into the
machine,which may cause short
circuits or electric leakage acci-
dents.
When using the power supply, insert
or unplug the power socket by
holding the insulated part of the
plug,and do not pull the power cord
directly.

3029
FAULT GUIDANCEFAULT GUIDANCE
ABNORMAL REASON SOLUTION
No record is
found or the sound
is not continuous
Remote control
malfunction
1.Place the CD player in a stable position
2.Clean or replace the record
1.Point the remote control at the amplifier
2.Use the remote control within 7 meters
3.Remove obstructing objects
4.Replace with new batteries
2.The record is dirty and scratched
1.The remote control is not pointed at the remote
control receiver of the amplifier
2.The remote control is too far away from
the amplifier
3.There is an object blocking between the remote
control and the amplifier
4.The battery in the remote control is exhausted
1.The location of the CD player is uneven or the
machine is vibrated during playback
1.Connect the power cord
3.The power switch is not pressed
1.Record reverse
2.Scratched or deformed record
1.The audio signal cable is not well connected
2.The volume of the amplifier is at the minimum
position
3.Press the power switch
1.Install the record (the label side of the record
should face up)
2.Change the record
1.Connect the audio signal line
2.Slowly increase the volume of the amplifier
1.Connect the power cord
2.Ask qualified maintenance personnel to replace
the fuse
1.The power cord is not connected properly
2.AC fuse blown
1.PGM programming button is not pressed
2." ▶▏▏" play button is not pressed
1.Press the PGM button until the PGM light is on
2.Click the " ▶▏▏" play button
1.The signal line is in poor contact or not inserted
deep enough
2.Bad signal line
1.Tighten the signal cable or force the plug into
2.Replace the signal line
ABNORMAL REASON SOLUTION
The machine does
not start when the power
button is pressed
The record is
loaded and played,but no
sound is heard
The record is playing,
but no sound is heard or
the sound is low
The program cannot
be regenerated
The sound is accompanied
by a loud humming
Only a single
track can be played “REPEAT 1/ALL” repeat key “REPEAT 1” is selected Press the repeat button twice to return to the
normal playback state

3231
PARAMETERS
2.Frequency Response ················ : 10Hz-20kHz±0.5 dB
1.Audio output level ····················· : 2.5 V
5.Harmonic distortion ·················· : <0.003%
6.Channel separation ··················· : >90 dB
3.Dynamic range ························· : ≥100 dB
4.Signal to noise ratio ··················· : >95 dB
Transistor Audio Output:
2.Frequency Response ················ : 20Hz-20kHz±0.5 dB
1.Audio output level ····················· : 2.5 V
5.Harmonic distortion ·················· : <0.005%
6.Channel separation ··················· : >90 dB
3.Dynamic range ························· : ≥100 dB
4.Signal to noise ratio ··················· : >94 dB
Tube Audio Output:
1.Dimensions(W×H×D) ················ : 446×120×420(mm)
2.Weight ··································· : 13.5 kg
Specification:
The company's product maintenance and repair entrust the local distributor to be responsible for contacting and contacting.
Our company's products pursue continuous improvement and update, product specifications and indicators are subject to change without notice.
If you have any questions about this manual, please consult the retailer or directly contact our company.
Implementation standards of this product:GB8898、GB15860、Q/SHYAO1-1997
This manual suits for next models
1
Table of contents
Other SHENGYA CD Player manuals


