Akai APRC51I User manual

English: APRC51I
Index
1. Safety
o1.1. Intended use
o1.2. Labels in this manual
o1.3. General safety instructions
2. Preparations for use
3. Installation
4. Functions
5. Operation
6. Cleaning and maintenance
7. Technical data
8. Disposal of used electrical and electronic equipment
Safety
Intended use
The iPod Music System functions as a docking station to play music from an iPod/iPhone. The
appliance also plays music from radio/CD. The clock function includes an alarm and sleep program.
Read the manual carefully before the first use.
Labels in this manual
WARNING A warning means that injury or death is possible if the instructions are not obeyed.
CAUTION A caution means that damage to the equipment is possible.
A note gives additional information, e.g. for a procedure.

General safety instructions
WARNING Do not put force on the appliance. The appliance can fall and can cause serious injury.
CAUTION Do not spill any liquid on the appliance.
WARNING Do not insert any objects in the ventilation holes.
CAUTION Do not block the ventilation holes.
This appliance is double insulated; therefore no earth wire is required. Always check that the mains
voltage corresponds to the voltage on the rating plate.
Preparations for use
Unpacking
Unpack the appliance carefully.
Check the package contents as described below. If any item is missing, please contact your
reseller.
Remove the labels from the front panel carefully if present.
We recommend that you retain the original carton and packing materials in case it ever becomes
necessary to return your product for service. This is the only way to safely protect the product against
damage in transit. If you do dispose of the carton and the packing materials, please remember to
recycle with due care to the environment.

Package contents
The following items are included in the received package:
1 iPod Music System
1 Remote control
2 Batteries (AAA)
1 Quick start guide
1 Mains cable
If any item is missing, please contact your reseller.
Installation
Put the appliance on a horizontal flat surface.
Connect the appliance to the mains.
CAUTION Do not put the appliance near a heat source.
Do not expose the appliance to direct sunlight.
This appliance is equipped with rubber feet to prevent it from moving. The feet are made from non-
migrating material specially formulated to avoid leaving any marks or stains on furniture. However,
certain types of furniture polishes, wood preservatives or cleaning sprays cause the rubber to soften
and leave marks or a residue on the furniture, and potentially risk the surface to become damaged. To
prevent damage to wooden surfaces, we recommend that you apply self-adhesive pads to the bottom
of the rubber feet before installation.

Connecting to the mains
Connect the female connector on the mains cable to the AC MAINS connection.
Connect the mains plug to a wall socket.
Install batteries
Remote control
Install batteries
Remove the battery cover.
Insert the batteries matching the (+) and (-) polarity markings.
Re-install the battery cover.
CAUTION Incorrect installation can cause battery leakage and corrosion which will damage the
appliance. Corrosion, oxidation, battery leakage and any other gradually acidic defect of this nature
will invalidate the guarantee.

APRC51I
The appliance can also be operated on battery power. For this purpose, the appliance uses six
batteries (C).
Please note: these batteries are not included.
Batteries are not necessary for normal operation.
Install batteries
Remove the battery cover.
Insert the batteries matching the (+) and (-) polarity markings.
Re-install the battery cover.
CAUTION Incorrect installation can cause battery leakage and corrosion which will damage the
appliance. Corrosion, oxidation, battery leakage and any other gradually acidic defect of this nature
will invalidate the guarantee.

Functions
Remote control
1. ON/ STANBY button
2. SY./MONO/ID3/ESP DISPLAY button
3. FUNCTION button
4. SOUND button
5. PREV button
6. PLAY/PAUSE button
7. MEMORY/ CLOCK button
8. VOL FOLDER/ PRE. UP, DN- button
9. REPEAT button
10. SLEEP(+/-) button
11. AUX IN button
12. MUTE button
13. BASS button
14. MENU button
15. ENTER button
16. NEXT button
17. STOP button
18. VOLUME +/ - button
19. RANDOM+ button
20. Digit buttons
21. TIMER button

APRC51I Docking Station
1. VOLUME - button
2. AUX IN
3. FUNCTION button
4. POWER button
5. FM antenna
6. iPod dock
7. CD compartment
8. PREV button
9. USB port
10. CLOCK ADJ./ MEMORY/ ENTER button
11. NEXT button
12. STOP/ MENU button
13. PLAY/ PAUSE button
14. Display
15. Remote sensor
16. VOLUME + button
17. FOLDER +/ PRESET + button
Operation
All functions of the appliance are accessible using the remote control. All instructions refer to operation
with the remote control, unless indicated otherwise.

Quick start
General functions
To switch on the appliance, press the STANDBY button (1). To switch back to the standby mode,
press the STANDBY button (1) again.
To select the source mode (iPod-AUX-TUNER-CD-USB....), press the FUNCTION button (3).
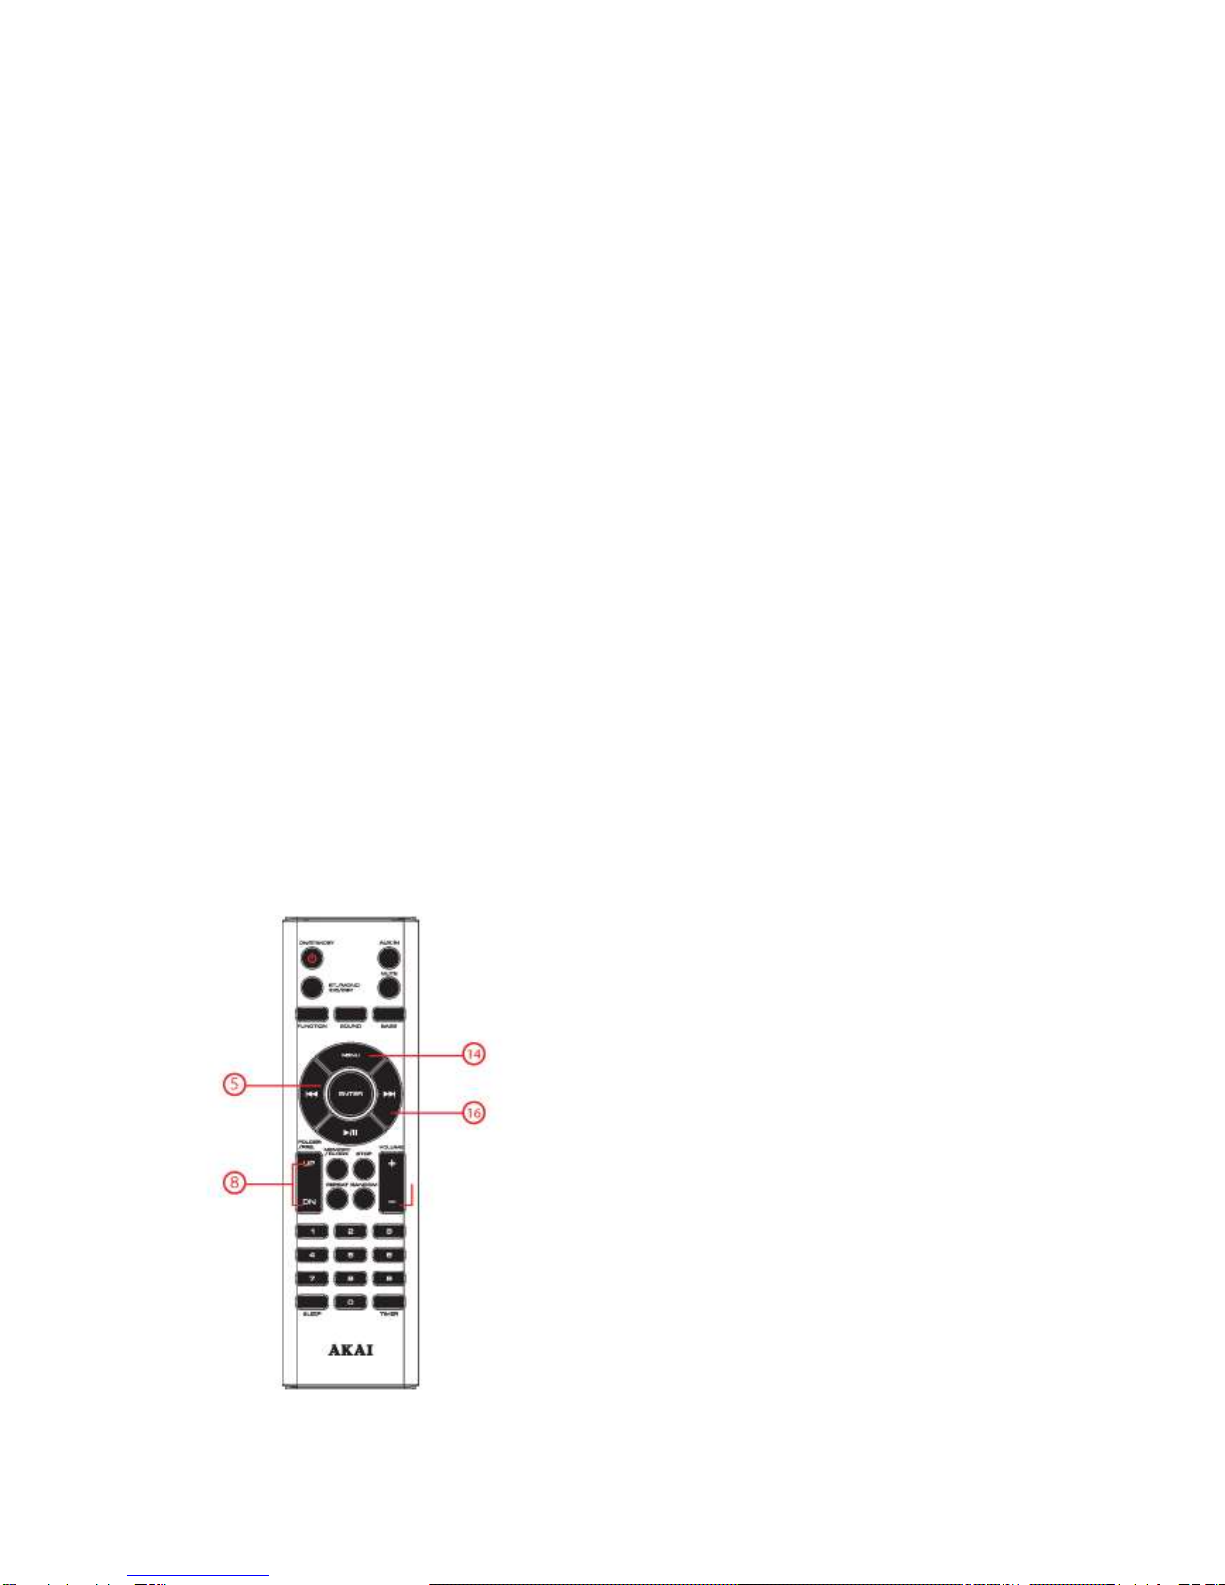
To adjust the volume, press the VOLUME - button or the VOLUME + button (18).
To enable the enhanced bass, press the BASS button (13). Press the button again to disable the
enhanced bass.
To mute or restore sound, press the MUTE button (12).
Use the SOUND (4) button to select the type of music.
You can choose from: FLAT, CLASSIC, ROCK, POP, JAZZ,
iPod/iPhone functions
Place your iPad/ iPhone in the docking station.
To select the source mode iPod, press the FUNCTION button (3).
To start playback, press the PLAY/PAUSE button (6) once.
For extended instructions, read the paragraph "iPod functions" further on in this manual.

Radio functions
Switch on the appliance. Select the tuner mode.
Use the FUNCTION (3) key for this.
For extended instructions, read the paragraph "Radio functions" further on in this manual.
CD functions
To select the source mode CD, press the FUNCTION button (3).
To insert a CD:
Press the CD compartment to open the appliance
Insert the CD with the label upwards
Close the CD compartment
To start playback, press the PLAY/PAUSE button (6) once.
For extended instructions, read the paragraph "CD functions" further on in this manual.
USB functions
To select the source mode USB, press the FUNCTION button (3).
Insert the USB device in the slot . The device can only be connected one way.
The USB input is located at the top of the appliance.
To start playback, press the PLAY/PAUSE button (6) once.
For extended instructions, read the paragraph "USB functions" further on in this manual.
iPod functions

Place your iPod/iPhone in the docking station.
Audio playback
Press the MENU (14) key to open the menu.
Press the FOLDER + button or the FOLDER - button (8) to select a folder or a file.
To select a track, press the PREV button (5) or the NEXT button (16) until the desired track is set.
To forward or rewind the track, press and hold the PREV button (5) or the NEXT button (16).
To pause playback, press the PLAY/PAUSE button (6) once; to resume playback, press the
button again.
Radio functions
Switch on the appliance. Select the tuner mode.
Use the FUNCTION (3) key for this.
Keep the key PREV (5) or the key NEXT (16) 2 pressed for seconds to search automatically. The
appliance will search for the next available station.
To search for a specific frequency, press the PREV button (5) or the NEXT button (16) repeatedly
until the desired frequency is set.
To skip to the next preset station, press the FOLDER UP button or the FOLDER DOWN button
(8).

Set pre-set stations
Search for the desired frequency with the PREV button (5) or the NEXT button (16) .
Press the MEMORY button (7).
Use the FOLDER UP/DOWN (8) buttons to select your preferred channel.
Press the MEMORY button (7) when the desired frequency is found.
Repeat the above steps to add more pre-set stations.
To skip to the next preset station, press the FOLDER UP/DOWN buttons (8).
You can also use the number keys on your remote control for this.
CD functions
To select the source mode CD, press the FUNCTION button (3).
The display shows the total number of tracks on the CD.
To start playback, press the PLAY/ PAUSE button (6) once.
During playback, the following functions are available:
To select a track, press the PREV button (5) or the NEXT button (16) until the desired track is set.
To search for a specific point on the disc, hold the PREV button (5) or the NEXT button (16) until
the point is reached and release the button.
To pause playback, press the PLAY/PAUSE button (6) once; to resume playback, press the
button again.
To stop playback, press the STOP button (17).

Using the REPEAT function
This function is available in PLAY and STOP mode.
Press the REPEAT button (9) once to repeat the current track. The REPEAT indicator is ON.
Press the button twice to repeat all tracks on the CD. The REPEAT ALL indicator is ON.
- Press the button once again to exit the REPEAT function.
Using the PROGRAM function
To use the PROGRAM function for CD, the playback must be in STOP mode.
To program a CD:
To play a list of tracks (max. 64) in a program, press the MEMORY button (7).
- Press the PREV button (5) or the NEXT button (16) to select a desired track.
- Press the MEMORY button (7) to confirm the selection. Repeat the previous step to select more
tracks and confirm every selection with the MEMORY button (7).
Press the PLAY/PAUSE button (6) to start the program.
To play the program again, press the MEMORY button (7) after the program has finished. Press
the PLAY/PAUSE button (6) to start the program again.
To view the program in stop mode, press the MEMORY button (7).
To stop the program during playback, press the STOP button (17).
To delete the program during the playback, press the STOP button (17) twice.

USB functions
Insert the USB device in the slot . The device can only be connected one way.
The USB input is located at the top of the appliance.
After connecting the appliance, the contents are loaded.
READING appears on the display.
Next, the total number of tracks appears on the display.
Press the FOLDER UP button or the FOLDEER DOWN button (8) to select a folder or a file.
Select the desired file using the PREV (5) button or the NEXT (16) button.
To start playback, press the PLAY/PAUSE button (6) once.
To stop playback, press the STOP button (17).
To remove the device, gently pull it out of the slot.
Due to the great variety of products with USB ports and their sometimes quite manufacturer-
specific functions we can neither guarantee that all devices will be recognised, nor that all
operating options that are possible in theory will actually work.
Insert the USB device in the slot . The device can only be connected one way.

Using the PROGRAM function
To use the PROGRAM USB/MP3 function for USB, the playback must be in STOP mode.
To play a list of tracks (max. 64) in a program, press the MEMORY button (7).
Press the PREV (5) button or the NEXT (16) button to select the desired folder.
Press MEMORY (7) to confirm.
Press the PREV (5) button or the NEXT (16) button to select the desired file.
Press MEMORY (7) to confirm.
Repeat the last 4 steps to add to the programme list.
To start playback, press the PLAY/PAUSE button (6) once.
To stop playback, press the STOP button (17).
Clock functions
Setting the current time
Turn the appliance off.
Use the STANDBY (1) key for this.
Keep key CLOCK (7) pressed for 3 seconds
The time is shown on the display.
Choose AM/PM
Use the keys PREV (5) en NEXT (16) for this.
Confirm AM/PM
Use the CLOCK (7) key for this.
The hours are flashing on the display.

Set the hour
Use the keys PREV (5) en NEXT (16) for this.
Confirm hour
To do this, press the CLOCK key (7).
The minutes are flashing on the display.
Set the minutes
Use the keys PREV (5) en NEXT (16) for this.
Confirm minutes
To do this, press the CLOCK key (7).
Setting the alarm time
You can use the alarm to set the time you wish to be woken up and by which source (TUNER, iPod
etc.).
You can also set the duration of the alarm.
Keep key TIMER (21) pressed for 2 seconds
The alarm icon appears on the display.
The hours are flashing on the display.
ON appears on the display.
Set the hour
Use the keys PREV (5) en NEXT (16) for this.
Confirm hour
Use the TIMER (21) key for this.
The minutes are flashing on the display.
Set the minutes
Use the keys PREV (5) en NEXT (16) for this.
Confirm minutes
Use the TIMER (21) key for this.
The ALARM ON time has been set.
OFF appears on the display.
You can now set the ALARM OFF time.
To do this, repeat the last 4 steps.
CD appears on the display.
Select the desired source (TUNER, iPod...).
Use the keys PREV (5) en NEXT (16) for this.
Press TIMER (21) to confirm.
Set the alarm volume.
Use the keys PREV (5) en NEXT (16) for this.
Press TIMER (21) to confirm.
Turn the appliance off.
Use the STANDBY (1) key for this.

During a power failure, or when unplugging the appliance, the time settings are lost.
Snooze alarm
The default snooze time is: 9 minutes.
To snooze the alarm, press any button except the POWER/STANDBY button (1). The alarm
sounds again after the snooze time has elapsed.
To stop the alarm, press the POWER/STANDBY button (1). The alarm is automatically set for the
next day.
Using the SLEEP function
Press the SLEEP button (10).
This key is located on your remote control.
Press the button repeatedly until the desired setting is found (00, 05, 10... 25, 20, 30, 40 ... 90,,
OFF). The SLEEP indicator is ON.
Press ENTER (15) to confirm.
The appliance stops playing after the chosen time has elapsed.
Press the SLEEP button repeatedly to turn off the SLEEP function.
SLEEP disappears from the display.
Cleaning and maintenance
WARNING Before performing any cleaning or maintenance, switch off and unplug the appliance.
Clean the outside of the appliance with a soft cloth. When the appliance is very dirty, dampen the cloth
slightly with water and a neutral solution.
Handle and care of a disc
Hold the disc with fingers. Hold the disc outer edge and/or the centre spindle hole. Do not touch
the disc surface.
Do not bend or press the disc. Do not expose the disc to direct sunlight or heating sources.
Clean the disc surface with a soft, dry cleaning cloth. Wipe the disc surface gently, radially, from
centre towards the outer edge.
Do not apply thinner, alcohol, chemical solvent, or sprays when cleaning. Such cleaning fluids will
permanently damage the disc surface.
Technical data
Voltage: 220VAC / 50 Hz
Power consumption: 80W
Standby power consumption: < 1W
Max power: 2 x 12W
Frequency response: L/R CH (60Hz-20KHz at +1 / -2dB)
Dimensions: 37 x 16,5 x 25,5 cm
Weight: 3,8 KG

Frequency range
FM radio: 87,5 - 108 Mhz
Frequency range: 20 Hz ~ 20 kHz
Signal/noise ratio: > 80 dB (1kHz)
Dynamic range: > 70 dB (1 kHz)
Distortion: < -60 dB (1kHz)
Remote control
Power consumption: 2 x 1,5V
Battery size: Cr2025
Working environment
Operating temperature: - 10 ~ +40 C(elsius)
Relative humidity: 5% ~90%
Disposal of used electrical and electronic equipment
The meaning of the symbol on the material, its accessory or packaging indicates that this product shall
not be treated as household waste. Please, dispose of this equipment at your applicable collection
point for the recycling of electrical and electronic equipments waste. In the European Union and Other
European countries which there are separate collection systems for used electrical and electronic
product. By ensuring the correct disposal of this product, you will help prevent potentially hazardous to
the environment and to human health, which could otherwise be caused by unsuitable waste handling
of this product. The recycling of materials will help conserve natural resources. Please do not therefore
dispose of your old electrical and electronic equipment with your household waste.
For more detailed information about recycling of this product, please contact your local city office, your
household waste disposal service or the shop where you purchased the product.
For more information and warranty conditions, please visit: www.akai.eu
Do not dispose of batteries as household waste but take them to a battery recycling facility.
Table of contents
Other Akai CD Player manuals