Shengzao Mechanical & Electrical Equipment SZ-1800 User manual

Operating Manual of SZ-1800
1/18
SZ-1800
Precise Mould Cold Welding Machine
Operating Manual
Shanghai Shengzao Mechanical & Electrical Equipment Co., Ltd

Operating Manual of SZ-1800
2/18
1. Overview
Machine working principle:
This machine can release electrical power in capacitor with pulse arc form instantly onto
tungsten and work pieces. The high temperature arc will make metal material work pieces
and welding wire dissolve immediately and then welding together, and achieve welding
effect.
Character of this kind of welding method: short time and low calorific value.
This welding machine can finish melt between electrode and work pieces less than a second.
Compared to normal welding machine (normal welding machine needs several seconds),
the heat send to work pieces of this machine is very small. So, to work pieces, it is low
calorific, low temperature increase except welding spot, no annealing, and no discoloration.
As each welding pulse volume is less than 2mm3, so the stress is also small. Though the
welding needs combine many dissolving pool, the welding spot stress direction is dispersive,
so the deformation is very small after welding.
Advantages of sz-1800 precise mould Cold welding machine
1. High welding intensity: metallurgical welding totally, each after welding part can be
grinded, milled, filed and other processing.
2. High precise welding: can use circle wire material to weld, thus redundant welding
material is very less, and easy to be reshaped. The minimum welding is 0.05mm (use
0.15mm diameter welding material).
3. Newly increased resistance welding function for better adapt to weld complex shape
work pieces and increase welding speed.
4. Fast welding speed: the fastest welding amount up to 100mm3/min.
5. Small damage on nature material: thermal point is small and no annealing and no
deformation to nature material.
6. Reasonable distribution of power: control by micro computer core. Different diameter
material will all get best power.
7. Wide range of voltage adaption: the machine can keep normal work when the voltage
variation is surged within 20% and hold steady output power.
8. Wire control light changing mask, shield arc light effectively: interior LED strong light,
provide better operating vision.
9. Easy to connect wire: match fast joint connector for convenient connection and
installation.
Operating Manual of SZ-1800
3/18
2. Performance Index
Welding material: all metal material
include copper, aluminum and other
work pieces except some low melting
and hard alloy material like Tin, Zinc.
Welding position: 1. Partial abrasion for
equipment and mould in welding
process.
2. Processing defect in
manufacture, like sand hole, gas hole,
size tolerance, corner edge damage and
shortage for arc welding.
3. Rust spot of cavity
and other hollow or defect.
Power: single phrase 220V, 50HZ
Power consumption: 10-1200W
Max output power instantaneously: more than 40 KW
Power mode: arc welding output (mode 1- mode 4): output pulse current 1-99 button;
output pulse time 1-99. Resistance output (single or continuous): electrode
size: 0.1mm-1mm
Consecutive output pulse frequency: four modes (1Hz, 2Hz, 3Hz, 5Hz ).
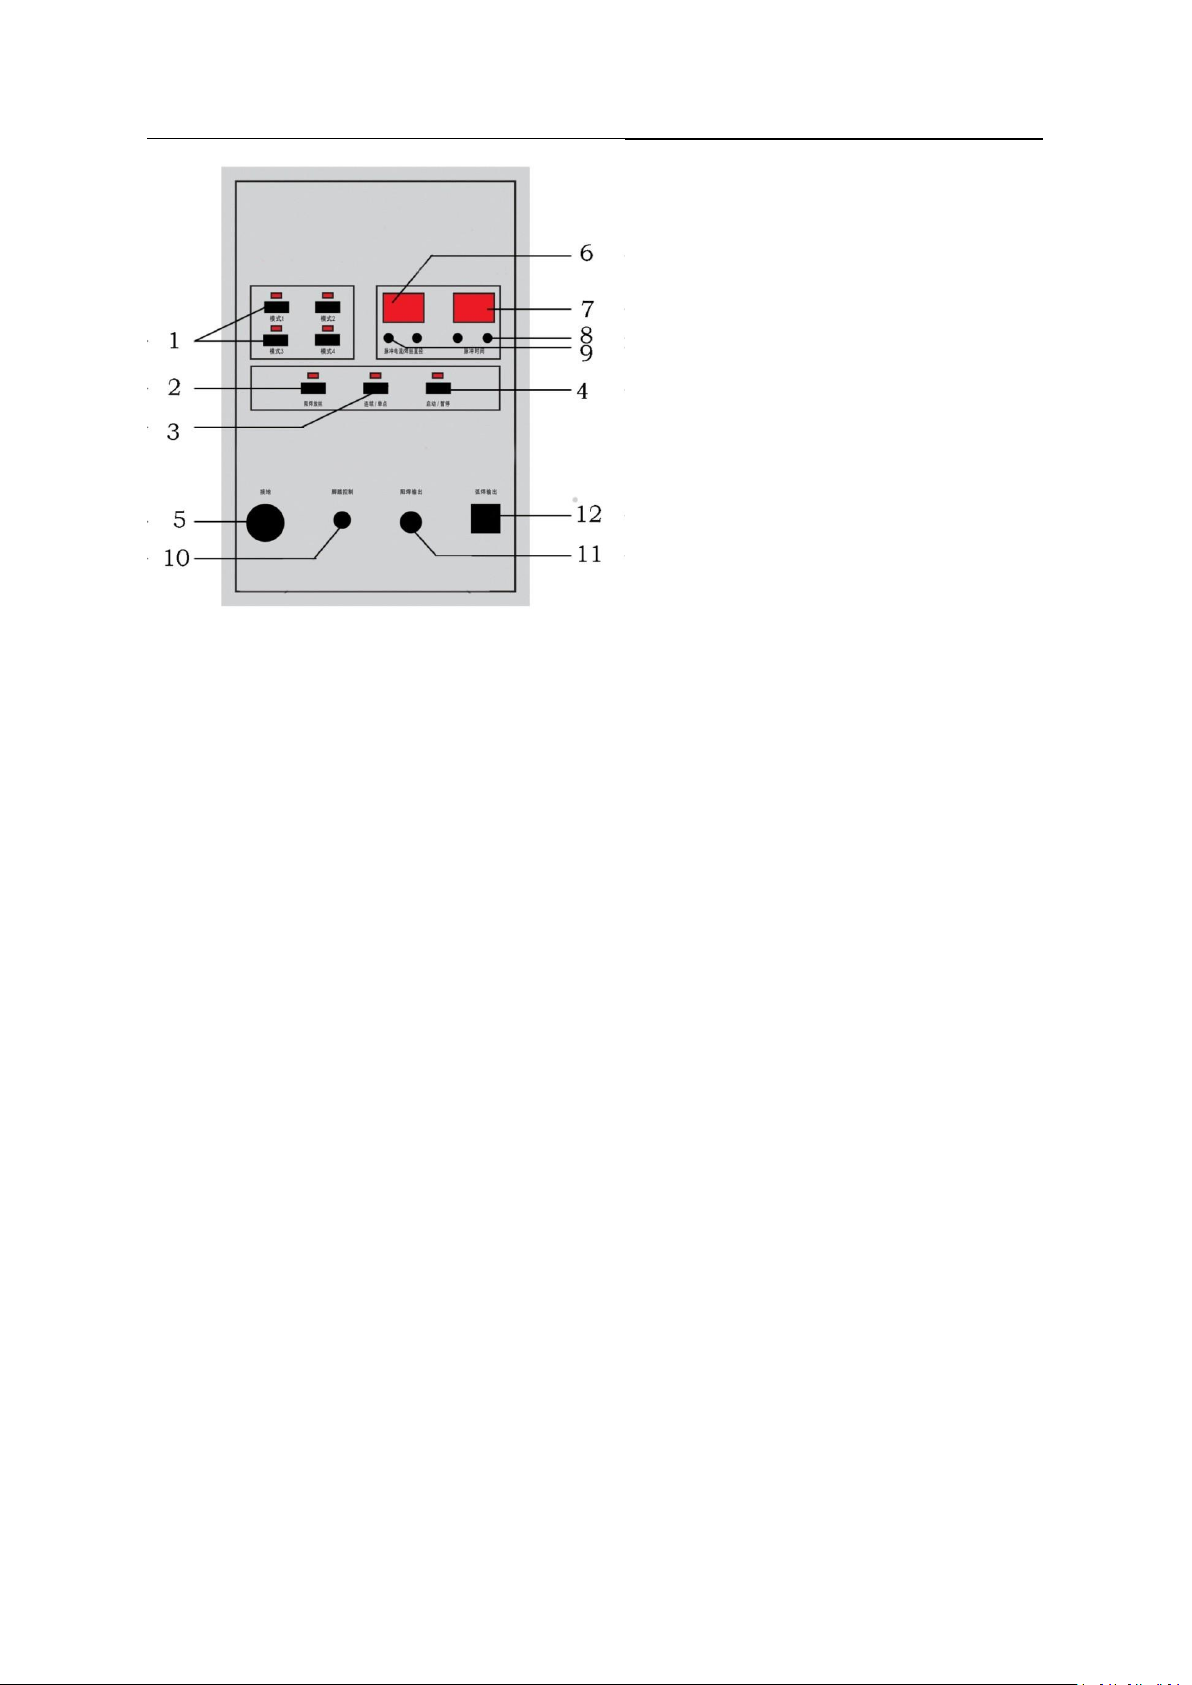
3. Operating Panel and Installation Diagram
Front Panel Part:
3.1. Connect arc welding gun coupling nut tightly to socket 12.
3.2. Connect grounding wire joint tightly to socket 5 in clockwise.
3.3. Plug resistance welding gun to socket 11.
3.4. Plug foot switch connecting wire to socket 10
①Mode option ⑦Pulse time value show screen
②Resistance welding ⑧Pulse time adjust key
③single / continuous ⑨Pulse current adjust
④Start/Pause ⑩Foot switch control socket
⑤Grounding wire ⑾Resistance welding gun
⑥Pulse current show screen ⑿Arc welding gun socket
Real panel part:

Operating Manual of SZ-1800
4/18
1. Plug argon tube ( Note: press plastic material in the connection part when pull out
argon tube)
2. Plug above control wire
3. Plug the socket to 220V 50HZ single phase socket; and the socket grounding wire should
available touch to ground.
4. OPERATING
Safety Preparation:
During welding process, some strong electric arc flash and high temperature splash will
burn eyes or skin. Please make sure to use our special light shielding and black lens screen.
Please install special mast before operating, and step on foot switch to inspect light
shielding will turn black automatically and non-transparency.
4.1 Electrode preparation and installation: electrode is a kind of tungsten Cerium electrode
(General welding material store on sale this electrode). Generally, defect on angular part
or small defect on surface part use 1.60mm diameter electrode. If you need welding
large defect parts, and the welding current is also large, please choose 2.0mm-2.5m
electrode.
4.2 When welding plane or corner angle part, you can grind the tungsten needle terminal to
70-90 degree cone for more steadily welding. If you need weld interior angels or narrow slit,
please grind the tungsten needle to 20-25 degree cone. If you need weld copper, aluminum
or other metals, please grind tungsten needle to hemisphere. Generally, the length of the
tungsten show out air nozzle must be around 8mm. Too long electrode will cause the
welding point turn yellow or black. Too short of the electrode will cause bad operating sight.
4.3 Choose suitable electrode (more details are in chapter ten)
Generally, choose the same material electrode as work pieces. If they are totally
different, please choose similar material electrode/ welding wire. For example: some
high carbon material, like cast iron work pieces, the welding point will turn harden
when welding, so we choose high nickel content welding wire for reduce welding point

Operating Manual of SZ-1800
5/18
hardness. Choose fine welding wire or small power can also reduce welding spot stress
work.
4.4 Charging: turn on the power button on real panel, the machine will on pause status, and
the pause indicator on panel will on.
4.5 Working: Press start/ pause button, the mode 2 indicator on the panel will on; the
welding power and welding time will show as “20”,”20” respectively. ( This is start on
default state).
4.6 Option mode: there are four mold button, choose suitable mode according to welding
quantity. Mode 1 is the smallest output, and mode 4 is the biggest. Each mode has
channel storage function in on power state of the machine. You can storage
different electrodes’ best welding parameter (pulse current and pulse time) in
suitable mode, which will be very convenient for operating.
4.7 Choose pulse current value: press the key can rise or deduce the show figure, the
figure will rise or deduce automatically if you press the
key over 1 second.
4.8 Choose pulse time value: press the key can rise or deduce the show figure, the figure
will rise or deduce automatically if you press the key over 1 second.
4.9 Grounding: put the grounded copper sheet under work pieces; clamp the work pieces
and copper sheet tightly when welding small work pieces.
4.10 Start welding:
01. Clean the surface rust, grease on the work pieces before welding.
02. Turn on the power button (red button on the rear cover).
03. Press start button on the panel.
04. Choose suitable mode, pulse current, and pulse time according to requirement.
(Please refer to chapter 5 of the detail instruction)
05. Open argon bottle valve, adjust throttle valve under suitable angel. (Attention:
Tread foot switch when adjust the throttle valve, normally 1L/min is economy
and appropriate.)
06. Put the welding electrode on suitable place, tread the switch, then come into a
welding spot.
07. Continuously repeat such action will get a high and wide welding wire. If you are
very skilled with the operation, you can press the “consecutive /single point
button on “consecutive “mode. Press the foot switch tightly, then the machine
will output pulse consecutively and get welding spot.
08. When stop working, please close machine power and argon bottle valve.
Remarks: the figure on the panel will continuous show a while after turn off the
machine. The figure will disappear until all the power in the machine released
completely.
4.11: Resistance welding mode:Choose this mode, we should use resistance welding
electrode gun. Following preparation should be finished before operating:
4.11.1 Check grounding fast connector is screwed tightly.

Operating Manual of SZ-1800
6/18
4.11.2 Put the copper sheet under work pieces (Please use vise fasten the copper sheet
tightly when welding small work pieces, for secure good touching.)
4.11.3 Check the resistance electrode tip, secure it is clean and smooth:
The method is like this: Press resistance welding button, choose suitable value
according to the electrode diameter. Press the electrode gun tightly on welding
wire, in case of striking fire.
5. Common Steel Work Pieces Welding
5.1:Plane Welding:
Plane welding include plane and other similar plane circular arc. Work pieces are
the most important part of arch heating in welding. The welding wire can form a
qualified welding spot only when the welding part of work pieces is melting. In practical
operating, the distance between tungsten needle and work pieces is small than the
distance between tungsten needle and welding wire.
Please check following diagram of tungsten needle. Please refer to following pulse
current and time setup.
Iron and steel material plane welding parameters:
The data show in this sheet is referred to skilled operator. New operator should add
each figure in the sheet 30% for getting better precise welding effect.

Operating Manual of SZ-1800
7/18
Electrode
Specification(mm)
Mode
Pulse
Current
Pulse
time
Distance from Work
pieces v(mm)
Distance from
Electrode l(mm)
Φ0.2
1
04
05
0.3
0.4
Φ0.3
1
06
06
0.3
0.4
Φ0.4
1
10
10
0.4
0.5
Φ0.5
1
15
15
0.5
0.6
Φ0.6
2
20
20
0.6
0.8
Φ0.7
2
25
25
0.8
1.0
Φ0.8
3
30
30
0.9
1.2
Φ1.0
3
35
35
1.1
1.3
Φ1.2
4
40
40
1.2
1.4
Φ1.6
4
55
55
1.3
1.6
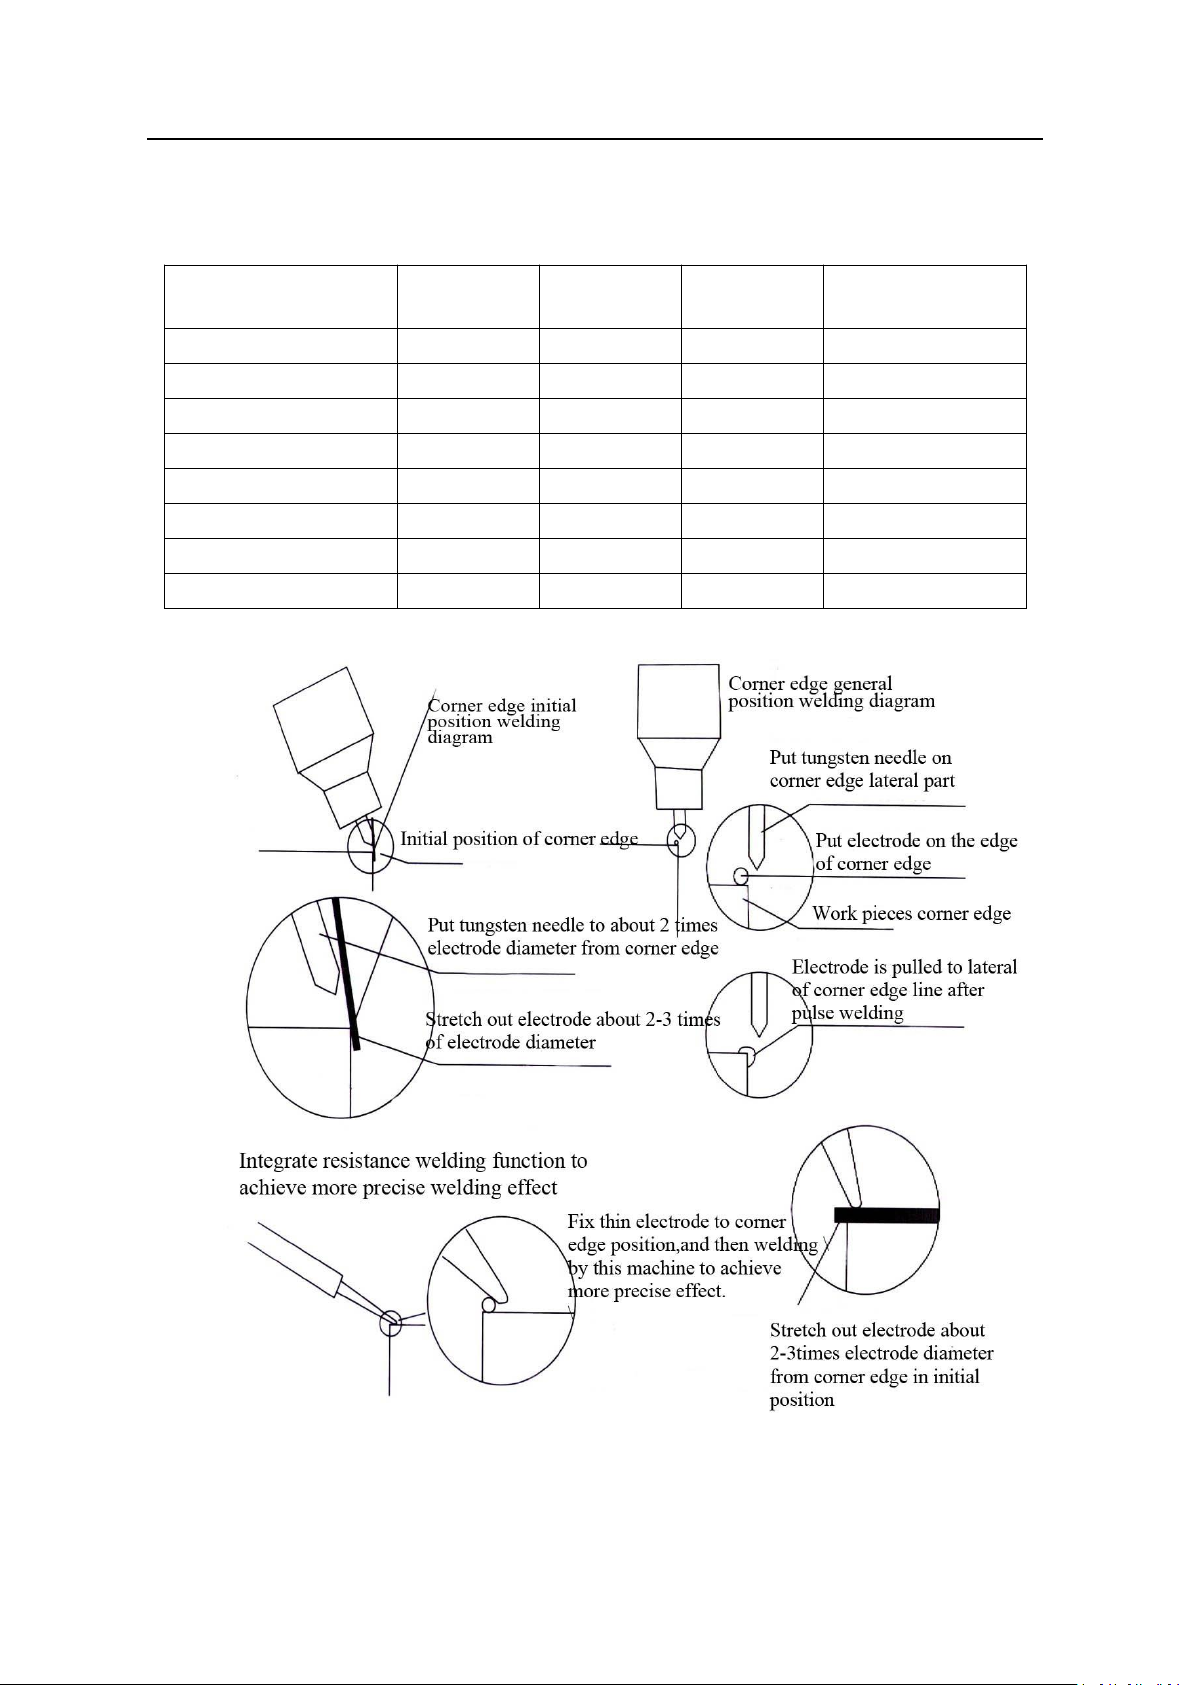
Multi seam welding method diagram 5.2、Corner Edge Welding
Welding corner edge of work pieces is
easy to raise undercut in its top or terminal
part. As corner edge work pieces dissipate
heat is small, the focus of arc heating is
different between plane welding and
corner welding. The heating center of
corner edge can be a little focus on
electrode, while use high heat electrode
fluid to melt the sharp corner edge in the
work pieces. So, the two parts will be
merged together, which avoid undercut of
the work pieces.
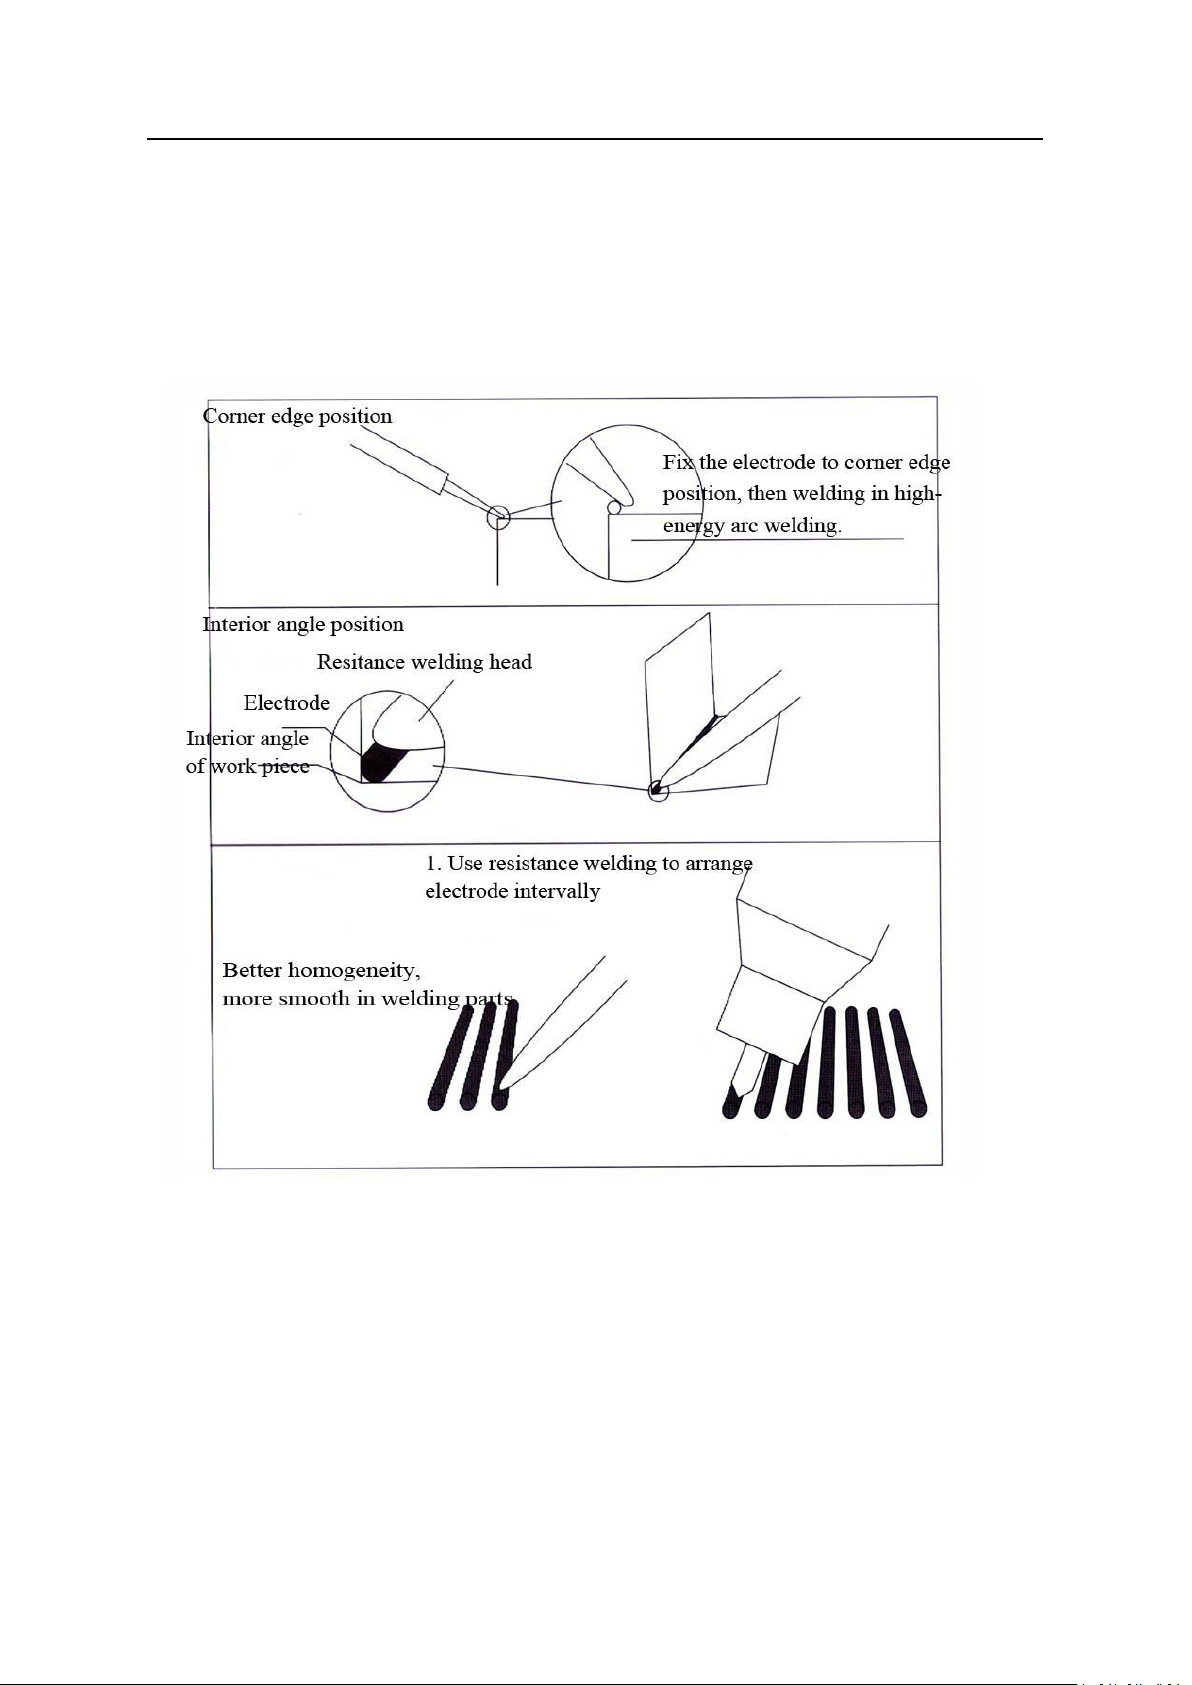
5.3 Interior Angle Welding
The interior angel is the inclined angle formed in two work pieces which is equal or
less than 90 degree. If use normal welding method to weld, some bottom parts can’t be
welded well, especially in welding small parts. You should grind tungsten needle into very
sharp shape (less than 20 degree). The distance between tungsten needle tip and bottom
angle, side profile is very small, and then the two sides’ materials will be melted together
into the center part, and form a welding spot. If no welding spot formed in the center,
please try to remove tungsten needle to near bottom position, or try to increase welding
current until a welding spot formed in the center.
Next step is remove the center of tungsten needle to 1/2 position between welding
spot and welding edge.
Operating Manual of SZ-1800
8/18
Iron and steel material corner edge welding parameters
The data in this sheet is for skilled operator reference. New operator please adopts
resistance welding.
Electrode
specification (mm)
Mode
Pulse
current
Pulse time
Distance to
electrode(mm)
Φ0.2
1
03
6
0.4
Φ0.3
1
03
8
0.4
Φ0.4
1
05
11
0.5
Φ0.5
1
08
13
0.6
Φ0.6
2
10
15
0.8
Φ0.7
2
14
20
1.0
Φ0.8
2
18
25
1.2
Φ1.0
2
22
30
1.3

Operating Manual of SZ-1800
9/18
Iron and Steel Material Interior Angle Welding Basic Parameters
Basic angle
welding (mm)
Mode
Pulse
current
Pulse time
Distance to basic
angle(mm)
0.3
1
05
05
0.2
0.5
1
10
15
0.3
0.8
2
18
20
0.4
1.2
2
22
25
0.5
1.6
3
25
30
0.6
2.0
3
28
30
0.8
NOTE: The data in this sheet is when the tungsten needle tips in good condition. If the
tungsten needle is not sharp, electrode and work pieces will not be fused well. We should
increase pulse current for reparation though it is not best option.

Operating Manual of SZ-1800
10 /18
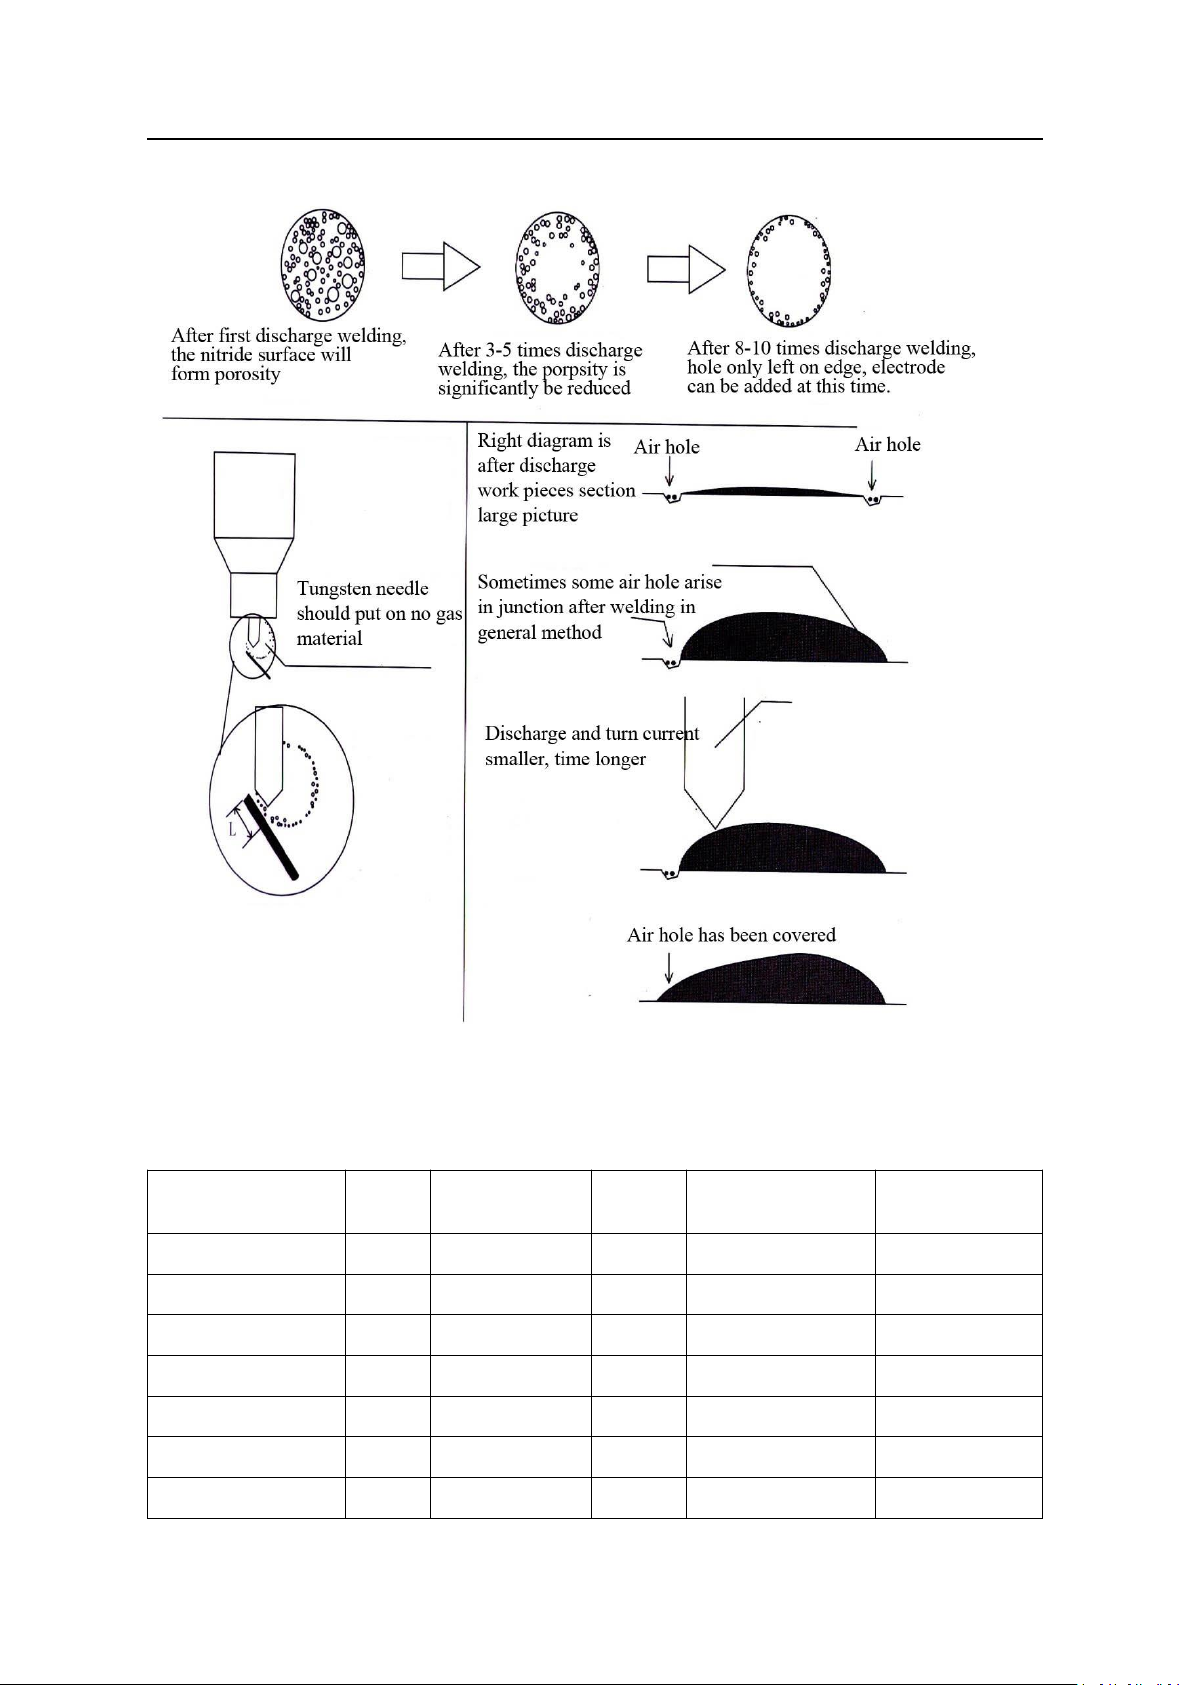
6: Nitriding work pieces welding
Much nitrogen molecule will penatrate into the workpieces when do nitriding.
Nitrogen will overflow fastly in welding under high temperature, which lead to many gas
holes in weld pool, even some melted metal will splash to tungsten needle and influence
welding. So, we should eliminate nitrogen for qualified welding. We adpot repeat arc
melting method to eliminate nigtrogen. Usually it takes 5-10 times arc melting. Please grind
the nitriding layer first if the welding work pieces is large.
To eliminate seam with many pin holes after welding, we should adpot this method.
Put tungsten needle on the junction of welding spot and nitriding layer 0.4mm-0.6mm
part. The length of tungsten needle is about 0.4mm, and put electrode on lateral of junction
part (please check following picture). Adjust welding spot temperature which can melt
electrode and cover junction seam. If the height of welding spot is over 0.5mm in this
process, please grind it below 0.2mm for easy delimiate the pin holes.
Operating Manual of SZ-1800
11 /18
Nitrogen Work Pieces Welding Parameters
Electrode
specification(mm)
Mode
Pulse current
Pulse
time
Distance to work
pieces V(mm)
Distance to
electrode(mm)
Φ0.2
1
04
12
0.3
0.4
Φ0.3
1
04
12
0.3
0.4
Φ0.4
1
06
18
0.3
0.4
Φ0.5
1
08
22
0.4
0.5
Φ0.6
2
11
25
0.6
0.8
Φ0.7
2
15
30
0.6
0.9
Φ0.8
2
18
35
0.8
1.0

Operating Manual of SZ-1800
12 /18
Chip welding 0.2
2
10
10
0.4
0.4
NOTE: The data in this sheet is used in sharp tungsten needle tip. If the tungsten needle is
not sharp, please repair it immediately. The data in this sheet is used for eliminating
the pin hole of welding spot edge. The data is not suitable for those have eliminated
gas or grinded nitride layer part welding. Please refer to Iron and Steel Material Work
Pieces Sheet for eliminated gas or grinded nitride layer welding.
7: Stainless Steel Plate Welding
7.1: Splicing
Splicing is: Splicing two same thickness plates together to be one plate; or welding rolled
plate as a whole.
Spare parts jointing seam should be small and smooth in splicing and welding.
Generally, adjust parameter is as follow:
Plate
Thickness(mm)
0.50
0.60
0.70
0.80
Pulse current
value
12
20
30
40
Pulse time value
12
20
30
40
Inspect welding power standard:
Check the back seam of welding spot whether it is fused. Use two same thickness
plates and same welding parts for trial welding. Fold the work pieces after welding;
check if there is a thin seam. Increase the welding current and time if a seam left. Or,
please increase time, to make the time value is bigger than current value. The smaller
value in current, the less material in work pieces, and the time value is bigger, weld
crater is deeper.
7.2: Extend Plate
Sometimes the chip terminal is undersized, please welding more material for extend
plate. We advice the power is as follow:
Plate Thickness(mm)
0.20
0.30
0.40
0.50
0.60
Pulse Current Value
02
03
04
05
06
Pulse Time Value
15
20
25
30
35
7.3: Riveting
7.3.1 Hole riveting power adjustment( unit: mm)
Thickness
0.20
0.30
0.40
0.50
0.60
0.70
0.80
0.90
1.00

Operating Manual of SZ-1800
13 /18
Punching
diameter
0.80
0.80
1.00
1.00
1.00
1.20
1.20
1.20
1.5-2
Welding head
diameter
0.60
0.60
0.80
0.80
0.80
0.90
0.90
0.90
1.00
Current value
05
04
04
06
07
10
12
15
20
Time value
10
12
20
25
30
30
30
30
25
*Welding head diameter is discharge part diameter.
7.3.2:No hole riveting power option:
Thickness(mm
)
0.20
0.30
0.40
0.50
0.60
0.70
0.80
Current value
02
03
04
05
08
12
16
Time value
60
65
70
99
99
99
99
8: Copper and Aluminum Work Pieces Welding
8.1: Purple copper work pieces welding:
The melting point of purple copper is low but good thermal conductivity, so the
instantaneous power of welding might be large, and also the pulse current and pulse time
might be larger in welding process, especially for pulse time is even longer. The tungsten
needle should be grinded spherical. There are two functions:
01: Prevent too intensive current to make the melting copper material splashed out and
formed some small pit.
02: Prevent tungsten needle be stuck and broken then pollute welding spot. The distance
between tungsten needle, welding wire and work pieces in welding are very near. Tungsten
needle is stuck with welding spot sometimes, but the quality of welding spot will not be
influenced if the tungsten is not broken. As the purple copper material of welding spot is
loosen, please hammer the work pieces after welding and use it after it become compact.
8.2: Brass work pieces welding:
As the brass is rich in zinc (the ignition point of zinc is low and easy to be burned and
volatilized), so the pulse current is smaller than in welding steel, and pulse time is longer
than welding steel. Please choose thinner than 1.2mm diameter welding wire, and not
sharp in tungsten terminal.
8.3: Bronze work pieces welding:
Bronze welding is easy to be operated, please refer to iron and steel welding method.
8.4: Aluminum work pieces welding:

Operating Manual of SZ-1800
14 /18
Aluminum is good thermal conductivity, and low ignition. Please refer to purple copper
welding method for aluminum welding.
8.5: Purple Copper Welding Parameters:
Electrode
specification(mm)
Mode
Pulse current
Pulse time
Distance for Tungsten
needle to electrode(mm)
Φ0.3
2
10
20
0.2
Φ0.6
3
20
40
0.2
Φ0.8
3
28
50
0.2
Φ1.0
4
35
70
0.2
Note: The distance from tungsten needle to work pieces is the same as tungsten needle to
welding wire. The data in this sheet is suitable for the work pieces which thickness is more
than 10 mm. The pulse current and pulse time will deduce 5% respectively when the
thickness of the work pieces decreases 1mm. The pulse current only need 50% of above
data when welding corner edge, and keep the same pulse time value.
8.6: Brass Welding Parameters:
Electrode
specification(mm)
Mode
Pulse current
Pulse time
Distance for tungsten
needle to electrode (mm)
Φ0.3
2
06
20
0.3
Φ0.6
3
13
40
0.3
Φ0.8
4
20
50
0.4
Φ1.0
4
25
60
0.5
Note: The distance between tungsten and work pieces can be the same as the tungsten
needle and electrode. The pulse current only need 50% of above data when welding
corner edge, and keep the same pulse time value.

Operating Manual of SZ-1800
15 /18
8.7: Aluminum Welding Parameters
Electrode
specification(mm)
Mode
Pulse
current
Pulse time
Distance for tungsten
needle to electrode (mm)
Φ1.0
3
35
40
0.5
Φ1.2
3
40
45
0.6
Φ1.6
3
55
60
0.8
Φ2.0
3
65
70
1.0
Note: The distance between tungsten and work pieces can be the same as the tungsten
needle and electrode. The pulse current only need 70% of above data when welding corner
edge, and keep the same pulse time value.
9. Special Technology Skills
9.1When is resistance welding function is suitable?
Resistance welding is a very useful auxiliary function. We can fix electrode on work
pieces simply when use resistance welding, and then arc welding. Resistance welding is
suitable for following:
9.1.1 New operator can do trial welding in advance, for better master the distance
between tungsten needle, work pieces and electrode.
9.1.2 The welding position is too narrow; we can fix the electrode simply, and then do
consecutive welding. This method can improve operating effect.
9.1.3 When some position should be in high smooth and high conductivity, we can
arrange the electrode intensively in advance, and than do consecutive welding.
9.1.4 If some position needs high precise welding effect, any tiny undercut is not
permitted. We can fix electrode for protection in prepared to be welded area.
9.2 Resistance Welding Parameters
Note:
Resistance welding is only suitable for all kinds of copper, steel and stainless steel.
Press purple copper welding head tightly on electrode to prevent damage the surface of
work pieces.
Electrode
specification(mm)
Mode
Pulse current
Pulse time
Φ0.3
Resistance welding
30
---
Φ0.6
Resistance welding
60
---
Φ0.8
Resistance welding
80
---
Φ1.0
Resistance welding
99
---
Operating Manual of SZ-1800
16 /18
It is null if the pulse time screen show”---“when using resistance welding mode. At this
time, adjust relevant pulse current value is available (refer to above sheet). Adjust relevant
pulse current value lower about 30% when use stainless steel wire.
The welding spot density should be 4-7 times as electrode diameter when fix electrode.
That is: if we use 0.6mm electrode, the distance for two resistance welding spot should be
at 2.4mm-4.3mm. The working time will be increased if the welding spot is too density; the
electrode will be instable if the welding spot is too scattered.
9.3 Why use lateral opening ceramic nozzle?
There are two lateral opening ceramic nozzles in tool kits. One side opening
should toward operator’s sight, and abridge the tungsten needle which nearly hide
inside the ceramic nozzle. (If the tungsten needle show out short, it will be better). This
kind of design is better for argon protection, so it can save argon and make welding
spot better. Operator will get better view about the tungsten needle’s position and
height for the opening, which will also bring more convenient and steady operating.

Operating Manual of SZ-1800
17 /18
10: Electrode / Welding Wire Option
Welding wire should be chose the same or similar material as nature. Too large
difference in structure could lead to sand holes, air holes or even can be welded well. If the
welding hardness it too low, the welding part will be abraded or sloughed. If the welding
hardness is too high, the after processing is difficult or will rub the work pieces.
Work Pieces Type
Available Electrode
Common plastic mold steel, hardness is
HRC25-35
H08Mn2SiA,P20
High-grade plastic mold steel, hardness is
HRC30-40
S136、NAK80
Hardware cold mold, damping mold, cutting
mold or tool hard surface, hardness is
HRC50-60
SKD11
All stainless steel work pieces
All stainless steel wire
Grey cast iron, some low hardness spherical
graphite cast iron, hardness is HRC10-20
Don’t use natural material in general ( cast
steel welding hardness is too high), please use
special cast steel welding wire or pure nickel
welding wire
Cast steel, some high hardness spherical
graphite cast iron, hardness is HRC20-40
Nature material, H08Mn2SiA or other similar
hardness welding wire
Special fissile work pieces
Special anti-cracking tensile welding wire, like
import 888T
Purple copper
Purple bronze filament, like purple copper core
in cable
Brass
Similar brand brass wire
Bronze
Relevant bronze
Aluminum, and other AL alloy
Relevant aluminum electrode

Operating Manual of SZ-1800
18 /18
11: FAQ (Frequently Asked Question)
Common
Phenomenon
Reason
Solutions
Electrode not
melt into work
pieces
Far distance from tungsten needle to
work pieces, but short distance from
tungsten needle to electrode.
Put the tungsten needle on
0.3mm-1.0mm position of the electrode,
and keep distance to the work pieces in
about 0.2-0.7mm height. Don’t deviate
the tungsten needle when step on foot
switch.
Machine output power is a little
small
Adjust the machine’s pulse time and
pulse current for increase output power.
Welding spot is not sharp and
disperse
Please check Page 3 and grind the
welding head sharply
The welding gun is too oblique, so
cause the discharge to the electrode
directly.
Try to keep welding gun and work pieces
vertical, 90 degree angle is the best.
The terminal part of the electrode
hasn’t touched work pieces.
Keep welding wire terminal and work
pieces close touching, adjust it when the
welding wire terminal is a little upwards.
Welding spot turn
black or yellow
Tungsten needle is too long and
cause argon protection is not good.
Readjust tungsten needle and keep
exposed part at about 8mm
Machine’s output power is too large
Adjust machine’s pulse time and pulse
current
Work pieces surface is dirty.
Clean work pieces surface oil, oxide
impurities.
Argon is not on or use out
Check whether there is argon spray out of
the spray nozzle when step on foot step.
Please check argon bottle valve, reducing
pressure valve for normal working if no
feeling of the argon.
Though can hear
arc sound, can’t
weld
Grounding cable hasn’t connected
with work pieces
Connect grounding wire to work pieces
Handle it too high and haven’t
touched metal induction coil of the
welding gun.
Keep one finger or palm touching metal
induction coil to secure arc when handle
welding gun.
Can’t be welded
after bead in
electrode
The diameter is larger than original
welding bead section. Then welding
power is not enough.
Cut bead section, or put tungsten needle
lower than standard position.
Tungsten needle
always stick work
pieces
The distance is too near to work
pieces
Adjust the distance from tungsten needle
to work pieces a little far.
Too much material in electrode
Put electrode far or cut bead section.
Table of contents
Popular Welding System manuals by other brands


Lincoln Electric
Lincoln Electric Airgas RED-D-ARC DX500e Operator's manual

ESAB
ESAB Origo Mig 4001i instruction manual

Parkside
Parkside P-ES 120 Operation and safety notes

CHICAGO
CHICAGO 3223 Assembly and operating instructions

ESAB
ESAB Caddyt Tig 150i Service manual

Lincoln Electric
Lincoln Electric MAGNUM PRO 400A Series Operator's manual