Omega 350C User manual


◀Guarantee Certificate ▶
The warranty of products shall confirm to the specification set forth in the article 2 'Configuration
and Specification" for 12 months from the date on Bill of Lading.
The extent of seller's liability under this warranty shall be limited to the repair or replacement as
herein provided of any defective parts thereof.
The warranty does not extend to following occasion:
-subjected to mis use, neglect, accident or abuse‐
-improperly repaired, installed, transported, altered or modified
-used in violation of instructions furnished by user's manual
Warranty Card.
Model
Serial No.
Manufacture
Date
Ship Date
Seller's Name
SAMJIN WEL TECH
‐
Client Name Company
Person
1.Warranty period is 12 months From the date
on Bill of Lading.
2.Except For the express limited warranties set
forth in this guarantee certificate, SAMJIN WEL‐
TECH has no other liability.
Certified by SAMJIN WEL TECH‐
* Note:
The 'Guarantee Certificate’ shall practically be effected with seller's signature after fill in blank of
Warranty Card.
Users has to pay attention to the subjects set forth Article 3 'Installation* when installing the
main power units and accessories.
SAMJIN WEL TECH has no liability of accessories, which are consumable and not to manufactured‐
by SAMJIN.

1
◀ CONTENTS ▶
1.PRODUCT INTRODUCTION
2.CONFIGURATION AND SPECIFICATION
3.INSTALLATION
4.HANDLING AND OPERATION
5.SAFETY INTRODUCTION
6.MAINTENANCE AND INSPECTION
7.TROUBLE SHOOTINGS
8.WELD CONDITION
9.CO 2/MAG INVERTER CIRCUIT DIAGRAM
Before using welding machine, users have to read the all contents described by manual
to have better quality of weld, and to reduce maintenance works.

2
1. Product Introduction
SAMJIN WEL TECH, Inverter C02/MAG ARC Welding Machine sustains excellent‐
stability under the changes of input power or surrounding temperature by using
I.G.B.T, and covering from thin plate to thick plate through very stable ARC and
minute adjustment due to welding parameter, and it is suitable in automatic
welding and high speed welding.‐
2. Configuration and specification
2-1 . Configuration
Type
Item 350 C 500 C
Input voltage AC 220V/AC 415V 1/3 Phase
Input power 16 KVA 26.5 KVA
Frequency 50/60HZ
Output current 50 350A‐60 500A‐
Max. no load voltage‐61V 70V
Load voltage 16 36V‐16 42V‐
Use rate 40% 40%
Dimension (WXDXH) 380 x540 x 600 410 x 620 x730
Weight 50kg 62kg
2 - 2 . Standard Specification
Name
Type 350 C 500 C Q'ty
Welding power DC 350A DC 500A 1
Wire feeder (0.9)1.2Φ (1.2)1.6Φ 1
Torch 350A, 3M 500A, 3M 1
Gas gage C02, Argon (110V) C02, Argon (110V) 1
Welding cable 5M 5M 1
Base metal cable 38SQ, 3M 60SQ, 3M 1
Tip (0.9)1.2Φ (1.2)1.6Φ 3
Gas diffuser 350A 500A 3
Insulator 350A 500A 3
Nozzle 350A 500A 3

3
2-3 . Electrical apparatus
Type
Item 350 C 500 C
NFB 50A 75 A
1st cable 10SQ or above 16SQ or above
Grounding cable 5.5 SQ or above
3. Installation
3 1 .‐Installation Diagram
Flg1. Full Installation Diagram
Voltage
selection
Single phase /
Triple phase
connection
Connection with
1P
Connection with
3P
3 2 .‐Location of installation
1)Keep wall side clearance of more than 30cm in dry room.
2)The area with no direct ray of sun, or no wind and rain.

4
3)The area where the surrounding temperature is in 10~40°C range.‐
4)The altitude of the location shall not higher than 1000m above the sea level.
3 3 .‐Cautions in grounding
1)The welder must be grounded, or electrical current of the case causes the unstability of
operation and accidents.
2)Connect grounding conductive cable which is 10SQ or more to the grounding terminal which is
marked "Grounding". During the grounding work, make sure to off the on/off switch in the
switch board, and afterward connect the ground cable.
3)When the base metal is placed on insulator such as wood, the base metal must be grounded.
4)When there swimming pool or pond between the earth of power source switch board and the
earth of welder, leakage current may flow to the pond or swimming pool. So in such place,
please connect grounding to both grounding points in parallel so that the leakage current flow
through the cable.
3 4. Capacity of power facility‐
Please use this welding machine at a rated input voltage. Since the welder is installed with a
building out network for input voltage, it will operate normally within a range of ±10% of the‐
input voltage. Any excessive input of voltage beyond the allowance can result in failure.
3 5 .‐Ventilation
CO2 arc welding resolves shield gas, CO2 in high temperature and produces few carbon‐
monoxide, Therefore, please ventilate properly when welding is carried out in a small space.
3-6 . Carbon dioxide
Please use KS No.3 or the one specified for welding.
3-7. Connection of electrical sys (Off the on/off switch in the switchboard)
Even one point of defective connection may cause unsatisfactory welding quality. Please tighten
the connection cables firmly with tool.
1)Connection of input power : Please connect referring to the Fig. 1. Install NFB for your safety.
When you install the electric leafage breakers, please install the one which can detect more
than 30mA.
2)Connection of output : Referring the Fig 1, please connect the torch to (+), base metal to ( ).‐
3)Connection of control cable: Connect the control cable to remote terminal in order to control
welding wire feeder and remote control box.

5
4)Ground: Ground terminal is behind of the inverter welder. The connection cable shall be 10SQ
or above.
5)When it is used with engine generator, please use bigger engine generator than the one
specified in 2 2.standard specification. Unstable output power voltage may cause the stop by‐
activating the abnormal voltage detection circuit of welder. And please start the engine
generator when the power switch of welder is off mode. An instant applying of excessive
voltage may cause malfunction of welder.
3-8 . Gas Connection
1)Connect CO2 gas to pressure regulator.
2)Connect outlet hose of gas pressure regulator to the gas inlet behind of in the welder.
3)Connect the heat plug of gas pressure regulator to the dedicated receptacle behind of the
welder. (The receptacle is dedicated to pressure regulator)
4)Install the gas container in the place where is no direct ray of sun. And it is recommended to
fix it to a supporter for safety.
5)For the good welding quality, please use high purity gas.
4. Handling and operation
4-1 . Front panel and name

10
4-2 . Function and explanation
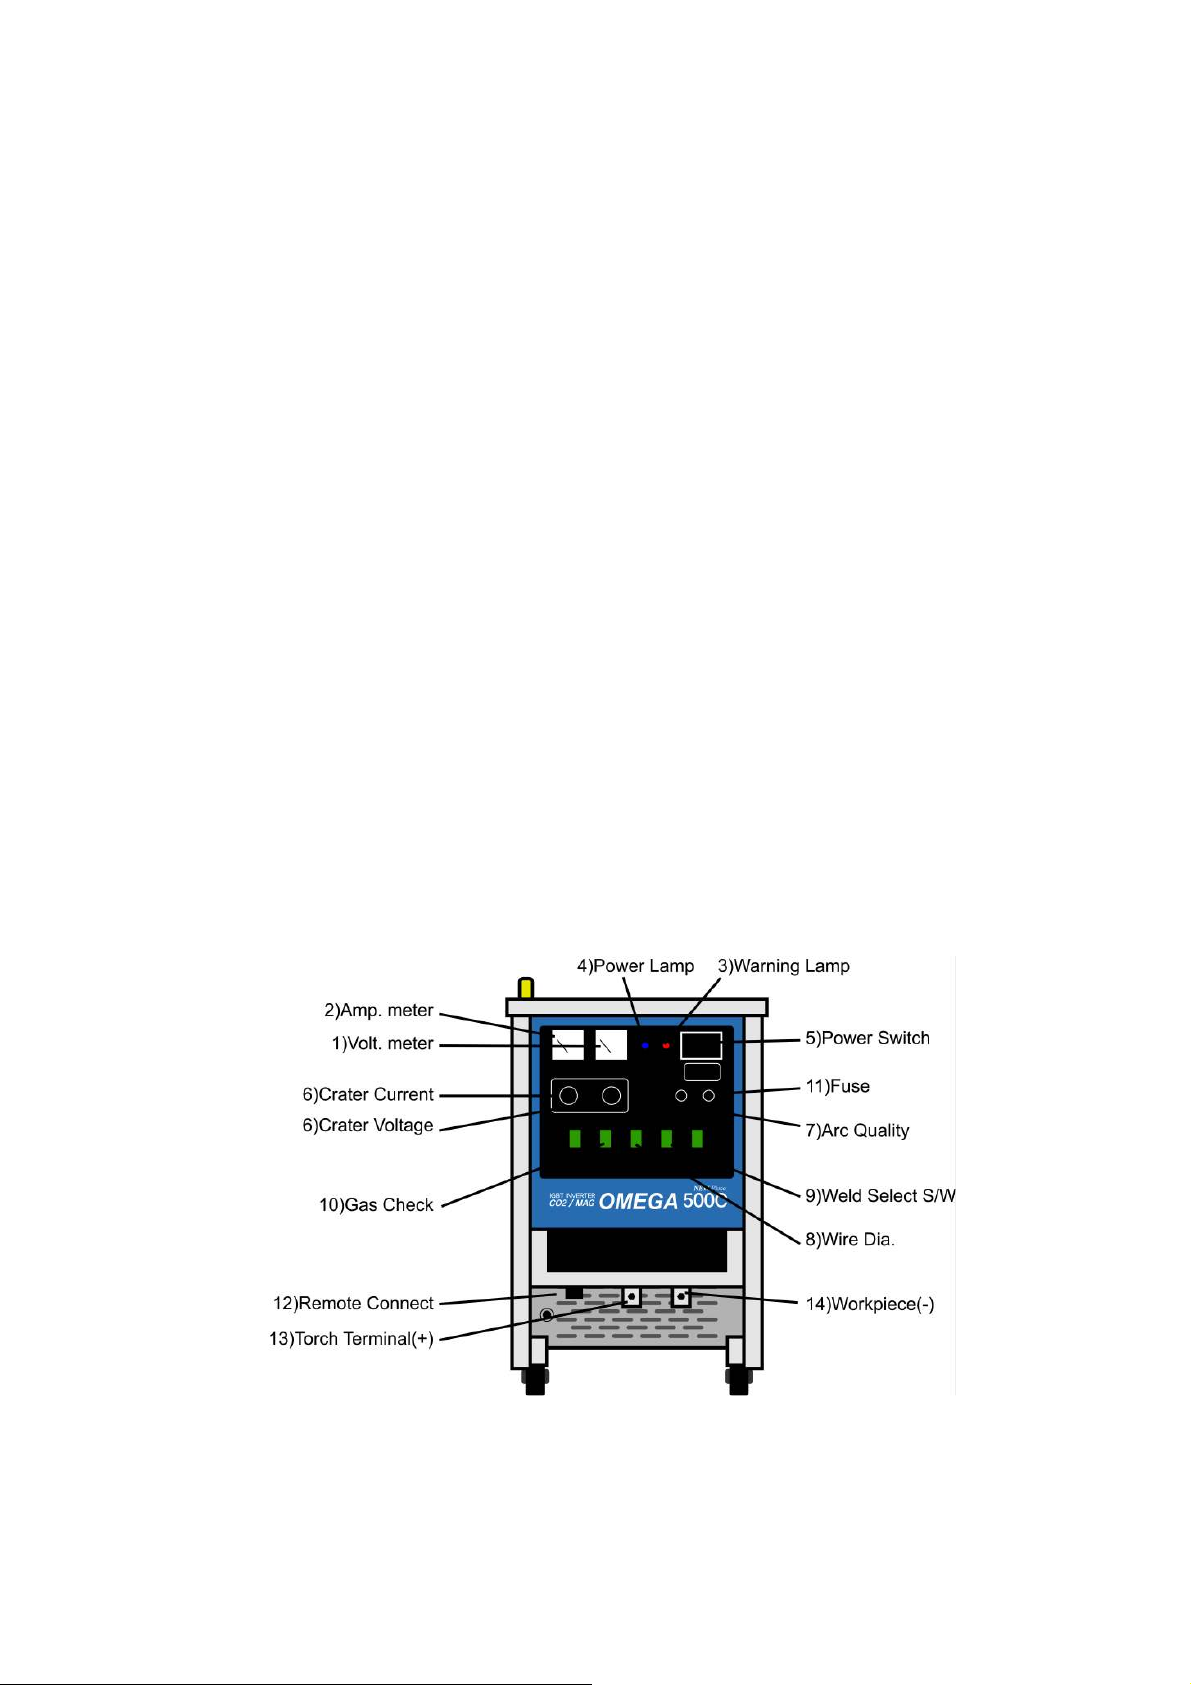
1)Voltmeter (Voltage): It will work at the time of no load or when the welding machine is put in‐
operation.
2)Amperemeter (Current): It will operate only at the time of welding (not work at the time of no‐
load)
3)Warning lamp (Error)
Abnormal power: In case input voltage drops below 20% of the standard voltage, lamp will be①
turned on (stop)
Overload: It will be turned on (stop) when welding current rises sharply②
Abnormal temperature: The temperature inside the machine reaches above 85 , it will be③ ℃
turned on; in case the warning lamp is turned off after a certain period of time, the machine
will be operative for use.
4)Power lamp (power): It shows that power is supplied to the welding machine.
5)Power switch (power): The switch turns on and off the welder and it will shut off in case of
overload.
6)Crater voltage, current: When Weld Select Switch is set to Crater, it will be adjustable. Please
refer to Welding Chart (chapter 8) for welding conditions.
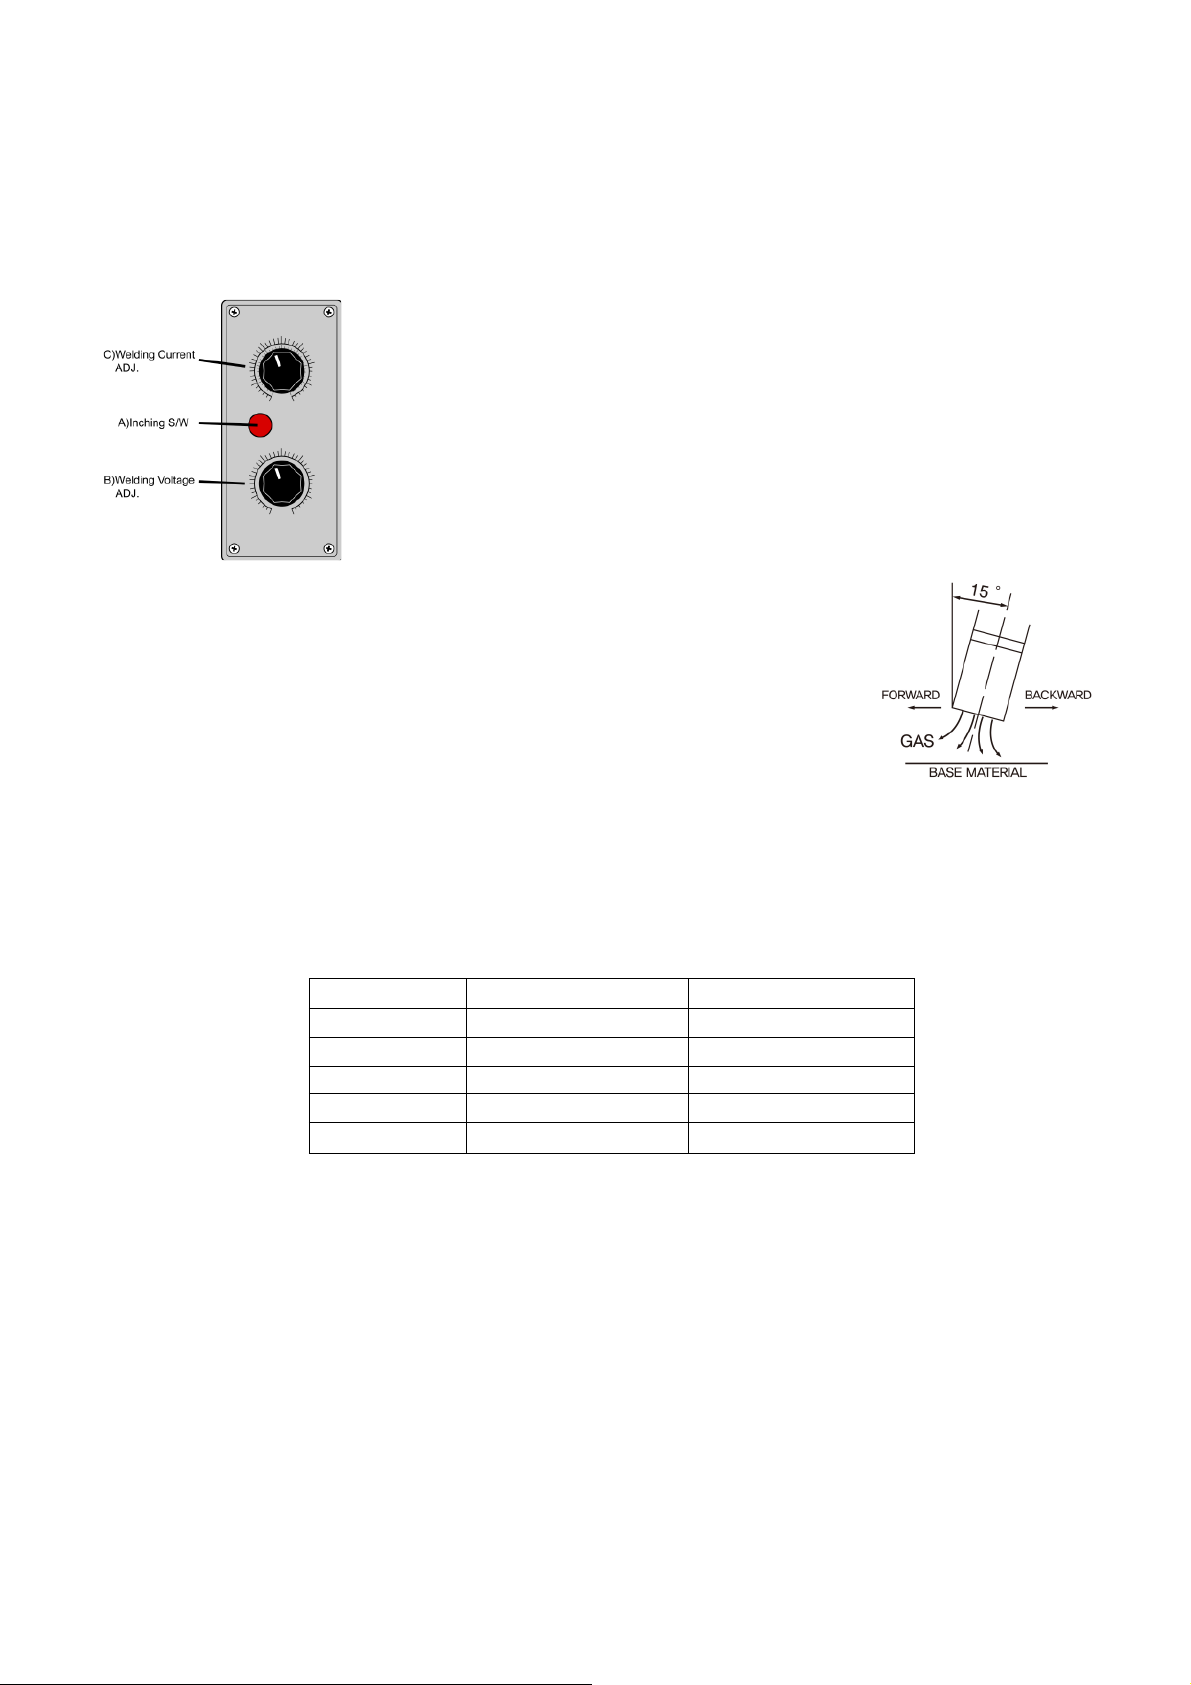
7)Arc quality: Depth of weld penetration in base metal, height and width of weld bead can be
adjusted depending on length of arc, current, and voltage.
Scale Amount of Weld penetration
of welding rod Height of weld bead Width of weld bead
0~ 6 Getting larger Getting lower Getting wider
0~ -6 Getting smaller Getting higher Getting narrower
8)Wire diameter select switch
9)Weld select switch
A)When there is no crater It is operative only when torch switch is set to ON.‐
B)When there is a crater Welding current start to flow when torch switch is turned on, and the‐
welding current keeps running even if the current is off; once the switch is turned on again, the
crater current begins to run, and when the switch is off, the welding is terminated.
10)Gas check : Gas check/welding
11)Fuse: It protects PCB (3A) and Motor (10A). Please use a fuse that meets standard
requirements.
Welding current (A) 100 150 200 250 300 400 500
Diameter of
wire ( .Φ
mm)
0.8 1.0‐--------------
1.2 ----------------------------
1.6 ----------------------------------------

11
12) Remote connector: It is to be connected with remote control box.
13) Torch terminal (+): It is to be linked to the torch terminal of wire feeder.
14)Earth terminal ( ): It should be connected to base metal‐
Remote control box
A) Inching: Switch that feeds wire up to the tip of torch at the time of
replacing welding rod
B) Welding voltage: Welding voltage can be adjusted.
C) Welding current: Welding current can be adjusted.
4-3.Cautions in handling
1) Torch angle by welding direction Incline the torch 10 15° toward the‐
welding direction, and afterward you can weld by ’forward method", or
’Backward method" In general, "Forward method' is used considering with
the friction of arc and protection of welded surface by gas.
2) Welding torch
If the welding torch is bent excessively, smooth wire feeding is not available, and welding
condition is damaged due to reduced current. Please do not bend cable forcefully.
3)Standard use rate
5. Safety instruction
1)Power source device : Install one on/off switch for one welder.
2)Terminal connection : Fasten the connection part for smooth current carrying in welding.
Loose fastening may cause cable damage or wasting power.
3)Ground : Apply class 3 grounding
4)Surrounding environment : Please avoid the location where moisture and dust is too much,
and surrounding temperature is too high. Select place where air is
ventilated well. Especially, ventilation relates to the use rate.
Use rate 350C 500 C
60% 350A 500A
70% 320A 440A
80% 280A 380A
90% 240A 340A
100% 200A 300A

12
6. Maintenance and inspection
Input power switch must be OFF when internal and external terminal are checked. The condenser
of welder internal circuit is charged, so please wait 5 minutes after completing welding work, and
afterward open the case and check.
6 1 .‐Check items by time
Before
welding
1)Does the switch work well ?
2)Does the cooling fan works well according to the On and Off mode, and is the air
well ventilated to forward?
3)Is there any abnormal vibration, noise or smell?
4)Any thing wrong in weld cable and connecting area?
5)Is there any defective insulation on cable?
3 6 month‐
1)Remove dust : Remove dusts by blowing out dry compressed air. Especially,
transformer, reactor and semiconductors shall be cleaned carefully.
2)Check of electrical contact area : Fasten bolts tightly and remove foreign material
such as rust with file or sand paper so that sufficient contact is available
between metals.
3)Check if ground is done well.
Annual
total
maintenance
1)Based on maintenance schedule, replace expendable supplies, repair case and
reinforce worn cables.
2)Insulation resistance shall be 1 mega ohm or above, or maintenance and repair are
required.

13
7. Trouble shootings
Step Phenomenon Reason Remedy
Poor lamp Replace lamp
1Power lamp id not tuned on
when power switch is ON.
Poor contact of the 1st *put part Contact test
Poor fuse Replace fuse
Poor NFB Replace NFB
Only FAN works Poor torch switch Replace torch switch
2Power lamp is on. but fan
does not work. Poor fan motor Replace fan motor
Gas do not come out
No gas or no connection Check and replace
Poor solenoid valve Replace valve
3 Defect in control PCB Request A/S
Poor torch switch Replace torch switch
Gas comes out even if power is
off.
Remove foreign material from
valve
4 Gas comes out Poor solenoid valve Replace valve
continuously Defect in control PCB Request A/S
Poor torch switch Replace torch switch
Weld wire is not fed even Poor motor fuse Replace fuse
though inching switch is Poor motor Replace motor
5 pressed Poor PCB relay Replace relay
Wire is not fed when torch Poor torch switch Replace torch switch
switch is ON Poor PCB Request A/S
Voltage and current are
not adjustable
Poor remote contact Check and replace
6 Poor control volume Replace
Poor PCB Request A'S
Under no load condition,‐
voltage meter does* not
work and no arc
Poor torch switch Replace torch switch
Poor PCB Request A/S
7Under no load condition,‐
voltage meter works but no
arc
Broken torch cable Replace torch cable
Poor contact of earth able Check
Crater is not controllable
Poor control volume Replace
8 Poor PCB Request A/S

14
8. Weld condition
8 1 .‐In case of improper welding conditions
8 2 .‐Clearance between base metal and tip
8 3 .‐Relation between weld current and voltage
Reason Remedy
Arc length is growing.
Particle of spatter becomes bigger.
Bead width is widening.
The length and height of weld penetration become smaller.
Arc voltage is too high.
Wire sticks to the base metal and too many spatters. Bead width
becomes narrow.
The depth and height of weld penetration becomes bigger.
Arc voltage is too low.
Particle of spatter becomes smaller.
Bead width is widening.
The depth of weld penetration becomes bigger.
Welding current is too high.
Bead width becomes narrow.
The length and height of weld penetration become smaller. Welding speed is fast.
Particle of spatter becomes smaller the number of spatter
decreases.
The depth and height of weld penetration becomes bigger.
Current density of wire is
high.
Wire diameter (mm) Clearance (mm)
0.9 1.0‐10 15‐
1.2 15 20‐
1.6 25 30‐

15
8 4. Reasons and remedy for defects of CO2 welding‐
type Main reason Remedy
1. Blow holes
1)No feed gas comes out
2)Air mixed in feed gas
3)Insufficient coating effect due
to strong wind
4)Carbon dioxide soaked in
5)Foreign material in welding
part
6)Nozzle diameter is too small
Arc Is too long
1)Check the gas cylinder, valve
and pressure regulator
2)Check the connection part of
gas tube
3)Make measure for wind m wind
speed 2m/s or more Remove
spatter from the nozzle
4)Use gas of welding purpose
5)Clean the welding area Remove
feed oil from roller and wire
6)Select proper nozzle diameter
7)Lower voltage
2. Under cut 1)Wrong grounding location
2)Welding speed is too fast
3)Arc length is long
4)Welding current Is too much
1)Ground onto the first location
2)Slower the welding speed
3)Keep arc length short
4)Select proper welding current
3. Over lap
1)Too low arc voltage comparing
to welding current
2)Welding speed is low
1)Raise arc voltage
2)speed up the welding speed
3. Curve bead 1)wire pressurizing lever does not
work
2)Distance between tip and the base
metal is too far.
3)Tip mounting is not proper
4)Wire bent
5)Tip is worn out
1)Adjust control screw of
pressurizing lever
2)More than 10 15 times of wire‐
diameter
3)Adjust mounting angle in order
to go into the wire guide
directly
4)Straighten wire
5)Replace contact tip angle
3. Crack
1)Improper welding conditions (high
current, high speed)
2)Wire approaching angle is too
small
3)Too much containing of carbon and
other metals in the base metal
4)Too much moisture in gas
5)Quick electrical break of arc in
crater
1)Set proper condition (Raise
voltage, slow speed)
2)Increase wire approaching
angle
3) Preheating and after heating‐
Treatment
4)Use gas of welding purpose 5}
Treat with crater
(add up enough deposition metal)

16
8 5 .‐C02(semi)auto weld condition
1)form butt weld
a) Short ARC weld
b) Hi Current weld‐
Thickness
(mm)
Gap
(mm) Wire dia.(mm) CT
(A)
Volt
(V)
Weld speed
(cm/min.)
1.6 0 0.8~1.0 90 18 45
2.0 0.5 0.8~1.0 100 18 50
2.3 1.0 0.8~1.2 120 19 55
3.2 1.2 0.8~1.2 140 19 50
4.5 1.5 1.2 160 23 50
6.0 1.5 1.2 260 26 50
8.0 1.5 1.2 320 32 50
Weld condition
Thickness
(mm) Improved Pieces Wire dia.
(mm) CT(A) Volt (V) SP
(cm/min)

17
2) horizontal fillet weld
3)Vertical down fillet weld
4)Edge weld (thin steel plate)
5)CO2 ARC for welding wire (solid wire)
Thickness
(mm)
Width
(mm)
Wire dia.
(mm)
Weld current
(A)
Weld voltage
(V)
Weld speed
(cm/min)
1.2 3.0 0.8~1.0 100 19 50
1.6 3.0 0.8~1.2 120 20 50
2.0 3.0 0.8~1.2 130 20 50
2.3 3.5 1.0~1.2 140 20.5 50
3.2 4.0 1.0~1.2 160 21 45
4.5 4.5 1.2 230 23 55
6.0 6.0 1.2 290 28 50
8.0 8.0 1.2 320 32 55
Thickness
(mm)
Weld width
(mm)
Wire dia.
(mm)
Weld current
(A)
Weld voltage
(V)
Weld speed
(cm/min)
1.6 3.0 0.8~1.0 130 20 50
2.0 3.0 1.0~1.2 130 20 45
2.3 3.0 1.0~1.2 140 20.5 45
3.2 4.0 1.0~1.2 170 21 45
4.5 4.5 1.2 230 23 50
6.0 6.0 1.2 290 28 50
9.0 7.0 1.2 330 33 45
12.0 11.0 1.6 400 38 25
Plate thick
(mm)
Wire dia.
(mm)
Current
(A)
Voltage
(V)
Speed
(cm/min)
Tip/Base M
(mm)
Gas volume
( /min)ℓ
1.6 0.9 65~75 16~17 40~ 10 10~15
2.3 0.9 80~100 19~20 40~ 10 10~15
3.2 1.2 130~150 20~22 35~ 10~15 10~15
4.5 1.2 150~180 21~23 30~ 10~15 10~15
Type Impurities Uses Wire dia.
(mm)
C Si Mn P S
KC 25‐0.10 0.22 0.62 0.015 0.009 Mild steel
hi tension‐
weld
0.8, 0.9
KC 26‐0.10 0.45 0.98 0.013 0.010 1.0, 1.2
KC 28‐0.11 0.82 1.45 0.014 0.016 1.6

18
6 ) h o r iz o n ta l fille t w e ld ( th i n s te e l p la t e )
8 6 .‐MAG (semi)auto weld condition
1)Vertical down butt weld
2)Horizontal fillet weld
Plate thick
(mm)
Wire dia.
(mm)
Current
(A)
Voltage
(V)
Speed
(cm/min)
Tip base M‐
(mm)
Gas volume
( /min)ℓ
0.8 0.9 60 ~70 16 ~17 40 ~45 10 10~15
1.2 0.9 80 ~ 90 18 ~19 40 ~50 10 10~15
1.6 0.9 90 ~110 19 ~20 45 ~50 10 10~15
2.3 0.9 100 ~130 20 ~21 45 ~50 10 10~15
2.3 1.2 120 ~150 20 ~21 45 ~50 10 10~15
3.2 1.2 150 ~180 20 ~22 45 ~50 10 ~15 10~15
4.5 1.2 200 ~250 24 ~26 40 ~50 10 ~15 10~15
Thickness
(mm)
Gap
(mm)
Wire dia.
(mm)
Current
(A)
Voltage
(V)
Weld speed
(cm/min)
0.4 0 0.4 20 15 40
0.6 0 0.4~0.6 25 15 30
0.8 0 0.6~0.8 30~40 15 40~55
1.2 0 0.8~0.9 60~70 15 ~16 30~50
1.6 0 0.8~0.9 100~110 16~17 25~60
3.2 1.0~1.5 0.8~1.2 120~140 16~17 25~30
4.0 1.5~2.0 1.0~1.2 150~160 17~18 20~30
Thickness
(mm)
Width
(mm)
Wire dia.
(mm)
Current
(A)
Voltage
(V)
Weld speed
(cm/min)
0.6 2.0 0.4~0.6 30~40 14 40~50
1.0 2.0'2.5 0.6~0.8 40~60 14~15 40
1.6 3.0 0.6~0.8 90~100 15~16 40~55
2.4 3.5 0.8~1.0 110~120 16~17 35~40
3.2 4.0 0.8~1.2 ~135 17~18 35~35
This manual suits for next models
1
Table of contents
Other Omega Welding System manuals
Popular Welding System manuals by other brands

Gude
Gude GE 145 W Translation of the original operating instructions

KRAUSMANN
KRAUSMANN 2520 Operation manual

EWM
EWM Phoenix 355 Progress puls HP MM TKM operating instructions

Miller Electric
Miller Electric Maxstar 150 STH Specifications

Lincoln
Lincoln IDEALARC DC-400 operating manual

Lincoln Electric
Lincoln Electric IDEALARC R3R-300 Operator's manual

Koike Sanso Kogyo
Koike Sanso Kogyo WEL-HANDY COMPACT Operation manual

Miller Electric
Miller Electric Welder owner's manual

Lincoln Electric
Lincoln Electric LN-15 Operator's manual

ESAB
ESAB Aristo 1000 AC/DC SAW instruction manual

Multiplaz
Multiplaz 3500 operating manual

Weldman
Weldman MISTRAL MIG 200 instruction manual