SHO-ME 21.7690 User manual
TECHNICAL SPECIFICATIONS INSTALLING THE 21.7690
CONNECTION DIAGRAMS
INPUT VOLTAGE .................... 10 to 30 Vdc
INPUT CURRENT ................... 8.75A at 12.8V, 4.25A at 25.6V
INPUT POWER ........................ 112 Watts
OUTPUT POWER .................... 90 Watts
OUTPUT ENERGY................... 80 Joules
FLASH RATES
Double Flash: ................ 170 flashes per minute.
Quad Flash: ................... 140 flashes per minute.
Quintuple Flash: ............ 140 flashes per minute.
Mega Flash:................... 140 flashes per minute.
IMPORTANT! NOTThis product is waterproof. It must be mounted to a metal surface in a clean dry area.
WIRED TO +12/24V FLASH PATTERN
NONE Quad Flash
ORANGE Mega Flash
WHITE Quintpule Flash
WHITE + ORANGE Double Flash
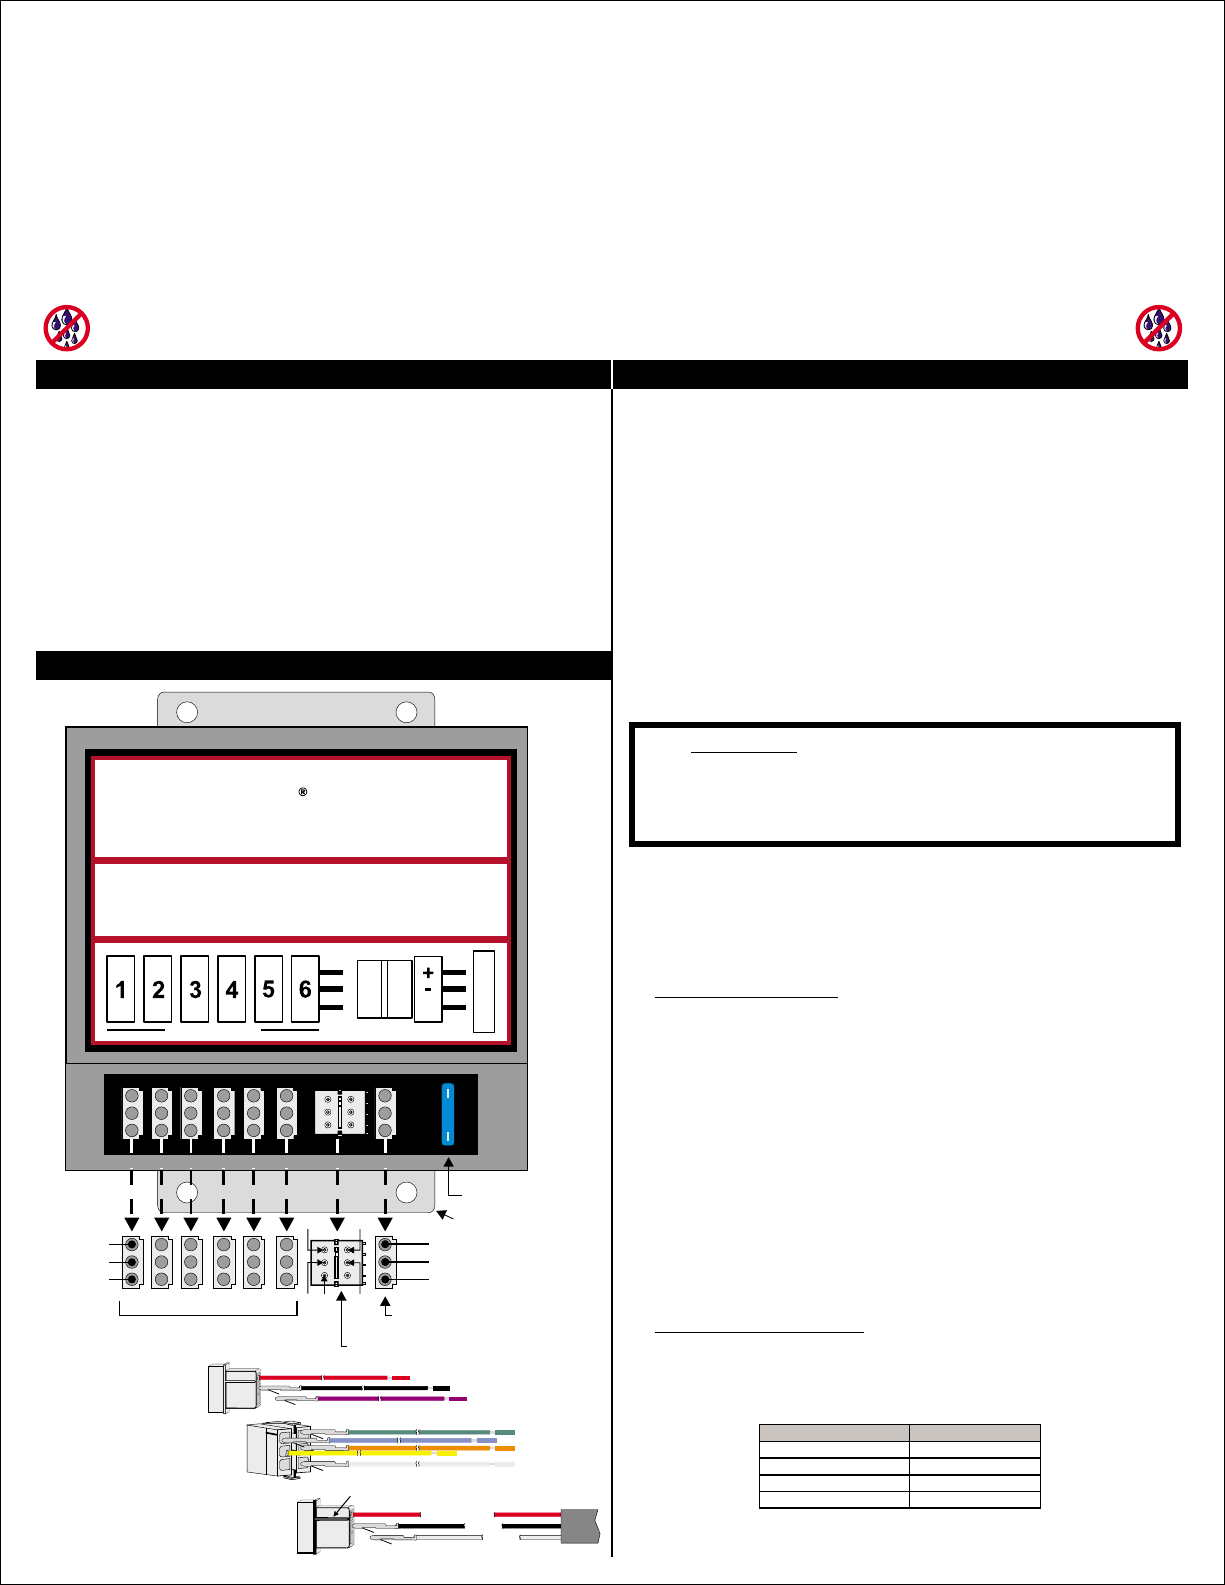
1. Physical Mounting
2. Strobe Head installation
Mount the power supply in a clean, dry location. Mounting the
unit to a flat metal surface will aid in heat dissipation. Use the
power supply as a template to mark the hole locations. The
mounting holes will accept up to a 1/4" bolt.
Plug the strobe light heads into the outlets. Keep the following in
mind:
• Heads connected to outlets 1, 3, 5 flash at the same time.
Note: The power
supply baseplate must be connected to chassis ground (GND) to
reduce radio interference.
• Heads connected to outlets 2, 4, 6 flash at the same time.
• Heads connected to 1, 3, 5 alternate with heads 2, 4, 6.
The divides equally between all strobe heads
installed. Example: 90 Watts into 2 heads = 45 Watts per head.
Consider this before selecting the number and type of strobe
heads to install. Do not exceed the wattage rating of the head.
If you have purchased a pre wired switch harness, follow the
included instructions. If you are wiring the system yourself
follow the instructions below and the diagrams on the next page.
• Connect the RED wire to battery positive (+) or a fuse panel
circuit rated for at least 15 AMPS.
• Connect the BLACK wire to battery negative (-) or directly to
vehicle chassis.
• The VIOLET wire controls HIGH / LOW power. Low power
limits the flash intensity for nighttime use. Connect VIOLET to
+12/24V for LOW, leave VIOLET disconnected for HIGH.
BLUE
.
WHITE + ORANGE: Selects the Flash Pattern as follows:
output power
Note: This supply reduces output power when only 2 outlets are activated.
3. Electrical Hookup
:
:
POWER HARNESS
CONTROL HARNESS
Note: Use the correct size wire for power connections.
The length of the wires determines the size needed.
1 to 7 ft. use 18AWG wire.
7 to 14 ft. use 16AWG wire.
14 to 25 ft. use 14AWG wire.
25 to 35 ft. use 12AWG wire.
Note: VIOLET, YELLOW, GREEN, BLUE, WHITE, and ORANGE are all
circuits and can be wired with a minimum of 22AWG wire.Low Current
: Enables Heads 1 & 2 when connected to +12/24V
GREEN: Enables Heads 3 & 4 when connected to +12/24V
YELLOW: Enables Heads 5 & 6 when connected to +12/24V
MODEL NO. 21.7690
WIRING INSTRUCTIONS
SHO-ME®
RED or GREEN
BLACK
WHITE
Power Connector
Control Connector
12 3 546
RED 10 to 30 Volts+
FUSE 15 AMP
BASEPLATE
BLUE
GREEN
WHITE
ORANGE
YELLOW
BLACK GROUND-
Strobe Head Outlets
15
VIOLET HIGH/LOW power
Connect to 10 to 30V for LOW power,
leave disconnected for HIGH power
+
.
STROBE HEAD
EXTENSION CABLE
123
RED or GREEN
Ridge indicates pin 1
BLACK
WHITE
Heavy duty extension cables have a GREEN wire,
Light duty extension cables have a RED wire.
123
RED
BLACK
VIOLET
POWER HARNESS
CONTROL HARNESS ORANGE
WHITE
YELLOW
GREEN
BLUE
SHO-ME
WARNING: High Voltage. Please wait 5 minutes after shutting this
unit off before attempting service. Warranty void if seal is broken.
INPUT VOLTAGE: INPUT: OUTPUT POWER:10 to 30 Vdc 110 WATTS(8.5A) 90 WATTS
MODEL NO. 21.7690
6 OUTLET POWER SUPPLY
MANUFACTURED IN U.S.A.
STROBE OUTLETS CONTROL
LOW
POWER
POWER
FUSE 15A
REDRED GREEN BLUE
WHITE
ORANGE YELLOW BLACKBLACK
VIOLETWHITE
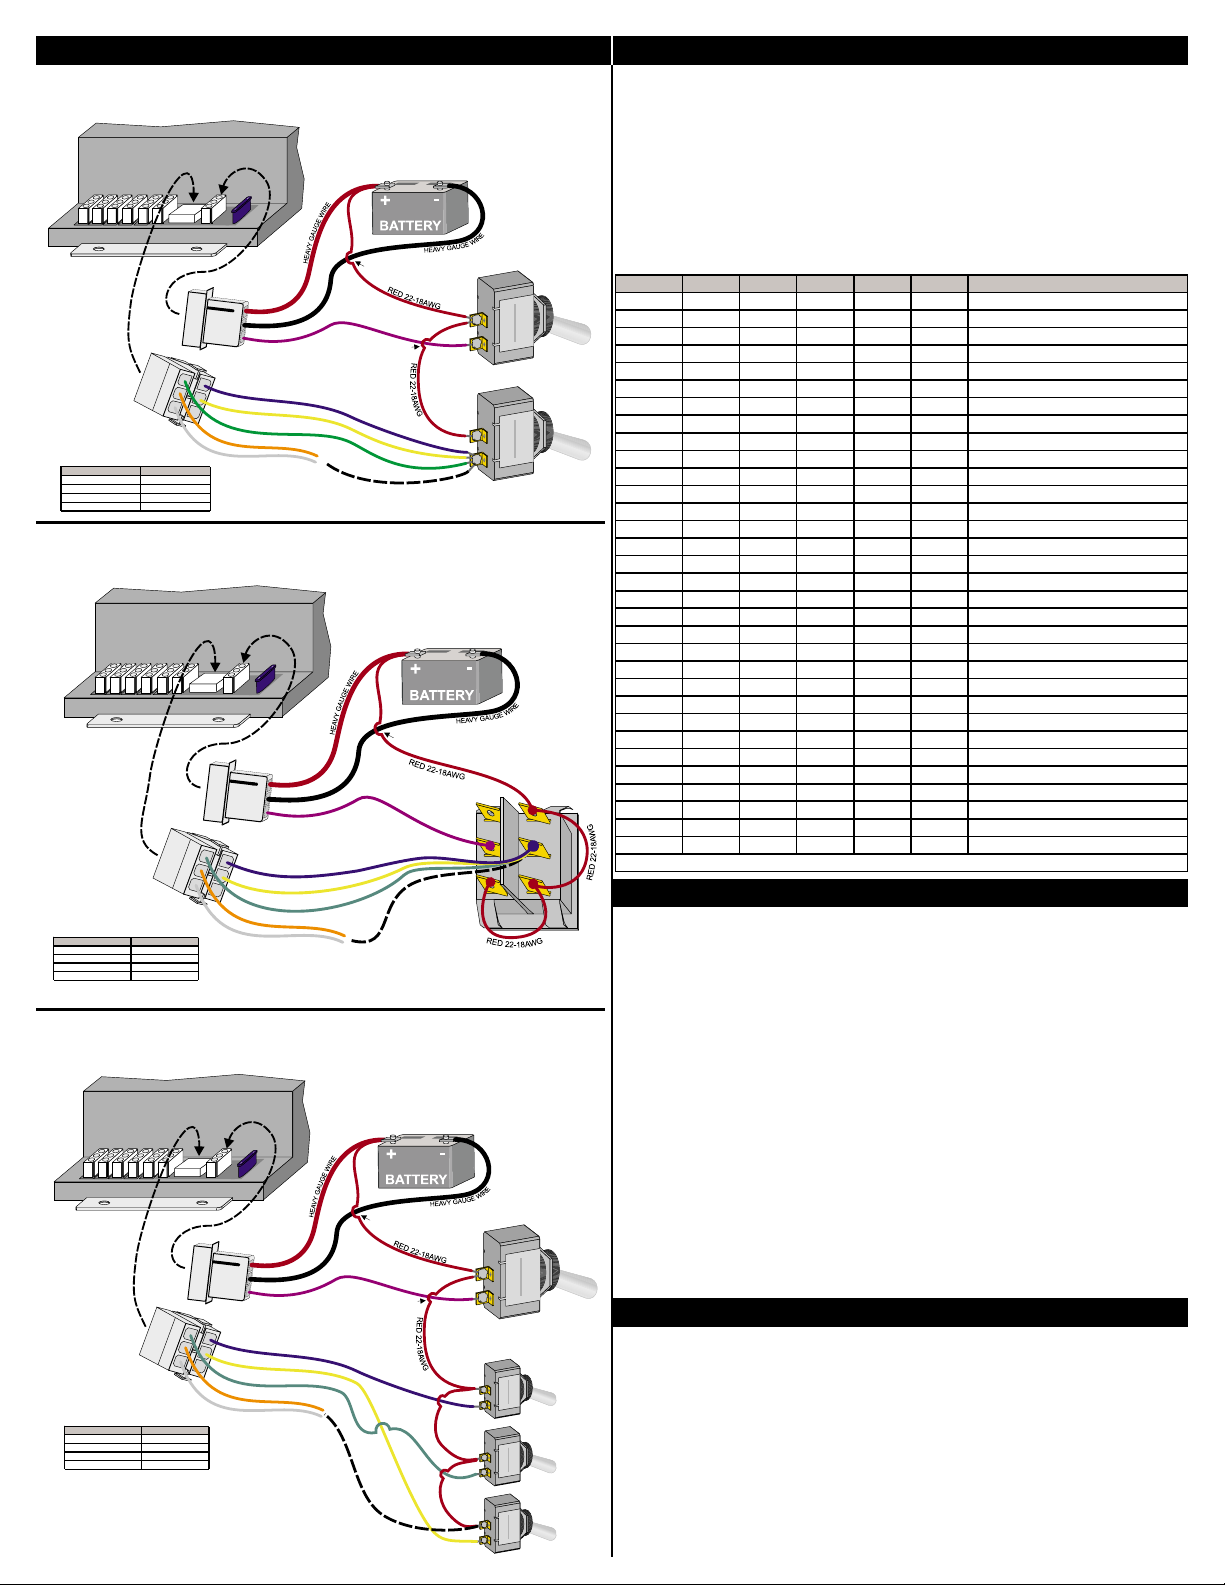
WIRING/CONNECTION DIAGRAMS PATTERN TABLE
TROUBLESHOOTING
DIAGRAM (1): ON/OFF and Low Power using two toggle
switches. Choose flash pattern from chart.
Selecting a flash pattern: In the table below, find the desired
flash pattern. Connect the wires marked to the
'load' side of the ON/OFF switch.
Example: To use pattern #8 (Quad Flash, All Heads), connect
the YELLOW, GREEN and BLUE wires to POWER.
POWER
Remove the remaining
wires, or connect them to Ground.
Remove the remaining wires, or connect them to Ground.
-
-
DIAGRAM (2): ON/OFF and Low Power using one DPDT
rocker switch. Choose flash pattern from chart.
DIAGRAM (3): Selective switching of strobe head pairs. Low
Power selection. Choose flash pattern from chart.
Blown Fuse
Erratic behavior (and/or) shutdown
: The 21.7690 will blow a fuse if the input
voltage is reversed. If this happens, first locate the wiring
fault, then replace the fuse with one of the same rating.
: The 21.7690 will
shut down if there is a short circuit condition on any one of
the strobe heads. If the electrical conductors connecting
the power supply to the strobe heads are exposed to water
a short circuit will result. The first sign is intermittent
operation, followed by complete shutdown of the strobe
system. To find the short circuit, unplug all strobe head
cables from the 21.7690. Test cable/head at a time
until the problem is found.
one
WIRED TO +12/24V FLASH PATTERN
NONE Quad Flash
ORANGE Mega Flash
WHITE Quintpule Flash
WHITE + ORANGE Double Flash
WIRED TO +12/24V FLASH PATTERN
NONE Quad Flash
ORANGE Mega Flash
WHITE Quintpule Flash
WHITE + ORANGE Double Flash
WIRED TO +12/24V FLASH PATTERN
NONE Quad Flash
ORANGE Mega Flash
WHITE Quintpule Flash
WHITE + ORANGE Double Flash
PATTERN WHITE ORANGE YELLOW GREEN BLUE FUNCTION
1SHUTDOWN
2POWER Quad Flash, 1 Alt 2
3POWER Quad Flash, 3 Alt 4
4POWER POWER Quad Flash, 1+3 Alt 2+4
5POWER Quad Flash, 5 Alt 6
6POWER POWER Quad Flash, 1+5 Alt 2+6
7POWER POWER Quad Flash, 3+5 Alt 4+6
8POWER POWER POWER Quad Flash, 1+3+5 Alt2+ 4+6
9POWER SHUTDOWN
10 POWER POWER Mega Flash, 1 Alt 2
11 POWER POWER Mega Flash, 3 Alt 4
12 POWER POWER POWER Mega Flash, 1+3 Alt 2+4
13 POWER POWER Mega Flash, 5 Alt 6
14 POWER POWER POWER Mega Flash, 1+5 Alt 2+6
15 POWER POWER POWER Mega Flash, 3+5 Alt 4+6
16 POWER POWER POWER POWER Mega Flash, 1+3+5 Alt2+ 4+6
17 POWER SHUTDOWN
18 POWER POWER Quintuple Flash, 1 Alt 2
19 POWER POWER Quintuple Flash, 3 Alt 4
20 POWER POWER POWER Quintuple Flash, 1+3 Alt 2+4
21 POWER POWER Quintuple Flash, 5 Alt 6
22 POWER POWER POWER Quintuple Flash, 1+5 Alt 2+6
23 POWER POWER POWER Quintuple Flash, 3+5 Alt 4+6
24 POWER POWER POWER POWER Quintuple Flash, 1+3+5 Alt2+ 4+6
25 POWER POWER SHUTDOWN
26 POWER POWER POWER Double Flash, 1 Alt 2
27 POWER POWER POWER Double Flash, 3 Alt 4
28 POWER POWER POWER POWER Double Flash, 1+3 Alt 2+4
29 POWER POWER POWER Double Flash, 5 Alt 6
30 POWER POWER POWER POWER Double Flash, 1+5 Alt 2+6
31 POWER POWER POWER POWER Double Flash, 3+5 Alt 4+6
32 POWER POWER POWER POWER POWER Double Flash, 1+3+5 Alt2+ 4+6
Alt = 'Alternates with'
ACCESSORIES
The following accessories are available to make the
installation of the 21.7690 power supply even easier:
A fully assembled switch panel which provides full
selection of all flash patterns as well as On/Off and Low
Power control.
ROTARY SWITCH PANEL
All panels are pre-wired with 15'(standard) of cabling.
INSTALL- 21.7690.CDR
Unused wires should either be removed, or connected to Ground.-
Choose flash pattern
with Orange and White wires.
15
SPST SPST
1
2
3
BATTERY -
GND, vehicle
chassis.
RED
YELLOW
GREEN
BLUE
BLACK
VIOLET
NO CONNECTION
NO CONNECTION
LOW POWER
SWITCH
ON / OFF
SWITCH
POWER HARNESS
CONTROL HARNESS
Toggle switches:
General purpose Single
Pole Single Throw.
Current through switch is
less than 1 amp.
ORANGE
BATTERY +
OR CONSTANT
POWER CIRCUIT
15
1
2
3
BATTERY -
GND, vehicle
chassis.
RED
BLACK
VIOLET
NO CONNECTION
POWER HARNESS
Rocker Switch:
General purpose Double
Pole Double Throw.
Current through switch is
less than 1 amp.
CONTROL HARNESS
YELLOW
GREEN
BLUE
ORANGE
WHITE
Choose flash pattern
with Orange and White wires.
Unused wires should either be removed, or connected to Ground.-
BATTERY +
OR CONSTANT
POWER CIRCUIT
15
SPST
SPSTSPSTSPST
1
2
3
BATTERY -
GND, vehicle
chassis.
RED
YELLOW
GREEN
BLUE
BLACK
VIOLET
NO CONNECTION
NO CONNECTION
LOW POWER
SWITCH
HEADS3&4
ON / OFF
SWITCH
HEADS5&6
ON / OFF
SWITCH
HEADS1&2
ON / OFF
SWITCH
POWER HARNESS
CONTROL HARNESS
Toggle switches:
General purpose Single
Pole Single Throw.
Current through switch is
less than 1 amp.
ORANGE
Unused wires should either be
removed, or connected to Ground.-
Choose flash pattern
with Orange and White wires.
BATTERY +
OR CONSTANT
POWER CIRCUIT
WHITE
Other SHO-ME Power Supply manuals


Popular Power Supply manuals by other brands


Manson Engineering Industrial
Manson Engineering Industrial SPA-8150 user manual

Extech Instruments
Extech Instruments 382203 user manual

CARLO GAVAZZI
CARLO GAVAZZI SPD24051 Installation & operation

CyberPower
CyberPower CP685AVR-G user manual

Tektronix
Tektronix PS 503S instruction manual

Digitrax
Digitrax PS2012 manual


