Show Technology SHOWPRO FUSION IP PROFILE 56 LEDPRO161 User manual
FUSION IP PROFILE 56
USER MANUAL
LEDPRO161
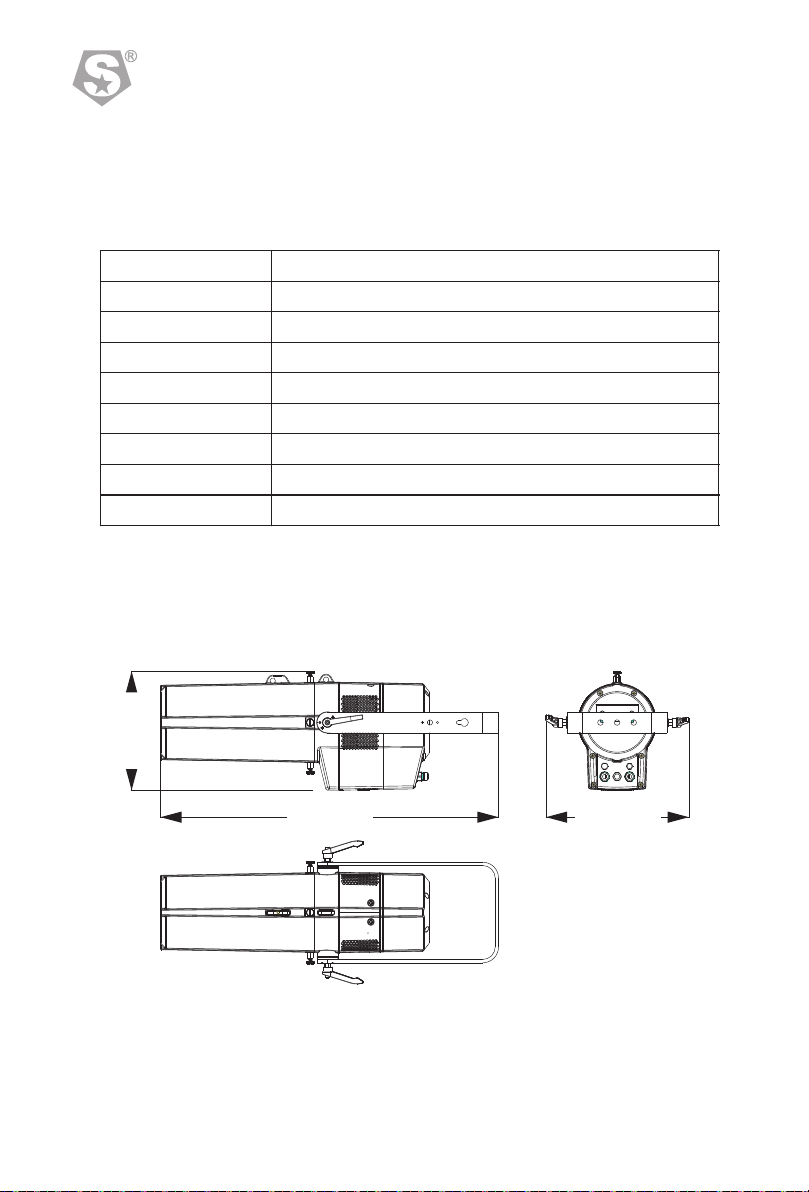
286.20 mm
812.80 mm 343.44 mm
GOBO ROTATION
CONTROL
CH.6
CH.7
0
10
146
151
201
206
9
145
150
200
205
255
NO FUNCTION
GOBO ADJUST THE ANGLE (0 —> 360°)
STOP ROTATION
CLOCKWISE (SPEED 1 —> 100%)
STOP ROTATION
COUNTERCLOCKWISE (SPEED 1 —> 100%)
NO FUNCTION
LIVE
STUDIO
POWER
OFF
DIM1
DIM2
DIM3
DIM4
ZOOM、FOCUS、GOBO RESET
NO FUNCTION
000 009
010 034
035 059
060 084
085 109
110 134
135 159
160 184
185 209
210 234
235 255
LEDPRO161
812×343×286(mm)
16KG
240W
AC100~240V
50/60Hz
-20℃~45℃
15°~30°
DMX512/RDM
Product Code
imenson
Weight
Rated Power
Input Voltage
Frequency Range
Ambient Temperature
Beam Angle
Control Model
D
1
Product Introduction
1.1 Specification CH.1 0 255 DIMMER
MODE 16BIT
CH.2
CH.3
CH.4
0
0
0
255
255
255
DIMMER FINE
ZOOM
FOCUS
STROBE
0
10
100
110
180
190
9
99
109
179
189
255
CH.5
NO FUNCTION
STROBE FROM SLOD TO FAST (0-25Hz)
NO FUNCTION
THUNDER STROBE
NO FUNCTION
RANDOM STROBE
CHANNEL VALUE FUNCTION
1 10

180
190
189
255
NO FUNCTION
RANDOM STROBE
CONTROL
CH.5
0
10
35
60
85
110
135
160
185
210
235
9
34
59
84
109
134
159
184
234
234
255
NO FUNCTION
LIVE
STUDIO
POWER
OFF
DIM1
DIM2
DIM3
DIM4
ZOOM、FOCUS、GOBO RESET
NO FUNCTION
CH.1
CH.2
CH.3
0
0
0
255
255
255
DIMMER
ZOOM
FOCUS
STROBE
0
10
100
110
9
99
109
179
NO FUNCTION
STROBE FROM SLOD TO FAST (0-25Hz)
NO FUNCTION
THUNDER STROBE
CH.4
SIMPLE
ECLIPSE 750 IP
SS857
IMPORTANT
ATTENTION
Caution, risk of electric shock
The light source contained in this luminaire shall only be replaced
by the manufacturer or his service agent or a similar qualified person.
1.2 Safety warning
ATTENTION !!
•This product left the place of manufacture in perfect condition. In order to
maintain this condition and for safe operation, the user must always follow the
instructions and safety warnings described in this user manual.
•Avoid shaking or strong impacts to any part of the equipment.
•Make sure that all parts of the equipment are kept clean and free of dust.
•Always make sure that the power connections are connected correct and
secure.
•If there is any malfunction of the equipment, contact your distributor
immediately.
•When transferring the product, it is advisable to use the original packaging in
which the product left the factory.
•Shields, lenses or ultraviolet screens shall be changed if they have become
damaged to such an extent that their effectiveness is impaired.
•The lamp (LED) shall be changed if it has become damaged or thermally
deformed.
•This product must be installed by a qualified professional.
•Always operate the equipment as described in the user manual.
•A minimum distance of 0.5m must be maintained between the equipment and
combustible surface.
•The product must always be placed in a well ventilated area.
•Always make sure that the equipment is installed securely.
•Do not stand close to the equipment and stare directly into the LED light source.
•Always disconnect the power supply before attempting and maintenance.
•Always make sure that the supporting structure is solid and can support the
combined weight of the products.
•The earth wire must always be connected to the ground.
•Do not touch the power cables if your hands are wet.
Always read the user manual before operation.
Please confirm that the power supply stated on the product is the same as the
mains power supply in your area.
CHANNEL VALUE FUNCTION
92
0x388Axxxx xxxx
VERSION V01
UID
LABEL ECLIPSE 750 IP
RDM
INFO
MENU
WIRELESS RESET YES
NO
WIRELESS
MENU
The DMX address code can be any value between 001and 512.
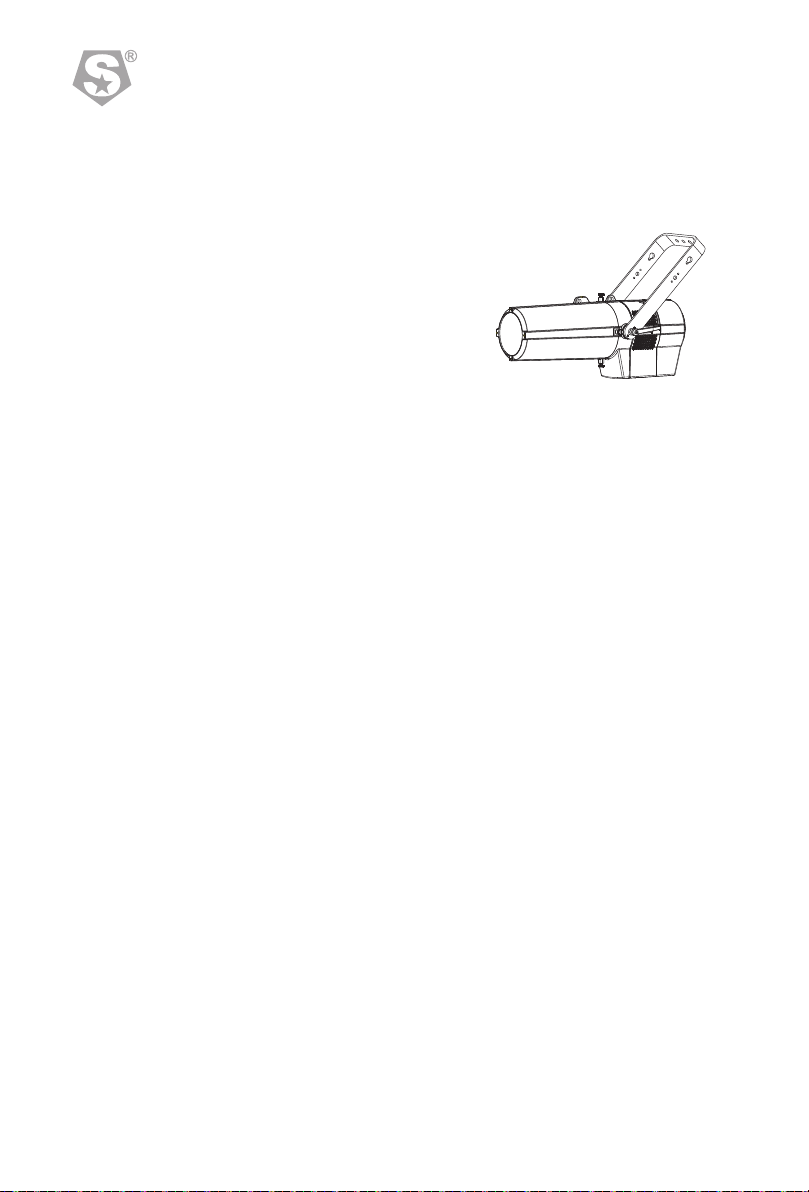
2.1 Mounting
2 Installation
The fixture can be mounted in any
position.Always ensure that
mounting surface can withstand 10
times the weight of thefixture.
Always use a safety cable when
mounting the fixture in any elevated
position.
Important safety note!!
Always use a safety cable when installing this unit!!
Be sure that the safety cable is connected to a solid load-bearing structure.
2.2 Power connections
This product uses input and output power cable is 1.5 square mm copper wire
Note:
If the signal cable is over 60m between the DMX512 controller and fixture or beween two
fixtures, then a DMX signal amplifier is needed as well.
2.3 Connecting DMX512
The DMX console and the lamp body are connected in series.
Because the Std.P MODE is five channels, the address code of the lamp increases by
5 times such as(1,6,11,16…),also each it can be reused as needed.
UPRIGHT
【PERFORM】menu, select【LIVE/STUDIO/POWER】as required fan speed.
【XY OFFSET】is the setting to hide the fine adjustment of the refresh frequency, select,
【SHOW】as not hidden, select【HIDE】as hidden, The default setting is【HIDE】.
【PWM】 is the PWM refresh frequency selection. When the [XY OFFSET] option is SHOW, the
PWM submenu can set X FINE and Y FINE tuning options. (Note: as the refresh frequency
increases, the gray scale level of the dimmer will decrease (i.e. the higher the refresh frequency,
the less gray it will be).
【DMX ERROR】 Choose<SAVE> in order to save the last DMX data in case of DMX signal error.
Choose<BLACK> in order to blackout in case of DMX signal error.
【RESET】 RESET the lamp. Enter the password "up down up down " to confirm, and then perform
the RESET of the lamp parameters.
3.9W Setting IRELESS
【WIRELESS】 WIRELESS DMX mode, press 【ENTER】key to ENTER, 【WIRELESS RESET】
WIRELESS DMX RESET, select YES as RESET, and NO as NO RESET.
3.10 INFO
•
•
Press【ENTER】into【INFO】check information,press up and down
【VERSION】is software versions;
•【RDM】check fixture's ID;
4Using a DMX512 Controller
4.1 Channel Assignment
Note: this product have two DMX512 channel configuration:
【SIMPLE】/【COLOR MODE 16BIT】
8
3

PLAY
EDIT
MANUAL
PROGRAM02
PROGRAM02 SCENE-02 ZOOM (0~255)
PROGRAM10
PROGRAM10 SCENE-30 GOBO ROTA (0~255)
PROGRAM01 SPEED0-255
PROGRAM01 SCENE-01 DIMMER (0~255)
……
…… …… FOCUS (0~255)
STROBE (0~25)
TIME (0~255)
FADE (0~255)
ECLIPSE 750 IP
SS857
MENU
MENU
KEY OFF
DIM1
OFF
LIVE
SAVE
****
DIM3
POWER
ON
DIM2
STUDIO
BLACK
OK
DIM4
DIMMER
PERFORM
DMX ERROR
RESET
SETTING ****
............
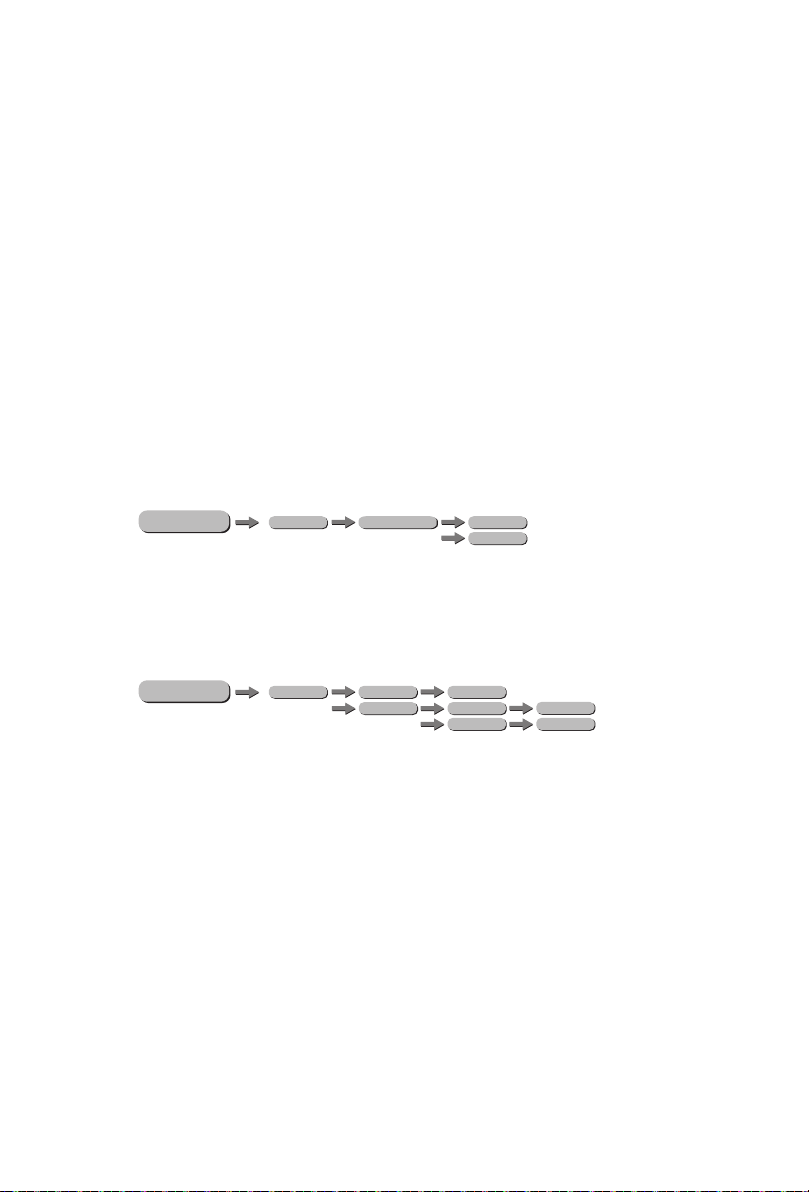
DMX Add r. 1 DMX Add r. 6 DMX Add r. 11
DMX512 control
As shown on the right, the controller is connected to the
lamp body in series, the DMX address code for the first
lamp is set to 1, and second unit is set to 6, and so on.
MENU U P
ENTER DOWN
MENU:Back
ENTER:Save
UP:Direction up
DOWN:Direction down
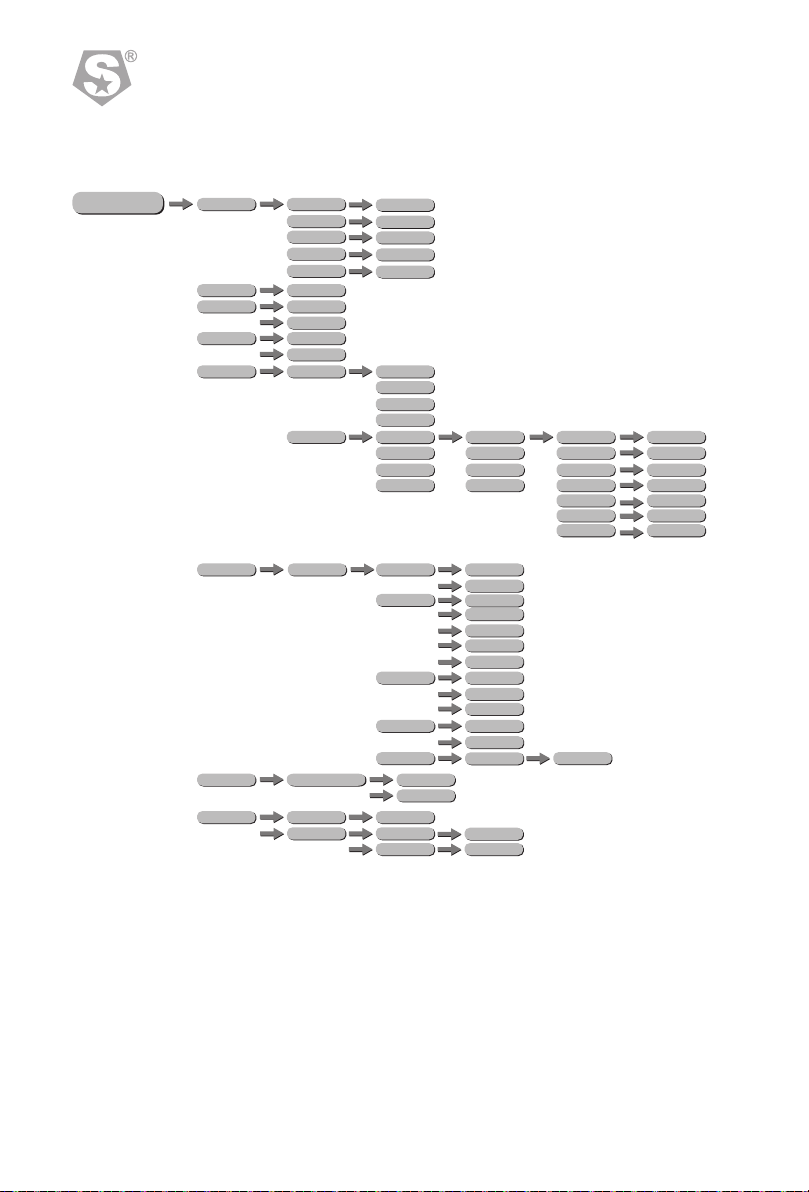
3.1 Display operation
3 Display panel operation
3.7 MANUAL Setting
Select 【PLAY】and press enter to select 【PROGRAM01】 ~ 【PROGRAM10】, the value adjustment
range of each self-programming mode is 0~255, press the 【MENU】 key to return the MENU, and
the selected value is saved automatically.
Enter the EDIT mode to edit the custom programs【PROGRAM01】to 【PROGRAM10】.Each custom
program has 30 steps that can be edited.Each step allows the creation of a scene using DIMMER
【DIMMER】, ZOOM 【ZOOM】, FOCUS 【FOCUS】, GOBO ROTA 【GOBO ROTA】, STROBE
【STROBE】, TIME 【TIME】, FADE 【FADE】.The data value range【0~255】 is in seconds,The TIME
setting of 【FADE 】 is less than that of 【 TIME】,press the 【MENU】 key to return the MENU, and
the selected value is saved automatically.
【MANUAL】,press 【ENTER】, enter into control knob switch set up.
【SET】...This menu allows the user to adjust key operation settings for this fixture.
【KEY】 ... select [ON] for automatic lock-out. Password to re-enter the display is <UP>+
<DOWN> + <UP> + <DOWN>.
【DIMMER】is a non-linear DIMMER speed setting,<OFF> is a normal linear dimming,Select
[DIM1]、 [DIM2]、 [DIM3] or [DIM4] for different dimming speeds. ([DIM4] is the slowest dimming
speed).
3.8 SETTING
4
7
MENU DIMMER
FOCUS
STAT
(0~255)
(0~255)
ZOOM
GOBO
STROBE
(0~255)
(0~255)
(0~25)
MENU
MENU
MENU
MENU
DIMMER
(001-512)
SIMPLE
DMX
PLAY
EDIT
MODE 16BIT
SLAVE
FOCUS
STAT
ADDRESS
PERSONALITY
RUN MODE
MANUAL
(0~255)
(0~255)
PROGRAM02
PROGRAM02 SCENE-02 ZOOM (0~255)
PROGRAM10
PROGRAM10 SCENE-30 GOBO ROTA (0~255)
ZOOM
GOBO
STROBE
(0~255)
PROGRAM01
PROGRAM01 SCENE-01 DIMMER (0~255)
(0~255)
……
…… …… FOCUS (0~255)
STROBE (0~25)
TIME (0~255)
FADE (0~255)
(0~25)
(001-512)
ADDRESS
SIMPLE
MODE 16BIT
PERSONALITY
DMX
SLAVE
RUN MODE
KEY OFF
DIM1
OFF
LIVE
SAVE
****
DIM3
POWER
ON
DIM2
STUDIO
BLACK
OK
DIM4
DIMMER
PERFORM
DMX ERROR
RESET
SETTING ****
VERSION V01
UID
LABEL ECLIPSE 750 IP
RDM
INFO
WIRELESS RESET YES
NO
WIRELESS
0x388A xxxx xxxx
3.2 Menu 3.3 I SettingSTAT C
Enter the STATIC mode to create the programs
Combine DIMMER/ZOOM/FOCUS/GOBO/STROBE to create a definite range of colors ,Push up
and down buttons adjust 0-255 value,Set value of the STROBE,Push up and down buttons
adjust 0-20Hz value
The static setting will be valid when the fixture is powered again.
3.4 DMX Address Setting
Enter Up/Down select 1~512 address.
Enter the【DMX】mode to set the DMX address.
【 】
Enter【MENU】return.
3.5 PERSONALITY Setting
•Press enter the menu to do a custom choice on the ‘PERSONALITY’menu.
•Press UP or DOWN to select 【SIMPLE】 【COLOR MODE 16BIT】,please refer to DMX
channel table for the specific channel value .
,
3.6 RUNMODE Setting
•
•
•
【RUNMODE】menu, select required run mode,there are any modes inside:【DMX】DMX
mode,【SLAVE】SLAVE mode, press Down/Up select mode.
【DMX】 mode is for using the DMX512 controller to control the fixtures.
【SLAVE】 mode is for Master -- Slave operation.
•press【ENTER】accept,press【MENU】return.
6
5

MENU DIMMER
FOCUS
STAT
(0~255)
(0~255)
ZOOM
GOBO
STROBE
(0~255)
(0~255)
(0~25)
MENU
MENU
MENU
MENU
DIMMER
(001-512)
SIMPLE
DMX
PLAY
EDIT
MODE 16BIT
SLAVE
FOCUS
STAT
ADDRESS
PERSONALITY
RUN MODE
MANUAL
(0~255)
(0~255)
PROGRAM02
PROGRAM02 SCENE-02 ZOOM (0~255)
PROGRAM10
PROGRAM10 SCENE-30 GOBO ROTA (0~255)
ZOOM
GOBO
STROBE
(0~255)
PROGRAM01
PROGRAM01 SCENE-01 DIMMER (0~255)
(0~255)
……
…… …… FOCUS (0~255)
STROBE (0~25)
TIME (0~255)
FADE (0~255)
(0~25)
(001-512)
ADDRESS
SIMPLE
MODE 16BIT
PERSONALITY
DMX
SLAVE
RUN MODE
KEY OFF
DIM1
OFF
LIVE
SAVE
****
DIM3
POWER
ON
DIM2
STUDIO
BLACK
OK
DIM4
DIMMER
PERFORM
DMX ERROR
RESET
SETTING ****
VERSION V01
UID
LABEL ECLIPSE 750 IP
RDM
INFO
WIRELESS RESET YES
NO
WIRELESS
ECLIPSE 750 IP
SS857
0x388Axxxx xxxx
3.2 Menu 3.3 I SettingSTAT C
Enter the STATIC mode to create the programs
Combine DIMMER/ZOOM/FOCUS/GOBO/STROBE to create a definite range of colors ,Push up
and down buttons adjust 0-255 value,Set value of the STROBE,Push up and down buttons
adjust 0-20Hz value
The static setting will be valid when the fixture is powered again.
3.4 DMX Address Setting
Enter Up/Down select 1~512 address.
Enter the【DMX】mode to set the DMX address.
【 】
Enter【MENU】return.
3.5 PERSONALITY Setting
•Press enter the menu to do a custom choice on the ‘PERSONALITY’menu.
•Press UP or DOWN to select 【SIMPLE】 【COLOR MODE 16BIT】,please refer to DMX
channel table for the specific channel value .
,
3.6 RUNMODE Setting
•
•
•
【RUNMODE】menu, select required run mode,there are any modes inside:【DMX】DMX
mode,【SLAVE】SLAVE mode, press Down/Up select mode.
【DMX】 mode is for using the DMX512 controller to control the fixtures.
【SLAVE】 mode is for Master -- Slave operation.
•press【ENTER】accept,press【MENU】return.
6
5

PLAY
EDIT
MANUAL
PROGRAM02
PROGRAM02 SCENE-02 ZOOM (0~255)
PROGRAM10
PROGRAM10 SCENE-30 GOBO ROTA (0~255)
PROGRAM01 SPEED0-255
PROGRAM01 SCENE-01 DIMMER (0~255)
……
…… …… FOCUS (0~255)
STROBE (0~25)
TIME (0~255)
FADE (0~255)
MENU
MENU
KEY OFF
DIM1
OFF
LIVE
SAVE
****
DIM3
POWER
ON
DIM2
STUDIO
BLACK
OK
DIM4
DIMMER
PERFORM
DMX ERROR
RESET
SETTING ****
............
DMX Add r. 1 DMX Add r. 6 DMX Add r. 11
DMX512 control
As shown on the right, the controller is connected to the
lamp body in series, the DMX address code for the first
lamp is set to 1, and second unit is set to 6, and so on.
MENU U P
ENTER DOWN
MENU:Back
ENTER:Save
UP:Direction up
DOWN:Direction down
3.1 Display operation
3Display panel operation
3.7 MANUAL Setting
Select 【PLAY】and press enter to select 【PROGRAM01】 ~ 【PROGRAM10】, the value adjustment
range of each self-programming mode is 0~255, press the 【MENU】 key to return the MENU, and
the selected value is saved automatically.
Enter the EDIT mode to edit the custom programs【PROGRAM01】to 【PROGRAM10】.Each custom
program has 30 steps that can be edited.Each step allows the creation of a scene using DIMMER
【DIMMER】, ZOOM 【ZOOM】, FOCUS 【FOCUS】, GOBO ROTA 【GOBO ROTA】, STROBE
【STROBE】, TIME 【TIME】, FADE 【FADE】.The data value range【0~255】 is in seconds,The TIME
setting of 【FADE 】 is less than that of 【 TIME】,press the 【MENU】 key to return the MENU, and
the selected value is saved automatically.
【MANUAL】,press 【ENTER】, enter into control knob switch set up.
【SET】...This menu allows the user to adjust key operation settings for this fixture.
【KEY】 ... select [ON] for automatic lock-out. Password to re-enter the display is <UP>+
<DOWN> + <UP> + <DOWN>.
【DIMMER】is a non-linear DIMMER speed setting,<OFF> is a normal linear dimming,Select
[DIM1]、 [DIM2]、 [DIM3] or [DIM4] for different dimming speeds. ([DIM4] is the slowest dimming
speed).
3.8 SETTING
4
7
0x388A xxxx xxxx
VERSION V01
UID
LABEL ECLIPSE 750 IP
RDM
INFO
MENU
WIRELESS RESET YES
NO
WIRELESS
MENU
ECLIPSE 750 IP
SS857
2.3 The control station setting of connecting DMX512
The DMX console and the lamp body are connected in series.
Because the Std.P MODE is five channels, the address code of the lamp increases by
5 times such as(1,6,11,16…),also each it can be reused as needed.
The DMX address code can be any value between 001and 512.
2.1 Mounting
2Installation
The fixture can be mounted in any
position.Always ensure that
mounting surface can withstand 10
times the weight of thefixture.
Always use a safety cable when
mounting the fixture in any elevated
position.
Important safety note!!
Always use a safety cable when installing this unit!!
Be sure that the safety cable is connected to a solid load-bearing structure.
2.2 Power connections
This product uses input and output power cable is 1.5 square mm copper wire
Note:
If the signal cable is over 60m between the DMX512 controller and fixture or beween two
fixtures, then a DMX signal amplifier is needed as well.
UPRIGHT
【PERFORM】menu, select【LIVE/STUDIO/POWER】as required fan speed.
【XY OFFSET】is the setting to hide the fine adjustment of the refresh frequency, select,
【SHOW】as not hidden, select【HIDE】as hidden, The default setting is【HIDE】.
【PWM】 is the PWM refresh frequency selection. When the [XY OFFSET] option is SHOW, the
PWM submenu can set X FINE and Y FINE tuning options. (Note: as the refresh frequency
increases, the gray scale level of the dimmer will decrease (i.e. the higher the refresh frequency,
the less gray it will be).
【DMX ERROR】 Choose<SAVE> in order to save the last DMX data in case of DMX signal error.
Choose<BLACK> in order to blackout in case of DMX signal error.
【RESET】 RESET the lamp. Enter the password "up down up down " to confirm, and then perform
the RESET of the lamp parameters.
3.9W Setting IRELESS
【WIRELESS】 WIRELESS DMX mode, press 【ENTER】key to ENTER, 【WIRELESS RESET】
WIRELESS DMX RESET, select YES as RESET, and NO as NO RESET.
3.10 INFO
•
•
Press【ENTER】into【INFO】check information,press up and down
【VERSION】is software versions;
•【RDM】check fixture's ID;
4 Using a DMX512 Controller
4.1 Channel Assignment
Note: this product have two DMX512 channel configuration:
【SIMPLE】/【COLOR MODE 16BIT】
8
3

180
190
189
255
NO FUNCTION
RANDOM STROBE
CONTROL
CH.5
0
10
35
60
85
110
135
160
185
210
235
9
34
59
84
109
134
159
184
234
234
255
NO FUNCTION
LIVE
STUDIO
POWER
OFF
DIM1
DIM2
DIM3
DIM4
ZOOM、FOCUS、GOBO RESET
NO FUNCTION
CH.1
CH.2
CH.3
0
0
0
255
255
255
DIMMER
ZOOM
FOCUS
STROBE
0
10
100
110
9
99
109
179
NO FUNCTION
STROBE FROM SLOW TO FAST (0-25Hz)
NO FUNCTION
THUNDER STROBE
CH.4
SIMPLE IMPORTANT
ATTENTION
Caution, risk of electric shock
The light source contained in this luminaire shall only be replaced
by the manufacturer or his service agent or a similar qualified person.
1.2 Safety warning
ATTENTION !!
•This product left the place of manufacture in perfect condition. In order to
maintain this condition and for safe operation, the user must always follow the
instructions and safety warnings described in this user manual.
•Avoid shaking or strong impacts to any part of the equipment.
•Make sure that all parts of the equipment are kept clean and free of dust.
•Always make sure that the power connections are connected correct and
secure.
•If there is any malfunction of the equipment, contact your distributor
immediately.
•When transferring the product, it is advisable to use the original packaging in
which the product left the factory.
•Shields, lenses or ultraviolet screens shall be changed if they have become
damaged to such an extent that their effectiveness is impaired.
•The lamp (LED) shall be changed if it has become damaged or thermally
deformed.
•This product must be installed by a qualified professional.
•Always operate the equipment as described in the user manual.
•A minimum distance of 0.5m must be maintained between the equipment and
combustible surface.
•The product must always be placed in a well ventilated area.
•Always make sure that the equipment is installed securely.
•Do not stand close to the equipment and stare directly into the LED light source.
•Always disconnect the power supply before attempting and maintenance.
•Always make sure that the supporting structure is solid and can support the
combined weight of the products.
•The earth wire must always be connected to the ground.
•Do not touch the power cables if your hands are wet.
Always read the user manual before operation.
Please confirm that the power supply stated on the product is the same as the
mains power supply in your area.
CHANNEL VALUE FUNCTION
92

286.20 mm
812.80 mm 343.44 mm
ECLIPSE 750 IP
SS857
GOBO ROTATION
CONTROL
CH.6
CH.7
0
10
146
151
201
206
9
145
150
200
205
255
NO FUNCTION
GOBO INDEX (0 —> 360°)
STOP ROTATION
CLOCKWISE (SPEED 1 —> 100%)
STOP ROTATION
COUNTERCLOCKWISE (SPEED 1 —> 100%)
NO FUNCTION
LIVE
STUDIO
POWER
OFF
DIM1
DIM2
DIM3
DIM4
ZOOM、FOCUS、GOBO RESET
NO FUNCTION
000 009
010 034
035 059
060 084
085 109
110 134
135 159
160 184
185 209
210 234
235 255
SS857SCT/SS857SWT
812×343×286(mm)
16KG
240W
AC100~240V
50/60Hz
-20℃~45℃
15°~30°
DMX512/RDM
Product Code
imenson
Weight
Rated Power
Input Voltage
Frequency Range
Ambient Temperature
Beam Angle
Control Model
D
1
Product Introduction
1.1 Specification CH.1 0 255 DIMMER
MODE 16BIT
CH.2
CH.3
CH.4
0
0
0
255
255
255
DIMMER FINE
ZOOM
FOCUS
STROBE
0
10
100
110
180
190
9
99
109
179
189
255
CH.5
NO FUNCTION
STROBE FROM SLOW TO FAST (0-25Hz)
NO FUNCTION
THUNDER STROBE
NO FUNCTION
RANDOM STROBE
CHANNEL VALUE FUNCTION
1 10

MODEL:SS857SCT/SS857SWT
ECLIPSE 750 IP
USER MANUAL
ECLIPSE 750 IP
SS857
RD-SS857-SM-00(SS-I)
Table of contents
Other Show Technology Dj Equipment manuals


