Showlite DS-3 User manual
DS-3 Derby Strobe
User-Manual
Item number: 00069702
Version: 08/2020
2
Thank you for choosing this product. To ensure that you are completely satisfied with this
product, please read and understand this manual carefully.
PLEASE READ CAREFULLY
Please keep this manual in a safe place for future reference. Hand over all documents when
passing on the product to third parties. Never leave children unattended with the packaging
material. For products packed in plastic bags, there is a risk of suffocation from packaging materials.
The product should only be used under adult supervision. Only use the product if it is in
perfect condition. Do not use the product if damage is visible or suspected. We are not liable
for any damage that occurs as a result of non-observance of the safety instructions or incorrect or
improper handling.
Follow the operating instructions!
The WARNING signal word identifies hazards that, without precautions,
could result in serious injury.
The signal word NOTE indicates general precautions that should be
observed when handling the product
Images and screen images in this manual may differ slightly from the
actual product's appearance, as long as it does not adversely affect the
technical characteristics and safety of the product.
All personal phrasing in this manual should be considered gender
neutral.
This operating manual applies to responsible users and to persons who have been
supervised or instructed in the operation of the device by a person responsible for their
safety and who have proven that they are capable of handling the device.
Children should be supervised to ensure that they do not use this
device as a toy.
Never allow children to play unattended with the packaging material.
Risk of damage to property! We are not liable for accidents that occur
as a result of non-observance of the safety instructions or incorrect
handling.
All information in this operating manual has been checked to the best of ourknowledge and belief.
However, neither the author nor the publisher can be held liable for any damages related to the use
of thismanual.
Other product, brand and company names mentioned in this document may be the
trademarks of their respective owners. The user of this document is responsible for
compliance with all applicable copyright laws.
3
Caution
Please observe the following basic instructions in order not to endanger yourself or others
and to avoid damage to external devices.
Warnings
Do not disassemble or modify the product. This could result in injury from electric shock.
If you notice that the power cord shows obvious signs of wear, the appliance is
malfunctioning, smells burnt or smokes, immediately unplug the appliance from the wall
outlet and refer servicing, maintenance or repair to an authorised service centre or your
dealer.
Before cleaning the product, you should turn it off and disconnect it from the power supply.
Always place the product on a flat, stable surface to ensure a secure stand.
Do not use the product in a damp or wet environment.
Do not place containers filled with liquids, such as vases, glasses or bottles, on the product.
Do not place small objects on top of it that could slide in, such as hairpins, sewing needles or
coins.
Precautions
To avoid damage to the product, do not place it in places with high temperatures or a lot of
dust, do not place it directly next to an air conditioner and avoid direct sunlight.
Do not place the article near other electrical equipment to avoid interference.
Do not use force when handling the product or place heavy objects on it.
Disconnect the power supply if you are not going to use the device for a longer period of
time. To disconnect the power, pull the plug, not the cable.
Please handle the power cable with care. It should not be near radiators, do not place heavy
objects on it and lay it in such a way that no persons can step on it or fall over it.
Mains voltage
If an external power supply unit is required for use, connect it to an outlet with the correct
voltage.
Do not connect the device to a different mains voltage than that for which your product is
intended.
Unplug the power cord from the wall outlet when not using the product or when there is a
thunderstorm.

4
Installation / Hanging mounting
The installation may only be carried out by authorised specialist personnel!
In case of overhead rigging, please observe the applicable standards and regulations in your
country. In any case, a second independent suspension must be used to secure the unit.
This can be ensured by a safety net or a suitable safety rope/chain or similar.
When mounting the unit on a stand, its secure stand and compliance with its maximum load
must be ensured.
Fire hazard
Do not attach the product to flammable materials. Do not cover ventilation slots and do not
operate the product above 40°C ambient temperature. Use the attached holding device for
mounting.
Keep a safety distance of at least 50cm to all other surfaces. Maintain a minimum distance of
at least 50cm between the light emission and the illuminated area. Keep liquids, moisture
and inflammable materials away from the product.
High light intensity
High light intensity can cause visual damage. Do not look directly into the light source.
Epilepsy
Flashing light can cause epileptic seizures. People who are sensitive to flasing light should
avoid exposing themselves to flashing light and refrain from looking directly at the light
source.
Place
Do not expose the product to the following conditions to avoid deformation, discoloration or
major damage:
Direct sunlight, extreme temperature or humidity, excessively dusty or dirty place, strong
vibrations or shocks, strong magnetic fields
Cleaning
Clean the product only with a soft, dry cloth. Do not use paint thinner, solvents, cleaning
fluids or chemically impregnated wipes.
Handling
Do not exert excessive force on operating elements such as switches, knobs, buttons, and
fastening screws.
Do not insert any paper, metal or other objects inside. If this happens, unplug the AC
adapter/power cord from the wall outlet. Have the product checked by qualified service
personnel.

5
© 2020
This manual is protected by copyright. Copying or reprinting, even in extracts, is only
permitted with the consent of Musikhaus Kirstein GmbH. The same applies to the
reproduction or copying of pictures, also in modified form.
Content
1. General overview............................................................................................... 6
2. Commissioning and mounting.......................................................................... 6
3. Product overview and operating elements ...................................................... 7
4. Operation............................................................................................................ 8
Menu structure..................................................................................................... 8
Stand-alone operation.........................................................................................10
Master-Slave operation.......................................................................................10
Operation with external DMX controller (1-channel mode/ 4-channel mode).......10
DMX protocol 4 channel mode............................................................................11
DMX protocol 1-channel mode............................................................................12
DMX XLR pin assignment...................................................................................13
IR remote control.................................................................................................14
5. Menu chart: ...................................................................................................... 15
6. Technical data.................................................................................................. 16

6
1. General overview
The DS-3 Derby Strobe Beam Effect is a powerful RGB LED light effect that
produces multicoloured moving light beams. The best effect you get in connection
with a fog machine. This lighting effect is DMX controllable, but can also be used
stand-alone or in a master-slave circuit.
2. Commissioning and mounting
Connect the power cable to a power outlet with the appropriate performance data.
Do not use a dimmer.
To ensure adequate ventilation, mount the light effect with the bracket or holding
device. Operate the spotlight to all further sides with a minimum distance of 50cm to
surfaces. Keep a minimum distance of at least 50cm between the light emission and
the illuminated area.
This spotlight is only intended for operation in dry indoor areas (protection class
IP20). Keep the spotlight away from liquids, moisture and flammable materials.
Fasten the spotlight carefully to prevent injuries from falling.
The spotlight may only be installed and secured by qualified personnel.
In case of overhead rigging, please observe the applicable standards and
regulations in your country. In any case, the installation must be secured by a
second independent suspension (e.g. safety net, safety rope, safety chain).
7
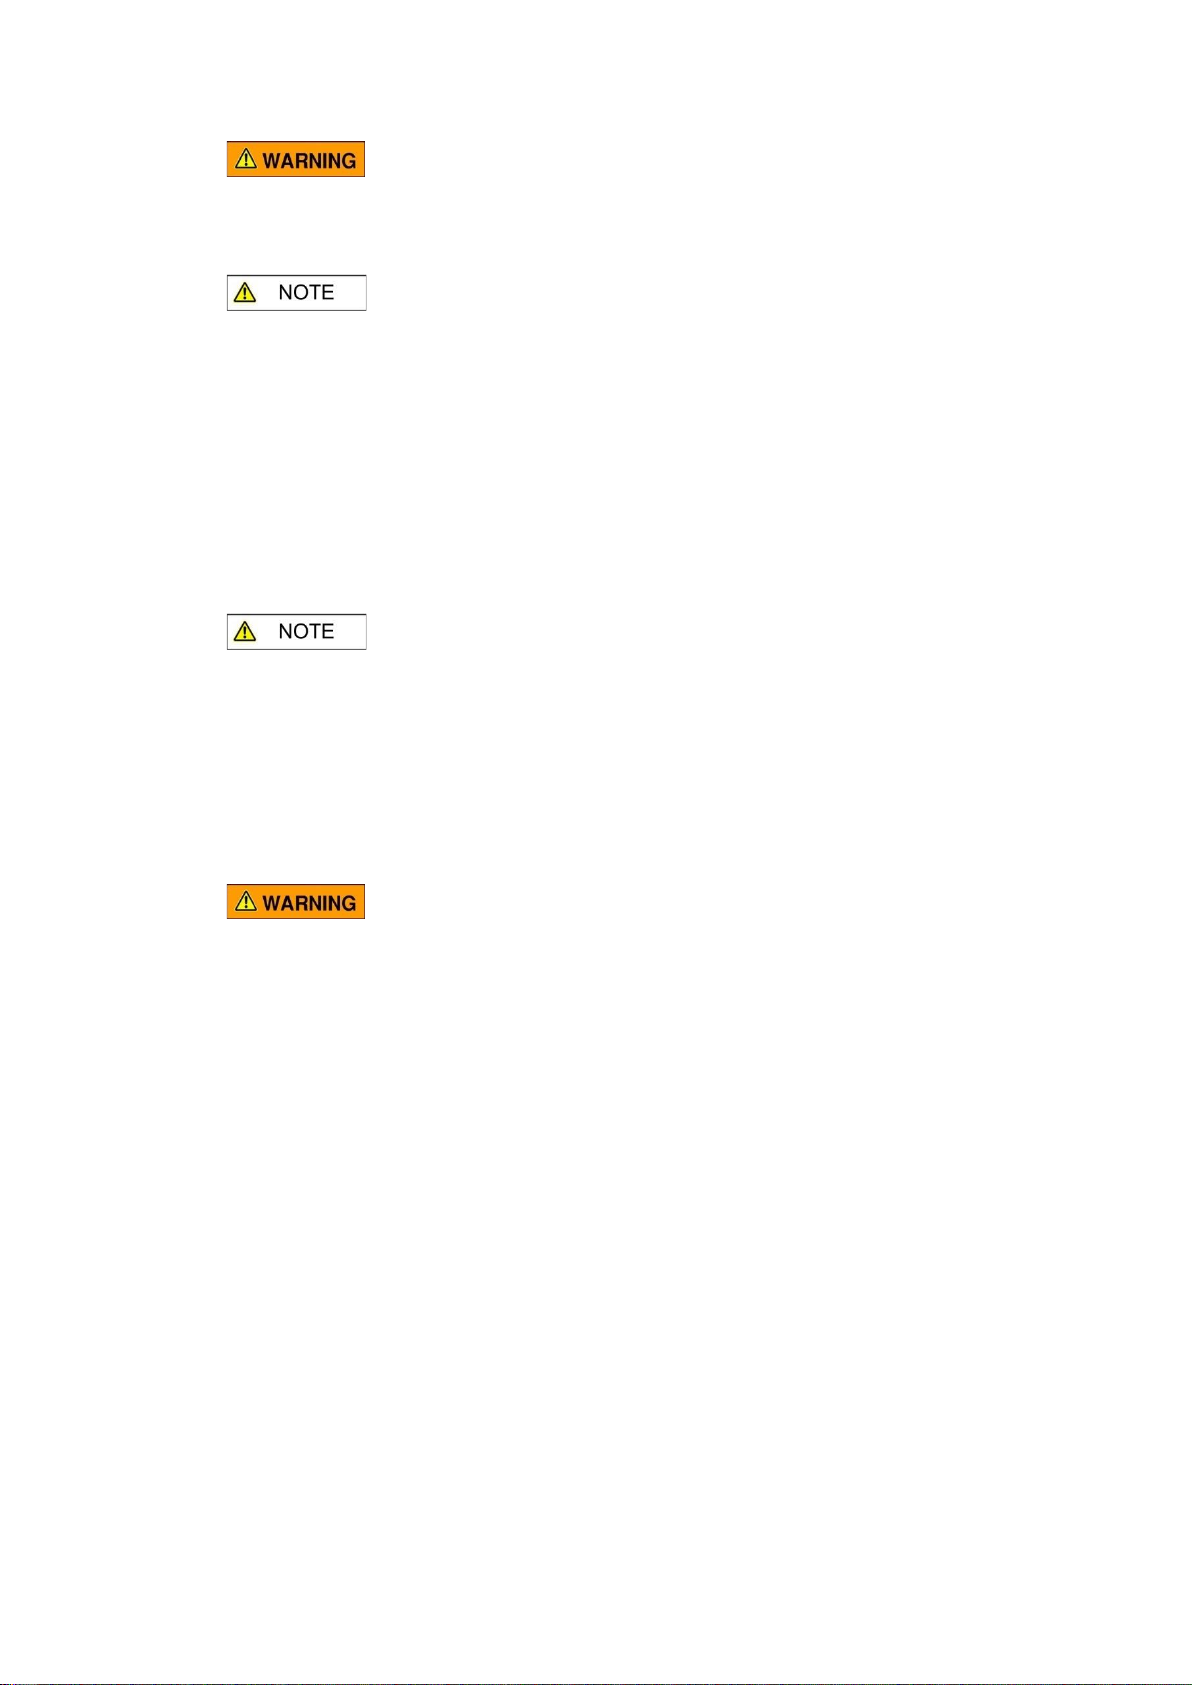
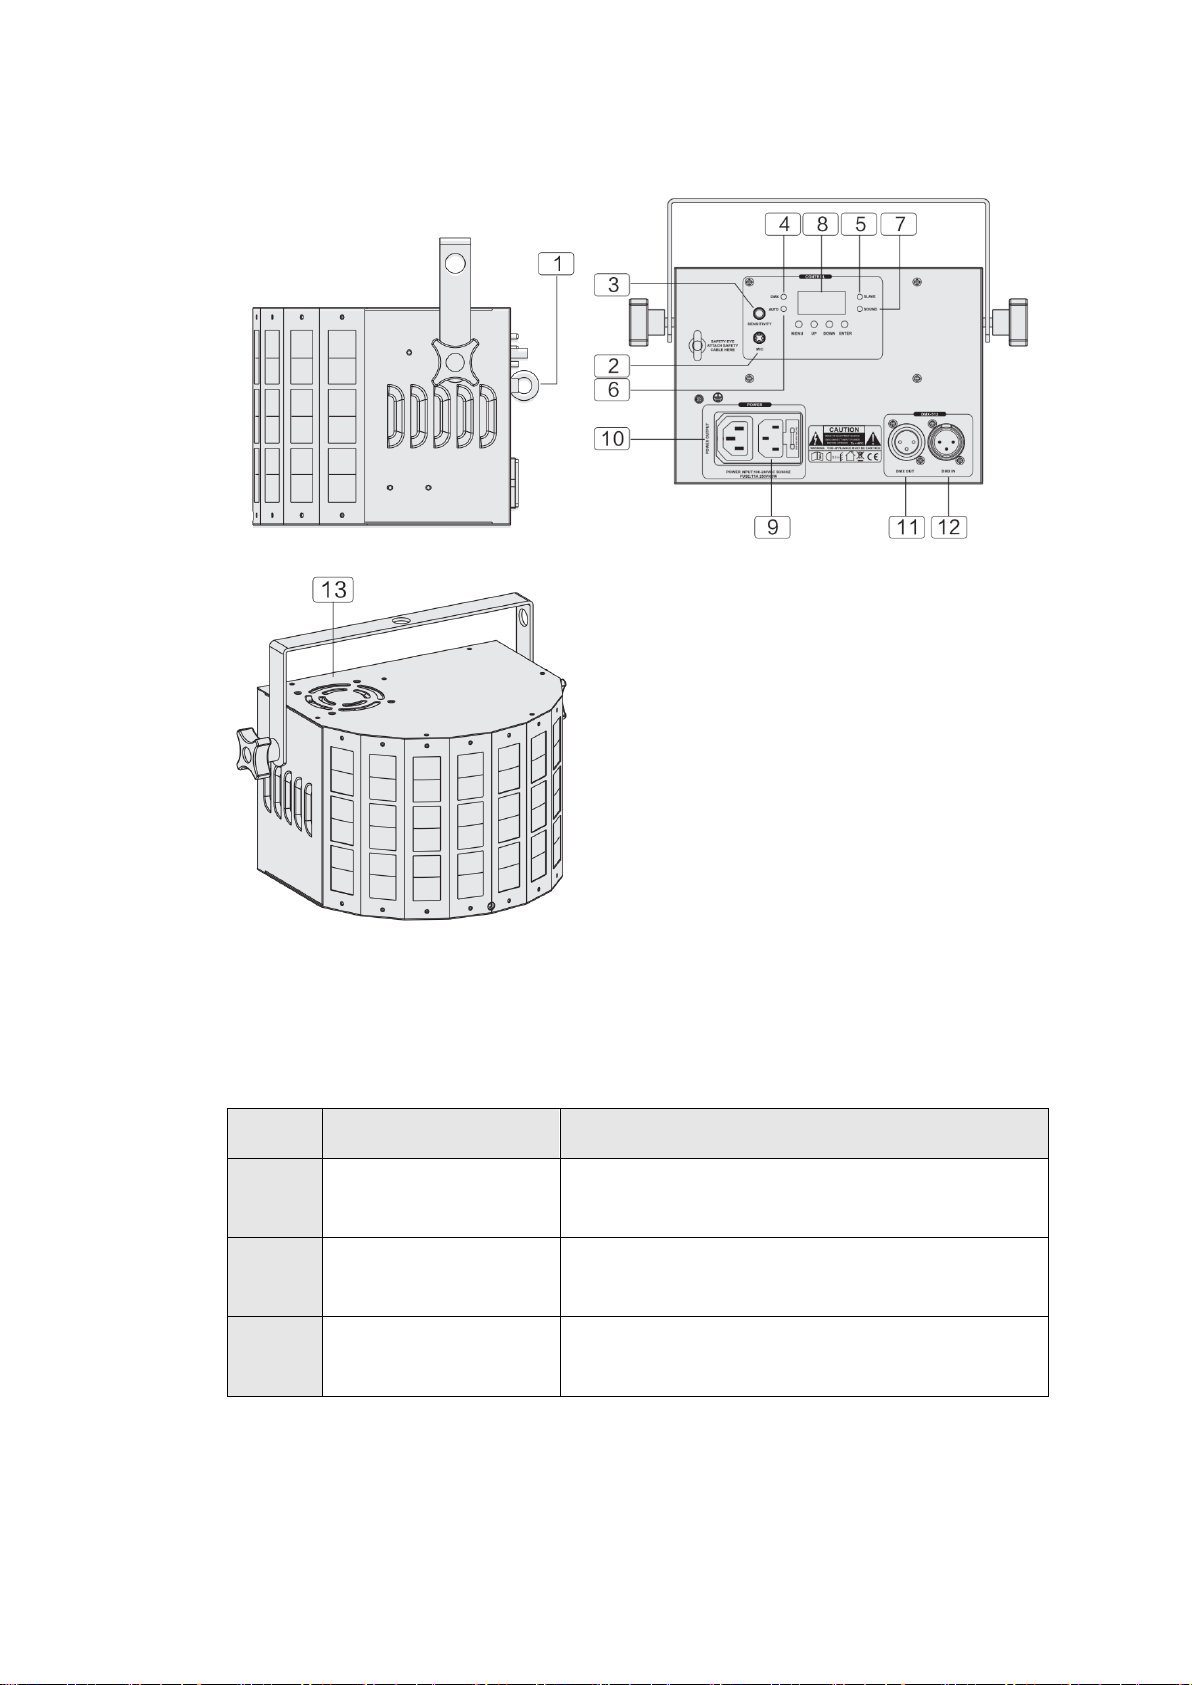
3. Product overview and operating elements
No.
Name
Function
1
Safety ring
Use this ring to attach a second independent
suspension. (e.g. safety rope, safety chain).
2
Microphone
The input signal via the microphone influences
the music control.
3
Music sensitivity
control
Adjust the sensitivity of the microphone to the
volume level of the environment.

8
4
DMX indicator
Shows whether DMX signals are received
5
Slave indicator
Shows whether the effect is operated in slave
mode.
6
Auto indicator
Shows whether the effect is operating in auto
mode.
7
Sound indicator
Shows whether the effect is operated with
music control.
8
Display
Displays information about menu or settings.
9
Input for power cable
Connect the supplied power cord to the mains
power here.
10
power connection
If necessary, connect the power cord for the
next effect here.
11
DMX-Out
For connection to the next light effect
12
DMX-In
For connection to the DMX controller
13
Ventilation grille
Cooling fan
4. Operation
After connecting the device to the mains, it is ready for operation. The display shows
the last operating mode. The operating modes can be selected via the display and
the control buttons. All settings remain stored, even when the unit is disconnected
from power.
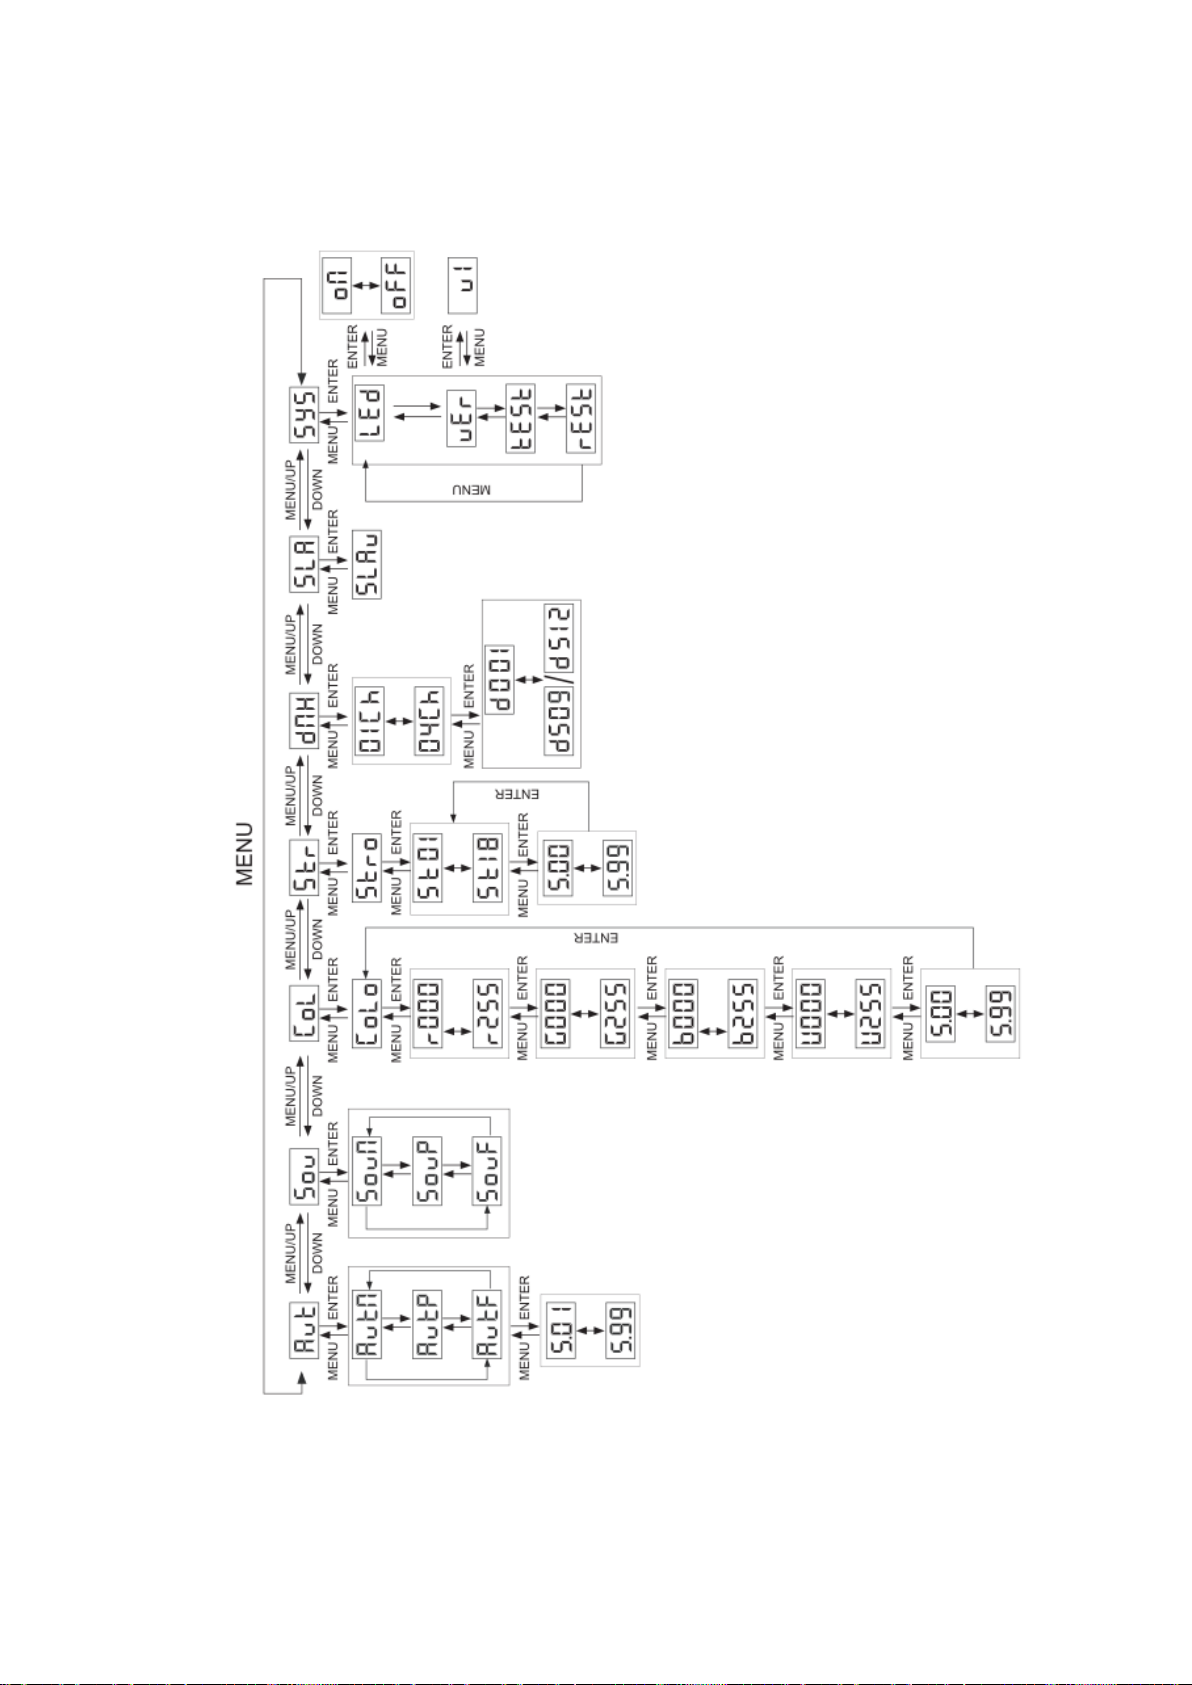
Menu structure
The operation is carried out via the keys MENU, UP, DOWN and ENTER. The
display shows the respective menu or the corresponding values. Press the MENU
key repeatedly until the desired selection is shown in the display. Change the values
to be set with the UP or DOWN keys. Press ENTER to reach any submenus and
again MENU to return to the previous menu level. Details of the individual menu
items are shown in the following table.

9
Display
Menu item
Display
Values
Display
Values Submenu(s)
Scroll with MENU or UP-
DOWN
Enter with Enter, Exit with
Menu, Change with UP-
DOWN
Enter and jump to the next
setting value with Enter, exit with
Menu, Change with UP-DOWN
Aut
(Automatic Program)
AutM
Automatic -- Mix
AutP
Automatics -- Derby
AutF
Automatic -- Strobe
S.01-99 (running speed)
Sou.
(music control)
SouM
Music Control - Mix
SouP
Music control - Derby
SouF
Music control - Strobe
CoL.
(Color)
CoLo
r000-255
(intensity red)
G000-255
(intensity green)
b000-255
(intensity blue)
U000-255
(intensity white strobe)
P.00-99
(Pulse speed)
Str
(Strobe)
Stro
St01-St18
(Strobe-Show 01-18)
P.00-99
(Strobe show speed)
dMX
(DMX).
01CH
1 channel mode
04CH
4 channel mode
d001-512
(DMX-start-address)
SLA.
(slave mode)
Slav
(when the display flashes,
there is no usable
connection to the MASTER

10
SYS.
(System)
LEdS
vErS
tESt
(starts test program)
RESt
(Reset to factory setting)
Energy-saving mode On-Off
Display of the version number
Confirm with ENTER
Stand-alone operation
This lighting effect can be operated without an external control unit. Several auto
programs are available for this purpose. These are: Mix, Derby-Show and Strobe-
Show, as well as the possibility of music control. In addition, you will find 18 more
different strobe shows in the Strobe menu. Please refer to the table "Menu
Structure" for the control of the corresponding function modes.
With the help of the "Color" settings, you can create an individual color mixture.
Change the intensity of the individual colors to create the desired effect.
Master-Slave operation
You can control another unit using a master fixture without using an external DMX
controller.
1. Set all units to DMX address d001 and set the subordinate spotlight to SLAVE
mode
Now connect the DMX-Out of the first fixture (master) to the DMX-In of the second
fixture (slave).
All fixtures now follow the settings selected
on the first fixture (master).
Operation with external DMX controller (1-channel mode/ 4-channel
mode)
Select the desired DMX mode in the menu. A four-channel mode for direct control
and a one-channel mode for "remote control" of the internal automation and sound
programs are available for this purpose.
To set the desired DMX addressing, enter the menu and select the first DMX
channel you want to control from the controller. To operate several fuxtures in
parallel, use the same channel assignment for all of them. Please make sure that no
other devices with one or more identical DMX addresses are connected to ensure
error-free operation.

11
DMX protocol 4 channel mode
Set for X your selected DMX start address.
Example: With start address 011
X=11 ... X+1= 12 ... X+2= 13 ... X+3= 14
The first three selected channels control the derby effect (channels X+1 and X+2
only show a reaction if a value is assigned to channel X) and the fourth channel
controls the strobe program, which can be operated individually or in combination
with the derby effect.
CHANNEL
Function
Value
Event
X
Colour
adjustment
000-005
006-020
021-035
036-050
051-065
066-080
081-095
096-110
111-125
126-140
141-155
‘156-170
171-185
186-200
201-215
216-230
231-255
Not assigned
red-
green-
blue-
white-
red/green-
red/blue-
red/white-
green/blue-
green/white-
blue/white-
red/green/blue-
red/green/white
green/blue/white
red/green/blue/white
Automatic (4-Color)
Automatic (Single/Multi-
Color)
X+1
Pulse
000-005
006-255
Pulse off
pulses increasing
value - increasing
speed until strobe
X+2
Engine
000
001-127
128-255
Motor off
Motor alignment
Motor increasing value -
increasing speed
12
X+3
Strobe
programs
000-009
010-019
020-029
030-039
040-049
050-059
060-069
070-079
080-089
090-099
100-109
110-119
120-129
130-139
140-149
150-159
160-169
170-179
180-255
Off
Pattern1 increasing
value - increasing speed
Pattern2 increasing
value - increasing speed
Pattern3 inc. Speed
Pattern4 inc. Speed
Pattern5 inc. Speed
Pattern6 inc. Speed
Pattern7 inc. Speed
Pattern8 inc. Speed
Pattern9 inc. Speed
Pattern10 inc. Speed
Pattern11 inc. Speed
Pattern12 inc. Speed
Pattern13 inc. Speed
Pattern14 inc. Speed
Pattern15 inc. Speed
Pattern16 inc. Speed
Pattern17 inc. Speed
Pattern18 inc. Speed
until full light
DMX protocol 1-channel mode
Set your selected DMX start address for X
CHANNEL
Function
Value
Event
X
Menu setting
000-009
010-050
051-090
091-130
131-170
171-210
211-255
Blackout
AutoMix
AutoDerby
AutoStrobe
SoundMix
SoundDerby
SoundStrobe

13
Use the following connection chain if you want to control several headlights
individually wth your controller.
Use the following connection chain if you want to control several headlights
identically with your controller.
The connecting chain should not exceed a length of 300m or a number of 32 units.
Use a terminating resistor at the end of the chain.
DMX XLR pin assignment
DMX-OUT XLR female
DMX-IN XLR-male
14
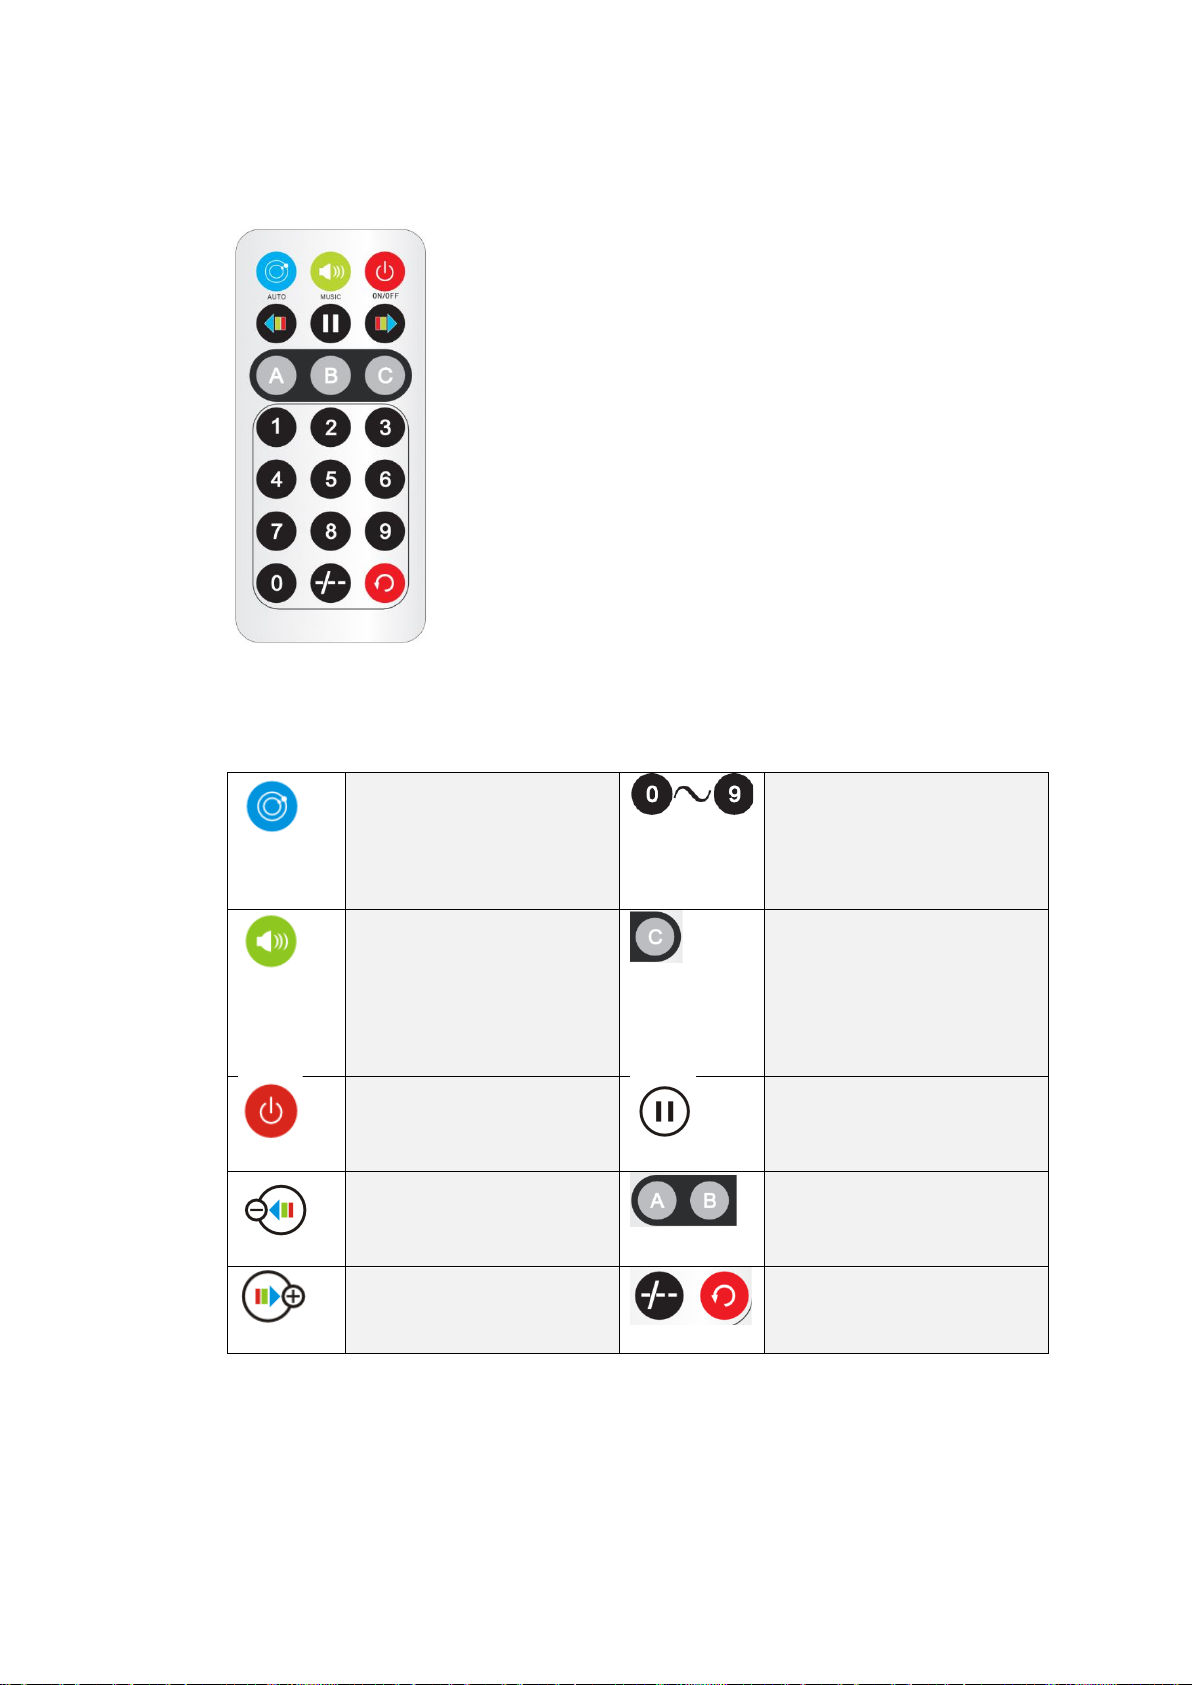
IR remote control
Auto program
The automatic programs
are played back in
random order
Speed selection
The higher the number,
the higher the playback
speed
Music control
The automatic programs
are played back in
random order, controlled
by music
Strobe LEDs On/Off
Blackout
Pause
Scroll colour samples -
Not assigned
Scroll colour samples +
Not assigned
15
5. Menu chart:

16
6. Technical data
Article description
DS-3 Derby Strobe
LED Power
3W red + 3W green + 3W blue + 3W
white + 16x0.5W strobe LED
Size in mm
190x260x190
Weight in kg
2
Power supply
AC 220-240V 50/60Hz
Power consumption
28W
Operating temperature max.
40°C
DMX
DMX-IN, DMX-OUT

17
WEEE declaration
(Waste of Electrical and Electronic Equipment)
Your product has been designed and manufactured with high quality materials and components that
are recyclable and can be reused.
This symbol means that electrical and electronic devices must be disposed of separately from
household waste at the end of their useful life.
Please dispose of this device at your local municipal collection point or at the recycling center.
Please help preserve the environment we live in.
Technical changes and changes in appearance are reserved.
All information corresponds to the status at the time of printing.
Musikhaus Kirstein GmbH assumes no liability for the correctness and completeness of the
descriptions, illustrations and information contained therein.
Shown colors and specifications may differ slightly from the product.
Musikhaus Kirstein GmbH - Products are only available through authorized dealers.
Distributors and dealers are not authorized representatives of Musikhaus Kirstein GmbH and have no
authorization to bind Musikhaus Kirstein GmbH legally in any way, be it expressly or through coherent
action.
Musikhaus Kirstein GmbH
Bernbeurener Str. 11
86956 Schongau –Germany
Telefon/Phone: 0049-8861-909494-0
Telefax/Fax: 0049-8861-909494-19
This manual suits for next models
1
Table of contents
Other Showlite Lighting Equipment manuals


Popular Lighting Equipment manuals by other brands


Robus
Robus GOLF R075LED-01 instructions

Beamz
Beamz BPP200 instruction manual

SloanLED
SloanLED Value-Line 701269-WLX-MB installation guide

Superior Life
Superior Life T10 installation instructions

Clas Ohlson
Clas Ohlson Clas Ohlson WX-LED20-9WW-1 operating instructions

Procopi
Procopi Trianon Assembly instructions

ACME
ACME LED STROBE 50 user manual

Lightolier
Lightolier CD7-4 Specification sheet

hidealite
hidealite Jolly Maxi US DALI manual

lap
lap G03306 installation instructions

ML Accessories
ML Accessories BL5BK Installation & maintenance manual

Harbor Freight Tools
Harbor Freight Tools ONE STOP GARDENS 57684 Owner's manual & safety instructions