Sidewinder SuperPivot User manual

OPERATOR’S
MANUAL
SuperPivot


1
TABLE OF CONTENTS
OWNER ASSISTANCE 3................................................................
WARRANTY AND LIMITATION OF LIABILITY 5...........................................
BLADE INFORMATION 9................................................................
BED OPENER BLADE 9..............................................................
TRENCHING BLADE 9...............................................................
GROOMING BLADE 9................................................................
SAFETY INFORMATION 10..............................................................
PERSONAL SAFETY 10..............................................................
MACHINE SAFETY 10................................................................
PERSONAL SAFETY DECALS 12........................................................
SAFETY DECAL INFORMATION 13......................................................
SERIAL NUMBER LOCATIONS 14.......................................................
SIDEWINDER
™
- SUPER PIVOT SERIAL NUMBER LOCATION 14........................
ENGINE SERIAL NUMBER LOCATION 14..............................................
CONTROL LOCATIONS - OVERVIEW 15.................................................
DAILY CHECKS TO PERFORM BEFORE STATING THE ENGINE 16.........................
CHECK ENGINE OIL LEVEL 16.......................................................
CHECK FUEL LEVEL 16..............................................................
CHECK THAT ALL SHIELDS ARE INSTALLED AND ATTACHING
HARDWARE IS TIGHT 16.............................................................
CHECK THE BLADE AND ATTACHING HARDWARE 17.................................
CHECK TIRE PRESSURES 17........................................................
ENGINE OPERATION 18................................................................
STARTING A COLD ENGINE 18.......................................................
STARTING A WARM ENGINE 19......................................................
STOPPING THE ENGINE 20..........................................................
PARKING THE MACHINE 22............................................................
OPERATING THE TOW VALVE 23........................................................
TOW VALVE ON 23..................................................................
TOW VALVE OFF 23.................................................................
OPERATING THE DIRECTIONAL CONTROLS 24..........................................
STOPPING MOVEMENT WITH ENGINE RUNNING 24...................................
PRELIMINARY STEPS TO MOVING THE MACHINE IN ANY
DIRECTION WITH ENGINE ON 24.....................................................
VARIABLE SPEED CONTROL ADJUSTMENT 26........................................
ADJUSTING THE VARIABLE SPEED CONTROL 26.....................................
FORWARD DIRECTION 27............................................................
REVERSE DIRECTION 27............................................................
BLADE AND SHIELD COMBINATIONS FOR USE WITH THE
SIDEWINDER
™
- SUPER PIVOT 28......................................................
BED OPENER AND TRENCHING BLADE SHIELD 28....................................
GROOMING BLADE SHIELD 28.......................................................

2
MAIN DRIVE BELT ROUTING FOR SPECIFIC APPLICATIONS 29..........................
TENSION HANDLE LOCATION 29.....................................................
BED OPENING OR TRENCHING POSITION 29........................................
GROOMING POSITION 29...........................................................
GROOMING - MAIN DRIVE BELT ROUTING 30........................................
BED OPENING AND TRENCHING - MAIN DRIVE BELT ROUTING 31....................
POSITIONING THE ADJUSTABLE ANGLE
SIDEWINDER
™
- SUPER PIVOT ATTACHMENT ARM 33...................................
ATTACHMENT ARM POSITION WHEN TRANSPORTING THE
SIDEWINDER
™
- SUPER PIVOT WITH THE ATTACHMENT ARM RAISED 33..............
ATTACHMENT ARM POSITION FOR BED OPENER OR TRENCHING
BLADE USE 33......................................................................
ATTACHMENT ARM POSITION FOR GROOMING BLADE USE 34........................
SIDEWINDER
™
- SUPER PIVOT SWING CONTROL LEVER 34...........................
ADJUSTING SIDEWINDER
™
- SUPER PIVOT ATTACHMENT ARM POSITION 34...........
OPERATING THE ATTACHMENT 37.....................................................
STARTING THE ATTACHMENT 37.....................................................
STOPPING THE ATTACHMENT 38.....................................................
ADJUSTING THE DEPTH CONTROL WHEEL 39..........................................
ADJUSTMENT PROCEDURE 39.......................................................
CHANGING ATTACHMENT BLADE 40....................................................
BLADE REMOVAL 40................................................................
INSTALLING THE BLADE 42..........................................................
SECURING THE MACHINE FOR TRANSPORT 44.........................................
ENGINE MAINTENANCE SEE ENGINE MANUFACTURES OWNER’S MANUAL...............
LUBRICATION 46......................................................................
SIDEWINDER
™
- SUPER PIVOT BELT TENSION AND ADJUSTMENT 48....................
MAIN DRIVE BELT 48................................................................
CHECKING BELT TENSION 48.......................................................
ADJUSTING BELT TENSION 48......................................................
ATTACHMENT DRIVE BELT 48........................................................
CHECKING BELT TENSION 48.......................................................
ADJUSTING BELT TENSION 49......................................................
END OF SEASON STORAGE SERVICE 51................................................
SPECIFICATIONS 52...................................................................

3
Thank you and congratulations on your purchase of a new Turf Teq Sidewindert- Super
Pivot!
We are confident that your Sidewindert- Super Pivot will be one of the most gratifying
pieces of equipment you will ever own. As a result of your investment in the Sidewindert
- Super Pivot, you will eliminate the need for back--breaking work done with shovels and
you will see an incredible increase in productivity.
Your happiness is our goal, so please let us know of any questions or issues you may
have so that we may answer them or address them as quickly as possible. (Please have
your serial number available when you call us). We would also like to hear from you on
how much you enjoy your new Sidewindert- Super Pivot!
Turf Teq, LLC Toll Free (866) 503-TURF

4
Total Customer Satisfaction is our Goal
The Sidewindert- Super Pivot is designed to provide trouble-free operation. To ensure
that you are satisfied with your Sidewindert- Super Pivot, we offer the following Guaran-
tee of Satisfaction:
•The Sidewindert- Super Pivot is GUARANTEED TO THE ORIGINAL PURCHASER
FOR ONE FULL YEAR against defects in materials and workmanship. If you feel that a
part is defective, contact us and we replace the defective part and provide repair in-
structions as required..
•The engine is guaranteed by the engine manufacturer:
Honda Engine: Two years in consumer use; two years in commercial use
•If your have questions or are not 100% satisfied with your Sidewindert- Super Pivot
within the first 30 days of use, call us toll free at 1-866-503-TURF and we will work to
answer your questions and to resolve your concerns.
Please have the following information from your packing slip and from the Sidewindert-
Super Pivot available when contacting our customer service department:
Name of Purchaser
Model
Serial Number
Date Purchased
Sales Order Number

5
Turf Teq, LLC
WARRANTY AND LIMITATION OF LIABILITY
(Customer Copy -- Page 1)
COVERAGE PROVIDED
Turf Teq, LLC, hereinafter called “Turf Teq” warrants to the original retail purchaser of each new Product Turf
Teq will replace any part thereof found to be defective in materials or workmanship within the time periods
identified below.
DEFINITION
“Products” are machines, attachments, and Replacement Parts therefore supplied by Turf Teq.
WARRANTY PERIOD
12 months from the date of first retail purchase.
Replacement Parts are warranted for 60 days or to the end of the Warranty Period, whichever is longer.
LIMITATIONS, INCLUDING DISCLAIMER OF IMPLIED WARRANTIES AND CONSEQUENTIAL DAM-
AGES
This warranty gives you specific legal rights and you may also have other rights that vary depending on
state or provincial laws.
Turf Teq does not authorize any person or Dealer to create for it any other obligation or liability in connection
with these Products. TO THE EXTENT ALLOWED BY LAW, ANY IMPLIED WARRANTY OF MERCHANT-
ABILITY OR FITNESS APPLICABLE TO THIS PRODUCT IS LIMITED TO THE STATED DURATION OF
THIS WRITTEN WARRANTY. TURF TEQ IS NOT LIABLE FOR LOSS OF THE USE OF THE PRODUCT,
LOSS OF TIME, INCONVENIENCE, COMMERCIAL LOSS OR CONSEQUENTIAL DAMAGES.
Some states and provinces do not allow limitations on how long an implied warranty will last or the exclusion
or limitation of incidental or consequential damages, so the above limitations or exclusions may not apply to
you.
The remedy of repair or replacement of a defective part during the warranty period herein specified shall be
the purchaser’s exclusive remedy.
RIGHT TO MAKE DESIGN CHANGES
Turf Teq reserves the right to make changes in the design and other changes in its Products at any time and
from time to time without notice and without incurring any obligation with respect to any product previously
ordered from it, sold or shipped by it.

6
Turf Teq, LLC
WARRANTY AND LIMITATION OF LIABILITY
(Customer Copy -- Page 2)
The warranty period will begin on the date of first retail sale.
The obligation of Turf Teq to purchase under this warranty is limited to the repair or replacement of
defective parts free of charge using genuine Turf Teq Replacement Parts. Repair or replacement in
accordance with this warranty shall constitute fulfillment of all liabilities of Turf Teq in respect to such
Products.
Turf Teq shall review these warranty provisions with the purchaser prior to retail sale, secure his ac-
knowledgement of delivery of this warranty and record the date of first retail sale.
WHAT IS NOT COVERED BY THE WARRANTY?
This warranty shall NOT apply under the following conditions:
1. With respect to vendor warranty items such as engines, which shall be warranted by their manufac-
turer, or local representative
a. Honda Engines have a 2 YEAR WARRANTY that is covered by American Honda Motor
Corporation.
2. If the Product has been subject to misapplication, abuse, misuse, improper maintenance or other
negligence, fire or other accident.
3. If parts or attachments other than those made or marketed by Turf Teq have been used in connec-
tion with the Product, and in the sole judgment of Turf Teq such use affects its performance, stability
or reliability.
4. If the Product has been altered or repaired in a manner which, in the sole judgment of Turf Teq, af-
fects its performance, stability or reliability.
5. Turf Teq shall have no liability for used equipment sold beyond the specified coverage period.
6. No warranty shall apply to damage resulting from accident or damage caused by environment (such
as exposure to corrosive material). Turf Teq shall not be responsible for any costs relating to rental
equipment used to replace the Product being repaired.
7. The warranty shall NOT apply to normal maintenance services, to normal replacement of service
items, or to normal deterioration due to use or exposure. Turf Teq shall not be responsible for nor-
mal replacement parts such as belts, chains, clutches, filters, oil, or other parts that are worn out,
unless they are determined by Turf Teq to be defective in material or workmanship.
Customer Signature _______________________
Date of Purchase _______________________
Date of Signature _______________________
Model Number _______________________
Serial Number _______________________

7
Turf Teq, LLC
WARRANTY AND LIMITATION OF LIABILITY
(Turf Teq Warranty Registration Copy -- Page 1)
Important: This copy must be completed, signed and returned to Turf Teq to register
the product and activate the warranty.
COVERAGE PROVIDED
Turf Teq, LLC, hereinafter called “Turf Teq” warrants to the original retail purchaser of each new Product Turf
Teq will replace any part thereof found to be defective in materials or workmanship within the time periods
identified below.
DEFINITION
“Products” are machines, attachments, and Replacement Parts therefore supplied by Turf Teq.
WARRANTY PERIOD
12 months from the date of first retail purchase.
Replacement Parts are warranted for 60 days or to the end of the Warranty Period, whichever is longer.
LIMITATIONS, INCLUDING DISCLAIMER OF IMPLIED WARRANTIES AND CONSEQUENTIAL DAM-
AGES
This warranty gives you specific legal rights and you may also have other rights that vary depending on
state or provincial laws.
Turf Teq does not authorize any person or Dealer to create for it any other obligation or liability in connection
with these Products. TO THE EXTENT ALLOWED BY LAW, ANY IMPLIED WARRANTY OF MERCHANT-
ABILITY OR FITNESS APPLICABLE TO THIS PRODUCT IS LIMITED TO THE STATED DURATION OF
THIS WRITTEN WARRANTY. TURF TEQ IS NOT LIABLE FOR LOSS OF THE USE OF THE PRODUCT,
LOSS OF TIME, INCONVENIENCE, COMMERCIAL LOSS OR CONSEQUENTIAL DAMAGES.
Some states and provinces do not allow limitations on how long an implied warranty will last or the exclusion
or limitation of incidental or consequential damages, so the above limitations or exclusions may not apply to
you.
The remedy of repair or replacement of a defective part during the warranty period herein specified shall be
the purchaser’s exclusive remedy.
RIGHT TO MAKE DESIGN CHANGES
Turf Teq reserves the right to make changes in the design and other changes in its Products at any time and
from time to time without notice and without incurring any obligation with respect to any product previously
ordered from it, sold or shipped by it.

8
Turf Teq, LLC
WARRANTY AND LIMITATION OF LIABILITY
(Turf Teq Warranty Registration Copy -- Page 2)
The warranty period will begin on the date of first retail sale.
The obligation of Turf Teq to purchase under this warranty is limited to the repair or replacement of
defective parts free of charge using genuine Turf Teq Replacement Parts. Repair or replacement in
accordance with this warranty shall constitute fulfillment of all liabilities of Turf Teq in respect to such
Products.
Turf Teq shall review these warranty provisions with the purchaser prior to retail sale, secure his ac-
knowledgement of delivery of this warranty and record the date of first retail sale.
WHAT IS NOT COVERED BY THE WARRANTY?
This warranty shall NOT apply under the following conditions:
1. With respect to vendor warranty items such as engines, which shall be warranted by their manufac-
turer, or local representative
a. Honda Engines have a 2 YEAR WARRANTY that is covered by American Honda Motor
Corporation.
2. If the Product has been subject to misapplication, abuse, misuse, improper maintenance or other
negligence, fire or other accident.
3. If parts or attachments other than those made or marketed by Turf Teq have been used in connec-
tion with the Product, and in the sole judgment of Turf Teq such use affects its performance, stability
or reliability.
4. If the Product has been altered or repaired in a manner which, in the sole judgment of Turf Teq, af-
fects its performance, stability or reliability.
5. Turf Teq shall have no liability for used equipment sold beyond the specified coverage period.
6. No warranty shall apply to damage resulting from accident or damage caused by environment (such
as exposure to corrosive material). Turf Teq shall not be responsible for any costs relating to rental
equipment used to replace the Product being repaired.
7. The warranty shall NOT apply to normal maintenance services, to normal replacement of service
items, or to normal deterioration due to use or exposure. Turf Teq shall not be responsible for nor-
mal replacement parts such as belts, chains, clutches, filters, oil, or other parts that are worn out,
unless they are determined by Turf Teq to be defective in material or workmanship.
Customer Signature _______________________
Date of Purchase _______________________
Date of Signature _______________________
Model Number _______________________
Serial Number _______________________
Important: This copy must be completed, signed and returned to Turf Teq within 30
days of purchase to register the product and activate the warranty.
RETURN TO: Turf Teq, LLC
P.O. Box 127
New Holland, PA 17557
9
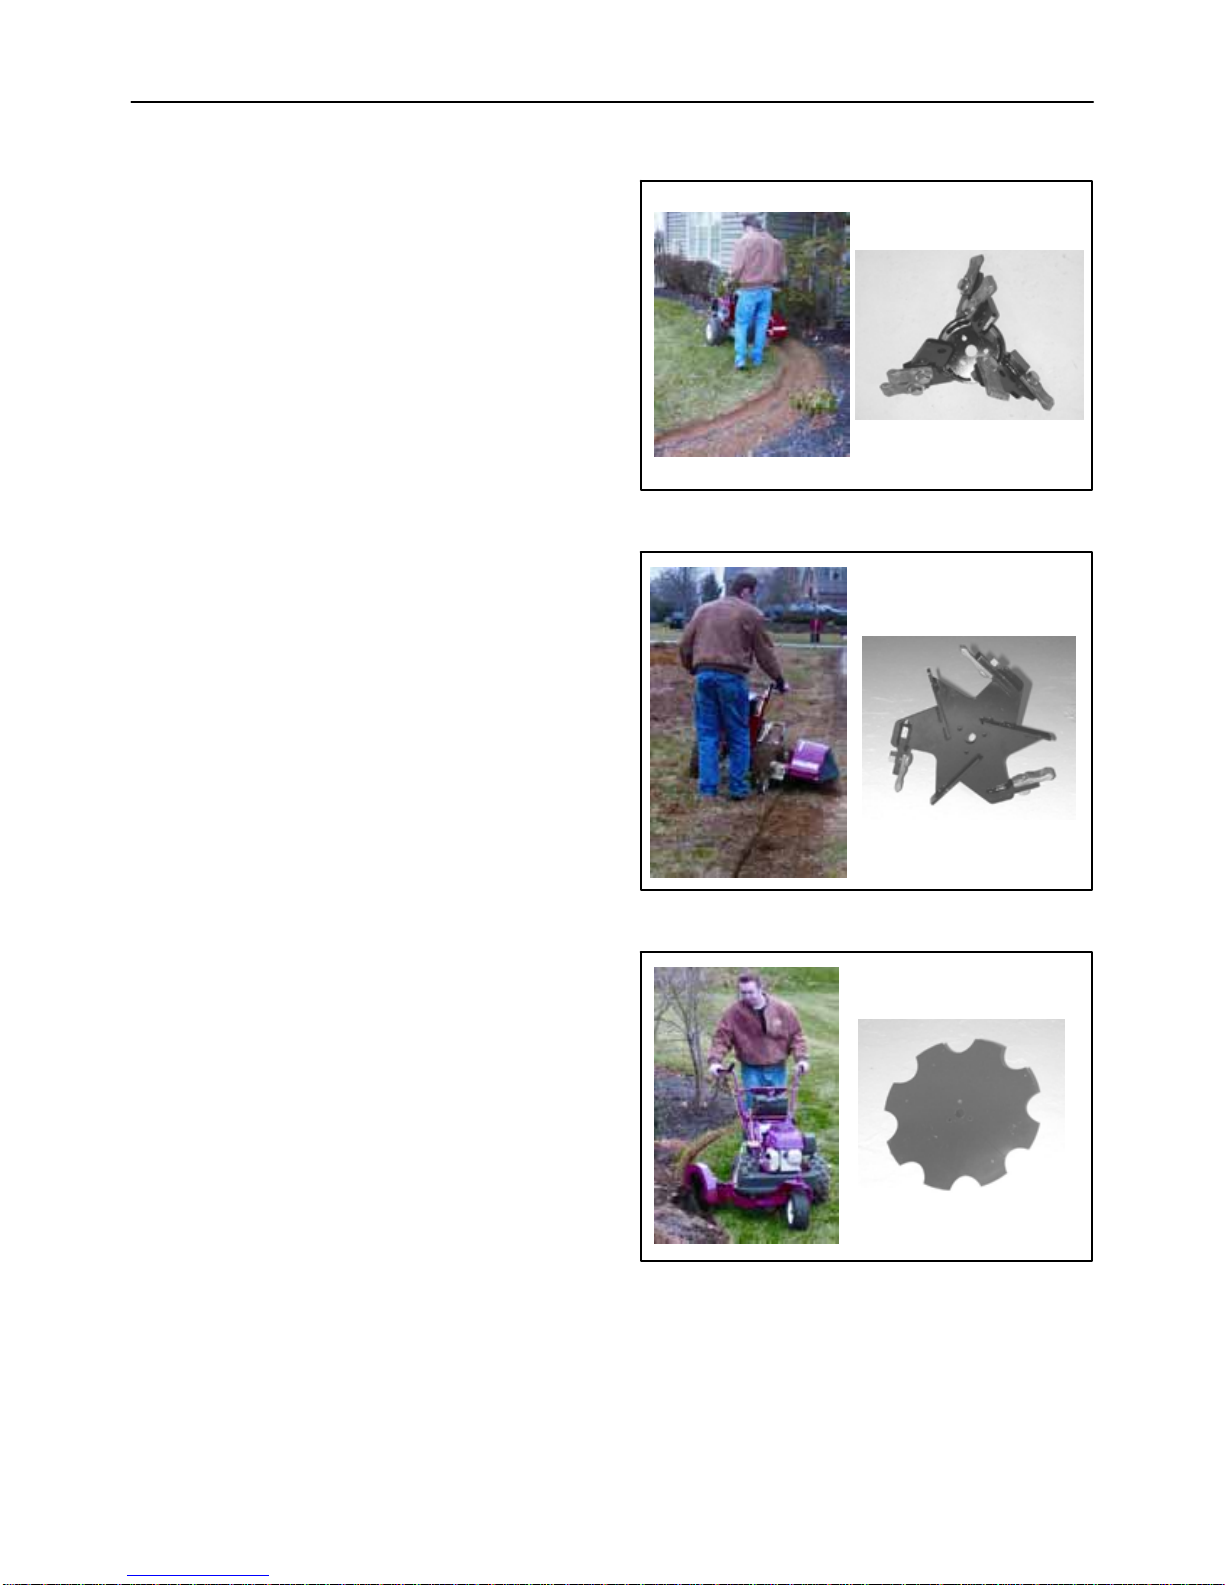
BLADE INFORMATION
BED OPENER BLADE
TheBedOpeneristheidealtooltousewhenopening
a new bed or preparing to remulch an existing bed.
The aggressive cutting action of the Bed Opener
Blade creates a clean, contoured edge up to 4.5”
deep and deposits the pulverized soil back into the
bed. The bed is ready to mulch with no further
clean-up effort required.
1
TRENCHING BLADE
Trenching action is useful for performing many
different tasks. Aggressive Trenching Blades are
available. The 16” diameter blade trenches 1-5/8”
wide and up to 5” deep. The 21” diameter blade
trenches 1-1/4” wide and up to 8” deep.
2
GROOMING BLADE
The Grooming Blade is ideal for edging existing
mulch beds or manicured edges where minimal
disturbance of the bed or edge plants is preferred.
The Grooming Blade slices the edge up to 5” deep
and is capable of riding up over roots or other
obstructions. Because it neatly slices the edge it
does minimal disturbance to the planting bed and
can be used several times a season to groom a bed
without remulching. The material sliced at the edge
ofthebedcanbeeasilyremoved,ifneeded,tocreate
a clean, fresh bed edge. The Grooming Blade can
onlybeusedwiththeSidewindert- Super Pivot
model. 3

10
SAFETY INFORMATION
PERSONAL SAFETY
SAFETY PRECAUTIONS
A careful operator is the best operator. Most accidents can be avoided by observing certain precautions. To
help prevent accidents, read and take the following precautions before operating the machine. Equipment
should be operated only by those who are properly trained.
GENERAL INFORMATION
1. Read the Operator’s Manual carefully before using the machine.
2. Only allow properly trained and qualified persons to operate the tractor.
3. Keep safety decals clean.
4. Install shields before starting or operating the machine.
5. Make sure all shields are in place at all times.
6. Check for buried cables, wires, pipes or foreign objects before starting to open a bed, groom a bed or to
trench. Do not operate the machine over objects.
PERSONAL PREPARATION AND ATTIRE
1. Wear safely glasses while operating the machine to protect your eyes.
2. Wear safety shoes with non-slip treads. Do not go barefoot or wearing open-toed shoes while operating
the machine.
3. Wear long pants
4. Use ear muffs or ear plugs to protect your hearing.
MACHINE SAFETY
MACHINE PREPARATION
1. Read the Operator’s manual for the machine and engine before operating the machine.
2. Become familiar with the controls BEFORE starting to operate the machine.
3. Inspect the area you will be working in for hidden objects such as large rocks, wires and other obstruc-
tions. Operating the machine over obstacles could damage the machine, cause property damage or
cause personal injury.
4. Wait for the engine to cool before refueling.
5. Fill the gasoline tank with the engine off and the machine outdoors.
6. Do not smoke while handling gasoline.
7. Keep any type of open flame away from the machine.
8. Check the bolt torque of the groomer blade, bed opening blade or trenching blade before operating the
machine.
9. Make sure the correct shield is installed for the blade.
10. Be sure the main drive belt is routed correctly to ensure the correct rotation for the blade.
11. Only operate the bed opener or trenching blade with the blade parallel to the right rear wheel.
12. Operate the groomer blade with the attachment arm pivoted from 10°to 40°.

11
OPERATING THE MACHINE SAFELY
1. Shut off the engine and apply the parking brake when the machine is not in use.
2. Do not operate the machine engine in an enclosed building without adequate ventilation.
3. Make sure all shields are in place before starting the machine.
4. Do not leave the attachment in the raised position when the machine is parked.
5. Only allow properly trained personnel to operate the machine
6. Keep bystanders at least 75 feet away from the machine. The blades can throw objects at great speed
and strike a bystander. Do not operate the machine when children or pets are in the area.
7. Disengage the main drive and stop the engine when a person or pet approaches the machine.
8. Be sure the main drive and the hydrostatic control are disengaged before starting the engine..
9. NEVER operate the machine without all the shields installed.
10. NEVER reach under the shields when the engine is running.
11. ALWAYS shut off the engine and disconnect the spark plug wire before making any adjustments to the
machine.
12. ALWAYS shut off the engine and disconnect the spark plug wire before cleaning the machine.
13. Operate the machine during daylight hours.
14. Lower the attachment arm to the ground when the machine is turned off.
15. Keep the machine clean and do not allow combustible materials to accumulate on the machine.
16. Operate slowly on slopes and uneven terrain
17. DO NOT weld, cut, bend or otherwise modify your Turf Teq machine including any shielding. Altering or
modifying your machine will void the warranty and may make the machine unsafe.
18. Make sure you operate at a speed where you have 100% control of the machine at all times.
19. Do not attempt to backup with the attachment on or in the ground.
20. Engage the attachment drive before lowering the attachment to the ground.
21. Keep feet and hands away from cutting blade.
SERVICING THE MACHINE SAFELY
1. Stop the engine before performing any service on the machine.
2. Remove the spark plug wire when working on the machine.
3. Wait for the engine to cool before working around the engine and muffler.

12
PERSONAL SAFETY DECALS
This manual shows machine decals with safety messages on, “WARNING,” and “DANGER.” These
safety messages are intended for your personal safety and those working with you. Please read the
safety messages and the specific information they contain.
WARNING: THE WORD “WARNING” IS USED WHERE THERE IS A POTENTIAL OR HIDDEN HAZARD
WHICH HAS THE POSSIBILITY FOR SERIOUS INJURY OR DEATH IF YOU DO NOT FOLLOW THE
OPERATING INSTRUCTIONS FOR YOUR MACHINE. IT IS USED TO WARN OPERATORS AND OTHERS
TO EXERCISE EVERY APPROPRIATE MEANS TO AVOID A SURPRISE INVOLVEMENT WITH
MACHINERY.
DANGER:THEWORD“DANGER”ISUSEDWHEREYOUAREATRISKOFBEINGKILLEDORSERIOUSLY
INJURED IF YOU DO NOT FOLLOW THE OPERATING INSTRUCTIONS IN CONNECTION WITH A
SERIOUS HAZARD.
FAILURE TO FOLLOW THE “WARNING” AND “DANGER INSTRUCTIONS MAY RESULT IN SERIOUS
BODILY INJURY OR DEATH.

13
SAFETY DECAL INFORMATION
The following safety decals were installed on the machine in the areas indicated. They are on the machine for
your safety.
Keep the decals clean and legible at all times.
Located on the control console. Located on front dolly wheel support.
Located on the blade cover.

14
SERIAL NUMBER LOCATIONS
SIDEWINDER™- SUPER PIVOT SERIAL
NUMBER LOCATION
The serial number is located below the fuel tank as
shown.
The serial number will be require when ordering
parts.
For easy reference, enter Model and serial number
on these lines:
Model
Serial Number 4
ENGINE SERIAL NUMBER LOCATION
The Honda engine serial number is located on the
backside of the engine as shown.
The serial number will be require when ordering
parts.
For easy reference, enter the engine manufacturer
and the serial number on these line:
Manufacturer
Serial Number
5

15
CONTROL LOCATIONS -- OVERVIEW
A
B
C
DE
F
I
H
G
A. Hydrostatic transmission control lever
B. Adjustable speed control
C. Throttle control
D. Attachment drive control and brake lever
E. Swing control lever
F. Attachment height control mechanism
G. Tow valve handle
H. Self-alligning adjustable depth wheel
I. Park brake lever

16
DAILY CHECKS TO PERFORM BEFORE STARTING THE
ENGINE
CHECK ENGINE OIL LEVEL
1. Place the machine on a level surface then
remove the oil dipstick.
2. Check the oil level as indicated in the engine
owner’s manual and fill with the recommended
motor oil.
6
CHECK FUEL LEVEL
1. Remove the fuel tank cap.
2. Fill tank to the bottom of the fuel tank neck.
3. Use minimum of 86 octane gasoline.
4. Wipe any spilled fuel before staring the engine.
DO NOT OVERFILL THE FUEL TANK. OBSERVE
ALL SAFETY STATEMENTS LISTED IN THE
SAFETY INFORMATION SECTION
7
CHECK THAT ALL SHIELDS ARE
INSTALLED AND ATTACHING HARDWARE
IS TIGHT
1. Check that the attachment blade shield is
installed, A.
2. Check the main drive belt shield, B.
3. Check the attachment blade belt shield, C.
4. Check the hydrostatic drive belt shield, D.
NOTES: DO NOT OPERATE THE MACHINE WITH
LOOSE OR MISSING SHIELDS. REPLACE MISS-
ING SHIELDS IMMEDIATELY.
A
B
C
D
8

17
CHECK THE BLADE AND ATTACHING
HARDWARE
1. Remove the blade shield as described in the
Changing Attachment Blade section.
2. Clean the shield and blade of dirt.
3. Check the blade for damage and wear.
4. Torque the 3 attaching bolts to 34 lb/ft. with a
torque wrench.
9
5. Torquethecarbide tipped teeth attaching bolts to
200 lb/ft.
NOTES: REPLACE DAMAGED AND WORN
BLADES IMMEDIATELY. A TORQUE WRENCH
MUST BE USED TO TORQUE THE ATTACHING
BOLTS AND CARBIDE TIPPED TEETH.
10
CHECK TIRE PRESSURES
Check tire pressures in the three tires and inflate to
14 psi.

18
ENGINE OPERATION
STARTING A COLD ENGINE
1. Place the throttle control to the CHOKE position.
11
2. Pull the starter rope slowly and with low force
until the slack is out of the rope and resistance is
felt.
3. Whenresistance isfelt,pulltheropewithenough
force to turn the engine fast enough to start the
engine. Return the pull rope gently to the
retracted position.
12
4. When the engine starts, position the throttle to
the RUN position for 30 seconds to allow the
engine to warm up.
13
Table of contents
Popular Lawn Mower manuals by other brands


Yard-Man
Yard-Man 1050-7 Operating manual and parts list

Baroness
Baroness LM331 Owner's operating manual

Stiga
Stiga ESTATE MASTER specification

Scag Power Equipment
Scag Power Equipment Liberty Z SZL48-18FR Operator's manual

Cub Cadet
Cub Cadet 184-387-100 owner's manual

Stiga
Stiga 110 Combi Pro user manual