SIDLER Electric User manual

OPERATING INSTRUCTIONS
Mode d’emploi
7626 Winston Street Phone: 604 415 2422 www.sidler-international.com
CANADA Fax: 604 415 2422
SIDLER® Modello
Electric
Cabinets are available in the following options:
Les armoires sont disponibles dans les options suivantes:
Width
Height
15”
31”
40”
19”
31”
40”
23”
31”
40”
IMPORTANT SAFETY INSTRUCTIONS
Read all instructions before using this cabinet
CONSIGNES DE SÉCURITÉ IMPORTANTES
Lisez toutes les instructions avant d'utiliser cette armoire


OPERATING INSTRUCTIONS
Mode d’emploi
7626 Winston Street Phone: 604 415 2422 www.sidler-international.com
CANADA Fax: 604 415 2422
IMPORTANT SAFETY INSTRUCTIONS
DANGER - To reduce the risk of electric shock:
Always unplug this furnishing from the electrical outlet before cleaning.
WARNING - To reduce the risk of burns, fire, electric shock, or injury
to persons:
This product is for household use only.
Do not use outdoors.
Use this furnishing only for its intended use as described in these
instructions.
Never operate this furnishing if it is not working properly or if it has been
damaged.
Close supervision is necessary when this furnishing is used by, or near
children, invalids, or disabled persons.
Never operate this furnishing with the air opening blocked. Keep the air
openings free of lint, hair and the like.
Never drop or insert any object into any opening.
Avoid dispensing of aerosol sprays in or near the cabinet, or where
oxygen is being administered.
The maximum load is 1.5 kg (3 lbs) per glass shelf.
SAVE THESE INSTRUCTIONS
GROUNDING INSTRUCTIONS
This product must be connected to a grounded metal, permanent wiring
system, or an equipment-grounding terminal or lead on the product.
DANGER - Pour réduire le risque de choc électrique:
Débranchez toujours ce meuble de la prise électrique avant de le
nettoyer.
AVERTISSEMENT - Pour réduire les risques de brûlures, d'incendie,
d'électrocution ou de blessures corporelles:
Une surveillance étroite est nécessaire lorsque cet équipement est utilisé
par ou près des enfants, des invalides ou des personnes handicapées.
Utilisez ce meuble uniquement pour l'usage prévu, tel que décrit dans
ces instructions.
N'utilisez jamais ce meuble s'il ne fonctionne pas correctement ou s'il a
été endommagé.
Ne laissez jamais tomber ou n'insérez aucun objet dans une ouverture.
Ne pas utiliser à l'extérieur.
Ne pas utiliser lorsque des aérosols (vaporisateurs) sont utilisés ou
lorsque de l'oxygène est administer.
Charge maximale de 1,5 kg (3 lb) par tablette.
CONSERVEZ CES INSTRUCTIONS
INSTRUCTIONS DE MISE À LA TERRE
Ce produit doit être raccordé à un système de câblage permanent en
métal mis à la terre, ou un conducteur de mise à la terre doit être relié
aux conducteurs du circuit et connecté à la borne de mise à la terre de
l'équipement ou au fil du produit.

OPERATING INSTRUCTIONS
Mode d’emploi
7626 Winston Street Phone: 604 415 2422 www.sidler-international.com
CANADA Fax: 604 415 2422
Parts List
Liste des pieces
Cabinet (1x) Door (1x) Glass Shelf (3x)
Armoire (1x) Porte Miroir (1x) L’etagere en verre (3x)
Clip (2x) Soft Close (3x) Soft Close Cap (3x)
Support (2x) Amortisseur (3x) Couvercle (3x)
Anchor (4x) Screw (4x) Hole Plugs
Goujon (4x) Vis (4x) Bouchon
Mounting Bracket (1x) Screw Cover (4x)
Support de montage (1x) Couvercle des vis (4x)
OPERATING INSTRUCTIONS
Mode d’emploi
7626 Winston Street Phone: 604 415 2422 www.sidler-international.com
CANADA Fax: 604 415 2422
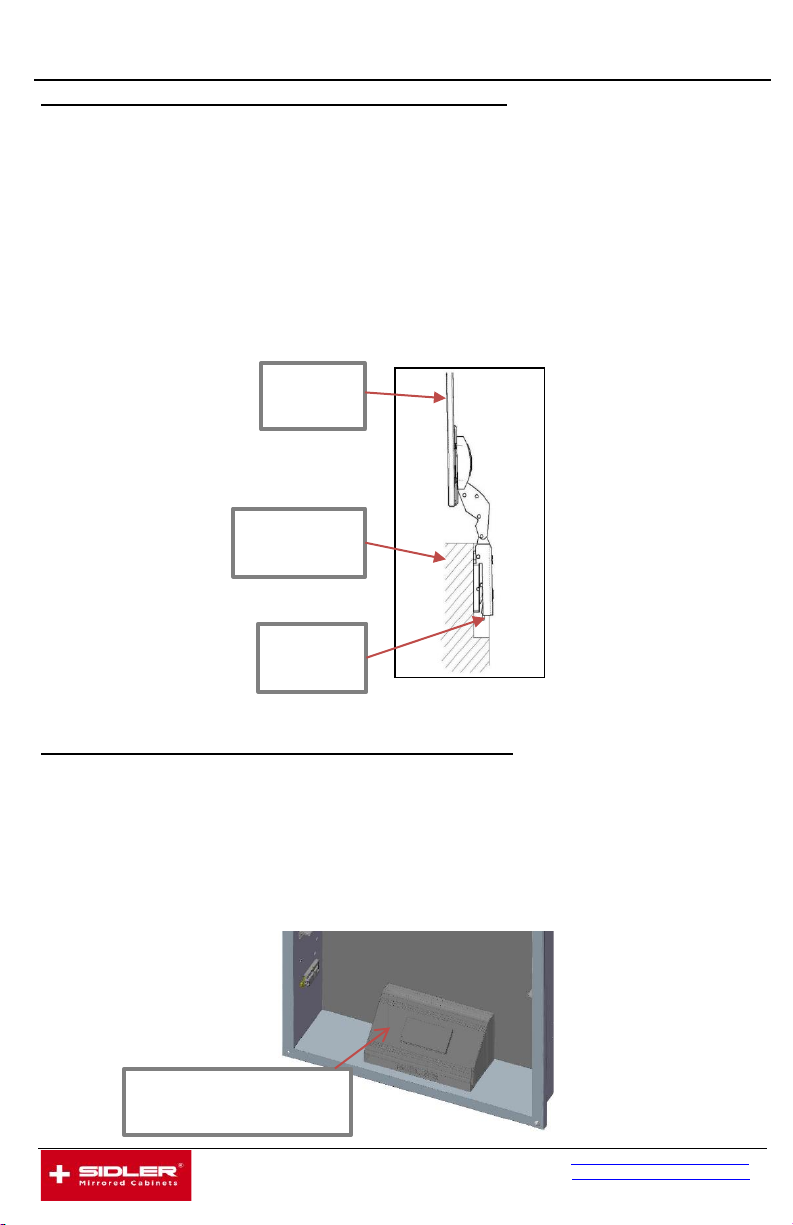
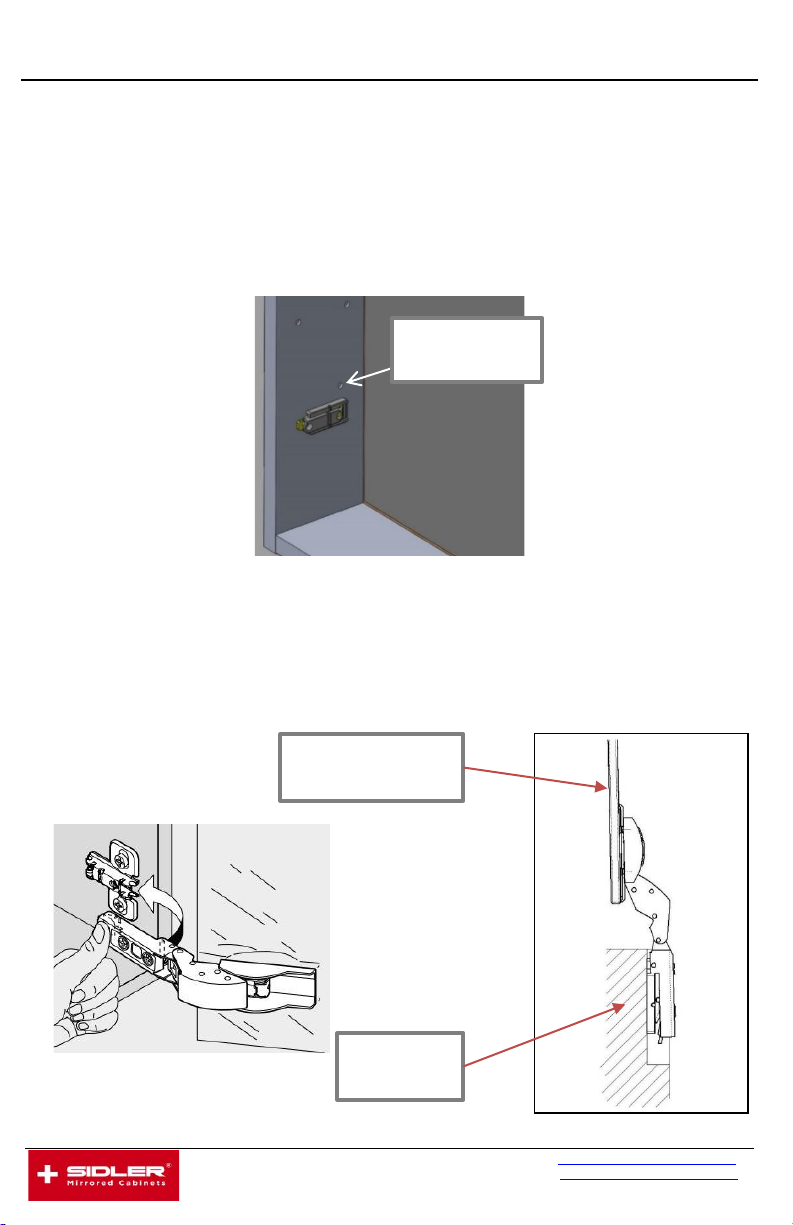
Step 1: Remove the mirror door
Étape 1: Retirez la porte du miroir
a) Remove the door from the cabinet by pulling clip C:
a) Retirez la porte de l'armoire en tirant sur le clip C:
!ATTENTION –Do properly hold the door before pulling clip C.
Handle door carefully!
!ATTENTION - Tenez correctement la porte avant de tirer le clip C.
Manipulez la porte avec précaution!
Step 2: Remove the outlet cover
Étape 2: Retirez le couvercle de sortie
a) Remove outlet cover by unscrewing four screws at the
bottom of the cabinet:
a) Retirez le couvercle de sortie en dévissant les quatre vis situées au
bas de l'armoire:
Cabinet
Armoire
Door
Miroir
Clip C
Pince C
Outlet cover
Couvercle de sortie
OPERATING INSTRUCTIONS
Mode d’emploi
7626 Winston Street Phone: 604 415 2422 www.sidler-international.com
CANADA Fax: 604 415 2422
Step 3: Surface Mount
Proceed with Step 4 for recessed mount
Étape 3: Fixation murale
Continue avec étape 4 si l’armoire est encastrée
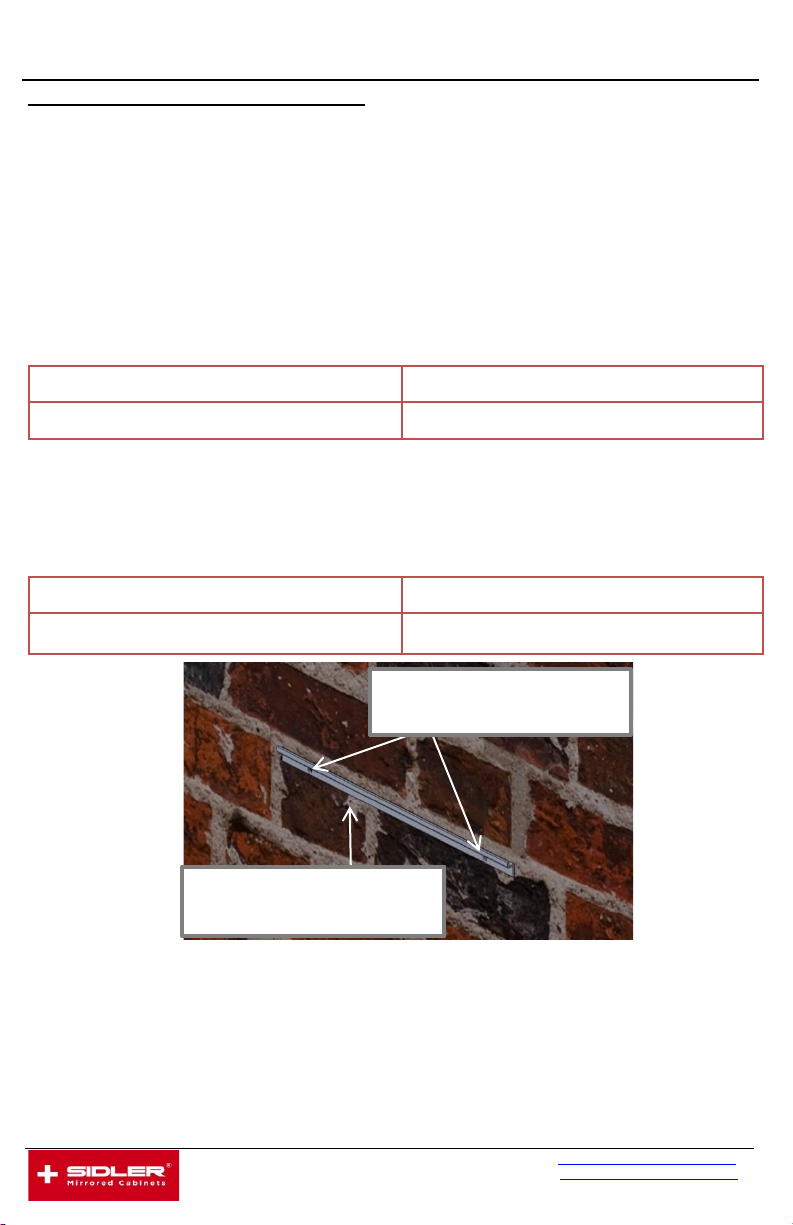
a) Install mounting bracket:
Determine correct height and hole positions (min 2x) on the
bottom mounting bracket. It is necessary that at least one
screw is located in a stud. Use hollow wall anchors (not
provided), or brick wall anchors (included). Drill holes Ø7/32”
into mounting bracket and install it.
Hollow wall anchors (not provided)
Dry walls, hollow brick walls
Provided anchors
Brick walls, concrete walls
a) Installez le support de montage:
Déterminez la hauteur correcte et la position des trous (min
2x) pour le support de montage. Il est nécessaire d’avoir une
vis à l’intérieur d’au moins un plot. Creusez des trous Ø7/32”
dans le support de montage et installez-le.
Ancrages muraux creux (non fournis)
Murs secs, briques creuses
Ancrages fournies
Murs en briques, murs en béton
Preparation for top Mounting Clip:
Put the Mounting Clips into the top profile of the cabinet. Place
the cabinet on the installed mounting bracket and determine
hole positions on the wall. It is necessary that at least one clip
is fixed into a stud. Remove the cabinet and install the wall
anchors into marked positions.
Drill hole Ø7/32”
Creusez trous Ø7/32”
Determine height
Déterminez la hauteur

OPERATING INSTRUCTIONS
Mode d’emploi
7626 Winston Street Phone: 604 415 2422 www.sidler-international.com
CANADA Fax: 604 415 2422
Préparation pour le clip de montage supérieur:
Placez les supports dans le profil en haut. Placez l’armoire sur le
support de montage et déterminez la position des trous en mur.
Il est nécessaire d’avoir une vis à l’intérieur d’au moins un plot.
Enlevez l’armoire et installez les goujons à la position marquée.
c) Remove the hole plug on back of the cabinet:
c) Retirez le bouchon du trou à l'arrière de l'armoire:
d) Thread the conduit:
Thread the conduit, supplied by a licensed electrician, through
the opening and secure it with a suitable strain relief. Connect
wires with terminal block as shown in Step 3f.
Conduit with three supplier wires 14 gauge for Canada.
Conduit with three wires min. 14 gauge for USA.
d) Enfiler le conduit approprié:
Enfiler le conduit approprié, fourni par un électricien agréé, à
travers l'ouverture et le fixer avec un serre-câble approprié.
Connectez les fils avec le bornier comme indiqué à Étape 3f.
Conduit avec trois fils de fournisseur de calibre 14 pour le Canada
Conduit avec trois fils min. Calibre 14 pour les États-Unis.
e) Mount the cabinet:
Put the cabinet back onto the mounting bracket and fasten it on
top with the Mounting Clips.
Mounting Clip
Support
!!!ATTENTION MIRROR!!!
!!!MIROIR D'ATTENTION!!!
Hole plug
Bouchon du trou
OPERATING INSTRUCTIONS
Mode d’emploi
7626 Winston Street Phone: 604 415 2422 www.sidler-international.com
CANADA Fax: 604 415 2422
e) Montage l’armoir:.
Remettez l’armoire sur le support de montage et vissez en haut
avec les supports.
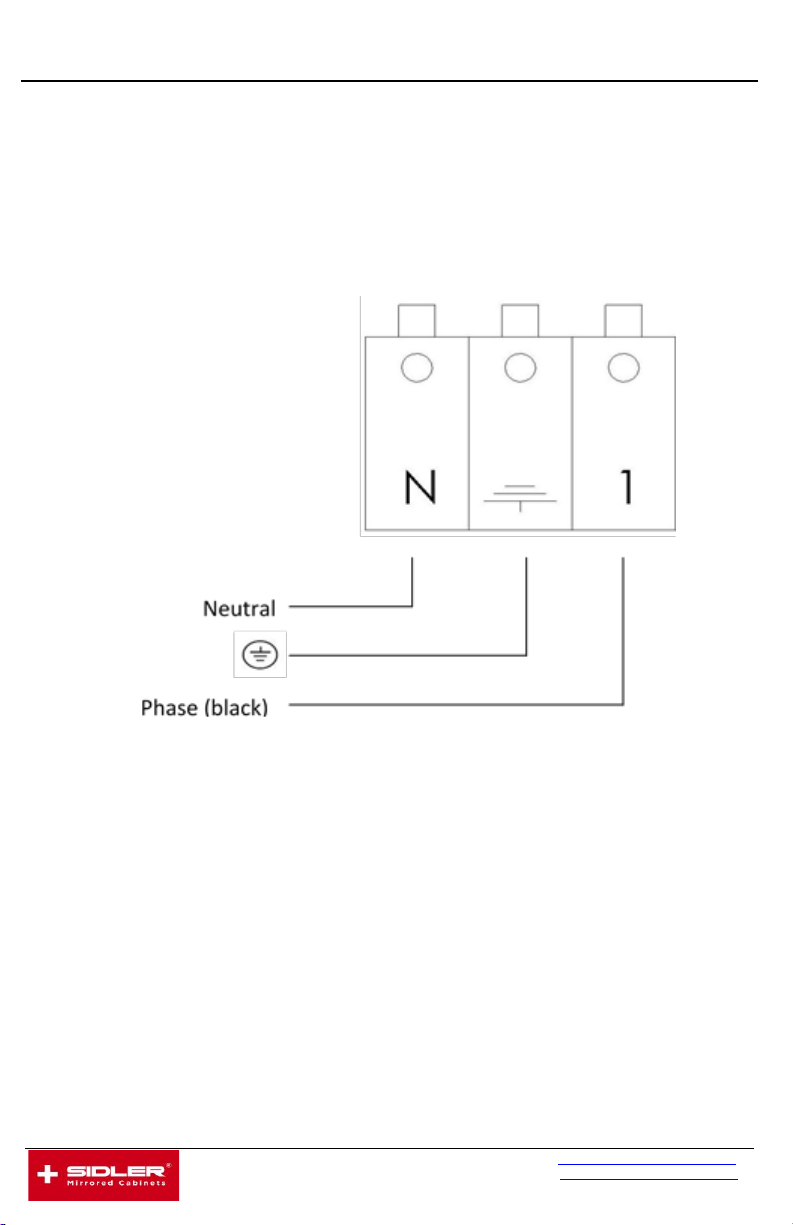
f) Connect the electrical cables:
Connect all cables (phase, neutral, and ground) in accordance
with the below diagram.
Warning announcement:
•Installation shall be performed by a qualified licensed
electrician.
•Grounding instructions for a permanently connected
product. This product must be connected to a ground
metal, permanent wiring system, or an equipment-
grounding conductor must be run with the circuit
conductors and connected to the equipment-grounding
terminal or lead on the product.
Put back the outlet cover.

OPERATING INSTRUCTIONS
Mode d’emploi
7626 Winston Street Phone: 604 415 2422 www.sidler-international.com
CANADA Fax: 604 415 2422
f) Branchez les cables électrique:
Branchez tous les câbles (live, phase, neutre et terre).
Avertissement:
•L’installation doit être effectuée par un électricien qualifié
•Les instructions de mises à la terre pour un produit
connecté en permanence. Ce produit doit être connecte a
une mise à terre, un système de câblage permanent ou un
conducteur de liaison a la terre doit être alimenté avec les
fils conducteurs de circuit et connectée les au bornier.
Remplacez le couvercle de sortie.
Outlet cover
Couvercle de sortie

OPERATING INSTRUCTIONS
Mode d’emploi
7626 Winston Street Phone: 604 415 2422 www.sidler-international.com
CANADA Fax: 604 415 2422
g) Mount the door:
Align door hinges with the hinge base plate in the cabinet and
snap it into position.
g) Montage la porte miroir:
Alignez les charnières de la porte avec les plaques de montage
dans l’armoire et poussez-les à la position.
h) Mount the side mirrors:
Mount the side mirror brackets by utilizing the holes in the side
profile. Spread the brackets equally over the entire cabinet
length.
Clean the inside of the side mirrors with the alcohol patches
provided.
Peel the tape off the brackets and carefully place the side
mirrors onto the brackets.
h) Installez les miroirs latéraux:
Installez les supports de miroir latéraux en utilisent les trous
dans le profil latéral. Dispersez les supports de façon égale sur
la longueur de l’armoire.
Nettoyez l’intérieur des miroirs latéraux avec le tissue d’alcool.
Enlevez la bande adhésive des supports et placez les miroirs
latéraux avec précaution sur les supports.
Bracket Orientation
2” and 4” side kit
Support d’orientation
Pour 2” et 4”
Bracket Orientation
6” side kit
Support d’orientation
Pour 6”
OPERATING INSTRUCTIONS
Mode d’emploi
7626 Winston Street Phone: 604 415 2422 www.sidler-international.com
CANADA Fax: 604 415 2422
Step 4: Recessed & Semi-Recessed Mount
Étape 4: Montage encastré et semi-encastré
a) The rough opening shall have the following dimensions as
per the table below:
a) Les côtes d’implantation doivent avoir les mesures comme dans le
tableau ci-dessous:
b) Remove hole plug at the bottom of the cabinet:
b) Retirez le bouchon du trou au fond de l'armoire:
Rough Opening
Cab.
Width
A
B
31”H
B
40”H
15”
14 ⁵⁄₁₆”
29 ⁵⁄₁₆”
38 ⁵⁄₁₆”
19”
18 ⁵⁄₁₆”
29 ⁵⁄₁₆”
38 ⁵⁄₁₆”
23”
22 ⁵⁄₁₆”
29 ⁵⁄₁₆”
38 ⁵⁄₁₆”
A
B
Hole plug
Bouchon du trou
OPERATING INSTRUCTIONS
Mode d’emploi
7626 Winston Street Phone: 604 415 2422 www.sidler-international.com
CANADA Fax: 604 415 2422
c) Thread the conduit:
Thread suitable conduit, supplied by a licensed electrician,
through the opening and secure it with strain relief.
Connect wires and terminal block as shown in Step 3f.
Fasten the cabinet with wood screws (4 pcs.) at the single hole
in each corner.
c) Vissez l’armoire:
Vissez l’armoire avec les vis (4 pieces) aux trous dans chaque
coin.
d) Mount the door:
Align door hinges with the hinge plate in the cabinet and snap
it into position.
d) Assemblez la porte:
Alignez les charnières de la porte avec les plaques de montage
dans l’armoire et poussez-les à la position.
Fasten here!
Vissez ici!
Cabinet
Amoire
Mirror door
Porte miroir
OPERATING INSTRUCTIONS
Mode d’emploi
7626 Winston Street Phone: 604 415 2422 www.sidler-international.com
CANADA Fax: 604 415 2422
Step 4: Final Assembly
Étape 4: Montage Finale
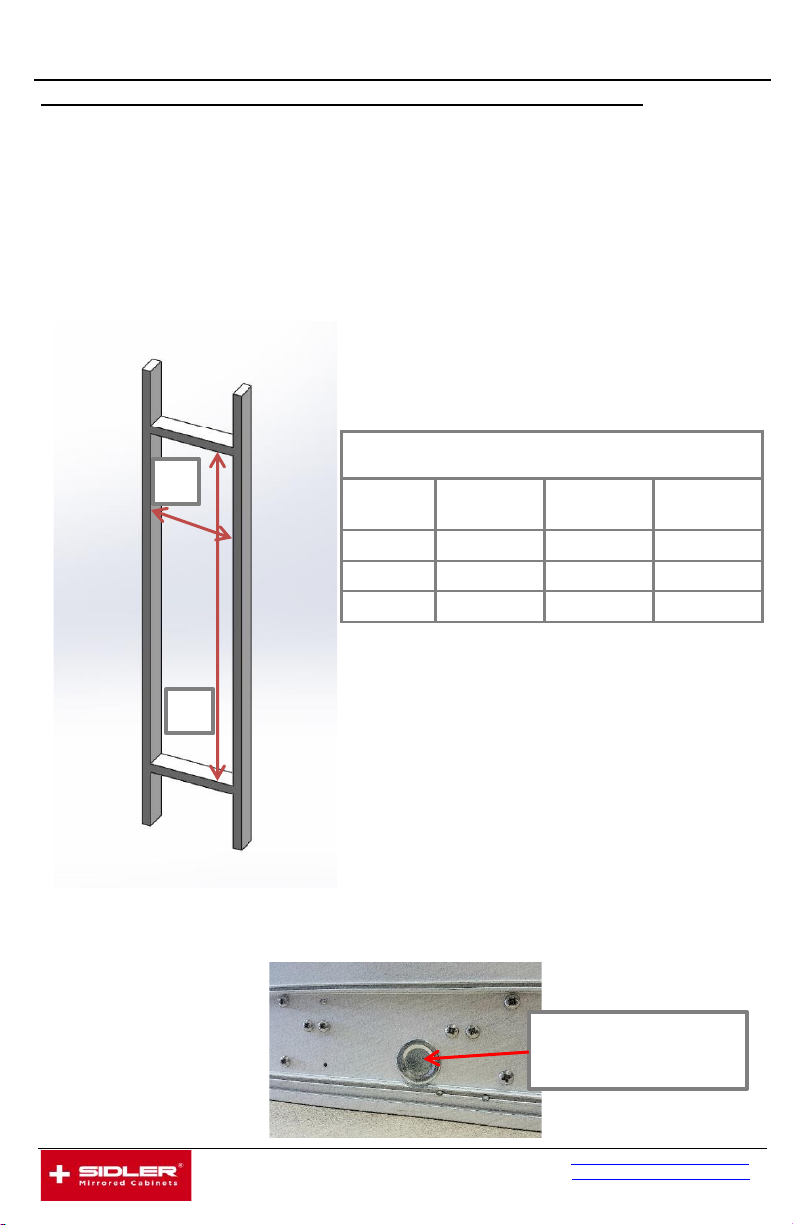
a) Align the door by turning the hinge screws (see diagram for
adjustment possibilities):
a) Alignez les portes sur les charnières (voir schéma pour les
possibilités d’ajustement):
b) Place the soft close cap and the soft close onto the hinges:
b) Placez le couvercle de l’amortisseur et attachez l’amortisseur de la
porte à la charnière:
Horizontal door adjustment with
this screw.
Réglage horizontal de la porte
avec cette vis.
Height door adjustment with this screw.
Réglage de la hauteur de la porte
avec cette vis.
Depth door adjustment with this screw.
Réglage de la profondeur de la porte
avec cette vis.
Soft close cap
Soft close
Challenges installing the soft close?
For a tutorial video please visit
www.youtube.com/ SidlerMirrorCabinets
Des difficultés d’installer les
amortisseur?
Pour un tutoriel vidéo, veuillez visiter
www.youtube.com/ SidlerMirrorCabinets

OPERATING INSTRUCTIONS
Mode d’emploi
7626 Winston Street Phone: 604 415 2422 www.sidler-international.com
CANADA Fax: 604 415 2422
c) Install parts:
Insert shelf holders/supports
Place glass shelves
Fill remaining holes with hole plugs
Cover screw heads with screw caps
Place door handle (if purchased) as desired (bottom or side
of mirror door)
c) Installer des pieces:
Placez les supports d’étagère
Placez les étagères en verre
Remplissez les trous avec les bouchons
Placez la poignée de porte (si achetée) comme vous le
souhaitez (en bas ou sur le côté de la porte miroir)
Step 5: Cleaning
Étape 4: Nettoyage
a) Do not use abrasive cleaners, scrapers, metal brushes, or
any items or products that could scratch or dull the
surface. Do not allow the surface to come into contact with
products such as acetone (nail polish remover), dry
cleaning solution, lacquer thinner, gasoline, etc.
a) N’utilisez pas de produit nettoyants abrasifs, grattoirs, brosses
métalliques, ni autres objets ou produits pouvant égratigner ou
tenir les surfaces.
Shelf holder
Support d’étagère
Screw cap
Couvercle de vis
Glass shelf
Étagère en verre
Plug
Bouchon

OPERATING INSTRUCTIONS
Mode d’emploi
7626 Winston Street Phone: 604 415 2422 www.sidler-international.com
CANADA Fax: 604 415 2422
LIMITED WARRANTY
SIDLER® will provide a two-year limited warranty in respect of
defects associated with the Product, commencing from the date
of delivery, subject to the following conditions:
I. The Product must have been professionally mounted and
installed by a certified licensed contractor in accordance
with the Safety Standards Act, S.B.C. 2003, c. 39, as
amended, and the Electrical Safety Regulation B.C. Reg.
100/2004, as amended.
II. The Product must have been used by the Purchaser in the
manner and for the purpose recommended and authorized
by SIDLER® and the manufacturer.
III. The Product must not have been modified, or changed in
design or function following delivery.
IV. In each case, written notice by the Purchaser specifying the
alleged defects must be received during the warranty
period (within two years of the date of delivery).
V. The warranty is limited to replacement parts only.
VI. Damages resulting from normal wear and tear are
excluded. The determination of whether damage has so
resulted will be in the sole discretion of SIDLER®.
VII. Damages resulting from any errors in representations
made by the manufacturer regarding product specifications
are excluded.

OPERATING INSTRUCTIONS
Mode d’emploi
7626 Winston Street Phone: 604 415 2422 www.sidler-international.com
CANADA Fax: 604 415 2422
Thank you for choosing SIDLER®
For more information on our products and to find
a dealer nearest you, please visit our website
www.sidler-international.com
For instructional videos on our products,
please visit our YouTube page
www.youtube.com/user/SidlerMirrorCabinets
If you have any questions or inquiries,
please contact us at 888 415 2422 or by email
Table of contents
Other SIDLER Bathroom Fixture manuals


Popular Bathroom Fixture manuals by other brands


Kohler
Kohler K-T10087 Homeowner's guide

KEUCO
KEUCO Axess 35006 0801 Series Mounting instruction

Hans Grohe
Hans Grohe Rainfinity 26243 Series Instructions for use/assembly instructions

GRE
GRE AR1020P instruction manual

Kinedo
Kinedo Modulo XL installation instructions

KEUCO
KEUCO Axess 35006 1301 Series Mounting instruction