Siefken SCHOCK DAMON SDO64O User manual

SDO64O
Modelo:
Instrucciones
Antes de usar esta herramienta, por favor lea cuidadosamente las INSTRUCCIONES DE USO.
Asegúrese de saber cómo funciona la máquina y cómo debe ser operada. Mantenga la
herramienta de acuerdo a estas instrucciones y asegúrese de que la maquina funcione
correctamente, por favor guarde estas instrucciones y otros documentos que vengan
junto con la herramienta.
TALADRO ROTATiVO DE 1/4”
SCHOCK DÄMON
3 YEARS
LIMITED WARRANTY

3 YEARS
LIMITED WARRANTY
1. Datos técnicos
2. Instrucciones de seguridad
3. Operación
4. Mantenimiento
5. Garantía
1
2
5
6
8

DATOS TÉCNICOS
Querido usuario,
Gracias por elegir SIEFKEN, por lo que tenemos la oportunidad de ofrecerle el mejor
servicio.
Creemos que nuestras herramientas eléctricas de alta calidad y alta eciencia lo
harán 100% satisfecho.
Le brindaremos una gama completa de servicios profesionales, Permita que las
herramientas eléctricas SIEFKEN se conviertan en un buen ayudante en su
trabajo.Por favor, lea el manual del usuario antes de operar las herramientas para
asegurarse de que nuestros productos de alta calidad puedan ser plenamente
aprovechados. Gracias de nuevo por usar las herramientas eléctricas SIEFKEN.
Leistung // Potencia 400W
Geschwindigkeit //Velocidad 0-4.500 RPM
Max bohrdurchmesser // Max.preforación Ø 6 mm.
3 YEARS
LIMITED WARRANTY
1

Advertencias generales de seguridad para herramientas eléctricas
(Para todas las herramientas eléctricas)
¡Advertencia!
Lea todas las advertencias e instrucciones de seguridad. El incumplimiento de las
advertencias e instrucciones puede provocar descargas eléctricas, incendios y / o
lesiones graves.
El término "herramienta eléctrica" en todas las advertencias se reere a su
herramienta eléctrica operada por la red (con cable) o herramienta eléctrica a
batería (inalámbrica). GUARDE TODAS LAS ADVERTENCIAS E INSTRUCCIONES PARA
FUTURAS REFERENCIAS
a) Seguridad en el área de trabajo
1) Mantenga el área de trabajo limpia y bien iluminada. Las áreas despejadas u
oscuras provocan accidentes.
2) No opere herramientas eléctricas en atmósferas explosivas, como en la presencia
de líquidos inamables, gases o polvo. Las herramientas eléctricas generan chispas
que pueden encender el polvo o los vapores.
3) Mantenga alejados a los niños y transeúntes mientras opera una herramienta
eléctrica. Las distracciones pueden hacer que pierdas el control.
b) Seguridad eléctrica
1) Los enchufes de la herramienta eléctrica deben coincidir con el tomacorriente.
Nunca modique el enchufe de ninguna manera. No utilice enchufes adaptadores
con herramientas eléctricas conectadas a tierra. Los enchufes no modicados y los
tomacorrientes correspondientes reducirán el riesgo de descarga eléctrica.
2) Evite el contacto del cuerpo con supercies conectadas a tierra o con conexión a
tierra, como tuberías, radiadores, cocinas y refrigeradores. Existe un mayor riesgo de
descarga eléctrica si su cuerpo está conectado a tierra.
3) No exponga las herramientas eléctricas a la lluvia o condiciones húmedas. El agua
que entra en una herramienta eléctrica aumentará el riesgo de descarga eléctrica.
4) No abuses del cable. Nunca utilice el cable para transportar, tirar o desenchufar la
herramienta eléctrica. Mantenga el cable alejado del calor, aceite, bordes alados o
piezas móviles. Los cables dañados o enredados aumentan el riesgo de descarga
eléctrica.
5) Cuando opere una herramienta eléctrica al aire libre, use un cable de extensión
adecuado para uso al aire libre. El uso de un cable adecuado para uso en exteriores
reduce el riesgo de descarga eléctrica.
3 YEARS
LIMITED WARRANTY
2

c) seguridad personal
1) Manténgase alerta, observe lo que está haciendo y use correctamente al operar
una herramienta eléctrica. No utilice una herramienta eléctrica cuando esté cansado
o bajo la inuencia de drogas, alcohol o medicamentos. Un momento de falta de
atención mientras se operan herramientas eléctricas puede provocar lesiones perso-
nales graves.
2) Usar equipo de protección personal. Siempre use protección para los ojos. El
equipo de protección, como la máscara antipolvo, los zapatos de seguridad antides-
lizantes, el casco o la protección auditiva utilizados para las condiciones adecuadas
reducirá las lesiones personales.
3) Evitar el arranque involuntario. Asegúrese de que el interruptor esté en la posición
de apagado antes de conectarlo a la fuente de alimentación y / o al paquete de
baterías, levantando o cargando la herramienta. Llevar las herramientas eléctricas
con el dedo en el interruptor o energizar las herramientas eléctricas que tienen el
interruptor activado invita a accidentes.
4) Retire cualquier llave de ajuste o llave antes de encender la herramienta eléctrica.
Una llave unida a una parte giratoria de la herramienta eléctrica puede provocar
lesiones personales.
5) No sobrepasar. Mantenga la postura y el equilibrio en todo momento. Esto permi-
te un mejor control de la herramienta eléctrica en situaciones inesperadas.
6) Vístase adecuadamente. No use ropa suelta o joyas. Mantenga su cabello, ropa y
guantes lejos de las partes móviles. La ropa suelta, las joyas o el cabello largo pueden
quedar atrapados en las piezas móviles.
7) Si se proporcionan dispositivos para la conexión de instalaciones de extracción y
recolección de polvo, asegúrese de que estén conectados y se usen correctamente.
El uso de la recolección de polvo puede reducir los peligros relacionados con el
polvo.
d) Uso de herramienta eléctrica y almacenamiento
1) No fuerce la herramienta eléctrica. Utilice la herramienta eléctrica correcta para su
aplicación. La herramienta eléctrica correcta hará el trabajo mejor y de manera más
segura en la base para la cual fue diseñada.
2) No utilice la herramienta eléctrica si el interruptor no la enciende y apaga.
Cualquier herramienta eléctrica que no pueda controlarse con el interruptor es
peligrosa y debe repararse.
3) Desconecte el enchufe de la fuente de alimentación y / o el paquete de baterías de
la herramienta eléctrica antes de realizar cualquier ajuste, cambiar accesorios o
almacenar herramientas eléctricas. Estas medidas de seguridad preventivas reducen
el riesgo de que la herramienta eléctrica se arranque accidentalmente.
3 YEARS
LIMITED WARRANTY
3

4) Guarde las herramientas eléctricas inactivas fuera del alcance de los niños y no
permita que personas no familiares con la herramienta eléctrica o estas instrucciones
operen la herramienta eléctrica. Las herramientas eléctricas son peligrosas en manos
de usuarios inexpertos.
5) Mantener herramientas eléctricas.
Verique si hay desalineación o unión de las piezas móviles, rotura de piezas y
cualquier otra condición que pueda afectar el funcionamiento de la herramienta
eléctrica. II dañado, haga reparar la herramienta eléctrica antes de usarla. Muchos
accidentes son causados por herramientas eléctricas mal mantenidas.
6) Mantenga las herramientas de corte aladas y limpias. Las herramientas de corte
mantenidas apropiadamente con bordes cortantes alados tienen menos probabili-
dades de atascarse y son más fáciles de controlar.
7) Utilice la herramienta eléctrica, los accesorios, las brocas, etc. de acuerdo con estas
instrucciones, teniendo en cuenta las condiciones de trabajo y el trabajo a realizar. El
uso de la herramienta eléctrica para operaciones diferentes de las previstas podría dar
lugar a una situación peligrosa.
e) Servicio
1) Solicite a un técnico de reparaciones calicado que repare su herramienta eléctrica
utilizando solo repuestos idénticos. Esto asegurará que se mantenga la seguridad de
la herramienta eléctrica.
2) Piezas reemplazables por el usuario: cepillos, interruptores.
3) Cuando el cable de alimentación esté dañado, compre el cable de alimentación
producido por el fabricante para reemplazarlo.
Advertencias de seguridad especícas
1) Asegúrese de colocarse de manera estable al operar una herramienta. Póngase el
cinturón de seguridad cuando realice una operación en alto, para asegurarse de que
no haya espectadores debajo.
2) Sujete rmemente la herramienta cuando trabaje para obtener el máximo control
sobre la reacción de torque o retroceso.
3) No toque las piezas giratorias cuando utilice una herramienta.
4) Al perforar o romper paredes u otras áreas ciegas donde pueda haber cableado
eléctrico, no toque ningún puerto metálico de la herramienta para evitar lesiones.
5) Nunca coloque la herramienta hacia abajo hasta que la broca o el accesorio se
detengan por completo.
3 YEARS
LIMITED WARRANTY
4

6) Solo se realiza una operación cuando la cartera de bits está bien sujeta.
7) Los accesorios pueden estar calientes después del uso. Evite el contacto con la piel
y use guantes o paños de protección adecuados para retirarse.
8) Use protectores para los oídos cuando use la herramienta por períodos prolonga-
dos. La exposición prolongada al ruido de alta densidad puede causar pérdida de
audición.
9) Usar una manija auxiliar al operar para garantizar la seguridad.
Advertencia de seguridad de operación
1. Instalar o quitar la broca.
Advertencia: el interruptor debe estar apagado y desconectado.
Antes de instalar o quitar la broca.
Aoje el mandril de taladro a mano y luego inserte la broca apretándolo a mano,
luego inserte la LLAVE en los tres agujeros. Apriételo en el sentido de las agujas del
reloj. Para retirar la broca, inserte la llave en uno de los oricios. Y luego aoje el
portabrocas en sentido contrario a las agujas del reloj.
2. Operación del interruptor
Presione el BOTÓN INTERRUPTOR para iniciar la herramienta. Aoje el botón y luego
la herramienta deja de girar. Si se requiere una rotación continua, presione el BOTÓN
INTERRUPTOR y el BOTÓN BLOQUEAR. Presione el BOTÓN DE INTERRUPTOR y aoje,
luego el botón también dejo de girar.
Cuando necesite cambiar la rotación, ajuste la perilla redonda en el medio del
BOTÓN DEL INTERRUPTOR. Cuando se ajusta en la dirección '+', la velocidad aumenta
y alcanzará la velocidad máxima cuando se ajusta al terminal. Ajústese a la dirección,
la velocidad disminuye y alcanzará la velocidad mínima cuando se ajuste al terminal.
Y el tiempo de apagado se acorta.
3. Operación reversible
Advertencia: compruebe el funcionamiento del interruptor para ver si es exible
antes de enchufar la alimentación. Presionando el botón y aojándolo para vericar
si el botón se puede reiniciar (apagar).
La herramienta gira en el sentido de las agujas del reloj cuando se gira el levante a 'F'.
Y en sentido contrario a las manecillas del reloj, gire el leven a 'R'.
3 YEARS
LIMITED WARRANTY
5

4. Operación de perforación
Al taladrar en madera, utilice el tornillo sinfín delantero. Estos tornillos delanteros
pueden perforar la madera en forma natural, sin necesidad de ejercer presión
sobre la herramienta.
Cuando taladre en metal, evite que el taladro se resbale, use un punzón y un martillo
para perforar una marca. Y luego usar las herramientas de perforación que perforan
en la marca.
Utilice lubricante de corte al taladrar en metal. Pero taladrado en seco en acero y
latón.
Advertencia: ejercer una presión excesiva no acelerará la velocidad de perforación,
pero dañará la punta del taladro. Es malo para el funcionamiento de la herramienta y
reducirá la cantidad de herramientas.
La herramienta / broca estará con gran fuerza mientras está perforando a través de la
pieza de trabajo. Por lo tanto, reduzca la presión y tenga más cuidado cuando la
broca vaya a perforar la pieza de trabajo.
Cuando la pieza de trabajo es muy pequeña, utilice un tornillo de banco u otra
herramienta de sujeción para apretarla.
Mantenimiento e inspección
1) tornillo
Verique regularmente cada parte de la herramienta si el tornillo está ojo. El suelto
debe apretarse con prontitud.
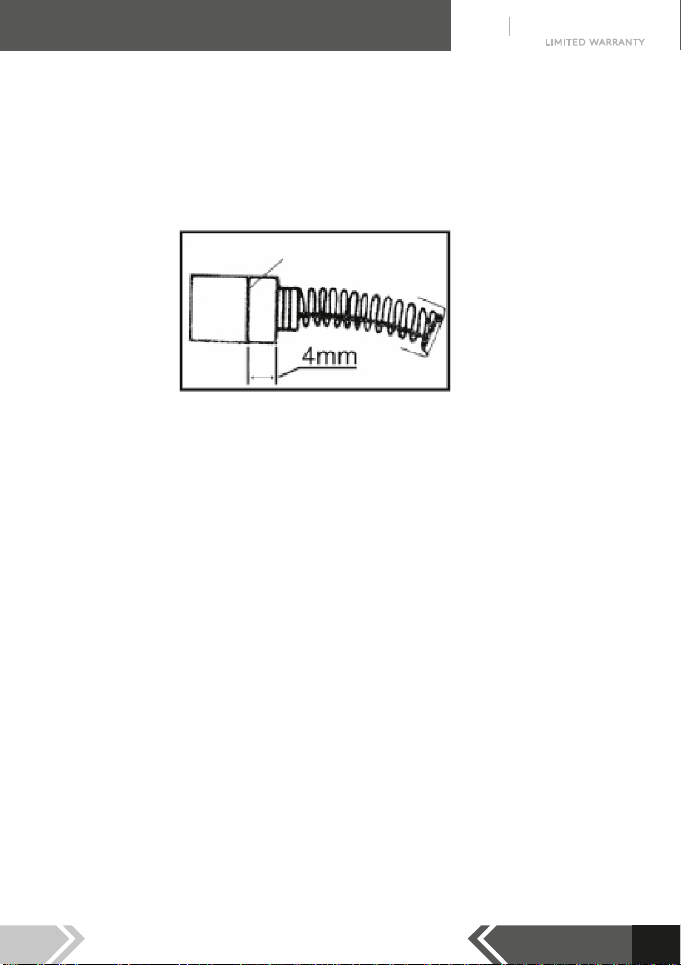
2) cepillo de carbón
Revise y reemplace regularmente las escobillas de carbón. Cuando las escobillas de
carbón se desgastan hasta los límites, se deben reemplazar de inmediato. Si hay dos
escobillas de carbón, deben reemplazarse juntas. Mantener las escobillas de carbón
limpias y deslizarse libremente dentro del portaescobillas
APRETAR
PALANCA AVANCE
RETROCESO GATILLO
BOTÓN DE
BLOQUEO
LLAVE MANDRIL
3 YEARS
LIMITED WARRANTY
6
3) cable de alimentación
Revise regularmente el cable de alimentación / enchufe si está rayado o dañado. Las
partes problemáticas deben reemplazarse de inmediato y deben ser reemplazadas
por el fabricante o la unidad autorizada.
LÍNEA LIMITE
3 YEARS
LIMITED WARRANTY
8

GARANTÍA
Inmejorable
Unübertrefflich Garantie
3
AÑOS
SERVICIO
sin costo
Service ohne Kosten
SATISFACCIÓN
TOTAL
Total Zufrieden
SERVICIO SIN COSTO
SIEFKEN incluye en sus herramientas 5 mantenimientospreventivos gratuitosdurante elprimer año.
Además cualquier reparación correctiva tendrá garantía de 1año. (No aplica para reparacioneshechaspor alguien diferente alpersonal
de SIEFKEN , así como dañospor uso incorrecto, alteraciones, abuso, desgaste naturalo accidentes.
Las baterías son consideradas piezas de desgaste y no las cubren los 3 años de garantía, pero ante cualquier falla otorgamos un tiempo
de 90 días a partir de la compra para que se acerque a cualquier Centro de Servicio corporativo o autorizado de nuestra marca para la
respectiva revisión.
SATISFACCIÓN TOTAL
Si la herramienta SIEFKEN no satisface la necesidad de trabajo, dentro de los 30 días posteriores a su compra podrá cambiarla por una del
mismo tipo con mayor capacidad solo abonando la diferencia.
Para hacer valida la garantía de la herramienta deben seguirse la guía de uso, mantenimientos y cuidados incluidos en el manual, si al
momento del diagnóstico se evidencia que no llevaron a cabo estos cuidados la garantía puede ser negada.
3 AÑOS DE GARANTÍA
Cada herramienta SIEFKEN Industriell tiene garantía alcomprador originalde estar libre de defectosen materiales y mano de obra.
Sujeto a ciertas excepciones, SIEFKEN reparará o remplazará cualquier parte de alguna herramienta eléctrica, luego de que examinada,
sea determinada por SIEFKEN como defectuosa en materiales o mano de obra por un periodo de un (3) años*, después de la fecha de
la compra, a menos que otra cosa sea señalada. Se debe devolver la herramienta eléctrica a la ubicación del centro de servicio SIEFKEN
o a la estación de servicios autorizados de SIEFKEN, mediante envío pagado y asegurado. Se debe incluir una copia de la prueba de
compra con el producto devuelto. Esta garantía no aplica a daños que SIEFKEN determine como provenientes de reparaciones hechas
por alguien diferente al personal de SIEFKEN , así como por uso inco abuso, desgaste naturalo accidentes
*Se excluye de este tipo de garantía a los compresores y aspiradoras de marca Siefken, los cuales gozarán de 1 año de garantía*
Para más información visita muestro wedsite:
www.siefkentools.com
3 YEARS
LIMITED WARRANTY
9

SDO64O
Modelo:
1/4” ROTARY DRILL
SCHOCK DÄMON
Instructions
Before using this tool, please read the INSTRUCTIONS FOR USE carefully. Make sure you
know how the machine works and how it should be operated. Keep the tool according to
these instructions and make sure the machine is working properly, please keep these
instructions and other documents that come with the tool.
3 YEARS
LIMITED WARRANTY

1. Technical data
2. Safety instructions
3. Operation
4. Maintenance
5. Warranty
1
2
5
6
8
3 YEARS
LIMITED WARRANTY

TECHNICAL DATA
Leistung // Power 400W
Geschwindigkeit // Speed 0-4.500 RPM
Max bohrdurchmesser // Max.drilling Ø 6 mm.
Dear user,
Thank you for choosing SIEFKEN, so we have the opportunity to oer you the best service.
We believe that our high quality and high eciency power tools will make you 100%
satised.
We will provide you with a full range of professional services, Allow SIEFKEN power tools
to become a good helper in your work. Please read the user manual before operating the
tools to ensure that our high quality products can be fully taken advantage of. Thanks
again for using the SIEFKEN power tools.
3 YEARS
LIMITED WARRANTY
1

General Power Tool Safety Warnings
(For all power tools)
Warning!
Read all warnings and safety instructions. Failure to follow warnings and instructions can
result in electric shock, re, and / or serious injury.
The term "power tool" in all warnings refers to your mains operated (corded) power tool or
battery (cordless) power tool. SAVE ALL WARNINGS AND INSTRUCTIONS FOR FUTURE
REFERENCE
a) Safety in the work area
1) Keep work area clean and well lit. Clear or dark areas cause accidents.
2) Do not operate power tools in explosive atmospheres, such as in the presence of
ammable liquids, gases, or dust. Power tools generate sparks that can ignite dust or fumes.
3) Keep children and bystanders away while operating a power tool. Distractions can cause
you to lose control.
b) Electrical safety
1) Power tool plugs must match outlet. Never modify the plug in any way. Do not use adapter
plugs with grounded power tools. Unmodied plugs and corresponding outlets will reduce
the risk of electric shock.
2) Avoid body contact with grounded or grounded surfaces, such as pipes, radiators, ranges,
and refrigerators. There is an increased risk of electric shock if your body is grounded.
3) Do not expose power tools to rain or wet conditions. Water entering a power tool will
increase the risk of electric shock.
4) Don't abuse the cable. Never use the cord to carry, pull, or unplug the power tool. Keep
cord away from heat, oil, sharp edges, or moving parts. Damaged or tangled cords increase
the risk of electric shock.
5) When operating a power tool outdoors, use an extension cord suitable for outdoor use.
Using a cord suitable for outdoor use reduces the risk of electric shock.
3 YEARS
LIMITED WARRANTY
2

c) personal safety
1) Stay alert, watch what you are doing, and use correctly when operating a power tool. Do
not use a power tool when you are tired or under the inuence of drugs, alcohol, or medica-
tions. A moment of inattention while operating power tools can cause serious personal
injury.
2) Wear personal protective equipment. Always wear eye protection. Protective equipment
such as a dust mask, non-slip safety shoes, helmet, or hearing protection used for the right
conditions will reduce personal injury.
3) Avoid involuntary starting. Make sure the switch is in the o position before connecting to
the power supply and / or battery pack, lifting or charging the tool. Carrying power tools
with your nger on the switch or energizing power tools that have the switch on invites
accidents.
4) Remove any adjusting key or wrench before turning on the power tool. A wrench attached
to a rotating part of the power tool can cause personal injury.
5) Do not exceed. Maintain posture and balance at all times. This allows better control of the
power tool in unexpected situations.
6) Dress appropriately. Do not wear loose clothing or jewelry. Keep your hair, clothing, and
gloves away from moving parts. Loose clothing, jewelry, or long hair can get caught in
moving parts.
7) If devices are provided for the connection of dust extraction and collection facilities,
ensure that they are connected and used correctly. Using dust collection can reduce dust-re-
lated hazards.
d) Power tool use and storage
1) Do not force the power tool. Use the correct power tool for your application. The correct
power tool will do the job better and safer on the base for which it was designed.
2) Do not use the power tool if the switch does not turn it on and o. Any power tool that
cannot be controlled with the switch is dangerous and must be repaired.
3) Disconnect the power supply plug and / or battery pack from the power tool before
making any adjustments, changing accessories, or storing power tools. These preventive
safety measures reduce the risk of the power tool accidentally starting.
3 YEARS
LIMITED WARRANTY
3

4) Keep inactive power tools out of the reach of children and do not allow people unfamiliar
with the power tool or these instructions to operate the power tool. Power tools are dange-
rous in the hands of inexperienced users.
5) Maintain power tools.
Check for misalignment or binding of moving parts, breakage of parts, and any other
conditions that may aect power tool operation. II damaged, have the power tool repaired
before use. Many accidents are caused by poorly maintained power tools.
6) Keep cutting tools sharp and clean. Properly maintained cutting tools with sharp cutting
edges are less likely to jam and are easier to control.
7) Use the power tool, accessories, drill bits, etc. in accordance with these instructions, taking
into account the working conditions and the work to be carried out. Using the power tool for
operations other than those intended could result in a dangerous situation.
e) Service
1) Have a qualied service technician repair your power tool using only identical replace-
ment parts. This will ensure that the safety of the power tool is maintained.
2) User replaceable parts: brushes, switches.
3) When the power cord is damaged, please buy the power cord produced by the manufac-
turer to replace it.
Specic safety warnings
1) Make sure to stand stably when operating a tool. Wear your seat belt when operating
overhead to ensure that there are no bystanders below.
2) Hold the tool rmly when working to gain maximum control over torque or kickback
reaction.
3) Do not touch the rotating parts when using a tool.
4) When drilling or breaking walls or other blind areas where there may be electrical wiring,
do not touch any metal port on the tool to avoid injury.
5) Never put the tool down until the bit or accessory comes to a complete stop.
3 YEARS
LIMITED WARRANTY
4

6) An operation is only performed when the bit wallet is well secured.
7) Accessories may be hot after use. Avoid contact with skin and use gloves or suitable
protective cloths to remove.
8) Wear ear protectors when using the tool for long periods. Prolonged exposure to
high-density noise can cause hearing loss.
9) Use auxiliary handle when operating to ensure safety.
Operation safety warning
1. Install or remove the bit.
Warning: switch must be o and disconnected.
Before installing or removing the bit.
Loosen the drill chuck by hand, and then insert the bit by hand-tight, then insert the
WRENCH into all three holes. Tighten it clockwise. To remove the bit, insert the wrench into
one of the holes. And then loosen the chuck counterclockwise.
2. Switch operation
Press the SWITCH BUTTON to start the tool. Loosen the button and then the tool stops
rotating. If continuous rotation is required, press the SWITCH BUTTON and the LOCK
BUTTON. Press the SWITCH BUTTON and loosen, then the button also stopped rotating.
When you need to change the rotation, adjust the round knob in the middle of the SWITCH
BUTTON. When adjusted in the '+' direction, the speed increases and will reach the
maximum speed when adjusted to the terminal. Adjust to the steering, the speed decreases
and will reach the minimum speed when it is adjusted to the terminal. And the shutdown
time is shortened.
3. Reversible operation
Warning: Check the switch operation to see if it is exible before plugging in the power.
Pressing the button and loosening it to check if the button can be reset (turned o).
Tool rotates clockwise when hoist is turned to 'F'. And counter-clockwise, turn the lever to 'R'.
3 YEARS
LIMITED WARRANTY
5

4. Drilling operation
When drilling in wood, use the front auger. These front screws can pierce the wood naturally,
without putting pressure on the tool.
When drilling in metal, prevent the drill from slipping, use an awl and hammer to pierce a
mark. And then use the piercing tools that pierce on the mark.
Use cutting lubricant when drilling in metal. But dry drilled in steel and brass.
Warning: Excessive pressure will not accelerate drilling speed, but will damage the drill tip. It
is bad for the working of the tool and will reduce the number of tools.
The tool / bit will be with great force while you are drilling through the workpiece. Therefore,
reduce the pressure and be more careful when the bit goes to pierce the workpiece.
When the workpiece is very small, use a vise or other clamping tool to tighten it.
Maintenance and inspection
1) screw
Regularly check each part of the tool if the screw is loose. The loose should be tightened
promptly.
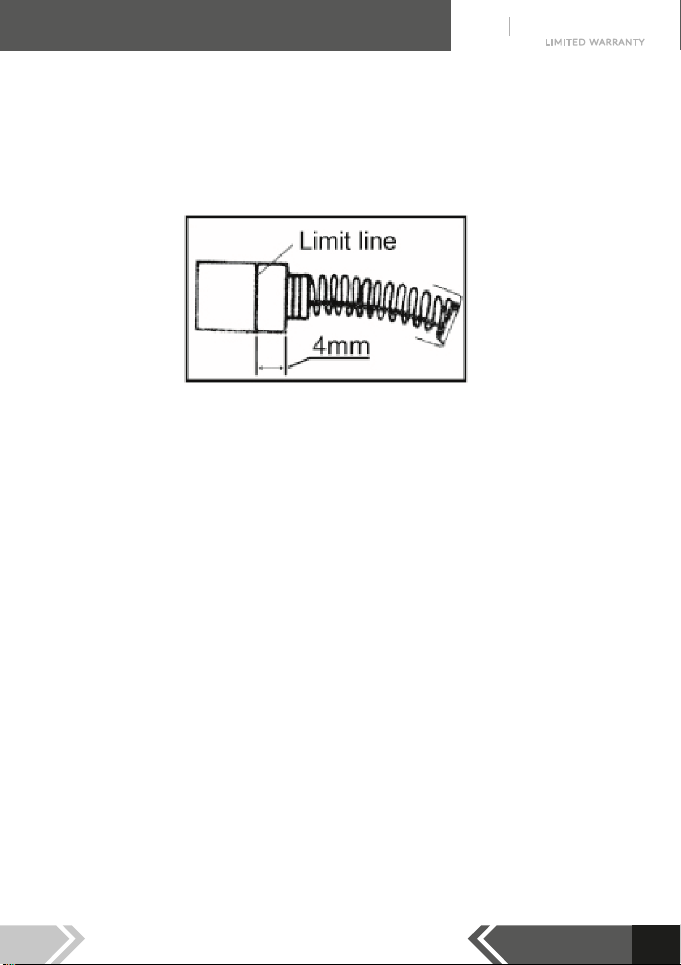
2) carbon brush
Check and replace carbon brushes regularly. When carbon brushes wear to the limits, they
should be replaced immediately. If there are two carbon brushes, they must be replaced
together. Keep the carbon brushes clean and slide freely inside the brush holder
3 YEARS
LIMITED WARRANTY
6
3) power cord
Regularly check the power cord / plug for scratches or damage. Problem parts must be
replaced immediately and must be replaced by the manufacturer or authorized unit.
3 YEARS
LIMITED WARRANTY
8

For more information visited our wedsite
www.siefkentools.com
WARRANTY
Unbeatable
Unübertrefflich Garantie
3
YEAR S
SERVICE
FREE OF CHARGE
Service ohne Kosten
TOTAL
SATISFACTION
Total Zufrieden
free service
SIEFKEN includes in its tools 5 free preventive maintenance during the first year.
In addition, any corrective repair will have a 1yearwarranty. (Doesnot apply to repairs made by someone other than SIEFKEN staff, as
well asdamage due to improper use, alterations, abuse, naturalwearor accidents.
Batteries are considered wear parts and are not covered by the 3-year warranty, in case of any failure we grant a time of 90 days from the
purchase for you approach any corporate or authorized Service Center for the right check.
TOTAL SATISFACTION
If the SIEFKEN tool does not satisfy the need for work, within 30 days after its purchase you can change it for one of the same type
with greater capacity only by paying the difference.
In order to validate the tool's guarantee, the use, maintenance and tool care guide included in the manual must be followed. If at the
moment of carry the tool to the service center the tool shows evidence that was not correctly maintained, the guarantee may be
denied.
3 YEARs WARRANTY
Each SIEFKEN Industriell tool is guaranteed to the originalpurchaser to be free from defects in materials and workmanship.
Subject to certain exceptions, SIEFKEN will repair or replace any part of any power tool, after it is examined, it is determined by SIEFKEN
as defective in materials or workmanship for a period of (3) years *, after the date of purchase , unless otherwise noted. The power tool
must be returned to the SIEFKEN service center location or to the SIEFKEN authorized service station, by paid and insured shipping. A copy
of the proof of purchase must be included with the returned product. This warranty does not apply to damages that SIEFKEN determines
as coming from repairs made by someone other than SIEFKEN personnel, aswell asby improper use, alterations, abuse, naturalwear or
accidents
*Generators, compressors, pressure washers and vacuum cleaners of the SIEFKEN brand, which
will have a 1 year warranty, are excluded from this warranty*.
3 YEARS
LIMITED WARRANTY
9
Table of contents
Languages:
Other Siefken Drill manuals


