Siemens Gigaset DX600A ISDN User manual

DX600A ISDN
DX600A ISDN
GIGASET. INSPIRING CONVERSATION.
Gigaset Communications GmbH
Frankenstr. 2a, D-46395 Bocholt
Manufactured by Gigaset Communications GmbH
under trademark license of Siemens AG.
As of 1 Oct. 2011 Gigaset products bearing the
trademark 'Siemens' will exclusively use the trademark 'Gigaset'.
All rights reserved. Subject to availability.
www.gigaset.com
© Gigaset Communications GmbH 2010

1
Gigaset DX600A ISDN – your perfect companion
... impressive inside and out. Go crazy for the vibrant 3.5" TFT display, first-class sound quality
and elegant exterior. Your Gigaset can do a lot more than just make calls:
Further information on your phone can be found at www.gigaset.com/gigasetDX600A.
After purchasing your Gigaset phone, please register it at www.gigaset.com/customercare –
this will ensure any questions you may have or warranty services you request are dealt with
even faster!
Have fun using your new phone!
Bluetooth, Ethernet, DECT and FAX connection
Connect your Gigaset to the Internet and your PC via Ethernet. Use your public and private
directories on the Internet. Update the directory on your Gigaset, the directory from your
Bluetooth mobile phone and your directory on the PC simultaneously.
Directory for 750 vCards – calendar and appointments
Save phone numbers and other data to the local directory. Enter appointments and anniver-
saries in the calendar and set reminders.
Use your Gigaset as a PABX
Register up to six handsets and a fax machine and use the three Gigaset answering machines.
Assign each device its own phone number (MSN).
It's easy to configure your Gigaset thanks to the wizards
These determine the MSNs for your ISDN connection (provider-specific) and assist you with
registering handsets and assigning send and receive MSNs to the desktop phone, handsets,
fax machine and integrated answering machine (¢page 14).
Go online with your Gigaset
Use your phone's info centre and have information specifically provided for the phone shown
on the display.
Do not disturb
Switch off the display backlight at night, use time control for calls or reject unknown calls.
Other practical information
Transfer the directory from an existing Gigaset handset, use the programmable function keys
for quick dial or to quickly access important functions, skip back five seconds when listening
to voicemail messages to repeat the last section.
Protect our environment
Gigaset Green Home — Be environmentally aware when using your phone. Details about our
ECO DECT products can be found at www.gigaset.com/customercare.

2
Desktop phone overview
1Adjust volume S= quieter; R= louder
during a call/message playback:
Handsfree/receiver volume;
When an external call is being signalled:
Ringer volume
2Display
3Display keys (programmable)
In the menu: Open a menu for further func-
tions
4Message key
Access to call and message lists;
Flashes: New message/new call or new
firmware
5End call/back key
End call, cancel function, go back one menu
level (press briefly), back to idle status
(press and hold)
6Function keys (programmable)
7Redial
Open the redial list
8Handsfree key
9Mute key
During a call: Activate/deactivate microphone
10 * key
Activate/deactivate ringer (press and hold);
Text input: Special characters table
11 Back key for answering machine
During playback: Back to the start of the
message/previous message
12 Play back messages
Activate/deactivate message playback
13 On/off key for answering machine
Activate/deactivate assigned answering
machine(s)
14 # key
For text input: Switch between upper/lower
case letters and digits
15 Control key
16 Microphone
123465
7891011 12 1314 15 16

3
Understanding the display icons
Ã123·06:30
Ã02
Mar 2010
13:52
INT 1
Calls Calendar
Mo Tu We Th Fr Sa Su
01 02 03 04 05 06 07
08 09 10 11 12 13 14
15 16 17 18 19 20 21
22 23 24 25 26 27 28
29 30 31
Desktop phone status
(two lines)
Current month/year
Time
Internal name
ØÙÚ
Signalling
External call
ØãÚ ØÃÚ
Internal call
Answering machine is
recording
ØÜ
Appointment / anniversary
ؼÚ
Alarm clock
Answering machine activated
1
/
2
/
3
numbers of the activated answering machines (orange=on)
Eco mode+ activated (white)
Eco mode+ and Eco mode activated (green)
Bluetooth activated
is replaced by ô, when a Bluetooth headset is connected, or by
õwhen a Bluetooth data device is connected
Ringer deactivated
is replaced by ñ, when alert tone activated
Alarm switched on and wake-up time set
Number of new messages:
uIn the missed alarms list
uIn the SMS list
uIn the missed calls list
uOn the network mailbox
Display in idle status (example)
Appointment added
to calendar
Current date
Status display in the headers: The following icons are displayed dependent on the settings
and the operating status of your desktop phone:
Ã123¼ò ó ·06:30
Ã02 ™10 Ë09 n08

4
Contents
Contents
Gigaset DX600A ISDN – your perfect companion . . . . . . . . . . . . . . . . . . . . 1
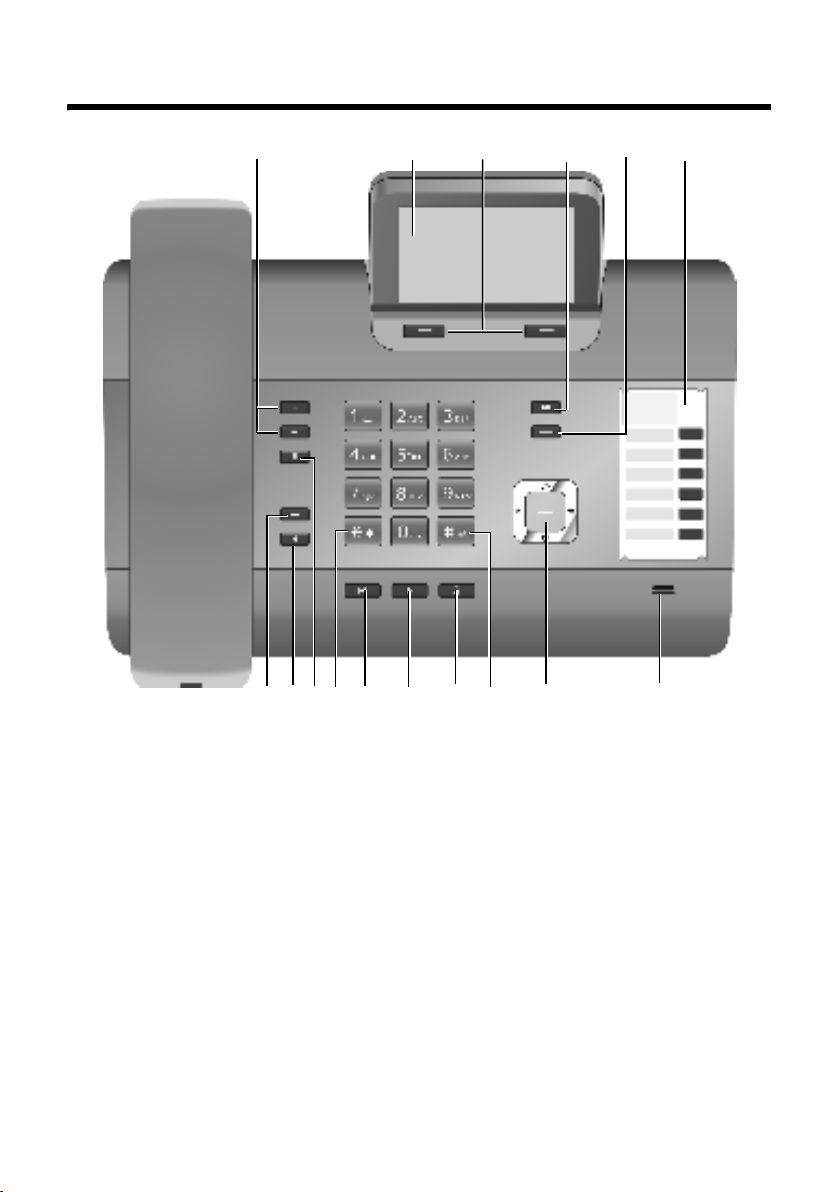
Desktop phone overview . . . . . . . . . . . . . . . . . . . . . . . . . . . . . . . . . . . . . . . . . . 2
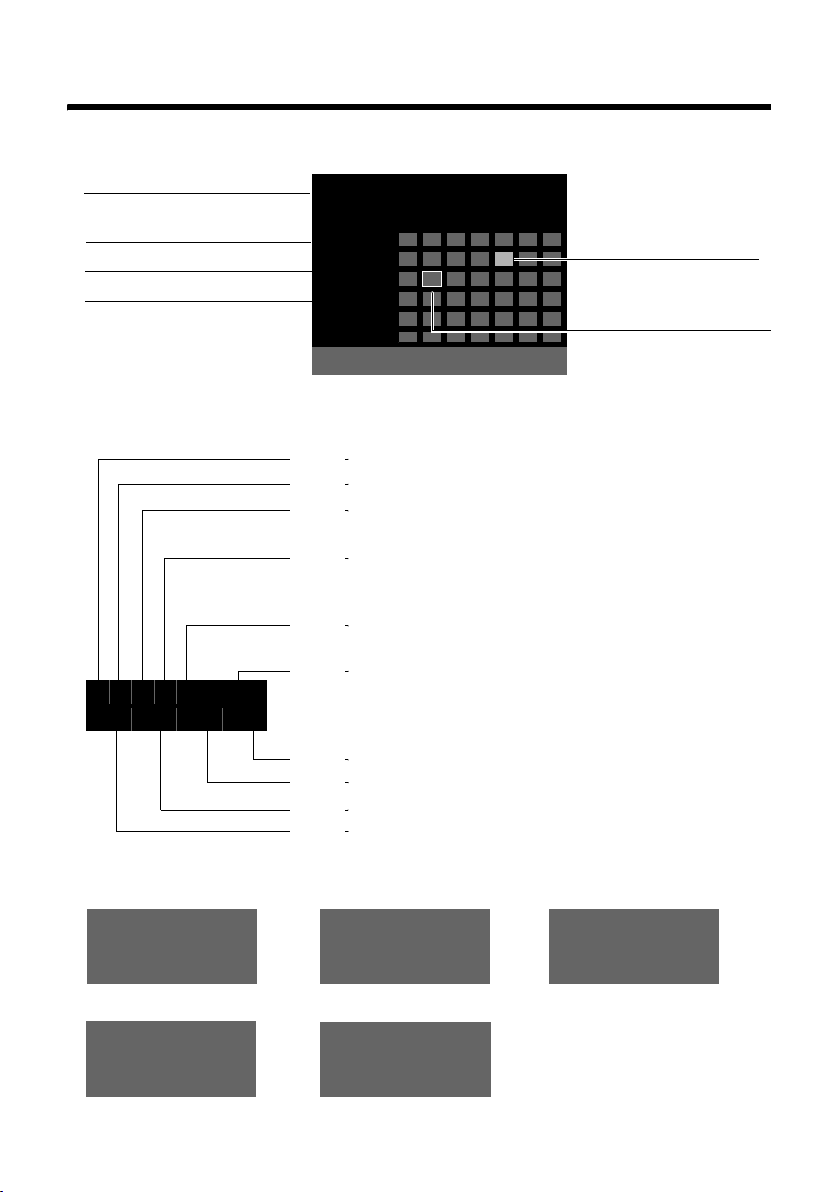
Understanding the display icons . . . . . . . . . . . . . . . . . . . . . . . . . . . . . . . . . . . 3
Following safety precautions . . . . . . . . . . . . . . . . . . . . . . . . . . . . . . . . . . . . . . . 6
Taking the first steps . . . . . . . . . . . . . . . . . . . . . . . . . . . . . . . . . . . . . . . . . . . . . . . 7
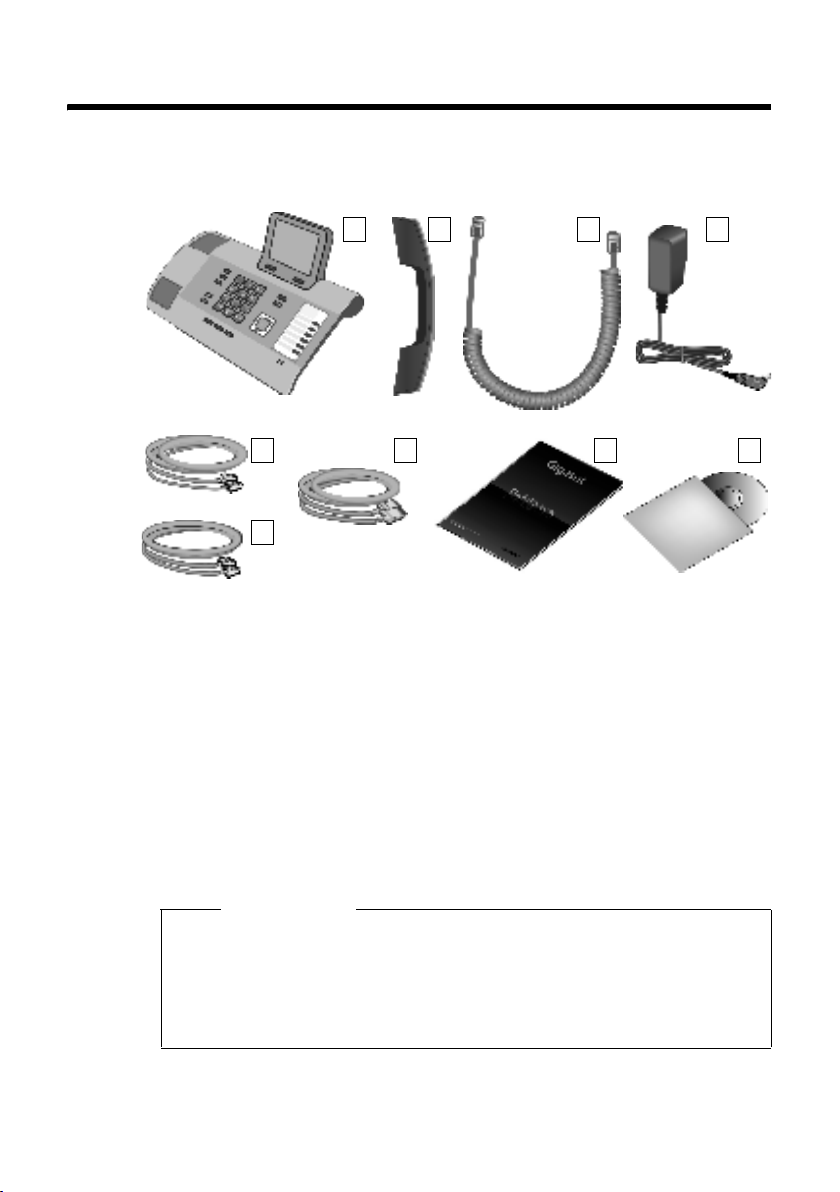
Checking the package contents . . . . . . . . . . . . . . . . . . . . . . . . . . . . . . . . . . . . . . . . . . . . . . . 7
Installing the desktop phone . . . . . . . . . . . . . . . . . . . . . . . . . . . . . . . . . . . . . . . . . . . . . . . . . . 8
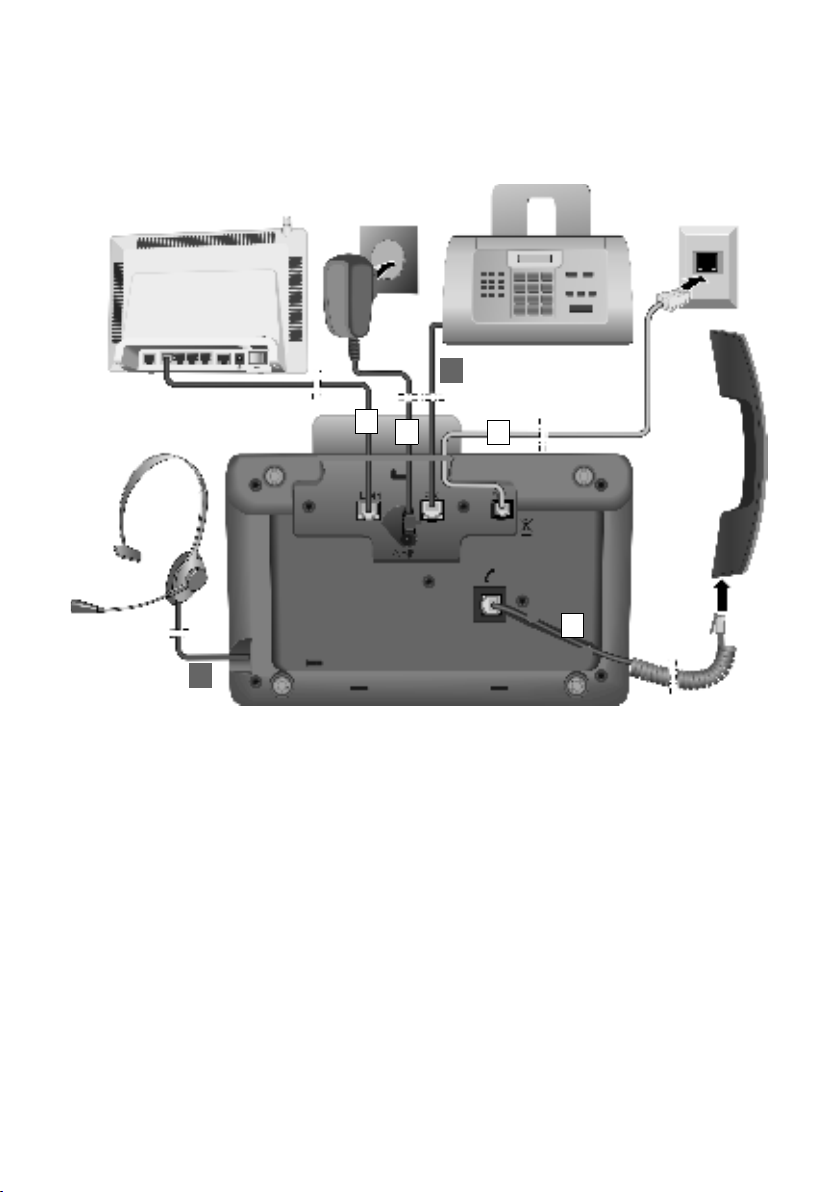
Connecting the desktop phone . . . . . . . . . . . . . . . . . . . . . . . . . . . . . . . . . . . . . . . . . . . . . . . 9
Preparing to use the desktop phone: Installation wizard . . . . . . . . . . . . . . . . . . . . . . . 14
Proceeding . . . . . . . . . . . . . . . . . . . . . . . . . . . . . . . . . . . . . . . . . . . . . . . . . . . . . . . . . . . . . . . . . . 22
Menu overview . . . . . . . . . . . . . . . . . . . . . . . . . . . . . . . . . . . . . . . . . . . . . . . . . . . 23
Making calls . . . . . . . . . . . . . . . . . . . . . . . . . . . . . . . . . . . . . . . . . . . . . . . . . . . . . . 27
Making external calls . . . . . . . . . . . . . . . . . . . . . . . . . . . . . . . . . . . . . . . . . . . . . . . . . . . . . . . . . 27
Making internal calls . . . . . . . . . . . . . . . . . . . . . . . . . . . . . . . . . . . . . . . . . . . . . . . . . . . . . . . . . 27
Ending a call . . . . . . . . . . . . . . . . . . . . . . . . . . . . . . . . . . . . . . . . . . . . . . . . . . . . . . . . . . . . . . . . . 27
Accepting a call . . . . . . . . . . . . . . . . . . . . . . . . . . . . . . . . . . . . . . . . . . . . . . . . . . . . . . . . . . . . . . 27
Activating/deactivating handsfree/open listening mode . . . . . . . . . . . . . . . . . . . . . . 28
Muting the desktop phone . . . . . . . . . . . . . . . . . . . . . . . . . . . . . . . . . . . . . . . . . . . . . . . . . . . 28
Making calls using network services . . . . . . . . . . . . . . . . . . . . . . . . . . . . . . . . . . . . . . . . . . 28
Using lists . . . . . . . . . . . . . . . . . . . . . . . . . . . . . . . . . . . . . . . . . . . . . . . . . . . . . . . . 29
Using the redial list . . . . . . . . . . . . . . . . . . . . . . . . . . . . . . . . . . . . . . . . . . . . . . . . . . . . . . . . . . 29
Using the call lists . . . . . . . . . . . . . . . . . . . . . . . . . . . . . . . . . . . . . . . . . . . . . . . . . . . . . . . . . . . . 29
Opening lists with the message key . . . . . . . . . . . . . . . . . . . . . . . . . . . . . . . . . . . . . . . . . . 29
Using directories . . . . . . . . . . . . . . . . . . . . . . . . . . . . . . . . . . . . . . . . . . . . . . . . . 30
Using the local desktop phone directory . . . . . . . . . . . . . . . . . . . . . . . . . . . . . . . . . . . . . . 30
Using online directories . . . . . . . . . . . . . . . . . . . . . . . . . . . . . . . . . . . . . . . . . . . . . . . . . . . . . . 31
Using the private net directory . . . . . . . . . . . . . . . . . . . . . . . . . . . . . . . . . . . . . . . . . . . . . . . 31
Sending SMS (text messages) . . . . . . . . . . . . . . . . . . . . . . . . . . . . . . . . . . . . . 32
Writing/sending/saving an SMS . . . . . . . . . . . . . . . . . . . . . . . . . . . . . . . . . . . . . . . . . . . . . . 32
Receiving an SMS . . . . . . . . . . . . . . . . . . . . . . . . . . . . . . . . . . . . . . . . . . . . . . . . . . . . . . . . . . . . 32
Reading SMS, managing lists . . . . . . . . . . . . . . . . . . . . . . . . . . . . . . . . . . . . . . . . . . . . . . . . . 32
Operating the desktop phone answering machine . . . . . . . . . . . . . . . . . 33
Operating via the desktop phone . . . . . . . . . . . . . . . . . . . . . . . . . . . . . . . . . . . . . . . . . . . . . 33
Activating/deactivating call screening . . . . . . . . . . . . . . . . . . . . . . . . . . . . . . . . . . . . . . . . 35
Operating when on the move (remote operation) . . . . . . . . . . . . . . . . . . . . . . . . . . . . . 35

5
Contents
Setting the desktop phone . . . . . . . . . . . . . . . . . . . . . . . . . . . . . . . . . . . . . . . . 37
Quickly accessing functions and numbers . . . . . . . . . . . . . . . . . . . . . . . . . . . . . . . . . . . . 37
Changing the display language . . . . . . . . . . . . . . . . . . . . . . . . . . . . . . . . . . . . . . . . . . . . . . 37
Setting the display . . . . . . . . . . . . . . . . . . . . . . . . . . . . . . . . . . . . . . . . . . . . . . . . . . . . . . . . . . . 37
Changing the handsfree/earpiece volume . . . . . . . . . . . . . . . . . . . . . . . . . . . . . . . . . . . . 38
Setting ringers . . . . . . . . . . . . . . . . . . . . . . . . . . . . . . . . . . . . . . . . . . . . . . . . . . . . . . . . . . . . . . . 38
Activating/deactivating advisory tones . . . . . . . . . . . . . . . . . . . . . . . . . . . . . . . . . . . . . . . 39
Changing the system PIN . . . . . . . . . . . . . . . . . . . . . . . . . . . . . . . . . . . . . . . . . . . . . . . . . . . . 39
Customer Service & Assistance . . . . . . . . . . . . . . . . . . . . . . . . . . . . . . . . . . . . 40
Questions and answers . . . . . . . . . . . . . . . . . . . . . . . . . . . . . . . . . . . . . . . . . . . . . . . . . . . . . . 41
Authorisation . . . . . . . . . . . . . . . . . . . . . . . . . . . . . . . . . . . . . . . . . . . . . . . . . . . . . . . . . . . . . . . . 41
Using insert strips . . . . . . . . . . . . . . . . . . . . . . . . . . . . . . . . . . . . . . . . . . . . . . . . . . . . . . . . . . . . 41
Index . . . . . . . . . . . . . . . . . . . . . . . . . . . . . . . . . . . . . . . . . . . . . . . . . . . . . . . . . . . . 42

6
Following safety precautions
Warning
Be sure to read this user guide and the safety precautions before using your telephone.
Explain their content and the potential hazards associated with using the telephone to your
children.
Use only the power adapter supplied, as indicated on the underside of the desktop
phone.
Use only the cables supplied for fax, ISDN, LAN and receiver connection and connect
these to the intended port only.
Using your telephone may affect nearby medical equipment. Be aware of the tech-
nical conditions in your particular environment e.g., doctor's surgery.
Do not install the phone in a bathroom or shower room. The phone is not splash-
proof.
Do not use your phone in environments with a potential explosion hazard (e.g., paint
shops).
If you give your Gigaset to a third party, make sure you also give them the user guide.
Remove faulty telephones from use or have them repaired by our Service, as they
could interfere with other wireless services.
Please note
uPlease note that only terminals that are operated in-house (inside buildings) may be con-
nected to the ISDN connections.
uNot all functions described in this user guide are available in all countries and with all pro-
viders.
$
ƒ

7
Taking the first steps
Checking the package contents
1 One desktop phone
2 One receiver to be connected to the desktop phone
3 One cable for connecting the receiver to the desktop phone
4 One power cable for connecting the desktop phone to the mains power supply
5 One telephone cable for connecting the desktop phone to the phone network
(8-pin with 2 mini western jacks 8/8)
6 One cable for connecting a fax machine to the desktop phone (6-pin with 2 mini
western jacks 6/6)
7 One Ethernet (LAN) cable (Cat 5 with 2 RJ45 modular jacks) for connecting the
desktop phone to a router (LAN/Internet) or PC
8 One quick user guide
9 One CD
1 2 3 4
98
6
5 7
Please note
To change the display language, proceed as follows (¢page 37):
¤Press right on the control key v.
¤Press the *#Q3#keys in succession.
¤Press the bottom of the control key srepeatedly until the correct language
is highlighted. Then press the right display key.

8
Taking the first steps
Installing the desktop phone
The desktop phone is designed for use in dry rooms in a temperature range of +5°C
to +45°C.
¤Set up the desktop phone at a central point in the building.
The phone's feet do not usually leave any marks on surfaces. However, due to the
multitude of different varnishes and polishes used on today's furnishings, the
occurrence of marks on the surfaces cannot be completely ruled out.
Firmware updates
This user guide describes the functions of your desktop phone from firmware
version 30.00.
Whenever there are new or improved functions for your Gigaset, firmware
updates are made available for you to download to your desktop phone.
If this results in operational changes to your desktop phone, a new version of
this user guide or the necessary amendments are published on the Internet
at www.gigaset.com.
Select the product to open the relevant product page for your desktop phone
where you will find a link to the user guide.
User guide
This document only describes how to get started with your Gigaset DX600A
ISDN and its key functions in condensed form.
You will find a detailed description of your Gigaset DX600A ISDN and its func-
tions together with a description of its Web configurator on the enclosed CD.
You can make phone settings from the PC via the Web configurator
(the phone's Web interface).
These instructions are in PDF format. You will need Adobe® Reader® to view
these documents. Adobe® Reader® can be found on the Internet at
www.adobe.com.
Please note
If you wish to operate handsets from your desktop phone, consider the range of
the desktop phone. This is up to 300 m in unobstructed outdoor areas and up
to 50 m inside buildings. The range is reduced when Eco mode is activated.
Warning
uNever expose the telephone to any of the following: Heat sources, direct sun-
light or other electrical appliances.
uProtect your Gigaset from moisture, dust, corrosive liquids and fumes.

9
Taking the first steps
Connecting the desktop phone
The following diagram is an overview of all connections for your desktop phone.
The individual steps are described in detail below.
Follow the steps in the order given below:
1 Connect the receiver to the desktop phone.
2 Connect the desktop phone to the telephone network (ISDN).
3 Connect the desktop phone to the mains power supply.
4 Connect the desktop phone to the router for accessing the Internet (via router
and modem or via router with integrated modem) and for configuring the desk-
top phone via the Web configurator.
5 Connect the desktop phone to a fax machine (optional).
6 Connect a wire-bound headset to the desktop phone.
1
2
3
4
5
6

10
Taking the first steps
1. Connecting the receiver to the desktop phone
1 Insert the jack, which can be found on the longer straight end of the connection
cable, into the connection port marked with the symbol ^on the underside of
the desktop phone.
2 Place the straight part of the cable in the cable recess provided.
3 Insert the other jack on the connection cable into the port on the handset.
2. Connecting the desktop phone to the telephone network
1 Insert one end of the telephone cable (8-pin with 2 mini western jacks 8/8)
from the rear into the recess in the housing.
2 Plug the telephone cable into the port marked with the symbol ]on the un-
derside of the desktop phone.
Underside of
the desktop
phone
3
1
2
3
2
1
Underside of
the desktop
phone

11
Taking the first steps
3 Subsequently, connect the telephone cable to the ISDN connection.
3. Connecting the desktop phone to the mains power supply
1 Insert the small jack on the power cable from the rear into the recess in the hous-
ing.
2 Plug the jack into the port marked with the symbol \on the underside of the
desktop phone.
3Then connect the power cable to the mains power supply.
You can now use your desktop phone to make calls and can be reached on your
main number!
The answering machine on the desktop phone is set with a pre-recorded
announcement in answer and record mode (¢page 33).
1
3
2
Warning
uKeep the power adapter plugged in at all times for operation, as the desk-
top phone does not work without a mains connection.
uUse only the power and telephone cable supplied.

12
Taking the first steps
4. Connecting the desktop phone with a router (Internet) or PC
Your desktop phone features a LAN connection, via which you can connect the
desktop phone to a router or PC.
It is at your discretion as to whether to connect the desktop phone to a router and
thus the Internet. However, you will require this connection, if you wish to use the
following features with your desktop phone:
uYou wish to be notified as soon as new software is available for your desktop
phone on the Internet.
uThe date and time on your desktop phone should be updated by a time server
on the Internet.
uYou want to use info services and/or online directories on your desktop phone.
The desktop phone will have to be connected to a PC, if you wish to use the follow-
ing features with your desktop phone:
uYou wish to set up the desktop phone using its Web configurator. Your PC will
also have to be connected to the router for this to work.
uYou wish to use the additional PC software "Gigaset QuickSync over Ethernet"
to load images or tunes from your PC to your desktop phone.
For Internet access you need a router connected to the Internet via a modem (this
may be integrated in the router).
1 Guide the end of the Ethernet cable provided (Cat 5 with 2 RJ45 modular jacks)
from the rear through the recess in the housing.
2 Plug the jack on the Ethernet cable into the LAN port on the underside of the
desktop phone.
3 Then insert the second Ethernet cable jack into a LAN port on the router or PC.
1
2
3

13
Taking the first steps
5. Connecting the desktop phone to a fax machine (optional)
You can connect an ITU-T Group 3 fax machine to the desktop phone via the
FAX port.
1 Insert one end of the fax connection cable from the rear into the recess in the
housing.
2 Plug the jack into the fax port on the desktop phone (labelled: FAX).
3 Connect the fax connection cable to the port on the fax machine.
The fax machine is automatically "registered" once you activate the FAX port on the
desktop phone (default setting is "off"):
v¢ÏSettings ¢System ¢FAX Port
§Change§ Press the display key to activate/deactivate the FAX port (³= on).
Please note
Your phone is preconfigured for dynamic assignment of the IP address. In order
for your router to "recognise" the phone, dynamic IP address assignment must
also be activated on the router i.e., the router's DHCP server must be activated.
If the DHCP server cannot or should not be activated, you must assign a fixed
IP address to the phone.
v¢ÏSettings ¢System ¢Local Network
Further information can be found in the long user guide on the enclosed CD.
1
3
2

14
Taking the first steps
After activating the FAX port, the fax machine is added to the list of internal partic-
ipants with the internal name INT 8.
Preparing to use the desktop phone: Installation wizard
As soon as the desktop phone is connected, the installation wizard starts. The wiz-
ard allows you to make all necessary settings for your desktop phone.
The following message appears in the display.
Several individual wizards are combined to form part of the installation wizard.
The following individual wizards are included in the installation wizard:
1ISDNwizard
2 Registration wizard
3 Connection wizard
Please note:
uIf the installation wizard is activated, no other handset can access the Settings
menu on the desktop phone.
uTo quit the installation wizard before the process is complete, press and hold the
end key T. All changes you have already saved using §OK§ are retained.
uTo skip a setting, press the bottom of the control key sor the display key §No§.
uTo return to a previous setting, press the top of the control key t.
1. ISDN wizard: Assigning/entering the connection's MSNs
Several numbers (MSNs) were provided by the network provider when you
received your ISDN connection confirmation. You can save up to ten numbers
(MSNs) on your desktop phone. If there is no MSN entered on your desktop phone,
you can do the following with the ISDN wizard:
uAssign the MSNs for your connection i.e., call these up from the exchange (auto-
matic MSN assignment) or enter these manually
¤Press the display key §Yes§ to start
installation.
Setup - Welcome
?
Would you like help
setting up
your phone?
No Yes
Please note
Use only the installation wizard on the desktop phone, but not on a registered
handset.

15
Taking the first steps
Please note:
Not every ISDN provider supports automatic MSN assignment. If this feature is
not supported, then you must enter the MSNs for your connection manually
(¢page 16).
uSet the receive MSN
uSet the send MSN
¤Press the display key §Yes§ to start
installation.
¤Press the display key §OK§ to start
automatic MSN assignment. This
process will take some time.
A corresponding message is shown
in the display.
After the MSNs have been successfully
assigned, a list containing the MSNs is
displayed.
¤Press the display key §OK§ to close the
ISDN wizard.
The display shows ISDN installation
complete.
ISDN Wizard
?
Start ISDN
installation wizard?
No Yes
ISDN Wizard Ð
This wizard helps you
detect and configure
your ISDN phone
numbers (MSNs).
OK
ISDN Wizard Ð
MSN Assignment
MSN1: 12345601
MSN2: 12345602
MSN3: 12345603
MSN4: 12345604
Change OK

16
Taking the first steps
If no MSNs can be found, No MSNs detected. is shown. You are prompted to enter
your MSNs manually:
The display shows ISDN installation complete.
¤Press the display key §OK§ to enter the
MSNs manually.
¤Enter a name for MSN 1 via the
number keys (max. 16 characters;
default MSN1)).
¤Press down on the control key sto
switch to entering the MSN number.
¤Enter your first MSN number (max.
20 digits).
¤Press down on the control key again
to switch to the next field.
¤Repeat the above procedure to
enter the remaining MSNs.
¤After entering the final MSN. Press
the display key §Save§.
ISDN Wizard
Ð
Please enter your
MSN data.
Back OK
ISDN Wizard
MSN - Name
MSN1
MSN - Number
MSN - Name:V
Back Save
ISDN Wizard
MSN - Name
MSN1
MSN - Number
123456
MSN - Name:V
Back Save

17
Taking the first steps
2. Registration wizard
The registration wizard helps you register handsets to the desktop phone.
If the handset has been successfully registered on the desktop phone, you will see
the following display (approx. 3 seconds long):
Then "Register a handset?" is shown in the display again (see above).
¤Press the display key §Yes§ if you wish to register another handset and perform
the steps listed above with this additional handset.
Press §No§ to close the registration wizard and start the connection wizard.
Please note
Press the left display key §No§, if you do
not wish to register any handsets. This
closes the registration wizard and the
connection wizard is started
(¢page 18).
The long user guide on the enclosed
CD tells you how to register handsets at
a later stage.
¤Press the display key §Yes§. The desk-
top phone changes to registration
mode.
Registration
?
Register a
handset?
No Yes
¤Start the registration within approx.
60 seconds on the handset
according to the handset's user
guide.
Info
Press the display key §Info§ to display
information about registering hand-
sets.
Registration
?
Please register
your handset
Cancel Info
Once a Gigaset handset has been suc-
cessfully registered, it will change to
idle mode. The handset's internal name
is shown on the display (INT 2, INT 3
to INT 7).
Registration
‰
Handset registered

18
Taking the first steps
3. Connection wizard
Using the Connection wizard, you can assign the previously configured numbers
(ISDN MSNs, ¢page 14) to internal parties (desktop phone, handsets and desktop
phone answering machines as well as any connected fax machine, ¢page 13) as
send and receive connections, if necessary.
uReceive connections are numbers (MSNs) on which you can be called. You can
assign the MSNs for internal parties as the receive connection. Incoming calls are
only diverted to the terminals to which the relevant receive connection has
been assigned. Terminals are e.g., desktop phone, handsets or answering
machines or a connected fax machine.
uSend connections are the numbers (MSNs) that are sent to the called party.
The network provider calculates charges based on the send connections.
You can assign a fixed MSN as a send connection to each internal party.
uEvery MSN can be both a send and receive connection. You can assign each MSN
to multiple handsets, the desktop phone and a connected fax machine as a send
and/or receive connection. It may only be assigned to an answering machine as
a receive connection.
After registration/getting started, the desktop phone, handsets and local answer-
ing machine 1 are assigned all MSNs as receive connections. The base number (usu-
ally MSN1) is assigned to the devices as a send connection.
Please note
uBy default, the desktop phone is assigned the internal name INT 1 and the
internal number 1.
uThe desktop phone assigns the lowest free internal number to the handset
(possible numbers: 2–7). The handset's internal name is shown in the display
e.g., INT 2. This means that the handset has been assigned the internal
number 2.
uThe internal numbers and names can be changed.
a.
¤Press the display key §Yes§, if you
wish to change the setting for the
desktop phone's send and receive
connections.
¤Press the display key §No§, if you do
not wish to change the setting for
the desktop phone.
Connection Wizard
?
Assign connections
to desk phone
INT 1?
No Yes

19
Taking the first steps
b. The list of receive connections cur-
rently assigned is displayed.
Press the bottom of the control key s
to scroll through the complete list if
necessary.
¤Press the display key §Change§, if you
wish to change the setting for the
receive connections on the desk-
top phone.
¤Press the display key §OK§, if you do
not wish to change the setting.
Press §OK§ to skip the following steps. Continue from £e.
Press §Change§ to display the following:
c. If you do not want incoming calls to
MSN1 indicated on the desktop
phone:
¤Press right on the control key v
to set to No.
d. ¤Press down on the control key s
to switch to the next MSN. Select
either Yes or No as described
above.
¤Repeat the steps for each MSN.
¤Press the display key §Save§ once
you have finished configuring the
settings for the desktop phone.
The updated list of receive connections is displayed one more time for you to
check.
Press the display key §OK§ to confirm the assignment.
Receive ConnectionsÐ
INT 1
receives calls for
MSN1: 12345601
MSN2: 12345602
MSN3: 12345603 x
Change OK
INT 1
Receive calls for
MSN1:
fYe s g
Receive calls for
MSN2: V
Back Save
INT 1
MSN1:
fNo g
Receive calls for
MSN2:
fYe s gV
Back Save
Table of contents
Other Siemens Answering Machine manuals