Sienna TS30 User manual

DO NOT USE EQUIPMENT BEFORE READING THIS MANUAL
This manual contains important warnings and instructions.
Please read these instructions carefully and keep for your reference.
Starter Sprayer TS30 Instruction Manual
Congratulations on purchasing the Starter Sprayer TS30.
This product has been specially designed to provide an efficient application
of tanning solution products.
Take a minute to read and understand how to operate your new Starter Sprayer TS30
and you will be able to provide the perfect flawless tan with every application.
Your Starter Sprayer TS30 is packaged with the following:
1. Starter Sprayer TS30 turbo powered spray unit
2. Starter Sprayer TS30 air hose
3. Starter Sprayer TS30 Gun
4. nstruction manual
INSTRUCTION MANUAL
STARTER SPRAYER TS30
2
123
45
6
10
9
11
7
8
12
13
14 16
15
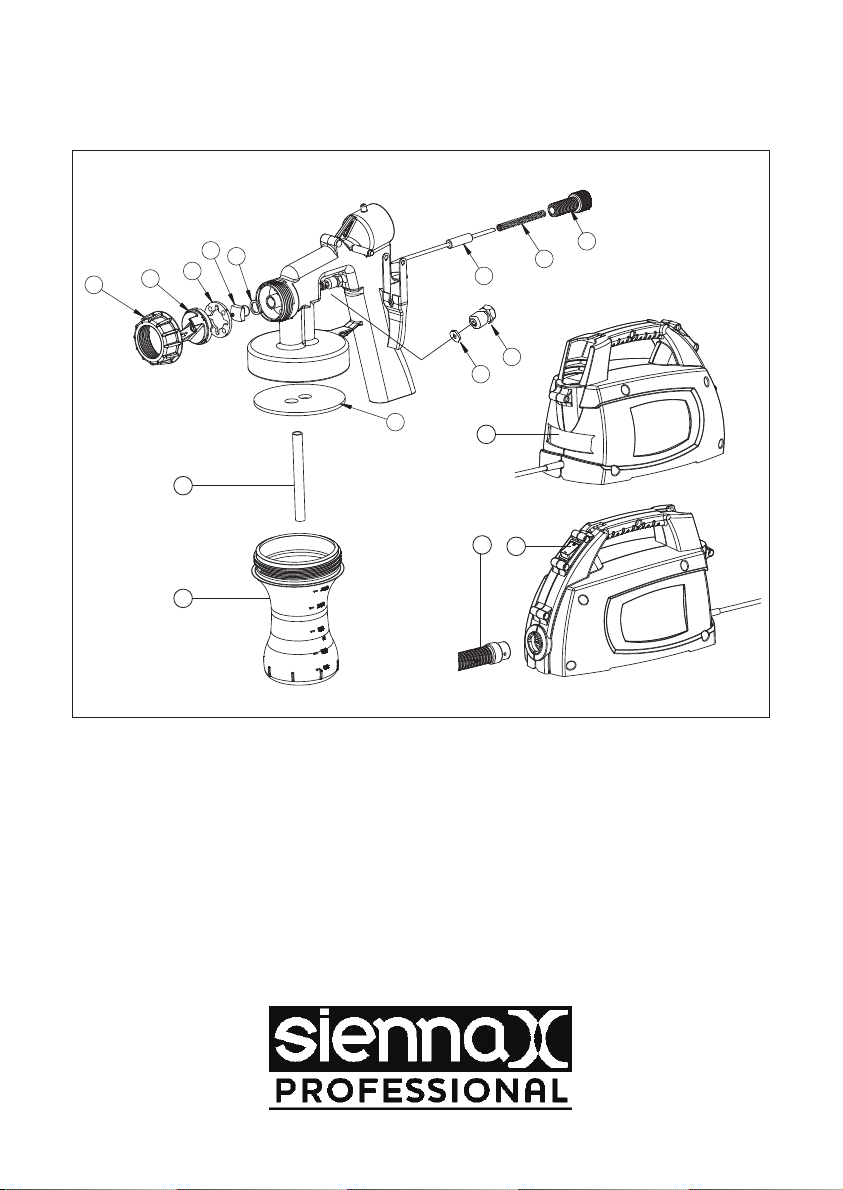
The Starter Sprayer TS30 exploded diagram and parts list
No. Description Part No.
1. Air Cap Ring L0215
2. Air Cap L0205
3. Spray Direction Plate L0206
4. Fluid Tip L0284
5. Fluid Tip Seal L0211
6. Needle L0283
7. Spring L0216
8. Solution Flow Screw L0210
No. Description Part No.
9. Gland Nut L0208
10. Gland Seal L0272
11. Container Seal L0335
12. Pick-upTube L0947
13. 250ml Container L0909
14. Air Hose L2030
15. Filter V0395
16. On/off switch n/a

3
Safety Instructions
• Never immerse the motor unit in water.
ARNING: Do not use your spray tan equipment near
bathtubs, showers, basins, or other vessels containing water.
• Always disconnect the motor unit from the mains supply when
re-filling the spray gun container or when cleaning the tanning
equipment.
• f you use your spray tan system close to a hand basin, shower
or a similar source of water, unplug it after use because the
proximity of water presents a hazard even when the equipment
is switched off.
• For additional protection, the installation of a residual current
device (RCD having a rated residual operating current not
exceeding 30mA is advisable in the electrical circuit supplying
the bathroom. Ask your installer for advice.
NOTE: Mains socket might not be permitted in average sized
bathrooms according to local wiring regulations.
• Do not spray into light switches or power sockets.
• This appliance is not intended for use by persons (including
children) with reduced physical, sensory or mental capabilities, or
lack of experience and knowledge, unless they have been given
supervision or instruction concerning use of the appliance by a
person responsible for their safety.
• Never allow children to operate the tanning system.
• Never spray or aim the spray gun at animals or livestock.
• We recommend you clean your spray equipment after every
use.
• Use only genuine manufacturer replacement parts.
• f the supply cord is damaged, it must be replaced by the
manufacturer, its service agent or similarly qualified persons in
order to avoid a hazard.

Usage Instructions
• Only use the tanning equipment as detailed in these instructions.
• The tanning solution must not be inhaled. We recommend that your clients use
use a face mask.
• Advise your clients not to wear deodorant, perfume or make-up for the spray
tanning session as these products could affect the performance and colour of
the tan.
• Advise your clients to remove any jewellery before the spray tanning session
starts as this may become discoloured.
• Advise your clients to shave or wax 24 to 48 hours before their spray tanning
session is due.
• Advise your clients to always cover their hair while their face is being spray
tanned, especially if their hair is bleached as this can be stained by the tanning
solution.
• Make sure the area where you spray tan is adequately ventilated.
• Do not apply tanning solution to open cuts, broken or damaged skin. Cosmetics
may cause a mild reaction if your client has sensitive skin.
• Advise your clients to avoid wearing light coloured clothing after spray tanning.
• f tanning solution is sprayed into the eyes, flush them out with water and
seek medical advice immediately.
IMPORTANT: Patch Test
We recommend testing your tanning solution and remove all other cosmetics.
t is rare, but if irritation occurs, please advise client against a full tan.
4

5
Preparing your equipment for use
Your tanning equipment is supplied as two main components, the motor unit, which includes the
hose, and the spray gun. Please refer to the exploded diagram and parts list on page 2 and follow
the simple instructions below:-
●Unscrew the Container (13) from the spray gun and fill it with tanning solution. Do not overfill the
Container.
Normally 50ml of solution is enough for one application.
●Make sure the Pick-up Tube (12) is pushed firmly into the lid of the spray gun.
Carefully screw the Container back into the lid of the spray gun, ensuring there is an airtight seal.
●Connect the hose to the spray gun by pushing it firmly into the hose inlet at the back.
●Connect the mains plug to a suitable 230V supply socket. Switch on the motor unit. No tanning
>> solution will be sprayed until you pull the spray gun trigger.
● Before operating the unit please ensure that the Container is securely fixed to the gun body and
the Gland Nut (9) is not loose. Doing this will create an airtight seal that is essential for the correct
operation of the unit.
● Over time the Gland Seal (10) will wear and need adjusting. To check the Gland Nut is correctly
>> fitted you will need a small adjustable spanner. Pull the trigger back and gradually tighten the >>
>> Gland Nut by turning it in a clockwise direction until the Needle (6) is not free to move when the
>> trigger is released.
● To obtain the optimum setting gradually unscrew the Gland Nut by turning it anti-clockwise
until the Needle moves forward into the Fluid Tip (4). To check your settings are correct spray a
>> container of water. Re-adjust if necessary.
● Always keep the motor unit as far away from the spraying area as possible to prevent tanning ●
● solution contaminating the motor.
Setting up the Spray Gun
Before beginning a spray tan session, we recommend that you set the spray pattern and the amount
of solution to be sprayed to your own preferred requirements.
Fig.2
Fig.1
●Adjust the spray pattern by rotating the Air Cap (2) as shown in Fig.1. e
recommend that you use a horizontal spray pattern when spraying.
●Adjust the volume of solution applied by adjusting the Solution Flow Screw (8),
>> at the back of the spray gun (Fig.2). Turn it clockwise to reduce the amount of
solution and anti-clockwise to increase it.
●t is a good idea to practice spraying onto a piece of plain, white paper until
you find the volume that is best for you.
NB – To deliver the best possible tanning results, we strongly
recommend attending sienna X accredited training.
Call 0333 600 1200 to find out more.

6
Troubleshooting
“There is no tanning solution coming out of the spray gun”
1. Check there is enough solution in spray gun container.
2. Make sure the spray gun is not clogged up with old tanning solution. Follow Cleaning and
Maintenance instructions.
“Tanning solution is too runny”
1. Spray volume may be too high. t can be adjusted with the Solution Flow Screw (8) by turning it
>> clockwise to reduce the amount of solution (Fig.2).
2. When spraying, hold the spray gun further away from your client’s body or move the spray gun
faster.
3. You may not be spraying evenly. Keep the spray gun moving and do not overlap those areas
already spray tanned.
“Tanning solution sprays irregularly”
1. The solution volume may be too low and this can be adjusted with the Solution Flow Screw (8)
>> by turning anticlockwise until you get the desired volume (Fig.2).
“The tan is patchy”
1. Ensure your client has exfoliated before spray tanning.
2. Ensure you spray tan in a methodical way to cover all areas. t is easy to see which parts have
been sprayed. Keep the spray gun moving and do not overlap those areas already spray tanned.
3. Ensure that you spray tan lightly and in layers rather than one thick layer.
Fully Accredited Sienna X training available and Refresher Training available simply call
0800 131 3151 for more information.
Cleaning & Maintenance
Always wash out your spray gun at least at the end of each day. f the tanning solution dries inside
the spray gun, cleaning will become more difficult and the spray gun may become inoperable.
To wash out your Spray Gun
● Switch off and disconnect the motor unit from mains supply.
● Unscrew the container from the main body of the spray gun.
● Pour any excess solution back into its orginal container for future use.
● Half fill the container with water and re-fit it to the spray gun main body, shake the spray gun
lightly, re-connect the motor unit to the mains supply and spray the water through the gun.
>> Repeat several times until the water is clear with no traces of tanning solution.
● Continue to spray the clean water until the container is empty. Run the spray gun for a further 2
minutes with just the air blowing through it. This will dry the inside of the spray gun preventing
any contamination of the working parts.
● Clean any traces of tanning solution from the outside of the gun with a damp cloth.
● Wipe clean the Container Seal (11) inside the lid of the spray gun.
7
EC Declaration of Conformity
We declare that the unit Micro Machine (TS10) conforms to LVD 2006/95/EC, EN 60335-2-23,
EN60335-1, EMF EN62233; EMC 2004/108/EC, EN 55014-1, EN 55014-2, EN 61000-3-2,
EN 61000-3-3.
Tim Hopper Technical Director
Mains Connection
This unit is a Class appliance which means it is double-insulated for your protection, no earthing
wire is necessary. f the supply cord is damaged, it must be replaced by the manufacturer or our
appointed agents. Your unit has been supplied with a mains lead with a fitted plug. This is identified
by the fuse holder in the base of the plug. Please read the following safety instructions before use.
1. f the fitted plug is cut off from the mains lead then the plug must be disposed of safely.
NEVER under any circumstances insert such a plug into a 13 Amp socket-outlet.
2. NEVER under any circumstances use the appliance or mains lead without the fuse cover fitted.
This is the little cover fixed into the base of the plug to hold the fuse in place.
3. f you lose the fuse cover then please contact any electrical dealer for a replacement or ring our
helpline.
4. A replacement fuse must be rated at 5 Amp. These must be manufactured and approved to
BS 1362.
5. IF IN ANY DOUBT CONTACT A QUALIFIED ELECTRICIAN.
f you are using an extension lead it must be rated at a minimum of 6 Amps and fully unwound. Do
not operate with a lead rated at less than 6 Amps as this will cause premature failure of the motor
which is not covered by the guarantee.
arranty
There is a full 6 months warranty on your Sienna-X Tanning System against faulty manufacture and
materials, from date of purchase. This is offered over and above your normal consumer statutory
rights. This warranty does not include damage to the product caused by incorrect use.
INFORMATION ON THE DISPOSAL OF ASTE ELECTRICAL AND ELECTRONIC
EQUIPMENT KNO N AS EEE
Your attention is brought to new directives applicable to the disposal of this electrical
equipment, where in accordance with the legislation this product must not be disposed
of in your normal household waste. nstead it is your responsibility to dispose of this
type of waste by handing it over to special designated collection points for recovery
and recycling. This product is marked with a ‘Wheelie bin’ symbol with a cross on it
to remind you of this action. The objective of this directive is to help conserve
resources and ensure that it is recycled in a manner that protects human health and
the environment. For more information about where you can drop off your waste
please contact your local authority, take back facilities are free of charge.
Copyright & Design Right Reserved © 2014
Design Registrations
GB 3019116, EU 000317128-0001, US D541,903S

©2014 NU0035 02/14
Unit B, Sherriff Street
Worcester, WR4 9AB
Fax: +44 (0) 1905 27080
Table of contents


