Siera PRO 3000G User manual

PRO 3000G
User Manual
9029210
9

1
PRO 3000G
Law Enforcement Audio&Video Recorder

2
Content
Preface……………………………………..……03
Structure and diagram………………………..….04
Button instruction ……………………………….05
Main specification …………………………….. .06
Quick use………………………………...….. 07-13
Trouble shooting………………………….….…..14
.
Warranty statement………..……………….....….15
.
Warranty card………………………………..…...16
========================================

3
PREFACE
We sincerely thank you for using our company’s new
product---police mobile camera .This manual is the introduction
of this product which briefly introduces its functions、features、
performance 、external structure、operation and caution items as
a reference for users’ convenience. Before using the camera,
please read the user manual carefully and keep properly.
●Warning:
①Far away from fire.
②Avoiding put LCD screen and video’s camera directly under
the sun.
③Do not disassemble the device without authorization.
④Pls use the original accessories from the manufacturer .
●Cautions:
①Before using the camera,pls tear off the protective film on
the screen.
②Pls charge full the battery and install it properly before use .
③Specific frequencies of electromagnetic waves may affect
image quality.
④Before you use the product to work,pls do a test in order to
master the use of video .
4
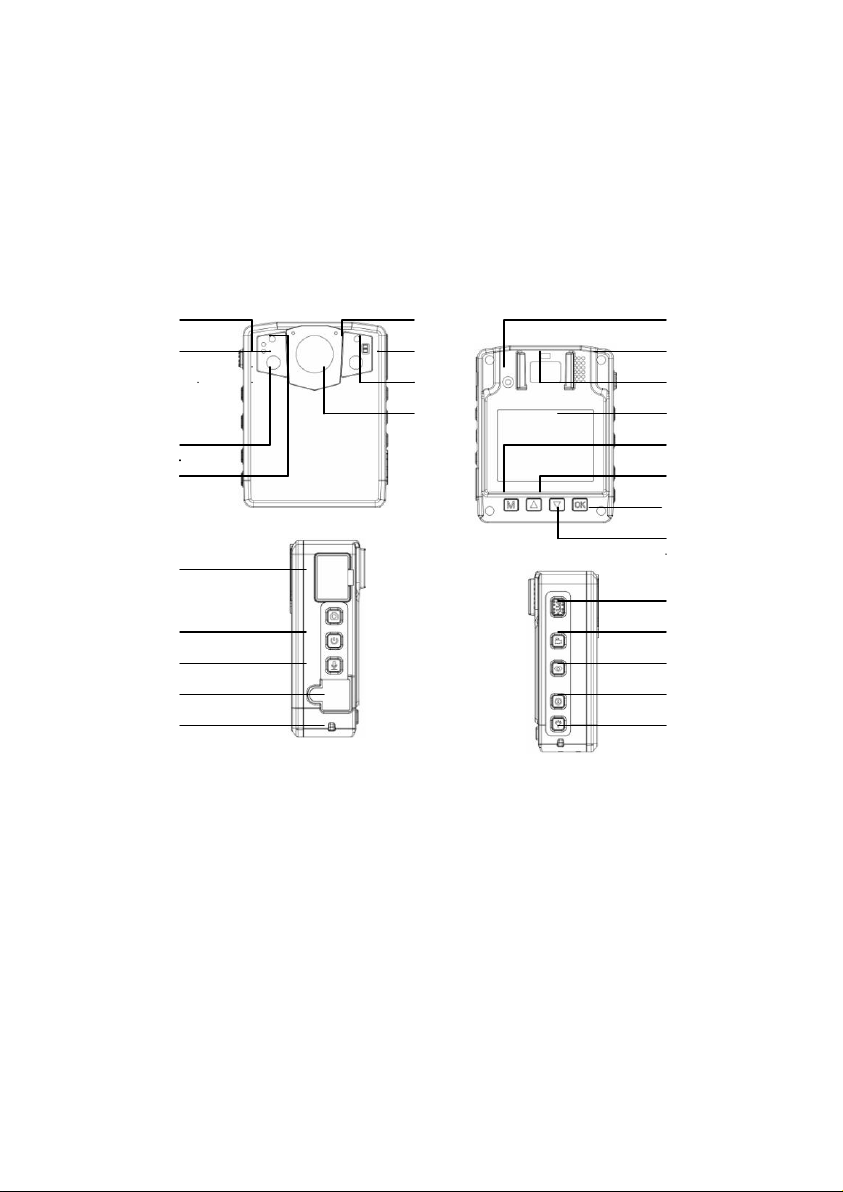
Structure and diagram >>>
………………………………………………………………………..............
1 10 14
2 11 15
12 16
13 17
318
419
20
21
5 22
6 23
7 24
8 25
9 26
1power light 9 USB 18 Menu/confirm
2work light 10 microphone 19 up
3 IR LED 11 white light 20 ESC
4 laser 13 camera 21 down
5 expansion 14 reset button 23 video
6 photo 15 speaker 24 IR
7power on /off 16 clip 25 mark
8 audio 17 screen 26 alarm
5
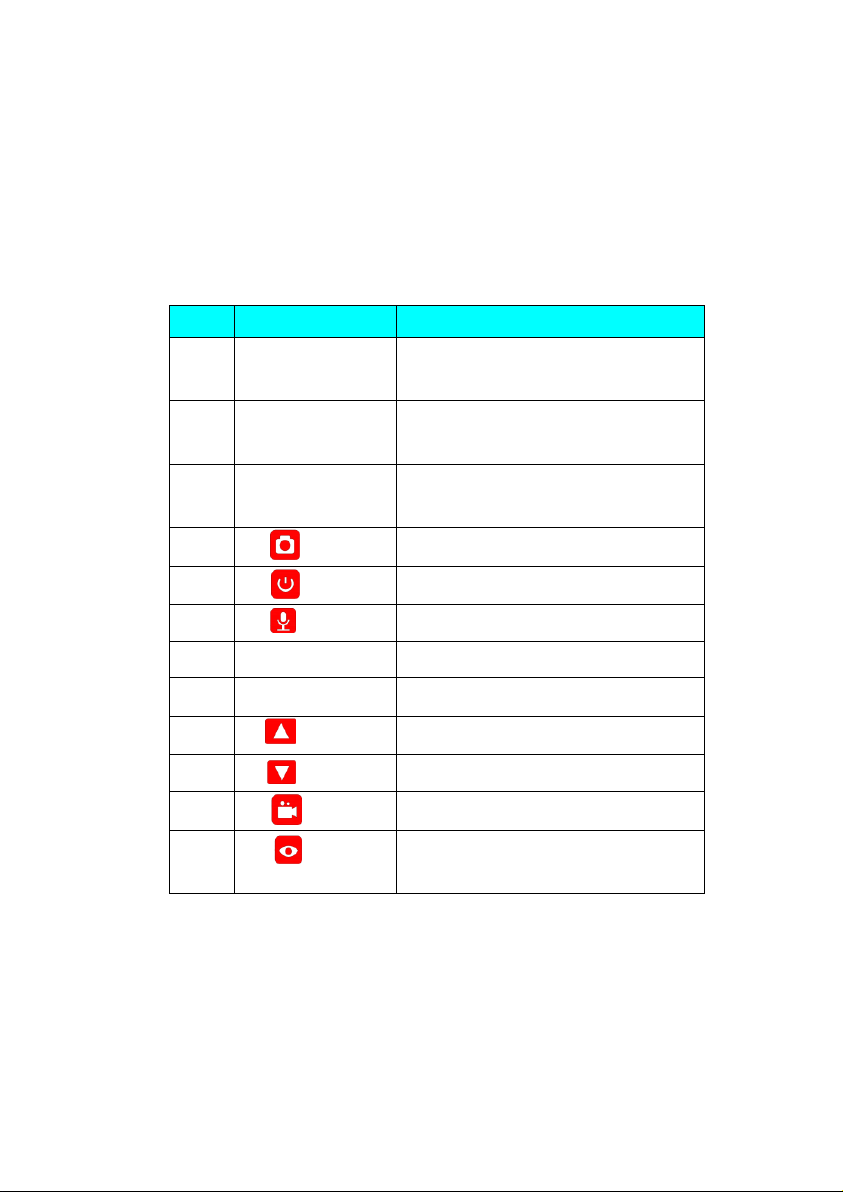
Button instruction>>
No
Button name
Function
1
Power indicator
light
Charging in red,standby in green
2
Work indicator
light
Recording flashing in red
5
External
expansion
Plug in mini camera
6
【】button
photo
7
【】button
Turn on/off /sleep
8
【】button
Audio
9
USB port
Charge and data transmission
14
【reset】button
Factory setting
19
【 】button
Up/zoom out
21
【 】button
Down/zoom in
23
【】button
recording
24
【】button
IR light /laser light

6
Main specification>>>
Video pixel
2304X1296-30P 1920X1080P-30P
1280X720-60P 1280X720-30P
watermark
support(user ID、date、time)
Camera pixel
34M(7696X4329 16:9)
Work time
10-12hours
Memory card
option 16G 32G 64G 128G
Camera
lens
170°
Night vision
10M
Battery
Type
Built in 3000-3600mAH battery
Charge time
3hours
Other
ID number
5 digits device ID and 6 digits polce ID
Encryption
support
Size
78 * 59 * 27.5cm
N.W .
110g
Screen
2inch
Accessories
Standard
Accessories
USB cable ,adaptor,user manual ,clip

7
Quick Use>>>
1.Power on/off
1)Shortly press the power button of camera ,the device will
be turned on and enter the standby mode. Under any
circumstance, press the power button for 3 seconds,the
equipment will be powered off.
2. Sleep screen mode
After turned on, in the mode of preview/recording, short press the
button to enter into save-power screen mode, the device still
working ,just the screen in black to save power. Press the
button again ,the screen will be lighted up.
3. Reset function
Short press the reset button to reset factory setting when device
malfunction.

8
4. IR Night vision function
*Manual IR function
1)Shortly press the IR button, you can manually turn on / off
infrared light when in ambient low outside light situations,the
video will be in black and white colour .
*Auto IR function
2)If set the IR autimactically,the infrared light will automatically
turn on when in low-light environments.
5. Photograph
1)After turned on, the equipment will directly enter the preview
mode, press directly the button to shoot photos.
2).Under the video-recording state, press the button to
capture the picture recorded at that time.
3) After turned on, in the mode of preview, press the button
to enter into the interface of parameters setting and select the
option of auto shotting, 3, 5, or 10 photos at once.
6. Recording
1).Normal recording
After turned on, the device will directly enter the camera preview
mode, directly press the button to record, press it again,
the device will stop and save the video.
2).One button recording

9
Under the power-off state, press the button for 3seconds,
the equipment will be turned on automatically and start the
video-recording function, at this time, if needing to end and save
the video, methods are same as above.
In case of shooting at dark night, press the IR button, then the IR
light will be turned on and enter the night shooting mode,
pictures shot at night are black and white
video pixel
card Memory
battery
recording time
time
date
3)Pre-record & Delay-record
After turned on, in the mode of preview, press the button to
enter into the interface of parameters setting and select the option
of Pre-record/delay-record. The device will pre-record 10secs
before pressed the record button and keep on recording 10secs
after end recording .
4)Video pixel is 2304x1296p-30p / 1920x1080p-30p/
1280x720-60p /1280x720-30p,select the pixel in the menu .
5)Motion detection
Comes with a motion detection feature to allow for recording
only when something happens.

10
After turned on, in the mode of preview, press the button to
enter into the interface of parameters setting and select the option
of “motion detect” ,press to setting.
7. Sound recording
After turned on, the equipment will directly enter the camera
preview mode, press directly the button to record sound,
the prompt that there is a picture under the sound-recording state
will be displayed on the screen, press the button again to
end and save audio file.
8. Video,audio,photo playback
Under the standby state, press the “ button,enter into the
playback menu,the equipment will show the video/photo/audio
files,then press the “UP/DOWN”button to choose the files,press
the “ ”button to playback,press” ” to end.
9.Laser pointer function
With the push of the button a red laser can pin-point
objects for the best positioning
10. GPS function(option)
After turn on ,set the GPS opened in the menu,will find a GPS
icon on the sceen same as picture .Then put the device outside for
minutes to collect the GPS signal, simultaneously the GPS icon
in brown colour ,it means the GPS is working properly.When the

11
icon in green colour,the GPS location is ok now ,you will see the
longitude and latitude in the preview screen .
GPS icon
11.External mini camera(option)
1) Plug the mini camera into AV IN port ,support use the mini
camera recording .
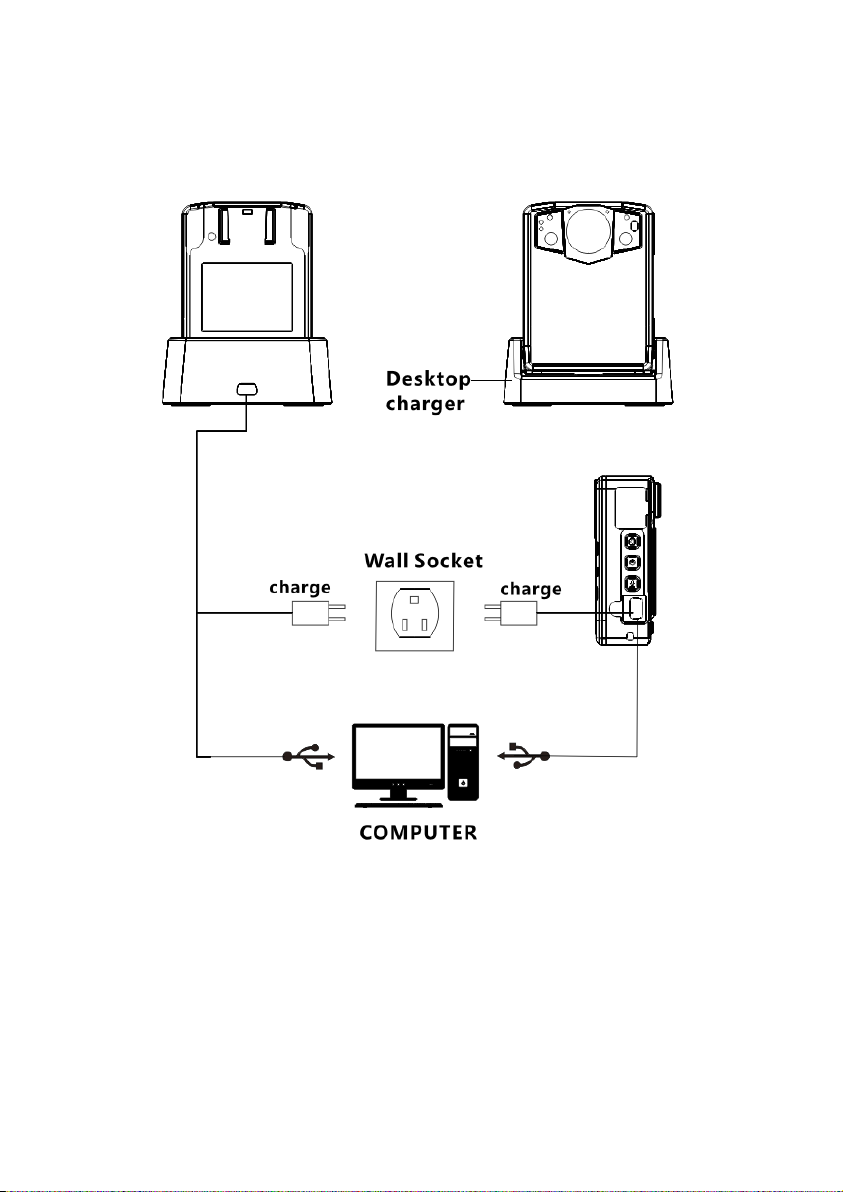
12.Charging methods
1)Connected the DVR with the adaptor and charging .
2)Plug into the desktop charger,then connect with the adaptor and
charging . (option accessories)
3)Put the battery into the desktop charger ,then connect with the
adaptor and charging, you can also to charge both an extra battery
and the camera simultaneously .(option accessories)

12
13

14
13. Management
After turn on the camera ,connect it to the computer ,enter the
password 000000 into the device screen ,same as below picture .
Enter U DISK mode directly ,find the camera disk in your PC and read all
the video files .
Enter U DISK mode

15
Troubleshooting>>>
Trouble
Possible causes
Solution
Can’t power
on
Battery is empty
Charge 3.5hours
Mainboard
automatic
protection
Press 【reset】button
Connect the camera with
computer ,insertion and
extraction the camera
repeatedly
Working
time short
undercharge
Charge the camera more than
3.5hours
Data
transmission
failed
Power of front
panel is not
enough
Use the USB port of back panel
DVR is not
recognized
by the
computer
USB cable
broken
Change new USB cable

16
Warranty statement>>>
1.Any one of the following user will not be able to enjoy the
commitment of the company's warranty policy
* Product was non-normal use
*Non-normal storage conditions, exposed to the humid
environment
* Exposed to the temperature too high or too low temperature
*Unauthorized repair, misuse, negligence, abuse,accident,
alteration
*Damage caused by force majeure (fire, accidents, etc.)
*Food or liquid splash caused damage
*Products of non-normal wear and tear
*Beyond the period of quality assurance
2.Camera warranty is 1 year ,accessories warranty is 3 months
3.More than the quality of the product warranty period,the
company will carry out repairs,you will cover the incremental
cost
Table of contents
Other Siera DVR manuals


