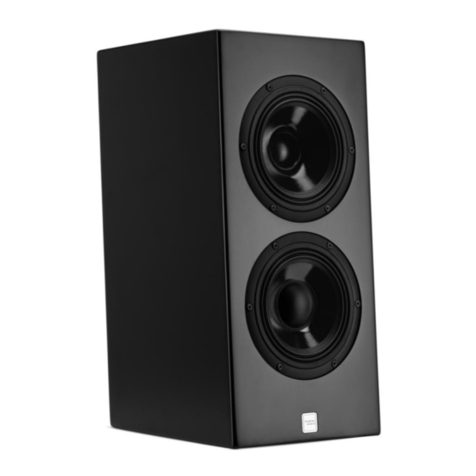
Sigberg Audio SBS.1 User manual

S I G B E R G
A U D I O
SBS.1
Active
Speakers
USER MANUAL

WE CAN’T WAIT TO PLAY
YOUR FAVORITE MUSIC!

INTRODUCTION
Thank you for purchasing a Sigberg Audio product. We
have done our best to provide a high quality product
that will be yours to enjoy for many years to come.
Please read this manual carefully to ensure that you get
the most out of your investment! It includes
information about how to install, set up and care for
your loudspeakers.
SBS.1 USER MANUAL © 2021-2023 Sigberg Audio 3

INSTALLATION &
SETUP

AVAILABLE
CONNECTIONS
Balanced (XLR) connection
Balanced analogue input and through output.
Digital (AES & S/PDIF coaxial and optical)
AES and coaxial input and through output, optical input
Unbalanced (RCA) connection
A stereo input signal is internally mixed to mono. For mono
use, simply connect only one of the channels (left or right) or
use an Y-split.
USB input
Connect your laptop to access the parametric EQ and
additional settings. Otherwise for maintenance / service only.
USB audio not supported
5

INITIAL
CONNECTIONS
The easiest way to think of the SBS.1 is as speakers with built-in
mono power amplifiers. This means you need to connect them to a
pre-amplifier or processor with either RCA or XLR stereo outputs,
the same way you would with a power amplifier.
If you only have one source (with volume control), you can also
connect the SBS.1 directly to a source like for instance a network
streamer.
Your pre-amp / source also need an additional pre-out or subwoofer
output to enable you to connect your subwoofer(s). Using a y-split is
also possible if you only have one pre-out.
If you use XLR connections and have dual subwoofers, you can also
connect the subwoofers directly via the speakers using the XLR
Through connection.
If you need assistance with setting up your system –feel free to
contact us, we will be happy to help!
6
SBS.1
L
SBS.1
R
Pre-amp
XLR / RCA
SW

DIGITAL CONNECTION
If you connect digitally, both speakers will receive a stereo signal.
Your SBS.1 speakers are preconfigured as a L+R pair that will pick up
the individual left or right channel. Inspect the serial number label on
the rear of the speaker. The identical serial numbers will end with
“L” and “R” respectively.
Place the speaker labeled “R” as the right speaker, and the speaker
labeled “L” as the left speaker.
You can double check the configuration by pressing the select button
on the speaker and holding it for 3 seconds. Either “Left”, “Right” or
“Left+Right” will light up to indicate the current configuration.
If you wish to change the configuration or accidently did so: Press
the button for three seconds and keep pressing. The configuration
will change and cycle through “L”, “R” and “L+R” every 1.5 seconds.
7
SBS.1
L
SBS.1
R
Pre-amp
AES / TOSLINK

SPEAKER
PLACEMENT:
INTRODUCTION
With its neutral response, even dispersion and
low distortion, the SBS.1 speakers are suitable
both for traditional hifi listening at home, as
well as nearfield / midfield studio use.
On the following pages we will share some
advice for how to get the most out of your
SBS.1 speaker system.
8

SPEAKER
PLACEMENT:
TOE-IN
The SBS.1 is designed to play well with no (zero)
toe-in, so placing the speakers parallel to the
wall.
This will give the largest soundstage, and due to the
point source nature of the coax driver, it will still give
you accurate stereo perspective. In short, the best of
both worlds.
If you would like a more direct sound and slightly
elevated highs, you can experiment with slight toe-in
towards the listening position. This may also give a wider
sweet spot.
Our recommendation is up to 10 degrees.
9
No
toe-in

SPEAKER
PLACEMENT:
DISTANCE
FROM WALL
The SBS.1 is designed to blend in with a modern living
space. Unlike many speakers, it is designed to be placed
close to the rear wall.
This will give the speakers a slight boost in the bass
region, and it will also give a more even response in the
lower frequencies due to a reduction of the so called
SBIR effect.
Recommended distance from the wall:
~10cm (4 inches)
As always, you are encouraged to experiment. 10-50cm
may work well depending on your room and listening
position.
10

SPEAKER
PLACEMENT:
DISTANCE,
HEIGHT
AND POSITION
Distance: A SBS.1 system with speakers and one or
more subwoofers have the capacity to fill relatively large
rooms. At the same time, its response is both neutral
and smooth, which means it can be used in a nearfield
situation without listening fatigue.
Height: With regards to height, we recommend that
the coax (upper) driver is at or slightly above ear height
when you are in the listening position. The best thing is
to measure, but speaker stands that are ~60-70cm tall
will likely work well.
Listening position: The traditional triangle with equal
distance between the speakers as well as from each
speaker to the listener is a good starting point with
regards to position. Having them wider apart is likely
better than a more narrow setup. If you have the luxury
of alternatives: experiment!
11

BASIC
OPERATIONS
Amplifier overview
12

BASIC
OPERATIONS:
BACK PANEL
Powering on and off
We recommend leaving the speakers on, unless they will not be used for an
extended period of time.
Always make sure the loudspeaker is powered OFF before
connecting/disconnecting cables.
Presets
3 EQ presets are available to adjust (see later in this manual for details).
Click the “select” button on the back of the speaker to switch between presets
(more about these later).
The green LED lights marked P1 / P2 / P3 will indicate the active setting.
13

BASIC
OPERATIONS:
ADJUSTING
DEFAULTS
You may override or adjust the settings below using a laptop connected to the USB port.
All settings are found by clicking the “Device settings” button in the main interface.
Auto on/off (enabled by default)
If no input is detected for 120 minutes, the speaker will enter power saving mode. It
will automatically wake up again when a signal is detected.
Power saving settings and auto on/off sensitivity can be adjusted by changing the
“Activate signal detection” parameters under Device settings.
Signal detection level 1 is the most sensitive (default), 4 is the least sensitive.
Gain and Auto on/off vs gain
The startup gain of the SBS.1 may be adjusted with the “Volume on start” setting.
The default value is +9dB.
Different sources have different output levels, which means the default configuration
of your SBS.1 may not work perfectly.
If you experience that the SBS.1 will not automatically turn on, try decreasing the
“Volume on start” setting by 3dB.
If you experience that your SBS.1 won’t turn off, try changing the “Signal detection
level” from 1 to 2, or increasing “Volume on start” by 3dB.
Note: If you change the gain (volume on start) on your speakers, you will need to
increase/decrease the gain on your subwoofers with the same amount to ensure
proper integration. This can be done either through the software or via the gain knob
on the back of your subwoofer.
14
The software needed to access
these settings can be
downloaded from
www.sigbergaudio.no
After installing the software,
locate the Hypex filter designer
and launch the software.
Connect the speaker to your
computer via the included USB
cable, and the software will
automatically detect your
speaker.
(Windows 7 or higher required)

BASIC
OPERATIONS:
ADJUSTING
DEFAULTS
You may override or adjust the settings below using a laptop connected to the USB
port. All settings are found by clicking the “Device settings” button in the main
interface.
Autodetect signal source
By default the amplifier will autodetect signal from any of the inputs.
If autodetect is enabled and no input is detected for 15 seconds, the subwoofer
will mute (green led blinking).
If you experience any problems with this feature, auto-detect can be disabled
on the main screen by changing the “Force input” setting to the preferred
input.
Note: this setting is defined independently per preset. If you want to force the
input to a specific input for all presets, you have to cycle through all three
presets via the “Filter preset” setting, and configure “Force input” to your
preferred setting on each one.
15
The software needed to access
these settings can be
downloaded from
www.sigbergaudio.no
After installing the software,
locate the Hypex filter designer
and launch the software.
Connect the speaker to your
computer via the included USB
cable, and the software will
automatically detect your
speaker.
(Windows 7 or higher required)

SUBWOOFER INTEGRATION

SIGBERG AUDIO
SUBWOOFER
INTEGRATION
Set your Sigberg Audio subwoofer(s) to preset 2.
Set gain on the subwoofer(s) in the default position (straight up), and listen to
some of your favorite music. Adjust up or down as necessary until the sound is
full, but balanced.
The subwoofer should sound like a natural extension of your speakers. If you
can clearly hear the subwoofer, try turning the level down slightly.
17
Our subwoofers have been
optimized to match the
gain of your SBS.1
speakers.
However, every preamp
have different output
levels, and every room
amplifies the bass from
your subwoofer differently
- so adjustments may be
needed to accommodate
the room and / or personal
preferences.

USING AN
EXTERNAL
CROSSOVER
(AVR PROCESSOR
OR SIMILAR)
The SBS.1 are designed to integrate perfectly with any Sigberg Audio
subwoofers (set your Sigberg Audio subwoofer(s) to preset 2). In this case, you
need to disable the internal lowpass/highpass feature of your AVR / amplifier.
Set your speakers to Large in the AVR setup, and set the subwoofer to
LFE+Main. Please refer to your AVR manual for details on how to do this.
If you want to use an external crossover to test alternative crossover points,
set your Sigberg Audio subwoofers to preset 1. A minimum crossover setting
of 100hz is recommended.
If you have Sigberg Audio subwoofer(s) or other high quality subwoofers placed
at the front wall, up to 160hz may work well.
18

INTEGRATING
SBS.1 WITH A
SUBWOOFER OF
A DIFFERENT
BRAND
Set the crossover of your subwoofer to 100hz, and adjust the subwoofer gain
until the sound is full. If you can clearly hear the subwoofer dominating, dial
back the subwoofer volume until the sound is balanced.
If you have trouble getting a good integration, try adjusting the crossover up or
down slightly (anywhere between 80-120hz may be appropriate, depending on
your subwoofer and your room).
19

SUBWOOFER
INTEGRATION
TROUBLESHOOTING
If you are unable to match up the gain between the speakers and the
subwoofers, it is possible to adjust the gain level of the speakers by connecting
with the included USB cable and a laptop (windows only). Please refer to the
section about Gain on page 14.
If you are still having trouble, do not hesitate to contact us at
support@sigbergaudio.no.
20
Other manuals for SBS.1
1
Table of contents
Other Sigberg Audio Speakers manuals
