Signal Wizard Systems Vsound 2 User manual

1
Vsound 2 Manual
Revision 2.5
Mac OSX version
Signal Wizard Systems ®

2
Table of contents
Section
Page
Introduction
3
Vsound pedal controls
4
Quick start tutorial
5
Notifications and System
6
Response control
7
Spectrum EQ
8
Changing default axes
10
Selecting an impulse response from the software
11
Batch file utility
12
Updating the operating system and factory defaults
13
About impulse responses
14
Hardware specifications
15
Software specifications
16
Contact us
17
Terms and conditions
18

3
1. Introduction
Congratulations on your purchase of vsound 2. Vsound is a revolutionary device that modifies the
sound produced by an electric violin, viola or cello (or an acoustic instrument fitted with a pickup),
producing an output that matches the timbre and voice of a high quality acoustic. Vsound is a complex
piece of electronic engineering, but it is very simple to operate. Simply plug the violin audio lead into
vsound, plug the output from vsound into an amplifier or headphones, switch on and select a violin
sound. Done.
Vsound comes with a range of other functions for optimal performance including a gain-selectable
preamplifier, volume control, a unique high-precision equaliser and an adjustable blender. The
blender, which combines the original with the processed signal, extends the scope of the system for
use with acoustic instruments fitted with pickups on the bridge. The pedal can be controlled either
from a computer using the software supplied (Mac OSX or Windows), or directly from the
footswitches on the top panel of the pedal.
Vsound is supplied with pre-loaded violin impulse responses in its memory, and additional ones are
supplied with the software. You can also download your own responses or contact us to provide you
with new or modified responses.
Here at Signal Wizard Systems Ltd we are really excited about vsound and we hope you get many
hours of enjoyment using this system.
Copyright © 2019 Signal Wizard Systems Ltd
www.signalwizardsystems.com

4
2. Vsound pedal controls
Top panel
•Volume. This rotary control adjusts volume of the output.
•Preamp. This sets the gain of the input preamplifier, allowing a gain of either 0 dB or 14 dB.
•Response select. This footswitch is used to select the IR. The pedal can hold 10 IRs in its memory,
and the footswitch cycles round from 0 (bypass) to 10.
•Bypass toggle. This footswitch toggles between bypass and the presently selected IR.
Front panel
•Input. Uses a standard ¼ mono jack plug.
•USB. This is a micro USB socket, used to connect the vsound pedal to your Mac.
•Power input. This is standard 9 V, centre negative socket, for 5.5 x 2.1 mm plugs
•Output. Uses a standard ¼ mono jack plug.

5
3. Quick start tutorial
Ensure your computer or laptop has internet access. If you are reading this then you will have already
downloaded and installed the vsound software from the website, and the vsound software is open.
Now follow these steps:
Connect the supplied power adaptor to vsound and switch on (do not use any other adaptor).
Connect vsound to the computer using the USB cable provided.
The drivers for the USB communication will automatically be installed from the internet. Do not
proceed until this stage has been completed.
Click the “Detect” button in the Notifications and system window. The system will search for the
vsound pedal, and will typically report the following messages:
Detecting hardware...
Hardware found.
Resetting system...
Testing status...
Communications: OK
Firmware version: 2.5
Start up mode: Saved settings
Volume: 5
Mixer wet: 100
Mixer dry: 0
Selected response: Bypass
Reset sequence complete.
Your vsound pedal is now fully set up and ready to go.
6
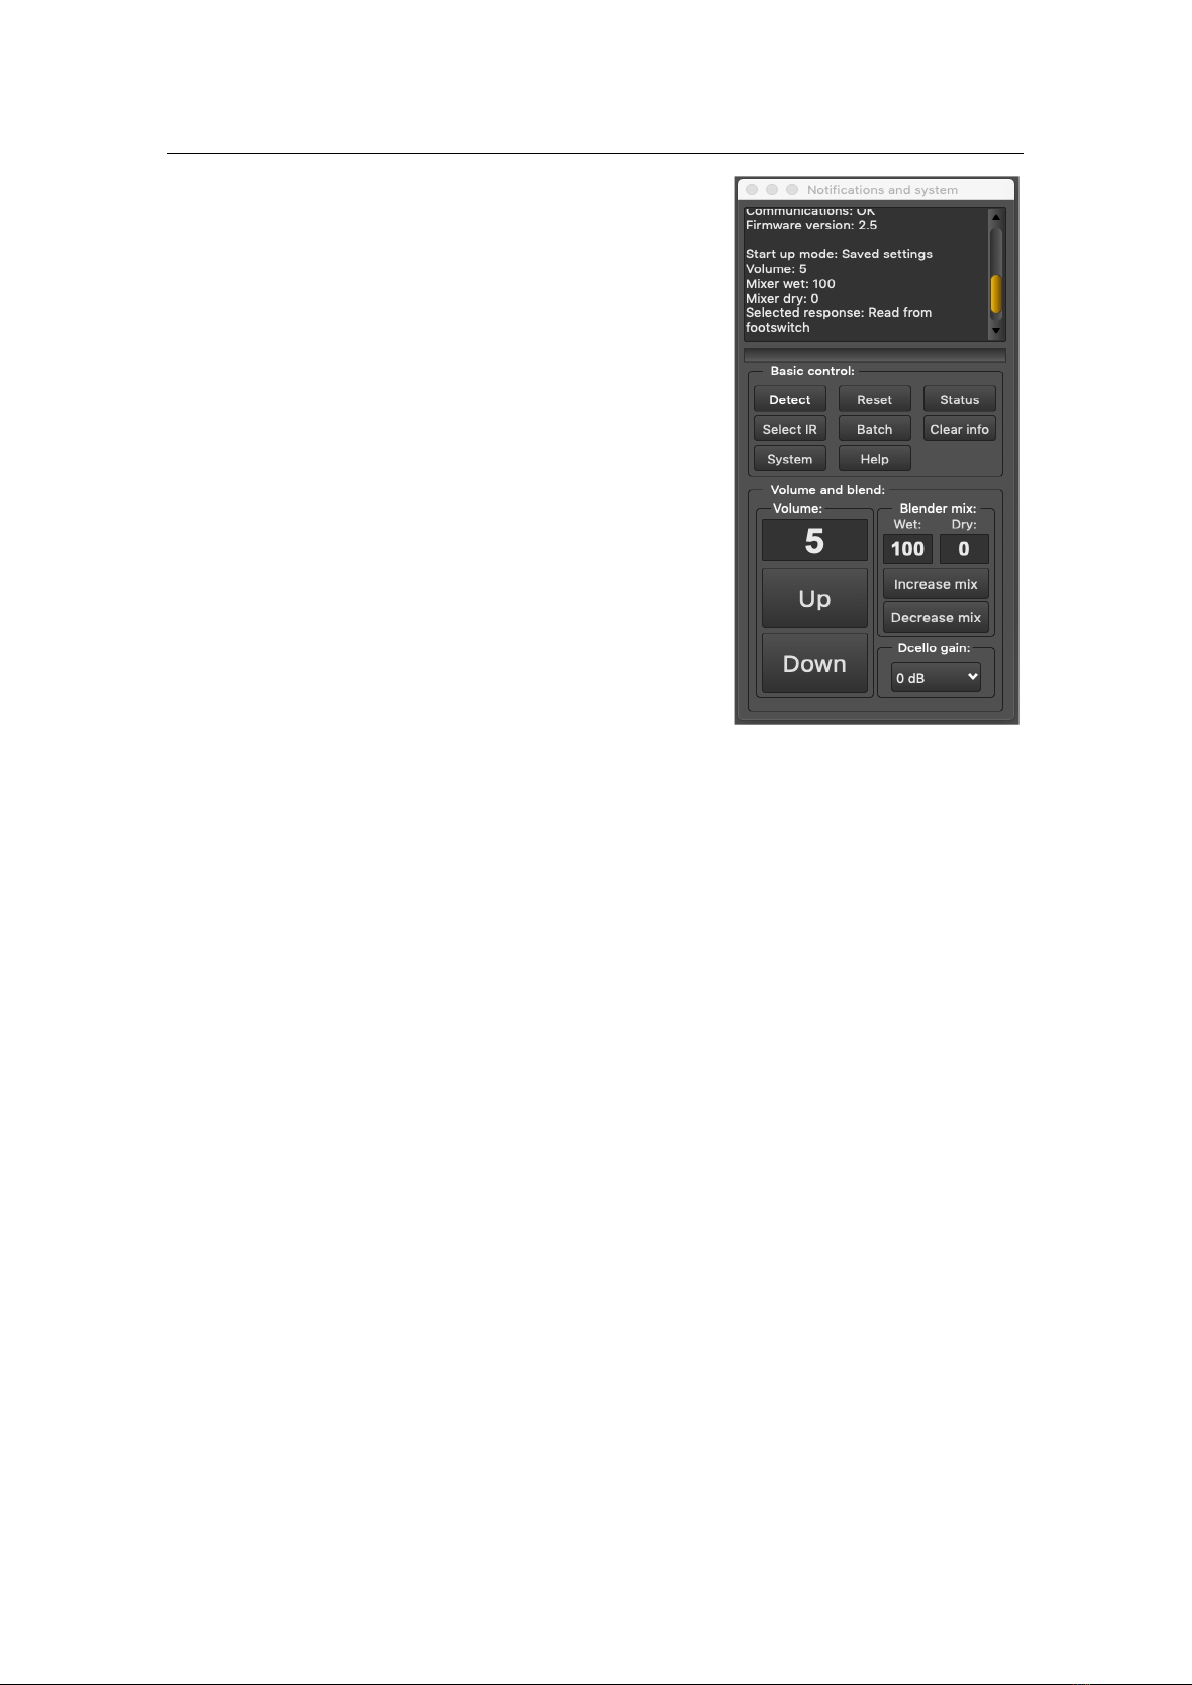
4. Notifications and system
The main controls in the Notifications and System window are as
follows:
•Detect –establishes communication with vsound. This button
must be clicked each time the software is opened (with the
hardware unit connected to the computer).
•Reset –resets the vsound pedal. This is equivalent to
powering up the hardware unit.
•Status - returns the operating status of vsound and syncs the
settings of the software to those of the hardware. For
example, if the volume control has been altered using the
navigator buttons on the hardware, clicking “Status” will
update the volume level shown by the software.
•Select IR –opens a new window, allowing any one of ten IRs
loaded in memory to be selected. Acts like the left footswitch.
•Batch –opens a new window, allowing the multiple IRs to be
grouped as a batch and all downloaded automatically.
•Clear info –clears all messages in the notification window.
•System –opens a new window, allowing the current version of the firmware operating system to
be updated or reloaded. Also allows the pedal to be reset to its factory default state.
•Digital volume buttons - these increase or decrease the digital volume in 4 dB steps. These buttons
act as a master volume control. Like all other controls, the digital volume setting is retained unless
changed or overridden using the default start up conditions.
•Increase mix and decrease mix –These buttons control the mix or blend proportions of the
original (dry) signal with the processed (wet) signal. It is a very powerful feature, since it allows
the player to make subtle changes to the timbre and colouration of the final audio output. The dry
signal is the signal originating directly from the pickup (after pre-amplification), but before the
bass cut filter. The wet signal is the signal following impulse response processing and
equalization. See the system diagram.
•Pre-amp (dcello) –alters the pre-amp gain between 0 dB and 14 dB. Note –this feature is only
supported by the dcello board, not the vsound 2 unit, which ignores this command. The pre-amp
gain for the vsound 2 unit is selected by the physical switch on the unit.

7
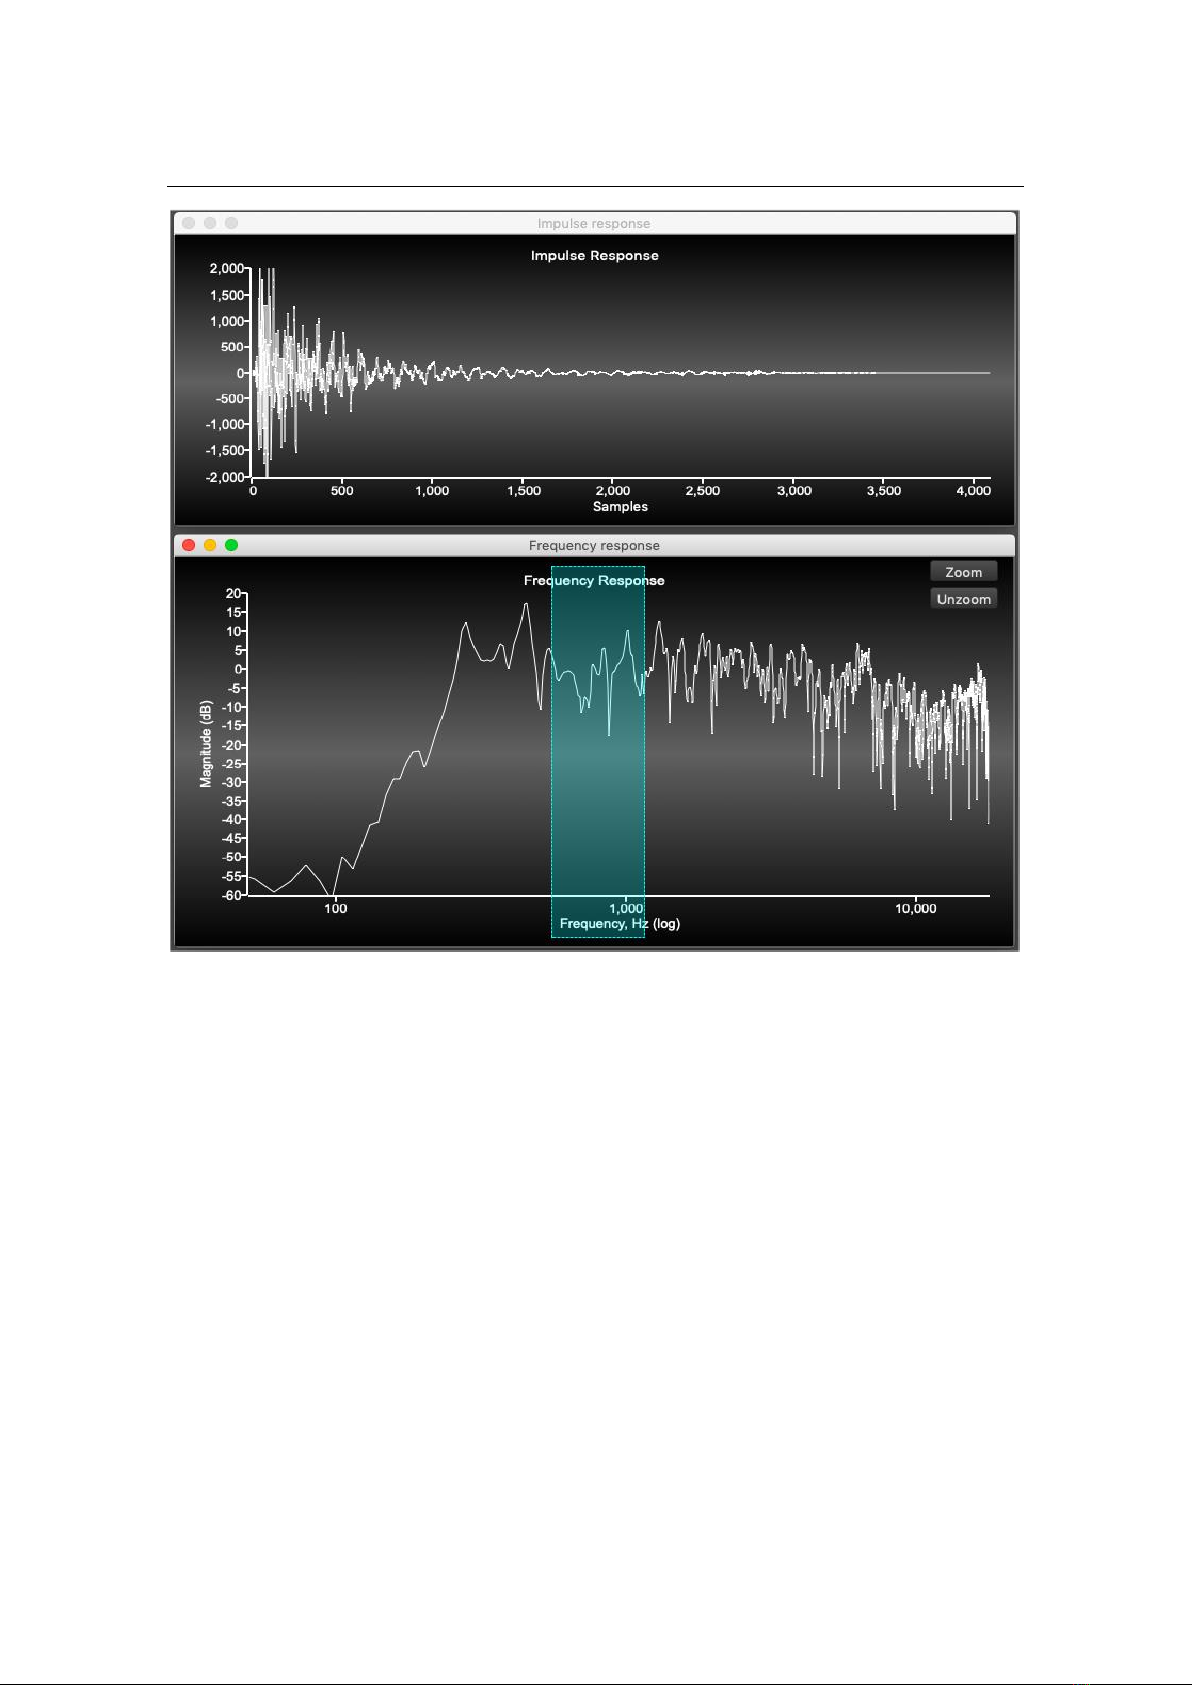
5. Response control
The Response Control window is the section of the software
that allows the user to open an impulse response and
download it to the hardware, as well as EQ the response
using the versatile EQ tool. The impulse response and its
spectrum are shown in the plot areas when loaded from
disc.
To open an impulse response file, simply click “Open
response”. The name of the file will appear in the text box
below this button.
To download the file, simply select any sector between 1
and 10 from the drop-down list, and click “Download”. As
the file is being downloaded, the software will display the
message “Downloading impulse response…” Any existing
impulse response in the chosen sector will be overwritten.
The vsound pedal will automatically select the impulse
response after download. To choose other previously
downloaded responses, click the “Select IR” button from the
Notification and System window.
Note: any settings and responses that you select will be automatically saved and recalled each time
the device is switched on or reset.
The controls are summarised as follows:
•Open response –opens an impulse response as a text file or a WAV (wave). The files supplied with
the software conform to a particular format, described under “About impulse responses”.
•Download –downloads the impulse response to the chosen sector (1 –10). The first 32 characters
of the title, will be used by vsound and appear in the “Select impulse response” window.
•Grid –toggles the grid on the frequency response and impulse response plots.
•Clear–clears the impulse and frequency response plots and internally closes the associated
impulse response file.
•Frequency axes –this drop-down list allows you to change the way the frequency response is
plotted. It does not affect the IR in any way, i.e. it is for visual purposes only.
•Master IR gain, dB - this slider allows you to change the gain of the IR before you download it,
within a range of +20 dB to -20 dB. When vsound opens an IR, it automatically sets the gain to a
standard loudness. This can be overridden with this slider control. Clicking the “Reset” button
returns the IR to its default (automatic) gain.
•Cursor, lower –Shows the x and y position of the mouse when oved over the IR or frequency plot.
For the IR plot, this is sample v gain. For the frequency plot, this is frequency v gain.
•Cursor, upper –Shows the x and y position of the mouse when the left button is held down (or
equivalent for the track pad) for the frequency plot. These windows are not used for the IR plot.
To zoom in on a region of the IR plot, move the cursor to a start point, hold down the left mouse
button (or mouse pad equivalent) and drag. Now release. The plot will zoom to this region. To
unzoom, drag anywhere on the IR plot from right to left. For the frequency plot, zooming is done
slightly differently. Select the region as before, which will become highlighted. Now click the “zoom”
button in the top-right corner of the frequency plot. To unzoom, click the “unzoom” button. The zoom
feature works differently for the IR and frequency plots because of the equalizer, which is discussed
next.
8
6. Spectrum EQ
The equalizer is a new and very powerful feature introduced in vsound version 2.5. It allows the
frequency response to be modified with exceptional precision using an interactive tool, instantly
generating a new impulse response that can then be saved or downloaded to the pedal in the usual
manner.
The newly equalised IR introduces no latency in the modified impulse response.
To use the editor, simply select a region of the frequency response you wish to change by holding
down the left mouse button, dragging and then releasing. Now using the mouse wheel, roll it forwards
or backward to increase or decrease the gain of the highlighted region (if you are using the mouse
pad, use a two-finger swipe, up or down).
If you want to EQ a very small region, then zoom in the normal way, select a region within this, and
EQ as before.
Important: the gain of the EQ’d region will change in steps given by the text box labelled “Gain inc.,
dB:”, in the Response Control window. By default, this is set to 1 dB, but you can change it to anything
you like. Take care when using large steps.
Note how the IR changes as you roll the mouse wheel or swipe with the mouse pad.
Also important: instead of using the mouse wheel or pad, you can simply click the button labelled
“EQ” in the Response Control window.

9
•Precision control - this has two settings, standard (default) or high. With the standard setting, the
equalizer will change the gain of the selected region of the frequency response exactly as specified.
However, with a large gain change, the modified impulse response can have ripples in the tail end,
which may be undesirable. To avoid this artefact, set the precision to “high”. The EQ will adapt the
gain of the frequency response so that the IR has no ripples.
•Shaping –by default, this is set to “curved”. This means that the gain of the region being EQ’d is
shaped to smoothly reach a peak at the centre, then fall off again. To EQ the region with a flat
profile, select “rectangular”.
•The “Undo” button restores the original impulse response (as it was when opened).
•The “Save IR” button allows you to save the newly edited impulse response as a new file.

10
7. Changing default axes
From the main menu, select Tools > Axes. A new
window opens, which you can use to change the
vertical axis range of the impulse response and
frequency response plots. For the frequency response
plot, two ranges are provided, depending on whether
the vertical axis is in dB (default) or linear scaling.

11
8. Selecting an impulse response from the software
Use this dialog box to select different violin
responses using the integrated software. The
controls are as follows:
•Select buttons - these work like the left
footswitch, except that any response can be
selected at random. The pedal will always
remember the most recently selected response
and use this on power-up or after a reset.
When an IR is selected, it is also plotted as an
impulse response and frequency response in
the normal way.
•Bypass - this deselects all filters (00 on the
display) and runs the vsound pedal in bypass
mode.
•Clear - clears all the violin response names from the name fields, setting them to empty (note: the
filters are still retained in the pedal’s memory, and remain there until overwritten).
12
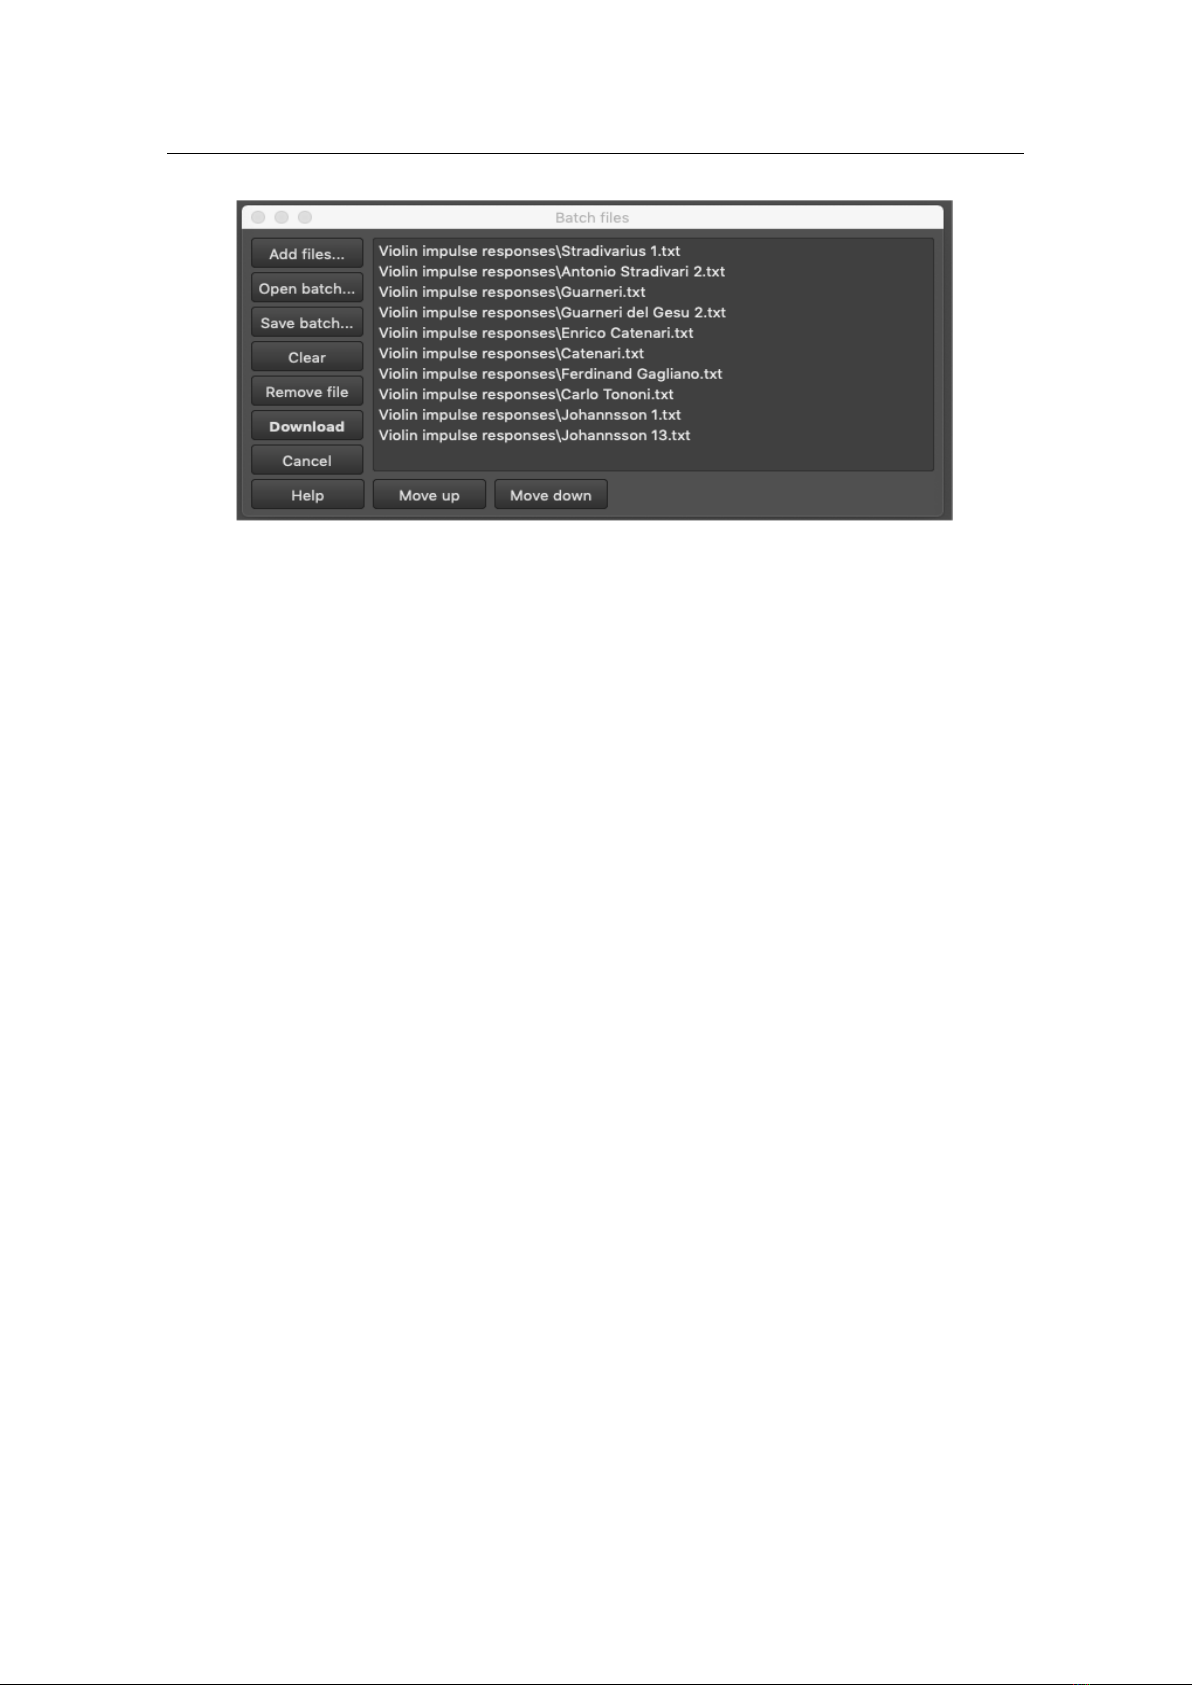
9. Batch file utility
The batch file window allows you to open multiple IRs, add them to a list, and download them all to
the unit as a batch.
You can also save your list as a batch file, for easy recall later. The buttons are:
•Add files… - click this to select and add any IR to the list.
•Open batch… - opens a batch file, which contains a list of IRs, that you created previously.
•Clear –clears all of the IRs from the list.
•Remove file –removes the IR that has been selected from the list.
•Download –downloads the entire list of IRs to the vsound pedal.
•Cancel –cancels the download operation.
•Move up –promotes the position of the select IR in the list.
•Move down - demotes the position of the select IR in the list.

13
10. Updating the operating system and factory defaults
Using this dialog box, you can download new
versions of the real-time firmware operating
system (OS) from the Signal Wizard Systems
website as they become available. You can also use
it to restore your vsound to its original factory
default settings. To check which version of the
firmware you have, click the “Status” button from
the Notification and System Window. If the version
on the web has a higher number, then download it
and save it to the vsound folder.
To update or restore the OS, select Tools > System from the main menu. A window will open, called
“Update operating system”. Click the “Update” button. The firmware will be downloaded in seconds.
To activate the new version of the firmware, click “Reset”. Check that the newly installed firmware
matches the version number on the website.
To restore your vsound pedal to its original factory default settings, click the “Default set” button.
Take care using this option, because any changes you have made to the pedal will be completely
overridden.

14
11. About impulse responses
Vsound operates by convolving the impulse response from an acoustic violin with an input signal,
normally taken from an electric (silent) violin). However, it is equally possible to use vsound with an
acoustic violin fitted with a bridge pickup. The use of the blender is desirable in this case, since it
allows the player to mix the original (dry) signal with the processed (wet) version, in any proportion.
Obtaining a high-fidelity impulse response from an acoustic violin is a subtle procedure, involving
measurements normally undertaken in an anechoic chamber under strictly controlled conditions.
Signal Wizard Systems offers a violin characterization service to provide our customers with impulse
responses of their favourite acoustic violins. For more details, please contact us through our website:
www.signalwizardsystems.com.
The impulse response files packaged with the system are formatted as encrypted text files and
therefore cannot be used with any other third-party software or system.
If you wish to produce your own impulse response files they must be in stored in WAV (wave) file
format. The WAV file must be single channel, 16-bit or 32-bit using PCM encoding (not floating-point
encoding) and contain 4096 values. The sample rate must be exactly 36 kHz (for technical reasons
relating to the internal operation of the vsound hardware).
If you have IRs in a different format but wish to use them with vsound, contact us and we will convert
them for you, free of charge.

15
12. Hardware specifications
Hardware
•Stomp-box design
•Large 2-digit 7-segment LED display
•Foot switches: violin select and bypass/toggle
•Standard quarter inch mono phono sockets
•Output to amplifier or headphones
•Rotary volume control
•9V DC input, centre negative
•Current consumption: 200 mA
•Micro USB socket
•Dimensions (mm): L127 x W94 x H42
•Weight: 315 grams
Analogue system
•24-bit sigma delta codec (ADC, DAC), 36 kHz sample rate
•Single channel input
•Gain switchable pre-amplifier, 0 dB and 14 dB
•Input impedance: 500 kΩ
•Output: audio power amplifier, 250 mW per channel of continuous average power to an 8X load
with 0.1% (THD).
•Full scale input/output voltage range, V (peak-to-peak), typical: ±1.8 V
•Noise: <1 mV RMS, codec sample rate of 36 kHz
•System latency, bypass: 0.68 milliseconds
•System latency, IR: 1.80 milliseconds
Processor system
•Clock Speed: 200 MHz
•Enhanced Filter Co-Processor (EFCOP)
•400 MMAC
•24-bit resolution (56-bit intermediate)
•Highly parallel instruction set with unique DSP addressing modes
•Two 56-bit accumulators including extension byte
•Two parallel 24 X 24-bit multiply-accumulates in 1 instruction cycle (1 clock cycle)
•Double precision 48 X 48-bit multiply with 96-bit result in 6 instruction cycles
•56-bit addition/subtraction in 1 instruction cycle
•Fractional arithmetic with support for multi-precision arithmetic
•Hardware support for block-floating point FFT
•Hardware nested DO loops
•Digital Phase Locked Loop (PLL) clock multiplier

16
13. Software specifications
•Seamless communication with hardware unit
•Download and control of impulse responses
•Auto loudness correction
•Autosave all settings
•Gain adjustment and full digital gain
•Blender control (wet/dry balance)
•Detailed impulse and frequency response display with zoom
•Spectrum EQ with save configuration
•Full real-time control of unit and violin select
•Diagnostics and easy firmware upgrade
•Fully compatible with dcello hardware
•Context sensitive help

17
14. Contact us
You can get in contact with us either by completing the online contact form on the Signal Wizard
website, by sending us an email or by phone.
General: mail@signalwizardsystems.com
Sales: sales@signalwizardsystems.com
Web: www.signalwizardsystems.com
Facebook: www.facebook.com/VsoundSWS
Tel: +44 161 306 4906
Company details
Copyright 2019 © Signal Wizard Systems Ltd. All rights reserved
SWS Ltd VAT number GB290639382
Company registration number 09689576
Signal Wizard Systems is a registered trade mark UK00002575413 (2011)

18
15. Terms and conditions
Signalwizardsystems.com is operated by Signal Wizard Systems Ltd, a company registered in
England (Company registration number 09689576, VAT number GB290639382). By law, all
customers have the right to cancel their orders. This legislation is specific to the Distance Selling
Regulations which give consumers extra protection when buying online.
All Signal Wizard products are guaranteed for 12 months from the date of purchase. If your product
fails within this period, for reasons other than mishandling, physical shock, water ingress or other
such accidents, we will repair or replace it free of charge.
You also have the right to cancel the purchase of a good without having to give a reason at any time
within the "cooling off period" of seven working days, beginning on the day after you receive the
goods.
If you are in possession of the goods you are under the duty to retain them and take reasonable care
of them. You must send the goods back to us to our contact address at your own cost (unless we
delivered the item to you in error or the item is damaged or defective) as soon as possible once you
have cancelled the contract.
We reserve the right to make a charge not exceeding our direct costs of recovering the goods if you
do not return the goods or return them at our expense.
Once you have notified us that you wish to cancel the contract, any sum debited to us will be refunded
to you as soon as possible and in any event within 30 days of your cancellation.
Signal Wizard Systems ®
Table of contents
Popular Recording Equipment manuals by other brands


Berkeley Audio Design
Berkeley Audio Design Alpha USB Preliminary user guide

urmet domus
urmet domus Agora 1372 Installation sheet

Bose
Bose ControlSpace SP-24 quick start guide

Endress+Hauser
Endress+Hauser Ecograph T technical information

impro
impro XRH900-1-0-GB Series installation manual

Vivaldi
Vivaldi TELEMACO Starting guide