SignWarehouse SE-XH-SB-5IN1-S User manual

800-899-5655
www.signwarehouse.com •SignWarehouse, Inc. • 2614 Texoma Drive, Denison, TX 75020
•Toll Free Phone: 1-800-899-5565 •Local Phone: 903-462-7700 •Fax: 1-800-966-6834
USER MANUAL
SignWarehouse Basics
5in1 Combo

800-899-5655
www.signwarehouse.com •SignWarehouse, Inc. • 2614 Texoma Drive, Denison, TX 75020
•Toll Free Phone: 1-800-899-5565 •Local Phone: 903-462-7700 •Fax: 1-800-966-6834
Table of Contents
Page
1
2
3
4
5
6
7
8
9
10
11
Specicaons
Operaon Instrucons Read Before Use
Basic Operaon
The Shirt Press and Changing Shirt Aachment
Plate Aachment
Mug Aachment
Using the Mug Aachment
Cap Aachment and Changing Lower Platen
Heat Transfer Applicaon Guidelines
Troubleshoong Tips
Warranty

800-899-5655
www.signwarehouse.com •SignWarehouse, Inc. • 2614 Texoma Drive, Denison, TX 75020
•Toll Free Phone: 1-800-899-5565 •Local Phone: 903-462-7700 •Fax: 1-800-966-6834
1
Specicaons:
Item Code: SE-XH-SB-5IN1-S
Voltage: 110V/60Hz
Power:
Control Panel: Digital Control Panel
Time Range: 0~999sec.
Temp. Range: 0~480°F
Packaging: Cardboard packaging
Gross Weight: 110lbs (50kg)
Operaon Handle
Control Panel
Heang Element Connector
Pressure Knob
Silicone Pad
Lower Aluminum Plate
Heang Element

800-899-5655
www.signwarehouse.com •SignWarehouse, Inc. • 2614 Texoma Drive, Denison, TX 75020
•Toll Free Phone: 1-800-899-5565 •Local Phone: 903-462-7700 •Fax: 1-800-966-6834
Operaon Instrucons
Read Before Use
● Check the voltage before using it. The correct voltage is 110-120V/60Hz
● Turn o the machine when not in use, and remove the power plug from socket.
● Grasp the handle rmly when opening.
● Keep children away from the machine.
● Do not touch the heang platen and platen cover aer pressing while in operaon
● Do not aempt to press products that are not intended for normal heat transfer
● Do not set the temperature any higher than 480° F as it may cause over heat and stop
working.
● The heat press carries a ground line by default, please make sure the socket gets a
ground line protector.
2

800-899-5655
www.signwarehouse.com •SignWarehouse, Inc. • 2614 Texoma Drive, Denison, TX 75020
•Toll Free Phone: 1-800-899-5565 •Local Phone: 903-462-7700 •Fax: 1-800-966-6834
3
Basic Operaon
Getting Started
● Connect the power cable, and turn on the power switch.
● The control panel will immediately display the current temperature which should
begin climbing shorty and will connue unl it reaches the programmed temperature.
● The control panel has two controllable opons.
○ P-1 = Program 1 = Temperature
○ P-2 = Program 2 = Timer
Setting Temperature and Timer
● Press "OK" to entrer the TEMPTERATURE seng (P-1)
● Arrow Up or Down to change the desired tempterature.
● Press "OK" again to lock in the new temperature and enter the TIMER seng (P-2).
● The press will beep and the temperature will stop climbing once programmed
temperature is reached.
Setting Temperature and Timer
● With the press open (handle up), turn the pressure knob clockwise to increase
pressure and counter clockwise to decrease pressure.
Fig 1: Close up of the control panel. Fig 2: The P-1 is to set the
temperature.
800-899-5655
www.signwarehouse.com •SignWarehouse, Inc. • 2614 Texoma Drive, Denison, TX 75020
•Toll Free Phone: 1-800-899-5565 •Local Phone: 903-462-7700 •Fax: 1-800-966-6834
4
The Shirt Press
The basic setup out of the box is a 12″ x 15″ shirt press. This press is a swing away,
which makes placing and removing garments safe and easy. Unlike some presses that
can only swing open to the right, this model can swing to the right or le.
Cauon: to reduce risk of burns, use the black handles to swing the heat platen away
during use.
1) Turn o the press, let aachments cool before switching out.
2) Loosen the wing nuts.
3) Slide the heat platen towards the back of the press.
4) Slide new aachments into the track.
5) Tighten the wing nuts and make sure the platen is secure.
6) Connect the plug into the control panel, and make sure the plug is securely
connected.
7) Thread the screw cap and ghten all the way. This keeps the plug from coming loose
during producon.
*No tools needed for this process*
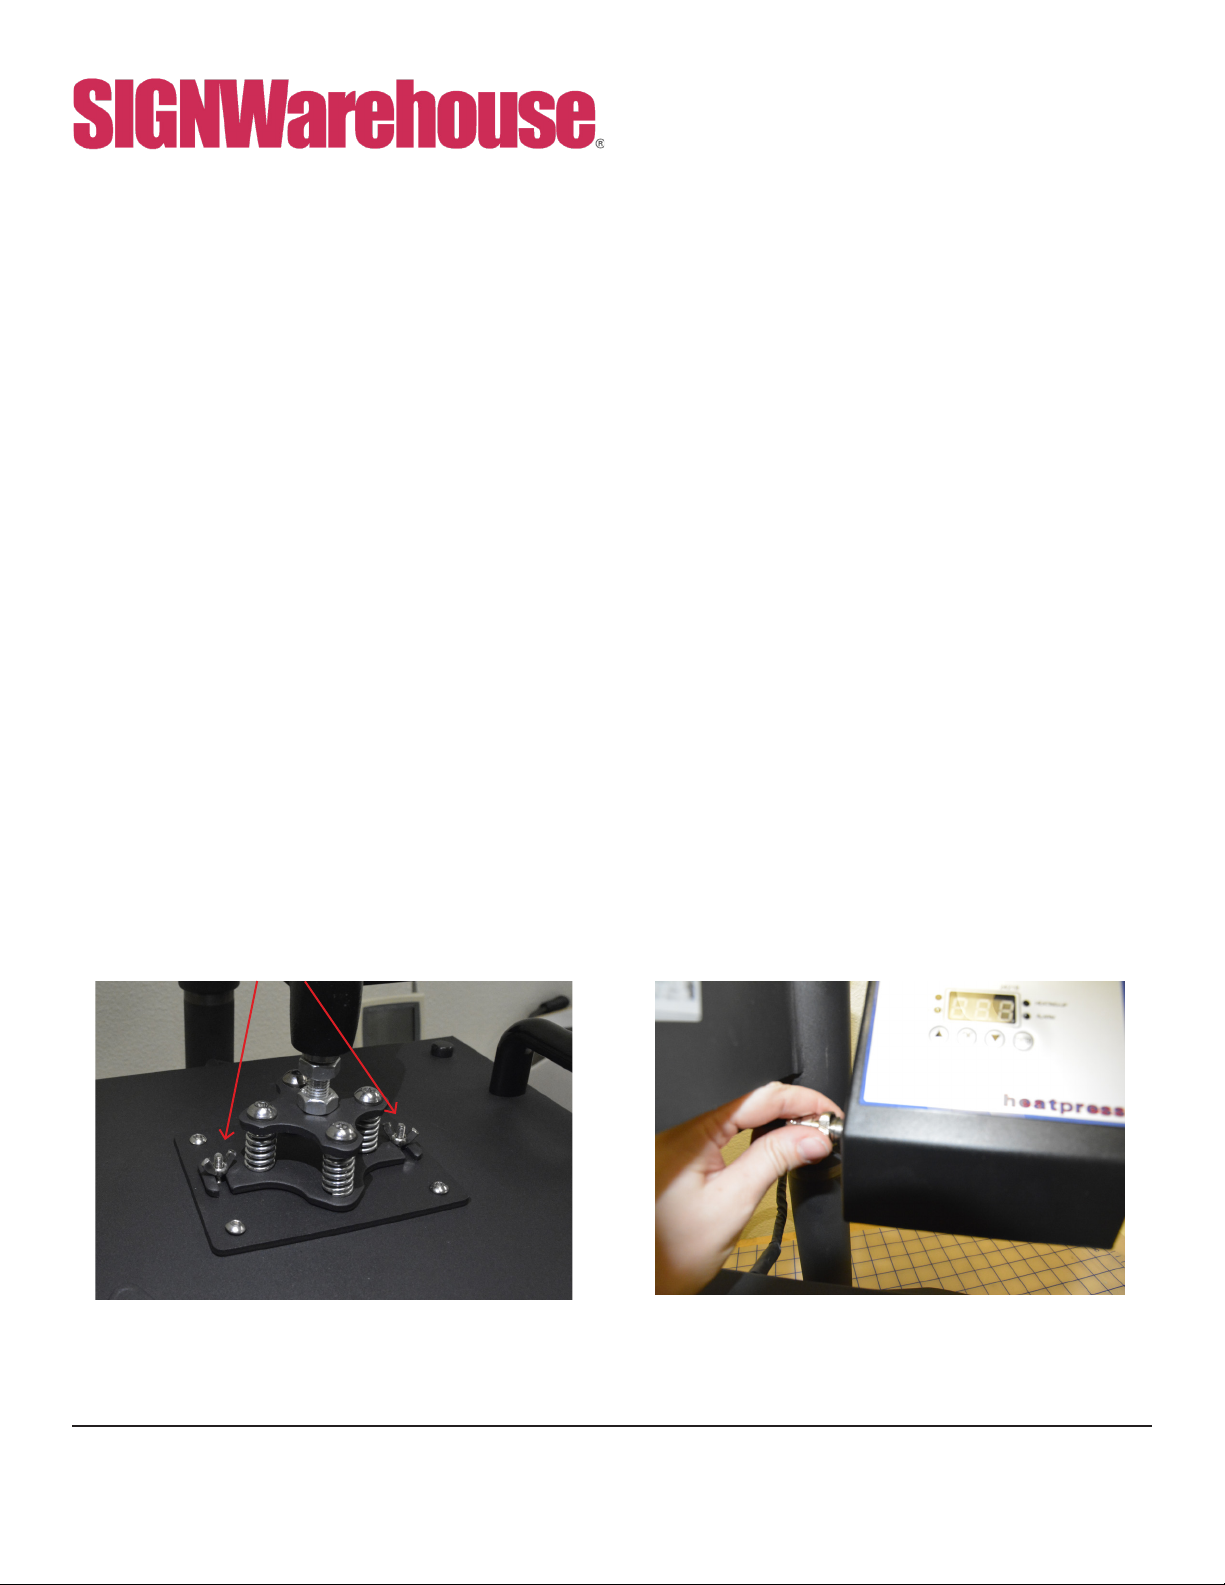
Changing Shirt Aachment
FIG 2: Remove the shirt aachment’s heat platen by
loosing the wing nuts.
FIG 3: To disconnect the power cable, loosen the
collar on the circular connector, then pull the plug
away from the control panel housing.
Wing Nuts
800-899-5655
www.signwarehouse.com •SignWarehouse, Inc. • 2614 Texoma Drive, Denison, TX 75020
•Toll Free Phone: 1-800-899-5565 •Local Phone: 903-462-7700 •Fax: 1-800-966-6834
5
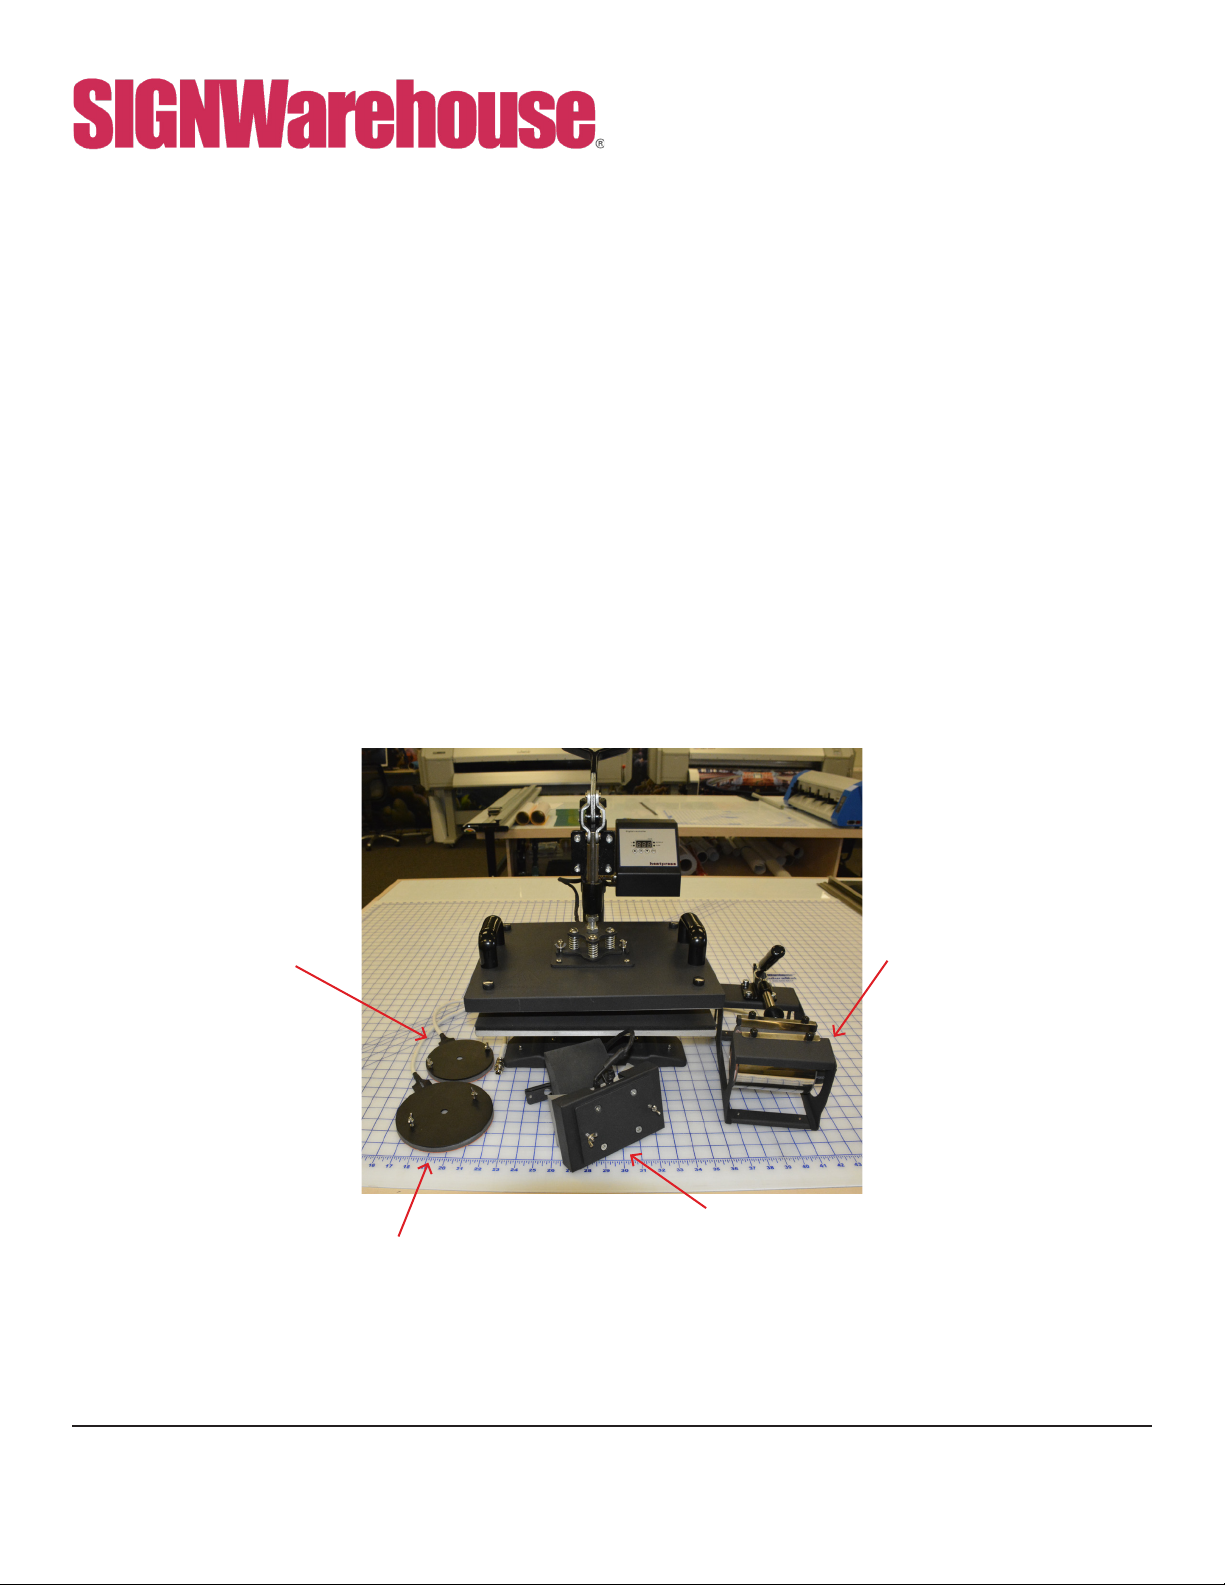
Plate Aachments
The Basic 5in1 combo heat press comes with two plate aachments. They’re 4.75” and
6” in diameter. These replace the upper swingaway heat platen and close on the stan-
dard 12” by 15” lower platen. When checking the pressure on this aachment, do a
few tests before comming to producon.
4.75" Plate Aachment Mug Aachment
Cap Aachment with
lower platen
6" Plate Aachment
FIG 4: The Basic with all the aachments is pictured
below

800-899-5655
www.signwarehouse.com •SignWarehouse, Inc. • 2614 Texoma Drive, Denison, TX 75020
•Toll Free Phone: 1-800-899-5565 •Local Phone: 903-462-7700 •Fax: 1-800-966-6834
Mug Aachment
The mug aachment is like our MP5 mug press, the dierence is that this one is not
a stand-alone unit. The basic setup is ideal for 11 oz mugs, but we oer other ngs
for larger and smaller cups as well. The mug press is great for dye sublimaon and laser
transfers. Remember that the dye sublimaon will only work with polymer-coated cups
and mugs.
The mug aachment operaon is a lile dierent then the others.
Cauon: The mug aachment has a very small platen so it heats up quickly. Make sure
the press is powered o before aempng to aach the mug aachment.
1) Remove the current aachment from the handle, and unplug it from control panel.
2) Plug in the mug aachment into the control panel, as seen below.
3) Check the pressure of the press. The mug aachment can be used with other heat
platens connected to the handle as long as it is plugged in.
4) Move the mug aachment handle backwards to open the sleeve and insert a mug.
Pull the handle forward to securely contain the mug in the sleeve.
5) To acvate the mer for mug aachment use, the handle must be lowered as if you
are using the shirt aachment.
Changing to Mug Aachment
FIG 6: The mug aachment is
ready for use. The lower platen
can be removed or stay on the
main base. The mug aachment
will work both ways.
FIG 7: The mug aachment’s
heat platen connects the same
way as the shirt aachment,
using the circular connector.
6
800-899-5655
www.signwarehouse.com •SignWarehouse, Inc. • 2614 Texoma Drive, Denison, TX 75020
•Toll Free Phone: 1-800-899-5565 •Local Phone: 903-462-7700 •Fax: 1-800-966-6834
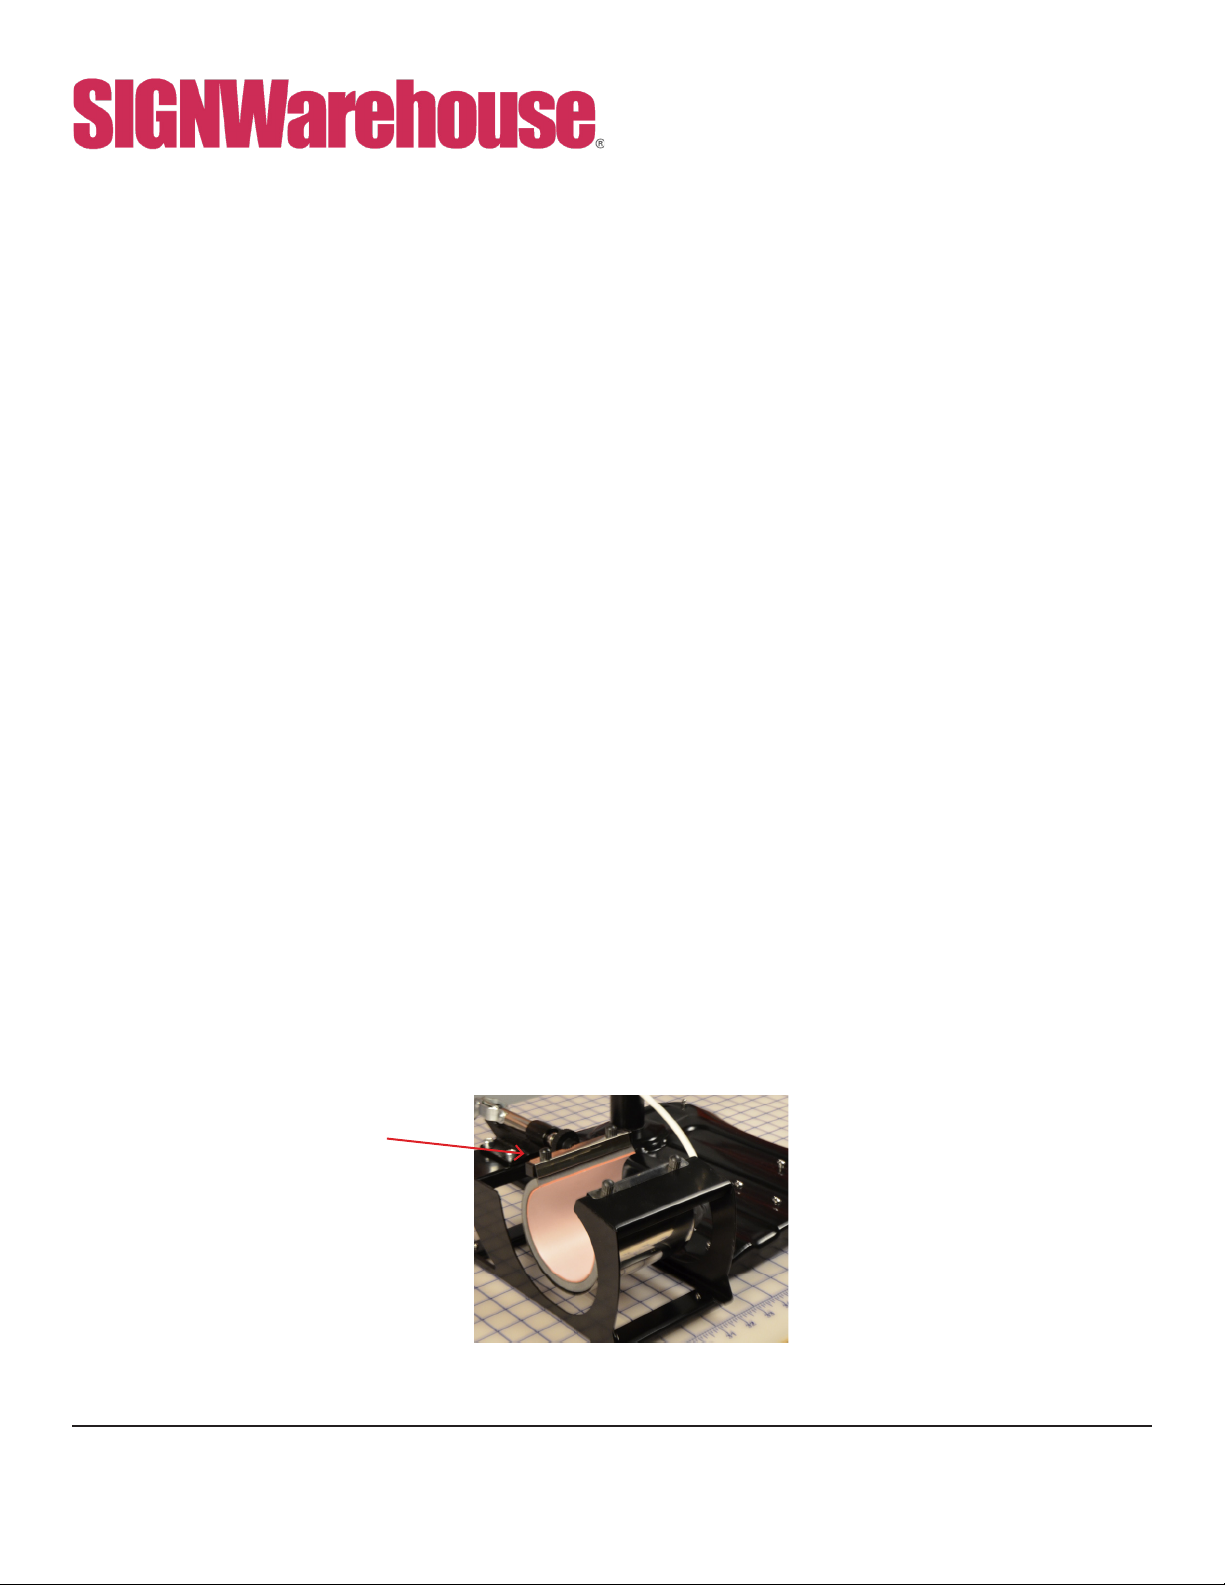
7
Thumb Screws
FIG 8: The thumb screws are located near the opening of the
mug aachment. Always make sure they are secured.
The mug aachment operaon is a lile dierent then the others.
Cauon: The mug aachment has a very small platen so it heats up quickly. Make sure
the press is powered o before aempng to aach the mug aachment.
1) Check the pressure of the press. The mug aachment can be used with other heat
platens connected to the handle as long as it is plugged in.
2) Move the mug aachment handle backwards to open the sleeve and insert a mug.
Pull the handle forward to securely contain the mug in the sleeve.
3) To acvate the mer for mug aachment use, the handle must be lowered as if you
are using the shirt aachment. Once you have placed your mug in the sleeve,
lower the heat press handle to start the cycle mer. At the end of the cycle,
raise the heat press handle to silence the alarm and push the mug aachment
handle backward to remove the mug.
4) Like the standalone MP5 EnduraPress mug press, you can use various mug ngs
with the mug aachment to decorate mugs of dierent diameters. The default ng
is designed for 11oz mugs. To change to a larger or smaller ng, remove the screws
or thumb screws and disconnect the power cable from the control panel. For more
informaon on mug ngs, please click here or refer to the MP5 User Manual.
TIP: Sublimaon connues as long as the surface temperature remains at or near 400°F.
If the mug is sll hot aer the transfer paper is removed, the ink may sublimate as
heat rises from the mug surface resulng in ‘ghosng’ or hazy blurry transfers.
To stop the sublimaon process aer you remove the transfer paper, dip the mug
in a bucket of cool water. This will ensure a clear, sharp transfer.
Using the Mug Aachment
800-899-5655
www.signwarehouse.com •SignWarehouse, Inc. • 2614 Texoma Drive, Denison, TX 75020
•Toll Free Phone: 1-800-899-5565 •Local Phone: 903-462-7700 •Fax: 1-800-966-6834
Cap Aachment
For best results, make sure you choose a heat transfer lm suitable for the cap’s fabric.
Use the me, temperature and pressure sengs for that parcular HTV.
To use the cap aachment, replace both the heat platen and table. Changing the lower
table from the shirt aachment to the cap aachment requires the use of a (5mm) allen
wrench and a pair of pliers.
Change the lower platen before aaching the cap press.
1) Use the 5mm allen wrench to loosen the table for the shirt aachment.
2) Place to the side and place the cap platen on the base.
3) Use the piers to secure the washer on the boom of the table while adjusng the
hex head bolts with the allen wrench.
4) Make sure the platen is secure.
5) Aach the cap press heat platen using the wing nuts, as seen below (Fig 11).
6) Place the crown of the cap over the curved base. Place your HTV transfer on
the crown, cover with a Teon Sheet, and lower the curved heat platen. Be sure
to adjust the pressure using the pressure knob (Page 3) to produce sucient pressure
for a successful transfer.
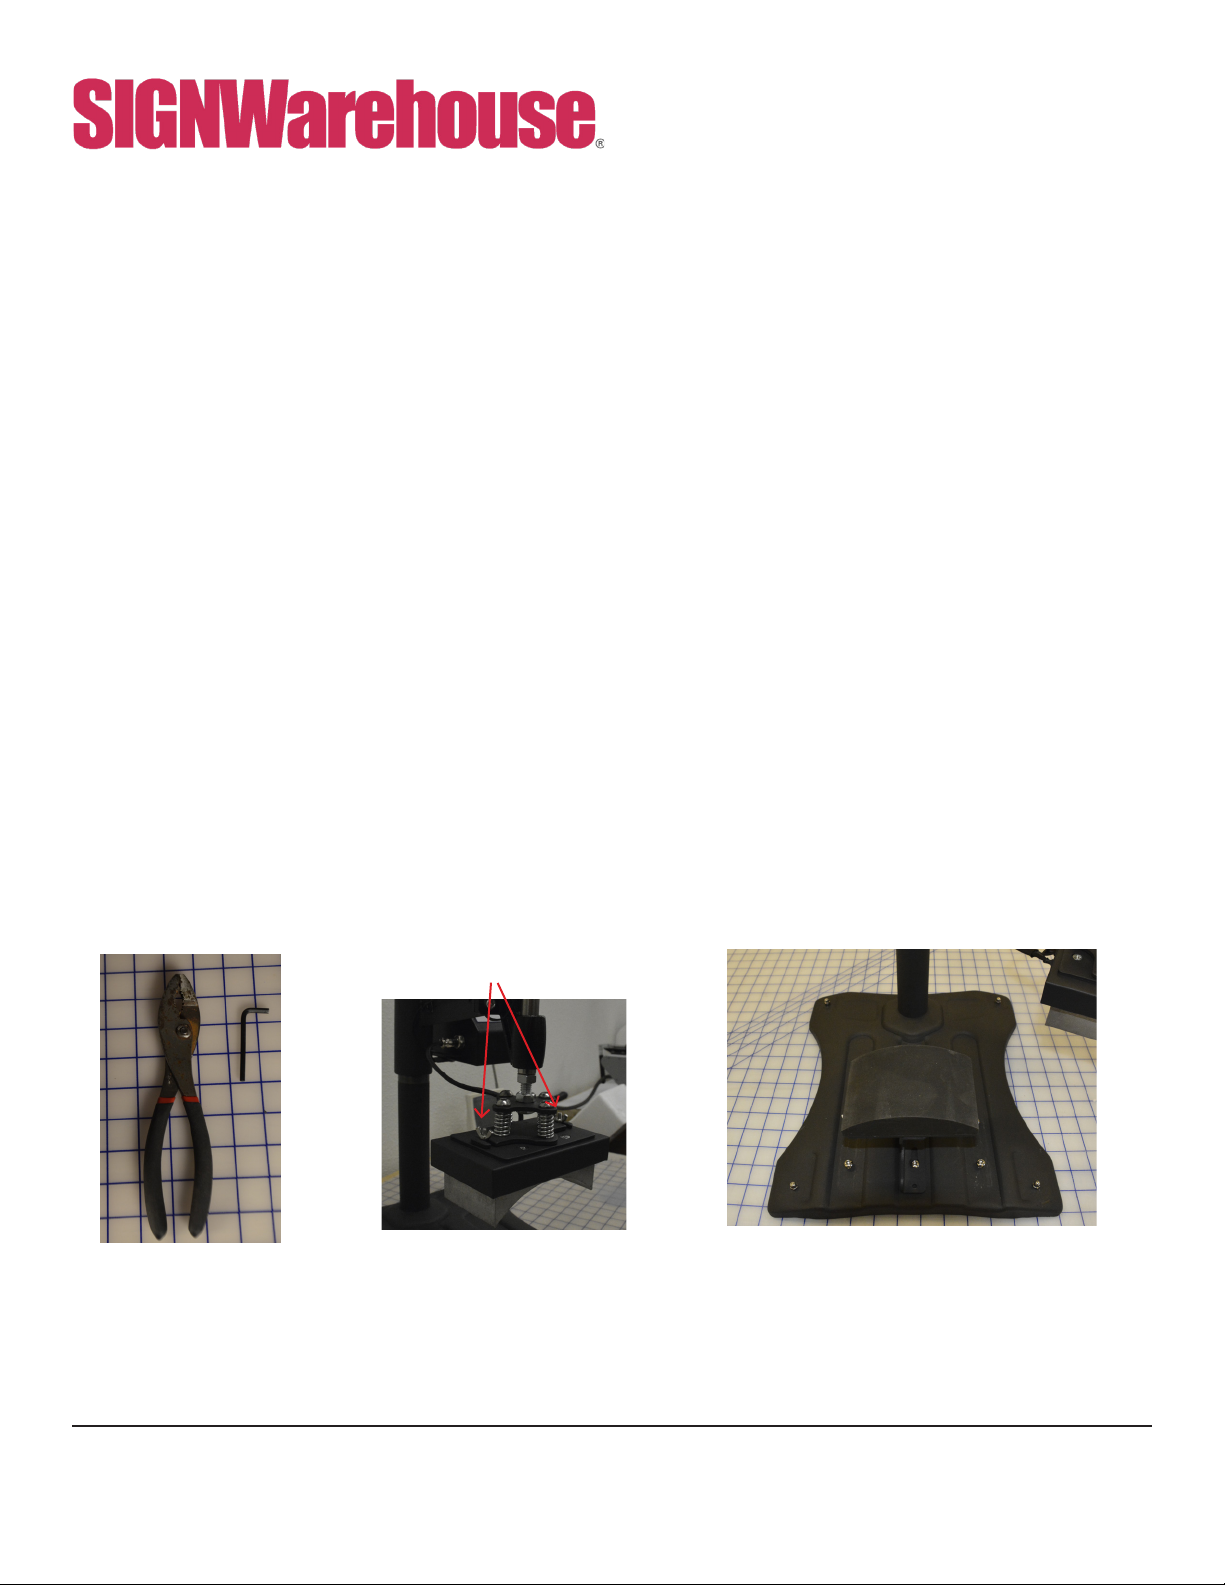
Changing the Lower Platen
Wing Nuts
FIG 9: A pair of
piers and an 5mm
allen wrench to
help change out the
platen
FIG 10: Slide the heang
platen into the track and
ghten the wing nuts.
FIG 11: When aaching the lower
platen, make sure the holes line up.
Always check the platen is secured.
8

800-899-5655
www.signwarehouse.com •SignWarehouse, Inc. • 2614 Texoma Drive, Denison, TX 75020
•Toll Free Phone: 1-800-899-5565 •Local Phone: 903-462-7700 •Fax: 1-800-966-6834
Heat Transfer Applicaon Guidelines
These are general guidelines. For specic me and temperature sengs for specic lms and/or
transfer papers, please refer to the instrucons for that parcular product.
TRANSFERS Device Fabric TEMP. TIME PRESSURE
mugs: sublimaon Mug press/
aachment
polymer-coated 400° F 240 seconds medium
mugs: laser transfer* uncoated 300°F 180 seconds rm
General Guidelines for heat transfers with other heat presses or aachments
Sublimaon Paper Ricoh, Epson Polyester 400°F 25~30sec. 30Psi
Ink Tran. Paper Inkjet Printer Light Color 365°F 15sec. 30Psi
Dark Color 330°F 25sec. 30Psi
Laser Transfer Paper** Laser Printer Light Color 345°F 30sec. 30Psi
Laser Printer Dark Color 260 - 320°F 35 - 120 sec. 25Psi
Transfer Vinyls Cung Ploer /300~320°F 8~10sec. 30Psi
Plassol Transfer / / 335°F 12sec. 50Psi
9

800-899-5655
www.signwarehouse.com •SignWarehouse, Inc. • 2614 Texoma Drive, Denison, TX 75020
•Toll Free Phone: 1-800-899-5565 •Local Phone: 903-462-7700 •Fax: 1-800-966-6834
Troubleshoong Tips
Q. Why isn’t my heat transfer vinyl scking to the fabric?
A. This can be caused by three things. Insucient pressure, or temperature, or me.
Time: Some heat transfer lms need a few seconds to cool before you remove the liner. Try a warm or
cold peel rst.
Temperature: If that doesn’t work, check to make sure you are using the recommended me and tem-
perature sengs. If you are, your press may not be pung out the correct amount of heat. Use a Geo
Knight IR thermometer to check the actual temperature of the platen.
Pressure: If the temperature is correct, adjust the pressure. Some lms require more pressure to bond
the adhesive to the fabric. There should be some resistance when you close the press. If you have
veried all of these and the lm doesn’t sck, contact SIGNWarehouse customer service or Technical
Support for further assistance.
Q. Why does my sublimated transfer look washed out?
A. This is usually caused by insucient temperature. Sublimaon works best at or near 400°F. If your
transfer is faded, check the output of the heat platen with a contact thermometer and make sure the
output matches the displayed temperature. If not, adjust as directed above. Then repress at 390 -
400°F.
Q. Why are my transfers are scking to the heang element of the upper platen?
A. If T-shirt vinyl is scking to the heang element, you have it upside down. Remove any adhesive
residue, ip it over and try again. If an inkjet or laser transfer is scking to the heang element, it’s
because the heat is aecng the ink. Cover it with a Teon sheet or sheet of silicone Kra paper to
prevent this. Using a Teon sheet or Kra paper is recommended for almost all heat transfer applica-
ons.
Q. Why is it so hard to peel the liner when I’m done pressing the paper?
A. A hot or warm peel lm may become hard to peel if allowed to cool. Always peel the lm or transfer
paper in accordance with the product’s recommendaons.
10

800-899-5655
www.signwarehouse.com •SignWarehouse, Inc. • 2614 Texoma Drive, Denison, TX 75020
•Toll Free Phone: 1-800-899-5565 •Local Phone: 903-462-7700 •Fax: 1-800-966-6834
We warrant that the BASICS heat press is free from defects in material or
workmanship for 90 days from the date of purchase. Warranty applicable to original
buyer only. Warranty is void in the event the product has been subject to abuse,
misuse, negligence or accident.
BASICS heat press must be returned in original carton with original packing. Please
call 800-699-5517 for an RMA authorizaon and number or your return will be
refused without it. RMAs are good for 10 days.
11
WARRANTY
Table of contents
Other SignWarehouse Power Tools manuals


