SignWarehouse enduraPRESS MF15 User manual


www.signwarehouse.com • SignWarehouse, Inc. • 2614 Texoma Drive, Denison, TX 75020
Table of Contents
Page
1
2
3
4
5
6
7
8
9
10
11
Specications
Operation Instructions Read Before Use
Control Panel Operations
The Shirt Press
Plate Attachments
Mug Attachment
Using the Mug Fittings
Cap Press Attachment
Heat Transfer Application Guidelines
Troubleshooting Tips
Wiring Schematic & Warranty
www.signwarehouse.com • SignWarehouse, Inc. • 2614 Texoma Drive, Denison, TX 75020
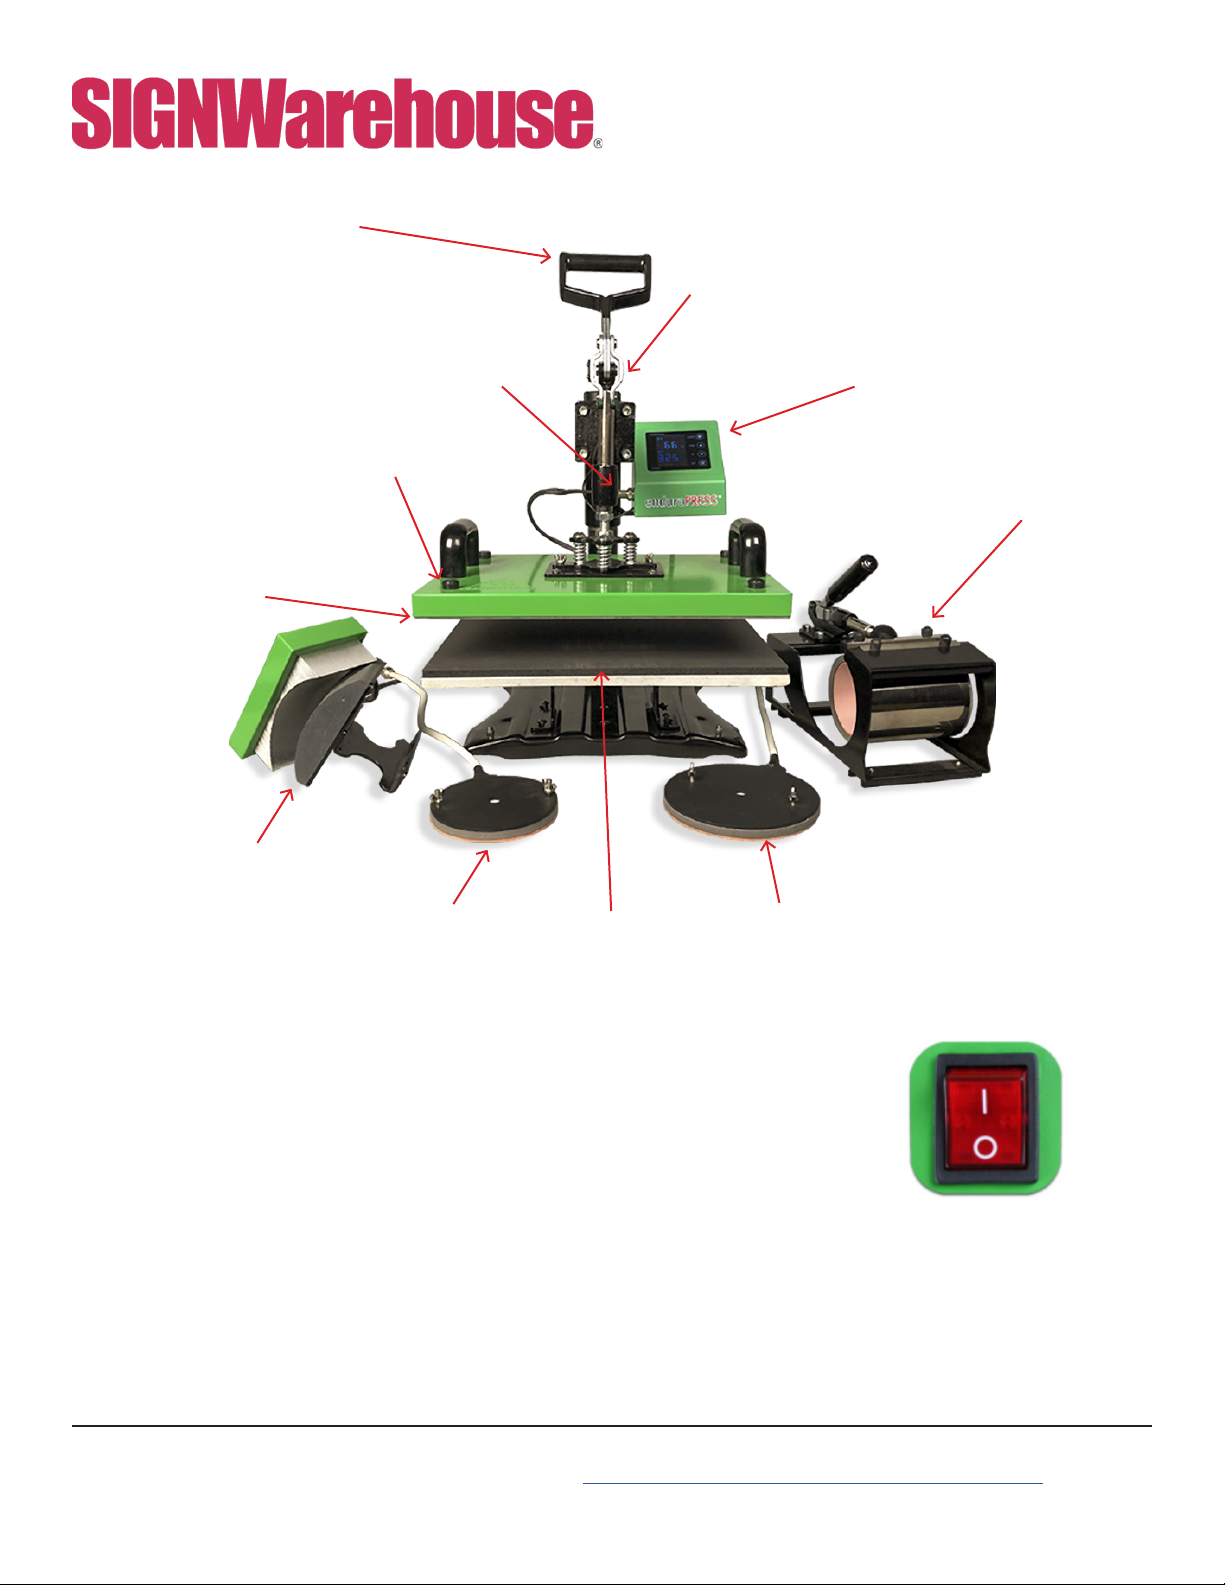
Operation Handle
Control Panel
Mug Attachment
Pressure Knob
Silicone Pad
4” Circle Press
Cap Attachment
and Lower Platen
6” Circle Press
Lower Aluminum Plate
Power Switch
Heating Element
Specications:
Model NO: ENDURAPRESS MF15
Multi-function combination heat press
Voltage: 120V/60Hz
Power: 10.5A, 1140W,
Control Panel: LCD Control Panel
Time Range: 0~999sec.
Temp. Range: 0~480°F
Max Open Height: 0.5”
Packaging: Double-walled Corrugated Paper Carton
Gross Weight: 77lbs (35kg)
Heating
Element
Plug
1

www.signwarehouse.com • SignWarehouse, Inc. • 2614 Texoma Drive, Denison, TX 75020
2
Operation Instructions
Read Before Use
1. Check the voltage before using it. The correct voltage is 110-120V/60Hz
2. Turn o the machine when not in use, and remove the power plug from
socket.
3. Grasp the handle rmly when opening.
4. Keep children away from the machine.
5. Do not touch the heating platen and platen cover after pressing whilst in
operation
6. Do not attempt to press products that are not intended for normal heat
transfer
7. Do not set the temperature any higher than 480F as it may cause over heat
and stop working.
8. The heat press carries a ground line by default, please make sure the
socket gets a ground line protector.
www.signwarehouse.com • SignWarehouse, Inc. • 2614 Texoma Drive, Denison, TX 75020
3
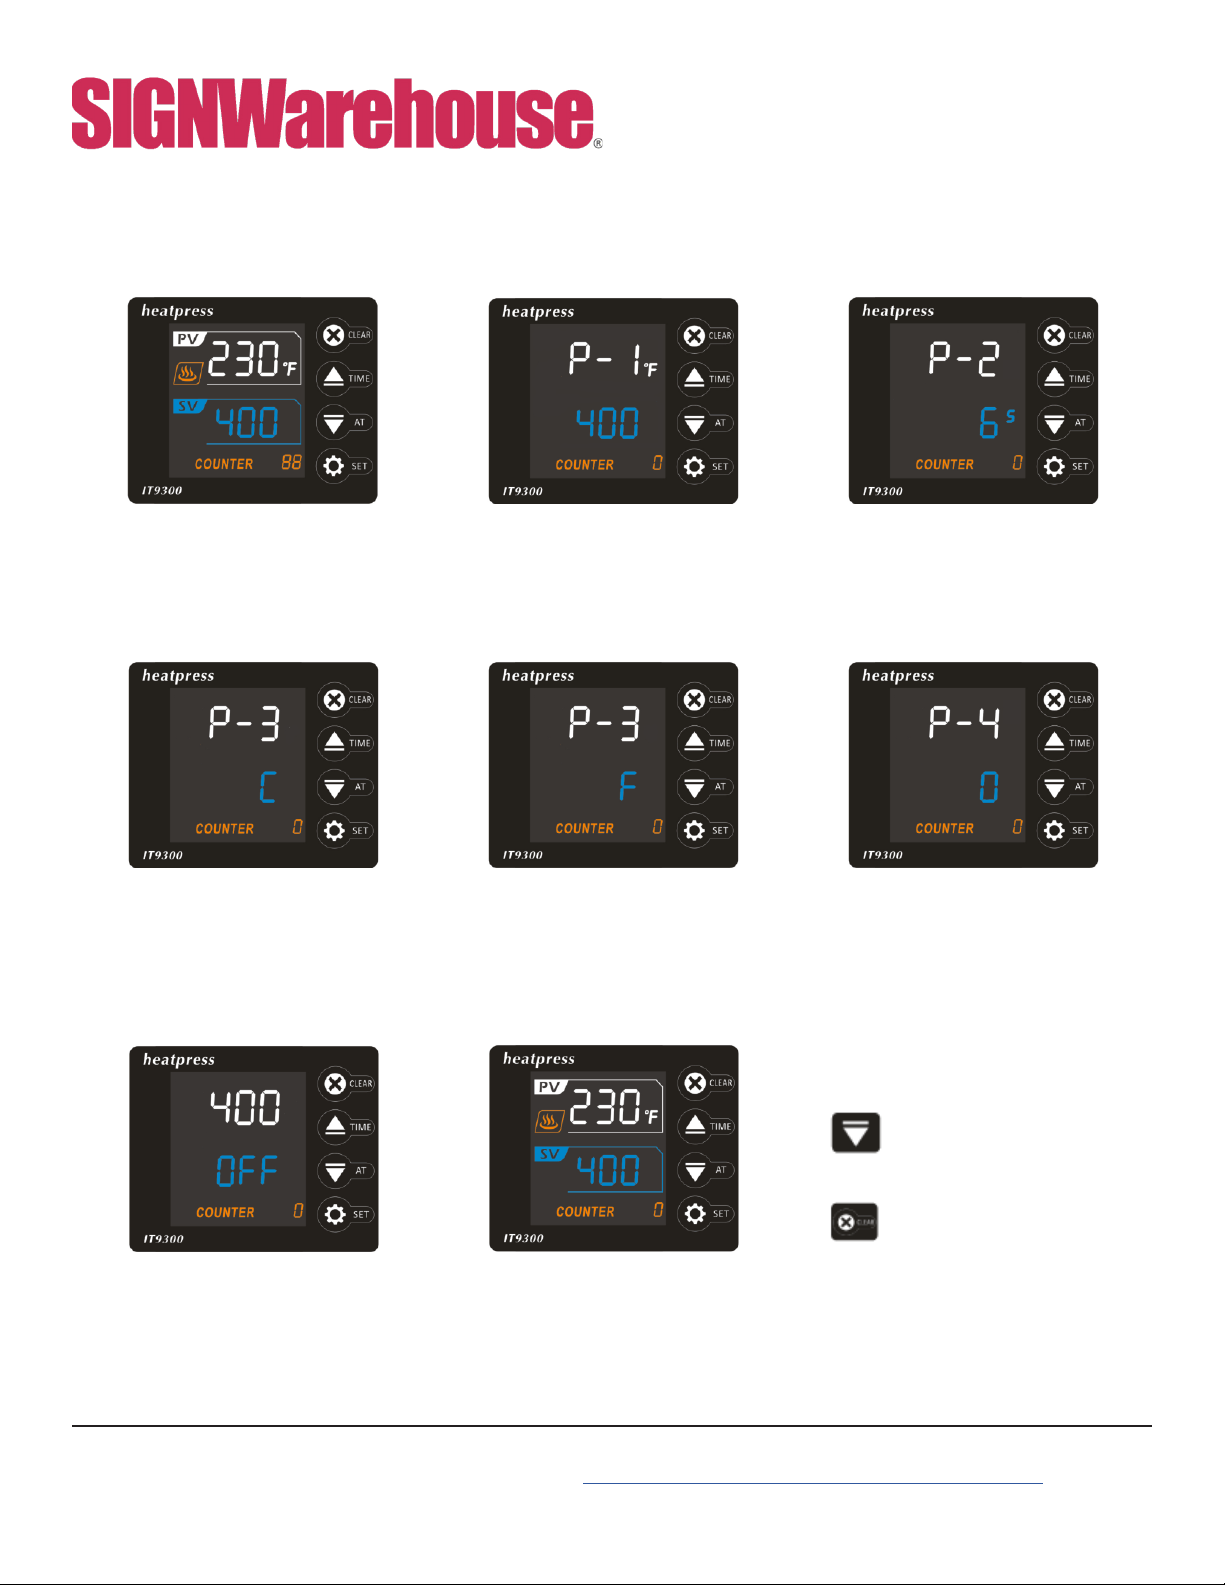
Control Panel Operations
Control Panel Display P-1: Temperature Setting
Mode
Hit SET & use the up and down
arrows to set temperature
P-3: ºC or ºF Read Out
Hit SET three times & use the up
and down arrows to select Celsius
or Fahrenheit
Auto Shut O Mode
The screen will read OFF and
start to cool down if heat press is
inactive
To reheat the press, hit any button
P-3: ºC or ºF Read Out
Hit SET three times & use the up
and down arrows to select Celsius
or Fahrenheit
P-2: Time Setting Mode
Hit SET twice & use the up and
down arrows to set amount of time
for pressing
P-4: Auto Shut O Mode
Hit SET four times & use the up and
down arrows to set auto shut o
when inactive 0-120 minutes range
Clear Counter Number
Long hold the CLEAR button to clear
your counter on the panel.
Other Functions
If you need to calibrate your press,
hold the down arrow for a few
seconds.
If you need to clear your counter,
hold your clear button for a few
seconds.
www.signwarehouse.com • SignWarehouse, Inc. • 2614 Texoma Drive, Denison, TX 75020
The Shirt Press
The basic setup out of the box is a 12″ x 15″ shirt press. This press is a swing away,
which makes placing and removing garments safe and easy. Unlike some presses that
can only swing open to the right, the MF15 can swing to the right or left.
Caution: to reduce risk of burns, use the black handles to swing the heat platen away
during use.
1) Turn o the press, let attachments cool before switching out.
2) Loosen the wing nuts.
3) Slide the heat platen towards the back of the press.
4) Slide new attachments into the track.
5) Tighten the wing nuts and make sure the platen is secure.
6) Connect the plug into the control panel, and make sure the plug is securely
connected.
7) Thread the screw cap and tighten all the way. This keeps the plug from coming
loose during production.
*No tools needed for this process*
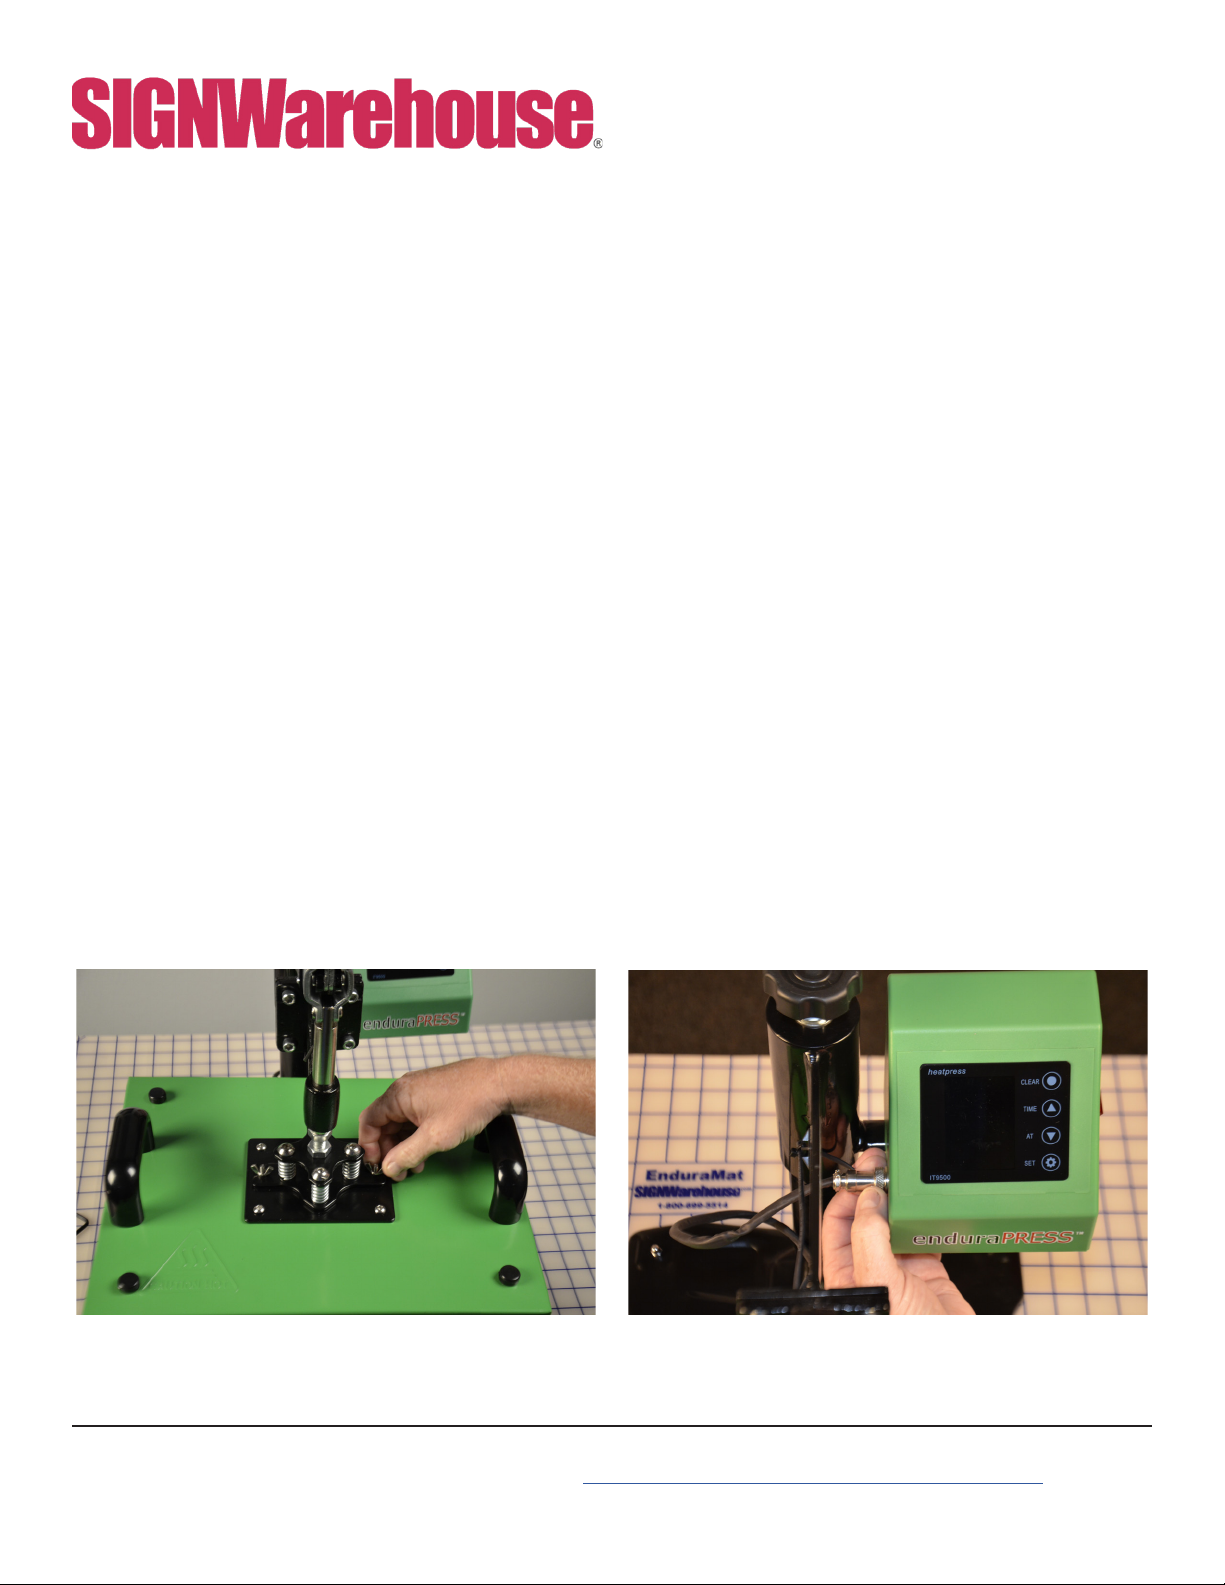
Changing Shirt Attachment
FIG 1: Remove the shirt aachment’s heat platen by
loosing the wing nuts.
FIG 2: To disconnect the power cable, loosen the
collar on the circular connector, then pull the plug
away from the control panel housing.
4
www.signwarehouse.com • SignWarehouse, Inc. • 2614 Texoma Drive, Denison, TX 75020
Plate Attachments
The MF15 combo heat press comes with two plate attachments. They’re 4.75”
and 6” in diameter. These replace the upper swingaway heat platen and close
on the standard 12” by 15” lower platen. When checking the pressure on this
attachment, do a few tests before committing to production.
Heating Element Plug.
FIG 5: Attach the plate heat platen using the wing nuts.
Make sure the platen is securely attached before use.
FIG 3: The plate attachments use the
standard base for the shirt attachment.
FIG 4: The plate attachment’s heat platen connects the
same way as the shirt attachment, using the circular
connector.
Wing nuts
5

www.signwarehouse.com • SignWarehouse, Inc. • 2614 Texoma Drive, Denison, TX 75020
Mug Attachment
The mug attachment is like our MP5 mug press, the dierence is that this one is not a
stand-alone unit. The basic setup is ideal for 11 oz mugs, but we oer other ttings for
larger and smaller cups as well. The mug press is great for dye sublimation and laser
transfers. Remember that the dye sublimation will only work with polymer-coated
cups and mugs.
The mug attachment operation is a little dierent then the others.
Caution: The mug attachment has a very small platen so it heats up quickly
Make sure the press is powered o before attempting to attach the mug
attachment.
1) Remove the current attachment from the handle, and unplug it from control panel.
2) Plug in the mug attachment into the control panel, as seen below.
3) Check the pressure of the press. The mug attachment can be used with other heat
platens connected to the handle as long as it is plugged in.
4) Move the mug attachment handle backwards to open the sleeve and insert a mug.
Pull the handle forward to securely contain the mug in the sleeve.
5) To activate the timer for mug attachment use, the handle must be lowered as if you
are using the shirt attachment.
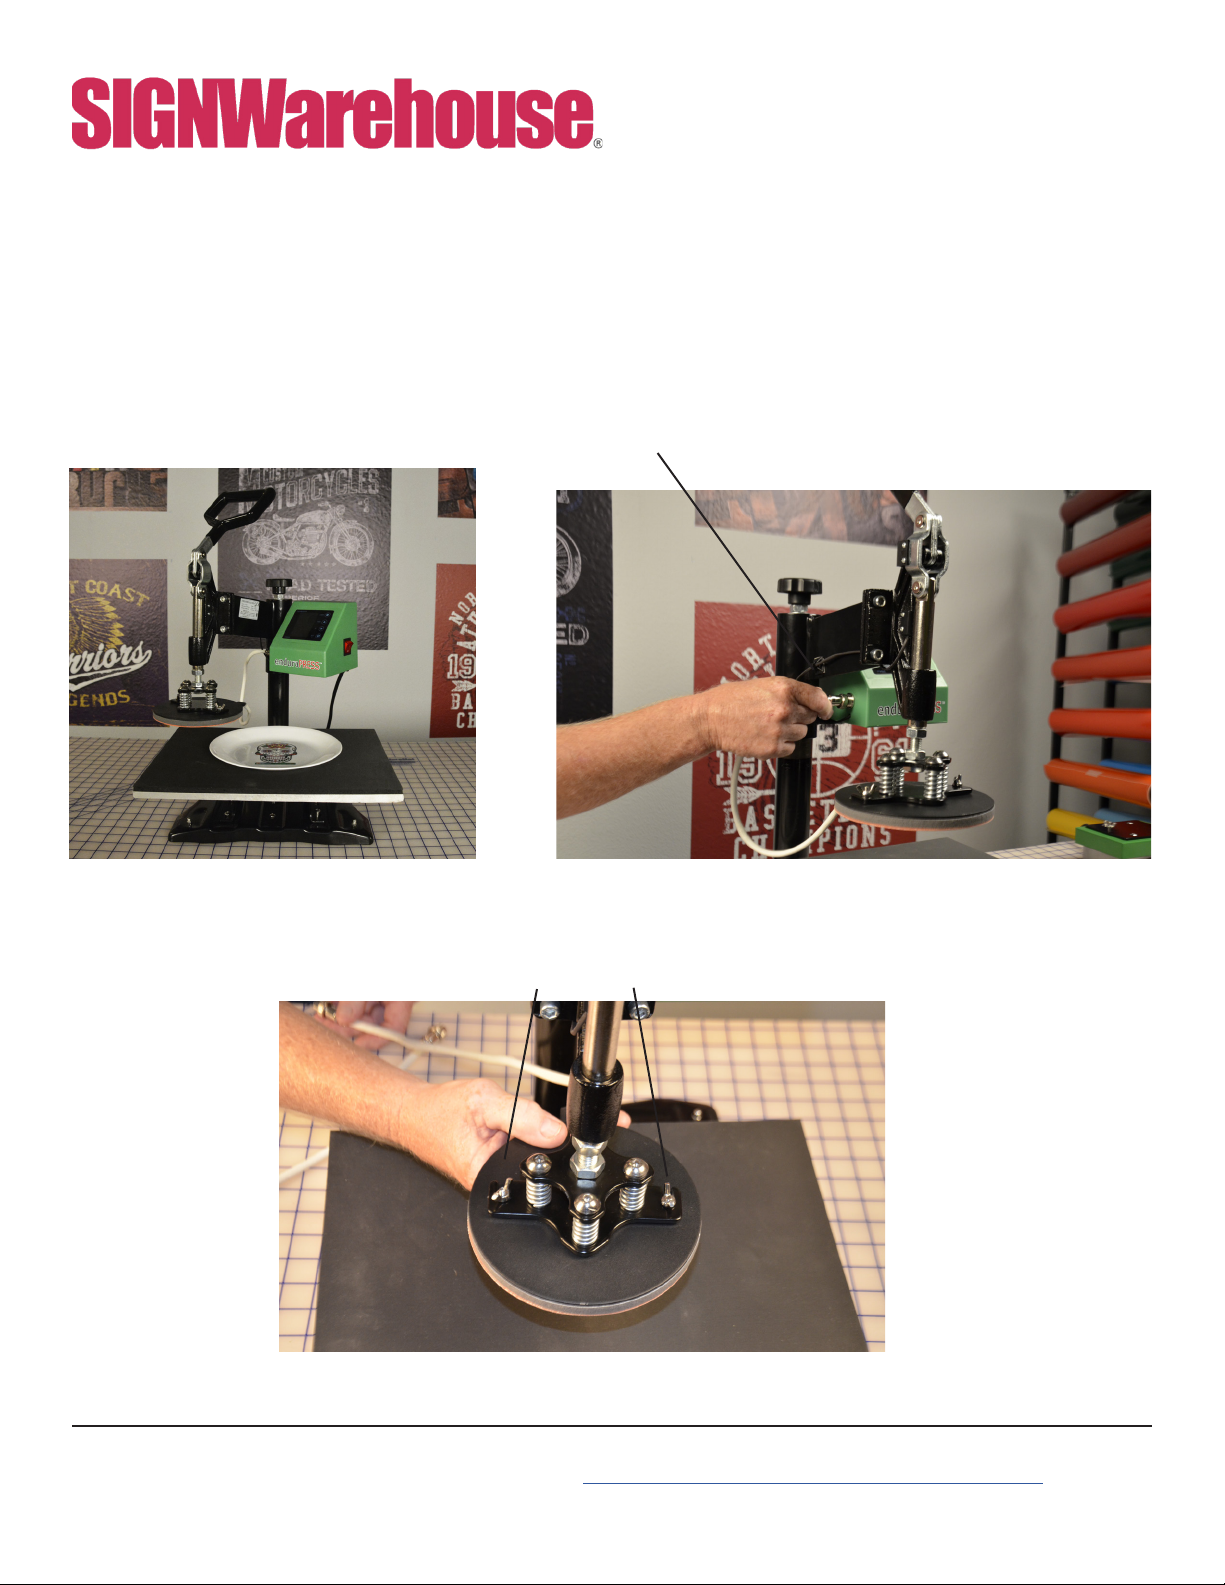
Changing to Mug Attachment
6
FIG 6: The mug aachment is
ready to press. The lower platen
can be removed or stay on the
main base. The mug aachment
will work both ways.
FIG 7: The mug aachment’s
heat platen connects the same
way as the shirt aachment,
using the circular connector.

www.signwarehouse.com • SignWarehouse, Inc. • 2614 Texoma Drive, Denison, TX 75020
Phillips screws
FIG 8: Use a phillips screw-
driver to remove the screws
holding the ttings to the
mug attachment frame
The mug attachment operation is a little dierent then the others.
Caution: The mug attachment has a very small platen so it heats up quickly. Make sure
the press is powered o before attempting to attach the mug attachment.
1) Check the pressure of the press. The mug attachment can be used with other heat
platens connected to the handle as long as it is plugged in.
2) Move the mug attachment handle backwards to open the sleeve and insert a mug. Pull
the handle forward to securely contain the mug in the sleeve.
3) To activate the timer for mug attachment use, the handle must be lowered as if you
are using the shirt attachment. Once you have placed your mug in the sleeve, lower
the heat press handle to start the cycle timer. At the end of the cycle, raise the heat
press handle to silence the alarm and push the mug attachment handle backward to
remove the mug.
4) Like the standalone MP5 EnduraPress mug press, you can use various mug ttings
with the mug attachment to decorate mugs of dierent diameters. The default tting
is designed for 11oz mugs. To change to a larger or smaller tting, remove the screws
with a phillips head screw driver and disconnect the power cable from the control
panel. For more information on mug ttings, please click here or refer to the MP5
User Manual.
TIP: Sublimation continues as long as the surface temperature remains at or near 400°F.
If the mug is still hot after the transfer paper is removed, the ink may sublimate as
heat rises from the mug surface resulting in ‘ghosting’ or hazy blurry transfers. To stop
the sublimation process after you remove the transfer paper, dip the mug in a bucket
of cool water. This will ensure a clear, sharp transfer.
Using the Mug Attachment
7
www.signwarehouse.com • SignWarehouse, Inc. • 2614 Texoma Drive, Denison, TX 75020
Cap Press Attachment
The MF15’s cap attachment is a lot alike our SA-CP36 cap press. For best results,
make sure you choose a heat transfer lm suitable for the cap’s fabric. Use the time,
temperature and pressure settings for that particular HTV.
To use the cap attachment, replace both the heat platen and table. Changing the lower
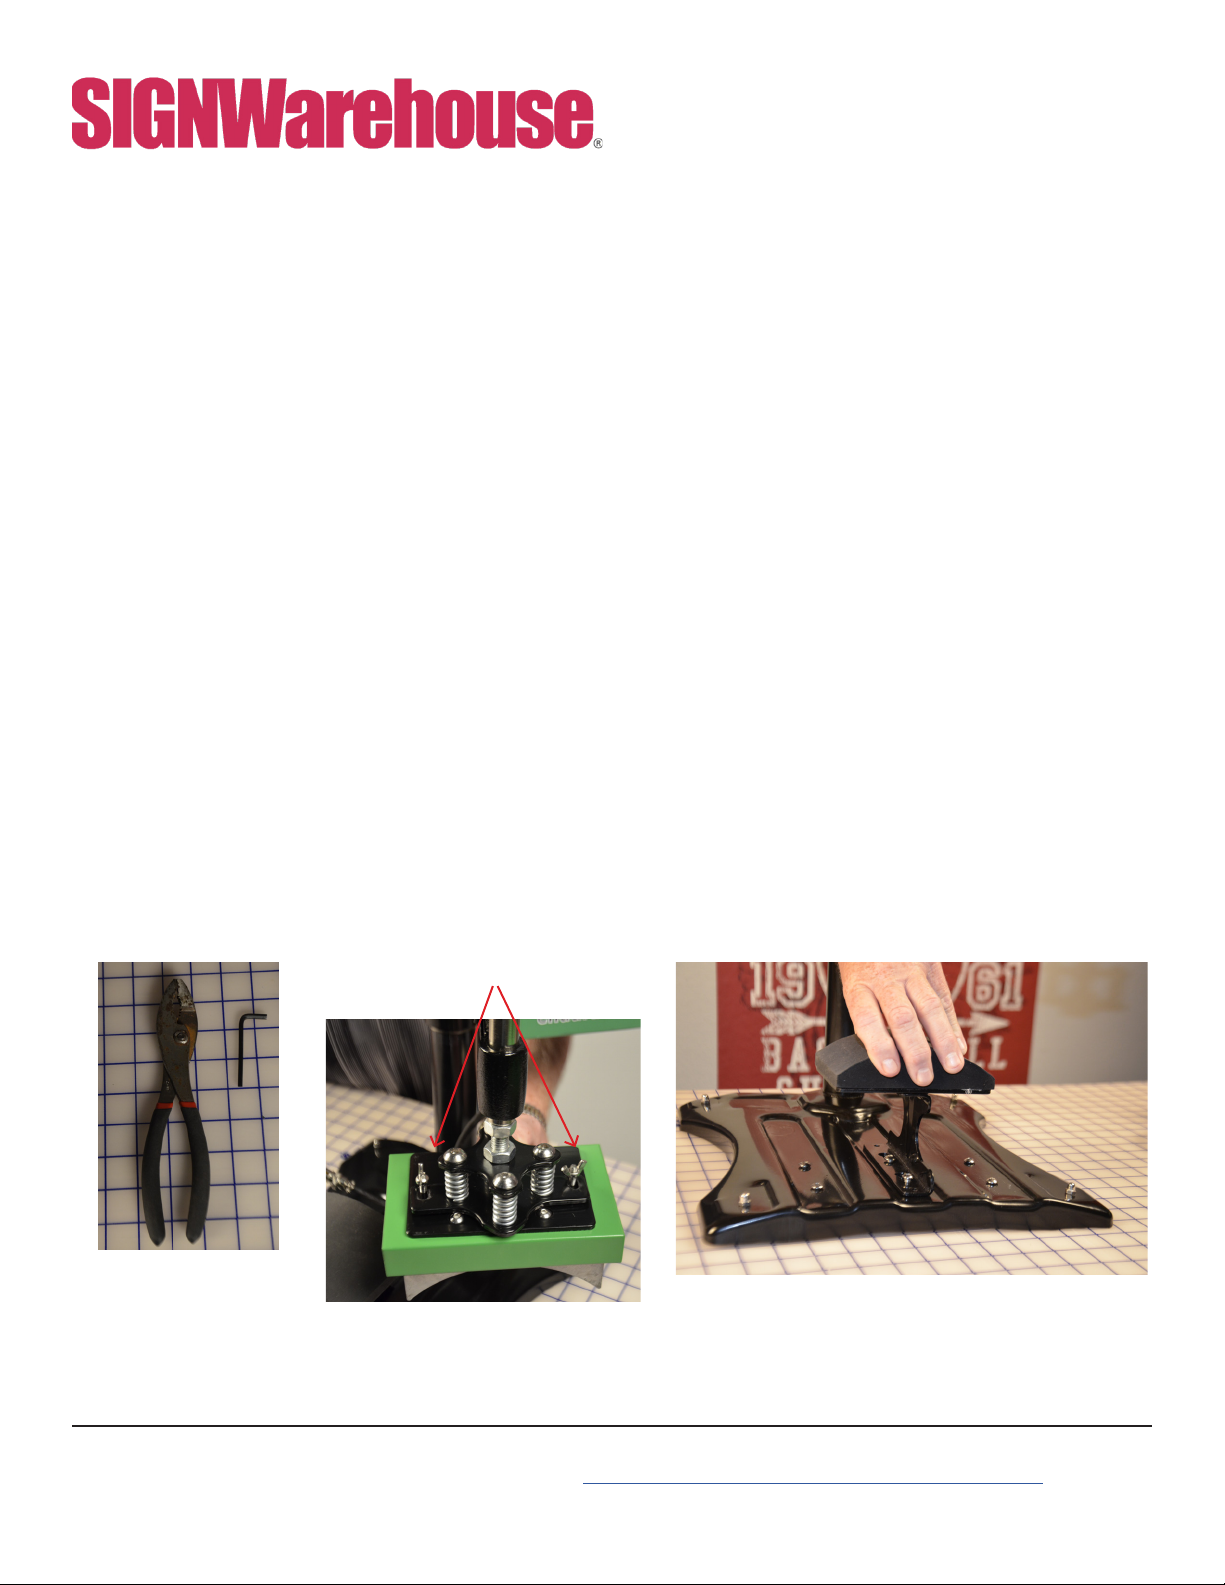
table from the shirt attachment to the cap attachment requires the use of a (8mm) allen
wrench and a pair of pliers.
Change the lower platen before attaching the cap press.
1) Use the 5mm allen wrench to loosen the table for the shirt attachment.
2) Place to the side and place the cap platen on the base.
3) Use the piers to secure the washer on the bottom of the table while adjusting the hex
head bolts with the allen wrench.
4) Make sure the platen is secure.
5) Attach the cap press heat platen using the wing nuts, as seen below (Fig 11).
6) Place the crown of the cap over the curved base. Place your HTV transfer on the
crown, cover with a Teon Sheet, and lower the curved heat platen. Be sure to adjust
the pressure using the pressure knob (Page 3) to produce sucient pressure for a
successful transfer.
Changing the Lower Platen
Wing Nuts
FIG 9: A pair of
piers and an 5mm
allen wrench to
help change out the
platen
FIG 10: Slide the heating
platen into the track and
tighten the wing nuts.
FIG 11: When attaching the lower platen,
make sure the holes line up. Always check
the platen is secured.
8
www.signwarehouse.com • SignWarehouse, Inc. • 2614 Texoma Drive, Denison, TX 75020
9
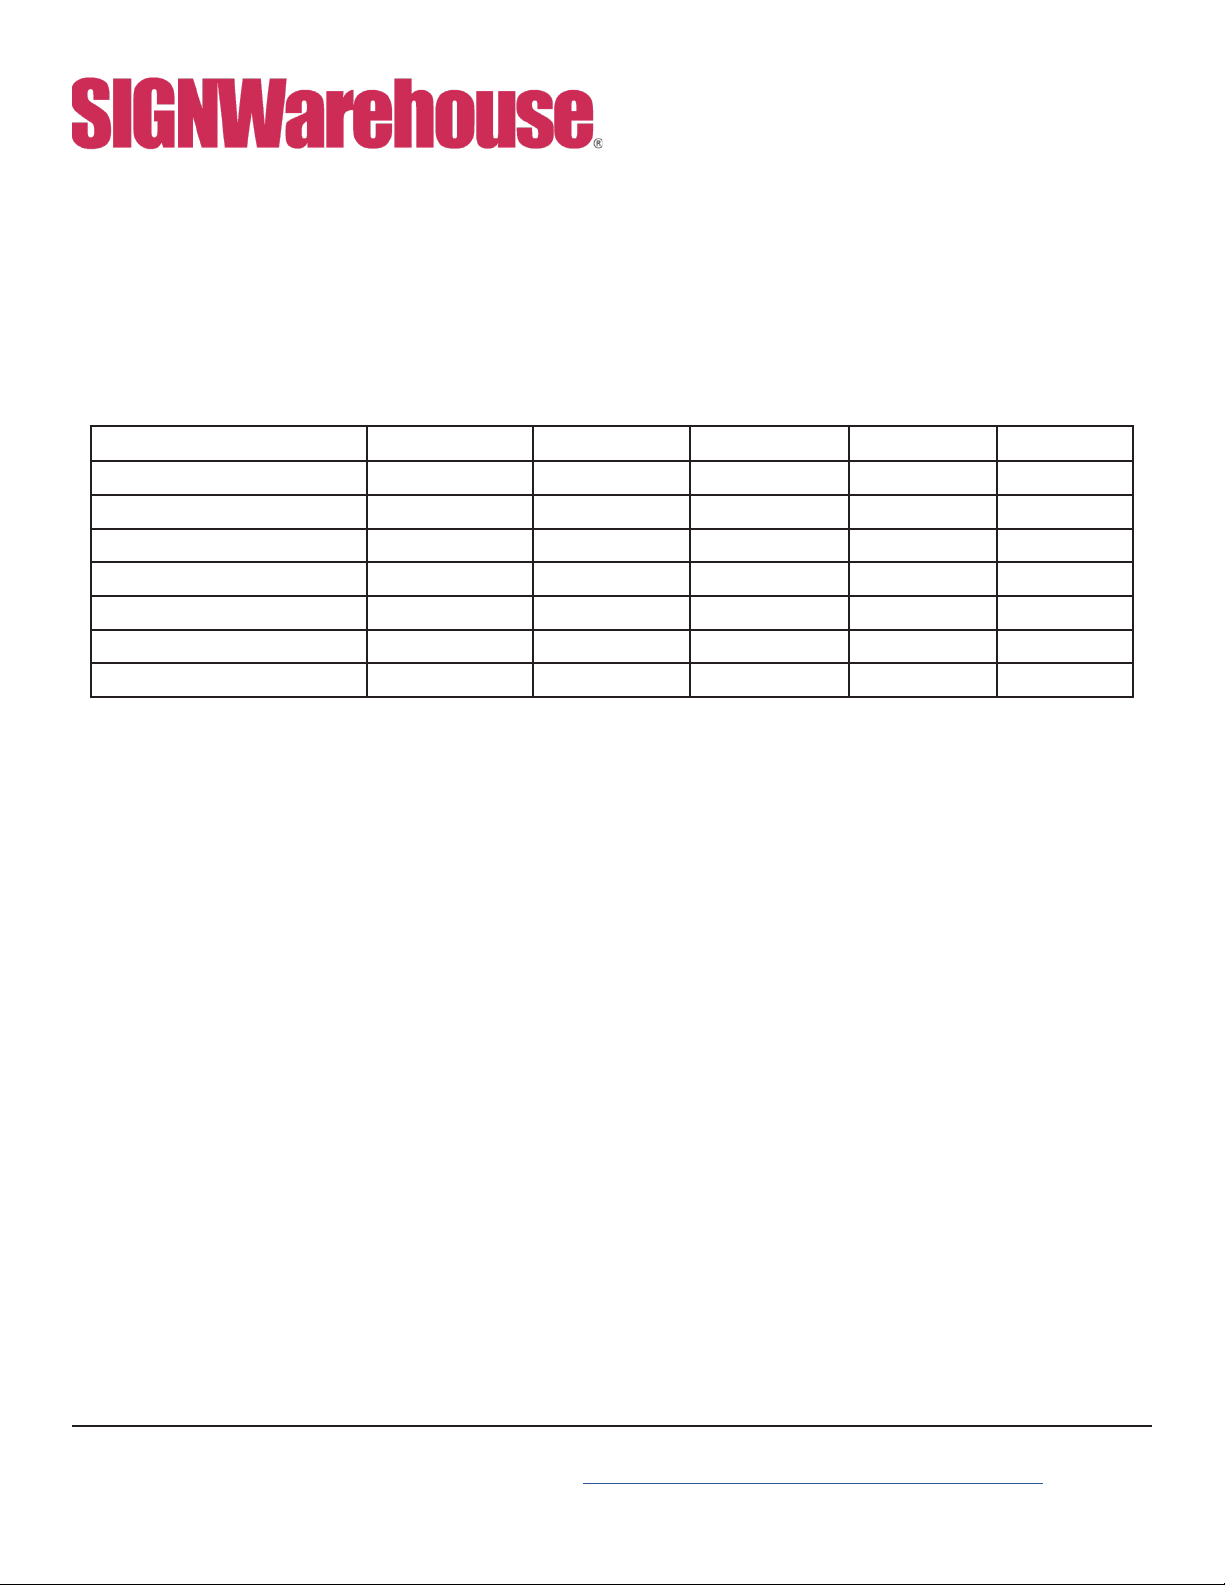
Heat Transfer Application Guidelines
These are general guidelines. For specic time and temperature settings for specic lms
and/or transfer papers, please refer to the instructions for that particular product.
** The EnduraPRESS CS15, CS15-AR, CS16, and CS16-AR are not recommended for use
with two-step laser transfer papers. For these demanding applications, we recommend the
EnduraPRESS SA12 or SD20.
TRANSFERS Device Fabric TEMP. TIME PRESSURE
Sublimation Paper Ricoh, Epson Polyester 400°F 25~30sec. 30Psi
Ink Tran. Paper Inkjet Printer Light Color 365°F 15sec. 30Psi
Dark Color 330°F 25sec. 30Psi
Laser Transfer Paper** Laser Printer Light Color 345°F 30sec. 30Psi
Laser Printer Dark Color 260 - 320°F 35 - 120 sec. 25Psi
Transfer Vinyls Cutting Plotter / 300~320°F 8~10sec. 30Psi
Plastisol Transfer / / 335°F 12sec. 50Psi

www.signwarehouse.com • SignWarehouse, Inc. • 2614 Texoma Drive, Denison, TX 75020
10
Troubleshooting Tips
Q. Why isn’t my heat transfer vinyl sticking to the fabric?
A. This can be caused by three things. Insucient pressure, or temperature, or time.
Time: Some heat transfer lms need a few seconds to cool before you remove the liner. Try a
warm or cold peel rst.
Temperature: If that doesn’t work, check to make sure you are using the recommended time and
temperature settings. If you are, your press may not be putting out the correct amount of heat.
Use a Geo Knight IR thermometer to check the actual temperature of the platen. If it is more
than 5° dierent from the LCD display (PV), adjust it using step four in the control panel (see
page 4).
Pressure: If the temperature is correct, adjust the pressure. Some lms require more pressure to
bond the adhesive to the fabric. There should be some resistance when you close the press.
If you have veried all of these and the lm doesn’t stick, contact SIGNWarehouse customer
service or Technical Support for further assistance.
Q. Why does my sublimated transfer look washed out?
A. This is usually caused by insucient temperature. Sublimation works best at or near 400°F.
If your transfer is faded, check the output of the heat platen with a contact thermometer and
make sure the output matches the displayed temperature. If not, adjust as directed above.
Then repress at 390 - 400°F.
Q. Why are my transfers are sticking to the heating element of the upper platen?
A. If T-shirt vinyl is sticking to the heating element, you have it upside down. Remove any
adhesive residue, ip it over and try again. If an inkjet or laser transfer is sticking to the heating
element, it’s because the heat is aecting the ink. Cover it with a Teon sheet or sheet of
silicone Kraft paper to prevent this. Using a Teon sheet or Kraft paper is recommended for
almost all heat transfer applications.
Q. Why is it so hard to peel the liner when I’m done pressing the paper?
A. A hot or warm peel lm may become hard to peel if allowed to cool. Always peel the lm or
transfer paper in accordance with the product’s recommendations.
www.signwarehouse.com • SignWarehouse, Inc. • 2614 Texoma Drive, Denison, TX 75020
11
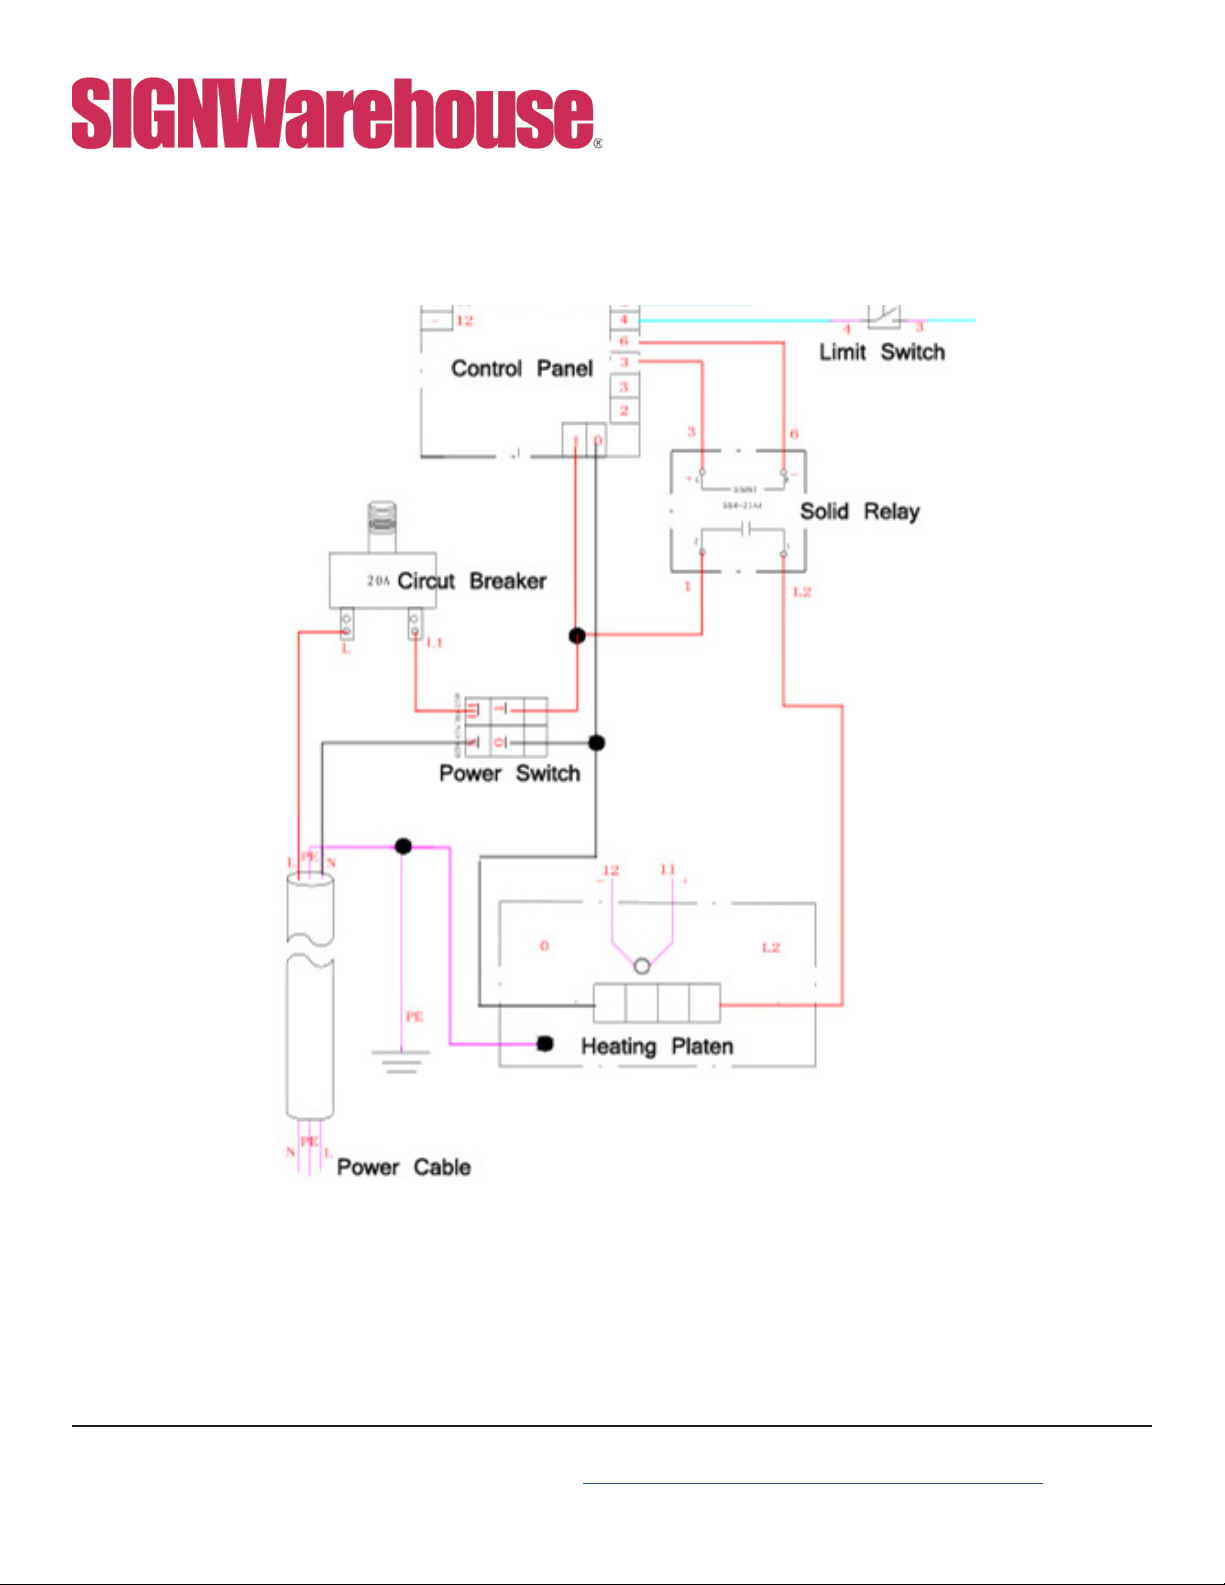
Wiring Schematic
WARRANTY
Thank you for choosing our products, you are entitled to one year free warranty service
for our products. All exceeds warranty period we will still provide technical supports and
maintenance guidance.
This manual suits for next models
2
Table of contents
Other SignWarehouse Power Tools manuals


Popular Power Tools manuals by other brands


Makita
Makita HM0810T instruction manual

Parkside
Parkside PFBS 12 B3 Translation of the original instructions

Black & Decker
Black & Decker BDCD8 Original instructions

Texas Pneumatic Tools
Texas Pneumatic Tools TX456 Service and operation manual

Makita
Makita DHR202SYE instruction manual

Bauer
Bauer 1632E-B Owner's manual & safety instructions