Silhouette Alta User manual

Getting started with your ®

Getting Started with Silhouette Alta®
1
Cog Y S A®
Silhouette Alta®
delta 3D printer
A/C adapter and
power cable
USB cable
1Check Included Items
The Silhouette Alta® comes with the items shown in the following list. Check that all the items have
been included before starting. If you are missing any items listed below, please contact
Filament spool
Platform tape
Filament
Platform
(build plate)
Small hex
key
Large hex
key
Nozzle
cleaner Spatula Keys
Filament tube

Getting Started with Silhouette Alta®
2
2
Take the Silhouette Alta® from the box and remove the strips of packing tape, zip ties, and foam as
indicated by the following pictures. These zip ties and strips of foam are used to hold the moving
parts of the Silhouette in place during shipment.
Install the Silhouette 3D® Software
Installation
1. Navigate to silhouetteamerica.com.
2. Click the blue “Update Software” button at the top of the screen.
3. Under “Silhouette 3D®,” go to the row labeled “Current Version.” Click either “Mac®” or
“Windows,” depending on your operating system, listed under the “Link” column.
FOR WINDOWS: Proceed through the installation process by following the on-screen prompts. If the
installation window does not automatically appear, open the Downloads folder in My Computer and
double-click the setup.exe program to run it.
FOR MAC®: Drag and drop the Silhouette Studio® application icon into the Applications folder to
install Silhouette Studio®.

Getting Started with Silhouette Alta®
3
If you would like to change the orientation, you will find the cube in the upper right-hand
corner of the page. By moving this cube around, you can look at your 3D designs from
all angles. To zoom in or zoom out on the print area, you can use the scroll bar on your
mouse or click the magnifying glasses at the top of the Silhouette 3D® window.
Opg S 3D®Sofw
Locate the Silhouette 3D® icon on the desktop, in the Start Menu on your PC, or in the
Applications folder on your Mac®. Double-click the icon to run the application.
Once Silhouette 3D® has loaded, you will notice a circle with a grid on your screen. This is
your print bed.
3Connect the Silhouette Alta®
Once the Silhouette 3D® software is installed, connect the Silhouette Alta® to the power supply.
Then connect the Silhouette to your computer with the included USB cable as shown in the diagram.
Turn the machine on by pressing the power button. If your computer displays a “New Hardware
Found” dialog box, follow the recommended instructions to accept your system’s installation of the
Silhouette driver.

Getting Started with Silhouette Alta®
4
Nvgo Tb
There is a panel on the right-hand side that shows the following tabs:
Design
This design area is your workspace to create projects.
This area houses the toolbars, the design space, and
the gray holding area. When you are in the 3D Print
or the Store tab, click the Design tab to return to your
design page.
Store
When you are connected to the internet, the Store tab
takes you to the Silhouette Design Store where you
can browse and purchase designs.
3D Print
The 3D Print tab allows you to adjust the print settings
for your designs and send them to your Alta.

Getting Started with Silhouette Alta®
5
1
7
8
2
3
9
4
5
6
Work Area Overview
1. Document Tools
2. Object Tools
3. Drawing Tools
4. Document Tabs
5. Holding Area (Gray)
6. Design/Print Area
7. View Cube
8. Navigation Tabs
9. Cloud/Library Panel
Dg Tb
Silhouette Cloud
Silhouette Cloud works hand in hand with Silhouette’s software to keep all of your designs synced on
multiple devices. You can sync up to five devices with your cloud account. If you aren’t using multiple
devices, Silhouette Cloud is useful in backing up your designs and preventing the need for recoveries.
In Silhouette Cloud, there is unlimited storage available for Silhouette Design Store downloads. There is
1 GB available for custom content. Club Silhouette Members receive 5 GB of storage for custom content.

Getting Started with Silhouette Alta®
6
The panel on the right-hand side will immediately prompt you to sign in to Silhouette Cloud, where you
can access your stored designs. Sort and organize your designs any way you would like by adding folders
and subfolders.
If at any time you want to minimize the cloud panel, click the tab with the two arrows pointing to the right.
The panel will then minimize. To open the panel again, click the same tab with the arrows now pointing to
the left.

Getting Started with Silhouette Alta®
7
Design/Print Area
There are two different sections in your workspace: the design space, or the printing area, and the gray
holding area. Images and designs can be placed on both the gray holding area and the printing space.
However, any designs that are in either the white design space or the gray holding area will be designated
as prints when you go to the 3D print tab. You can toggle through the layers and decide which designs
you want to keep and print. Keep in mind that each print must remain within the active print area (bound
inside the red box on the white area). Any parts of the design outside of this area will not be printed.
Document Tabs
Your document tabs are located at the top of your workspace. When you open a new document while you
already have a document open, a new tab will open. The document tab highlighted in white shows which
document is open in your workspace. The other open documents are shown with grayed-out tabs.
Your document tabs allow you to move easily back and forth between multiple projects and let you know
at a glance what projects you currently have open. When you save a file, the document tab automatically
updates to the file name.
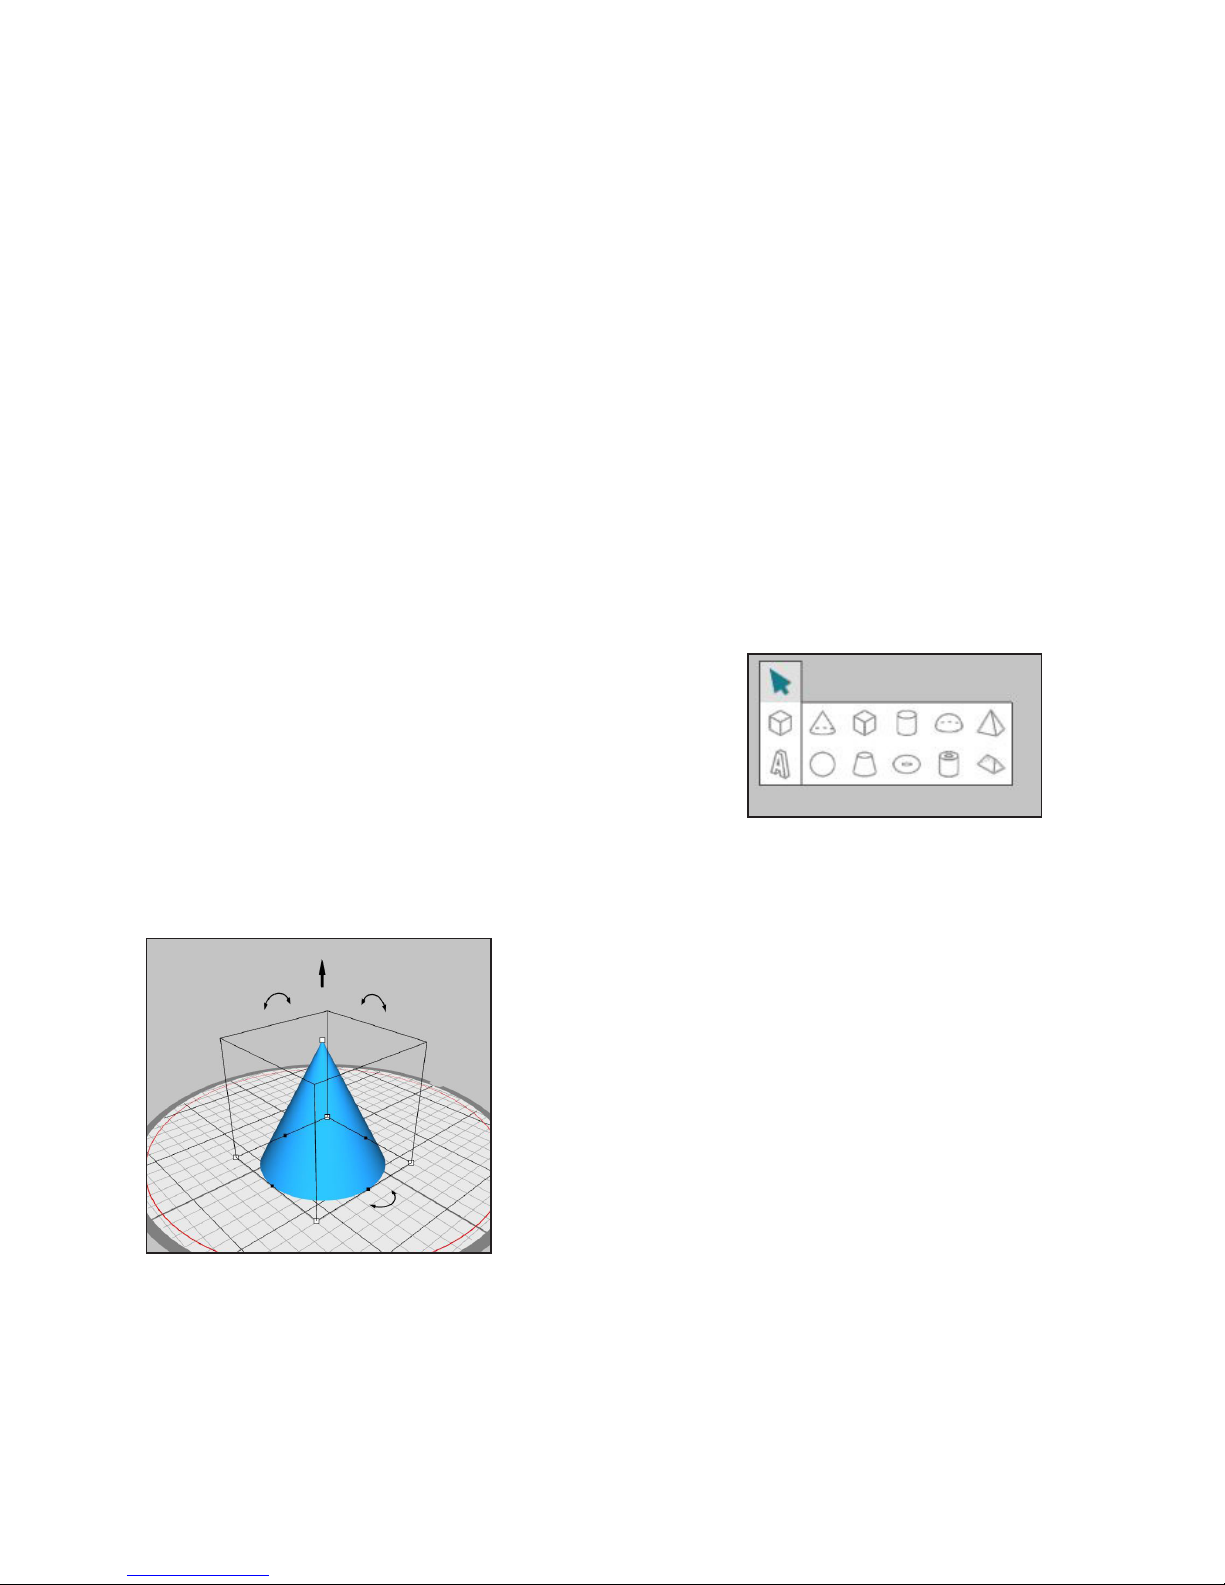
Creating Simple Shapes
Silhouette 3D® has built-in functions to draw simple 3D shapes,
such as cubes, spheres, cones, cylinders, and so on. Each of these
shapes can be found in the shape tool on the left-hand side. Click
the shape to open the shape options and select the shape you
wish to add to the print area.
To adjust the size of a shape or object, click and drag one of the
white squares in the corner or at the top of the object. Hold down
the Shift key when you click and drag a white square if you would
like to modify one part of the shape instead of having the shape
change in size overall.
To simply adjust one of the sides without adjusting any other
part of the object, click and drag one of the black squares in the
middle of the line.
To move the object around, click and hold on any part of the
object and drag the object to the desired position.
To move the object vertically, click and hold the black arrow
and drag it up or down. You can also adjust the angle of the
object by clicking and dragging the rounded arrows and letting
go when you reach the desired position.
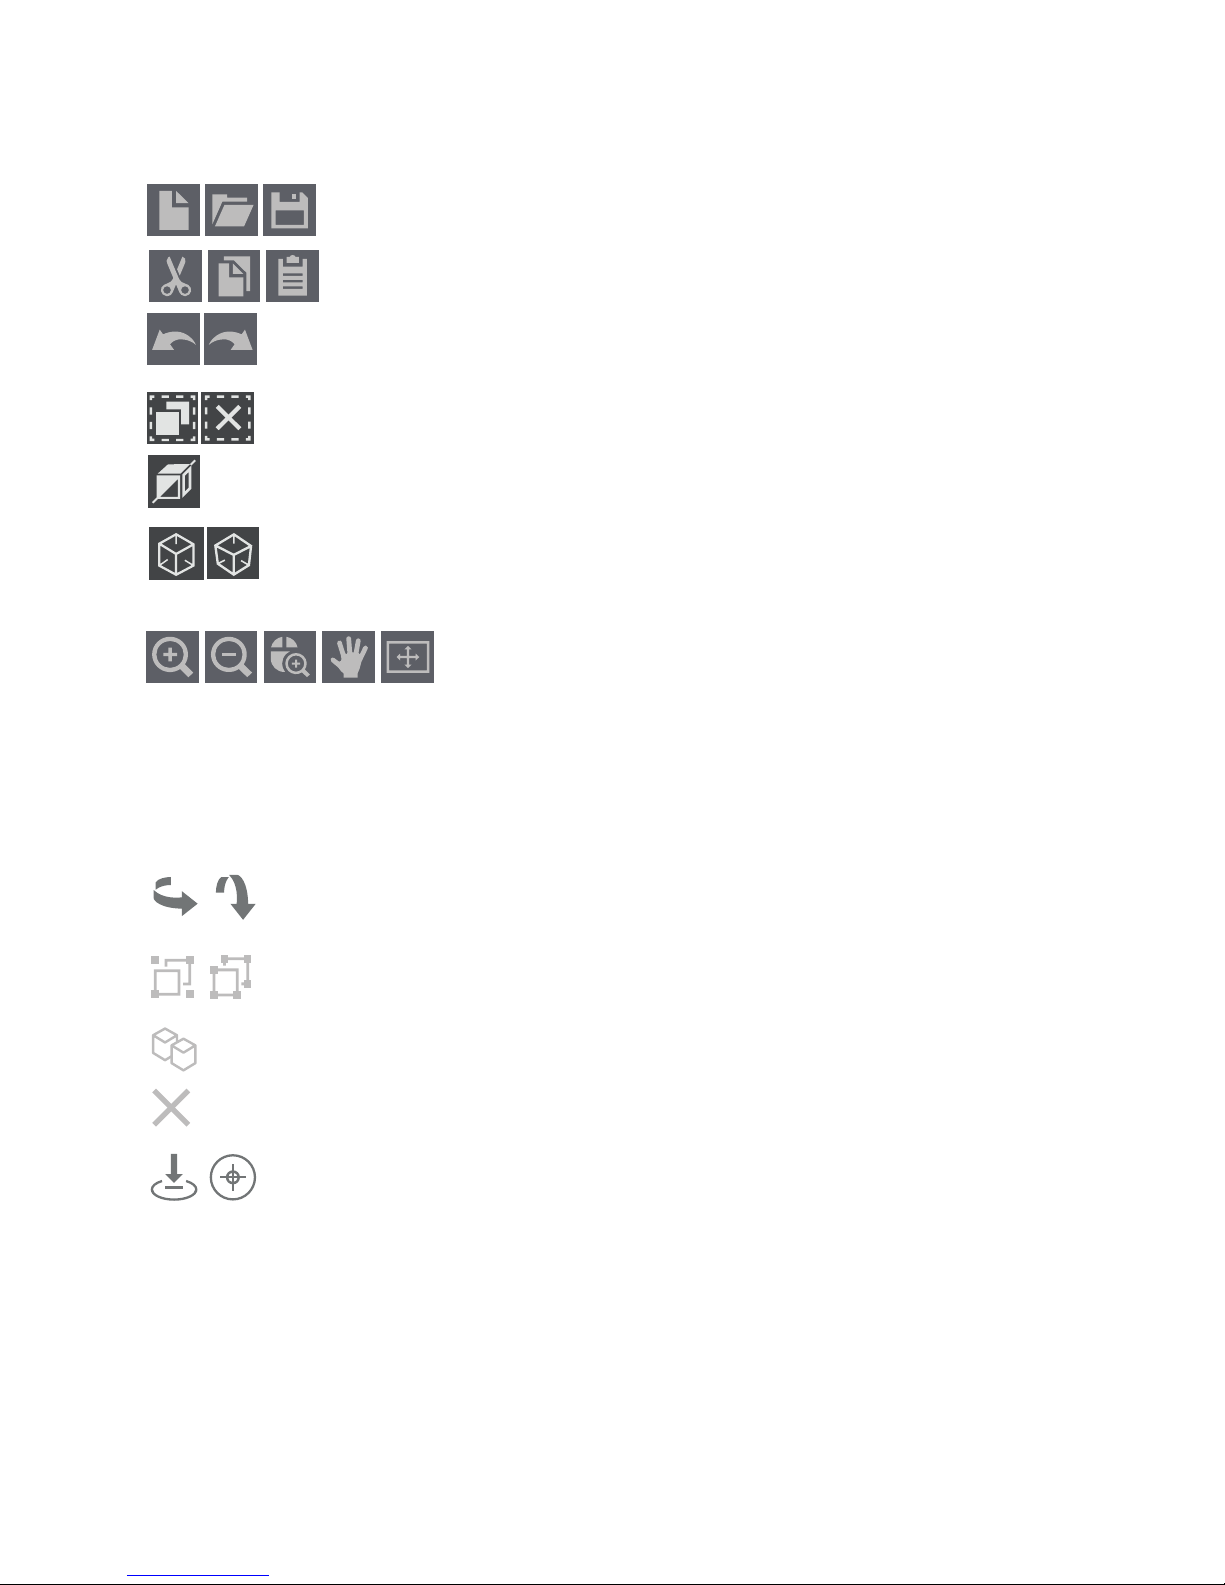
If you want to delete an object, select the shape, and click the
X icon, located in the middle of the quick-access toolbar under
the Document Tools.

Getting Started with Silhouette Alta®
8
Creating Text
To print letters or words using any font on your computer, choose the Text tool on the left-hand
side of the screen. When you select the text tool, a box will come up and prompt you to enter your
text.
You can move and adjust the text the same way you move and adjust objects. To change the text, double-
click the box and enter the new text. To change the font, make sure the text box is selected and go to the
top of the Silhouette 3D® page. On the left side under the Document Tools, you will see a drop-down
menu where you can select your font. To change the text, double-click on the text and type in the new text.

Getting Started with Silhouette Alta®
9
Object Tools
When you click on a 3D object, there are object tools that appear in the toolbar below the document
tools.
You can cycle through these transform tools to flip or rotate objects or text.
To group multiple objects so that you can move them all at once, hold down Shift, click
on each object you wish to group together, and select the group icon. To ungroup the
objects, make sure the box with the objects is selected, and select the Ungroup icon.
If you wish to copy an object, you can click the duplicate icon when an object is selected.
When an object is selected, you can click on this icon to delete the object.
To bring an object back to the level of the print bed base, click the icon with the arrow
pointing down to the print bed. To center the icon in the middle of the print bed, click
the icon that looks like a target.
Document Tools
At the top of the Silhouette 3D® software screen, there are tools to help you with certain view
functions in the document.
Use these tools to create a new document, open an existing document, or save
your current document.
You can use these tools to cut, copy, and paste designs to the design area.
To undo the previous action you just made, you can click on the arrow turning to the
left. To redo an action you just undid, click on the arrow turning to the right.
The icon on the left helps you select all of the objects, and the icon on the left deselcts
all of the objects you may have selected.
To display or hide the wireframe view, click on this icon.
The icon on the left changes the display to an orthographic view, meaning it will be
easier to see the true distance between objects. The icon on the right changes the
display to perspective view, which is the default view.
Click on any of these tools to change your view of the design area.
From left to right, the tools are zoom in, zoom out, selection zoom,
pan, and fit to page.

Getting Started with Silhouette Alta®
10
Browsing Designs
Click the Silhouette Cloud panel to view the Silhouette designs you have on your computer. The
Silhouette Alta® includes 25 free designs to help you get started. Connect your Alta to your computer
and register your machine to get your 25 free designs.
Sign in to your Silhouette account to open your library. Click on the Library folder and then the folder
titled “Free Designs” to view all 25 designs included with your machine.
Use the View as Icons button and View as List button near the top right-hand side of
the window to change the view of your designs in the right panel.
One great feature of the Silhouette 3D® software is that you can import designs from any third-party
sources as long as the designs are in a compatible file format (i.e. .STL and .OBJ). There are many
third-party websites online that offer 3D designs for you to use. Just make sure you comply with the
appropriate product licenses that are listed when you download the file.

Getting Started with Silhouette Alta®
11
Organizing Designs
You can organize your designs within your Library for your convenience by creating new folders for
your designs.
With the Library folder highlighted, right-click and select New Folder. Then type a name for your new
folder.
Drag any design from the right panel into your newly created folder in the Folders panel on the left.
The numbers in parentheses next to each folder indicate how many objects are included in each
folder.
To access the 25 free designs that come with your Alta machine, make sure you have registered your
machine at www.silhouetteamerica.com/setup. Select your language and click the Silhouette Alta®.
Opening Designs
To open a design in your Silhouette Library, navigate to the folder the design is in. Once you find your
design, double-click it. It will open on the Design page in Silhouette 3D®.
If you have another design that you would like to print with your Alta machine, you can open that
design in Silhouette 3D®. Simply go to File>Open or click on the folder icon located along the top
of the page and find the file you wish to open. You can get designs from any third-party source you
would like as long as they come in the form of .S3D, .STL, or .OBJ files.

Getting Started with Silhouette Alta®
12
Searching Designs
At the top of the Library window, you will find a Search box. Click in the text box and type a keyword
to search your library of objects. Search results will display in the right panel.
Using Designs in the Library
Using the folders in the Library, navigate to a design that you would like to print. Double-click the
design to place it on your page in the software.
If the design is a 2D design, the software will give you the option to import your file as select 3D
objects. Some 2D designs will work better than others, so you may have to play around and do some
3D test prints to see which designs will work the best. There are six different 3D import options you
can choose from: extrusion, cookie cutter, jewelry box, stencil box, stencil, and wax pendant.
Diamond Earrings by Lori Whitlock—Design ID #268357

Getting Started with Silhouette Alta®
13
S Tb
The Silhouette Design Store contains designs for you to print with your Silhouette Alta®. To access
the Design Store, click the Store tab in the upper-right corner of the software. Your default browser
will launch and automatically pull up the Design Store. From there you can search for designs you can
print.
At the Design Store, you’ll find a variety of designs to purchase, including 2D designs and 3D designs.
Search for designs by keyword using the search bar or by category by using the menu bar.

Getting Started with Silhouette Alta®
14
Browsing for New Designs
The Silhouette Design Store works like any other web page and can be navigated by clicking on
various links to browse new releases, popular designs, etc. The home page contains popular and new
designs that you may be interested in.
For now, try downloading a design you want. Click on the design in the search results to view details
about the design.
Click the Add to Cart button to add this design to your shopping cart.
Locate the shopping cart icon in the upper right-hand corner of the window and click
it to view your shopping cart.
Click the Checkout button to proceed. At this time the system will ask you to sign in before
downloading the design. Creating a new account takes only a few seconds. Click the “Sign up FREE”
link on the login page to create a new account.

Getting Started with Silhouette Alta®
15
Creating an Account
Several different account types exist. Once you’re more familiar with the Silhouette Design Store, you
may wish to purchase a subscription and download dozens of designs each month.
In order to create a free account and buy designs one at a time, choose the “Sign up FREE” option.
You will be asked for your name, email address, and password in order to create an account. Type
your information and click the Sign Up button.

Getting Started with Silhouette Alta®
16
Once your account is created, you will need to access your shopping cart again and try the
checkout process once more. You will be asked to validate your password each time you
download designs.
Type your password to authorize the download.

Getting Started with Silhouette Alta®
17
3D P Tb
Preparing to Print
When you click the 3D Print tab, the software will automatically center your object in the print space. Be
sure your design is small enough to fit within the red circle, which is the print margin.
Turn the Silhouette Alta® on by pressing the power button on the side of the machine and waiting for the
machine to start up. Make sure the printer is connected to your computer with the USB cable.
Applying Platform Tape
The platform, also known as a build plate, is what your 3D object will be built on, so it’s important that you
prepare it. Using platform tape protects the platform and helps the filament to adhere properly.
The liner for the platform tape is perforated down the middle to make it easier to apply. Start by taking off
the liner half without the notch and line up the top half of the platform tape (with the liner still on) with the
platform’s notch. Rub the bottom half of the tape in place. You can use your hand or the spatula tool, but
the most important thing is to make sure there are no air bubbles or creases in the platform tape when it is
applied to the platform.
Then remove the other half of the liner and rub the remaining tape in place. Again, make sure there are
no air bubbles or creases. If your platform tape is not lying completely flat against the platform, your 3D
object won’t print properly.
After the tape is adhered, place the platform under the print nozzle with the tape side facing up. Make sure
the notch of the platform lines up with the notch at the bottom of the machine.
Filament Loading Lever
Print Head
Platform
On/Off Switch

Getting Started with Silhouette Alta®
18
Inserting the Filament
To load the filament in your Alta 3D printer, start by opening Silhouette 3D®, and power on your Alta. In
the software, click on the 3D Print tab. In the upper right-hand corner, ensure that your machine has been
selected. With the Alta selected, click on the Filament button. Next, click on Load Filament and go through
the following steps to load your filament properly.
Place your filament spool on top of your machine and put the roll of filament on the spool. When using
filament that comes in either a loose roll or a reel, it is important to make sure that you keep a hold of the
leading end because the filament can become tangled.
On top of the machine, there is an eye and the filament clip. Feed the filament through the eye and then
the filament tube. This will help prevent the filament from becoming tangled and jamming the machine.
Once the filament has been fed through the filament tube, press the tab on the filament clip to open the
hole where you can insert the filament. Push the filament in about an inch or until you see it in the filament
hose near the top of the machine. Then release the clip.
Click Next in Silhouette 3D®, and then click Load. The machine will feed the filament through the inner
print tube and heat up the print head. The print head will then move down and print a small amount of
filament once the filament is warmed up.
Make sure you store any filament you are not currently using in a watertight container to maintain its
quality. Humidity will cause the filament to become brittle and render it unusable.

Getting Started with Silhouette Alta®
19
Selecting the Print Settings
When you first open the 3D Print tab, you’ll notice that any designs, both on your print bed and in the
gray holding area, are still there, but each object will be put into its own print job unless you group objects
together prior to going to the 3D print step.
You’ll also notice that a box comes up with a list of your print settings. Here you can change the type of
print settings you want and change your filament, if necessary.
Silhouette 3D® has default print settings, which are the recommended settings, for each print type, but you
can adjust these settings by clicking on the plus sign on the right of the drop-down menu.
Select the profile you wish to change. There are four different sections: Layers and Perimeters, Infill,
Support Material, and Speed and Extrusion. After you are done making any adjustments, you can click the
Save Settings button to save a new print profile.
Other manuals for Alta
1
Table of contents
Other Silhouette 3D Printer manuals
Popular 3D Printer manuals by other brands

Creality 3D
Creality 3D HALOT-ONE user manual

Zcorporation
Zcorporation Spectrum Z 510 Maintenance manual

Shining 3D
Shining 3D Transcan-C user manual

Zcorporation
Zcorporation ZPrinter 310 troubleshooting guide

3D Upfitters
3D Upfitters CR-10S Pro/CRX R1 Enclosure Kit instruction manual

FLAMENT INNOVATIONS
FLAMENT INNOVATIONS BFP-ICARUS manual