silversun SSL30NW User manual
VIAL SOLAR
SOLAR STREET LIGHT
AVISO WARNING
•Por favor, lea el manual de instrucciones antes de
instalar el producto.
•El sistema debe ser instalado, conectado y probado
por un electricista certificado, basado en los
estándares de seguridad y las regulaciones locales.
•No sobrepasar la potencia nominal.
•El reemplazo solo puede ser realizado cuando la
lámpara esté apagada y se haya enfriado por
completo.
•Está prohibido cubrir el dispositivo con una tela o
material similar.
•Cualquier incumplimiento de estas instrucciones o
modificaciones en el dispositivo anulan la garantía.
•Su grado de protección IP66 asegura una protección
frente a potentes chorros de agua.
•Please read the instruction manual before installing
the product.
•The lighting system should be installed, connected
and tested by certified electrician based in safety
standards and local regulations.
•Do not use over rated power lamp.
•Replacement only can be done when the power is off
and the lamp is complete cooled down.
•Insulation cloth or similar material is prohibited to
cover the lighting fixture.
•Any missuse of these instructions or any changes to
the fixture shall nullify the guarantee.
•Its protection rating IP66 ensures a protection against
powerful jets of water.
!
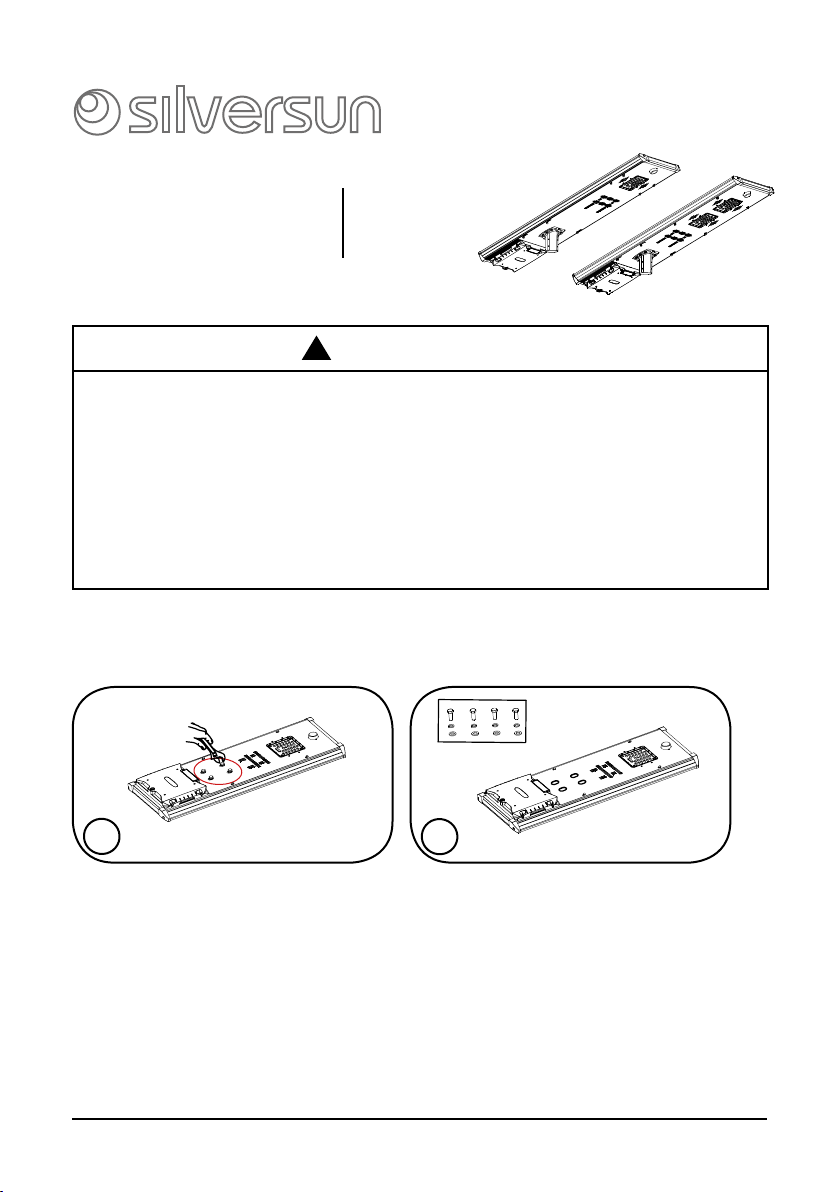
1. Montaje Installation
1.
1.Aflojar cuatro pernos hexagonales con una
llave inglesa.
1.Use a wrench to loosen the four hex bolts.
Manual de instalación
Installation guide
Mayo 2023
May 2023
2.
2. Separar cuatro pernos hexagonales exteriores,
arandelas de resorte y arandelas planas del
cuerpo de la lámpara.
2. Separate the four outer hexagon bolts, spring
washers, and flat washers from the lamp body.
Este producto contiene una fuente luminsosa de la clase de eficiencia energética D
This product contains a light source of energy efficiency class D
SSL30NW
SSL60NW
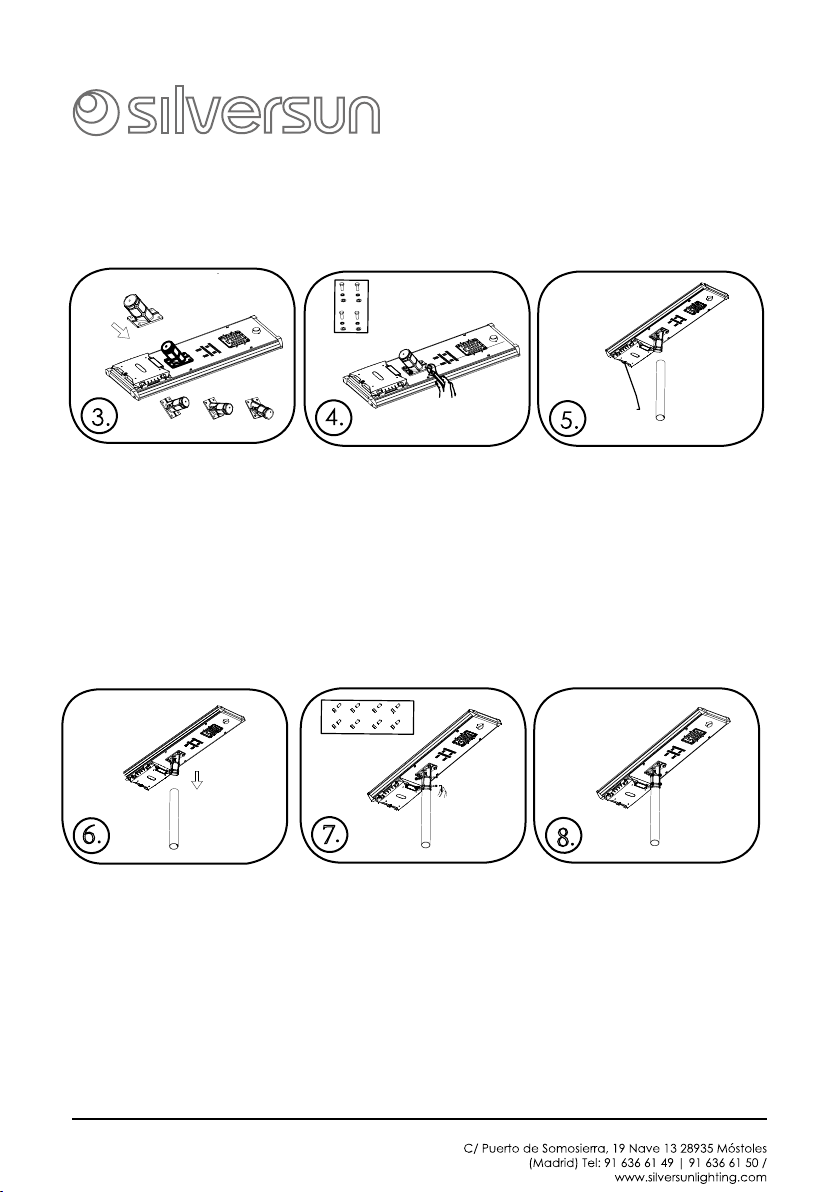
4.Use a wrench to fix the four
outer hexagon bolts, spring
washers and flat washers to
secure the sleeve bracket.
3.Alinear el agujero de fijación
del brazo con el agujero del
tornillo.
Manual de instalación
Installation guide
5.Turn on the switch before
putting the light fixture into the
light pole to ensure it can work
normally before mounting on the
lamp pole.
7.Use an Allen wrench to secure
the light fixture with the eight Allen
set screws and nuts.
6.
Align the light fixture with the
light pole, and adjust the
direction properly.
678
15° 30° 45°
4. Asegurar cuatro arandelas
planas de perno hexagonal
exterior con una llave inglesa
para sujetar el brazo.
lamp pole
Switch
position
5.Encienda el interruptor antes
de poner la luz en el poste de
luz Para asegurarse de que
funciona correctamente antes
de instalarse en el poste de luz.
6. Alinear la luz con el poste de
luz y luego ajustar la dirección
correctamente.
7. Con una llave hexagonal
interior, fije la lámpara con
ocho tornillos y tuercas
hexagonales interiores. 8. The light pole is erected and
the installation is complete.
8. Se ha instalado el poste de
luz correctamente.
Nota: en el hemisferio norte, los paneles deben instalarse hacia el sur, y en el hemisferio sur, los
paneles deben instalarse hacia el Norte.
Note: In the northern hemisphere, the panels should be installed facing south, and in the southern
hemisphere, the panels should be installed facing north.
May 2023
Mayo 2023
3.Align the socket fixing hole
with the screw holes.
Manual de instalación
C/ Puerto de Somosierra, 19 Nave 13 28935 Móstoles
(Madrid) Tel: 91 636 61 49 | 91 636 61 50 /
www.silversunlighting.com
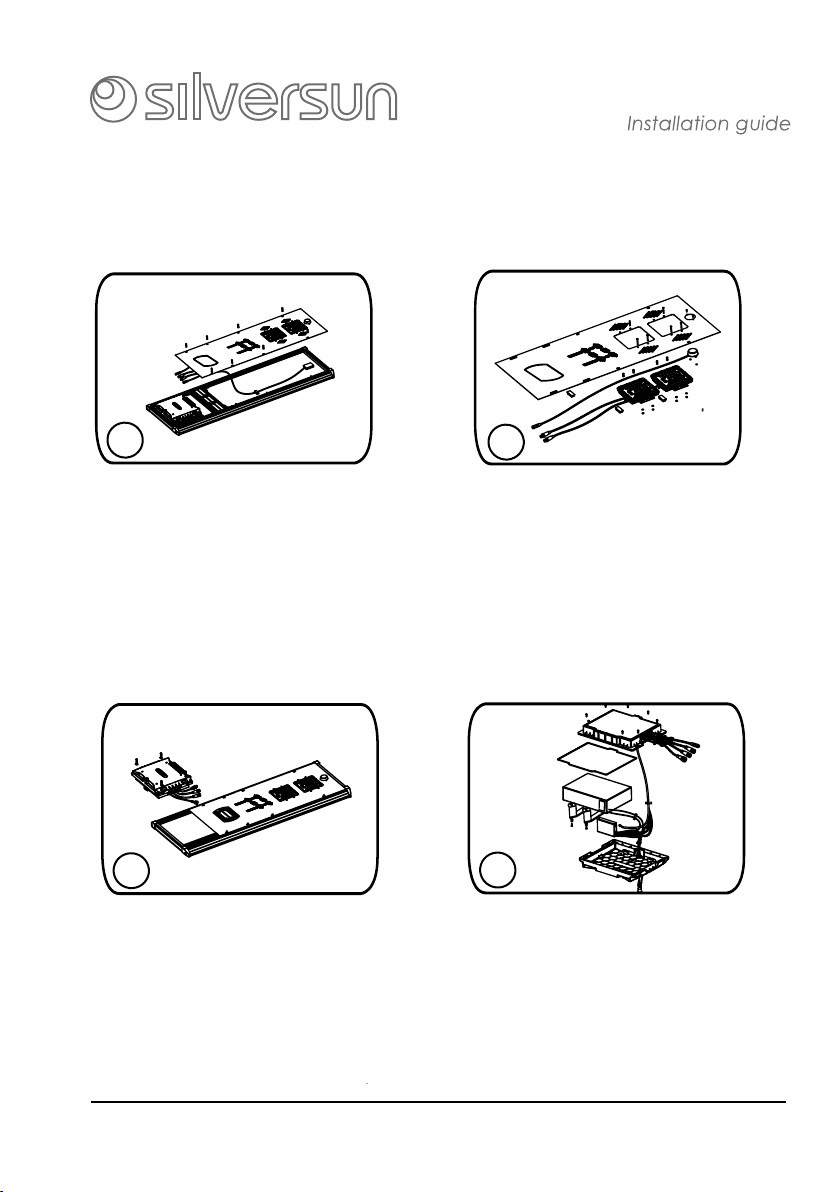
1. 2.
1.Desenrosque los tornillos de fijación del panel,
desenrosque el conector impermeable entre
cada componente y la cabina de la batería y
luego retire el panel.
1.Unscrew the panel fixing screws, unscrew
the waterproof joints between each component
and the battery compartment, and lift out the
panel.
2.Desenrosque los tornillos de fijación del
módulo, retire el módulo, reemplace el nuevo
módulo, fije con tornillos, reconecte los cables
eléctricos, instale el panel.
2. Unscrew the fixing screws of the module,
take out the module, replace it with a new
module, fix it with screws, reconnect the wires,
and install the panel.
1. 2.
1.Desenrosque los tornillos de fijación entre la
Caja de la batería y el cuerpo de la lámpara,
desenrosque el conector impermeable entre
cada componente y la cabina de la batería y
luego levante la Caja de la batería.
1. Unscrew the fixing screws between the
battery box and the lamp body, unscrew the
waterproof joints between each component
and the battery compartment, and lift out the
battery box.
2.Desenrosque los tornillos de fijación en la tapa de
la batería, retire el controlador, Corte el cableado
y luego conecte el nuevo controlador, bloquee la
batería e instale la batería en el cuerpo de la
lámpara.
2.Unscrew the fixing screws on the covers of
the battery box, take out the controller, cut off
the wiring, then connect the new controller, lock
the battery box, and then install the battery box
into the lamp body.
3. Sustitución / Desmontaje Replacement / Dissembly
Fuente de Luz Source Light
Sólo se podrá realizar por personal cualificado. Only to be done by qualified personnel
Controlador /Controller
Sólo se podrá realizar por personal cualifi cado. Only to be done by qualifi ed personnel
May 2023
Mayo 2023

Manual de instalación
C/ Puerto de Somosierra, 19 Nave 13 28935 Móstoles
(Madrid) Tel: 91 636 61 49 | 91 636 61 50 /
www.silversunlighting.com
Esta marca en el producto, los accesorios o la literatura indica que el producto y sus accesorios electrónicos (por
ejemplo, cargador, auriculares, cable USB) no deben ser eliminados con otros residuos domésticos al final de su vida
útil. Para evitar posibles daños del medio ambiente de la salud humana por la eliminación incontrolada de
desperdicios, separe estos elementos de otros tipos de residuos y recíclelos responsablemente para promover la
reutilización sostenible de los recursos materiales.
1) Todo el proceso debe manejarse con cuidado, prestando atención a
la seguridad del personal y la integridad del producto.
1) The whole process should be handled with care, paying attention to personnel
safety and product integrity.
2) Después de sacar la luz de la Caja de embalaje, busque algo para cubrir
el panel fotovoltaico para que no sea penetrado por la luz.
2) After the lamp is taken out of the packing box, find something to cover the
photovoltaic panel so that it cannot be penetrated by light.
3) Encienda el interruptor y espere a que el 10s entre en el modo de descarga.
En el modo de descarga, el indicador siempre está encendido y la fuente de
luz siempre está encendida.
3) Turn on the switch and wait for 10S to enter the discharge mode. In the
discharge mode, the indicator light is always on and the light source is always on.
4) Después de encender la luz, retire el deflector del panel fotovoltaico, apunte
el panel fotovoltaico hacia el sol y espere a que el 10s entre en el modo de
carga. En el modo de carga, el indicador parpadea lentamente y la fuente
de luz se apaga.
4) After the light is on, remove the shield on the photovoltaic panel, point the
photovoltaic panel to the sun, and wait for 10S to enter the charging mode. In
charging mode, the indicator light flashes slowly and the light source goes out.
5) En este momento, todo el sistema está en estado normal y se puede
instalar normalmente.
5) At this time, the whole system is in normal state and can be installed normally.
May 2023
Mayo 2023
4. Comprobación de funcionamiento / Check lamp works properly
Sólo se podrá realizar por personal cualificado. Only to be done by qualified personnel
This manual suits for next models
1
Other silversun Outdoor Light manuals


Popular Outdoor Light manuals by other brands

Home Decorators Collection
Home Decorators Collection HB48023PA-151 Use and care guide

Promate
Promate MotionTorch user guide

Yeelight
Yeelight YLCT03YL user manual

planeo
planeo Agate Manual and safety instructions

Paradise Datacom
Paradise Datacom GL22315 installation instructions

Würth
Würth WLH 1 Premium Translation of the original operating instructions


IKEA
IKEA ORGEL VRETEN quick start guide

Winter Wonder Lane
Winter Wonder Lane XL3211205 Operation and safety instructions

LIVARNO LUX
LIVARNO LUX 104775 Operation and safety notes

Maxim Lighting
Maxim Lighting Morrow Bay VX 40285WGET installation instructions

Luce Plan
Luce Plan Costanzina D13 pi. manual

Totec
Totec AMA-SW01 quick guide