Totec AMA-SW01 User manual

Inst_AMA-SW01
See reverse side for more information
Voir au verso pour plus d’information
Pour du support, visitez www.totec.ca
?For support, visit
120V
Conforms to / Conforme à
CSA C22.2#250.0
UL1598 / UL8750
AMA-SW01 Projection installation accessory
Accessoire d’installation en projection
Inst_AMA-SW01
See reverse side for more information
Voir au verso pour plus d’information
Pour du support, visitez www.totec.ca
?For support, visit
Conforms to / Conforme à
CSA C22.2#250.0
UL1598 / UL8750
AMA-SW01 Projection installation accessory
Accessoire d’installation en projection
120V
120V
MCD10-10 Fixture required (sold separately)
Luminaire requis (vendu séparément)
* Suggested use. Many other positions and setups possible.
* Utilisation suggérée. Plusieurs autres positions et installations possibles.
MCD10-10 Fixture required (sold separately)
Luminaire requis (vendu séparément)
* Suggested use. Many other positions and setups possible.
* Utilisation suggérée. Plusieurs autres positions et installations possibles.
Inst_AMA-SW01
See reverse side for more information
Voir au verso pour plus d’information
Pour du support, visitez www.totec.ca
?For support, visit
Conforms to / Conforme à
CSA C22.2#250.0
UL1598 / UL8750
AMA-SW01 Projection installation accessory
Accessoire d’installation en projection
MCD10-10 Fixture required (sold separately)
Luminaire requis (vendu séparément)
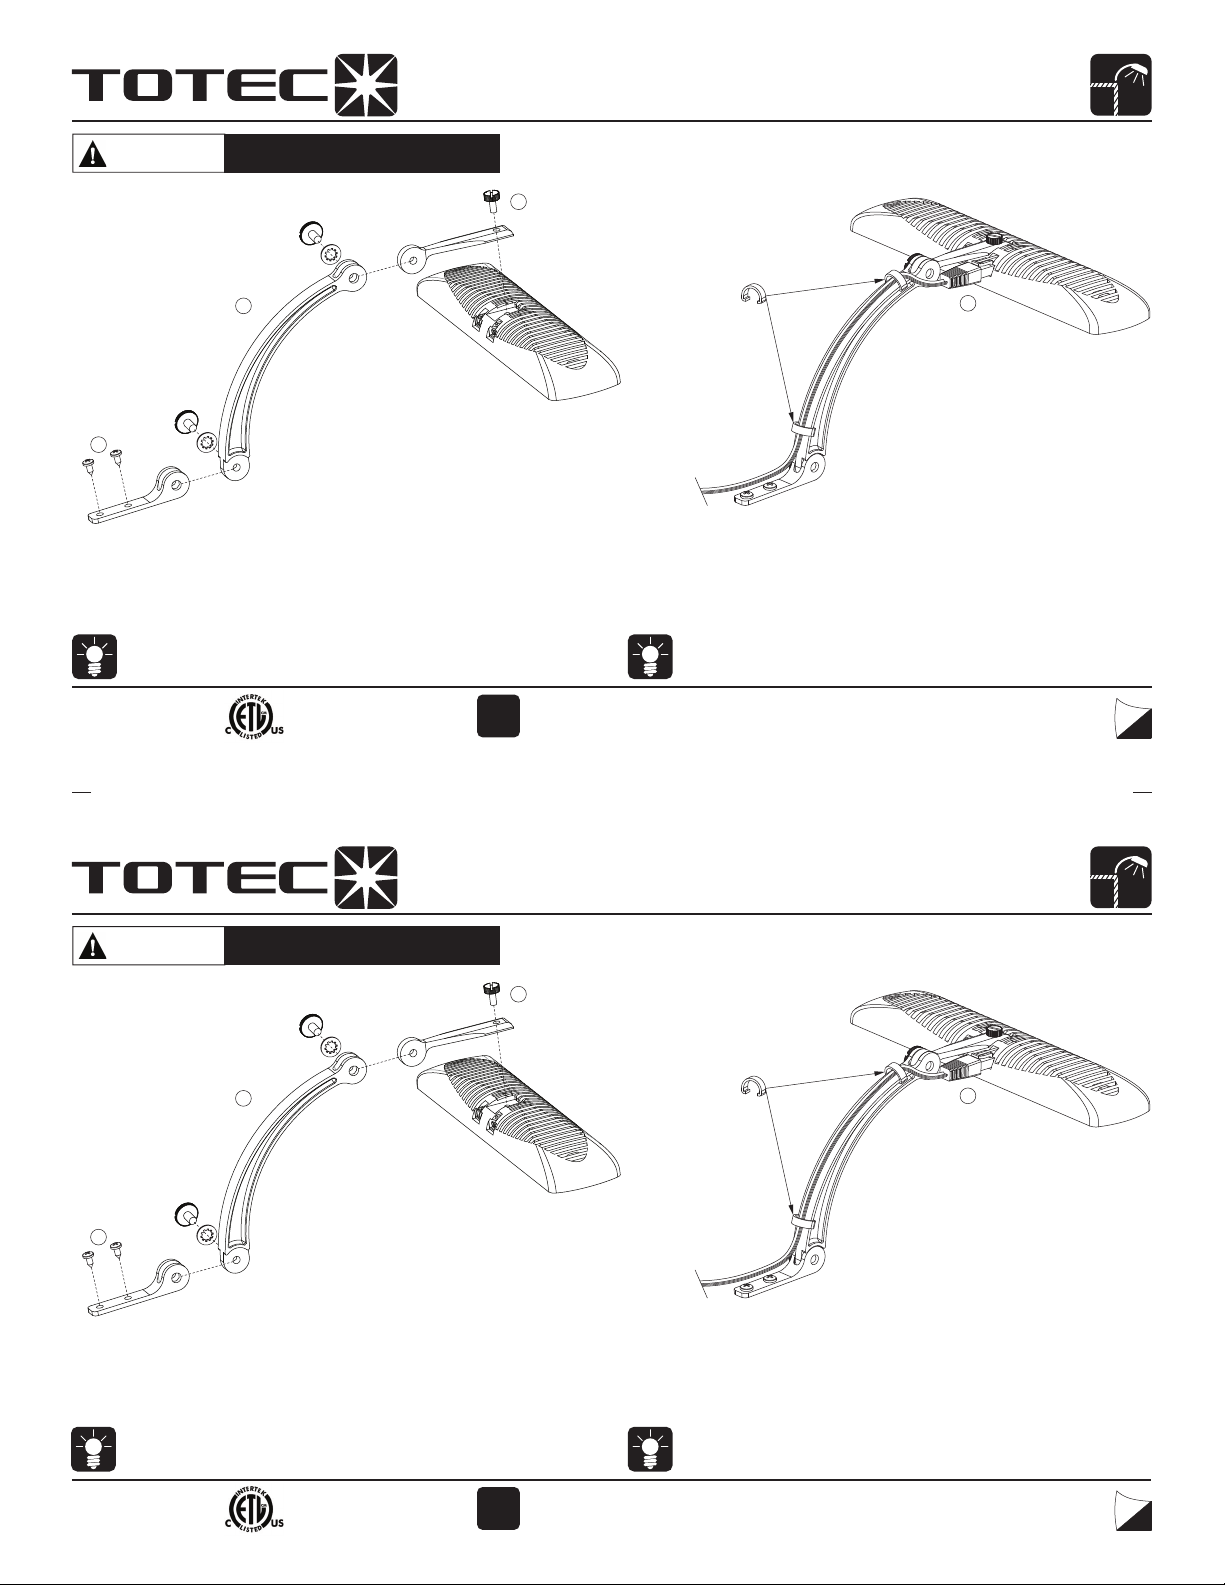
1- Assemble the pivot arm in the desired conguration using the knob screws and
tooth washers (included).
2- Use the assembly knob supplied with MCD10-10 to x the luminaire to the arm.
3- Screw the assembly on the surface using mounting screws (included).
4- Energize the system using compatible accessories sold seperatly.
1- Assembler le bras pivotant dans la conguration désirée en utilisant les vis bouton et les
rondelles dentelées (incluses).
2- Utiliser le bouton d’assemblage fourni avec le MCD10-10 pour xer le luminaire au bras.
3- Visser l’assemblage à la surface en utilisant les vis de montage (incluses).
4- Alimenter le système en utilisant les accessoires compatibles vendu séparément.
Use plastic clips to route the
wire on the pivot arm
Utiliser les attaches de plastique
pour guider le l sur le bras pivotant
4
1
2
3
To prevent knobs from loosening with xture’s weight,
always place them on the left side of the assembly (as illustrated)
An d’éviter que les boutons ne se déserrent avec le poids du luminaire,
placez-les toujours du côté gauche de l’assemblage (tel qu’illustré)
! !
Inst_AMA-SW01
See reverse side for more information
Voir au verso pour plus d’information
Pour du support, visitez www.totec.ca
?For support, visit
Conforms to / Conforme à
CSA C22.2#250.0
UL1598 / UL8750
AMA-SW01 Projection installation accessory
Accessoire d’installation en projection
MCD10-10 Fixture required (sold separately)
Luminaire requis (vendu séparément)
1- Assemble the pivot arm in the desired conguration using the knob screws and
tooth washers (included).
2- Use the assembly knob screw supplied with MCD10-10 to x the luminaire to the arm.
3- Screw the assembly on the surface using mounting screws (included).
4- Energise the system using compatible accessories sold seperatly.
1- Assembler le bras pivotant dans la conguration désirée en utilisant les vis bouton et les
rondelles dentelées (incluses).
2- Utiliser la vis bouton d’assemblage fournis avec le MCD10-10 pour xer le luminaire au bras.
3- Visser l’assemblage à la surface en utilisant les vis de montage (incluses).
4- Alimenter le système en utilisant les accessoires compatibles vendu séparément.
Use plastic clips to route the
wire on the pivot arm
Utiliser les attaches de plastique
pour guider le l sur le bras pivotant
4
1
2
3
To prevent knobs from loosening with xture’s weight,
always place them on the left side of the assembly (as illustrated)
An d’éviter que les boutons ne se déserrent avec le poids du luminaire,
placez-les toujours du côté gauche de l’assemblage (tel qu’illustré)
! !
Popular Outdoor Light manuals by other brands

Anslut
Anslut 004699 operating instructions

LiteOn
LiteOn Leotek Arieta ComfortGuide installation guide

DELTA DORE
DELTA DORE TYXIA 4600 Connection and Adjustments

GLITZHOME
GLITZHOME GH20403 Assembly instruction

Epstein-Design
Epstein-Design Snowball manual

Gainsborough
Gainsborough K546 Assembly instructions


BGS technic
BGS technic 6660 instruction manual

P. M. Lighting
P. M. Lighting Professional Series installation instructions

Ingo Maurer
Ingo Maurer DEW DROPS FLOOR instructions

Eglo
Eglo MALGERA instructions

Fermob
Fermob MOOON! H63 quick guide

DW Windsor
DW Windsor FOCUS-LIGHTING STICKS 900 Series instructions