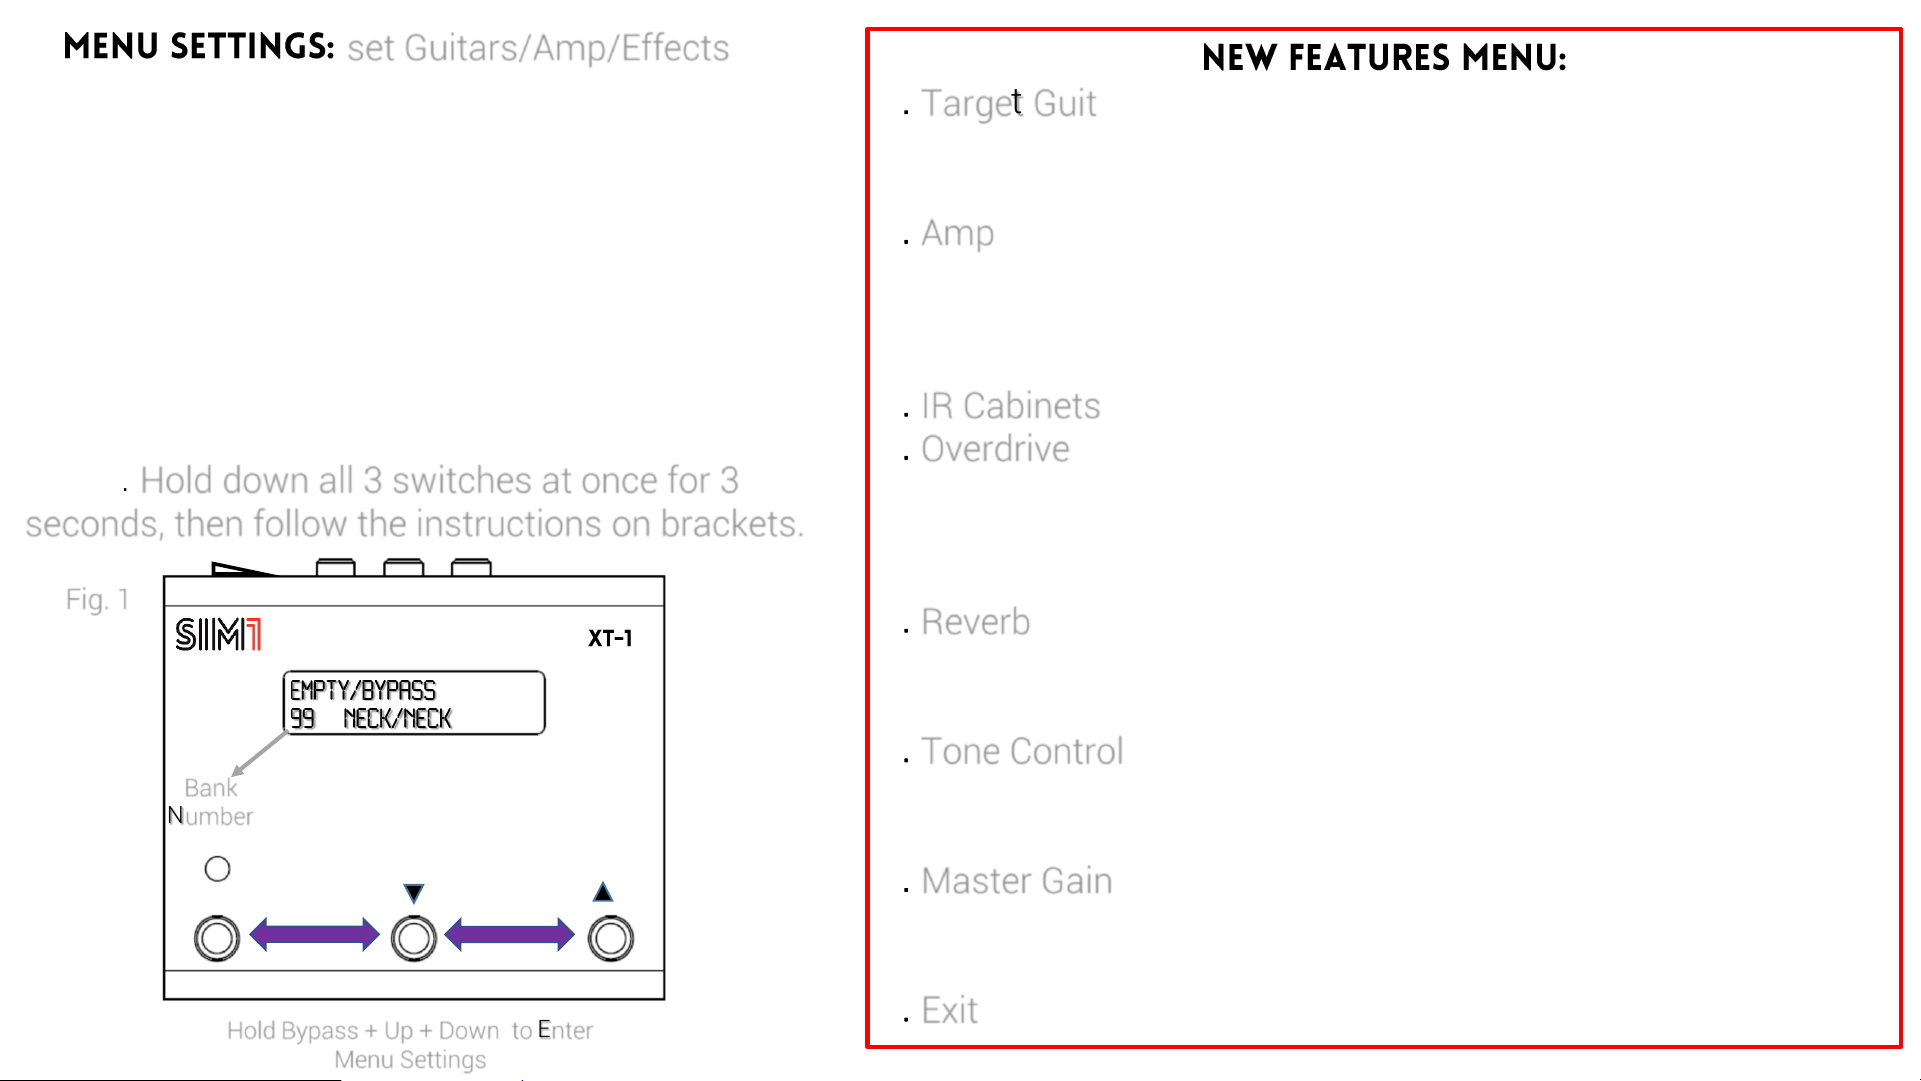
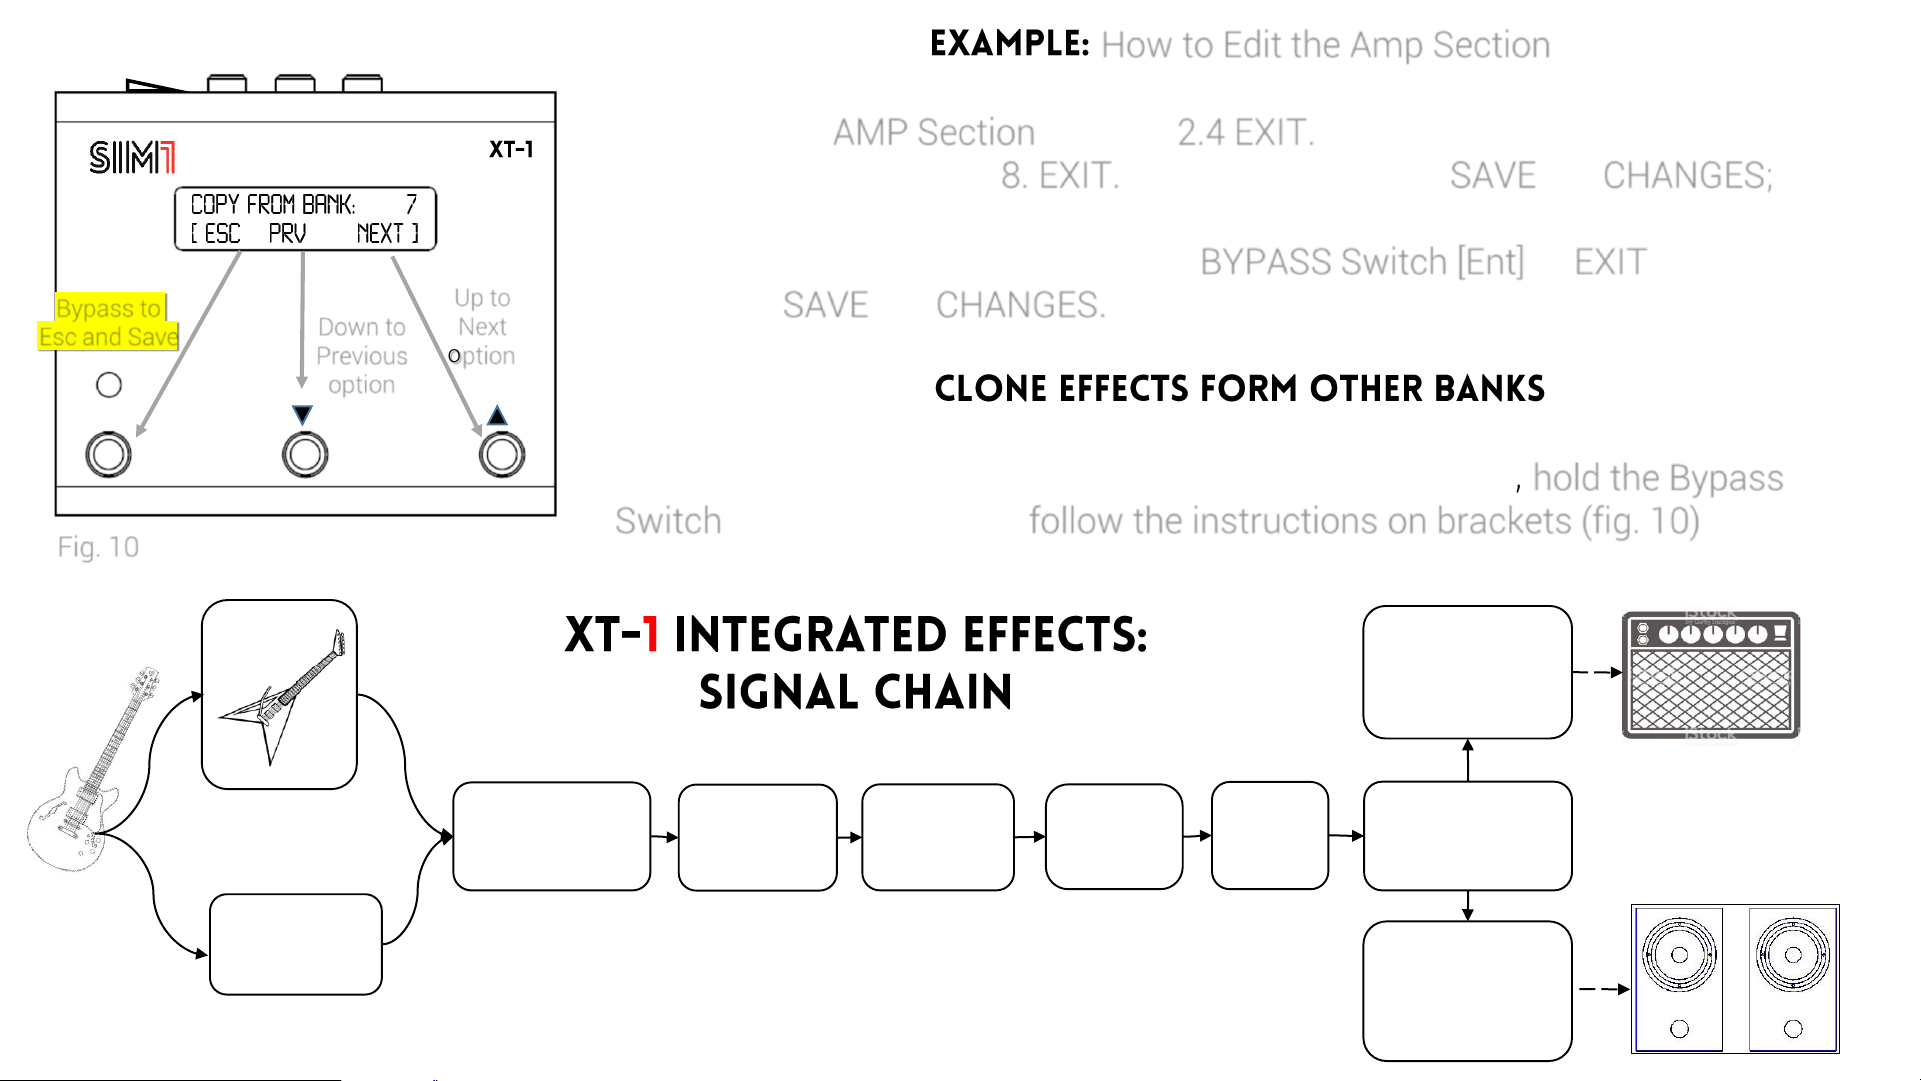
manuals.online logo
Brands
  1. Home
  2. •
  3. Brands
  4. •
  5. SIM1
  6. •
  7. Music Pedal
  8. •
  9. SIM1 XT-1 User manual

SIM1 XT-1 User manual

Other manuals for XT-1

2

Other SIM1 Music Pedal manuals

SIM1 XT-1 User manual

SIM1

SIM1 XT-1 User manual

SIM1 XT-B User manual

SIM1

SIM1 XT-B User manual

SIM1 XT-1 User manual

SIM1

SIM1 XT-1 User manual

Popular Music Pedal manuals by other brands

Walrus Audio ARP-87 instruction manual

Walrus Audio

Walrus Audio ARP-87 instruction manual

Ibanez Phaser Mini owner's manual

Ibanez

Ibanez Phaser Mini owner's manual

Ashdown GEEZER BUTLER PEDAL OF DOOM user guide

Ashdown

Ashdown GEEZER BUTLER PEDAL OF DOOM user guide

TC Electronic G-Natural user manual

TC Electronic

TC Electronic G-Natural user manual

Pro-MIDI G25 user manual

Pro-MIDI

Pro-MIDI G25 user manual

Whirlwind oc-bass quick start guide

Whirlwind

Whirlwind oc-bass quick start guide

Strymon Lex-rotary user manual

Strymon

Strymon Lex-rotary user manual

Behringer PB600 manual

Behringer

Behringer PB600 manual

Lexicon MX200 user guide

Lexicon

Lexicon MX200 user guide

Dunlop Hendrix 68 Shrine Octavio Fuzz Series quick start guide

Dunlop

Dunlop Hendrix 68 Shrine Octavio Fuzz Series quick start guide

Matthews Effects Whaler V2 manual

Matthews Effects

Matthews Effects Whaler V2 manual

Grid 1 Pedal Jeanie user manual

Grid 1

Grid 1 Pedal Jeanie user manual

Amptweaker tightboost user manual

Amptweaker

Amptweaker tightboost user manual

Ibanez TS-808 Tube Screamer Overdrive Pro owner's manual

Ibanez

Ibanez TS-808 Tube Screamer Overdrive Pro owner's manual

DW 7000 owner's manual

DW

DW 7000 owner's manual

FAMC Liquid-Foot Jr. Series user manual

FAMC

FAMC Liquid-Foot Jr. Series user manual

Dimavery EPVP-50 manual

Dimavery

Dimavery EPVP-50 manual

Tefi Vintage Lab GEGÈ operating manual

Tefi Vintage Lab

Tefi Vintage Lab GEGÈ operating manual

manuals.online logo
manuals.online logoBrands
  • About & Mission
  • Contact us
  • Privacy Policy
  • Terms and Conditions

Copyright 2025 Manuals.Online. All Rights Reserved.

Firmware 3.40
Add Source
(b)
Learn & Play
(a)
on/off out balanced
out
in 9/12 V
led
interactive
display
USB
MIDI
true bypass down up
Menu Set: Amp, Ir Cab, OD, Reverb
(c)
&
a. Learn & Play - automatic pickups matching
(hold bypass + down)
Set up your Source Guitar by recording Neck, Mid
and Bridge position pickups. The system will
automatically match the Target Guitar pickups
with your Source Guitar pickups.
b. Add Source –Learning of one pickup at a time
(hold down + up)
Record and store one pickup at a time as Source
Guitar. The matching Source/Target pickups is
not automatic, it requires the use of the Editor or
the App. Through the Editor you can turn the new
Source Guitar into a Target Guitar, using the
“Show in Target” button in “My Guitars”.
c. Menu Settings –set guitars/amp/effects
(hold bypass + down + up)
Surf the Effects Menu. Select and set each effect
you wish to add to the current Bank. It includes:
Source/Target guitar selection, Amp, IR Cabinets,
Overdrive, Reverb, Tone Ctrl, Master Gain.
bypass
Hold bypass + down
for Learn & Play
4. Play an ascending chromatic scale starting
from the E (6 open string), making a progression
of 6 notes per string (80 seconds, 2 seconds per
note is recommended) –see the tab beside.
Use the following link to watch the tutorial video:
https://www.youtube.com/watch?v=vs4QqvRW
O5I&list=PLAcvE1aTv_Nu-
cVeMTJbYJgnv7ZykqCTS&index=5&t=1s
a) & Set-up your source guitar (automatic pickups matching).
For a perfect guitar emulation the pedal must learn the tone of each pickup of the
Source Guitar. With this procedure it will automatically make the matching
between the Target and the Source Guitar pickups.
The XT-1 comes with 99 banks (30 Guitar Profiles Presets - 66 Empty /Bypass).
The 30 presets will be visible after you run the very first Learning Procedure.
1. Make sure your Source Guitar is in tune (440 Hz), with volume/tone open;
2. Switch the pickup selector of your Source Guitar to the Neck position
3. Hold simultaneously the BYPASS and DOWN switches on the pedal for 3
seconds. The system will ask you the number of pickups you would like to
configure (1 or 3). Press the DOWN switch to configure only 1 pickup, or UP
switch to configure 3 pickups. When the countdown is finished the device will
start recording (
Hold Down to Abort the procedure
).
bypass
- -
Hold UP and DOWN
For QUICK START
bypass
%
Select
Down or Up
5. If you are satisfied with the quality rating, then press the UP switch, otherwise
press DOWN switch and repeat the last pickup configuration.
6. If you selected the 3-pickup option, repeat steps 4-5 for mid and bridge pickup
as well. (For any reason, during individual Pickup configuration, it is possible to
stop the Learning Procedure just pressing the DOWN switch for 2 seconds).
7. After you have configured the last pickup (Bridge PU), the system will make a
computing process of the sounds loaded in the XT-1 (Display: Computing
Progress 00%...100%).
8. At the end of the Computing Process, press the UP switch again to end the
Learning procedure. At this point the Target Guitar profiles included in XT-1 will
be associated to the pickups you just configured. Scroll UP and DOWN the Switch
selectors to test the variety of sounds.
a2) Source Set Up
During the very first use, when XT-1 is reset, it is possible to skip the Learning
Procedure, by holding for 3 seconds the DOWN and UP Switches.
You will be asked to choose among 4 Source Guitar pickup configurations: S-S-S,
S-S-H, H-H, S-S Tele. Follow the instructions on brackets to set the Source guitar
closer to the one you have. NB: the Quick Start Source Guitar Set Up is an
approximation. To get best results, the standard procedure is always preferable.
Bypass
to Esc
Down
to
Confirm
Up to Next
option
For each Target Guitar Preset, while performing, it is
recommended to switch the Pickup position of your Source
Guitar to the one suggested on the display. This allows to
reach a sound as close as possible to that one of the
original Target Guitar.
When the BYPASS MODE is activated the Check Indicator
will show the red light and the message “True Bypass” will
appear on the Display. Now the signal is not processed in
any way, and the sound will be the original one of the
Source Guitar. The second line of the display shows the
guitar/pickup you are supposed to play as Source Guitar.
Pressing the BYPASS Switch again, the red light of the
check indicator will turn off and the sound will shift to that
one of the Target Guitar in use.
The BALANCED OUTPUT, connected directly to the mixer of the PA, is useful for instance when playing the sound
of a target acoustic guitar. In this way the result will be more realistic and accurate.
The STANDARD OUTPUT must be connected to the guitar amplifier. Other effects can be connected in cascade,
both through the BALANCED OUTPUT or through the STANDARD OUTPUT.
Target Guitar
Pickup
Source Guitar
Pickup
Pickup Matching
bypass
Hold Down
+ Up to start
b) Learning one pickup at a time (pickup matching through editor)
This function allows you to record more Source Guitar pickups, without modifying
the previous configuration of the pedal. The matching between Target and Source
Guitar pickups requires the use of the Editor for PC/Mac.
Useful to:
•Record, as Source Guitars, some different pickup configurations, i.e. positions 2
(Neck+Mid) or 4 (Mid+Bridge) of a Stratocaster model;
•Record as many Source Guitars as you want, to use in a different moment;
•Learn and Store the sound of Guitars to be used as Target (Source Guitars can
be Turned into Target Guitars, using the function of the Editor “Show in Target”).
1. Make sure your Source Guitar is in tune (440 Hz), with volume/tone open;
2. Switch the pickup selector of your Source Guitar to the one that you wish to profile;
3. Hold simultaneously the UP and DOWN switches on the pedal for 3 seconds. When the countdown is finished
the device will start recording (
Hold DOWN to Abort the procedure
).
4. Play the same chromatic scale explained in the Learn & Play paragraph.
5. The newly created Source Guitar will be named with a progressive number (i.e. Guit4, in case Guit1, Guit2, Guit3
were already stored).
bypass
Hold Bypass + Up + Down to Enter
Menu Settings
Bank
Number
c) set Guitars/Amp/Effects
This menu gives the opportunity for example to set,
the bank in use, with a different Source/Target Guitar,
to add some effects/cabinet simulation or to set
volumes to each guitar profile. This feature allows
you to connect the XT-1 directly to the PA or to a
powered speaker and use it as a stand-alone pedal.
NB: It substitutes the «Shop Mode» of the previous
versions.
Go to any of the 99 banks of the pedal you wish to
adjust. Hold down all 3 switches at once for 3
seconds, then follow the instructions on brackets.
1. Target Guit
1.1 Model (Select the Source/Target Guitar in the bank)
1.2 Gain (adjust the volume of each target guitar)
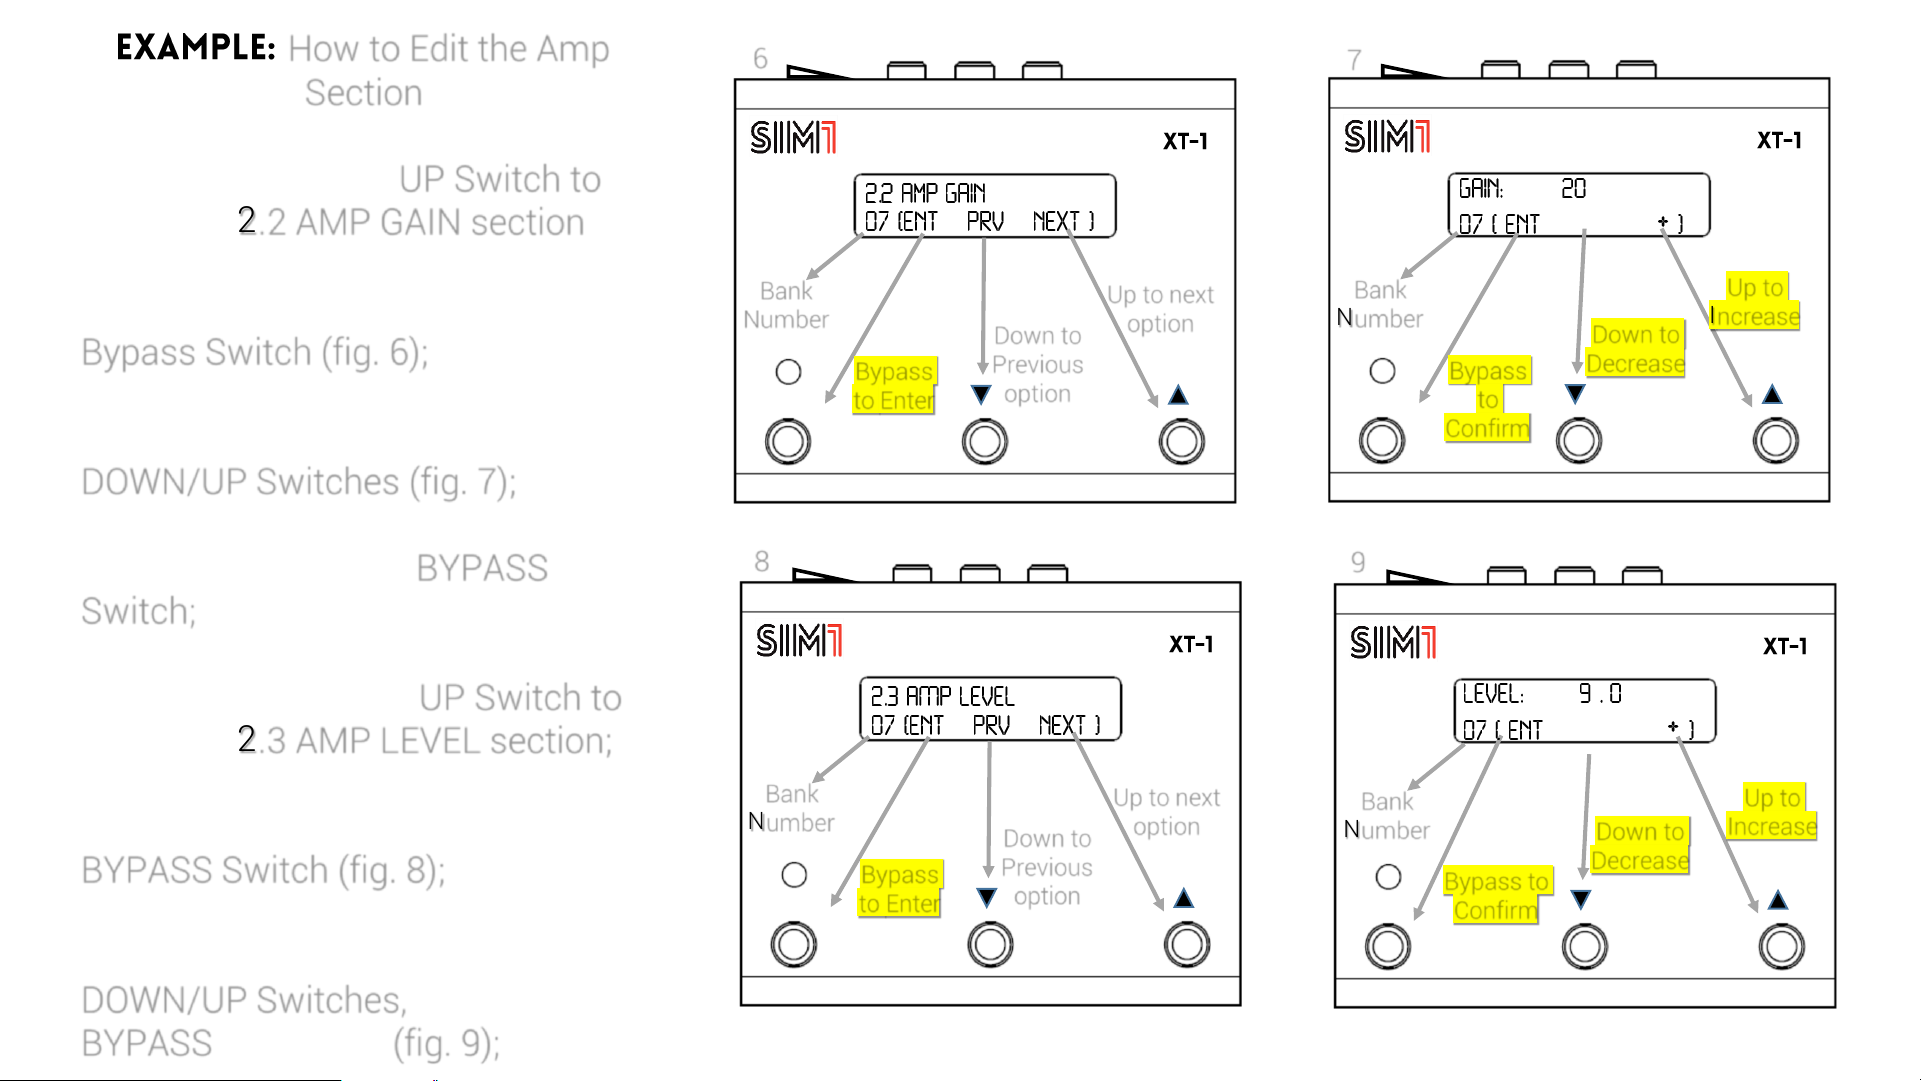
2. Amp
3.1 Amp Status (Select the Amp Model)
3.2 Amp Gain (set the Gain Percentage )
3.3 Amp Level (set the Amp Volume)
2. IR Cabinets (add an Impulse Response Cabinet Emulation)
4. Overdrive
4.1 OD Status (activate the Overdrive)
4.2 OD Drive (set the Overdrive Percentage )
4.3 OD Level (set the Overdrive Volume)
5. Reverb
5.1 Rev Status (activate the Reverb)
5.2 Rev Level (set the Reverb Percentage )
6. Tone Control
6.1 Treble
6.2 Bass
7. Master Gain
7.1 Master Unbal (set the Volume of the Unbalanced Output)
7.2 Master Bal (set the Volume of the Unbalanced Output)
8. Exit
Fig. 1
bypass
Bank
Number Down to
Previous
option
Up to
Scroll up
options
Bypass
to Enter
bypass
Bank
Number Down to
Previous
option
Up to
Scroll up
options
Bypass
to Enter
Up to Next
option
bypass
Bank
Number Down to
Previous
option
Bypass
to
Confirm
bypass
Bank
Number Down to
Previous
option
Up to Next
option
Bypass
to
Confirm
How to Edit the Amp Section
1. Scroll up with the UP Switch until you reach “2 -Amp section”;
2. Enter this section through the BYPASS Switch (fig. 2);
3. Enter the section “2.1 Amp Status through the BYPASSN Switch (fig.3);
4. Activate and Select your favourite Amp through UP or Down Switches (fig. 4);
5. Confirm using the BYPASS Switch (fig. 5);
Up to Next
option
2
345
bypass
Bank
Number Down to
Previous
option
Up to next
option
Bypass
to Enter
bypass
Bank
Number Down to
Previous
option
Up to next
option
Bypass
to Enter
bypass
%
-
Bank
Number Down to
Decrease
Up to
Increase
Bypass
to
Confirm
bypass
Down to
Decrease
Up to
Increase
Bypass to
Confirm
-db
-
How to Edit the Amp
Section
6. Scroll up with the UP Switch to
get to the 2.2 AMP GAIN section;
7. Enter this section through the
Bypass Switch (fig. 6);
8. Adjust the Gain level through the
DOWN/UP Switches (fig. 7);
9. Confirm using the BYPASS
Switch;
10. Scroll up with the UP Switch to
get to the 2.3 AMP LEVEL section;
11. Enter this section through the
BYPASS Switch (fig. 8);
12. Adjust the Drive Vol. through the
DOWN/UP Switches, then press
BYPASS to confirm (fig. 9);
67
89
Bank
Number
bypass
Down to
Previous
option
Up to
Next
option
Bypass to
Esc and Save
Fig. 10
1.1 Target
Guitar
Bypass=ON
4.Overdrive
1.2 Target
Gain 6. Tone 3.Cabinet IR
7.1 Master
Gain
BAL Out
7.2 Master Gain
UNBAL Out
Target Guitar 2.Amp 5.Reverb
How to Edit the Amp Section
13. Leave the AMP Section through 2.4 EXIT. When you finish editing your
preset, go to the section 8. EXIT. You will be asked to SAVE the CHANGES;
14. In any section, you can even hold BYPASS Switch [Ent] to EXIT and
eventually SAVE the CHANGES.
On each bank of XT-1 it is possible to Copy/Paste the PreAmp/Effects settings
from a different preset. Go to the bank you wish to modify, hold the Bypass
Switch for 2 seconds, and follow the instructions on brackets (fig. 10).