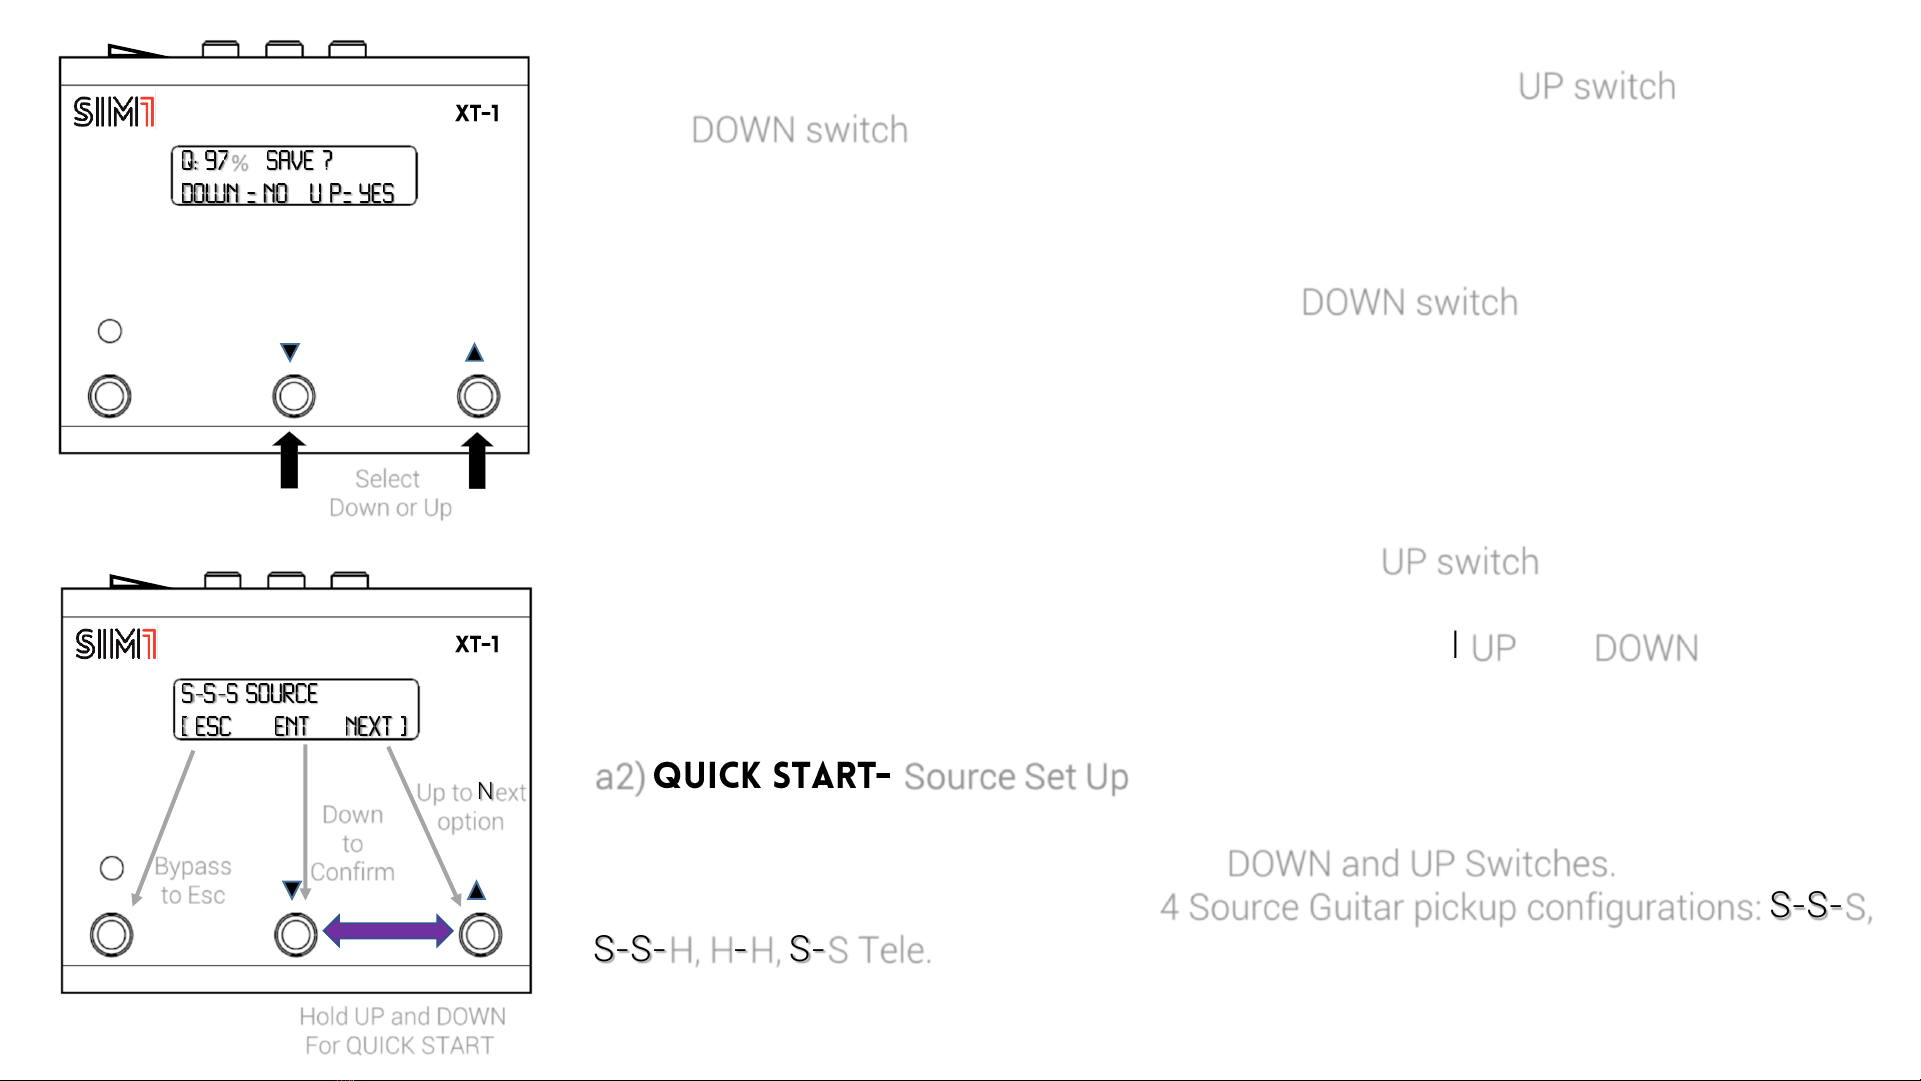
SIM1 XT-1 User manual

Firmware 3.0

Add Source
(b)
Learn & Play
(a)
on/off out balanced
out
in 9/12 V
led
interactive
display
USB
MIDI
true bypass down up
Menu Set: PreAmp, Ir Cab, OD, Reverb
(c)
&
a. Learn & Play - automatic pickups matching
(hold bypass + down)
Set up your Source Guitar by recording Neck, Mid
and Bridge position pickups. The system will
automatically match the Target Guitar pickups
with your Source Guitar pickups.
b. Add Source –profiling of one pickup at a time
(hold down + up)
Make the profile and store one pickup at a time
as Source Guitar. The matching Source/Target
pickups is not automatic, it requires the use of
Editor or the App. Through the Editor you can turn
the new Source Guitar into a Target Guitar, using
the “Show in Target” button in “My Guitars”.
c. Menu Settings –set preamp/effects
(hold bypass + down + up)
Surf the Effects Menu. Select and set each effect
you wish to combine to each Target Guitar. It
includes: Gain of Target Guitar, IR Cabinets,
PreAmp, Overdrive, Reverb, Master Gain.

bypass
Hold bypass + down
for Learn & Play
4. Play an ascending chromatic scale starting
from the E (6 open string), making a progression
of 6 notes per string (80 seconds, 2 seconds per
note is recommended) –see the tab beside.
Use the following link to watch the tutorial video:
https://www.youtube.com/watch?v=vs4QqvRW
O5I&list=PLAcvE1aTv_Nu-
cVeMTJbYJgnv7ZykqCTS&index=5&t=1s
a) & Set-up your source guitar (automatic pickups matching).
For a perfect guitar emulation the pedal must learn the tone of each pickup of the
Source Guitar. With this procedure it will automatically make the matching
between the Target and the Source Guitar pickups.
1. Make sure your Source Guitar is in tune (440 Hz), with volume/tone open;
2. Switch the pick up selector of your Source Guitar to the Neck position
3. Hold simultaneously the BYPASS and DOWN switches on the pedal for 3
seconds. The system will ask you the number of pickups you would like to
configure (1 or 3). Press the DOWN switch to configure only 1 pickup, or UP
switch to configure 3 pickups. When the countdown is finished the device will
start recording (
Hold Down to Abort the procedure
).

bypass
- -
Hold UP and DOWN
For QUICK START
bypass
%
Select
Down or Up
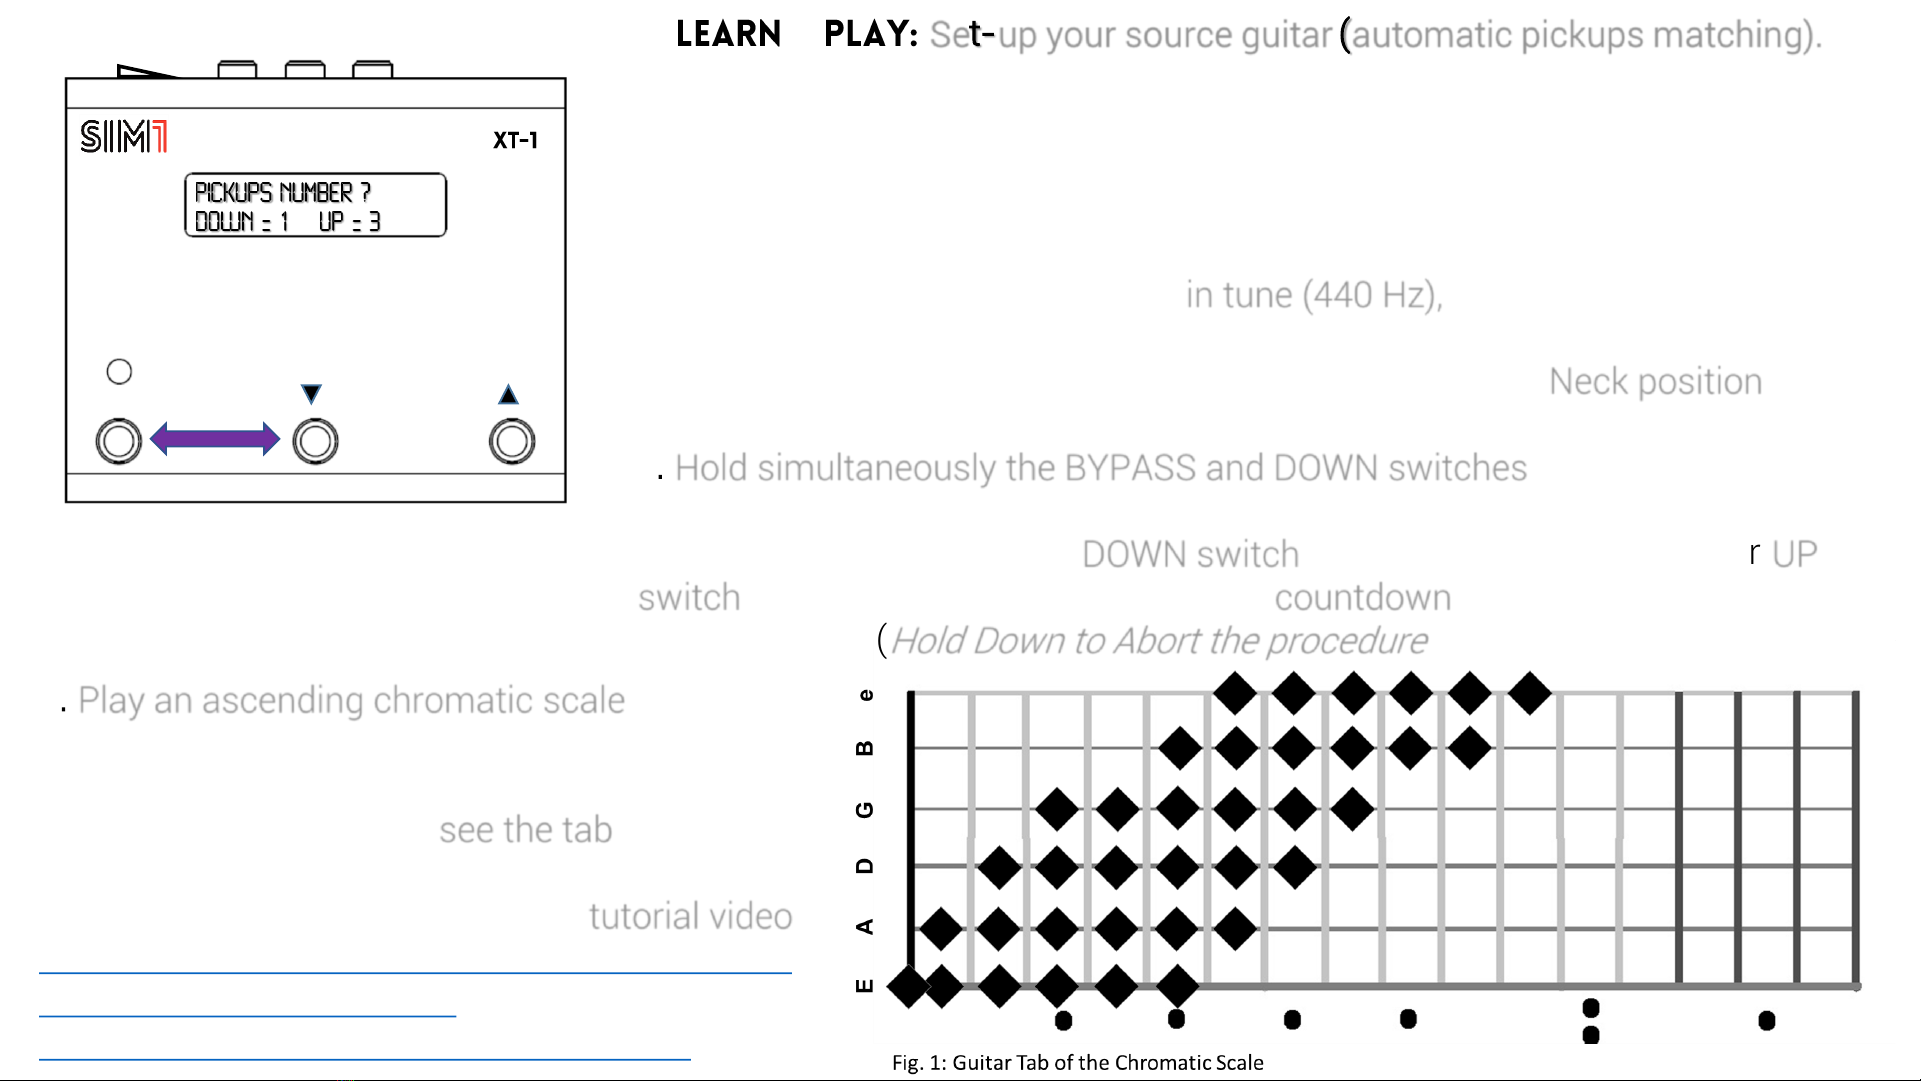
5. If you are satisfied with the quality rating, then press the UP switch, otherwise
press DOWN switch and repeat the last pickup configuration.
6. If you selected the 3-pickup option, repeat steps 4-5 for mid and bridge pickup
as well. (For any reason, during individual Pickup configuration, it is possible to
stop the Learning Procedure just holding the DOWN switch for 2 seconds).
7. After you have configured the last pickup (Bridge PU), the system will make a
computing process of the sounds loaded in the XT-1 (Display: Computing
Progress 00%...100%).
8. At the end of the Computing Process, press the UP switch again to end the
Learning procedure. At this point the Target Guitar profiles included in XT-1 will
be associated to the pickups you just configured. Scroll UP and DOWN the Switch
selectors to test the variety of sounds.
a2) Source Set Up
During the very first use, when XT-1 is reset, it’s possible to skip the Learning
Procedure, by holding for 3 seconds the DOWN and UP Switches.
You will be asked to choose among 4 Source Guitar pickup configurations: S-S-S,
S-S-H, H-H, S-S Tele. Follow the instructions on brackets to set the Source guitar
closer to the one you have. NB: the Quick Start Source Guitar Set Up is an
approximation. To get best results, the standard procedure is always preferable.
Bypass
to Esc
Down
to
Confirm
Up to Next
option

For each Guitar Profile Preset, while performing, it is
recommended to switch the Pickup position of your Source
Guitar to that one suggested on the display. This allows to
reach a sound as close as possible to that one of the
original Target Guitar.
When the BYPASS MODE is activated the Check Indicator
will show the red light and the message “True Bypass” will
appear on the Display. Now the signal is not processed in
any way, and the sound will be the original one of the
Source Guitar. The second line of the display shows the
guitar/pickup you are supposed to play as Source Guitar.
Pressing again the BYPASS Switch, the red light of the
check indicator will turn off and the sound will shift to that
one of the Target Guitar in use.
The BALANCED OUTPUT, connected directly to the mixer of the PA, is useful for instance when playing the sound
of a profiled acoustic guitar. In this way the result will be more realistic and accurate.
The STANDARD OUTPUT must be connected to the guitar amplifier. Other effects can be connected in cascade,
both through the BALANCED OUTPUT or through the STANDARD OUTPUT.
Target Guitar
Pickup
Source Guitar
Pickup
Pickup Matching

bypass
Hold Down
+ Up to start
b) Profile one pickup at a time (pickup matching through editor)
This function allows to record more Source Guitar pickups, without modifying the
previous configuration of the pedal. The matching between Target and Source
Guitar pickups requires the use of the Editor for PC/Mac.
Useful to:
•Record, as Source Guitars, some different pickup configurations, i.e. positions 2
(Neck+Mid) or 4 (Mid+Bridge) of a Stratocaster model;
•Record as many Source Guitars you want, to use in a different moment;
•Profile one or more Guitars to be used as Target Guitars (Source Guitars can be
Turned into Target Guitars, using the function of the Editor “Show in Target”).
1. Make sure your Source Guitar is in tune (440 Hz), with volume/tone open;
2. Switch the pick up selector of your Source Guitar to that one you wish to profile;
3. Hold simultaneously the UP and DOWN switches on the pedal for 3 seconds. When the countdown is finished
the device will start recording (
Hold DOWN to Abort the procedure
).
4. Play the same chromatic scale explained in the Learn & Play paragraph.
5. The new created Source Guitar will be named with a progressive number (i.e. Guit4, in case Guit1, Guit2, Guit3
were already stored).

bypass
Hold Bypass + Up + Down to Enter
Menu Settings
Bank
Number Down
to Enter
Up to
Scroll up
Bypass
to Esc
c) set PreAmp/Effects
This menu (firmware 3.0) gives the opportunity to
add some effects/cabinet simulation and set
volumes to each guitar included in the presets. This
feature allows to connect XT-1 directly to the PA or to
a powered speaker, and use it as a stand alone pedal.
NB: It substitutes the «Shop Mode» of the previous
versions.
Go to the guitar/bank you wish to adjust. Hold for 3
seconds the 3 switches contemporarily and follow
the instructions on brackets, to adjust your settings.
1. Target Guit
1.1 Gain (adjust the volume of each target guitar)
1.2 Bypass (set the bank in bypass mode)
2. IR Cabinets (add an Impulse Response Cabinet Emulation)
3. PreAmp
3.1 PreAmp Status (activate the PreAmp Section)
3.2 PreAmp Gain (set the Gain Percentage )
3.3 PreAmp Level (set the PreAmp Volume)
4. Overdrive
4.1 OD Status (activate the Overdrive)
4.2 OD Drive (set the Overdrive Percentage )
4.3 OD Level (set the Overdrive Volume)
5. Reverb
5.1 Rev Status (activate the Reverb)
5.2 Rev Level (set the Reverb Percentage )
6. Tone Control
6.1 Treble
6.2 Bass
7. Master Gain
7.1 Master Unbal (set the Volume of the Unbalanced Output)
7.2 Master Bal (set the Volume of the Unbalanced Output)
Fig. 1

bypass
Bank
Number Down
to Enter
Up to
Scroll up
options
Bypass
to Esc
bypass
Bank
Number Down
to Enter
Up to
Scroll up
options
Bypass
to Esc
Up to Next
option
bypass
Bank
Number Down to
Previous
option
Bypass
to Esc bypass
Bank
Number Down to
Previous
option
Up to Next
option
Bypass
to Esc
How to Edit the Overdrive Section
1. Scroll up with the UP Switch until you reach the point 4 - Overdrive section;
2. Enter this section through the DOWN Switch (fig. 2);
3. Enter the section 4.1 Overdrive Status through the DOWN Switch (fig.3);
4. Activate or Deactivate the Overdrive through UP or Down Switches (fig. 4);
5. Esc using the BYPASS Switch (fig. 5);
Up to Next
option
2
345

bypass
Bank
Number Down to
Enter
Up to next
option
Bypass
to Esc
bypass
Bank
Number Down to
Enter
Up to next
option
Bypass
to Esc
bypass
%
-
Bank
Number Down to
Decrease
Up to
Increase
Bypass
to Esc
bypass
Down to
Decrease
Up to
Increase
Bypass to
go Esc
-db
-
How to Edit the
Overdrive Section
6. Scroll up with the UP Switch to
get the DRIVE section;
7. Enter this section through the
DOWN Switch (fig. 6);
8. Adjust the Drive level through the
DOWN/UP Switches (fig. 7);
9. Esc using the BYPASS Switch;
10. Scroll up with the UP Switch to
get the LEVEL section;
11. Enter this section through the
DOWN Switch (fig. 8);
12. Adjust the Drive Vol. through the
DOWN/UP Switches (fig. 9);
67
89
Bank
Number

bypass
Down to
Previous
option
Up to
Next
option
Bypass to
Esc and Save
Fig. 10
1.2.Target
Bypass=ON
4.Overdrive
1.1 Target
Gain 6. Tone 2.Cabinet IR
7.1 Master
Gain
BAL Out
7.2 Master Gain
UNBAL Out
Target Guitar 3.PreAmp 5.Reverb
How to Edit the Overdrive Section
13. When you finish to edit your preset, exit using repeatedly the BYPASS
Switch, until you get the SAVE CHANGES page;
14. Use UP Switch to save changes, DOWN Switch not to save, BYPASS Switch
to go back to the previous page.
On each bank of XT-1 it’s possible to Copy/Paste the PreAmp/Effects settings
from a different preset. Go to the bank you wish to modify, hold Bypass Switch
for 3 seconds, and follow the instructions on brackets (fig. 10).

Back-up & Upgrade for the Configuration Manager Software
XT-1 is equipped with an USB Port 2.0, which must be used strictly with an USB
pendrive in order to transfer the Back Up of sounds (both source guitars and target
guitars) from XT-1 to the Configurator Manager Software, make your own set up,
and bring them back to XT-1 in order to make the upgrade of the device .
bypass
Insert the USB pendrive in the USB port, then hold for 3 seconds
the DOWN Switch. At this point on the display will appear “Back
Up…”. Leave the USB pendrive inserted into the unit until all the
data will be forwarded to the key, and “Done!” will appear on the
display. Now it’s possible to remove the pendrive and to insert it
to the PC/MAC in order to import the Back Up of your XT-1 on
the Configurator Manager. For more information on the
Configurator Software Use see the related tutorial video.
…
bypass
Once all data have been saved from the Configurator Manager
Software to the Pen Drive, bring it back to the USB port of the
pedal, then hold for 3 seconds the UP Switch. At this point on
the display will appear “Upgrade..”. Leave the pendrive inserted
into the unit until all the data will be forwarded to XT-1, and
“Done!” will appear on the display. Now it’s possible to remove
the pendrive. For more information on the Configurator
Manager watch the tutorial video:
https://www.youtube.com/watch?v=b6AMX52A6gE&list=PLAc
vE1aTv_Nu-cVeMTJbYJgnv7ZykqCTS&index=2
…
…
…

bypass
Hold simultaneusly the two switches
to reset the device
In order to reset the device at the factory default settings you must hold
simultaneously the BYPASS and UP Switches for 3 seconds. You will be asked to
confirm this procedure: press “UP” Switch to definitively reset, “Down” Switch if you
don’t want to reset. After the reset procedure all the Source and Target Guitars inside
XT-1 will be restored to those of factory default setting. It’s strongly suggested to
make a backup before making this procedure, in order not to definitively lose Guitars
(either Sources or Targets).
By switching the pedal on, during the booting process, the XT-1 Code, a special code
different for all devices, will appear on the display. This code is useful to register your
device in the SIM1 Web-Store (https://store.sim-one.it/) or in the App. This procedure
will allow you to use in your XT.1 pedal the new sounds you will buy or you will
download for free from the Community. Please note that if you do not digit in a correct
way this Code on the Web/App, the downloaded sounds will not be correctly installed
in your XT-1 device and it will report an error.
bypass
…
Switch the pedal on
to get the XT-1 Code

for PC/Mac
1. Create an account on the Online Store https://store.sim-one.it/, making sure to register your pedal with the
correct XT-1 code;
2. Buy or Download for free from the Community some new Guitar Profiles;
3. In the «Download» section of the website http://www.sim-one.it/ get and install the Configuration Manager for
PC/Mac in your Computer;
4. Browse the content of your pendrive and select the backup file
«xt1.arc»;
5. Click on «Sync with Store» to get the new Guitar profiles you
ordered from the Store;
5. Click on any Guitar of the “Target” column to check the available
instruments, and select the one you wish to insert on that bank;
6. Create your favourite configuration (matching Source/Target guitars) in the available 30 banks. Edit Volumes
and add Cabinets Simulations (IR);
7. Save your new configuration on the USB pen drive, and Exit. Bring the Pendrive to the pedal and hold the UP
switch in order to do the Upgrade procedure and transfer the new configuration on XT-1.

for PC/Mac
Select the Source Guitar
Select the Target Guitar
Insert Bypass in the Bank
Adjust the Target Guitar Gain
Assign a MIDI Program
Change in the Bank
Load ad insert IR for Cabinet
Simulations
Adjust the Master Gain of
the 2 independent outputs
Edit source guitar names/
Turn Source into Target/send
to the Community
Download the guitar tones you
got from Store/Community
Save the Configuration
Midi Master: control with
XT-1 other MIDI devices

Total pre-sets …..…………………………………………...……………………………………………………………………………………………………….……………….………30
Guitar Profiles pre-loaded ………………………….…………………………………………………………………………………………………………………………………12
AD Conversion …....…………………………………………………………………………………………………………………………………………….……………………...32 bit
DA Conversion..…............................................................................................................................................................................32 bit
Sample Rate ………………………………………………………………………………………………………..…………………………………………..……………….48/96 kHz
Input Impedance ……………..……………………………………………………………………………………………………..………………………………………….…..…1 MΩ
Output Impedance (Standard Output-OUT)……………….……..………………………………..……………………………………………………………...680 Ω
Output Impedance (Balanced Output-BAL) …………………………………………………….…………………………………………………………….…...10 kΩ
Recommended Load Impedance …..………………………………..…………………………………………………………………………….….10 KΩ or Greater
Signal To Noise ratio ……………………………………..…………………………………..………………………………………………………………..…………….> 104 dB
Controls……………………………………………………………………………….…………….... On/Off switch, Switches Up & Down , Switch Bypass
USB Port……………………..………….………………………………………………………………………………………...……………………………………………………..…….2.0
Indicators…………..………………..………………..………………..………………..………………………..….……..Display Lcd (2 lines, 16 typefaces each)
Connectors………….... ………..………………..………………..………………..…………………….......…jack ¼ inch (Input/Output/Balanced Output)
Connector AC Adaptor Jack …………………………..………………..………………..………………..………………..…………….…………….………..5.5*2.1mm
Power Supply …………………..……………………....………………..………………..…….………….…….AC 9V-1 A o 12 V 500 mA –sold separately
Polarity……………………………………………..………………..………………..………………..………….……..………..……….………………………….…. Negative inner
Dimensions …………….……….……..……………..………………..………………..………………..………………………….…....…..147 (W) 125 (D) 47 (H) mm
Weight ……….………………………………………………………………….….………………..………………..………………..………………..…….……..…………….…....680 g.
Accessories ………..………………….….….……………………………………..……………………….. User’s Manual, AC Adaptor, Wi-Fi USB Adapter
Options …………………. ………..………………..………………..………………..…………………………………………………..…………………………….. USB Pen Drive
Midi Program Change……. ………..………………..………………..………………..………………..………through MIDI/USB adapter (Not included)

&
Graphics or painting imperfections are due to
handcraft production
Legal Address: Via Ca' Rossa 54, 47121 Forlì (FC) - Italy
Operational Headquarter: Via Balzella 41/D, 47122 Forlì (FC) - Italy
www.sim-one.it info@sim-one.it
“Sim1 – Sound Imprinting’ is a registered trademark property of Sim1 Srl. All other product names and images,
trademarks and artists names are the property of their respective owners, which are in no way associated or
affiliated with Sim1. Product names are used solely for the purpose of identifying the specific products used during
tone recording sessions and of describing certain types of tones achievable with Sim1’s modeling technology. Use
of these names does not imply any cooperation or endorsement.”
Other manuals for XT-1
2
Other SIM1 Music Pedal manuals