Simgrade R7 User manual

Manual v.1.3
02.03.2021

2
1. General 3
1.1 Varoitukset ja ohjeet turvalliselle käytölle 4
1.1.1. Käyttöympäristö ja turvalliset säilytysolosuhteet 4
1.1.2. Takuu 4
1.1.3. CE-Merkintä 4
1.1 Varningar och instruktioner för säker användning 5
1.1.1. Driftsmiljö och säkra lagringsförhållanden 5
1.1.2. Garanti 5
1.1.3. CE-märkning 5
1.1. Warnings & instructions for safe usage 6
1.1.1. Operating environment and safe storage conditions 6
1.1.2. Warranty 6
1.1.3. CE-Marking 6
1.2. Important Notes 7
1.4. Mounting the pedals 8
1.5. Connecting the pedals to the controller box 8
1.6. Grounding the controller box 9
1.7. Maintenance 9
2. Mechanical Adjustments 10
2.1. General 10
2.2. Brake 11
2.3. Throttle 13
3. Software 14
3.1. General 14
3.2. Layout 14
4. Options & Alternative setups 16
4.1. Extra PU-spring pack 16
4.2. Separate preload spring 18
4.3. Load soft stop 20
4.4. Fixed heel supports 22

3
1. General
Please read the manual carefully as it contains important information regarding the
pedals and safe usage of them.
The latest version of the manual can always be found at: https://simgrade.fi
Contact the manufacturer: [email protected]
Pictures on the manual might not represent your actual pedal configuration exactly.
Thank you for choosing R7, we hope you will enjoy your new pedals.
Best regards,
Team SIMGRADE°

4
1.1 Varoitukset ja ohjeet turvalliselle käytölle
●VAROITUS: TUKEHTUMISVAARA - sisältää pieniä osia, käyttö vain aikuisen valvonnassa! Älä
anna lasten käyttää polkimia, tai mitään toimitettua osaa tai työkalua ilman aikuisen
valvontaa.
●Älä koskaan käytä vahingoittunutta tai millään tavalla viallista tuotetta, lopeta käyttö ja ota yhteys
jälleenmyyjään tai valmistajaan.
●Sisältää teräviä reunoja ja kulmia sekä sulkeutuvia välejä, älä koske polkimiin käytön aikana.
●Älä käytä maaöljypohjaisia voiteluaineita polkimien kanssa, ne vahingoittavat osia polkimista. Mikäli
voitelua tarvitaan, suosittelemme PTFE-kuivavoitelusuihketta.
●Varmista, että kaikki jotka polkimia käyttävät, ovat lukeneet ja ymmärtäneet käyttöohjeen sisällön
(ajantasaisen käyttöohjeen löydät: https://simgrade.fi ).
●Varmista aina, että kaikki liitokset ovat kireällä ennen kuin käytät polkimia. Kiristä liitos aina mutterin
puolelta kun sellainen on käytössä.
●ÄLÄ avaa ohjausboxia.
●Polkimia tai niiden osia ei saa käyttää kuin siihen tarkoitukseen, johon ne on suunniteltu. SIMGRADE°
R7 PEDALS on tarkoitettu käytettäväksi USB-peliohjaimena tietokoneella. Valmistaja ei vastaa
vahingoista, jotka voivat syntyä tuotteen ohjeiden vastaisesta käytöstä.
●Kiinnitä aina polkimet M6-pulteilla (4kpl / poljin) tukevaan alustaan. Käyttäjä vastaa siitä, että alusta
kestää polkimien käytön.
●Maksimi kiristysmomentti muovia sisältäviin liitoksiin / muoviosien kiinnittämiseen: 6 Nm.
1.1.1. Käyttöympäristö ja turvalliset säilytysolosuhteet
●15°C – 35°C lämpötila, tiivistymätön kosteus.
●Älä altista polkimia tai muita sen osia suoralle auringonvalolle tai kosteudelle.
●Vain sisäkäyttöön ja varastointiin.
1.1.2. Takuu
Tuotteella on 2 vuoden takuu, poislukien tilanteet ja tapahtumat joissa:
- Käyttö- tai hoito-ohjeita on laiminlyöty.
- Tuotetta on käytetty väärin tai huolimattomasti.
- Tuotteen luovutuksen jälkeen on sattunut onnettomuus tai muu tapahtuma, jossa tuote on
vahingoittunut ulkoisten tekijöiden toimesta.
- Normaali kuluminen käytössä.
1.1.3. CE-Merkintä
Tuote täyttää EU:n terveys-, turvallisuus- ja ympäristönsuojelustandardit.
- Valmistaja: SimGrade Oy
- Valmistajan osoite: Piispanpelto 8, 02200 Espoo
- Tuotteen nimi / tunnus: SIMGRADE° R7 PEDALS

5
1.1 Varningar och instruktioner för säker användning
●VARNING: FARA FÖR ATT KOKA - Små delar, vuxen övervakning krävs! Låt aldrig barn
använda pedalerna eller någon av de medföljande delarna eller verktygen utan övervakning
av en vuxen.
●Använd aldrig skadad eller på något sätt defekt produkt, sluta använda den och kontakta
återförsäljaren eller tillverkaren.
●Det finns skarpa kanter och hörn och stängande luckor, håll dig borta från pedalerna medan de
används.
●Använd inte petroleumbaserade smörjmedel med pedalerna, de kommer att skada några av delarna i
pedalerna vid kontakt. Om du behöver använda något smörjmedel rekommenderar vi torr PTFE-spray.
●Se alltid till att alla som använder pedalerna har läst och förstått innehållet i manualen (en uppdaterad
manual finns: https://simgrade.fi ).
●Kontrollera alltid att alla anslutningar är åtdragna innan du använder pedalerna. Dra alltid åt från
muttersidan när en används.
●Öppna INTE kontrollboxen.
●Pedaler eller delar av pedaler får inte användas för det ändamål för vilket de är konstruerade.
SIMGRADE ° R7 PEDALS är avsedd att användas som USB-spelkontroll på en dator. Tillverkaren
ansvarar inte för skador som kan uppstå genom att använda produkten i strid med instruktionerna.
●Fäst alltid pedalerna på stöd botten med M6-bultar (4 st / pedal). Det är användarens ansvar att se till
att plattformen tål användning av pedalerna.
●Maximalt åtdragningsmoment för fogar / fastsättning av plastdelar: 6 Nm.
1.1.1. Driftsmiljö och säkra lagringsförhållanden
●15 ° C till 35 ° C temperatur, icke kondenserande fukt.
●Utsätt inte pedalerna eller andra delar av den för direkt solljus eller fukt.
●Endast för inomhusbruk och förvaring.
1.1.2. Garanti
Produkten har 2 års garanti, exklusive situationer och händelser där:
- Instruktioner för användning eller skötsel har ignorerats.
- Produkten har använts felaktigt eller slarvigt.
- En olycka eller annan händelse har inträffat efter att produkten har överlämnats, där produkten har
skadats av externa faktorer.
- Normalt slitage vid användning.
1.1.3. CE-märkning
Produkten uppfyller EU: s standarder för hälsa, säkerhet och miljöskydd.
- Tillverkare: SimGrade Oy
- Tillverkarens adress: Piispanpelto 8, 02200 Espoo
- Produktmodellnamn / identifiering: SIMGRADE° R7 PEDALS

6
1.1. Warnings & instructions for safe usage
●WARNING: CHOKING HAZARD - Small parts, adult supervision required! Never let children
use the pedals, or any of the provided parts or tools without supervision by an adult.
●Never use damaged or in any way defect product, stop using it and contact the reseller or the
manufacturer.
●There are sharp edges and corners and closing gaps, keep away from the pedals while they are
being used.
●Do not use petroleum based lubricants with the pedals, these will damage some of the parts in the
pedals when in contact. If you need to use some lubricant, we recommend dry PTFE-spray.
●Always make sure everyone using the pedals have read and understood the content of the manual
(up-to-date manual can be found: simgrade.fi).
●Always check that all connections are tightened before using the pedals. Always tighten from the nut
side when one is used.
●DO NOT open the controller box.
●Pedals or any of their parts may not be used on any other purpose than what they were designed for.
SIMGRADE° R7 PEDALS is meant to be used as an USB-input device on a computer. The manufacturer
is not liable for any damage that may result from using the product in violation of the instructions.
●Always fasten the pedals to the support base with M6 bolts (4 pcs / pedal). It is the user's
responsibility to ensure that the platform can withstand the use of the pedals.
●Maximum tightening torque for joints / attachment of plastic parts; 6Nm.
1.1.1. Operating environment and safe storage conditions
●15°C – 35°C temperature, non-condensing humidity.
●Do not expose the pedals or any provided part to direct sunlight or moisture.
●Indoor use and storing only.
1.1.2. Warranty
The product has a 2-year warranty, excluding situations and events where:
- Instructions for use or care have been disregarded.
- The product has been used incorrectly or carelessly.
- An accident or other event has occurred after the product has been handed over, in which the product
has been damaged by external factors.
- Normal wear and tear in use.
1.1.3. CE-Marking
Product meets EU standards for health, safety, and environmental protection.
- Manufacturer: SimGrade Oy
- Manufacturer address: Piispanpelto 8, 02200 Espoo
- Product Model name / identification: SIMGRADE° R7 PEDALS

7
1.2. Important Notes
It is recommended to connect the pedals directly to the motherboard of the PC (back of
the computer), into a USB 2.0 slot (black color). We do not recommend using USB-hubs
with the pedals.
It is recommended to press the pedals in a straight angle, this way you’ll have less strain
on your knees and also the pedals will see less torsional loads.
Do not overtighten the nut on the main pivot point (bolt that goes through the bearings).
If the nut requires retightening, loosen up the bolts that connect the pedal to the rig
from one side first, and pay close attention that the pedal arm still moves freely after the
tightening (to check this on the brake, loosen the preload first).
Do not overtighten the connections that have plastic parts. Always pay close attention
and make sure that no part is getting deformed.
Ergonomically correct driving setup is key to driving enjoyment. Don’t hesitate to adjust
the pedals to meet your needs, that is what the adjustments are there for!
8
1.4. Mounting the pedals
●A proper racing rig with a sturdy mounting platform is required.
Aluminium extrusion profile base for the pedals is recommended.
●Always use all 4 mounting bolts (M6) on each pedal. Mounting pattern for one
pedal is 80 mm (longitudinal) x 90 mm (lateral).
●Controller box can also be mounted with bolts (M4, DIN912). For aluminium
profile, use L=25 mm bolts.
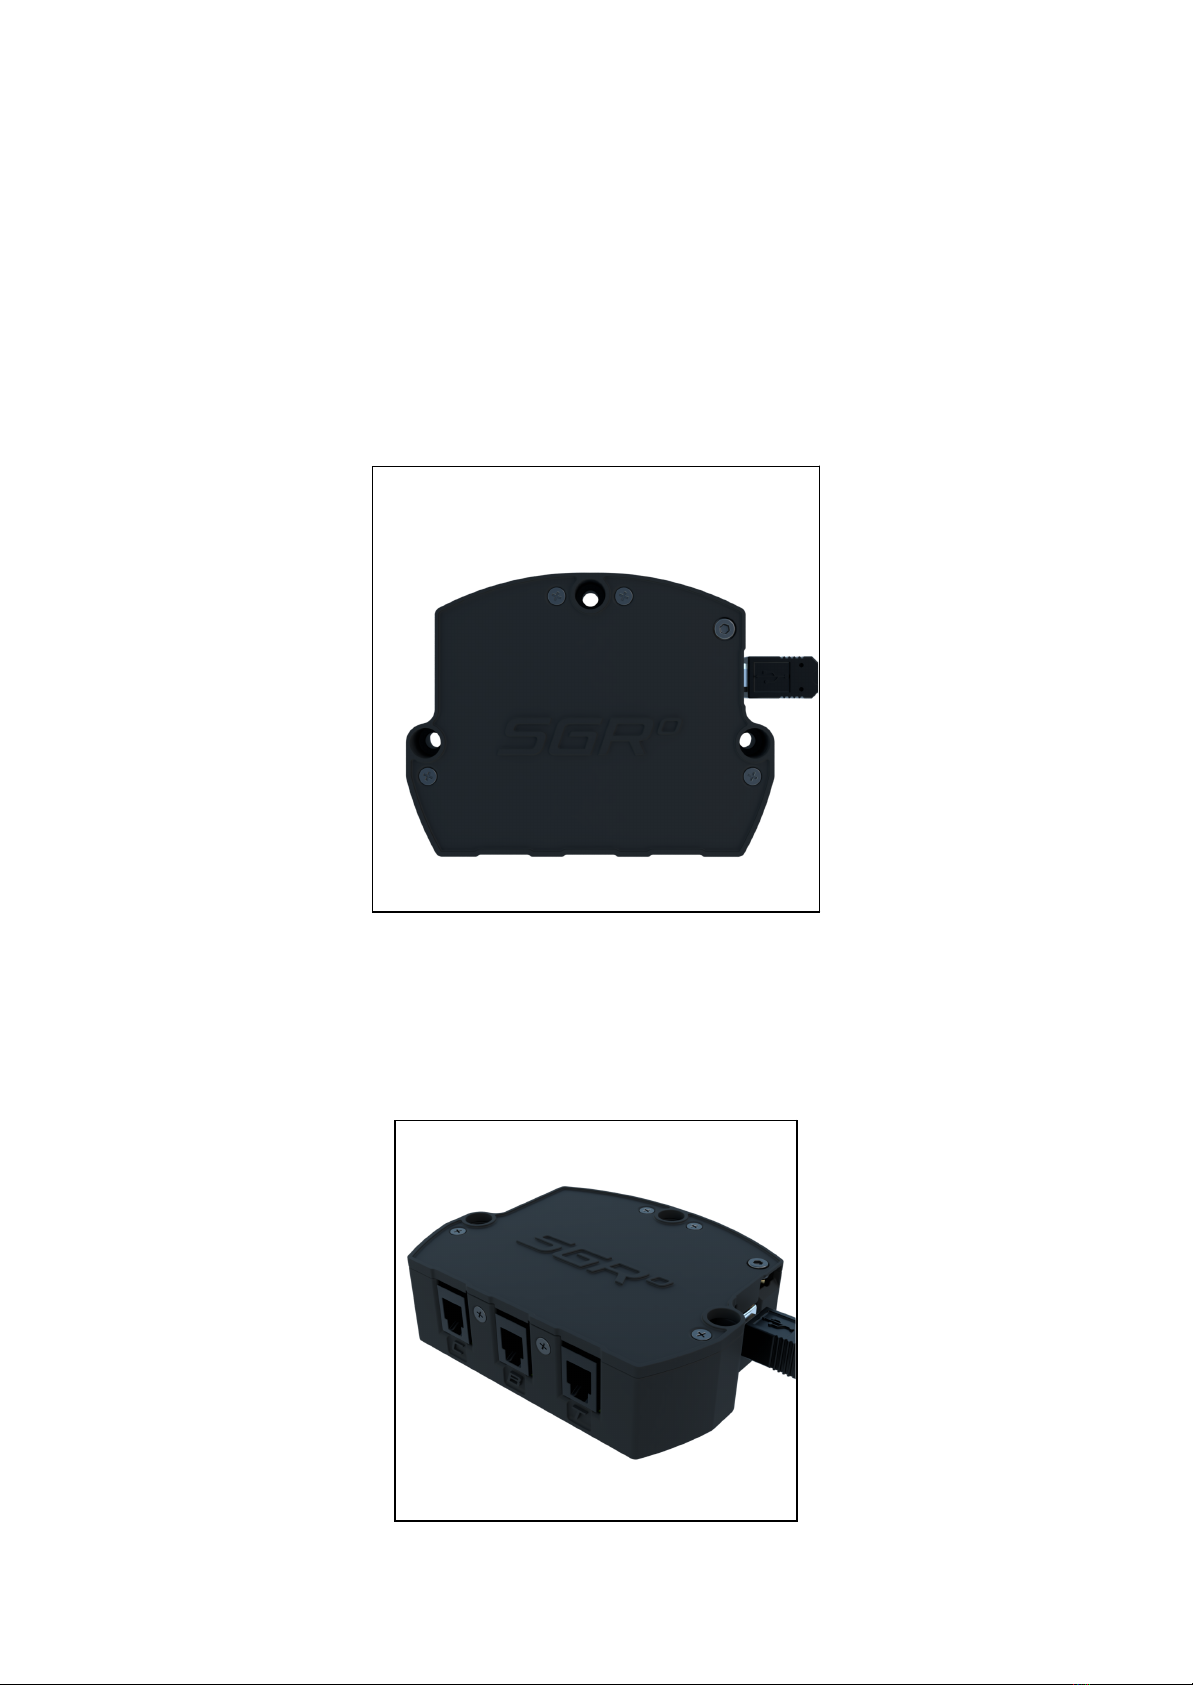
1.5. Connecting the pedals to the controller box
Connect the brake pedal to the middle port, and throttle on the side of the USB-out port.
Ports are marked with letters: C=CLUTCH | B=BRAKE | T=THROTTLE

9
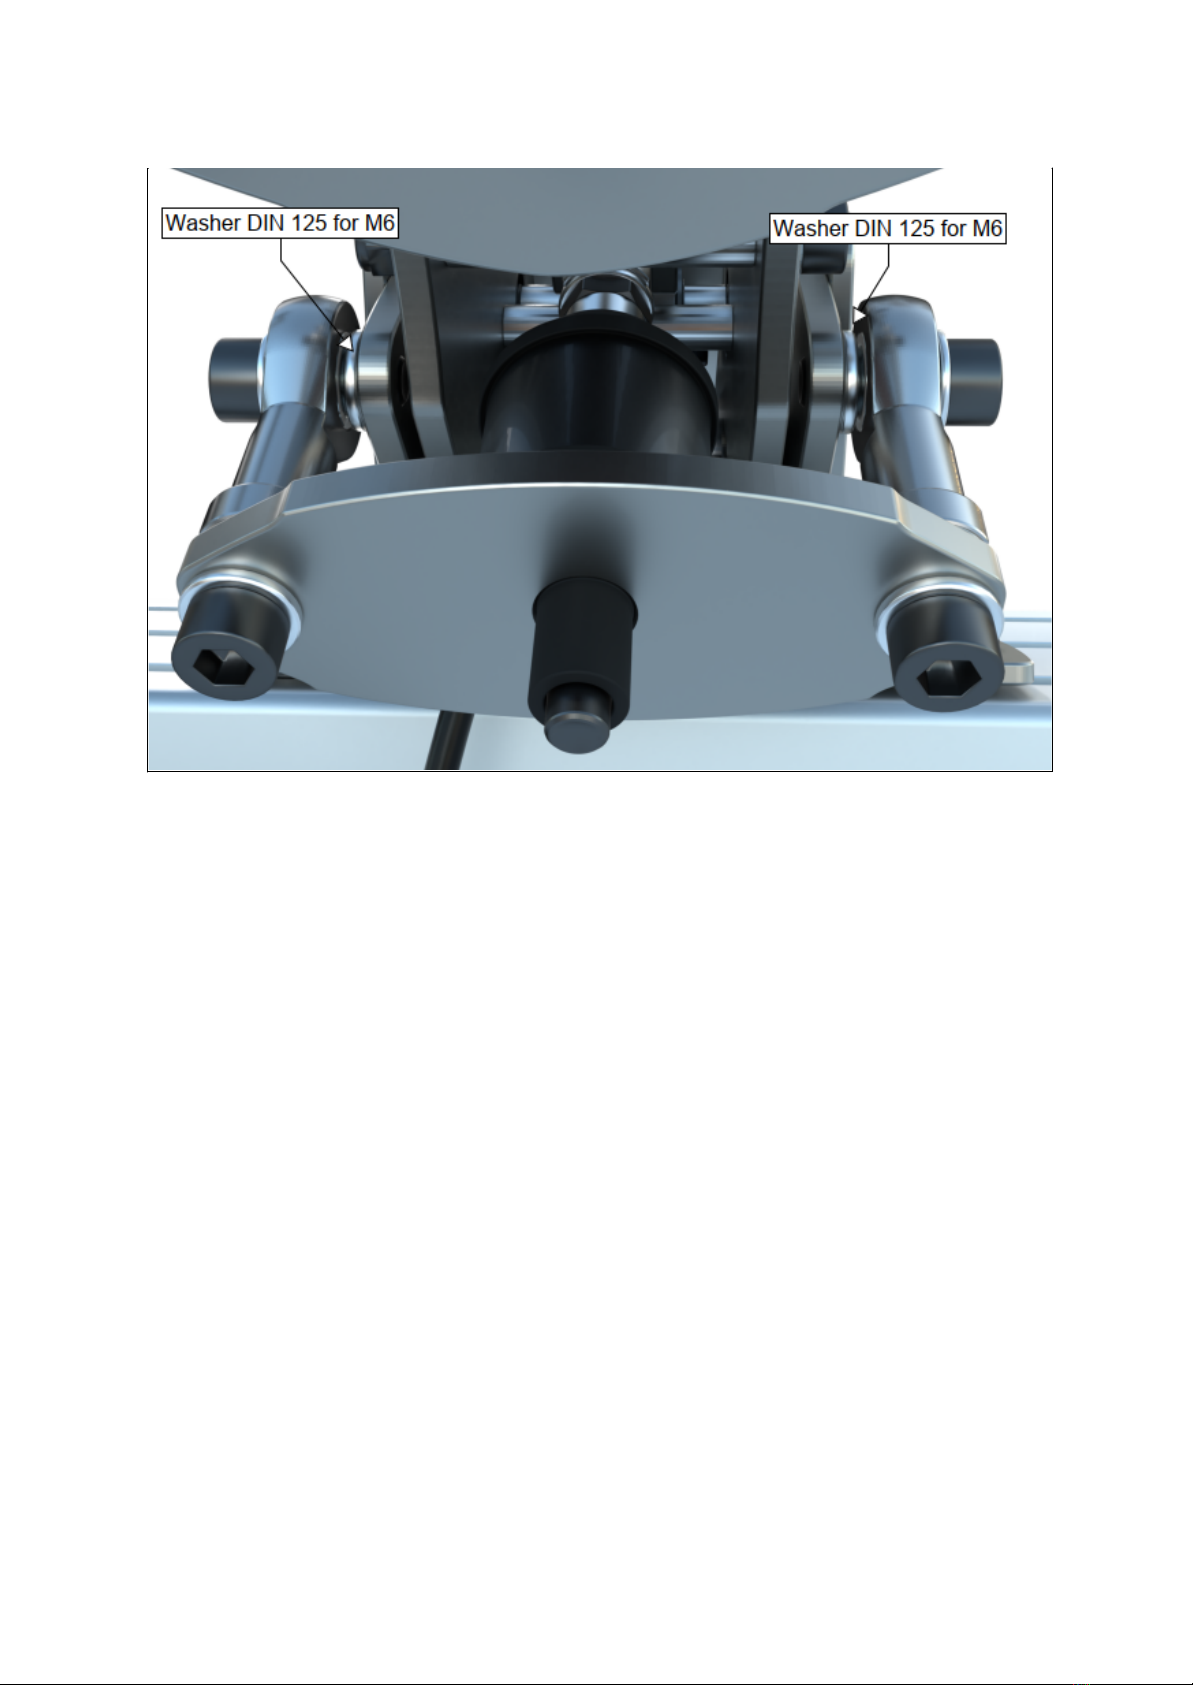
1.6. Grounding the controller box
In case you have some installed hardware that is creating EMI issues (and signal from
the pedals is not stable), you might need to ground the pedals by connecting a cable
from the controller box to the throttle pedal. Connect the grounding cable to the
locations shown in the pictures below. Make sure the pedal end is directly connected to
the frame plate, between the washer and the frame (and directly against the standoff at
the box end). The controller box end is M3, and the pedal end is M5 (fork type).
1.7. Maintenance
Pedals should not need any added lubrication in normal conditions. If you add some
regardless of this, only use dry PTFE-spray.
10
2. Mechanical Adjustments
2.1. General
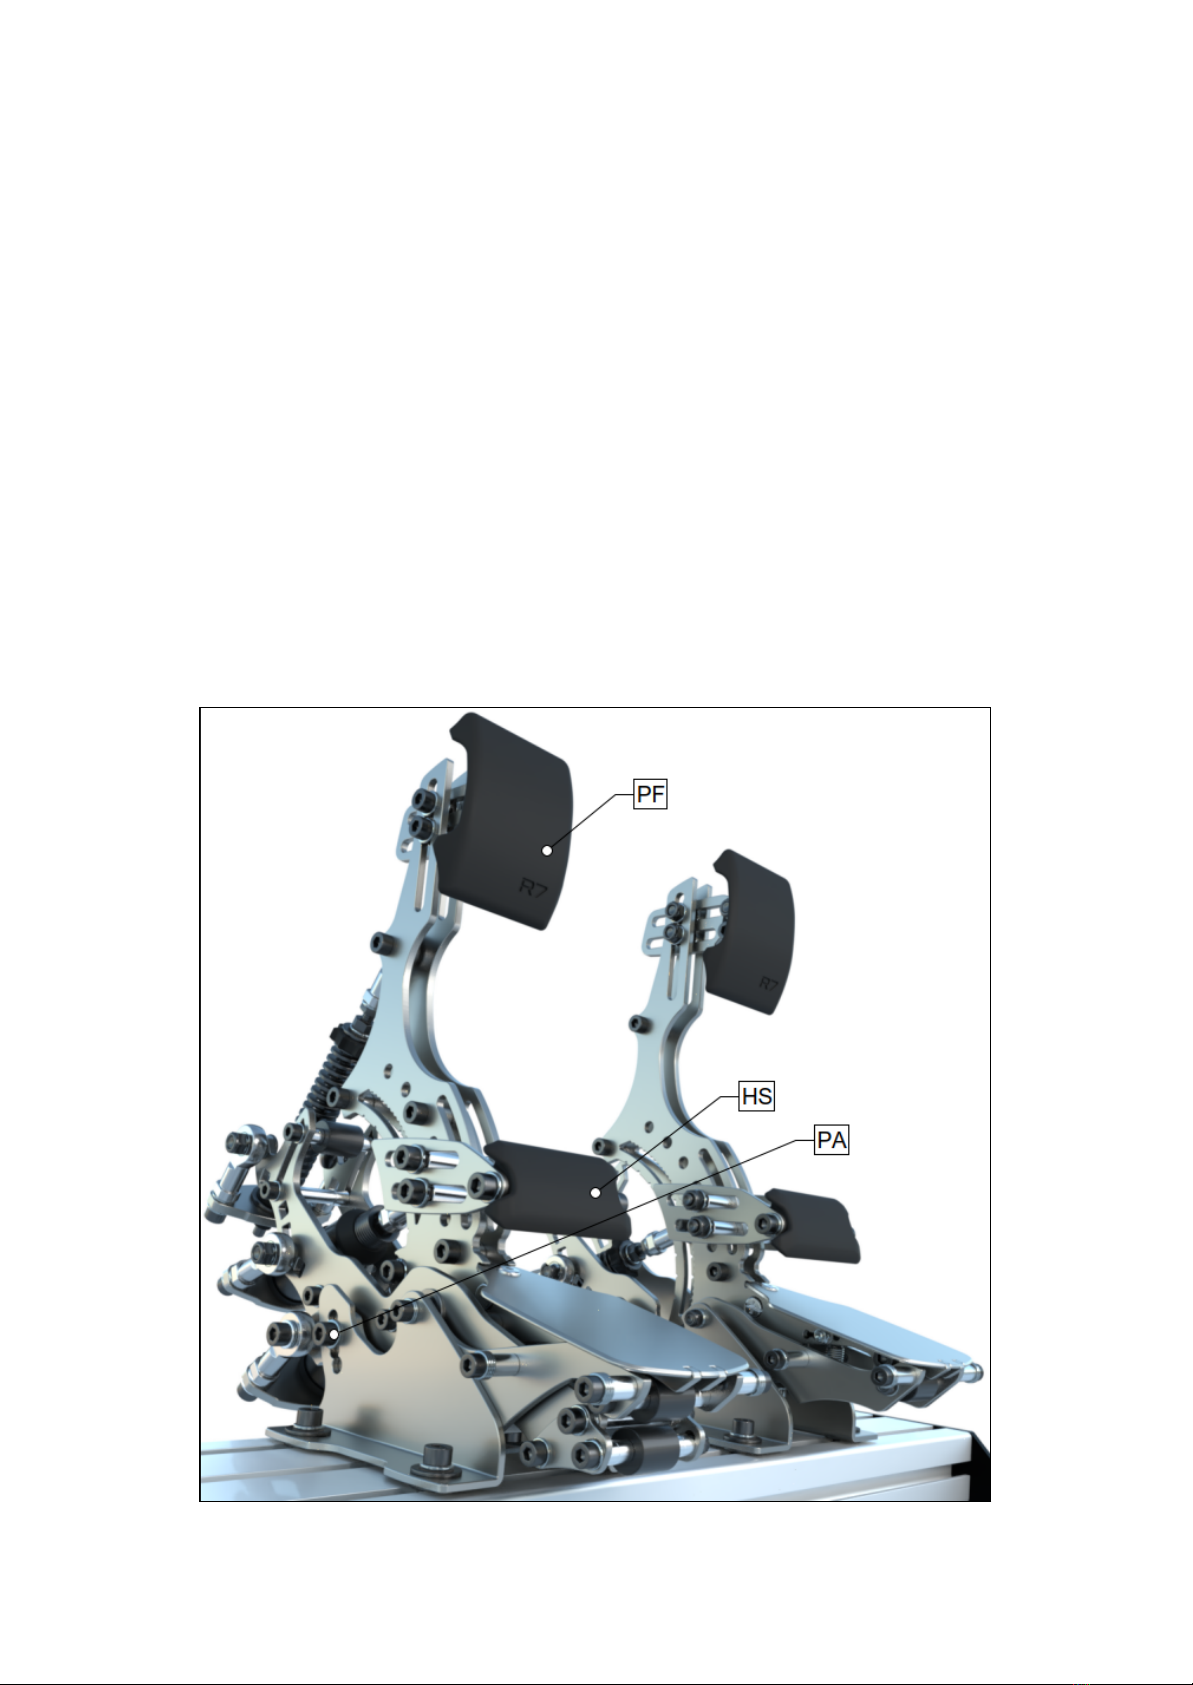
●To achieve a more traditional feel to the pedals, adjust the heel support (HS)
closer to the pedal arm. This will reduce the movement of your heel, which might
feel more comfortable at first. It is recommended that you gradually learn to use
the heel supports further away from the pedal arms, as this will increase the
control you have on the pedals.
●It is good practise to first adjust the angle of the whole pedal using the bolts on
the back (PA) and then fine tune by adjusting pedal face(s) (PF).
●If you notice that the pedal face (PF) has loosened, follow these steps: 1) loosen
the nyloc nuts on both sides 2) tighten the M6-bolt (there is another nut inside
the PF) 3) tighten the nyloc nut while keeping the bolt secured. Don’t overtighten.

11
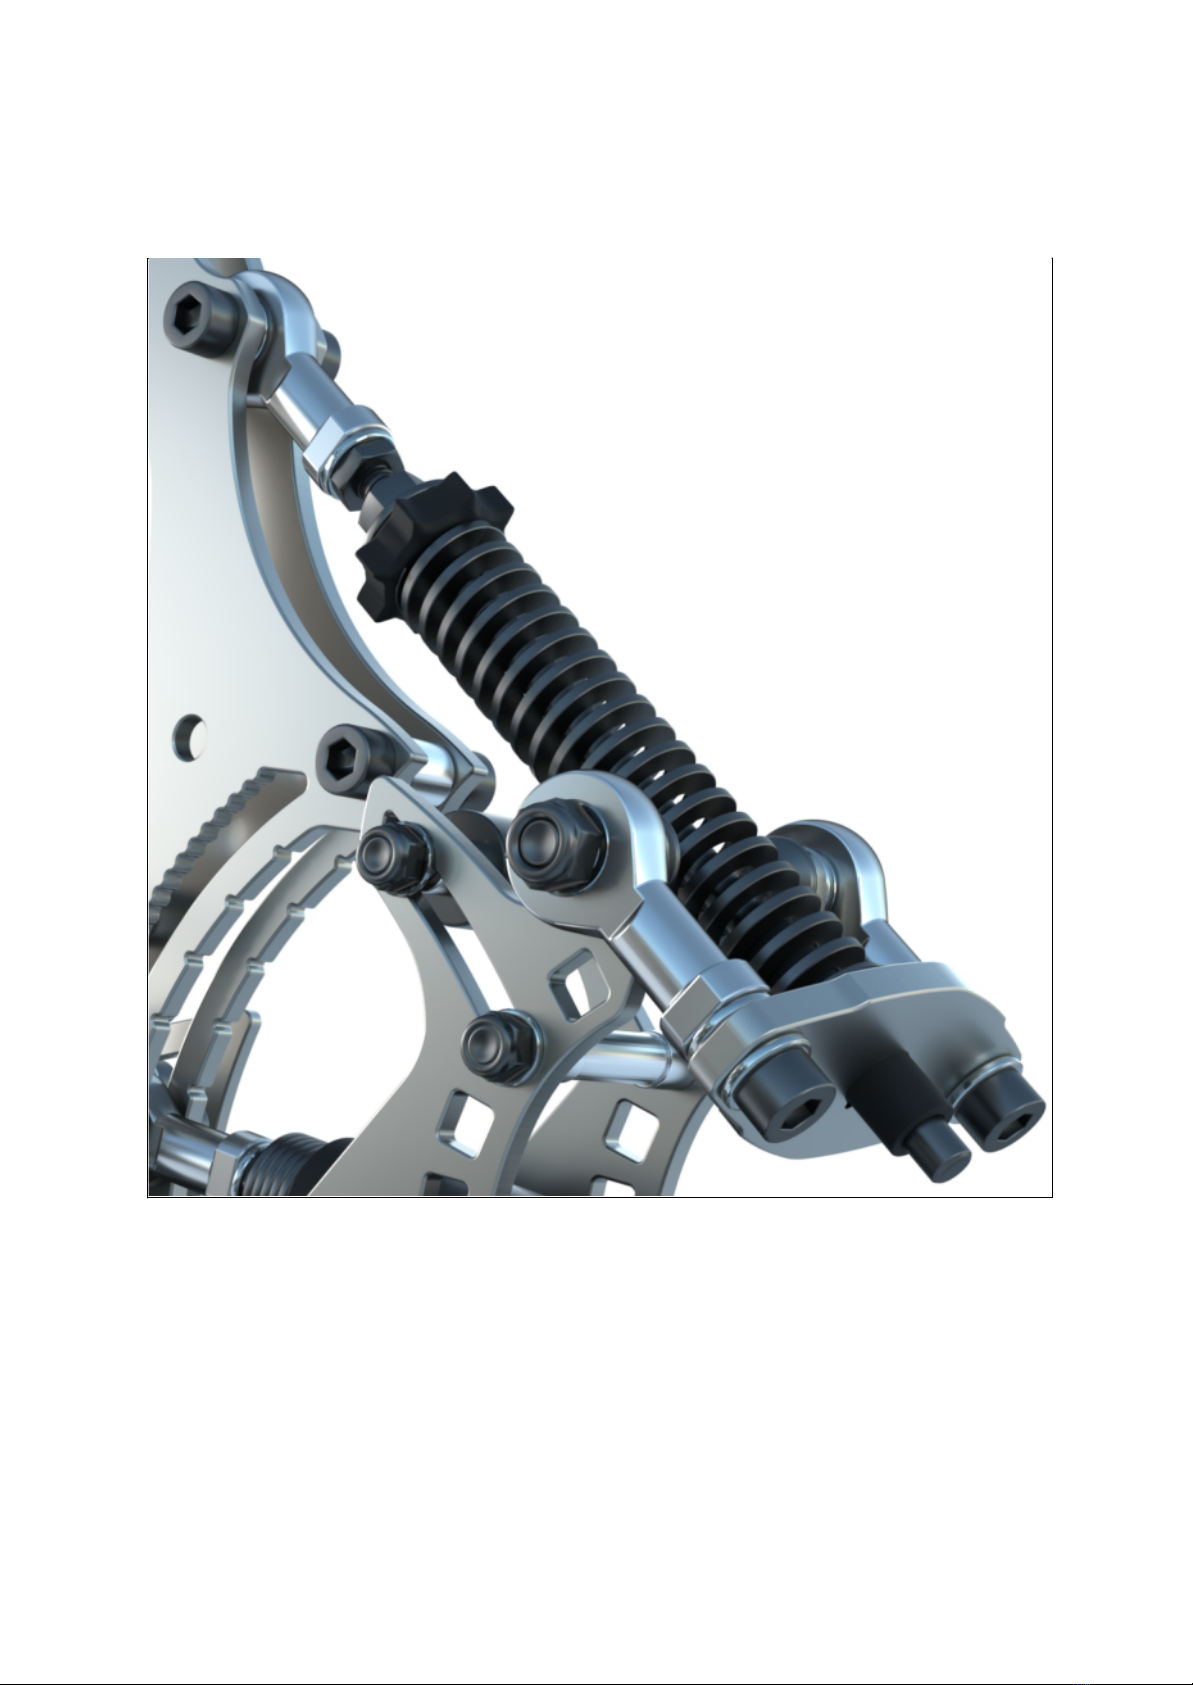
2.2. Brake
●On the brake pedal, inside the polyurethane springs (later: PU-springs), you
should always have correct amount of spacers installed. These will protect the
PU-spring from overcompression and allow you to fine tune the pedal feel, as you
can limit the amount of maximum compression for each element.
●For the provided L=20 mm PU-springs, the minimum amount of spacers is 10
mm and the maximum amount of spacers is 15 mm. If you’re using different
length PU-springs, always leave min. 1 mm of empty space inside for a small
amount of compression to happen, and follow the manufacturer’s instructions of
the maximum allowed compression.
●Do not use more than one black plastic spacer (1 mm) inside of each PU-spring.
●Recommended workflow sequence for adjusting the brake pedal feel:
1. Install chosen PU-springs with spacers inside (within allowed limits, see
bolded part above). Spacers included with the pedal set: 10 mm | 6 mm |
2 mm | 1 mm (plastic).
2. Adjust the rod-end on the pedal arm to the top-position, and tighten the
rod end connection nut (S) just slightly so that it holds the position.
3. Tighten the bolts on the back (B) and check that the amount of preload is
as wanted. Add or remove washers (A) as needed to adjust the level of
preload. Make sure the spherical rod-ends (2 pcs) on the sides are aligned
correctly and are not touching the frame of the pedal.
4. Loosen the rod-end connection (S) on the pedal arm and make sure it sits
nicely between the teeth on the pedal arm. Tighten the nut.
5. Test the pedal. If it feels too firm, lower the rod-end on the pedal arm to
make the pedal feel softer with more travel.
6. If you need to change the combination of PU-springs / inner spacers /
preload, start the procedure from the beginning.
7. Calibrate the pedal (check the dead zones from the software).
Note: It’s normal for a small amount of initial settling to happen when the pedals are
new, or when you’ve changed mechanical settings. Basically what this means is that if
you feel the brake preload loosening, it’s because the connecting elements are moving
slightly and getting settled on the other end of their mounting clearance. Once they’ve
settled, you should not get this loosening effect anymore. Hence, make sure this settling
has happened (and after that check that the preload is still as wanted - if needed add
some washers to adjust), before a race or a timed lap.
●Preload for the PU-springs is generated by using a required amount of washers /
spacers (A) to generate the desired amount of compression for the PU-springs by
tightening the bolts (B) on the back.
●PU-springs: BLACK=SOFT | YELLOW=MEDIUM | RED=HARD

12
^Lower pic: PU-springs cut in half, max. amount of spacers installed: 10+2+1+2.
13
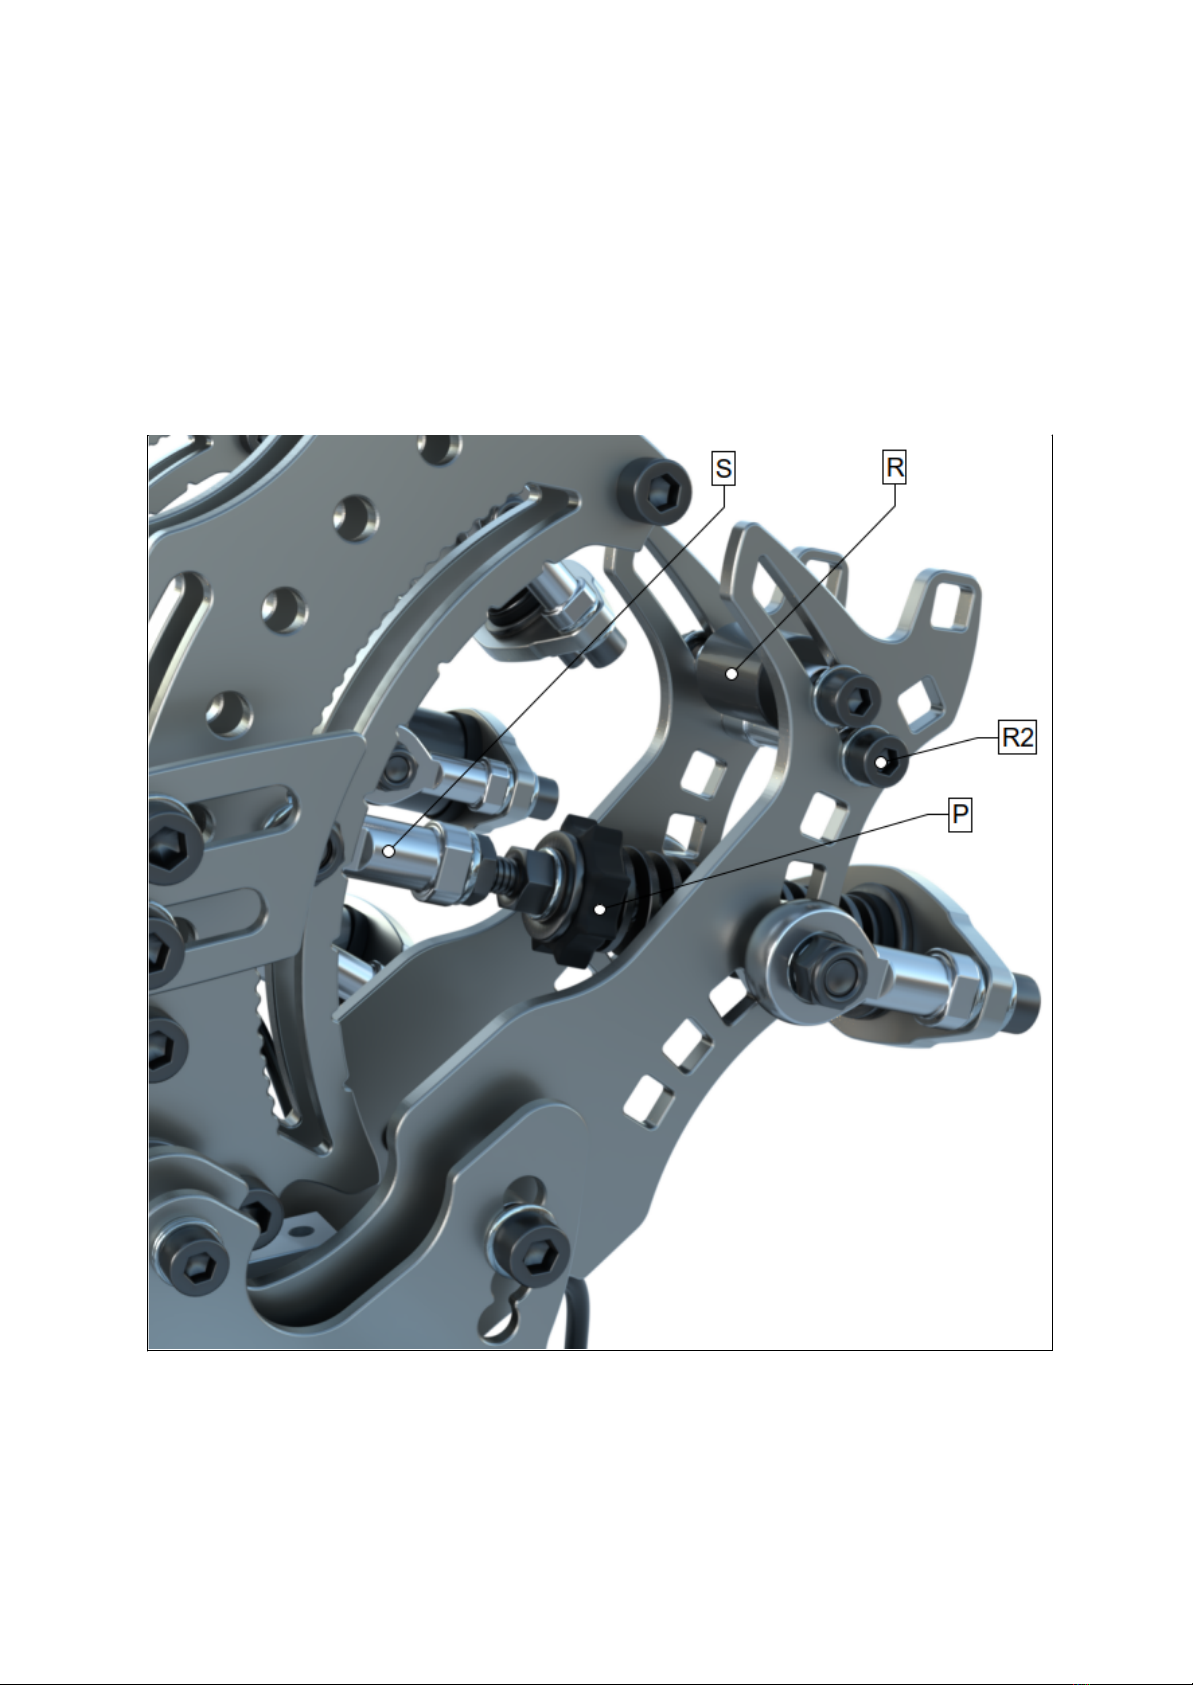
2.3. Throttle
1. Preload is adjusted with the hand nut and secured with a regular nut (P).
2. Pedal feel can be adjusted by changing the rod-end position on the pedal arm as
well (S).
3. Throttle travel is adjusted by changing the location of the stopper (R).
4. Do not remove the supporting bolt behind the stopper (R2).

14
3. Software
3.1. General
1. Always calibrate (adjust the dead zones) the pedals after mechanical changes.
2. Adjusting the dead zones: Position of the horizontal lines (DZ) defines the area on
the sensor range that is read as an input. Only the area between the lines is read
as an input signal.
3. Always close the software after making adjustments.
4. Using the “save config” function saves all the settings together in a file.
5. It is not necessary to save a configuration to a file using the “save config” button.
Changes are saved automatically and stored to the board.
6. If you have a clutch, it needs to be enabled on the software (C).
3.2. Layout
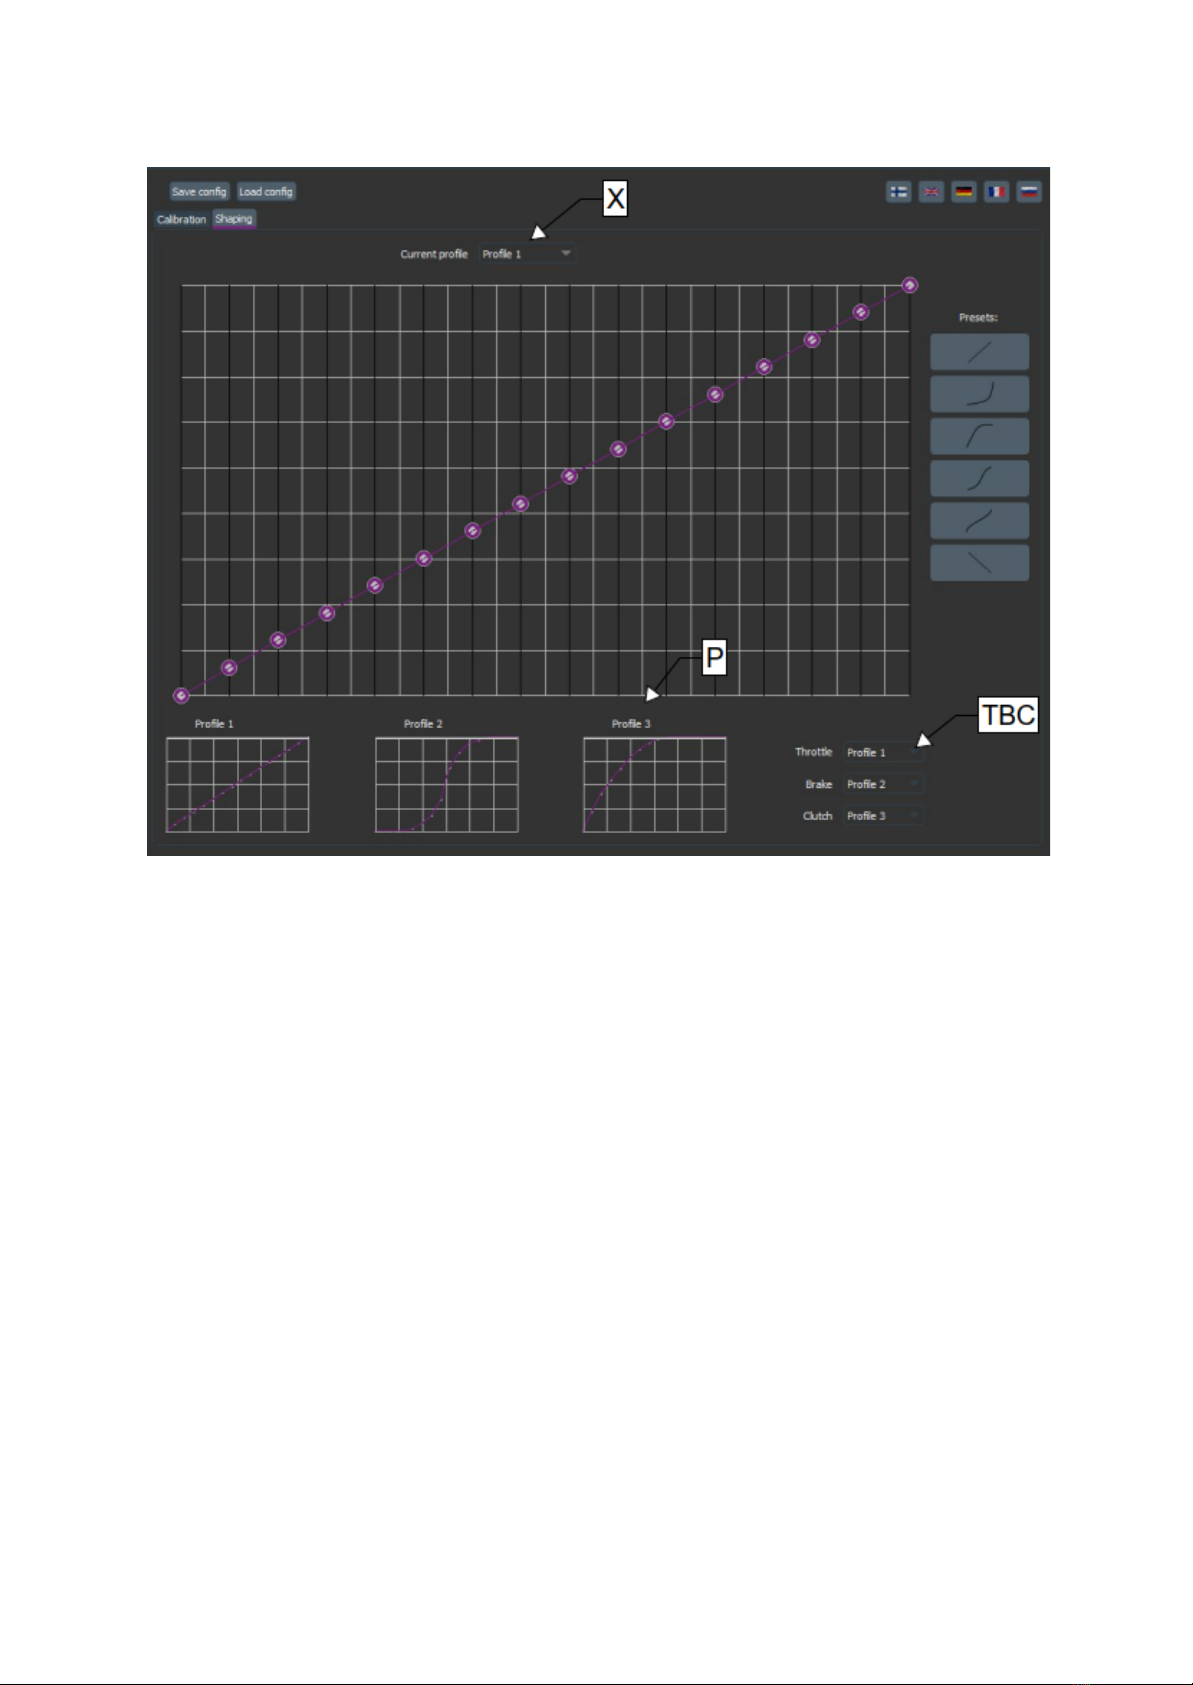
15
DZ = Horizontal lines for adjusting the dead zones.
C = Toggle switch for activating / deactivating the clutch.
X = Name of the profile that is being edited.
TBC = Profiles that are being used for each pedal.
P = Your profile preview windows. You can click on the picture to activate the profile
shape to the current profile slot (X) you are adjusting.

16
4. Options & Alternative setups
4.1. Extra PU-spring pack
This option enables you to transfer some part of the load (pedal force) to the pedal
mounting platform instead of the load cell. As a result, higher pedal forces can be used.
The distribution of the amount of force to the load cell vs. the frame depends a) on the
relative stiffnesses of the compressive elements in use (usually PU-springs) and b) the
leverage ratio settings (rod-end locations on the pedal arm).
^ Before use: Check that the marked bolts are tight from both sides (M6-8). Tighten if
needed.
17
Install washers between the frame plate and the rod ends, see picture above. Tighten
the M6-nut on the pedal arm end only so that the nyloc insert secures the connection,
tightening more than that is unnecessary, see picture below.
18
4.2. Separate preload spring
This option enables adding preload force to the pedal without affecting any other setting.

19
Install washers between the frame plate and the rod ends, see the picture above.
Tighten the M6-nut on the pedal arm end only so that the nyloc insert secures the
connection, tightening more than that is unnecessary.

20
4.3. Load soft stop
This option enables creating a mechanical soft stop for the load transferred to the load
cell. When the polyurethane stoppers touch, they softly start limiting the load transferred
to the load cell. Note: remove all preload from the pedal before installation.
Other manuals for R7
1
Table of contents
Other Simgrade Music Pedal manuals


