Simply Shade SS-SERENATA User manual
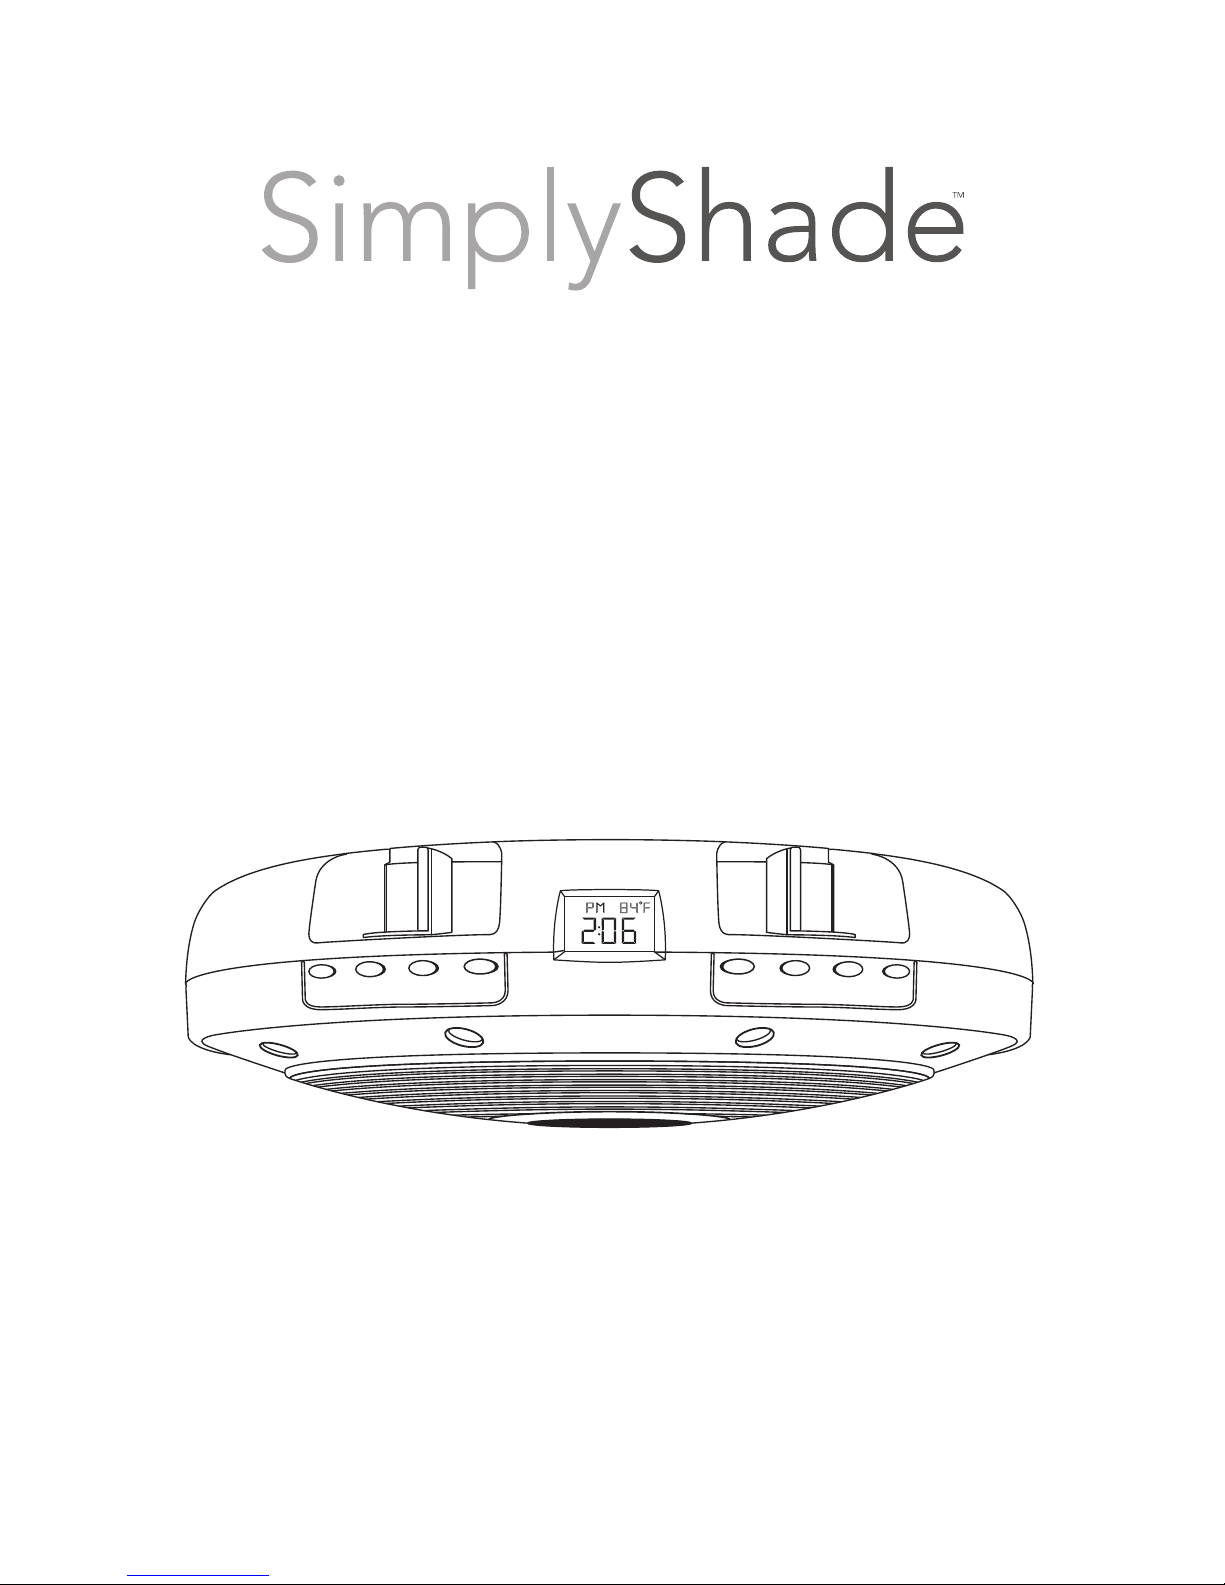
SS-SERENATA
I n s t r u c t i o n M a n u a l
Serenata
Umbrella Light
TIME
POWER
FM/AM
F/C P/S VOL- VOL+
UPDOWN
www.simplyshade.com
©2015 SimplyShade - All Rights Reserved. 7/15
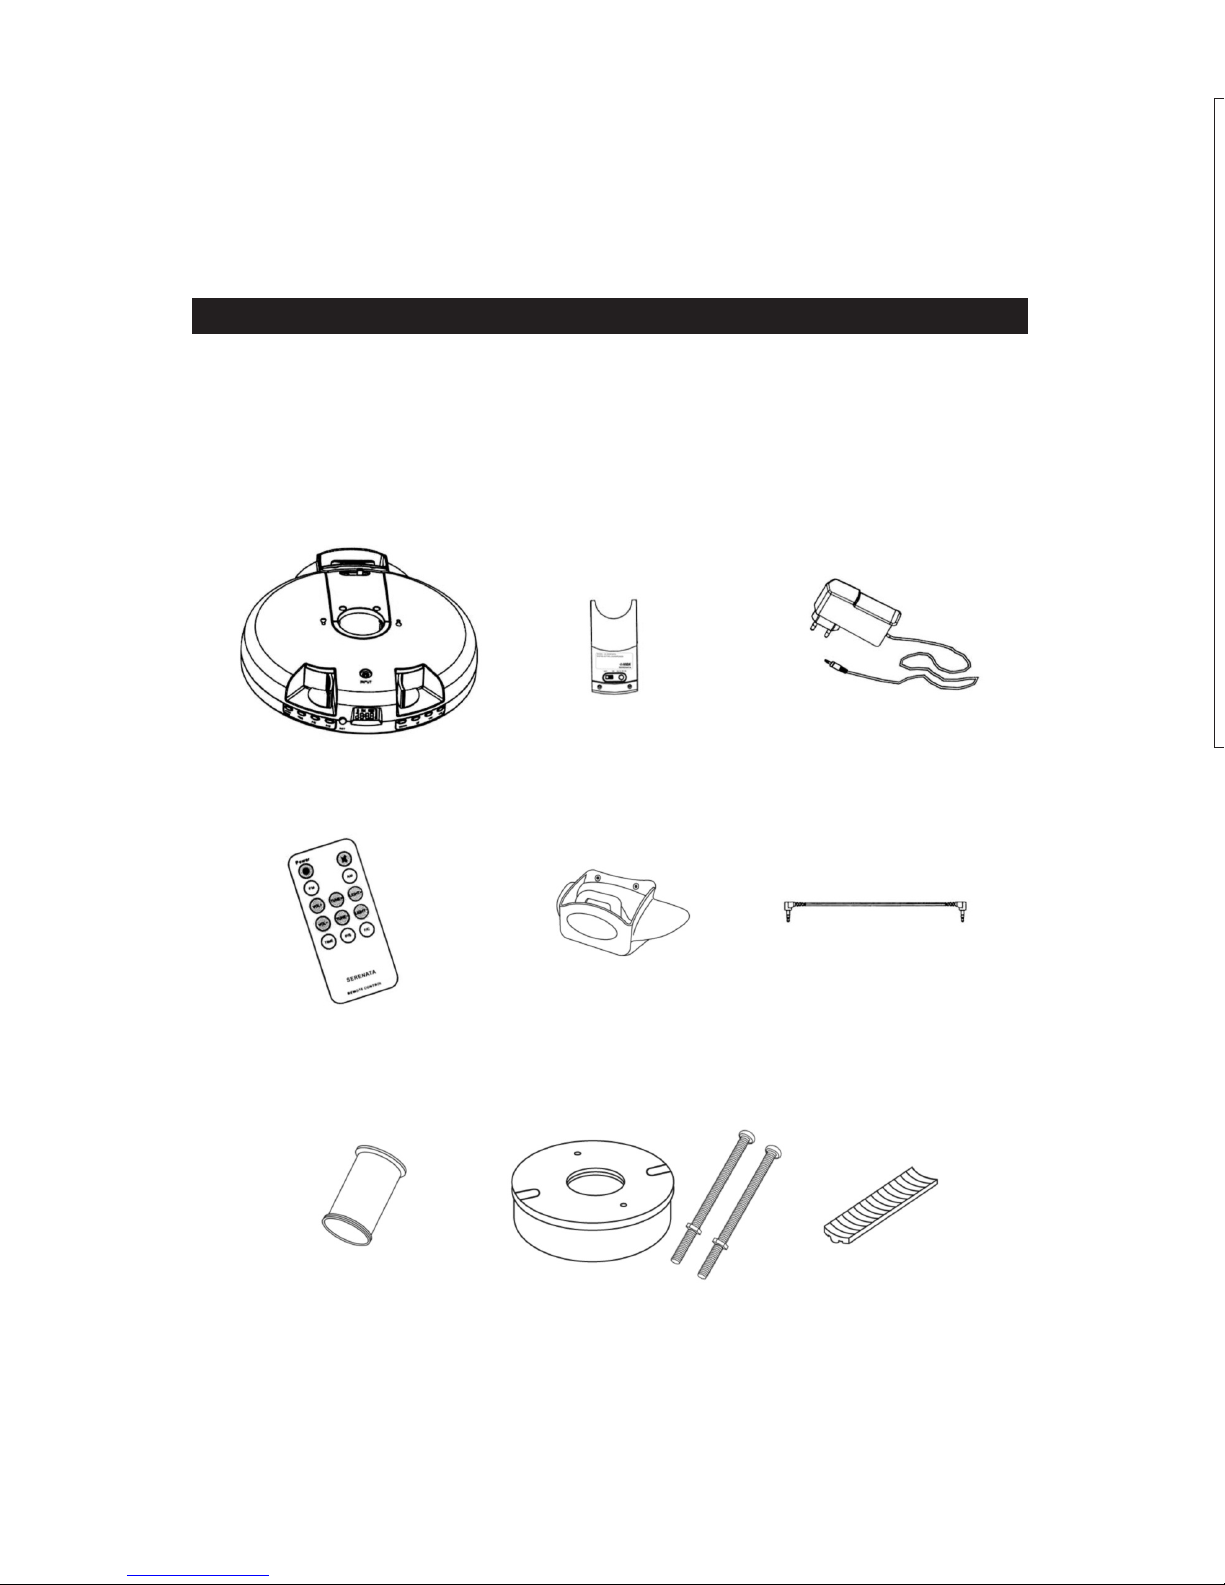
A - Serenata F - Audio Cable
B - Battery Pack G - Adapter Sleeve
C - Charger H - Universal Hub Adapter (screws included,
D- Remote Control adapter for non-SimplyShade umbrellas)
E - Music Source Holder I - Cushion Grips (3 extra size sets included)
Thank you for your purchase of SimplyShade’s Serenata Wireless Umbrella
Light and Media Center.
Please remove all contents from the package, inspect and review checklist.
CAUTION: To reduce personal injury and damage to your umbrella light, read and
follow this assembly and operation guide.
SERENATA CHEC LIST
ABC
DEF
GHI
1 10
S A F E T Y P R E C A U T I O N S :
• If unit is exposed to light moisture, light to medium rain; allow unit to air dry for
24 hours before reuse.
WARNING: The Serenata umbrella light i not waterproof. If the light is
immersed in a pool or spa or exposed to heavy rain the unit will be damaged
and negate the 1 year warranty.
Note:
• Position the Serenata in a location that will protect it from direct sunlight and
moisture.
• Charge the battery for 8 hours prior to first use.
• Do not overcharge the battery. Remove when indicator light turns green.
WARRANTY:
The manufacturer warrants that this
umbrella, when subject to normal and
proper use, will be free from
manufacturing defects for a period of
one year from the original date of
purchase. Should any defect occur
during the specified time period, the
manufacturer will repair, replace, or
provide replacement parts, at its own
option. Limited warranty against fabric
fading, based on fabric grade. Warranty
is not transferable.
We will not warrant any claim coverage
unless both the original sales receipt and
request form are sent to us. Any items
that are returned for warranty or non
warranty purposes must be issued a
Return Authorization Number. Only
upon issuance of an RA # and inspection
by our QC department will credit or
replacement of umbrella be issued. It is
the customer’s responsibility to pay the
freight on return products or
replacement parts. ALL RETURNED
ITEMS MUST INCLUDE THE RA#
CLEARLY WRITTEN ON THE
RETURN PAC AGE or package will be
refused by our warehouse personnel.
NOTE: Damages and failure caused by
improper use due to neglect of reasonable
and necessary care are not covered by
this warranty.
Additionally, acts of nature (including but
not limited to wind, hurricanes, tornadoes,
and storms) are not covered by this
warranty.
2
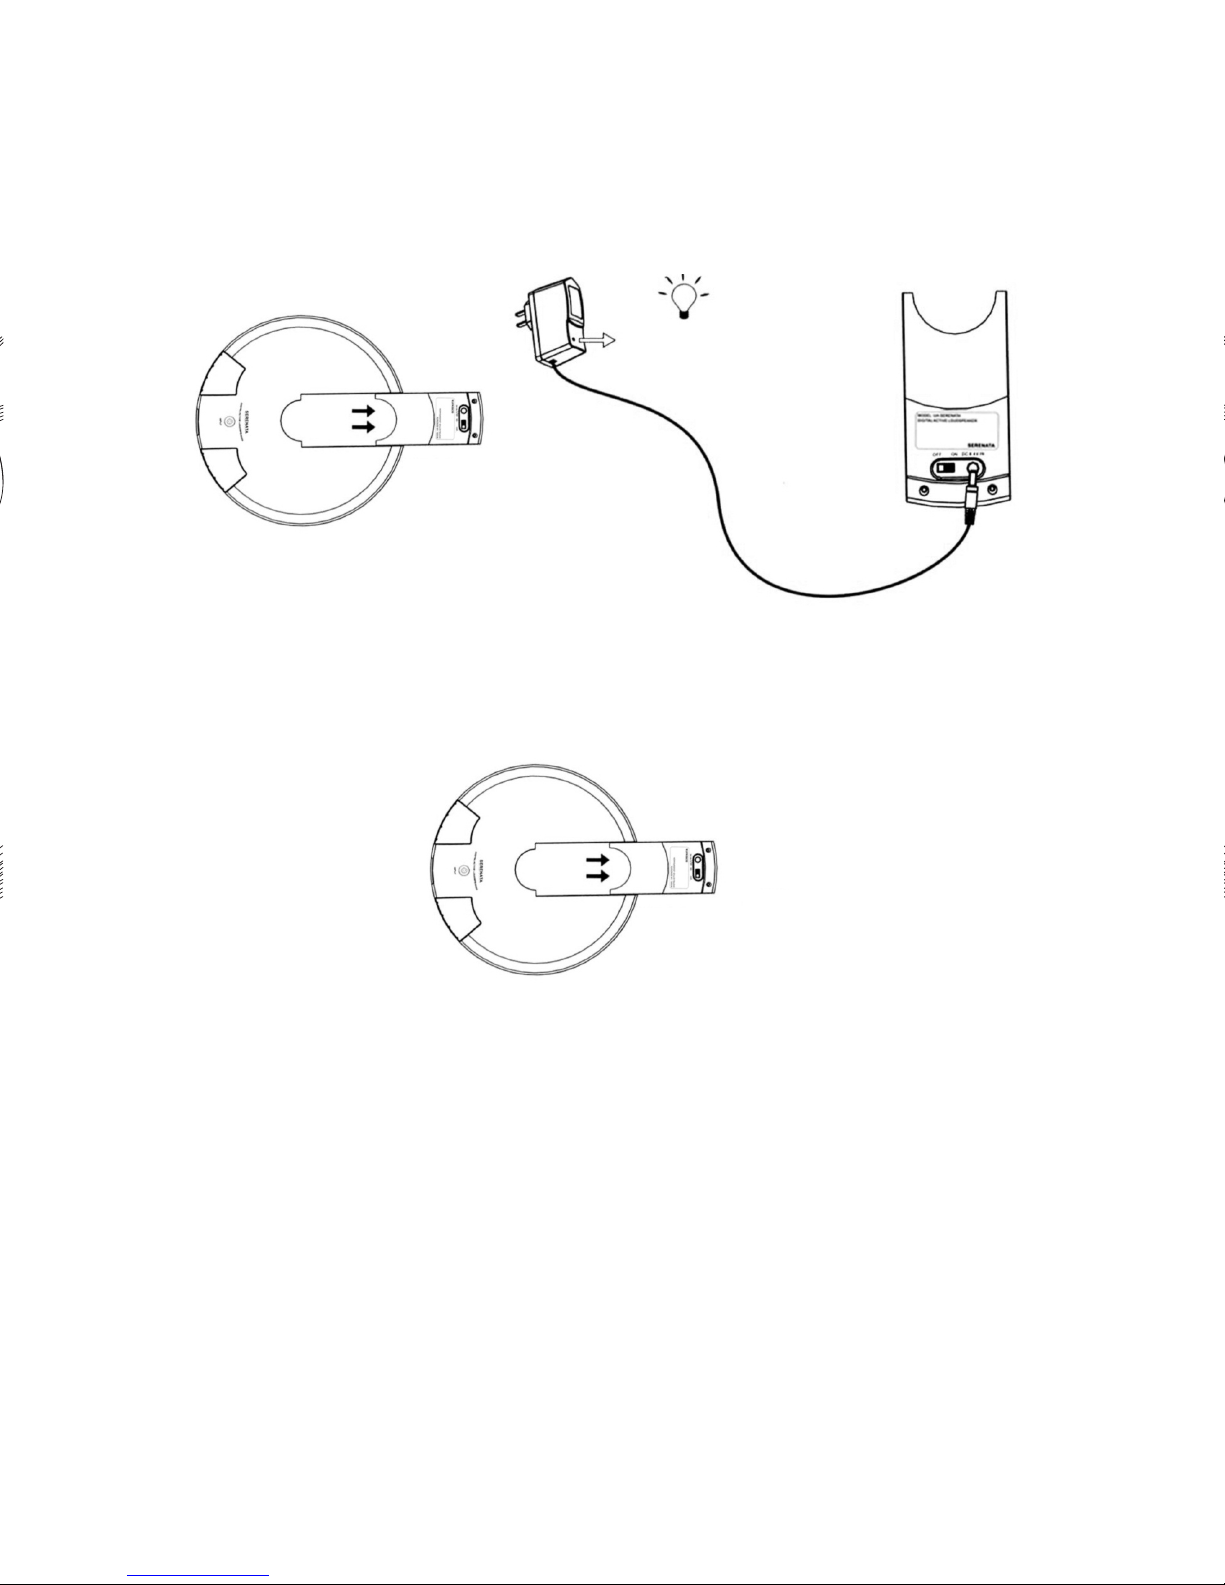
S T E P 1 Charging the Battery Pack
a. Grab firmly and pull the battery pack from the Serenata to remove (Fig. 1).
b. Attach the charger to the battery pack and plug into any 110V power source.
The battery is fully charged when the indicator light changes to green (Fig. 2).
Note: Charge battery for 8 hours before first use.
(Fig. 1)
S T E P 2 Attaching the Serenata to Umbrella
a. Grab firmly and pull the battery pack from the Serenata to remove (Fig. 3).
b. For centerpo t market umbrella , slide the Serenata onto the center post.
Note: It may be necessary to squeeze the 2 lock and release tabs on the
Serenata to fit onto post. (See page 7)
For SimplyShade idepo t cantilever tyle umbrella , attach Serenata onto
adapter on lower hub.
For all other idepo t cantilever tyle , attached supplied Adapter Sleeve (G)
and Universal Hub Adapter (H) to the lower hub and tighten with supplied
screws. Swap out cushions grips on Serenata with smallest cushion grip size.
(See page 8)
c. Attach Serenata onto adapter.
(Fig. 3)
9
(Fig. 2)
Hold Serenata firmly and pull the battery pack from umbrella light (Fig. 32). Slide
the Serenata onto Universal Hub Adapter or center post (Fig. 33). If using Universal
Hub Adapter, swap out cushion grips with smallest cushion grip size. For all other hubs
or center post, change cushion grip size if necessary. It may be necessary to squeeze
the 2 lock and release tabs on the Serenata to fit onto post.
(Fig. 33)
(Fig. 32)
Secure Serenata to Universal Adapter Hub by sliding small screws on Hub into holes
located on top of Serenata. Once Serenata is securely on light adapter or center post,
slide battery pack back onto Serenata (Fig. 35). Your Serenata is now ready for use
(Fig. 36 ).
(Fig. 34)
(Fig. 35)
(Fig. 36)

3 8
(Fig. 4)
(Fig. 5)
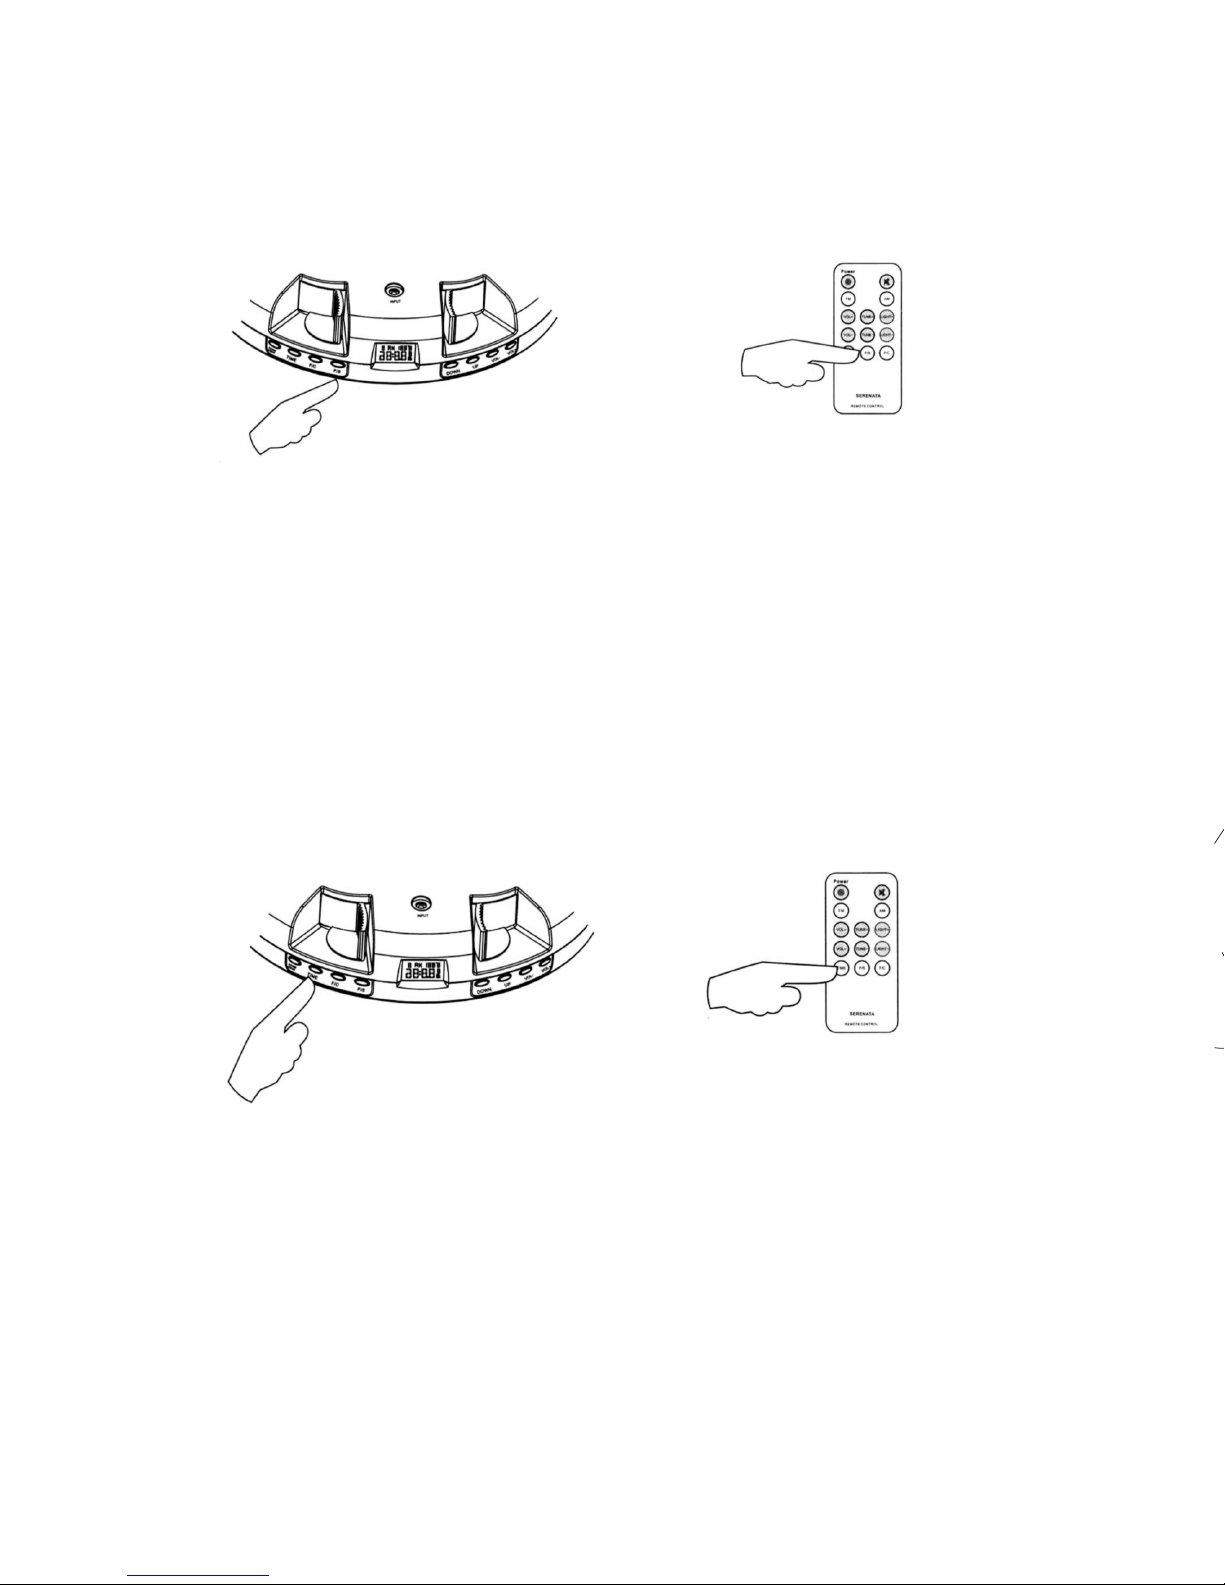
S T E P 3 Adjusting the Light Settings
a. To turn on the lights, switch the battery pack to the “ON” position (Fig. 4).
b. To adjust the brightness, simply press the “F/C” button on the Serenata (Fig. 5)
or press the “LIGHT (+ or -)” button on the remote control (Fig. 6).
(Fig. 6)
ON
F/C
LIGHT +
LIGHT -
To OPEN and ATTACH SERENATA to a non-SimplyShade Umbrella:
Remove screw from cantilever hub (Fig. 27a). Remove second screw diagonally from
other screw (Fig. 27b). Screw Adapter Sleeve to Universal Hub Adapter and tighten
(Fig. 28).
(Fig. 27a)
(Fig. 27b)
(Fig. 28)
(Fig. 29)
(Fig. 30)
Attach Universal Hub Adapter to hub on cantilever and secure using (2) supplied
screws
(Fig. 29). Tighten screws with nuts on opposite end (Fig. 30). Screw in 2 small screws
onto Universal Hub Adapter (Fig. 31). Do not screw all the way in.
(Fig. 31)

47
f. To scan the radio stations, simply press & ho d the “UP” or “DOWN” button
(Fig. 10) or “TUNE (+ or -)” button (Fig. 11) for at least 3 seconds. Scanning will
stop automatically when a station is located.
g. To adjust the volume, press the “Vol. (+ or -)” button on the Serenata (Fig. 12)
or on the remote control (Fig. 13).
(Fig. 12) (Fig. 13)
S T E P 4 Programming the Radio
a. Switch the battery pack to the “ON” position.
b. Press the “POWER/FM/AM” button on the Serenata (Fig. 7) or press the
“Power” button on the remote control (Fig. 8).
c. Position the Serenata for proper reception.
d. To select FM or AM, press the “POWER/FM/AM” button once again on either
the Serenata (Fig. 9) or “POWER” on remote control (Fig. 8).
e. To select a radio station, press the “UP” or “DOWN” button on the Serenata
(Fig. 10) or press the “TUNE (+ or -)” button on the remote control (Fig. 11).
(Fig. 7) (Fig. 8)
(Fig. 9) (Fig. 10) (Fig. 11)
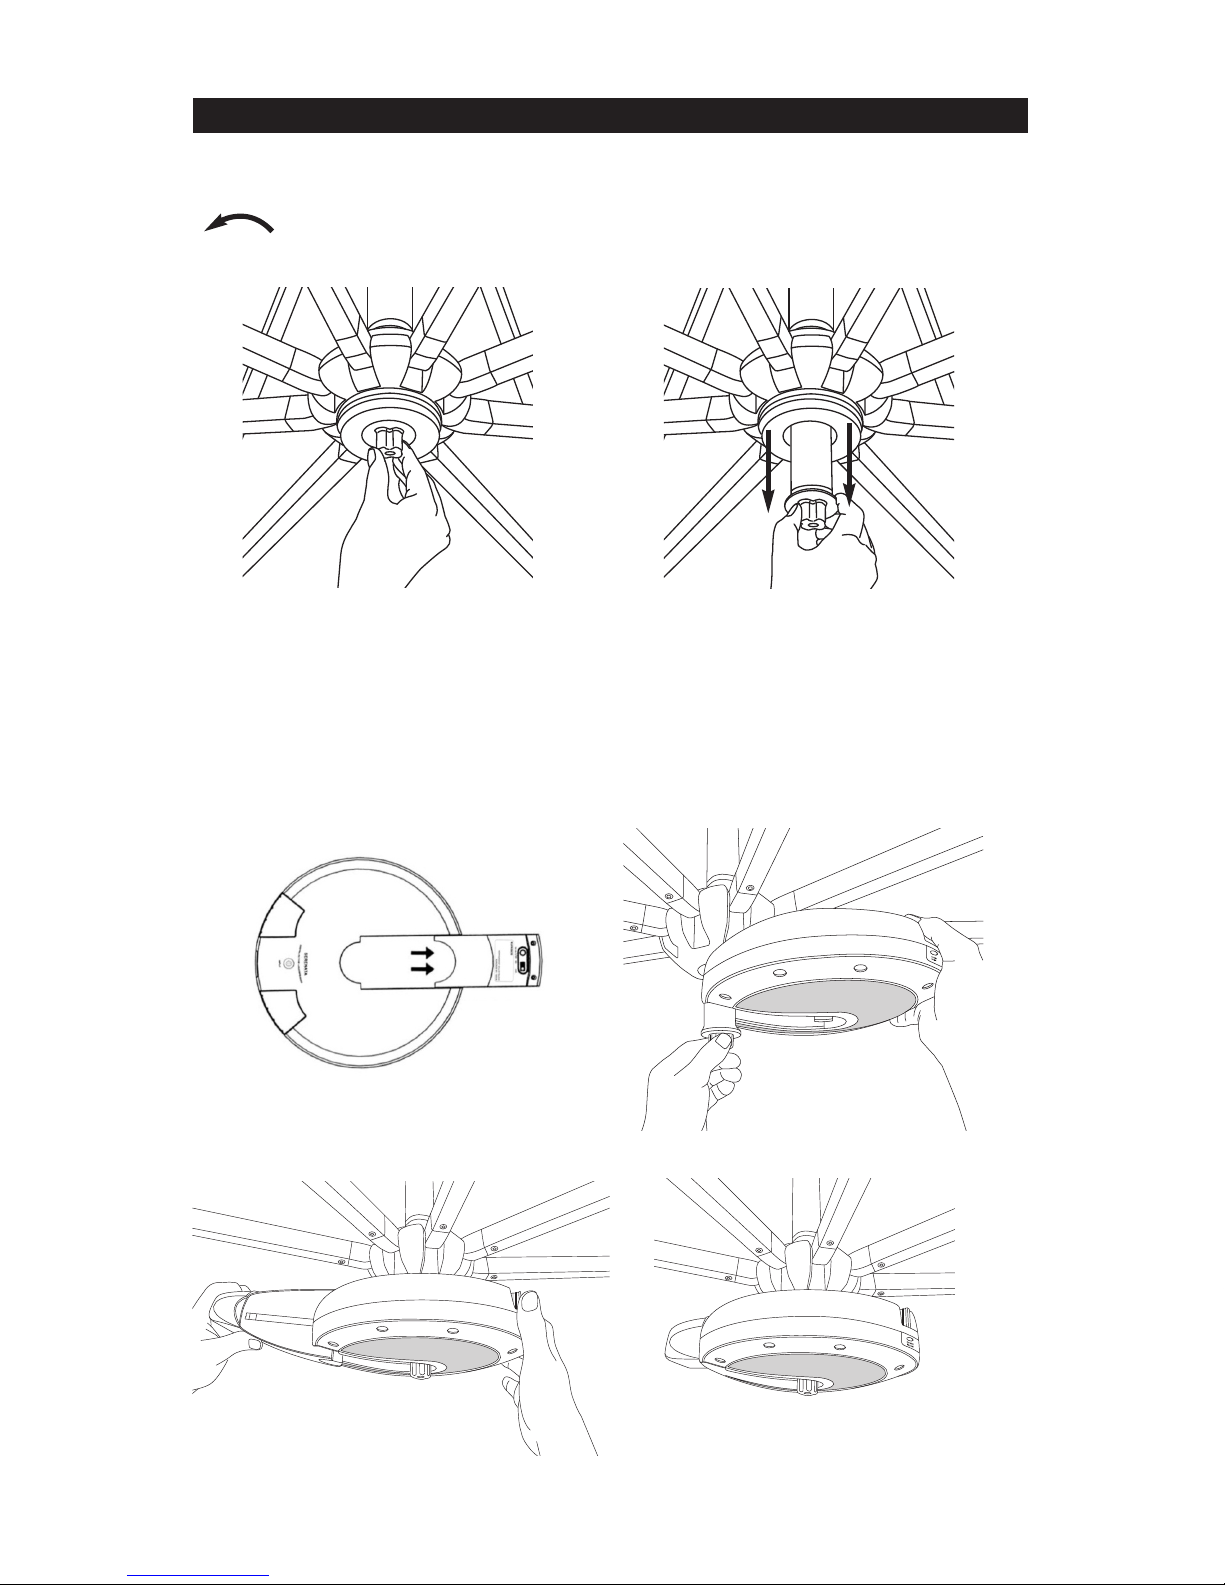
To ATTACH SERENATA Umbrella Light to Cantilever Umbrella:
Loosen the light adapter built into the umbrella runner by turning counter-clockwise
(Fig. 21). After loosening, pull down light adapter post (Fig. 22) to attach the
SERENATA umbrella light (sold separately).
(Fig. 21) (Fig. 22)
Additional Features
To OPEN and ATTACH SERENATA to SimplyShade Umbrella:
Hold Serenata firmly and pull the battery pack from umbrella light (Fig. 23). Slide
the Serenata onto light adapter or center post. It may be necessary to squeeze the 2
lock and release tabs on the Serenata to fit onto post (Fig. 24). Once Serenata is
securely on light adapter or center post, slide battery pack back onto Serenata (Fig. 25).
Your Serenata is now ready for use (Fig. 26).
(Fig. 24)
(Fig. 23)
(Fig. 25)
(Fig. 26)
65
S T E P 7
a. Press & hold the “F/C” button on the Serenata (Fig. 18) or the remote control
(Fig. 19) for at least 2 seconds. Fahrenheit will display on the screen.
b. Press & hold the “F/C” button again for at least 2 seconds and Celsius will
display on the screen.
S T E P 8 iPod/MP3 Player
a. Attach music source holder to Serenata (Fig. 20). Insert iPod into music source
holder (Fig. 21).
b. Turn on the radio.
c. Turn on the iPod/MP3 player and select the music.
d. Insert one end of the audio cable into the output socket on the MP3 player, and
then insert the other end of the cable into the input socket on the Serenata
(Fig. 22).
d. To convert back to radio, simply unplug the cable.
(Fig. 18) (Fig. 19)
b. Adjust the hour by pressing the “Vol. (+ or -)” button.
c. Press & re ease the “TIME” button again and the “minute” will flash.
d. Adjust the “minute” by pressing the “Vol. (+ or -)” button.
e. Press & re ease the “TIME” button once again to save the settings.
(Fig. 16) (Fig. 17)
S T E P 6 Setting the Time
a. Press & re ease the “TIME” button on the Serenata (Fig. 16) or the remote
control (Fig. 17). The “hour” will flash on the display screen.
S T E P 5 Using the Radio
a. Turn the radio on and tune-in the station you want to save.
b. Press & ho d the “P/S” button for at least two seconds on the Serenata
(Fig. 14) or on the remote control (Fig. 15). The P/S channel will flash on the
display screen.
c. Press the “Vol. (+ or -)” button to select P/S channel.
d. Press & ho d the “P/S” button once again for at least 2 seconds to save the
radio station. NOTE: Setup will automatically void if Step 5, Fig. 15 is not
completed within 10 seconds.
e. The memory can save up to 5 stations on both FM and AM bands.
(Fig. 14) (Fig. 15)
(Fig. 22)
(Fig. 20)
(Fig. 21)
Upside Down Right side Up
(Fig. 21)
47
f. To scan the radio stations, simply press & ho d the “UP” or “DOWN” button
(Fig. 10) or “TUNE (+ or -)” button (Fig. 11) for at least 3 seconds. Scanning will
stop automatically when a station is located.
g. To adjust the volume, press the “Vol. (+ or -)” button on the Serenata (Fig. 12)
or on the remote control (Fig. 13).
(Fig. 12) (Fig. 13)
S T E P 4 Programming the Radio
a. Switch the battery pack to the “ON” position.
b. Press the “POWER/FM/AM” button on the Serenata (Fig. 7) or press the
“Power” button on the remote control (Fig. 8).
c. Position the Serenata for proper reception.
d. To select FM or AM, press the “POWER/FM/AM” button once again on either
the Serenata (Fig. 9) or “POWER” on remote control (Fig. 8).
e. To select a radio station, press the “UP” or “DOWN” button on the Serenata
(Fig. 10) or press the “TUNE (+ or -)” button on the remote control (Fig. 11).
(Fig. 7) (Fig. 8)
(Fig. 9) (Fig. 10) (Fig. 11)
To ATTACH SERENATA Umbrella Light to Cantilever Umbrella:
Loosen the light adapter built into the umbrella runner by turning counter-clockwise
(Fig. 21). After loosening, pull down light adapter post (Fig. 22) to attach the
SERENATA umbrella light (sold separately).
(Fig. 21) (Fig. 22)
Additional Features
To OPEN and ATTACH SERENATA to SimplyShade Umbrella:
Hold Serenata firmly and pull the battery pack from umbrella light (Fig. 23). Slide
the Serenata onto light adapter or center post. It may be necessary to squeeze the 2
lock and release tabs on the Serenata to fit onto post (Fig. 24). Once Serenata is
securely on light adapter or center post, slide battery pack back onto Serenata (Fig. 25).
Your Serenata is now ready for use (Fig. 26).
(Fig. 24)
(Fig. 23)
(Fig. 25)
(Fig. 26)

3 8
(Fig. 4)
(Fig. 5)
S T E P 3 Adjusting the Light Settings
a. To turn on the lights, switch the battery pack to the “ON” position (Fig. 4).
b. To adjust the brightness, simply press the “F/C” button on the Serenata (Fig. 5)
or press the “LIGHT (+ or -)” button on the remote control (Fig. 6).
(Fig. 6)
ON
F/C
LIGHT +
LIGHT -
To OPEN and ATTACH SERENATA to a non-SimplyShade Umbrella:
Remove screw from cantilever hub (Fig. 27a). Remove second screw diagonally from
other screw (Fig. 27b). Screw Adapter Sleeve to Universal Hub Adapter and tighten
(Fig. 28).
(Fig. 27a)
(Fig. 27b)
(Fig. 28)
(Fig. 29)
(Fig. 30)
Attach Universal Hub Adapter to hub on cantilever and secure using (2) supplied
screws
(Fig. 29). Tighten screws with nuts on opposite end (Fig. 30). Screw in 2 small screws
onto Universal Hub Adapter (Fig. 31). Do not screw all the way in.
(Fig. 31)

2
S T E P 1 Charging the Battery Pack
a. Grab firmly and pull the battery pack from the Serenata to remove (Fig. 1).
b. Attach the charger to the battery pack and plug into any 110V power source.
The battery is fully charged when the indicator light changes to green (Fig. 2).
Note: Charge battery for 8 hours before first use.
(Fig. 1)
S T E P 2 Attaching the Serenata to Umbrella
a. Grab firmly and pull the battery pack from the Serenata to remove (Fig. 3).
b. For centerpo t market umbrella , slide the Serenata onto the center post.
Note: It may be necessary to squeeze the 2 lock and release tabs on the
Serenata to fit onto post. (See page 7)
For SimplyShade idepo t cantilever tyle umbrella , attach Serenata onto
adapter on lower hub.
For all other idepo t cantilever tyle , attached supplied Adapter Sleeve (G)
and Universal Hub Adapter (H) to the lower hub and tighten with supplied
screws. Swap out cushions grips on Serenata with smallest cushion grip size.
(See page 8)
c. Attach Serenata onto adapter.
(Fig. 3)
9
(Fig. 2)
Hold Serenata firmly and pull the battery pack from umbrella light (Fig. 32). Slide
the Serenata onto Universal Hub Adapter or center post (Fig. 33). If using Universal
Hub Adapter, swap out cushion grips with smallest cushion grip size. For all other hubs
or center post, change cushion grip size if necessary. It may be necessary to squeeze
the 2 lock and release tabs on the Serenata to fit onto post.
(Fig. 33)
(Fig. 32)
Secure Serenata to Universal Adapter Hub by sliding small screws on Hub into holes
located on top of Serenata. Once Serenata is securely on light adapter or center post,
slide battery pack back onto Serenata (Fig. 35). Your Serenata is now ready for use
(Fig. 36 ).
(Fig. 34)
(Fig. 35)
(Fig. 36)

A - Serenata F - Audio Cable
B - Battery Pack G - Adapter Sleeve
C - Charger H - Universal Hub Adapter (screws included,
D- Remote Control adapter for non-SimplyShade umbrellas)
E - Music Source Holder I - Cushion Grips (3 extra size sets included)
Thank you for your purchase of SimplyShade’s Serenata Wireless Umbrella
Light and Media Center.
Please remove all contents from the package, inspect and review checklist.
CAUTION: To reduce personal injury and damage to your umbrella light, read and
follow this assembly and operation guide.
SERENATA CHEC LIST
ABC
DEF
GHI
1 10
S A F E T Y P R E C A U T I O N S :
• If unit is exposed to light moisture, light to medium rain; allow unit to air dry for
24 hours before reuse.
WARNING: The Serenata umbrella light i not waterproof. If the light is
immersed in a pool or spa or exposed to heavy rain the unit will be damaged
and negate the 1 year warranty.
Note:
• Position the Serenata in a location that will protect it from direct sunlight and
moisture.
• Charge the battery for 8 hours prior to first use.
• Do not overcharge the battery. Remove when indicator light turns green.
WARRANTY:
The manufacturer warrants that this
umbrella, when subject to normal and
proper use, will be free from
manufacturing defects for a period of
one year from the original date of
purchase. Should any defect occur
during the specified time period, the
manufacturer will repair, replace, or
provide replacement parts, at its own
option. Limited warranty against fabric
fading, based on fabric grade. Warranty
is not transferable.
We will not warrant any claim coverage
unless both the original sales receipt and
request form are sent to us. Any items
that are returned for warranty or non
warranty purposes must be issued a
Return Authorization Number. Only
upon issuance of an RA # and inspection
by our QC department will credit or
replacement of umbrella be issued. It is
the customer’s responsibility to pay the
freight on return products or
replacement parts. ALL RETURNED
ITEMS MUST INCLUDE THE RA#
CLEARLY WRITTEN ON THE
RETURN PAC AGE or package will be
refused by our warehouse personnel.
NOTE: Damages and failure caused by
improper use due to neglect of reasonable
and necessary care are not covered by
this warranty.
Additionally, acts of nature (including but
not limited to wind, hurricanes, tornadoes,
and storms) are not covered by this
warranty.

SS-SERENATA
I n s t r u c t i o n M a n u a l
Serenata
Umbrella Light
TIME
POWER
FM/AM
F/C P/S VOL- VOL+
UPDOWN
www.simplyshade.com
©2015 SimplyShade - All Rights Reserved. 7/15
Table of contents
Popular Accessories manuals by other brands


MSA
MSA General Monitors S4000TH instruction manual

Energify
Energify Vacuum Food Jar manual

Paramount Fitness
Paramount Fitness Ultra UV2 Replacement instructions

Hisense
Hisense RS-13DJ1SCA/UGE-003 Service manual

Safeguard Supply
Safeguard Supply ERA-DSTX owner's manual

American Dynamics
American Dynamics AD1422 Information sheet

LEGRAND
LEGRAND Wattstopper CH-250-LA installation instructions

Fidelity Electronics
Fidelity Electronics FM180 Operation manual

Garmin
Garmin GFS 10 - Fuel Sensor installation instructions

Batco
Batco 2035 Assembly manual

Alphacool
Alphacool NexXxoS GPX-A 290-M10 instruction manual

Savi
Savi ST-900-CE user guide