Simpsons DWQSC1400 User manual
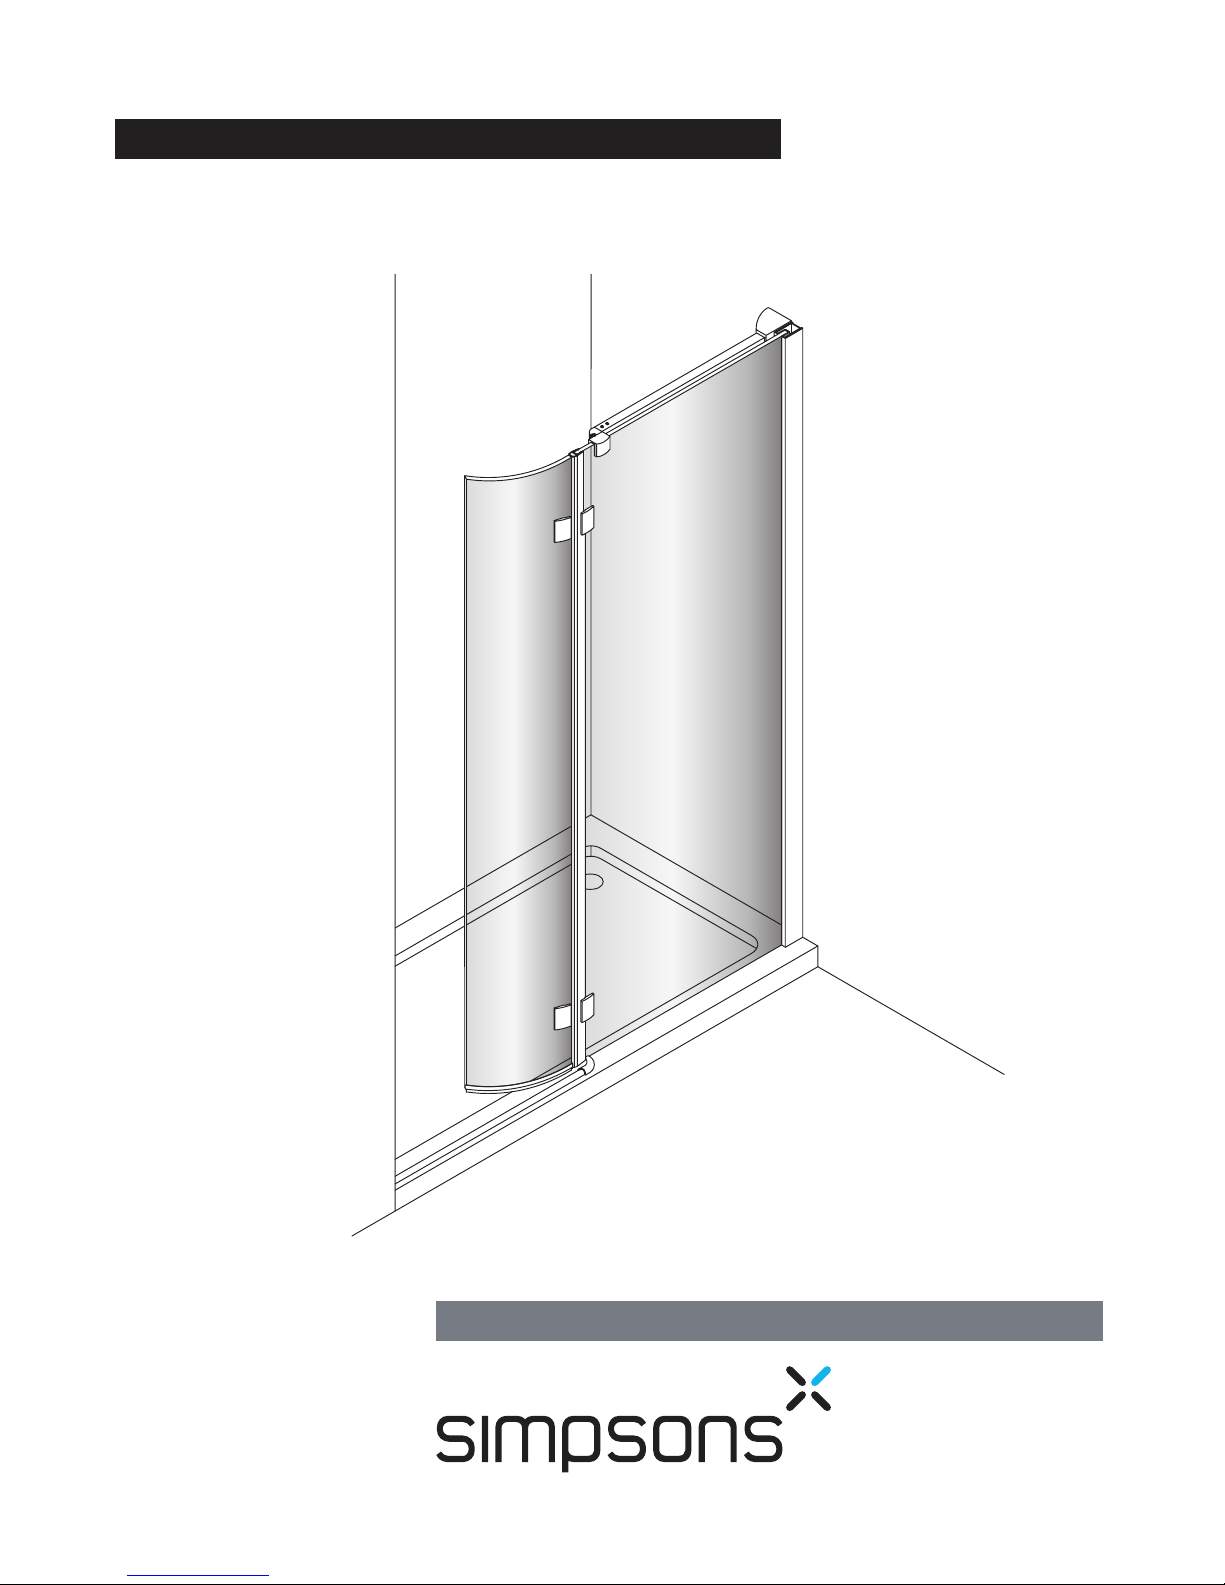
DESIGN WALK IN QUADRANT DWQSC1400
DWQSC1700
INSTALLATION INSTRUCTIONS
B

IMPORTANT - Please read before installation
Please read these instructions carefully before starting
installation and keep in a safe place for future reference.
Check the contents of the pack carefully before installation.
Simpsons will not be held responsible for any de-fit / re-fit costs
where faulty product has been fitted.
If any fault is found with materials or workmanship, it must be
reported immediately to the manufacturer. Remedial action will
be taken, based on information received, on condition that:
1. Full details are supplied to the manufacturer;
2. The enclosure has not been modified or tampered with;
3. The manufacturer is informed of any damage/shortages
prior to installation.
We do not accept responsibility for any problems that may occur
through incorrect installation.
The success of the installation and operation of any shower
enclosure is, of course, dependant on the squareness, alignment
and construction of the walls to which fixing is to be carried out.
VERY IMPORTANT
You must complete all tiling and grouting, and the shower tray
MUST be level and fully sealed to the tiles before installation. If
you do not fit the enclosure onto a tiled surface, or seal the tiles
to the tray before installation, water may soak into the wall behind
the wall channels.
INSTALLATION - Advice and safety
The installation instructions are based on typical use and
conditions.
This product comes with the wall channel pushed onto the
glass panel frame.
The door is designed to open inwards only.
These hints have been prepared for your guidance, you must
exercise due care at all times.
For Health and Safety 2 people must carry out the installation
of this enclosure.
Handle glass with care. Although the glass supplied is tough-
ened safety glass (EN12150), impacts can damage both the
glass and the frame.
CARE AND CLEANING
Do not use solvents or abrasive material or chemicals to clean
the enclosure.
1
Only clean using soapy water and a soft cloth, rinse
thoroughly afterwards.
INSTALLATION - Left and Right hand
●Left entry, The “up” arrow on the glass should be in red, and be on the outside of the enclosure.
●Right entry, The “up” arrow on the glass should be in blue, and be on the outside of the enclosure.
These products are reversible for left or right hand opening.
Please follow the diagram, and detailed below for your choice of installation.
BLH RH
Warning!
Please check for any hidden pipes or cables before drilling holes
in the wall.
To stop the drill bit slipping, masking tape can be applied to the
tiles when preparing the holes.
When using power tools always follow the manufacturers user
instructions.
Do not sit the enclosure on a bed of silicone, as this will also stop
any water from draining back into the tray.
DO NOT SEAL THE ENCLOSURE TO THE TRAY ON THE
INSIDE.
If the enclosure is sealed to the tray on the inside, any water that
may get into the framework will not be able to drain back into the
tray, this may cause the enclosure to leak.
Leave the silicone sealant to dry for 24 hours before using the
enclosure.
2
Drill, 6mm Masonry drill bit, 3.2mm General drill bit, Philips screwdriver, Spirit level, Pencil, Tape measure, Silicone sealant.
Tools and equipment needed
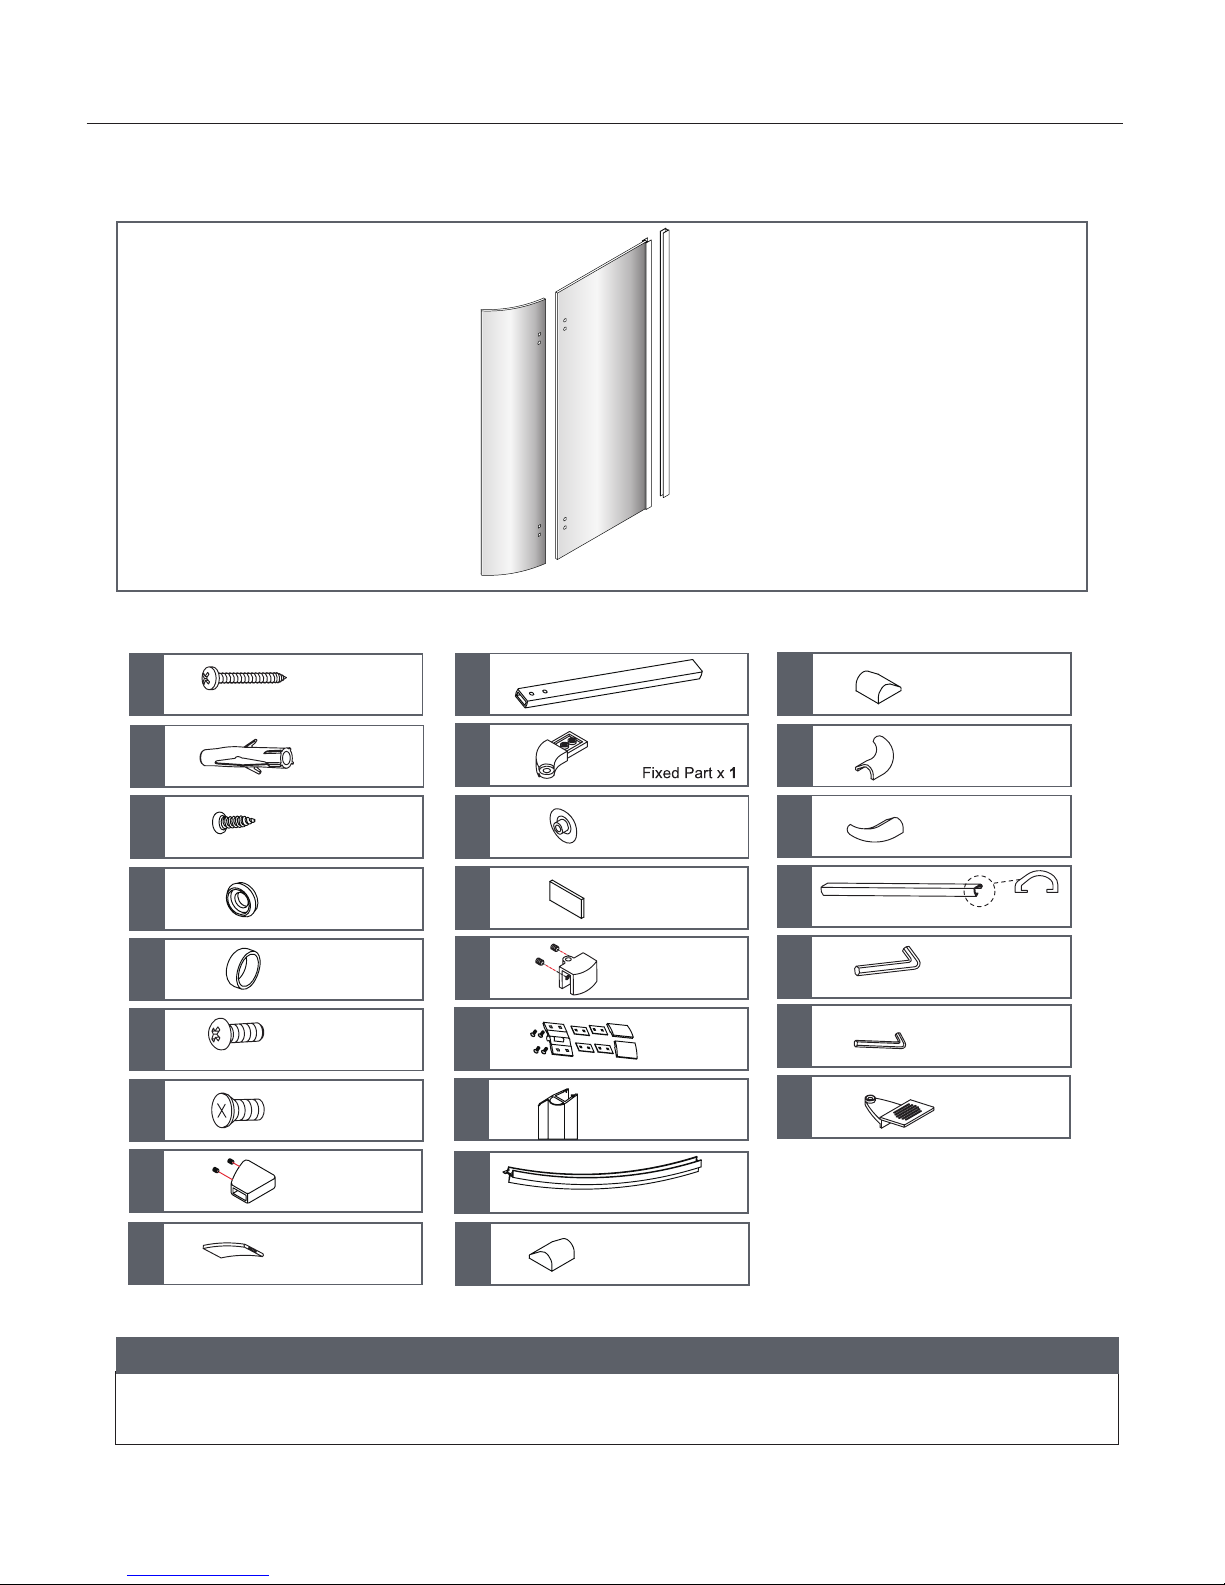
CONTENTS
M4 *50mm Screw x 5
A
Wall Plug x 5
B
M4 *12mm Screw x 3
C
Washer x 3
D
Cover x 3
E
M6 *10mm Screw x 2
F
M5 *14mm Screw x 1
G
Wall Bracket x 1
H
Cover x 2
L
Mat x 1
M
Glass Clamp x 1
N
Hinge x 2
O
Bottom Waterproof strip x 1
P
Waterproof Profile x 1
Q
R
S
End Part (RH) x 1
T
End Part (LH) x 1
U
V
Wall Bracket Cover x 1
I
Support Bar x 1
J
K
Drill Jig x 1
X
Y
W
B
Allen Key 3mm x 1
Allen Key 4mm x 1
Waterproof Strip x 1
End Part (RH) x 1
End Part (LH) x 1
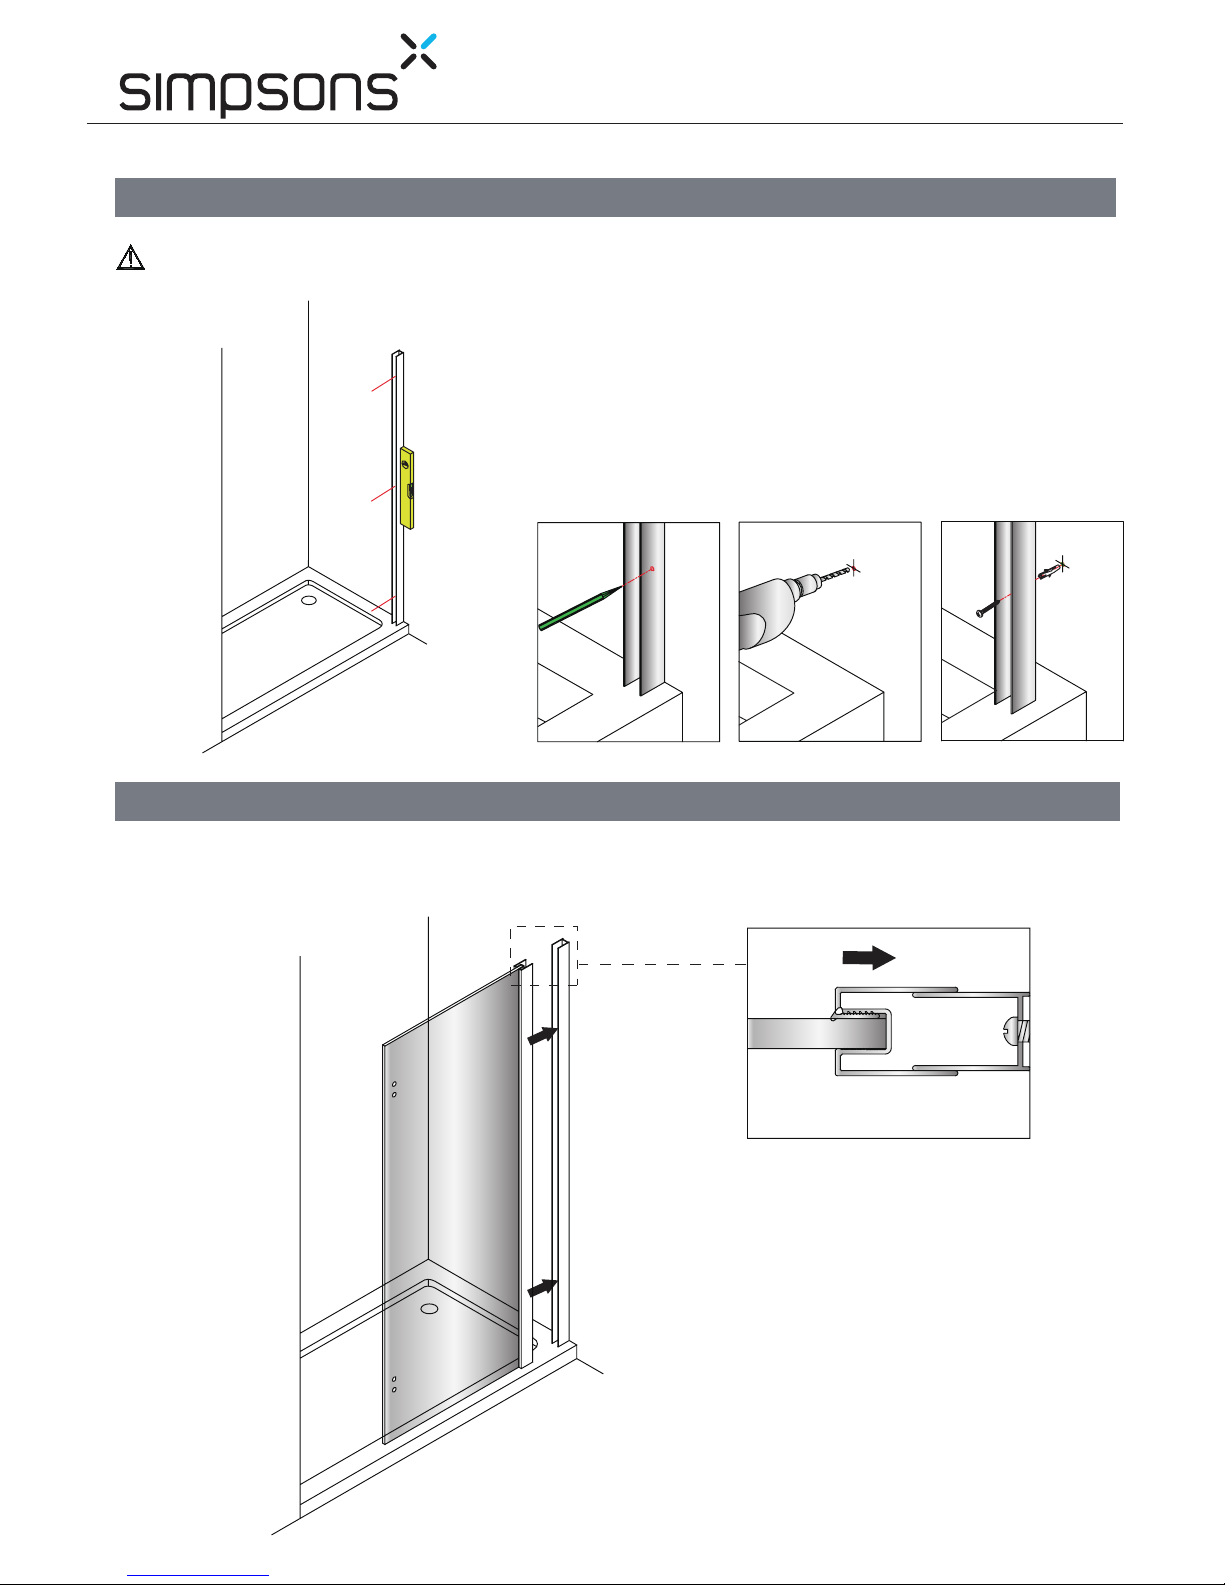
Step 1 - FITTING AND POSITIONING WALL CHANNEL
3
Step 2
Remove the wall channel from the glass panel frame. Place the wall channel
in position on the tray (10 - 15mm in from the outer edge of the tray), use a
spirit level to ensure it is vertical and mark all 3 fixing holes onto the wall.
Drill holes in the positions marked using a 6mm masonry drill bit. Insert wall
plugs (B) into all of the holes (beyond the thickness of the tile).
Fix the wall channel to the wall using 3 screws (A).
Note: Inject silicone sealant into the holes before inserting the screws to
seal the holes.
Push the glass panel on to the wall channel.
B
A
REFER TO PAGE ONE FOR YOUR CHOICE
OF INSTALLATION - LEFT OR RIGHT!
B
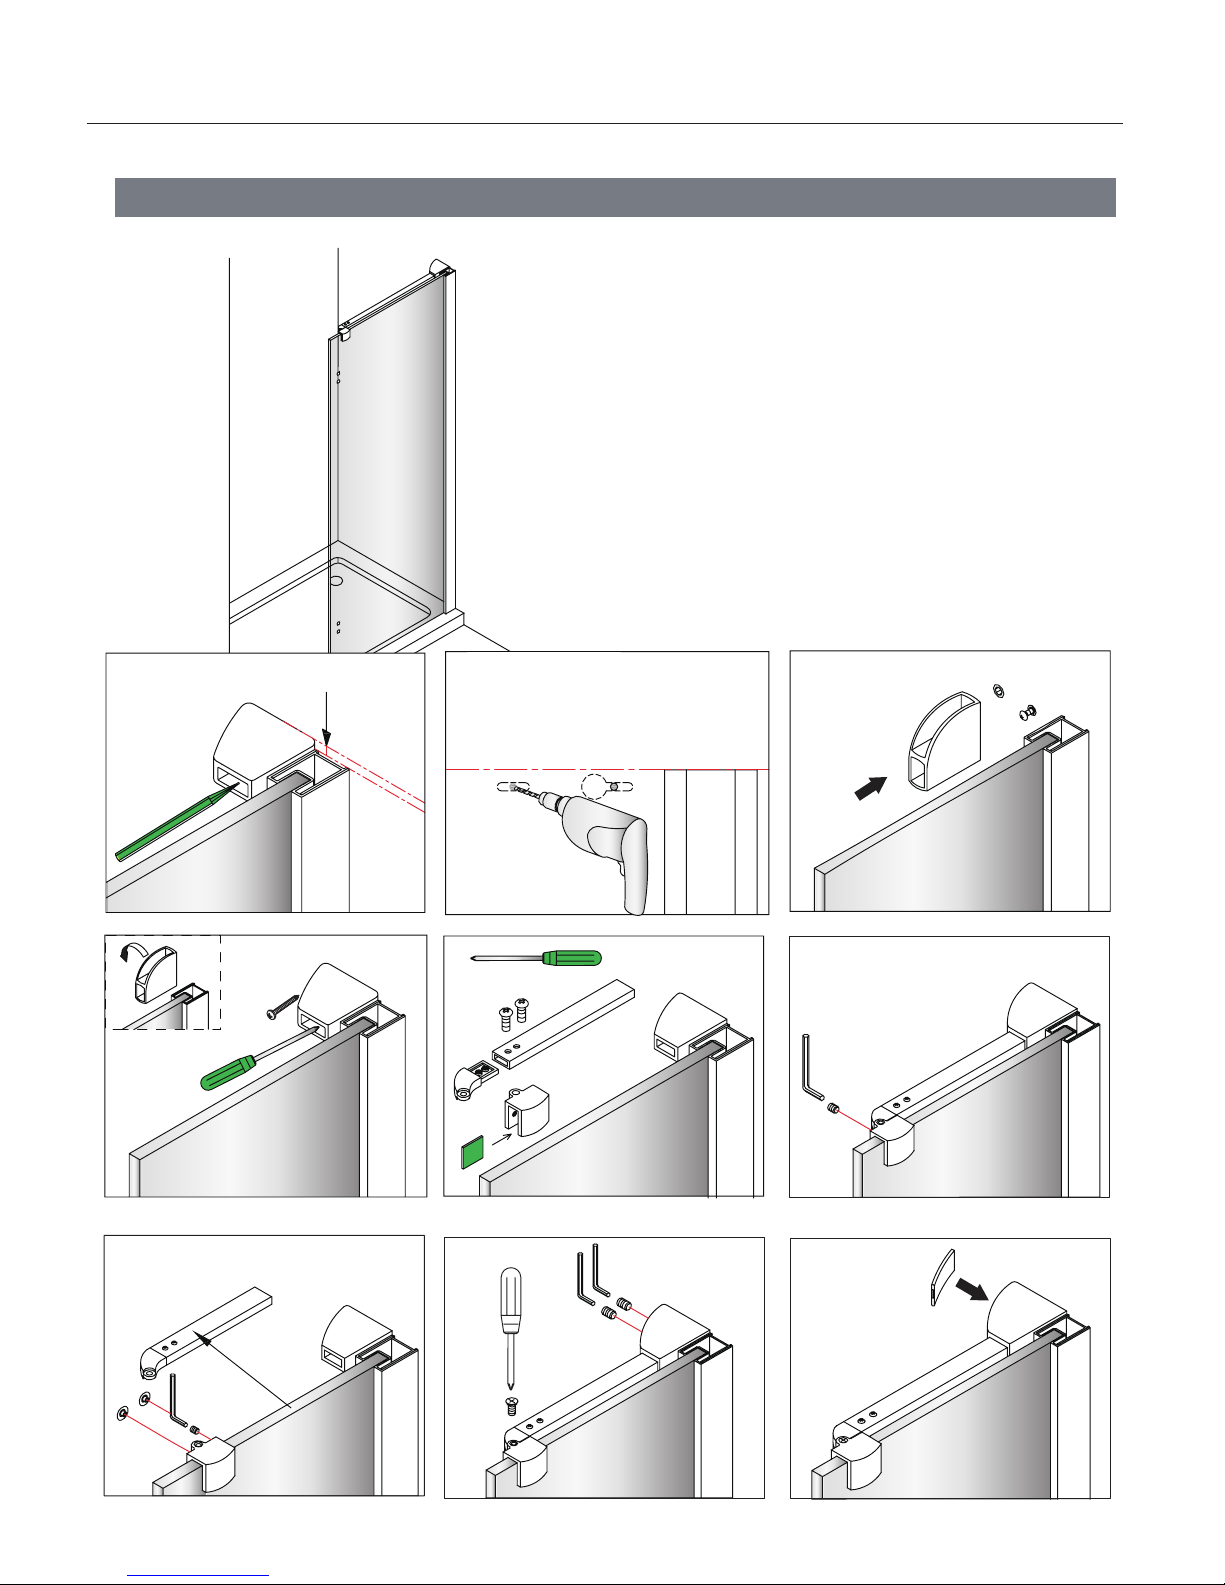
Step 3 - FITTING THE BRACING BAR
4
B
Place part (H) in position (2mm above the side panel in vertical;
align against the side panel in horizontal.)
Use a spirit level to check the level.
Mark the hole positions on to the wall.
Drill holes in the positions marked using a 6mm masonry drill
bit. Insert wall plugs (B) into the two holes.
(beyond the thickness of the tile).
3
456
7
A
AF
G
M
H
K
N
J
I
W
J
4mm
! Please note the grub screws within part (H) and
part (N) need to be loosened so that the supporting
bar (J) can be inserted.
2mm
H
12
89
W
4mm
L
X
3mm
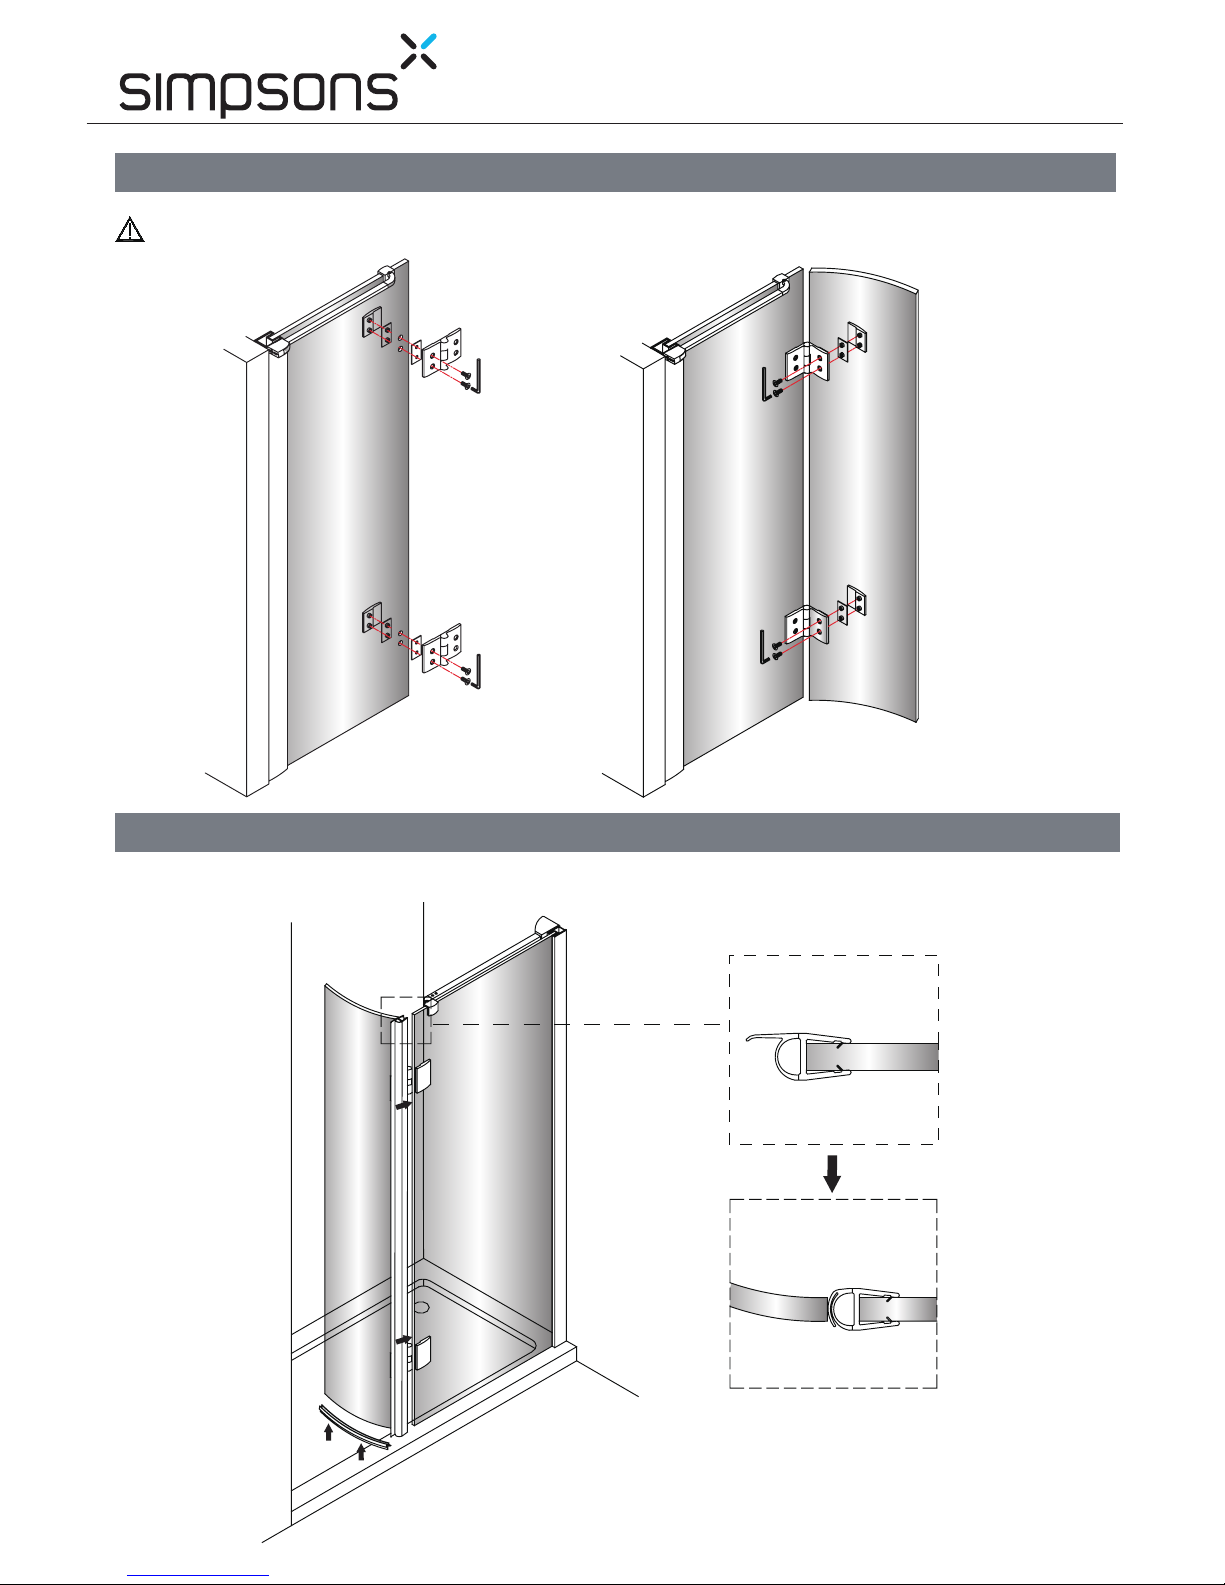
Step 4 - HINGE ASSEMBLY
5
Step 5 - FITTING SEALS
B
Fix Hinges to the fixed glass panel. Support door and fix hinges to moving glass. Do not fully tighten.
Check that the door closes and that the top is aligned with the fixed glass panels. Fully tighten screws with allen key(W).
O
W
W
Inside
P
Q

Step 6
6
Step 7
B
Once you have checked that the door opens and closes
correctly fix the glass panel frame to the wall channel.
From inside, drill 3 holes through the wall channel/glass panel
frame using a 3.2mm drill bit and Drill Jig (Y). Fix using
washers (D), screws (C) and push on the screw covers (E).
D,C,E
Y
Place the breakwater bar (V) and the two end parts - RH (R, T) or two end parts - LH (S, U) on the shower tray.
Using a pencil mark the outline after adjusting the 3 parts fit for the shower tray and door glass.
Spread silicone sealant under the 3 parts, put them on the shower tray following the marked line.
R
T
V
cd
b
a
Lmm
L+20 mm
V
V
R
T

Step 8
7
For any further information please contact
Simpsons on: 0845 873 5808
Or visit our web-site at
www.simpsons-enclosures.co.uk
The manufacturer reserves the right to make technical
modifications without prior notice.
24H
B
Inside
Sealing inside:
Run a line of silicone sealant from top to bottom down
the joint between the wall channel and tile.
Do not seal the enclosure to the tray on the inside.
Outside
Sealing Outside:
Run a line of silicone sealant from top to bottom down
the joint between the wall channel and tile.
Note: If required you can also run a line of silicone
sealant 100mm up the joint where the door slots onto
the wall channel.
This manual suits for next models
1
Table of contents
Popular Other manuals by other brands


Delta Electronics
Delta Electronics G3D Specifications

Digital Watchdog
Digital Watchdog DWC-V362D user manual

ReelCraft
ReelCraft BA36106 LT operating instructions

Dwyer Instruments
Dwyer Instruments HTDL-10 Installation and operating instruction manual

Schweitzer Engineering
Schweitzer Engineering SEL-387-0 instruction manual

SLS
SLS smartSLED quick start guide


