Sincreative CM9429B-UL User manual

Rev 1.0
HOUSEHOLD USE ONLY
Please read all instructions carefully before using the product
INSTRUCTION MANUAL
2 in 1 Coffee Maker
love · life
Model: CM9429B-UL

CONTENTS
IMPORTANT SAFEGUARDS ..................................................................
SPECIFICATIONS .........................................................................................
KNOW YOUR COFFEE MAKER ...................................................................
CONTROL PANEL .........................................................................................
PLUGIN AND TIME OUT ............................................................................
WATER EMPTY ALERT .................................................................................
INITIAL USE ..................................................................................................
INITIAL CLEANING .....................................................................................
HOW TO BREW COFFEE .............................................................................
CLEANING AND MANTAINANCE ........................................................
TROUBLESHOOTING ..............................................................................
WARRANTY INFORMATION .......................................................................
CUSTOMER SUPPORT ..................................................................................
01

IMPORTANT SAFEGUARDS
When using your, basic safety precautions should always be followed to reduce the risk of fire, electric shock, and/or injury to
persons, including the following:
01. Read all instructions.
02. This appliance is not intended for use by persons (including children) with reduced physical, sensory, or mental
capabilities,or lack of experience and knowledge, unless they are closely supervised and instructed concerning use of
the appliance by a person responsible for their safety.
03. Close supervision is necessary when any appliance is used by or near children. Children should be supervised to ensure
that they do not play with the appliance.
04. Do not touch hot surfaces. Use handles or knobs. Care must be taken, as burns can occur from touching hot parts or
from spilled, hot liquid.
05. To protect against electric shock, do not place cord, plug, or coffee maker in water or other liquid.
06. Unplug from outlet when the coffee maker is not in use and before cleaning. Allow to cool before putting on or taking off
parts and before cleaning the appliance.
07. Coffee maker must be operated on a flat surface away from the edge of counter to prevent accidental tipping.
08. Do not operate any appliance with a damaged supply cord or plug, or after the appliance malfunctions or has been
dropped or damaged in any manner. Supply cord replacement and repairs must be conducted by the manufacturer, its
service agent, or similarly qualified persons in order to avoid a hazard.
Call the provided customer service number for information on examination, repair, or adjustment.
09. The use of accessory attachments not recommended by the appliance manufacturer may cause injuries.
10. Do not use outdoors.
11. Do not let cord hang over edge of table or counter or touch hot surfaces, including stove.
12. Do not place on or near a hot gas or electric burner, or in a heated oven.
13. Avoid contacting moving parts.
02

14. Be certain lid is securely in place during frothing or warming.
15. To disconnect appliance, press control button(s) until power indicator light is no longer glowing and then remove plug
from wall outlet.
16. To unplug, grasp the plug and pull from the outlet. Never pull from the power cord.
17. Do not place coffee maker in a cabinet when in use.
18. WARNING! To avoid hot water spraying from the piercing needle, do not lift the lid during the brew process.
19. Do not use appliance for other than intended use.
20. WARNING! To reduce the risk of fire or electric shock, do not remove the bottom cover of the coffee maker. There
are no user-serviceable parts inside. Repair should be done by authorized service personnel only.
21. CAUTION! Cut Hazard: Removable single-serve pod holder contains a sharp needle. Use caution when handling.
22. CAUTION! Cut Hazard: Piercing needle is sharp. Use caution when cleaning.
23. To reduce the risk of fire, do not store anything directly on top of the appliance surface when the appliance is in
operation.
CAUTION! There are two sharp needles that puncture the capsules.
One is located inside the capsule adaptor and the other is located on the top underside of the adaptor compartment. To avoid
risk of injury do not place fingers inside either parts. Also exercise caution when cleaning the parts.
CAUTION: There are boiling water in the front tab lid section during the brew process.
Do not open the lid at any time for risk of injury.
24. Only use capsules intended for this appliance. If the capsule does not fit,do not fores the capsule into the appliance.
25. WARNING: To avoid the risk of injury, do not open the brew chamber during the brew process.
SAVE THESE INSTRUCTIONS
HOUSEHOLD USE ONLY
03

Capacity of water tank: 41OZ/1.2L
Dimension: 11.14 * 9.25 * 11.93 INCHES
Net weight: 5.28 LBS
SPECIFICATIONS
Model: CM9429B-UL
Rated Voltage: 120V~ 60Hz
Power: 1000W
KNOW YOUR COFFEE MAKER
04
2
1
3
4
5
6
7
8
9
10
11
12
1. Lid Handle
2. Piercing Needle
3. Filter Holder
4. Brew Chamber
9. Top Cover
10. Water Tank Cover
11. Water Tank
12. Wire Storage Slot(not shown)
5. Control Panel
6. Capsule Holder
7. Main Body
8. Removable Drip Tray

CONTROL PANEL
05
A B
C D E
A: Cup Size Indicators (6/8/10/12/14oz);
B: Strong Indicator;
C: Regular Button: Press to brew a regular coffee;
D: Cup Size Button: Press to choose the cup size you want;
E: Strong Button: Press to brew a strong coffee;

Once you plug in your coffee maker, all the indicators will flash 3times and the Cup size button will flash for 5seconds then
light up continuously. Your coffee maker is enter standby mode.
After 5minutes of inactivity, your coffee maker will enter sleep mode. The indicators will dim. To reactive your coffee maker,
just press press the regular button or strong button.
PLUG-IN AND TIME OUT
Your coffee maker will let you know when the water tank is empty. When this happens, brewing will stop, and all the buttons
will flash. At this point, refill the water tank and exit the alert mode by pressing the regular button or strong button.
WATER EMPTY ALERT
01. Pull your coffee maker and all accessories out of the box.
02. Remove all packaging materials from within and around your coffee maker.
03. Place your coffee maker on a dry, stable and level surface.
04. Plug in your coffee maker.
05. Lift the water tank up to remove from the coffee maker.
06. Handwash the water tank, capsule holder and filter holder with warm water and dish soap. Rinse with warm, clear water.
07. Wipe the water tank and accessories with a clean , dry cloth.
08. With a damp cloth, wipe down the coffee maker base and control panel.
INITIAL USE
06

Before you brew your first cup of coffee, clean your coffee maker. Run the following cleaning program without a coffee capsule
or ground coffee.
01. Fill the water tank with cold water to the MAX line as indicated on the water tank.
02. Place a empty cup or mug which can hold at least 14oz of liquid beneath the brew spout and onto the drip tray.
03. Open the top cover and place the capsule holder or filter holder into the brew chamber, then close the top cover.
04. Press the cup size button to 14oz, then press the regular button. The button flashed as the water heats.
05. The regular button will illuminate. The coffee maker begins a brewing cycle and hot water will pour from the brew spout.
After the brewing cycle ends and the water stops dripping from the spout, discard the water in the cup or mug. To stop
the brewing cycle at any time, press the regular button again.
06. Repeat this process if necessary.
Now your coffee maker is ready.
Caution: Brewing reaches high temperatures. Dot not open the top cover or touch the brew spout during the brewing
process. These may result in personal injury and/or property damage.
INITIAL CLEANING
07
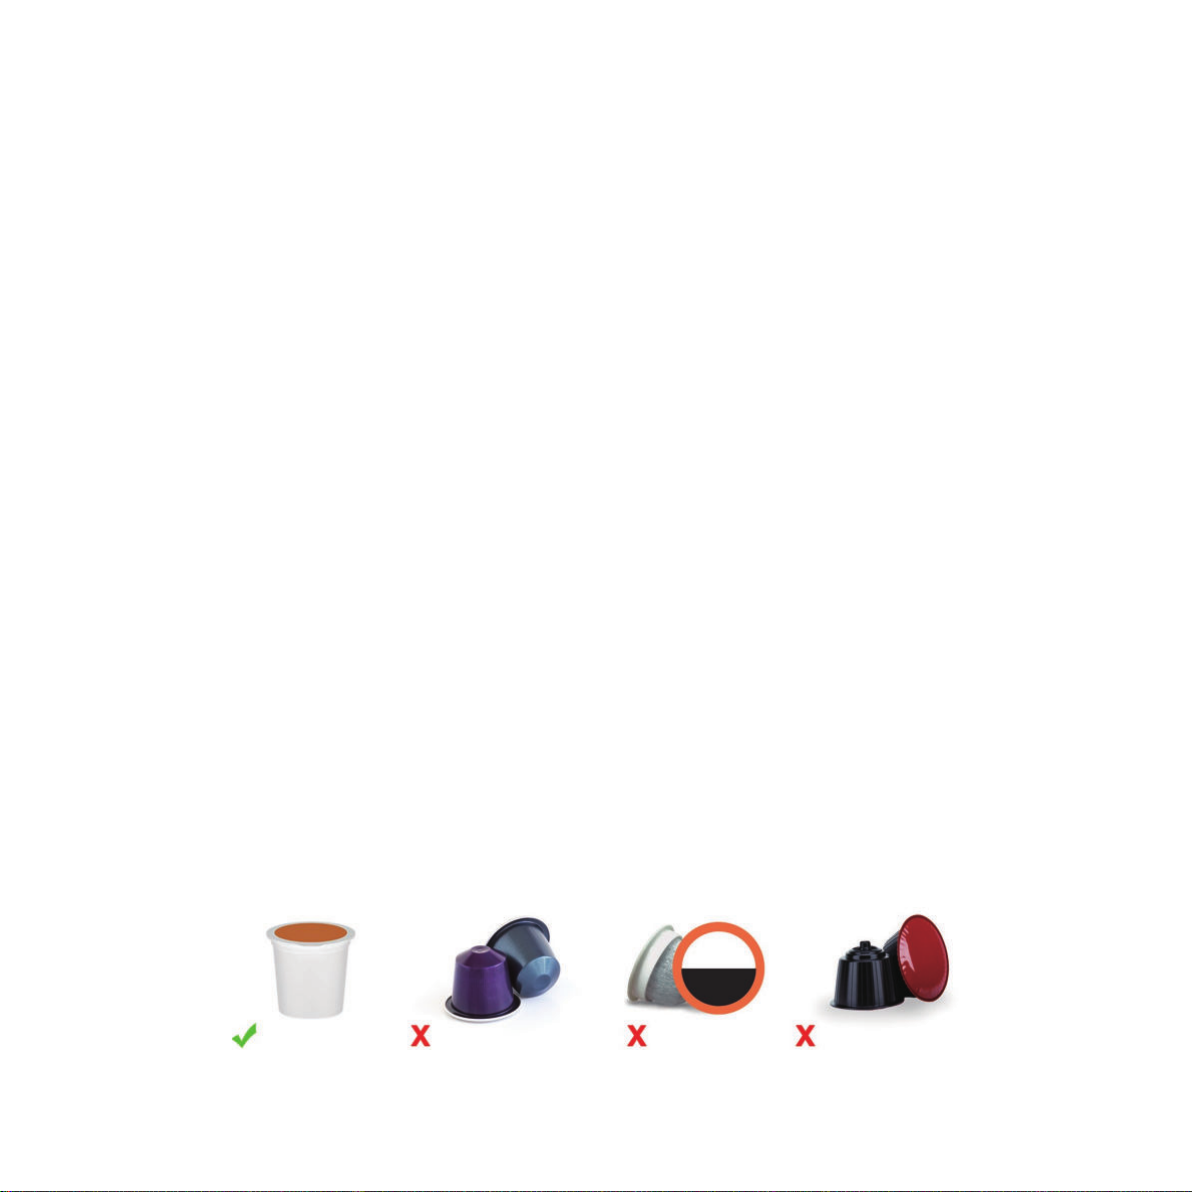
K Cup Capule Nespresso Capsule SF Capsule Dolce Gusto Capsule
Once you’ve cleaned your coffee maker and first run cleaning process, you can begin brewing your first cup of coffee.
Use K-Cup capsule or Ground Coee
With your coffee maker, you can brew coffee with a K-Cup capsule, or grind your favorite coffee beans and use filter holder.
Scoop about 10-15g of medium to medium-fine ground coffee into the filter holder.
01. Fill the water tank up to the MAX line. DO NOT attempt to brew if the water level is below the MIN line.
02. Lift the top cover and place the the capsule holder or filter holder into the brew chamber. Then close the top cover,
ensuring it is securely latched.
03. Select the desired amount of coffee you could like to brew by pressing the cup size button.
04. For a regular cup of coffee, press the regular button. For a strong cup of coffee, press the strong button. The selected
button will flash while water heating cycle begins. You can stop the brewing process at any time by pressing the selected
button again.
05. The select button will remain illuminated when the coffee maker start the brewing cycle. The hot coffee will pour from
the brew spout once the heating process is finished. The heating process will takes about 80-150 seconds.
06. When the coffee stops dripping from the brew spout, lift the top cover and discard the used K-Cup capsule or ground
coffee. And wash the capsule holder or filter holder under running water.
07. Now you can enjoy your freshly brewed cup of coffee.
Now your coffee maker is ready.
Note: Use K-Cup capsule only.
HOW TO BREW COFFEE
08
Caution: Brewing reaches high temperatures. Dot not open the top cover or touch the brew spout during the brewing
process. These may result in personal injury and/or property damage.

Clean your coffee maker regularly to ensure the best possible flavor and to prevent mineral deposits from building up in the
coffee maker.
Always unplug the coffee maker and let it cool to room temperature before cleaning. Never use metal scouring pads, abrasive
powders, or harsh chemical detergents on any of the coffee maker’s parts. Let all parts dry thoroughly before use, and before
storage.
Clean water tank
Remove the tank and handwash with dish soap and warm water. Then rinse it under running water.
Clean the capsule holder or filter holder
Remove and handwash with dish soap and warm water or place in the top rack of a dishwasher.
Clean the drip tray
Remove and handwash with dish soap and warm water. Then rinse it under running water.
Clean the piercing needle
The piercing needle is located on the inside top of the top cover. Should an obstruction occur
because of coffee grounds, it can be cleaned using a paper clop or similar needle. Insert the paper
clip to loosen the obstruction and push it out.
Caution: The piercing needle is sharp.
CLEANING AND MANTAINANCE
09

Descaling
With regular use minerals may accumulate in the coffee maker, which can affect the temperature, volume and strength of your
brew.
To make sure your coffee maker stays in tip top shape, descale it regularly to keep minerals deposits from building up.
After 150 cycles, the cup size button and strong button will alternate flash in red to remind you to clean and descale your coffee
maker.
The ratio of descaling solution should be 1:4 for household descaler, or 3:10 for citric acid.
01. Combine cleaner and water as shown above.
02. Fill the water tank to the MAX line with the cleaning mixture.
03. Place a empty mug beneath the brew spout. Ensure the brewing lid is securely latched.
04. Press and hold the cup size button and Strong button for 3seconds. The machine will brew approx.14 oz of the mixture,
then stop automatically. Repeat this process until the water tank is empty.
05. Discard the cleaning mixture from the mug and place the emptied mug back beneath the brew spout.
06. Rinse the water tank and fill to the MAX line with cool, clean water.
07. Press and hold the cup size button and Strong button for 3seconds. The machine will brew approx.14 oz of water, then
stop automatically. Repeat this process until the water tank is empty.
08. Discard the water produced from the coffee maker.
Caution: Hot water is used for descaling. To avoid risk of personal injury and/or property damage, the mug must be large
enough to hold the entire contents of the water tank (41 oz / ~ 1.2 L). Any other servicing should be performed
by an authorized service representative.
10
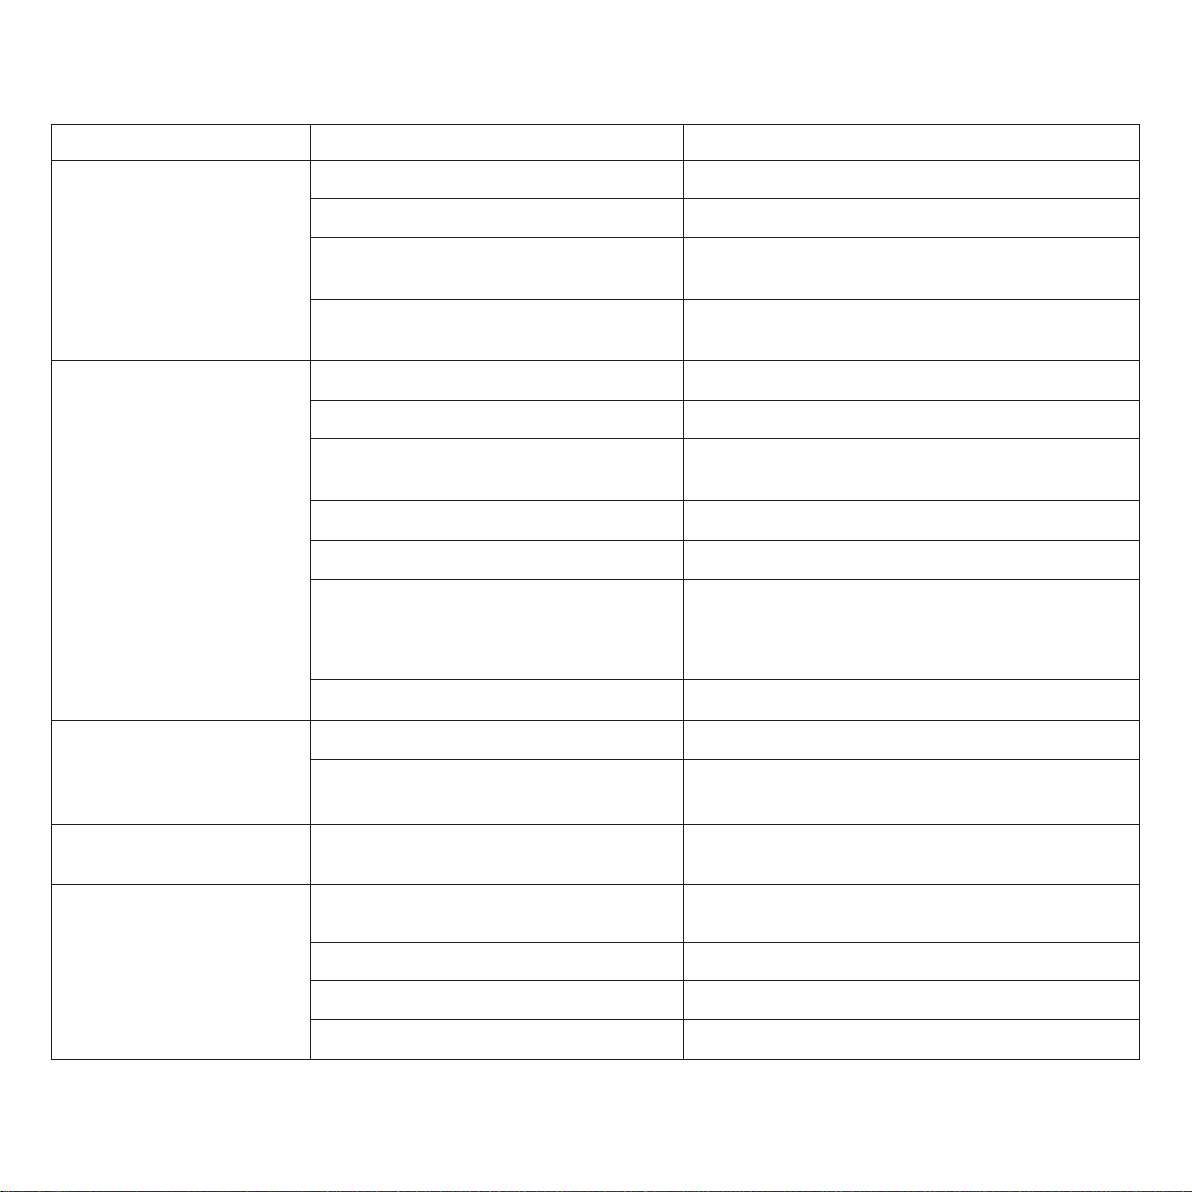
TROUBLESHOOTING
CAUSE SOLUTIONPROBLEM
Switch the appliance on by pressing Regular button or
Strong button.
Unplug the appliance from the wall outlet and contact our
customer support.
Insert the plug into the wall outlet.
Check fuses and circut breaker.
Appliance not switched on.
Malfuctioning appliance.
The appliance not plugged in.
Wall outlet not energized.
Clean the Filter Holder and refill with coarse ground
coffee.
Replace with a suitable capsule.
Check the brew spout for blockages.
Clean and descale the appliance.
Ground coffee too fine.
Capsule not suitable.
Brew spout blocked.
Excessive lime scale buildup.
Repeat settings selection, then press the Regular button
or Strong button.
Refill the water tank with fresh water.
No action after volume selection.
Water tank is empty.
A toothpick or fine pipe cleaner with fresh water.
Refill the water tank with fresh water.
Switch the appliance off and carefully replace the capsule
into the holder, press with enough force to feel the needle
pierce the capsule.Ensure that the lid is closed all the way
when the capsule is installed.
The needle(s) may be plugged with debris.
Empty water tank.
Upper/bottom of the capsule not pierced by
the needle.
The appliance is not working.
No water comes out from the
brew spout.
Clean the Filter Holder and refill with fresh ground coffee.
Reduce the amount of water used on the next brew.
Add more ground coffee. Do not fill over the MAX fill line
on the round coffee holder.
Discard of the old capsule and use a new one.
Ground coffee used more than once.
Too much water used.
Not enough ground coffee.
Capsule used more than once.
Coee flavor is too weak.
Brewing process does not
start.
Refill the water tank with fresh water and restart
operation.
Not enough water according to the
pre-selected volume.
Brewing process stops before
completion.
11
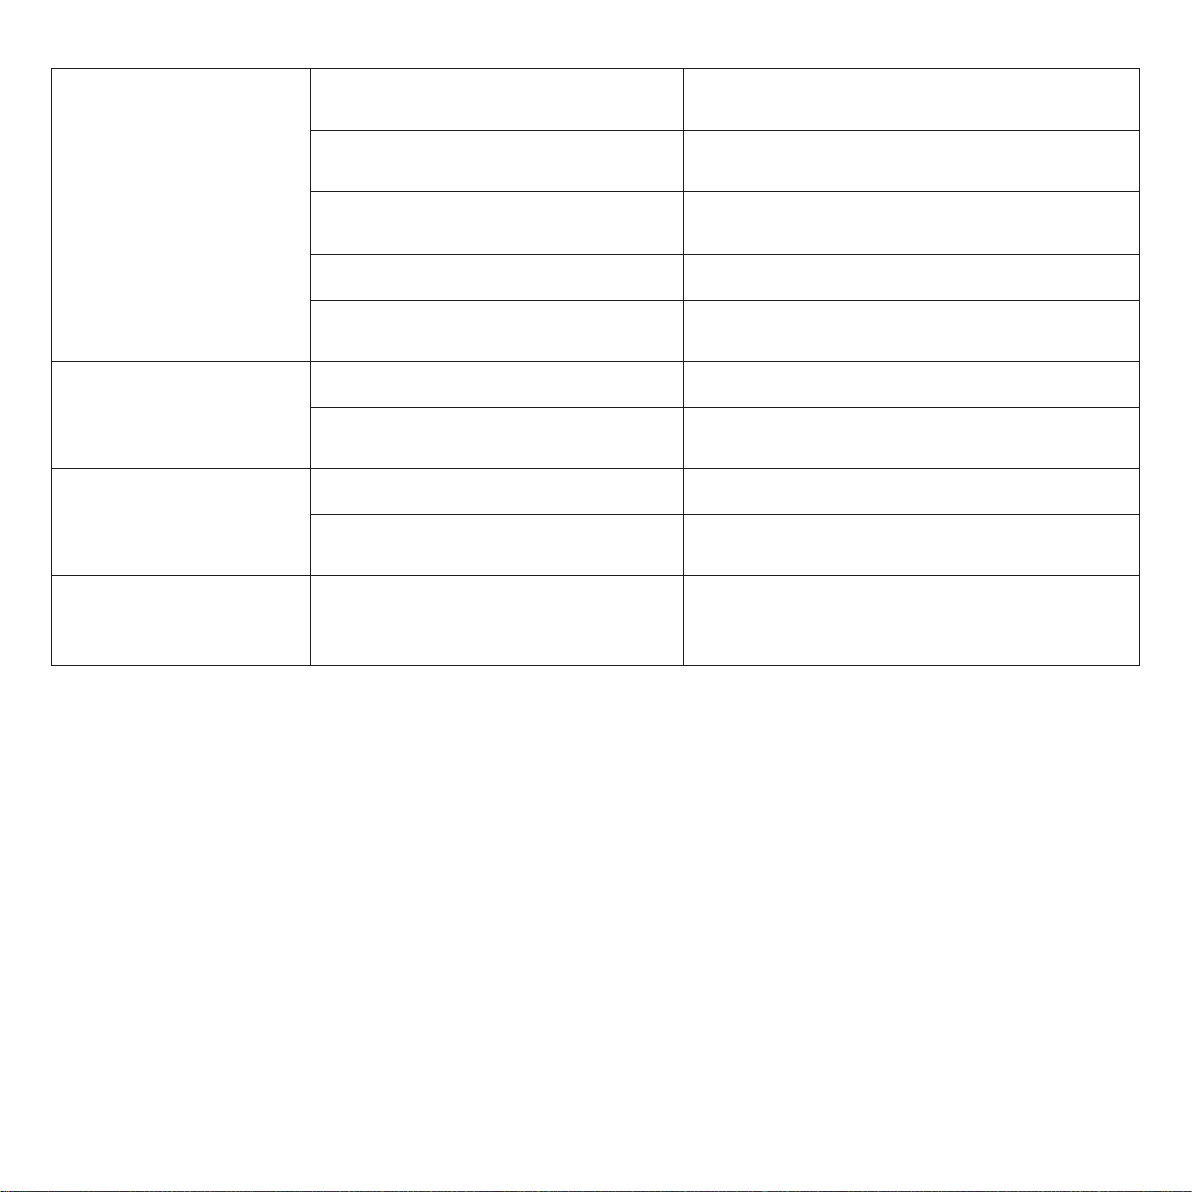
Contact our customer support.The Filter Holder/Capsule Holder/Brew
Chamber is Damaged.
Remove some ground coffee from the Filter Holder.
Ensure the lid of Brew Chamber is properly closed.
Too much ground coffee inside the Filter
Holder.
Clean the Filter Holder and refill with coarse ground
coffee.
Ground coffee is too fine.
Switch the appliance off and carefully replace the capsule.Upper/bottom of the capsule not pierced by
the needle.
Replace with a K-Cup capsule.Capsule is not K-Cup capsule.
Unplug the appliance from the wall outlet and contact our
customer support.
Malfuctioning appliance.
Clean and descale the appliance.Excessive lime scale buildup.
The appliance is leaking
during brewing cycle.
The volume is less than the
pre-selected volume.
Unplug the appliance from the wall outlet and contact our
customer support.
Malfuctioning appliance.
Refill the water tank with fresh water.Water tank is empty.
The coee maker does not
work and all buttons flash
while brewing.
Run descaling cycle.Descale alert.
The cup size button and
regular button flash in red
when plug in.
NOTE: If your problem is not listed, please contact Customer Support.
12

WARRANTY INFORMATION
The manufacturer provides warranty in accordance with the legislation of the customer's own country of residence, with a minimum
of 12 months, starting from the date on which the appliance is sold to the end user.
The warranty only covers defects in material or workmanship.
The warranty will not apply in cases of:
- Normal wear and tear.
- Incorrect use, e.g. overloading of the appliance, use of non-approved accessories.
- Use of force, damage caused by external influences.
- Damage caused by non-observance of the user manual, e.g. connection to an unsuitable mains supply or non-compliance with the
installation instructions.
- Partially or completely dismantled appliances.
CUSTOMER SUPPORT
If you have any questions or concerns about your new product, please contact our helpful Customer Support Team.
Contact our team by email:Support@sincreative.com
•Please have your invoice and order ID ready before contacting Customer Support.
13

1
Sincreative Brands Inc
20947 Currier Rd, Unit C,
Walnut, CA 91789,
United States of America
support@sincreative.com
www.sincreative.com
Table of contents
Other Sincreative Coffee Maker manuals


