SINED CALORE-BIANCO-1500 User manual

Version: 2021-9-13
INFRARED HEATER
Models
CALORE-BIANCO-1500 C1500B CH15A7R
CALORE-BIANCO-1800 C1800B CH18A7R
CALORE-BIANCO-2400 C2400B CH24A7R
CALORE-BIANCO-3200 C3200B CH32A7R
CALORE-NERO-1500 C1500N CH15A7R BLACK
CALORE-NERO-1800 C1800N CH18A7R BLACK
CALORE-NERO-2400 C2400N CH24A7R BLACK
CALORE-NERO-3200 C3200N CH32A7R BLACK

The photo is only indicative, the actual may appear slightly different in colour.

IMPORTANT INFORMATION
Please read the operating instructions carefully before installing and using the infrared heater.
This user manual contains important information for your safety as well as recommendations on the correct use and
maintenance of the appliance.
HAT'S IN THE BOX
Infrared heater equipped with flexible cable and Shuko plug.
Instructions for use and installation.
One box containing 2 sets of brackets.
n infrared remote control ( batteries not included)
SAFETY INSTRUCTIONS
Certain precautions must be observed when using the infrared heater. Improper use without observing the
precautions can cause damage to the health of the user and other persons as well as damage to their property.
Use only the voltage indicated on the heater's nameplate.
Connect the appliance only to a correctly installed power outlet with earth contact.
The heater must be connected to the power supply via a2-pole circuit breaker.
It is strongly recommended to use a 30m differential switch.
The unit must be handled with care and avoid vibration or shock.
Do not use the unit in areas where petrol, paint or other flammable liquids are used or stored.
Do not use the appliance particularly in dusty environments or where explosives are stored.
Do not use the appliance on a construction site, in a greenhouse, in a barn or in animal stables.
Do not use the appliance as a sauna heater.
Heating: Do not touch the radiant plate. The temperature of the radiant plates during operation of the heater can
reach 380 °C. To avoid burns, do not touch the surface of the appliance with your hands and other body parts. It is
also necessary to avoid touching the heater while the appliance is switched on, as serious burns may occur. The
appliance may take up to 1 hour to cool down after switching off.
Do not place any clothes, towels or similar on top of the heater to dry. Risk of overheating and fire
Do not leave the heater unattended during use.
Do not use this heater on a wet surface, or where it may fall or be pushed into water.
Do not touch an appliance that has fallen into the water. Switch off the power first and unplug it immediately.
If the power cable is damaged, it must be replaced by an authorized electrician.
If the heater is defective, it must be checked and repaired by the manufacturer, its service agent or similarly qualified
persons.
Do not use the appliance with wet hands.
Use this device only as described in this manual. ny other use is not recommended by the manufacturer and may
cause fire, electric shock or injury.
Do not use abrasive products for cleaning this appliance. If the body gets dirty, clean the dust with a cloth, the
radiant boards must be cleaned cold with a soft damp cloth. lways remove the plug from the mains before cleaning.
The heater must be installed by an authorized installer at least 2.2 m from the floor
The heater must not be placed immediately under a power outlet. The socket must not be located on the back of the
heater. The power outlet must be located outside the physical footprint of the unit to minimize heat build-up behind
the heater.
The system must be equipped with a standard power supply point with a break contact distance of at least 3 mm.
The standard power outlet must be installed by an authorized electrician.
If the heater is to be mounted in slope (e.g. inclined or angled ceiling), make sure that the electrical connection is
positioned at the lowest point of the heater.
Do not connect the appliance to the power source until it has been installed in its final position and adjusted to the
position where it will be used.

Do not work with the cable wound in a spiral as this could cause heat accumulation, which could be dangerous.
The use of an extension cord with this appliance is not recommended.
Do not allow the cable to come into contact with heated surfaces during operation.
Do not run the power cable under carpets, rugs or runners etc. Place the cable away from areas where it may trip.
Children under 3 years of age must be kept away, unless they are continuously supervised.
Children between 3 and 8 years of age must only be able to switch the appliance on and off if it has been positioned
or installed in the intended normal operating position and if they have received the instructions on how to operate
the appliance safely and understand the dangers involved. Children from the age of 3 years and under must not
connect, adjust and clean the appliance or carry out maintenance.
This appliance can be used by children from 8 years of age and up and by people with reduced physical, sensory or
mental abilities or with little experience and knowledge, if they have received under expert supervision instructions
on the safe use of the appliance and understand the dangers. Children must not play with the appliance. Cleaning
and maintenance of the appliance must not be carried out by children without supervision.
The appliance is intended exclusively for the purpose described in the operating instructions.
Do not use the appliance or any part of it outside its intended use to avoid risks.
The use of accessories not recommended or not sold by the appliance manufacturer may result in the risk of personal
injury.
CAUTION - some parts of this product may become very hot and cause burns. Particular attention must be paid to
children and vulnerable people.
Install and operate the heater in a strictly horizontal position on the ceiling or on the structural surface of the ceiling.
The thermal resistance of the ceiling cladding and ceiling material must be at least 80 °C.
ARNING: This heater is not equipped with a room temperature control device. This heater must be used in open,
outdoor environments or in large rooms with high ceilings.
The heater must not be placed near to the floor, as severe burns can occur due to high surface temperatures.
Do not use this heater in small rooms or where the room or area is occupied and by people who unable to leave
the room alone, people who are unable to operate the heater safely according to the guidelines in the user manual,
unless constant supervision is provided.

HO TO OPERATE THE HEATER
General Drawing
1. Heater radiant surface
2. Heater operation indicator
3. Brackets for wall or ceiling mounting
4. Power cables and plug.
5. Remote control
Technical specifications
MODEL N ME
CALORE-
BIANCO/NERO-
1500
CH15 7R
CALORE-
BIANCO/NERO-
1800
CH18 7R
CALORE-
BIANCO/NERO-
2400
CH24 7R
CALORE-
BIANCO/NERO-
3200
CH32 7R
Voltage 230-240V~ 50Hz 230-240V~ 50Hz 230-240V~ 50Hz 230-240V~ 50Hz
Rated power (W) 1500 1800 2400 3200
Ideal wall mounting height (M) 1.8- 2.1 1.8- 2.1 1.8- 2.1 1.8- 2.1
Ideal ceiling mounting height (M)
2.1- 2.1 2.1- 2.3 2.1- 2.5 2.1- 2.5
Electrical protection class I I I I
Splash water protection rate IP65 IP65 IP65 IP65
Cable length (mm) 1050 1050 1050 1050
Unit size L*W*H (mm) 1045*177*60 1225*177*60 1505*177*60 1915*177*60
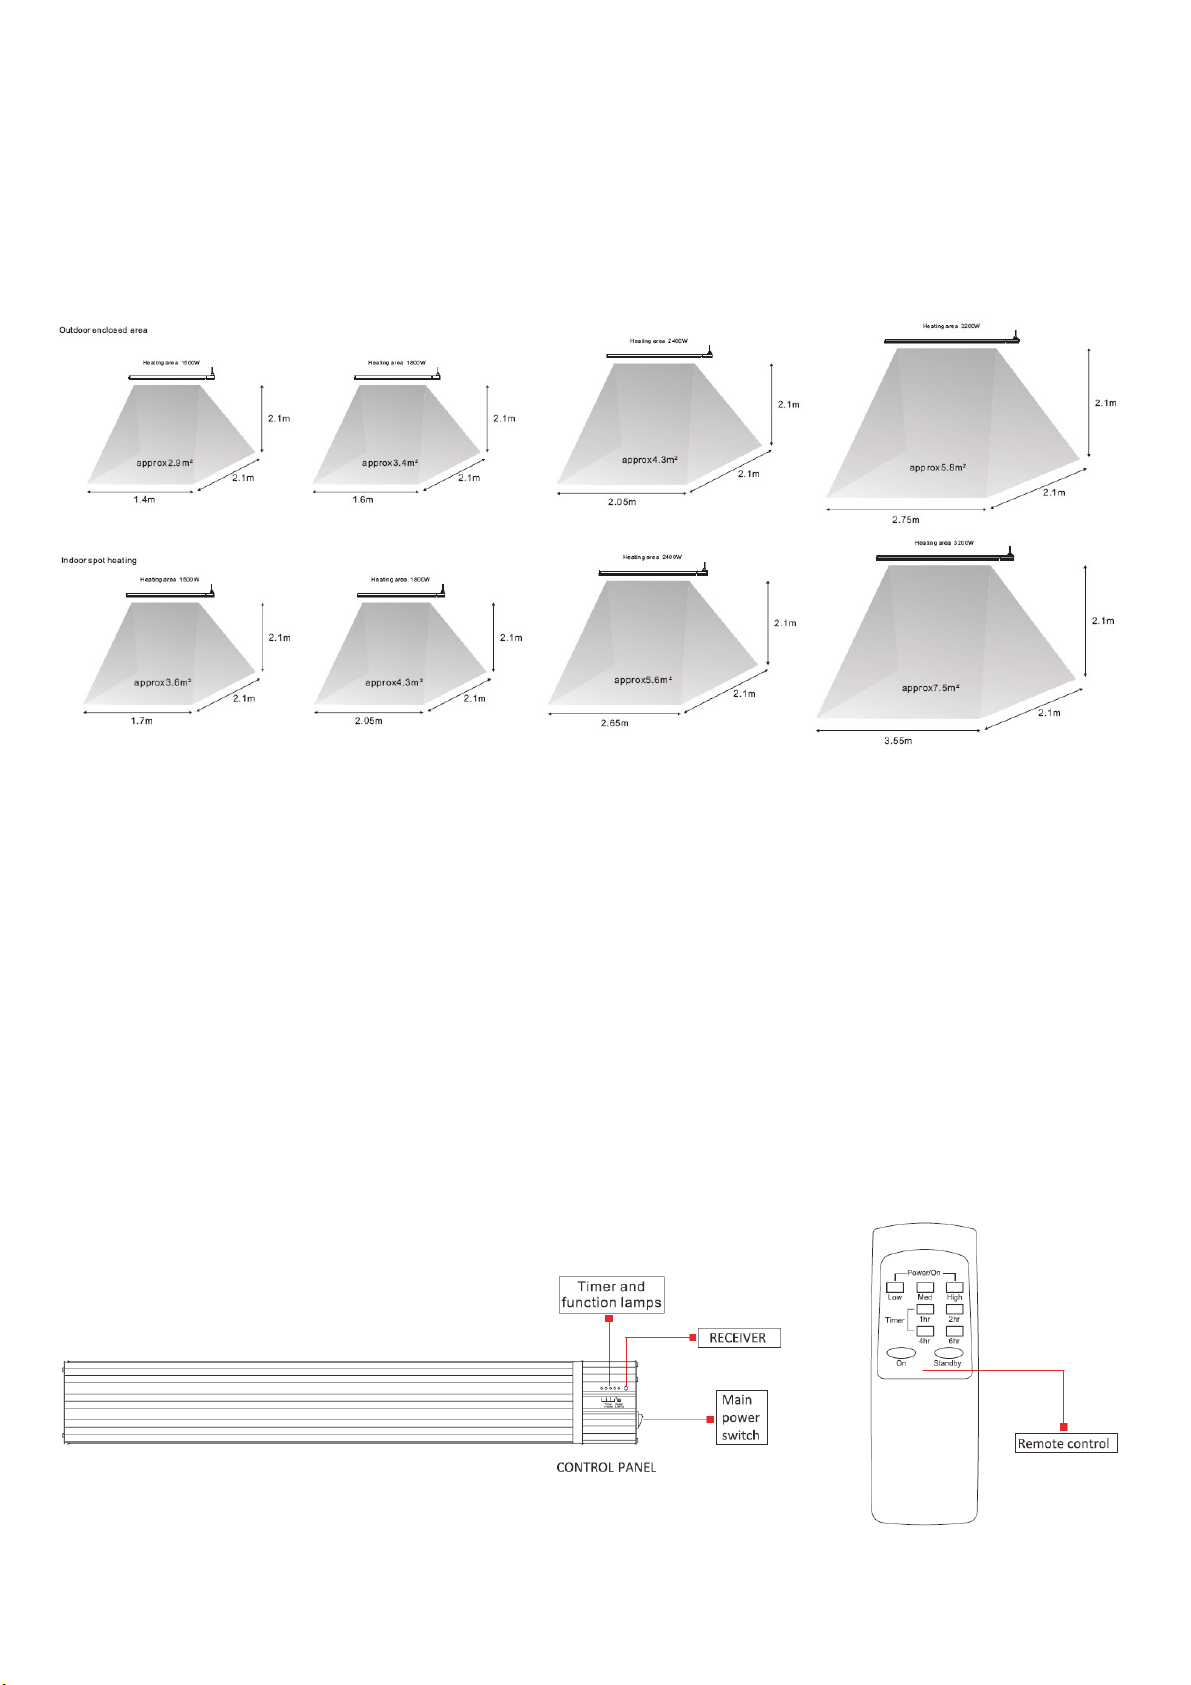
Heating area (M2)
The radiator panel heater produces radiant heat that heats objects rather than air. Therefore, it is imperative that the objects
to be heated (i.e. people) are inside the surface directly radiated by the heater.
The following diagrams show the approximate heating area based on a closed indoor and outdoor environment. The diagram
shows that the maximum heat output is directly below the heater and the temperature decreases as the user moves away
from the heater.
OPERATION
W RNING!
Light crackling can be heard during the heating or cooling period. This is a normal operating noise.
NOTE:
The discoloration of the paint on the wall of the heater body direct to the ceiling during operation is not a defect. The
colour change for the heating plates is not a defect.
fter switching the appliance on for the first time and after long periods of inactivity, the appliance may expel a slight
odour for a short period of time. This does not affect the use of the heater.
To exclude unpleasant burning smells, it is recommended to keep the heater clean by avoiding dust accumulation on it.
The distance between the heater and the remote control must be less than 3 meters, and the remote control must
point directly at the receiver on the front panel during operation.
Operations:
1. Insert 2 batteries into the remote control (not included)
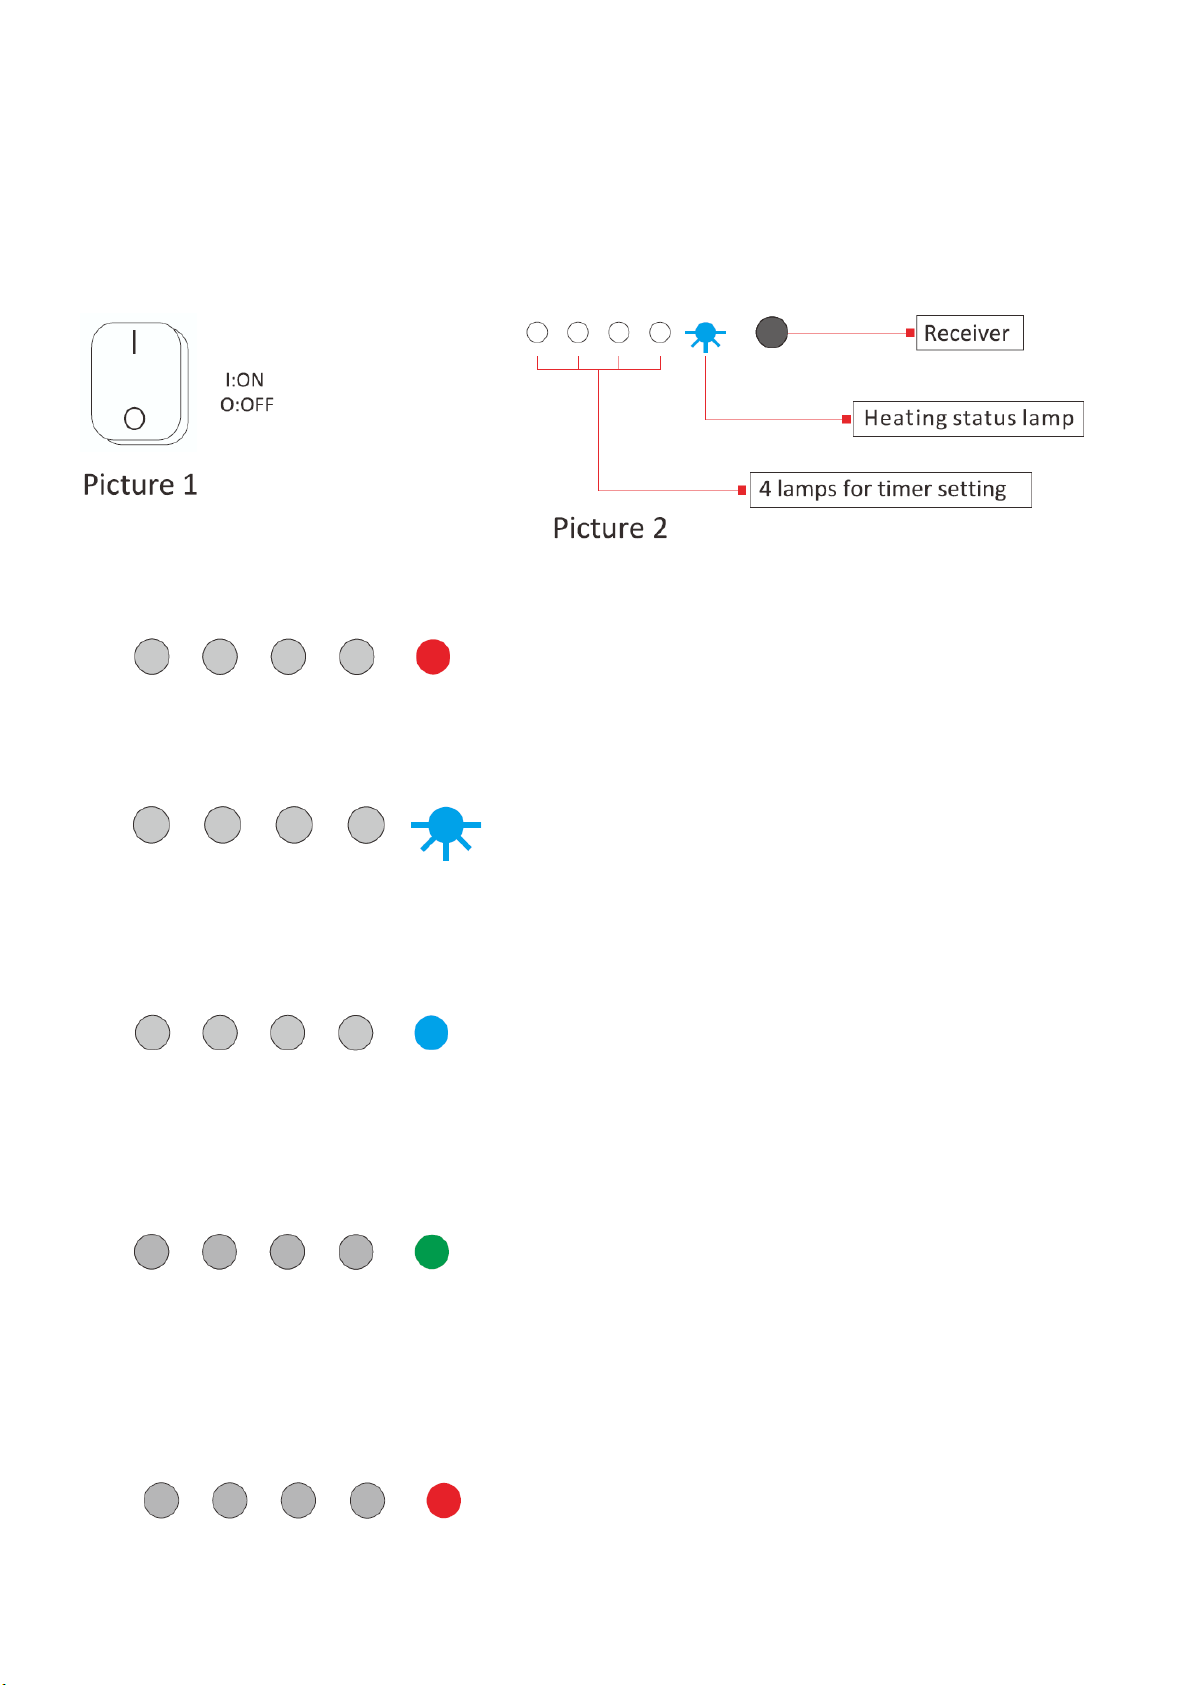
2. Plug the power cord of the appliance into the socket and press the Main power switch in position I (figure 1), the
appliance emits an acoustic signal, the heating status light turns blue and flashes, the appliance is switched on in
standby mode, but does not heat up yet (figure 2).
3. Point the remote control directly at the receiver, press the "ON" button, the device will beep 1 time. The device starts
to heat up in high power mode(100% of rated power), the heating status check bulbs will turn red (figure 3).
Press the "standby" button, the unit will emit 1 beep and return to Standby mode, with the blue lamp flashing (figure
4).
4. When the appliance is in heating or standby mode, point the remote control directly at the receiver and press the
"low" button, the appliance will beep and start heating in lower power mode (33% of rated power). The heating status
light will turn BLUE (figure 5).
5. When the appliance is in heating or stand-by mode, point the remote control directly at the receiver and press the
"Med" button, the appliance will emit 1 beep, and start operating in medium power mode (66% of total rated power).
The heating mode light will turn green (figure 6).
6. When the appliance is in heating or standby mode, point the remote control directly at the receiver and press the
"High" button, the appliance will emit 1 beep and start operating in high power mode (100% of the total rated power).
The heating mode indicator light will turn red (figure 7).
Picture 4
Picture 5
Picture 6
Figure 7
Picture 3

Timer:
Press the time zone buttons on the remote control (figure 8) to activate the delay switch-off timer.
For example, point the remote control directly at the receiver and press the "1" button, the first bulb on the right will turn
white (figure 9), the unit will automatically turn off after 1 hour and return to standby mode. (figure 4).
Press the "2 hr" button to activate the 2 hour timer and press the "4 hr" button to set the 4 hour timer and press the "6 hr"
button to set the 6 hour timer (figure 10).
Please refer to the figure below to illustrate the set timer.
First press the "1h" button and then the "2h" button to activate the 3-hour timer (figure 11).
Press the 1h, 2h, 4h and 6h button in order to activate a timer of maximum 13 hours (figure 12).
INSTALLATION
Please read the manual carefully before installation.
The heater must be installed according to the manufacturer's installation instructions
This heater is supplied with a pair of stainless steel adjustable angle mounting brackets. The adjustable angle allows the heater
to be installed on vertical, horizontal and inclined surfaces.
The ideal mounting position is directly above the area to be heated with longitudinal orientation and vertically facing
downwards. If this is not possible, the heater(s) can be mounted on a wall and angled downwards.
Figure 8 Picture 9:1 hour timer
Figure 10
Picture 11
Picture 12

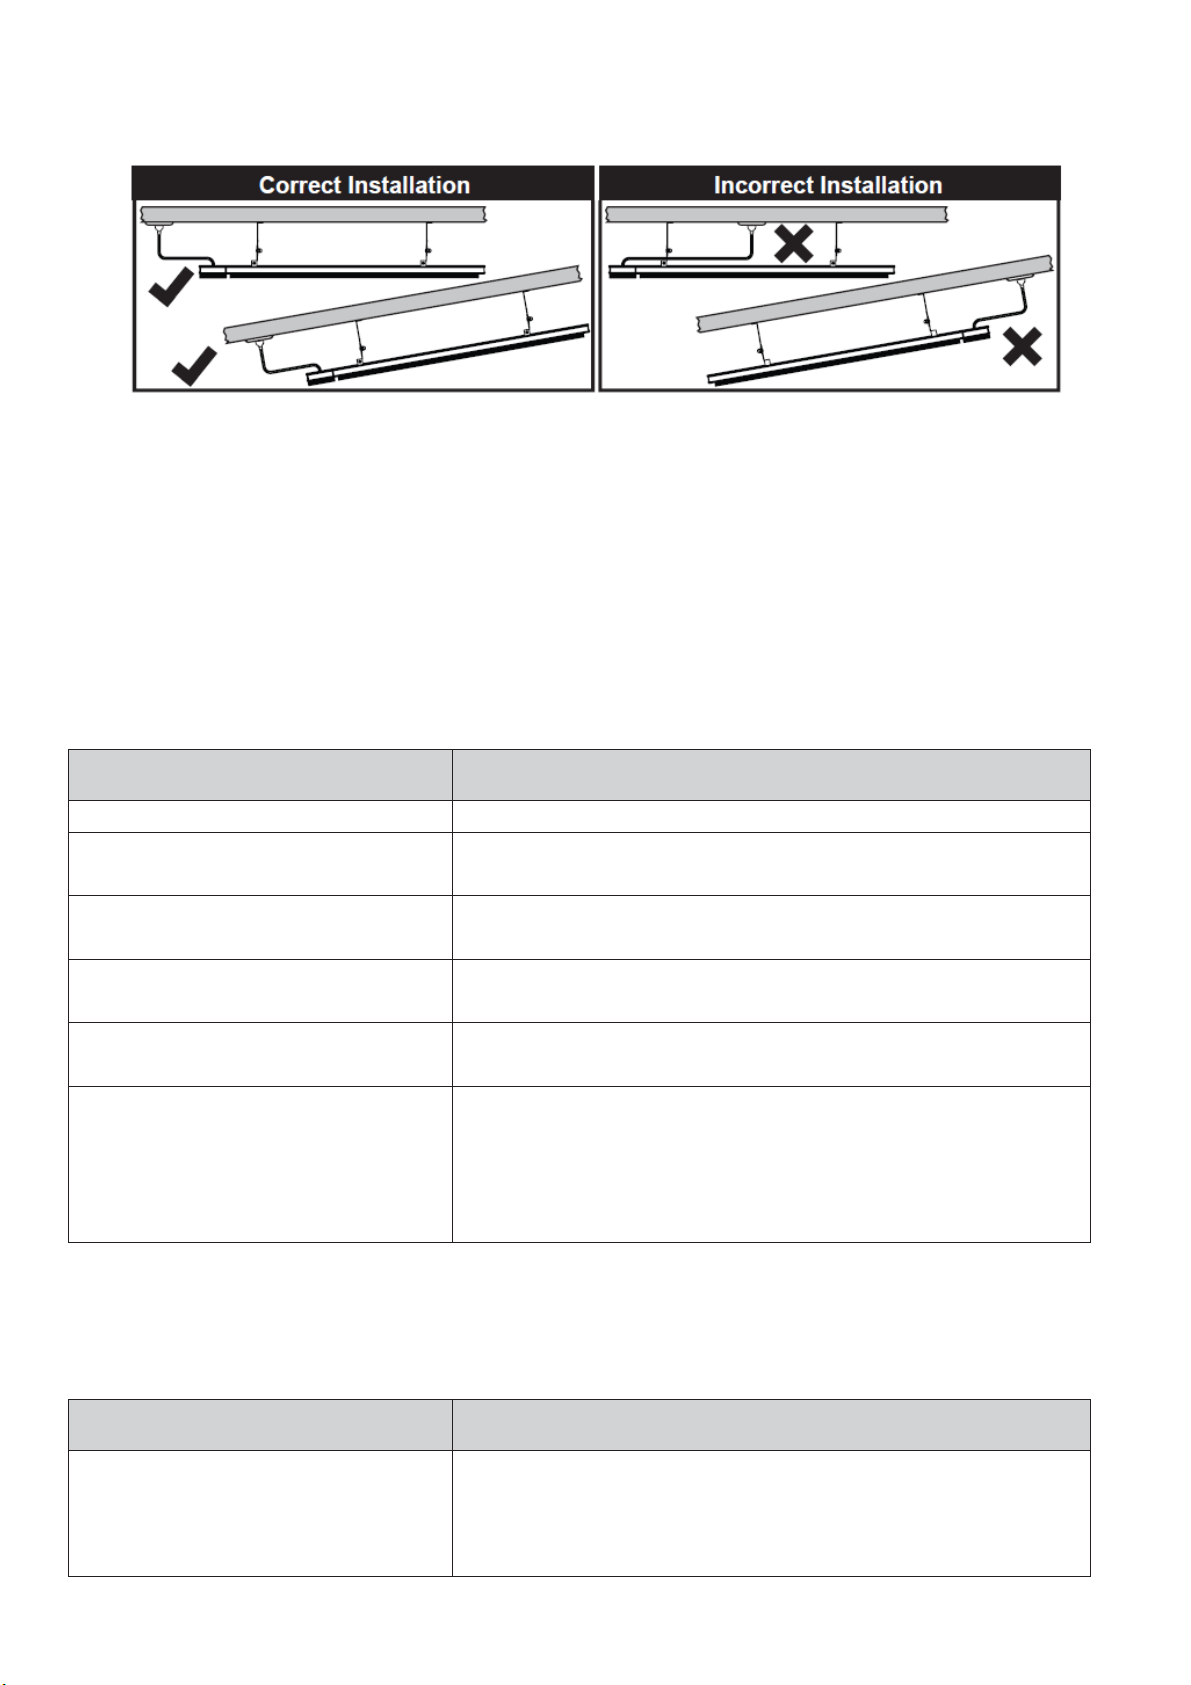
Warning: The heater must never be installed in an upward or inward facing position, the heating surface must always be
positioned so that the heat is directed downwards or outwards.
Authorizations
Minimum distances when mounting the heater on VERTIC L W LL.
Minimum distances for mounting the heater parallel to the ceiling.
Minimum distances when mounting the heater at an angle to the ceiling.
Installation process
ARNING! The installation of the infrared heater and its connection to the power supply must only be carried out by
qualified specialists in accordance with the electrical installation regulations and the safety regulations of the power supply
system.
1. Open the factory package and carefully remove the heater.
2. Remove the wrapping paper from the end of the heater.
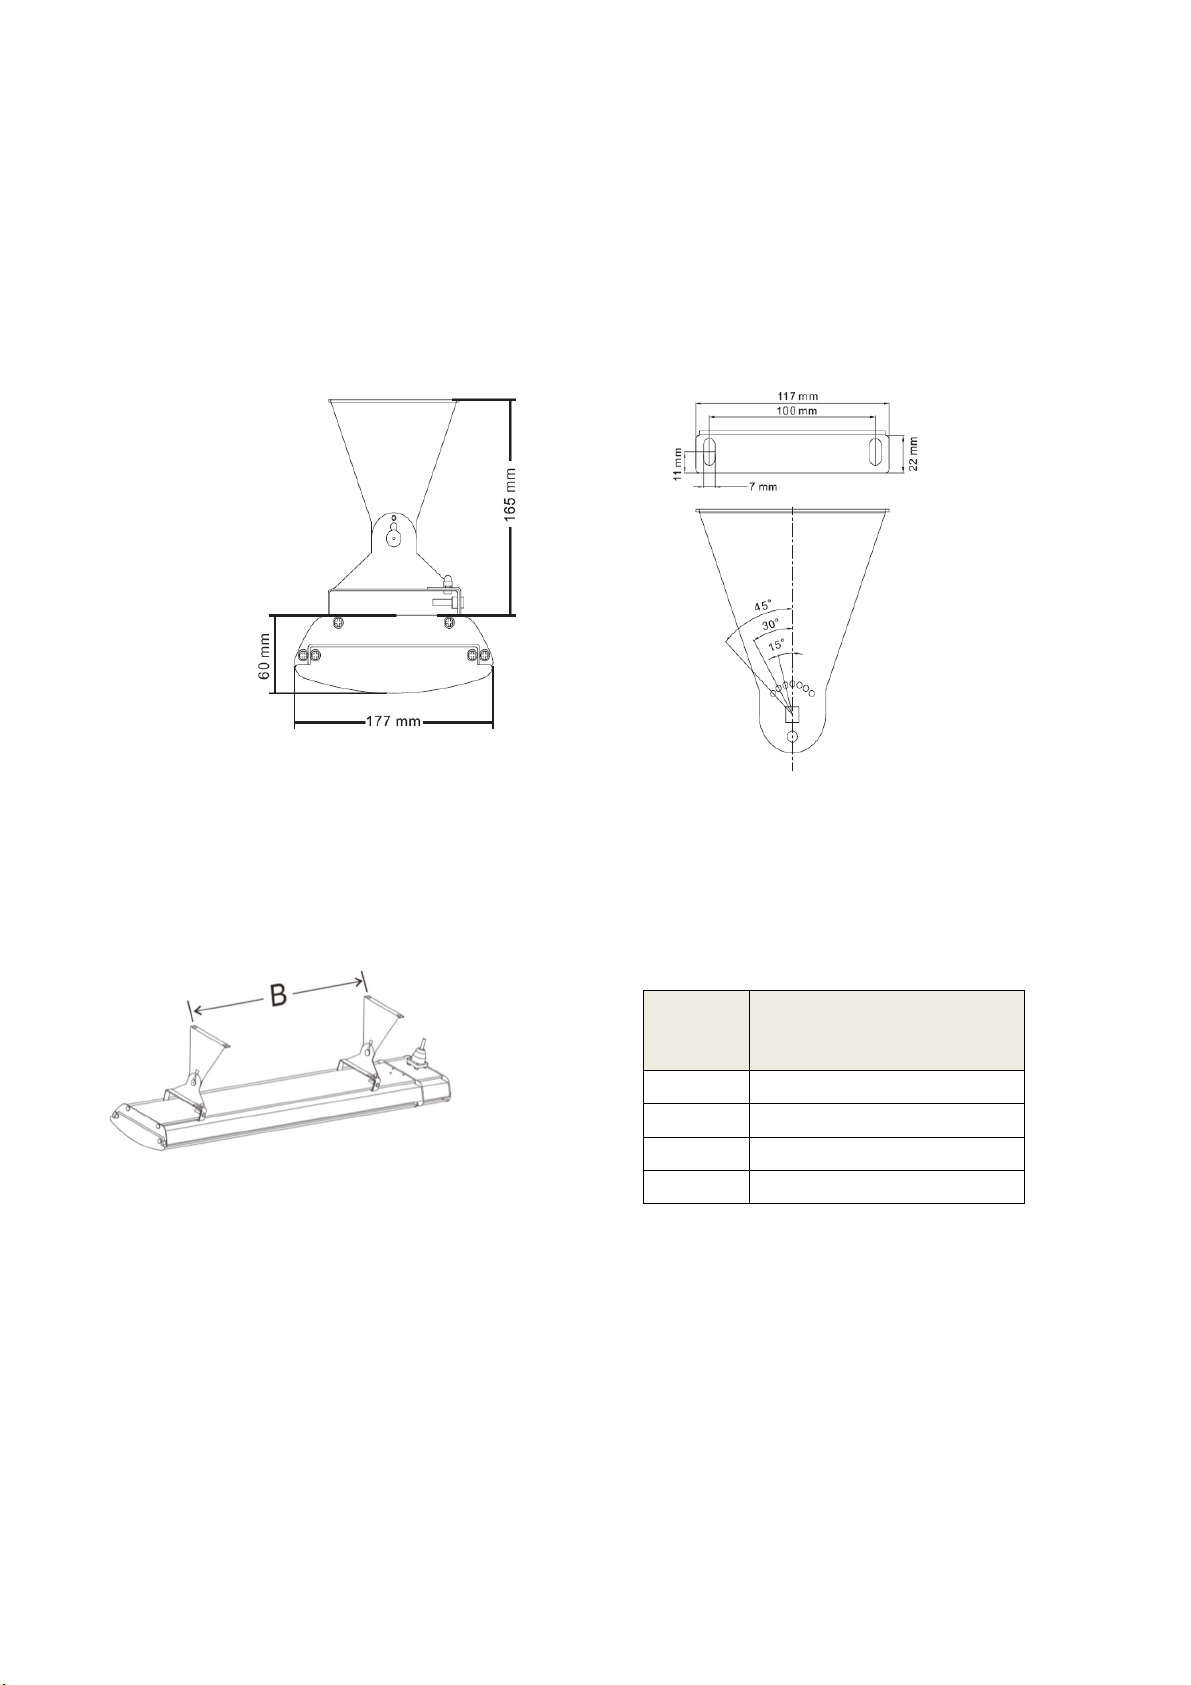
3. Pull out a pair of mounting brackets. These adjustable brackets allow direct ceiling or wall mounting, and are equipped
with preset parallel, 15°, 30°, 45° and 165mm height angle options.
4. The correct installation process, as shown in the diagram above, selects the position of the heater on the ceiling by
positioning the structural pivot or beams to ensure a safe fixing of the heater, respecting the minimum distances from the
floor and other objections.
5. Install two ceiling or wall brackets with the following minimum recommended bracket distance "B".
6. Set the adjustable angle mounting brackets to the desired angle and secure the brackets with a spanner.
For ceiling installation, the available mounting angles are limited to 0°, 15° and 30° only.
For wall installation, the available mounting angles are limited to 15°, 30° and 45° only.
Model
no.
"“B”
MINIMUM DIST NCE (mm)
1500W 530 ±50
1800W 710 ±50
2400W 990 ±50
3200W 1400 ±50

7. Hang the heater from the brackets and secure it firmly in place with the mounting bracket locking plates by tightening the
bolts.
NOTE:
Depending on the material and design of the structural elements of the ceiling or wall, the heater must be fixed with the
correct fasteners. The weight of the heater is up to 9.5 kg, the installation site must be able to support 5 times the weight
of the heater.
It is the installer's responsibility to choose the correct wall or ceiling fixing.
Mains connection
• The heater is designed for connection to the 230-240V~ 50Hz single-phase mains power supply with grounding
• Before connection, make sure that the specifications of the power grid at the connection point meet the single-phase 230-
240V~ 50Hz voltage.
• The mains power supply must be equipped with an automatic circuit breaker with a nominal current of not less than 16 .
• It is strongly recommended to use a switch with an earth circuit.
• The heater must not be placed immediately below the socket. The socket must not be positioned behind the heater. The
power outlet must be outside the physical footprint of the heater to minimize heat build-up behind the heater.
• If the heater is to be mounted on a slope (e.g. vaulted ceiling), make sure that the supply point is at the lowest point of the
heater.
MAINTENANCE
• Maintenance should only be carried out by a qualified electrician.
• During operation it is necessary to periodically (once a year) check the electrical cable contacts and terminal connectors for
proper tightening.
• If the heater gets dirty, wipe off the dust with a damp cloth, the parts radiants must be cleaned cold with a soft damp cloth.
W RNING!
Never immerse the appliance in water! Danger of death!
TROUBLESHOOTING
The possible malfunctions are shown in the table below.
SYMPTOMS CAUSE
Does not heat up / No function indicators Check that the power supply is connected and switched on
The heater smells when it is used for the
first time.
This is caused by the oil or dust left over from the production process
and will stop after a short period of time.
Weak odour for short periods after the
heater is switched on
This is normal and should stop after a short time.
The heater stinks when turned on after
periods of inactivity
Formation of debris and dust on the heater, Turn off the heater and let
it cool and then clean it
Tinkle noises when the heater is on and
after being switched off
These are noises of expansion and contraction of the metal components
of the heaters and is normal
Poor heating performance Exposure to extreme environmental conditions such as strong winds /
excessively cold temperatures can lower the heating performance of an
outdoor installation.
The unit is not installed in the correct position, perhaps too high or the
heater is too small for the recommended area.
hen to contact the service department or authorized seller
There are no user-serviceable parts in this unit, but only an authorized person can service or maintain this unit by a qualified
electrician.
SYMPTOMS CAUSE
There is a burning smell and strange
sounds (different from normal expansion
and contraction noises) coming from the
unit.
Turn off the heater and contact the seller.

When the circuit breaker trips (safety,
grounding) or the fuses blow.
Turn off the heater and contact the authorized electrical installer.
Poor heating performance Installation not correctly dimensioned, contact your authorized
electrical installer
Faulty heating element, switch off the heater and contact the seller
Does not heat up / No function indicators Check that the power supply is connected and switched on, if still
defective, switch off the heater and contact the seller or electrician
installer.
IRING DIAGRAM
Proper disposal of this product
This mark indicates that this product should not be disposed of with other household waste
throughout the EU. To avoid possible damage to the environment or human health from uncontrolled
waste disposal, recycle it responsibly to promote the sustainable reuse of material resources. To return
your used device, please use the return and collection systems or contact the dealer where you
purchased the product. They may take this product for environmentally safe recycling.
Batteries must be disposed of in accordance with current regulations.
Production: FOSH N CITY SHUNDE DISTRICT W RMTEK ELECTRIC L CO., LTD.
ddress: N. 302 NINETEEN BUILDING, PH SE 3, RONGLI TI NFUL I INDUSTRI L P RK,
RONGGUI, SHUNDE, FOSH N, GU NGDONG, CHIN
Made in China Imported in Italy by M.P.C. srl Via Pulci 15 20126 Milan Italy
Tel +39 02 47758004 e-mail inf[email protected] website www.sinedtechnology.co m
SINED trademark and SINED logo are registered by
SINED VENT S ONLINE S.L.U.
EUTM 018196373
230
-
240VAC
50Hz
This manual suits for next models
19
Table of contents
Other SINED Heater manuals


Popular Heater manuals by other brands


Arrow
Arrow DVi25S owner's manual

TERMA
TERMA MEG user manual

Klarstein
Klarstein WONDERWALL AIR 72 manual

Aspira
Aspira ASPIRCOMFORT CLASS 620H Installation, use and maintenance manual

Vortice
Vortice THERMOLOGIKA SOLEIL PLUS Instruction booklet

Space-Ray
Space-Ray CB40-N7 Installation and operation instructions

EAS Electric
EAS Electric EHC2200 instruction manual

Marley
Marley 2500 & C2500 Series Installation, operation & maintenance manual

Saunum
Saunum Spa Session Instructions for use and installation

Far Group
Far Group Farelek YQ-12 manual

Rointe
Rointe Kyros Instruction manuals

Clarke
Clarke XR60DV Operation & maintenance instructions