SINED CALDO-VETRO-NERO-2000 User manual

Version: 2021-09-13
Infrared heater
CALDO-VETRO-NERO-2000 W20A12GR-LG
CALDO-IRA-INOX-2000 W20A12MR-LG
User Manual
CALDO-VETRO-NERO-2000 W20A12GR-LG
The pho o is only indica ive, he real device may appear sligh ly differen in color.
CALDO-IRA-INOX-2000 W20A12MR-LG

IMPORTANT INFORMATION
Please read the operating instructions carefully before installing and using the infrared heater.
This user anual contains i portant infor ation about your safety, as well as reco endations for proper
use and aintenance.
Keep the operating anual together with the warranty certificate, the sales receipt and, if possible, the
cardboard packaging and packing aterial.
The infrared la p you have purchased ay be so ehow different fro the one described in the anual, but
this does not affect how it is used and how it works.
I portant precautions and instructions provided in this owner's guide do not include all possible ways and
situations you ay encounter. You ust understand that co on sense, prudence and care are factors that
cannot be "built into" any product.
SAFETY INSTRUCTIONS
•
Read he ins ruc ions before ins alla ion and use. Certain precautions ust be observed when using the
infrared heater. I proper operation without observing the precautions ay cause da age to the health of
the user and other persons as well as da age to their property.
•
Installation and electrical connection ust be perfor ed by a qualified electrician.
•
Use only the voltage indicated on the heater na eplate.
•
Connect the unit only to a properly installed power outlet with ground contact.
•
The heater ust be connected to the power supply with a2-pole circuit breaker.
•
It is strongly reco ended to use a 30 A differential switch.
•
The unit ust be handled with care and avoid vibration or shock.
•
Do not use the device in areas where gasoline, paint, or other fla able liquids are used or stored.
•
Do not use the apparatus in areas where there is a particular risk of explosion.
•
Do not use the unit in a construction site, greenhouse, barn, or stable where there is fla able dust.
•
Do not use the unit as a sauna heater.
•
Do not use this unit where ani als reproduce or grow.
•
WARNING: To avoid burns, do not touch the surface of the unit with your hands or other body parts.
•
Do not place any clothing, towels or the like on top of the heater to dry. Risk of overheating and fire
•
Do not leave the heater unattended during use.
•
Do not use this heater on a wet surface, or where it ay fall or be pushed into water.
•
Do not touch a device that has fallen into water. Turn off the power and unplug i ediately.
•
If the power cord is da aged, it ust be replaced by the anufacturer, its service agent or si ilarly qualified
persons to avoid danger.
•
If the heater is defective, it ust be checked and repaired by the anufacturer, its service agent or si ilarly
qualified persons to avoid danger.
•
CAUTION: The heater ust not be used if the glass panels are da aged.
•
Do not use the device with wet hands.
•
Use this unit only as described in this anual. Any other use is not reco ended by the anufacturer and
ay cause fire, electric shock, or injury.
•
Do not use abrasive cleaning products on this device. Clean with a da p (not wet) cloth rinsed only with war
water and soap. Always re ove the power plug fro the ains before cleaning.
•
The heater ust be installed at least 2.2 above the floor when the heater is wall- ounted.
•
The heater ust not be i ediately under an electrical outlet. The power outlet ust not be located on the
back of the heater. They should be located outside the physical footprint of the units to ini ize heat buildup
behind the heater. The installation should have a disconnect echanis on all poles with a contact distance
of at least 3 . The all-pole disconnect echanis ust be installed less than 1.8 above the floor.
•
The heater ust be installed so that switches and other controls cannot be touched by a person in the
bathtub or shower.
•
Do not connect the unit to the power source until it has been installed in its final position and adjusted to the
position where it will be used.
•
Do not work with the cable wound in a spiral as this could cause heat build-up, which could be dangerous.
-We do not reco end the use of an extension cord with this device.
•
Do not allow the cable to co e into contact with heated surfaces during operation.
-Do not pass the feeding cord under carpets, rugs, runners, etc.. Place the cord away fro areas where it
ay trip.
•
Children under 3 years of age should be kept away, unless they are continuously supervised.
•
Children between the ages of 3 and 8 years old should turn the unit on and off only if it has been placed or
installed in the intended nor al operating position and has received supervision or instructions on how to
operate the unit safely and understand the hazards involved. Children 3 years and under ust not connect,
adjust and clean the appliance or perfor user aintenance.
•
This appliance ay be used by children 8 years of age and older and by persons with reduced physical, sensory
or ental capabilities or lack of experience and knowledge, if they have received supervision or instructions
on how to use the appliance safely and understand the dangers. Children should not play with the appliance.
Cleaning and aintenance of the appliance ust not be carried out by children without supervision.
•
The device is intended exclusively for the purpose described in the operating instructions.
•
Do not use the device or any part of it outside of its intended use to avoid risks.
•
The use of accessories not reco ended or not sold by the anufacturer of the equip ent ay cause a risk
of injury to persons.
•
CAUTION: So e parts of this product ay beco e very hot and cause burns. Special attention should be paid
to children and vulnerable people.
•
CAUTION: This heater is not equipped with a roo te perature control device. Do not use this heater in s all
roo s when occupied by people who are unable to leave the roo alone, unless constant supervision is
provided.
Specifica ion
2 Ins alla ion
These heaters are specifically designed for installation and use in outdoor environ ents such as verandas,
terraces, patios, backyards, porches, gazebos and outdoor areas.
2.1 Safe y dis ances required for wall moun ing
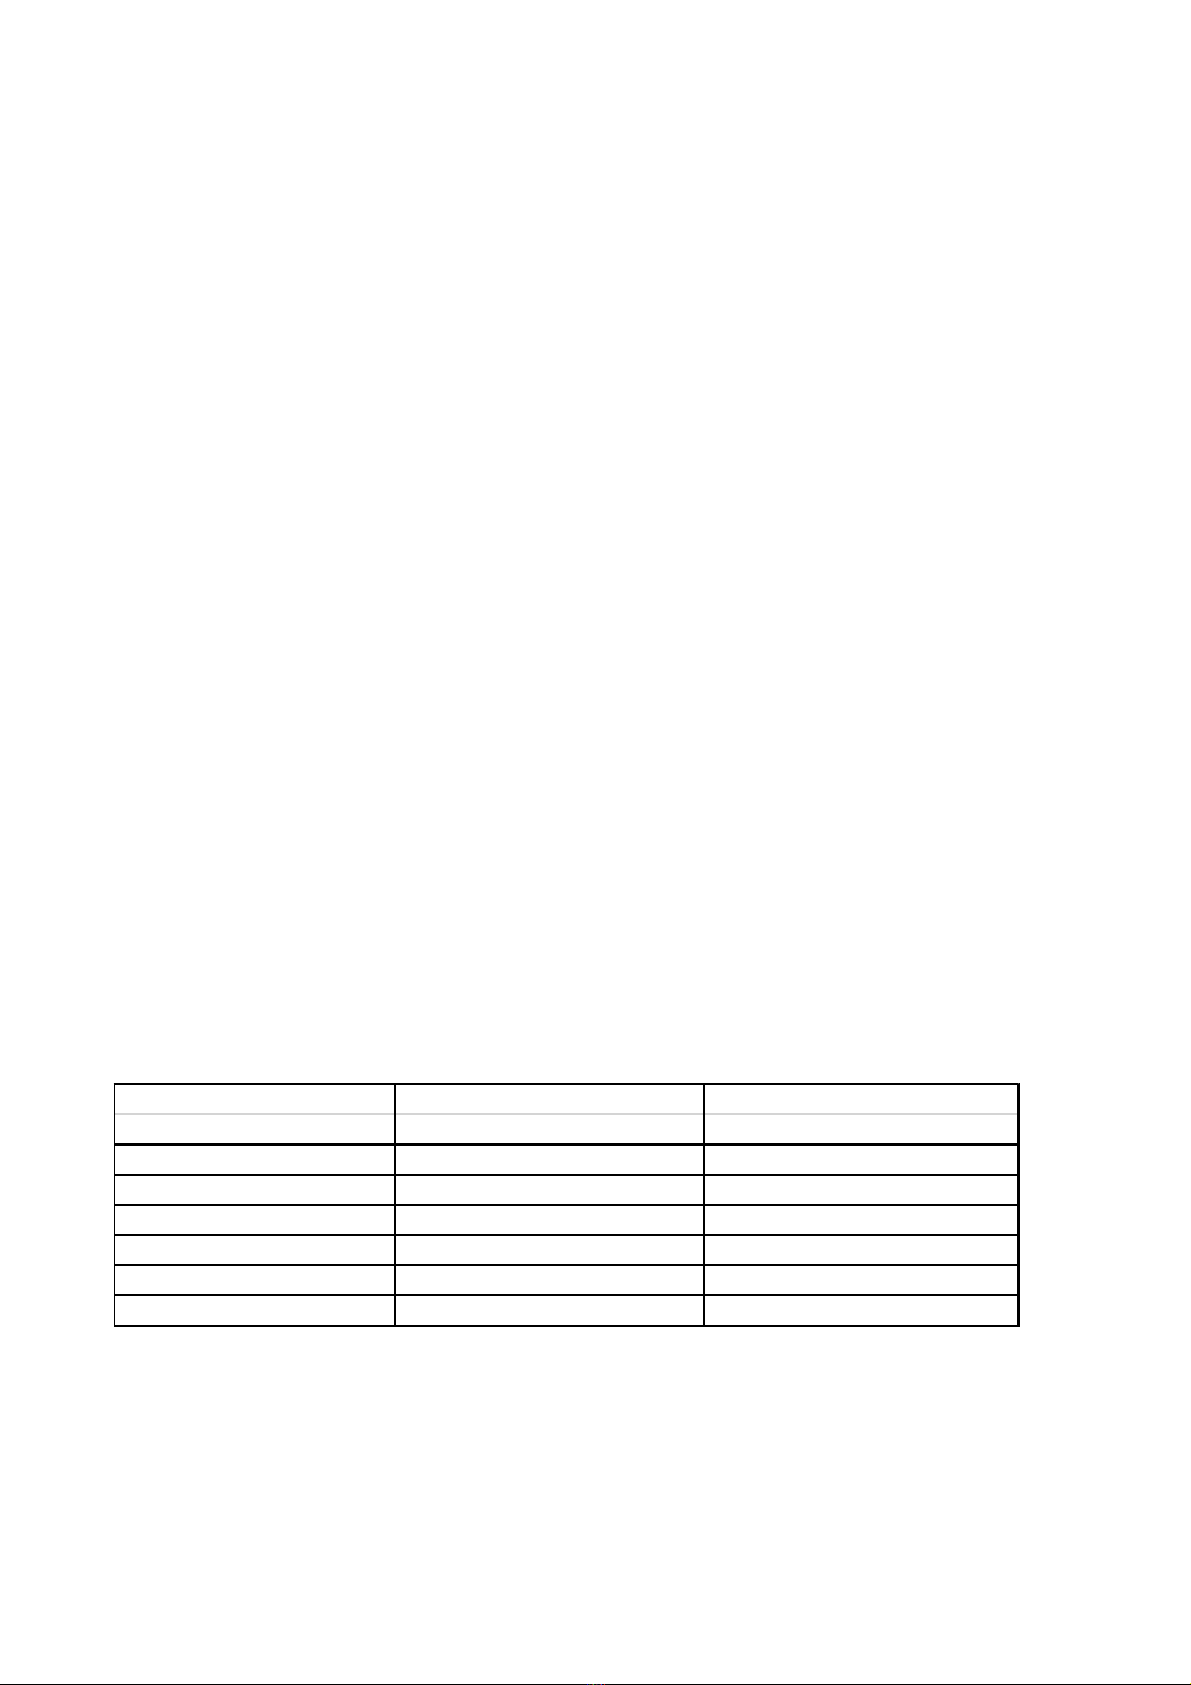
Caution: The unit should only be operated in a horizontal position with a axi u slope of ±5°.
Never install the unit on a fla able surface (plastic, nylon, cardboard, etc.).
Model CALDO-VETRO-NERO-2000 CALDO-IRA-INOX-2000
W20A12GR-LG W20A12MR-LG
Voltage 230-240V~, 50-60Hz 230-240V~, 50-60Hz
Power(W) 2000 2000
Installation wall or ceiling ounting wall or ceiling ounting
Product Size ( ) 742*110*139 742*110*139
Insulation Classe I Classe I
Water proof IP65 IP65

Install the device at a ini u distance of
•
2.2 m above ground
•
0.5 m from he walls
•
0.2 m from ceiling
•
1.5 fro fuels like tents
•
1 fro people or ani als
Unit: ( )
2.2 Safe y dis ances required for ceiling ins alla ion

2.3
Ins alla ion for wall and ceiling moun ing:
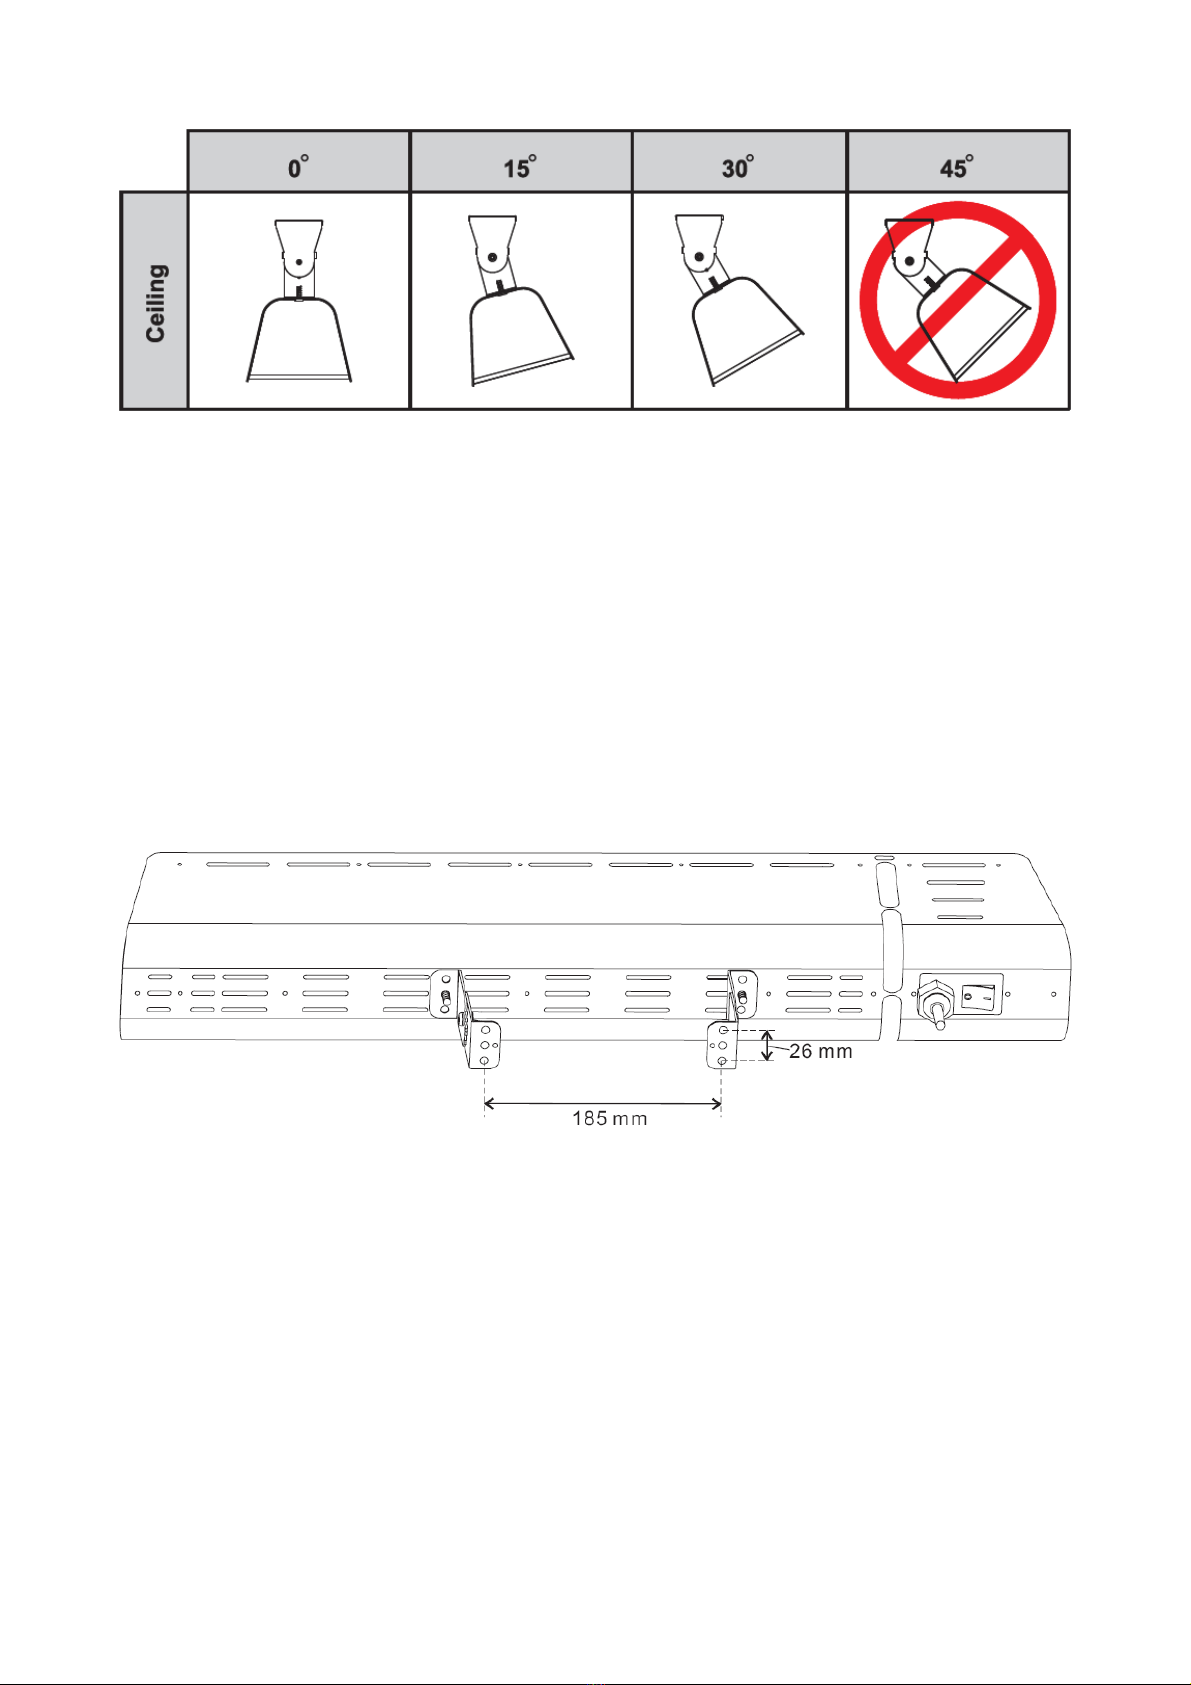
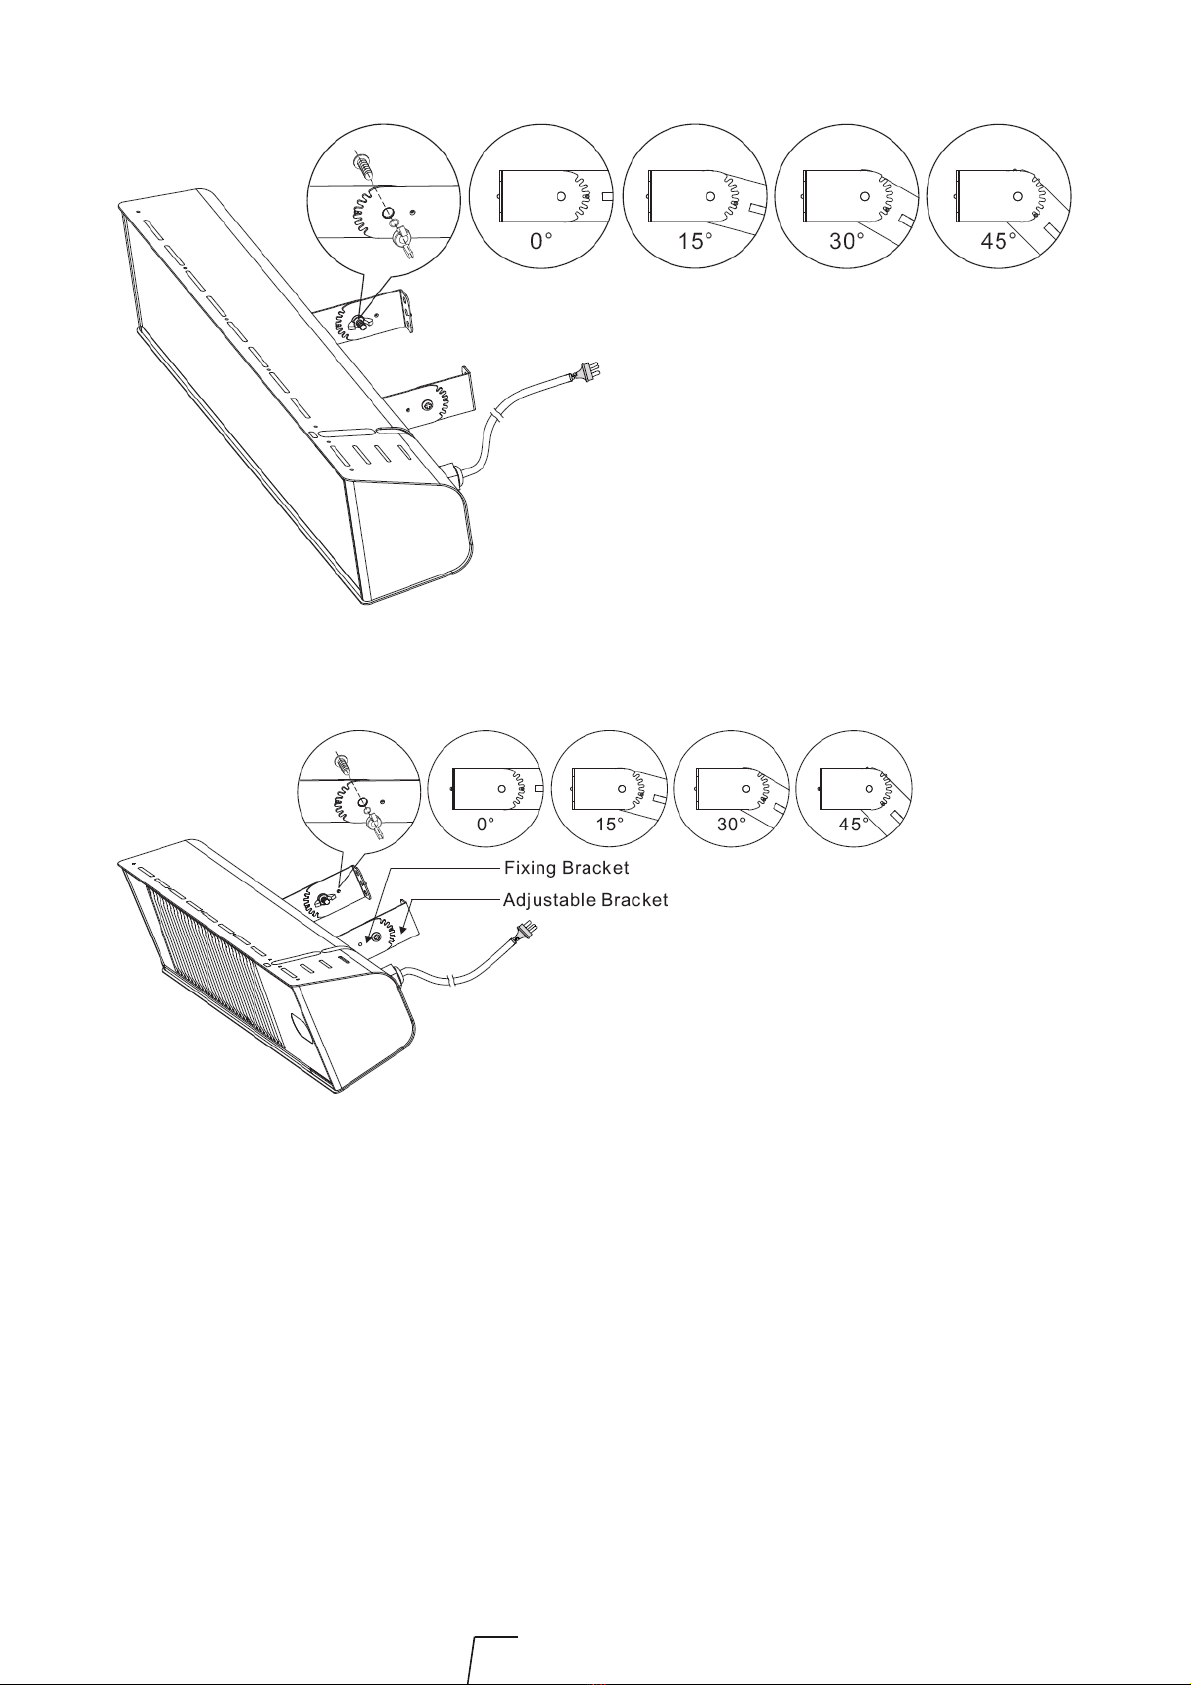
2.3.1
Install the wall or ceiling ounting bracket, with 4 screws ST5 x 35 (no supplied) and 4 plastic
plugs (no supplied);
2.3.2
Select the desired angle, insert the slot of the adjustable bracket, on the stop of the fixing bracket;
2.3.3
Secure the fixing bracket and the adjustable bracket with 2 Philips Bolt M6x16 screws and wing nut;
CALDO-VETRO-NERO-2000 W20A12GR-LG
CALDO-IRA-INOX-2000 W20A12MR-LG
NOTE:
Depending on the aterial and design of the structural ele ents of the ceiling or wall, the heater ust be
fixed with the correct fasteners. The heater can weigh up to 5.5 kg. Kg, the installation site ust be able
to support 5 ti es the weight of the heater.
It is the installer's responsibility to choose the correct wall or ceiling ounting.
3. 3. How o opera e
Ins ruc ions for opera ion:
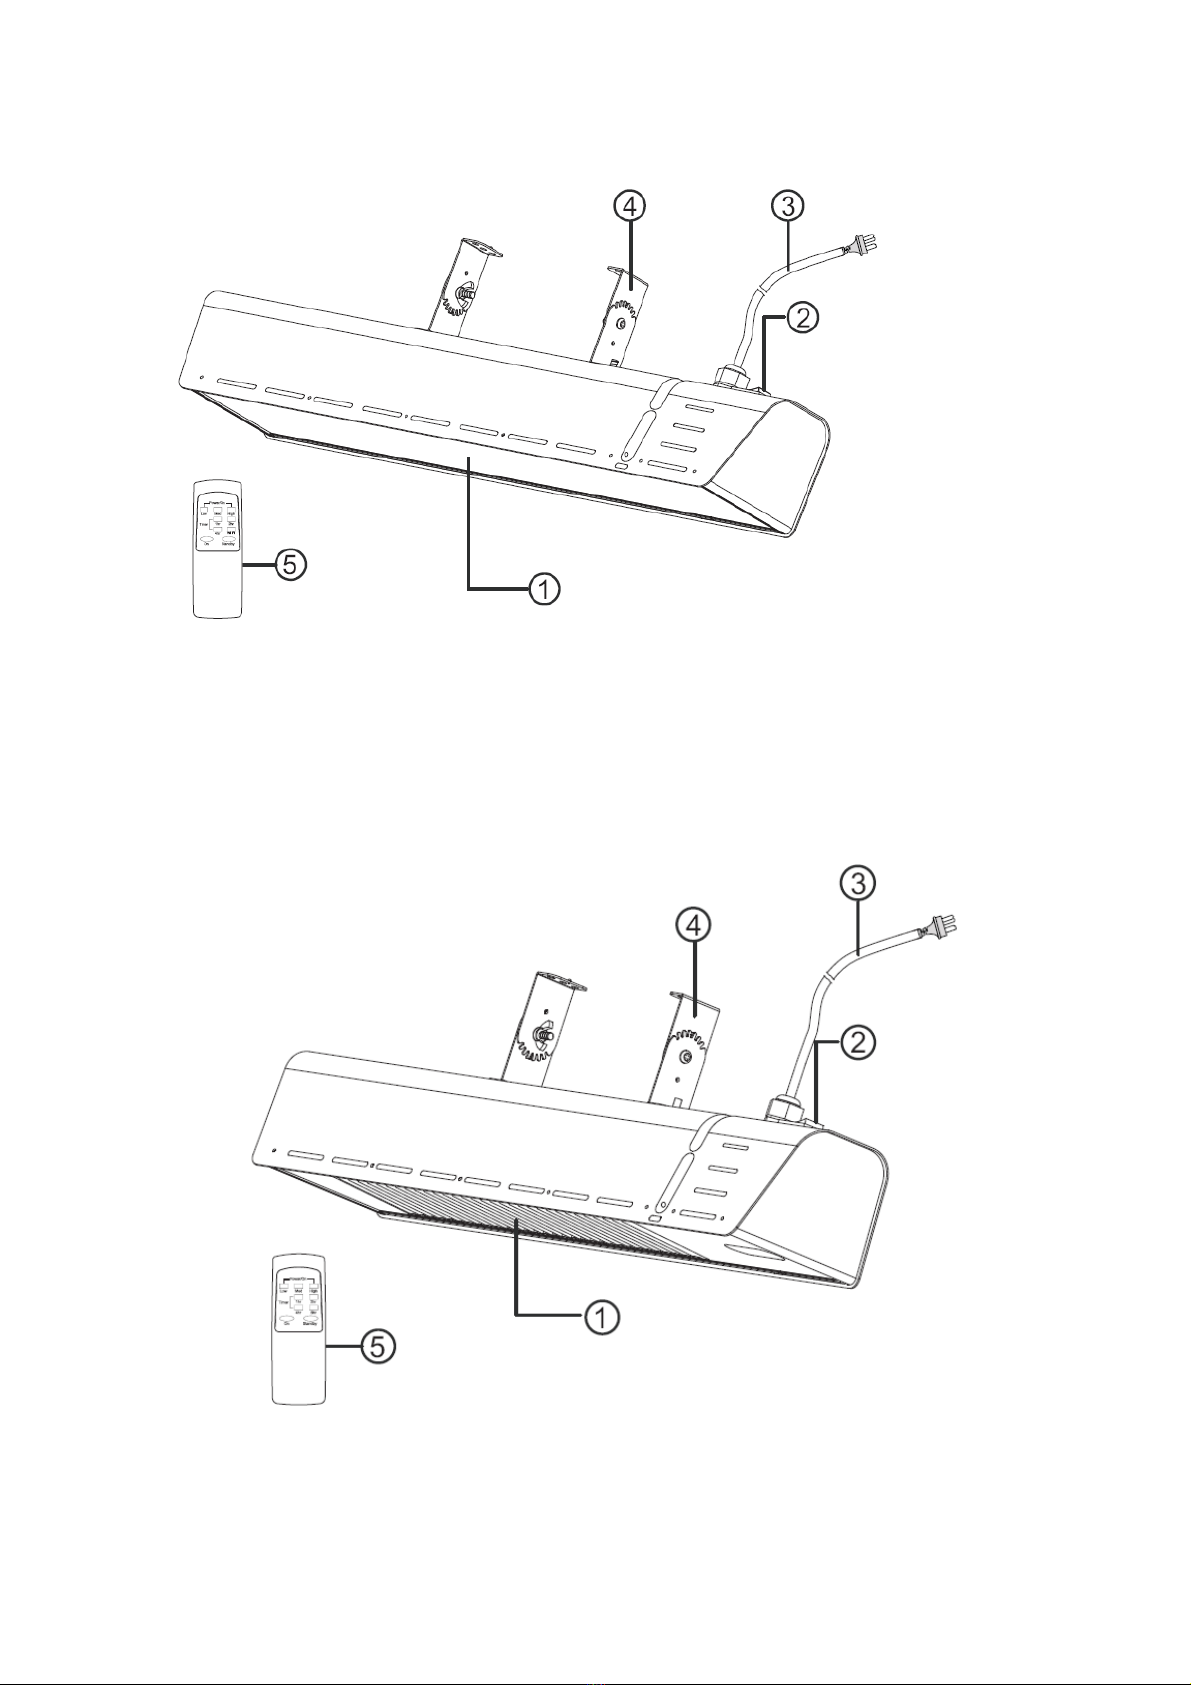
CALDO-VETRO-NERO-2000 W20A12GR-LG
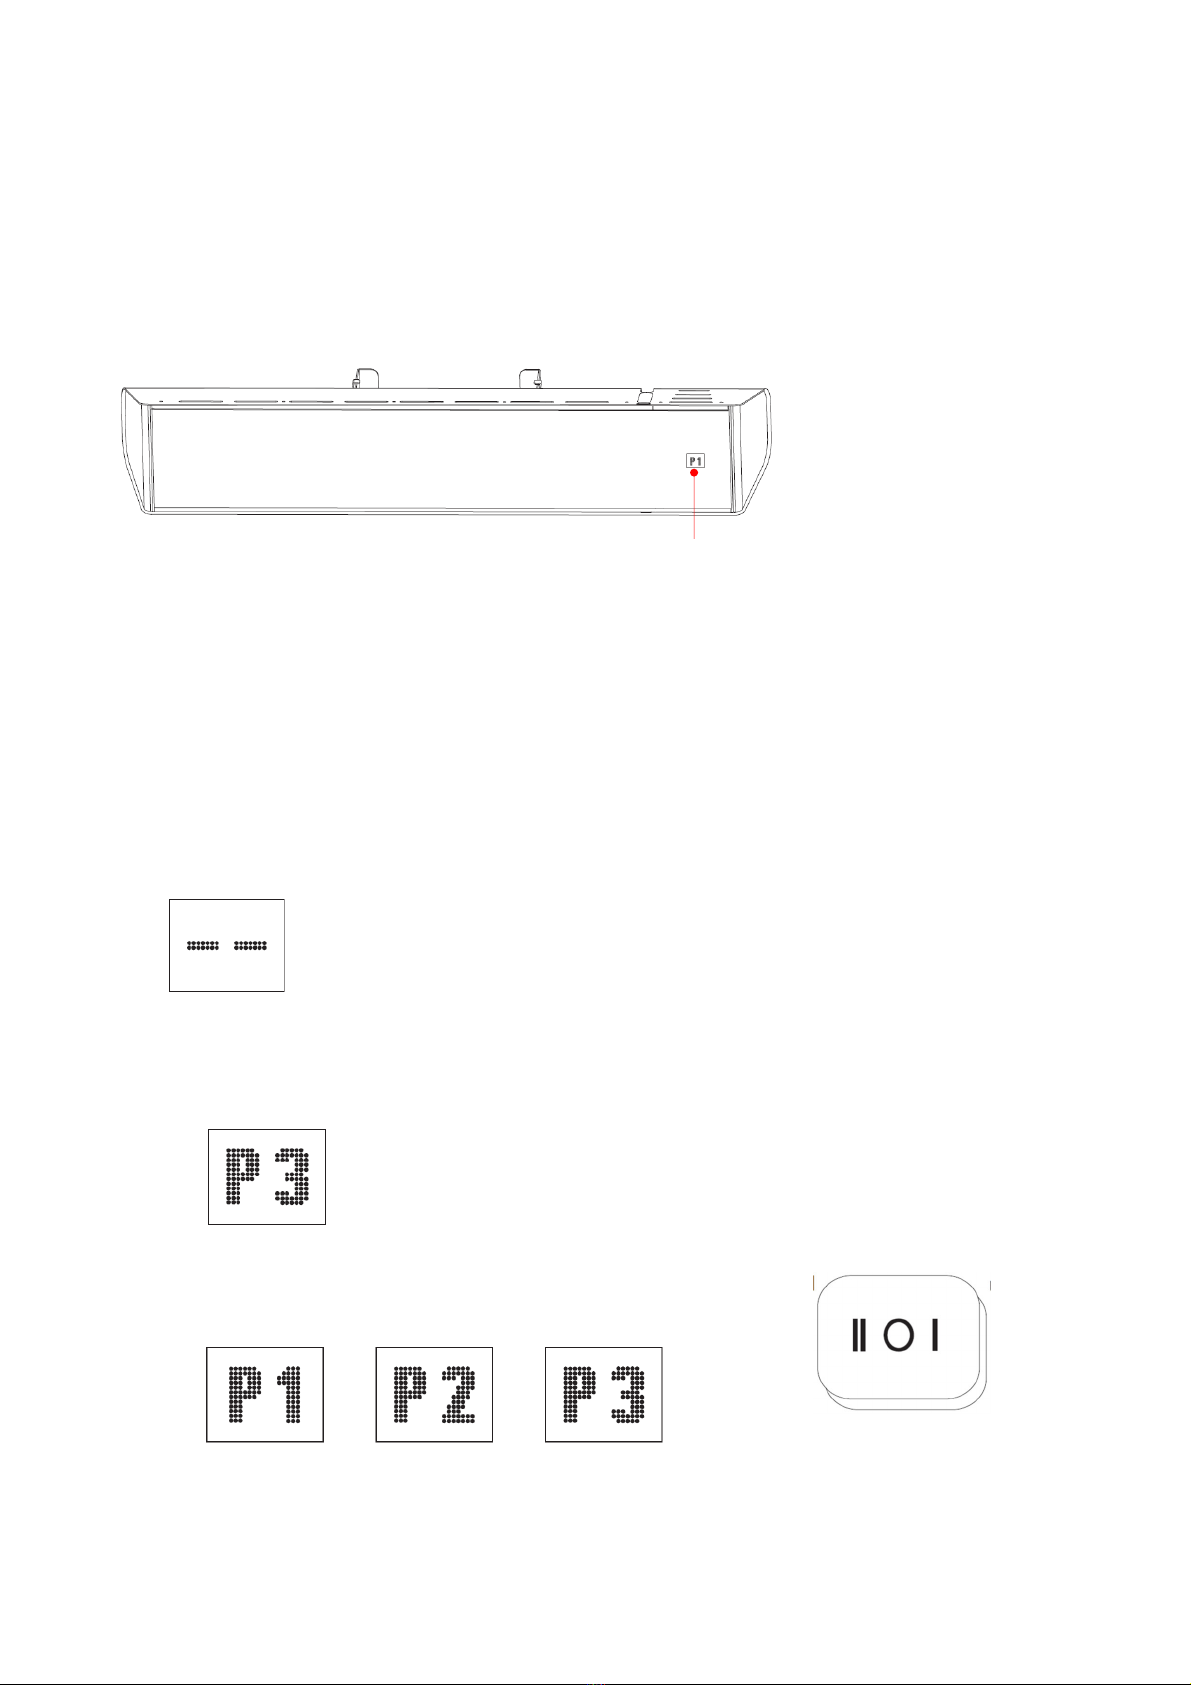
① Black cera ic glass panel
② ON/OFF ain power switch
③ Power cable
④ Brackets for wall or ceiling ounting
⑤ Infrared re ote control
CALDO-IRA-INOX-2000 W20A12MR-LG
① Alu inu grill
② ON/OFF ain power switch
③ Power cable
④ Brackets for wall or ceiling ounting
⑤ Infrared re ote control
The distance between the heater and the re ote control should be less than 3 me ers and the re ote
control should be pointed directly at the receiver.
ATTENTION! The receiver is located near the viewing area and cannot be seen with the naked eye.
Connect the heater to a 230-240V~ 50-60Hz power outlet. Set the rocker switch to position I: the heater
will start operating. Warning: The remo e con rol canno opera e he hea er a his s age.
Insert 2 AAA batteries not included in the infrared re ote control. Set the rocker switch to the O
position: the heater is off.
Connect the heater to a 230-240V~ 50-60Hz power outlet. Set the rocker switch to position II, the heater
will start in Standby ode, at this ti e the "- -" sy bol will flash to indicate that the unit is in Standby
ode.
Press the "ON" KEY on the re ote control, the heater starts operating at high power (P3);
Press the "LOW", "MED", and "HIGH" buttons on the re ote control, the heater will operate with the
LOW and MED, HIGH power settings, and the "P1" "P2" "P3" sy bol will be shown on the display area.
P1: 33% of rated power;
P2: 66% of rated power
DISPLAY
(below setting) (HIGH setting)
(MED setting)

P3: 100% of rated power
TIMER FUNCTION.
The heater is equipped with a progra able ti er that auto atically puts the heater into Standby
ode after 1, 2, 3, 4 ... ax. 13 hours of operation.
To activate the ti er, point the re ote control directly at the receiver and press the "1 hr" button. 01"
will be shown on the display area as shown below. this will cause the heater to auto atically go into
Standby ode after 1 hour of operation. Once in Standby ode, the "- -" sy bol will flash.
To set the 13-hour ti er, point the re ote directly at the receiver and then press 1 2 4 6 on the re ote,
"13" will be indicated on the display area. This will auto atically put the heater into Standby ode after
13 hours of operation. Once in Standby ode, the "- -" sy bol will flash.
ATTENTION:
1, During the running ti e of the ti er, the nu ber on the display shows the re aining ti e. Exa ple
Fox, the 13-hour ti er is activated, the display shows "11" after 2 hours of operation;
2, During the running ti e of the ti er, the display will show the working power and the re aining
ti er alternately;
Deactivate or reprogra the ti er.
If the ti er is activated, pressing the sa e key a second ti e will reprogra or disable the ti er.
Exa ple 1. After activating the 13-hour ti er by pressing pusher "1" "2" "4" "6", then pressing pusher
"1" the ti er will be reprogra ed to (13-1) = 12 hours, then pressing pusher "2" the ti er will be
reprogra ed to (13-2) = 11 hours. By pressing several other buttons in sequence, the ti er can be
reset to 0, the heater enters Standby ode and the "- -" sy bol flashes.
Exa ple 2, a 6-hour ti er is set by pressing key "2" "4". Press push-button "2", the ti er is set to 6-2 =
4 hours, press push-button "4" i ediately after, the ti er is set to 0, the heater goes into standby
ode and the sy bol "- -" flashes.

CAUTION: There is a built-in safety feature that will auto atically activate the heater to go into standby
ode after eight hours of continuous operation if the ti er is not activated.
At this point the "- -" sy bol will flash to indicate that the unit is in standby ode.
4. 4. Cleaning:
Disconnect the unit fro the power supply;
After the unit has cooled down, the case can be dried;
Do not touch the bulb ele ent with your fingers as this contact ay cause stains.
The reflector should be cleaned regularly by professionals.
Do not use abrasive or caustic cleaners!
Never i erse the device in water! Danger of death!
5. 5. Main enance
Any aintenance or repair, including replace ent of the bulb ele ent, should only be perfor ed by a
qualified electrician.
Wiring diagram
Proper disposal of his produc
This ark indicates that this product should not be disposed of with other household
waste throughout the EU. To avoid possible har to the environ ent or hu an health
fro uncontrolled waste disposal, recycle waste responsibly to pro ote the sustainable
reuse of aterial resources. To return your used device, use the return and collection
syste s or contact the dealer where you purchased the product. They ay take this
product for environ entally safe recycling.
Batteries ust be disposed of in accordance with current regulations.
Production: FOSHAN CITY SHUNDE DISTRICT WARMTEK ELECTRICAL CO., LTD.

Address: N. 302 NINETEEN BUILDING, PHASE 3, RONGLI TIANFULAI INDUSTRIAL PARK,
RONGGUI,SHUNDE,FOSHAN,GUANGDONG,CHINA
Made in China I ported in Italy by M.P.C. srl Via Pulci 15 20126 Milan Italy
Tel +39 02 47758004 e- ail info@ pcshop.it website www.sinedtechnology.co
SINED trade ark and SINED logo are registered by SINED VENTAS ONLINE S.L.U. EUTM 018196373
This manual suits for next models
3
Table of contents
Other SINED Heater manuals


