Singer C5600 User manual

INSTRUCTION MANUAL
C5600 / C5605 / C5630 / C5635

IMPORTANT SAFETY INSTRUCTIONS
Read all instructions before using this household sewing machine.
When using an electrical appliance, basic safety precautions should always be followed, including the
following:
Keep the instructions at a suitable place close to the machine. Make sure to hand them over if the machine is
given to a third party.
This appliance is intended for use by adults. The appliance can be used with adult supervision by (i) children
aged from 8 to 12 years and (ii) persons with reduced physical, sensory or mental capabilities or lack of
experience and knowledge if they have been given instruction concerning use of the appliance in a safe way
and understand the hazards involved. Cleaning and user maintenance shall not be made by children without
supervision. It is not allowed for anyone to play with the machine. Children up to 8 years are not allowed to use
the machine.
WARNING – TO REDUCE THE RISK OF BURNS, FIRE, ELECTRIC
SHOCK, OR INJURY TO PERSON:
• A sewing machine should never be left unattended when plugged in. The electrical socket, to which the
machine is plugged in should be easily accessible. Always unplug this sewing machine from the electric
outlet immediately after using and before cleaning, removing covers, lubricating or when making any other
user servicing adjustments mentioned in the instruction manual.
• Do not allow to be used as a toy. Close attention is necessary when this sewing machine is used by or near
children.
• Use this sewing machine only for its intended use as described in this manual. Use only attachments
recommended by the manufacturer as contained in this manual.
• Never operate this sewing machine if it has a damaged cord or plug, if it is not working properly, if it has
been dropped or damaged, or dropped into water. Return the sewing machine to the nearest authorized dealer
or service center for examination, repair, electrical or mechanical adjustment.
• Never operate the sewing machine with any air openings blocked. Keep ventilation openings of the sewing
machine and foot control free from the accumulation of lint, dust, and loose cloth.
• Keep ngers away from all moving parts. Special care is required around the sewing machine needle.
• Always use the proper needle plate. The wrong plate can cause the needle to break.
• Do not use bent needles.
• Do not pull or push fabric while stitching. It may deect the needle causing it to break.
• Wear safety glasses.
• Switch the sewing machine o (“0”) when making any adjustment in the needle area, such as threading
needle, changing needle, threading bobbin, or changing presser foot, etc.
• Never drop or insert any object into any opening.
• Do not use outdoors.
• Do not operate where aerosol (spray) products are being used or where oxygen is being administrated.
• To disconnect, turn all controls to the o (“0”) position, then remove plug from outlet.
• Do not unplug by pulling on cord. To unplug, grasp the plug, not the cord.
• The foot control is used to operate the machine. Never place other objects on the foot control.
• Do not use the machine if it is wet.
• If the LED lamp is damaged or broken, it must be replaced by the manufacturer or its service agent or a
similarly qualied person, in order to avoid a hazard.

• If the cord connected with the foot control is damaged, it must be replaced by the manufacturer or its service
agent or a similarly qualied person, in order to avoid a hazard.
• The machine must only be used with foot control of type JF-1000 manufactured by Jaguar International
Corporation or YC-485EC manufactured by Taiwan Yamamoto Electric Corp.
SAVE THESE INSTRUCTIONS
SERVICING OF DOUBLE INSULATED PRODUCTS
In a double-insulated product, two systems of insulation are provided instead of grounding. No ground means
is provided on a double-insulated product, nor should a means for grounding be added to the product. Servicing
of a double-insulated product requires extreme care and knowledge of the system and should be done only by
qualied service personnel. Replacement parts for a double-insulated product must be identical to those parts
in the product. A double-insulated product is marked with the words ‘DOUBLE INSULATION’ or ‘DOUBLE
INSULATED’.

TABLE OF CONTENTS
INTRODUCTION............................................. 1
Intended Use .................................................................. 1
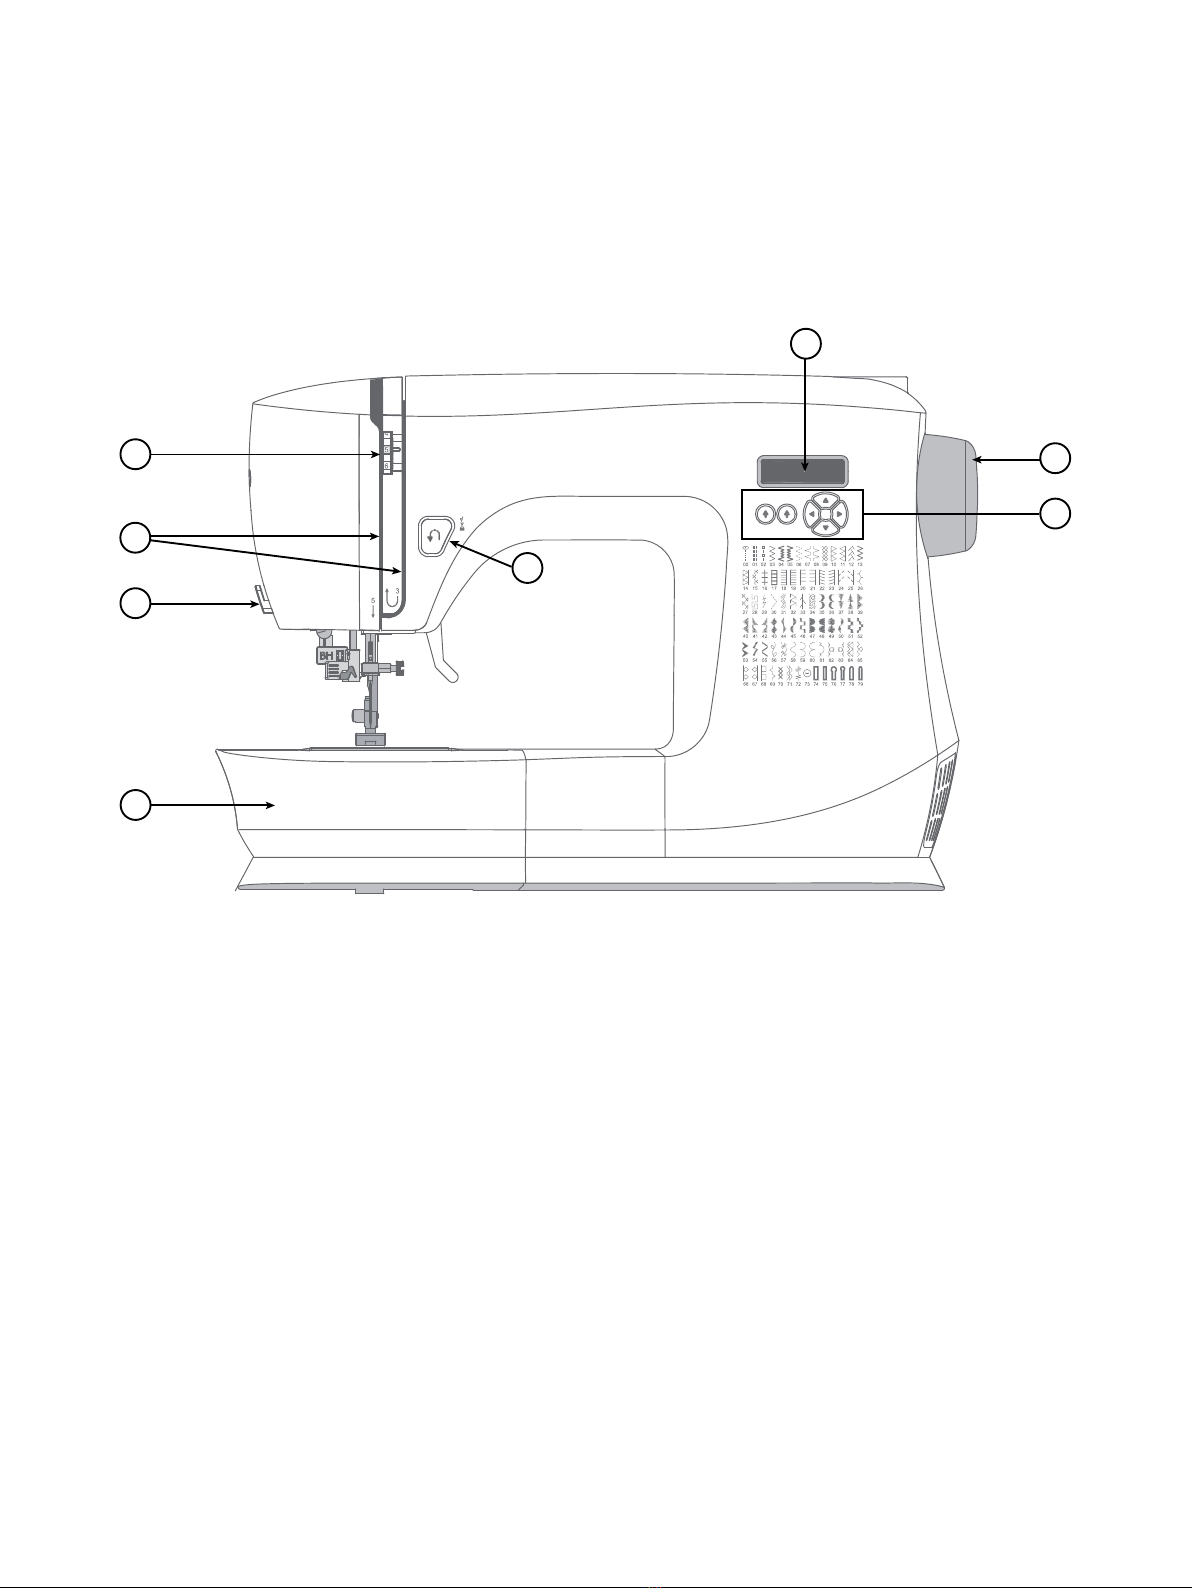
Machine Overview.......................................................... 1
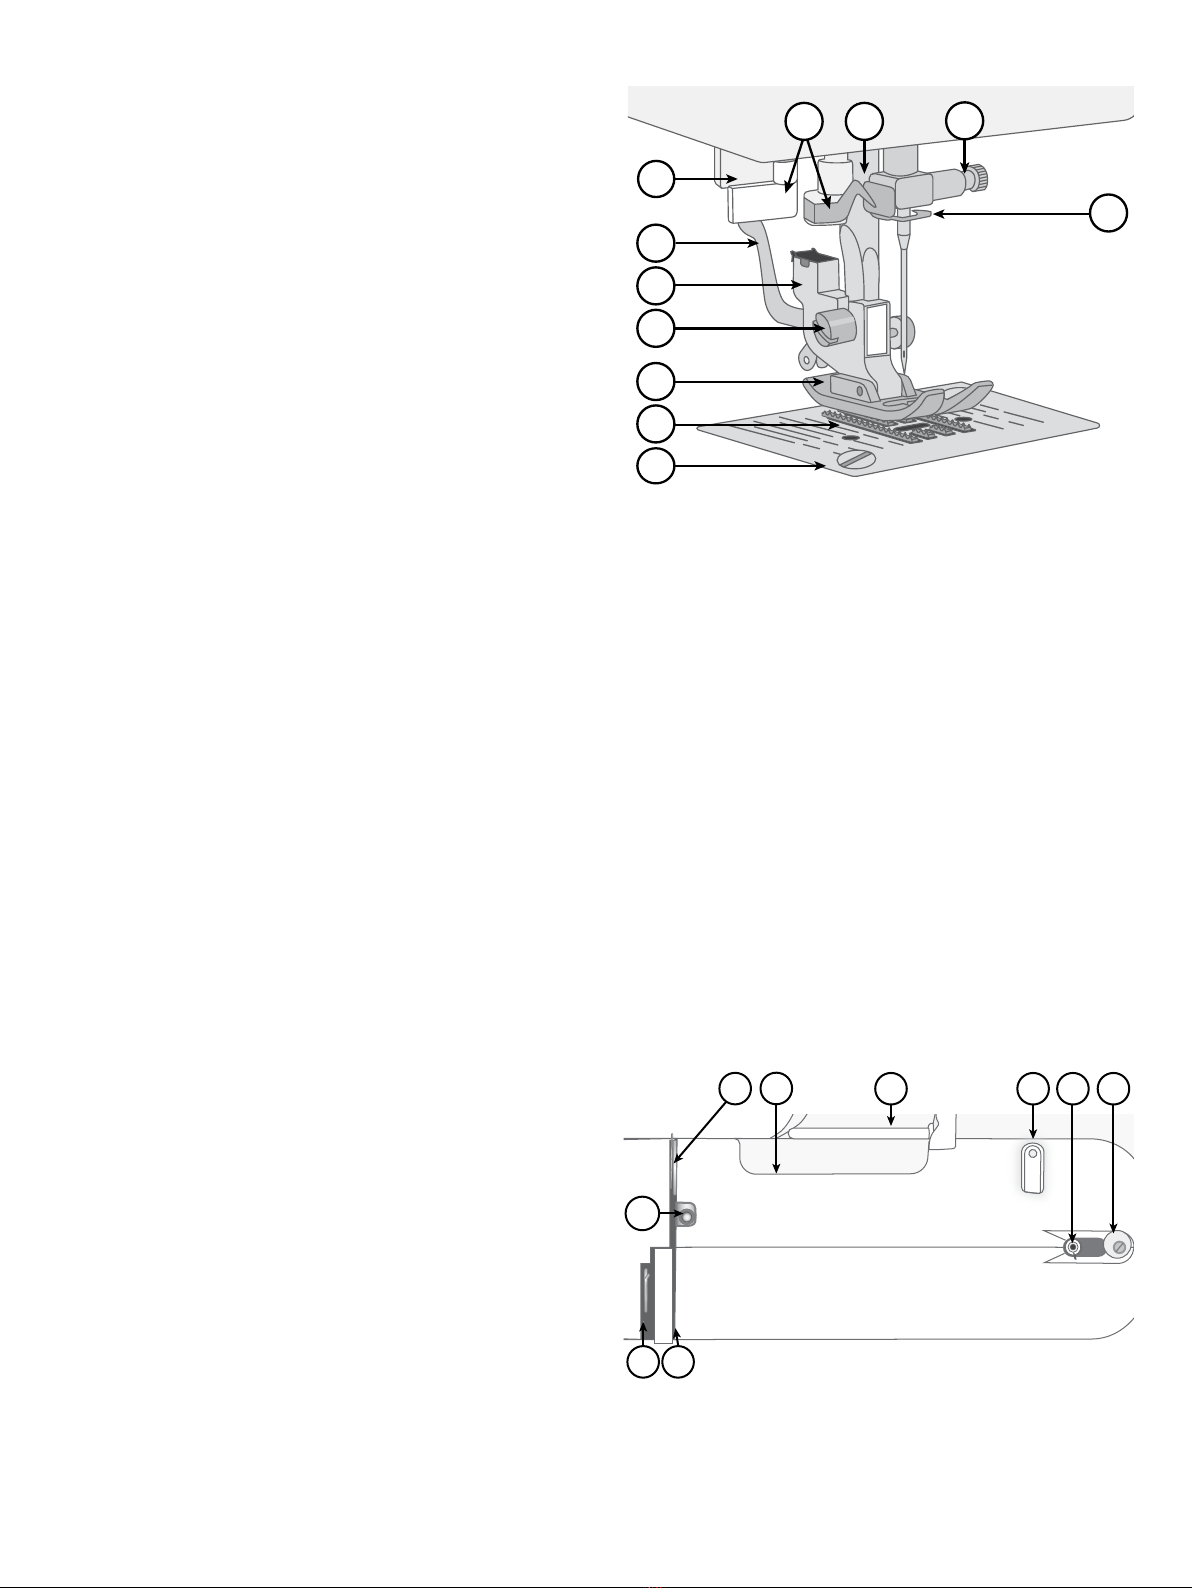
Needle Area Overview.................................................... 2
Top of Machine ............................................................... 2
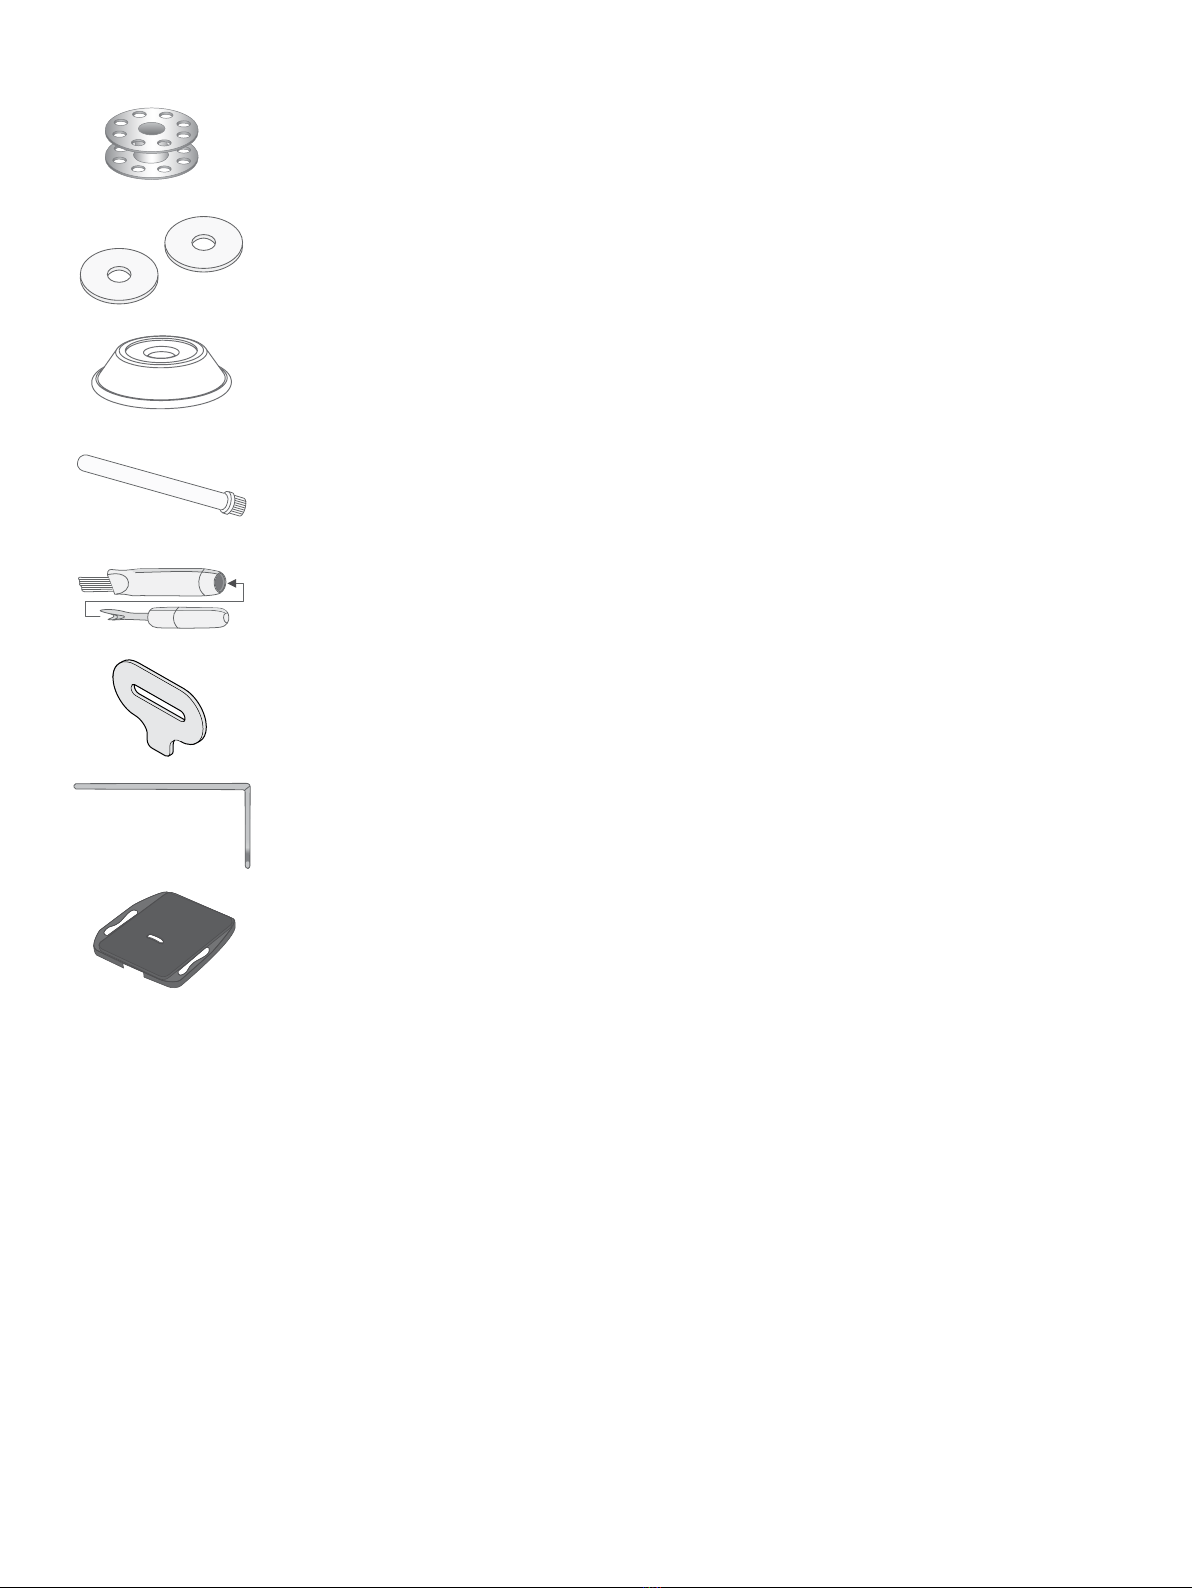
Overview Accessories .................................................... 3
Included Accessories ................................................. 3
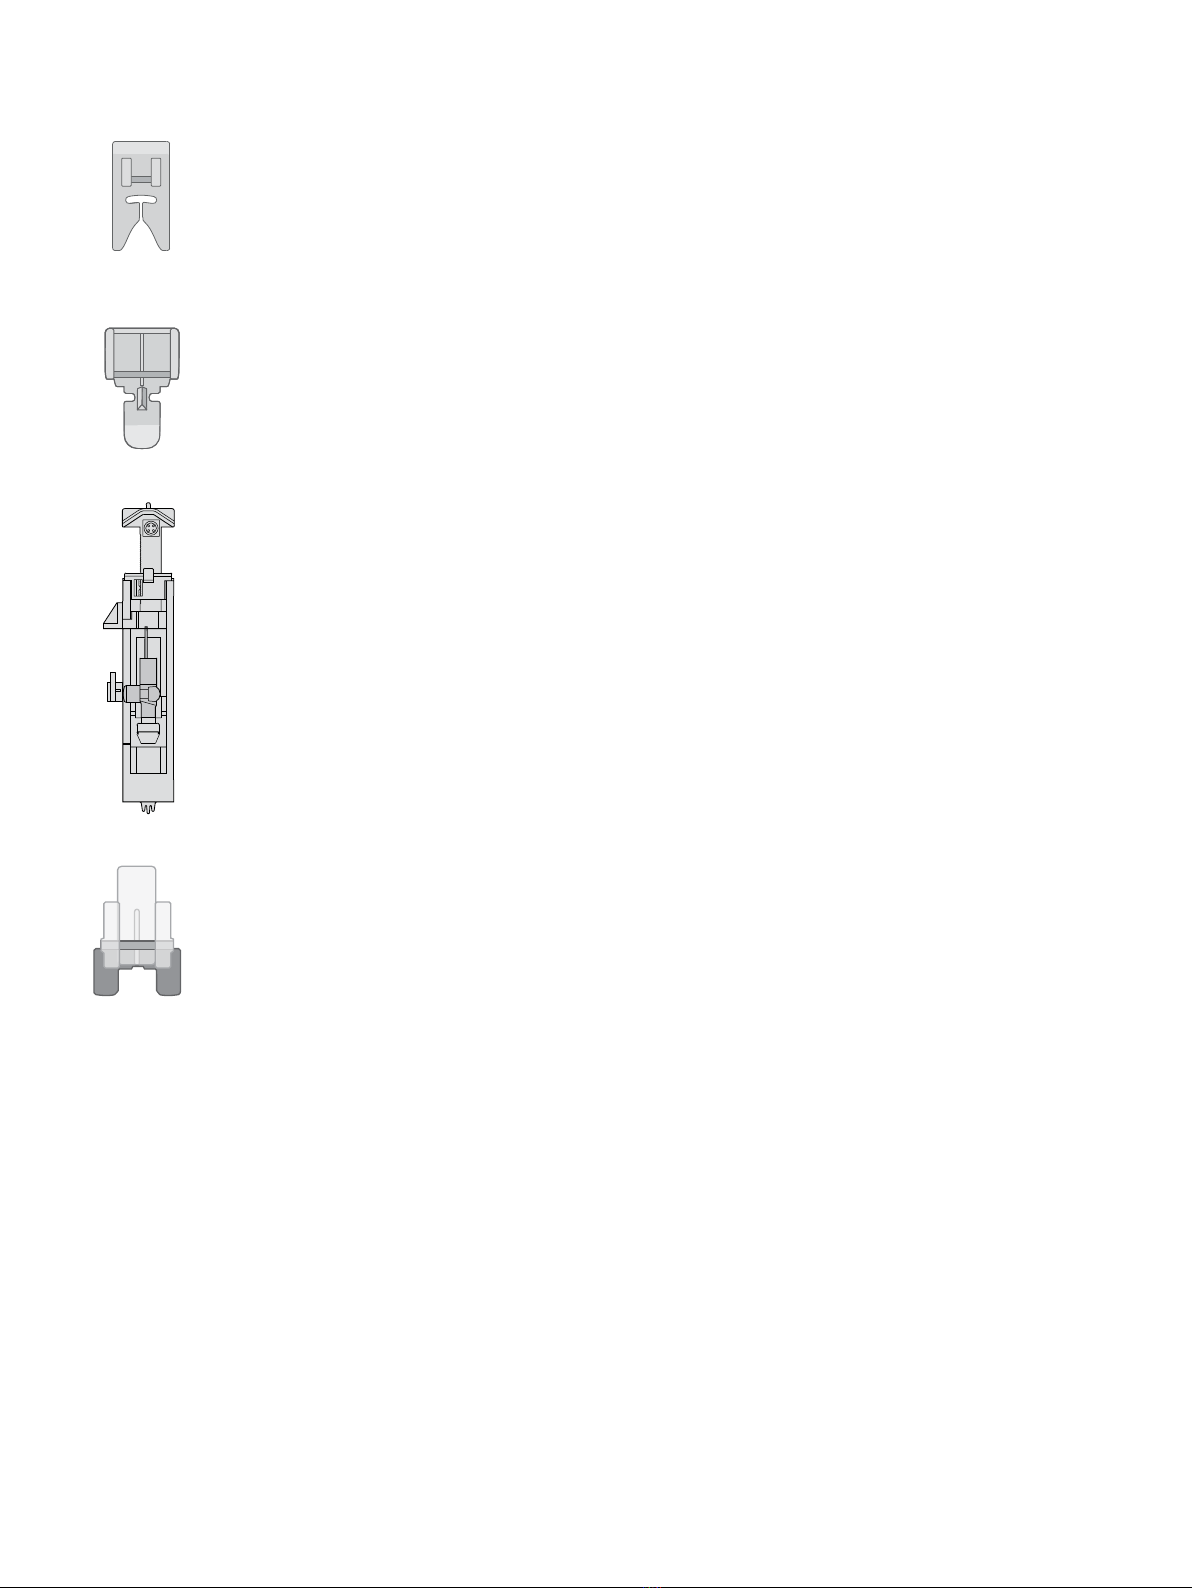
Presser Feet................................................................... 4
Optional Accessories .................................................. 4
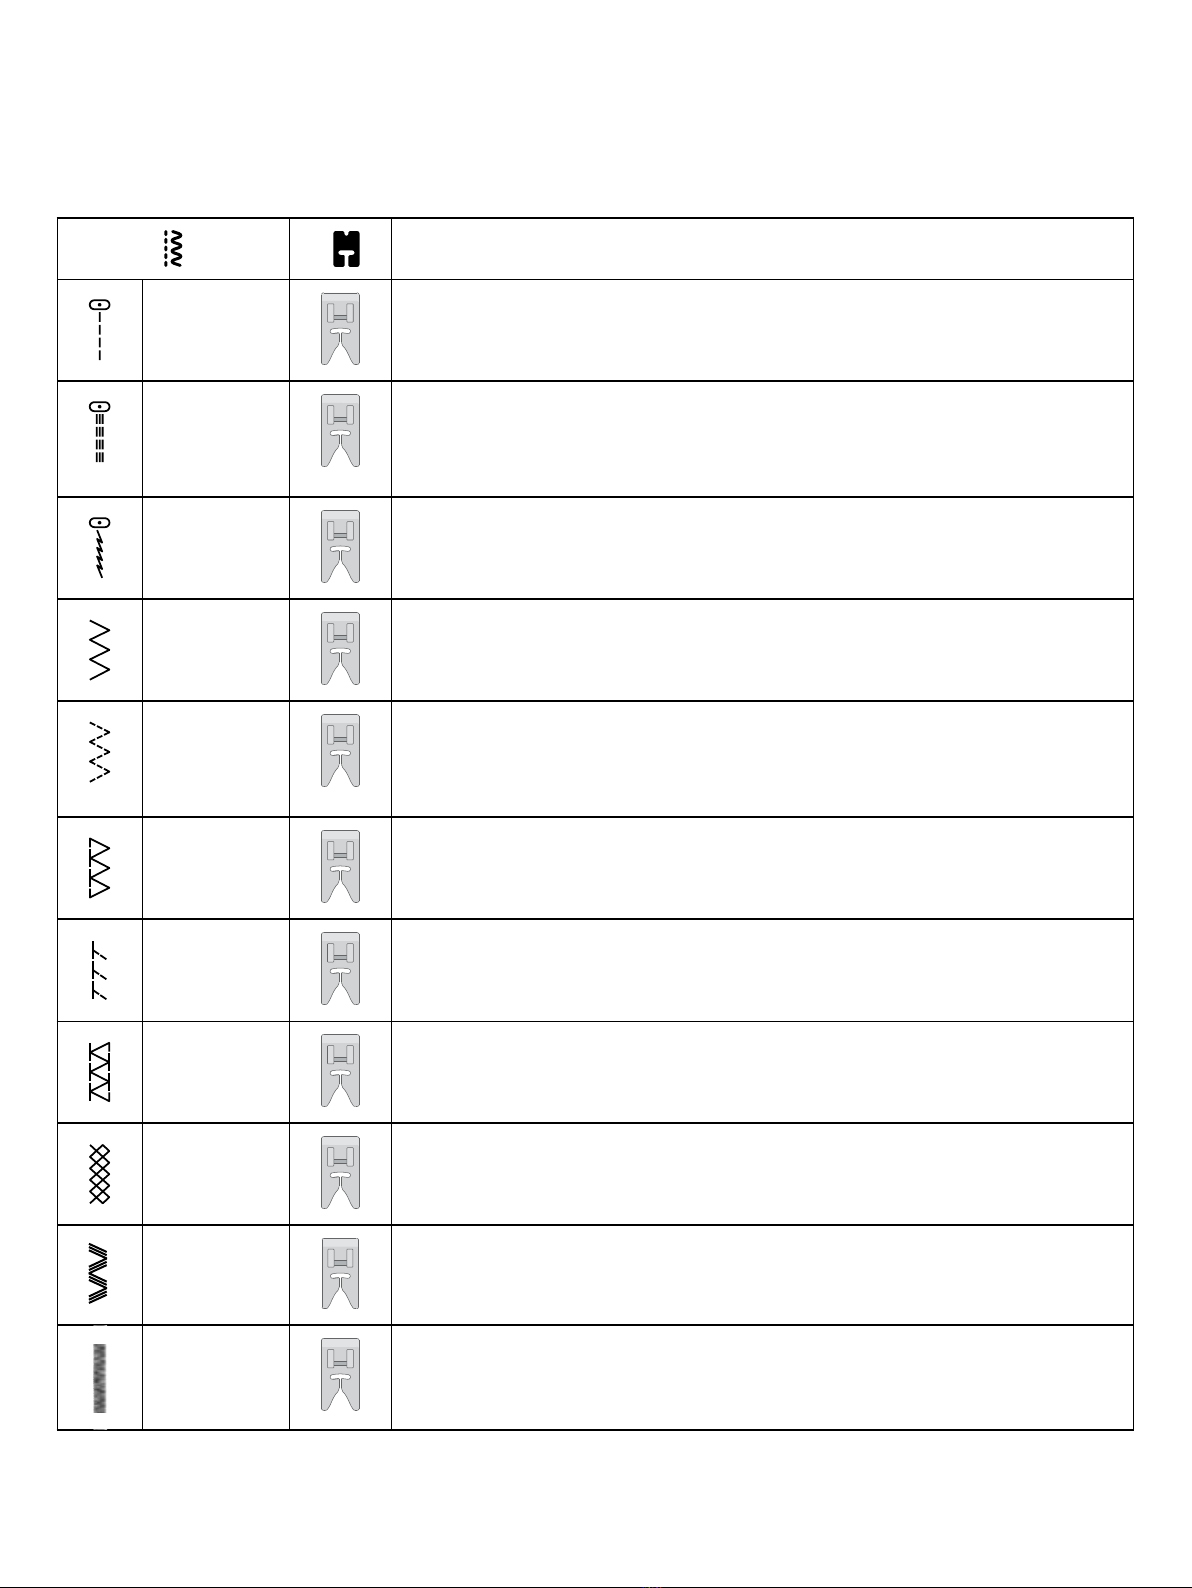
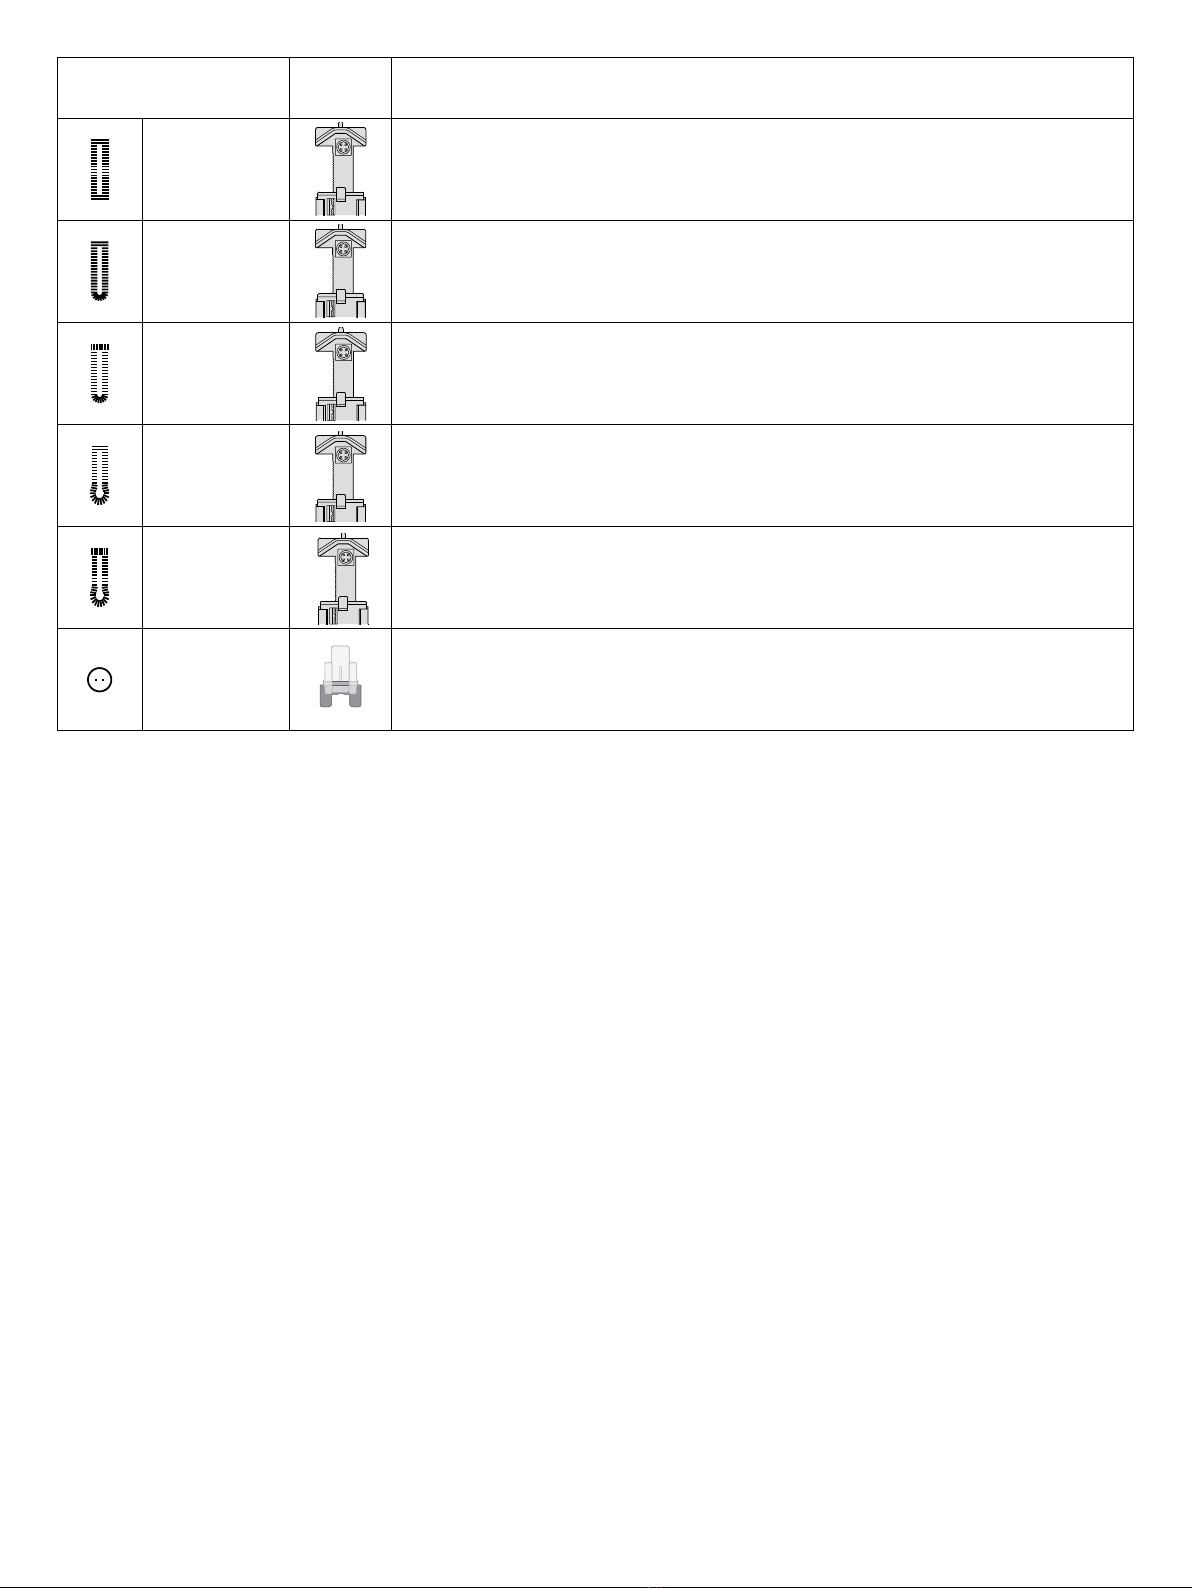
Stitch Overview............................................................... 5
Choosing Utility and Decorative Stitch Patterns ......... 5
PREPARATIONS............................................ 7
Unpacking the Machine.................................................. 7
Connect to the Power Supply......................................... 7
Packing Machine after Sewing ....................................... 7
Free Arm/Removable Accessory Tray ............................ 8
Presser Foot Lifter.......................................................... 8
Thread Knife................................................................... 8
Spool Pin ........................................................................ 9
Wind the Bobbin ........................................................... 10
Removing Bobbin Case from Shuttle ........................... 10
Inserting Bobbin Into Bobbin Case................................11
Inserting Bobbin Case Into Shuttle................................11
Picking Up Bobbin Thread.............................................11
Thread the Machine...................................................... 12
Needle Threader........................................................... 13
Needles ........................................................................ 13
Important Needle Information ................................... 14
Selection Guide — Needle Size, Fabric, Thread ...... 14
Change the Needle....................................................... 14
Thread Tension............................................................. 15
Change the Presser Foot ............................................. 15
OPERATING YOUR MACHINE.................... 16
Machine Operation Controls......................................... 16
Reverse Button ......................................................... 16
Tie-O ....................................................................... 16
Functions of Control Panel ........................................... 16
Stitch Number Selection Buttons .............................. 17
Stitch Length and Stitch Width / Needle Position...... 17
Helpful Messages......................................................... 18
SEWING........................................................ 19
Sewing.......................................................................... 19
Start to Sew – Straight Stitch........................................ 19
Change Needle Position ........................................... 19
Change Sewing Direction............................................. 20
Finish Sewing ............................................................... 20
Straight Stretch Stitch................................................... 20
Zigzag Stitching............................................................ 21
Multi-Step Zigzag Stitch................................................ 21
Slant Overedge Stitch................................................... 21
Overedge Stitch............................................................ 22
Feather Stitch ............................................................... 22
Shell Stitch.................................................................... 23
Double Overlock Stitch ................................................ 23
Ladder Stitch ................................................................ 23
More Decorative Stitches &
Ideas For Decorative Machine Stitching....................... 24
Darning and Mending ................................................... 24
Repair Large Holes ................................................... 24
Repair Tears.............................................................. 24
One-Step Buttonhole.................................................... 25
Sew Zippers.................................................................. 26
Centered Zipper ........................................................ 26
Hand-Look Quilt Stitch.................................................. 27
Button Sewing .............................................................. 27
MAINTENANCE............................................ 28
Cleaning the Machine................................................... 28
Cleaning the Feed Teeth and Shuttle Area................... 28
Cleaning the Sewing Machine
and Foot Control........................................................... 28
Troubleshooting............................................................ 29
Technical Specication ................................................. 32

Introduction – 1
English
Introduction – 1
English
INTRODUCTION
Optimal use and maintenance are described in these instructions. This product is not intended for industrial or commercial use.
Additional assistance, by region, may be found online at www.singer.com.
1. Accessory Tray / Free Arm — Provides a at surface
when sewing and allows storage for your accessories.
Remove the accessory tray to use the free arm which makes
it easier to sew, e.g., trouser hems and sleeves.
2. Thread Knife — For trimming thread ends at the end of
sewing.
3. Threading Slots — Thread paths with tension discs and
take up lever.
4. Thread Tension Dial — Adjustable for setting the desired
tension for your stitch, thread and fabric.
5. Reverse Button — Press and hold to sew in reverse or to
make a tie-o, e.g., when securing the beginning or ending
of a seam.
6. Display — Current stitch and settings are displayed.
7. Hand Wheel — Used to manually control the movement of
the needle and the thread take-up lever.
8. Function Buttons — Used for selecting stitches. Control
the stitch width and the stitch length.
Intended Use
Machine Overview
7
8
6
5
1
2
3
4

2 – Introduction
English
2 – Introduction
English
Needle Area Overview
Top of Machine
1. Needle Plate — provides a at area around presser foot for
sewing. Guidelines indicate various seam allowances used
to guide fabric while sewing.
2. Feed Teeth — feed the fabric under the presser foot when
sewing.
3. Presser Foot — holds fabric against feed teeth which draw
fabric under the presser foot as you sew.
4. Presser Foot Holder Screw — loosen the screw to
remove the presser foot holder.
5. Presser Foot Holder — holds the presser foot.
6. Presser Foot Release Button — press this button to release
the presser foot from the holder.
7. Buttonhole Lever — used for buttonhole sewing.
8. Built-in Needle Threader — thread the needle quickly and
easily.
9. Presser Foot Bar — accommodates the presser foot holder.
10. Needle Clamp Screw — secures the needle.
11. Needle Thread Guide — helps maintain thread ow
when sewing.
1. Bobbin winding tension disc
2. Thread guides
3. Handle
4. Spool pin
5. Hole for auxiliary spool pin
6. Bobbin winding spindle
7. Bobbin winding stopper
8. Thread tension discs
9. Thread take-up lever
2
3
4
5 6
9 8
7
1
1
2
3
4
5
6
7
8 9 10
11

Introduction – 3
English
Introduction – 3
English
Overview Accessories
Included Accessories (Not Pictured)
• Needles
• Foot control
• Power cord
Bobbin x4 — Only use the type of metal bobbins delivered with your machine (SINGER® Class 15 met-
al bobbins). One of the bobbins is inserted in the machine upon delivery.
Felt Pad x2 — Used to cushion the spool of thread when using the Auxiliary Spool Pin.
Spool Cap — For various thread spool styles.
Auxiliary Spool Pin — For sewing with large thread spools or when using specialty threads.
Brush and Seam Ripper — Used to remove stitches/brush o lint.
Screwdriver — Used to remove the needle plate, presser foot holder or needle screw.
Edge/Quilting Guide — Used for straight and accurate sewing, e.g., when quilting. Insert the guide into
the slot at the back of the presser foot holder. Adjust the position to t your project.
Darning Plate — Use the darning plate when you need to control fabric feeding for button sewing, free
motion work and free motion darning. Raise needle and presser foot, and position darning plate onto the
needle plate with the two pins on the back inserted to the holes of needle plate.

4 – Introduction
English
4 – Introduction
English
Optional Accessories
Additional optional accessories are available for your machine. Check with your authorized SINGER® retailer or singer.com for more
information.
1-Step Buttonhole Foot
This foot allows you to make perfectly sized buttonholes for your button. It has a space at the back for a
button, used to set the size of the buttonhole. The machine will automatically sew a buttonhole to t that
button size.
Button Sewing Foot
The Button Sewing Foot quickly and neatly sews on buttons, eliminating the need to sew them manually.
The foot sits on top of the button, with the opening positioned around the holes.
All Purpose Foot
(attached to the machine upon delivery)
This foot is used for general sewing on most types of fabric. The bottom of the foot is at, so that the fabric
is held down rmly against the feed teeth while sewing. It also has a wide slot so that the needle can move
from left to right, depending on which stitch you sew.
Zipper Foot
This foot is used for inserting zippers. Attach the foot to the presser foot holder on either side of the foot,
depending on which side of the zipper is being sewn. The Zipper Foot can also be used to create and insert
piping.
Presser Feet

Introduction – 5
English
Introduction – 5
English
Application
Straight Stitch
Center Position
The basic stitch used for sewing. The most common use for a straight stitch is to sew two
pieces of fabric together.
Straight Stretch
Stitch
Stronger than a regular straight stitch, on stretch knit fabrics, because it locks three times
— forward, backward and forward again. Use it to reinforce seams of sportswear and for
curved seams which take a lot of strain.
Stretch Stitch For seams in tricot and stretch fabrics.
Zigzag Stitch A very versatile stitch for decorative sewing, appliqué, attaching trims, and more.
Multi-Step
Zigzag Stitch
Finish seam allowances to prevent the fabric from unravelling. When seam nishing, the
smaller step of the stitches will help keep fabric more at than a regular zigzag. It can
also be used for mending tears and sewing elastic.
Overlock Stitch Sew seam and overcast in one step. For medium and medium/heavy stretch fabrics.
Slant Overedge
Stitch
Seam and overcast in one step. For medium and heavy stretch fabrics.
Closed Over-
lock Stitch
Sew decorative hems and overlapped seams, belts and bands. For medium/heavy stretch
fabrics.
Honeycomb
Stitch
For elastic insertion, decorative stitching, smocking, couching and hemming.
Ric-Rac Stitch The pleasing appearance of this stitch enables it to be used for decorative topstitching or
for attaching laces and trims. It is also ideal for quilting applications and edge-joining.
Satin Stitch This is a closely spaced zigzag stitch for appliqué, bar-tacking, etc. Slightly loosen the top
thread tension and manually adjust the stitch length between 0.5 and 2.0 for satin stitch-
ing. Use a backing of stabilizer or interfacing to avoid puckering.
Stitch Overview
Choosing Utility and Decorative Stitch Patterns
The stitches described in the below chart are utility stitches, used mainly for utility sewing. When sewing, use a thread tension
between 3–5. Always test sew on a piece of scrap fabric, and adjust the tension if necessary.

6 – Introduction
English
6 – Introduction
English
Application
Buttonhole Sew buttonholes on home decór, garments, crafts and more.
Rounded Bart-
ack Buttonhole
For light weight fabrics.
Rounded Bart-
ack Buttonhole,
Reinforced
For light weight fabrics.
Keyhole But-
tonhole
Square end for tailored jackets, coats, etc.
Keyhole Button-
hole, Reinforced
Square end for tailored jackets, coats, etc.
Button Sewing
Stitch H
For sewing on buttons.

Preparations – 7
English
Preparations – 7
English
PREPARATIONS
1. Place the box on a steady, at surface. Lift the machine out of the box, and remove the packaging.
2. Remove all outer packing material and the plastic bag.
3. Wipe o the machine with a dry cloth to remove any lint and/or excess oil around the needle area.
Note: Your sewing machine is adjusted to provide the best stitch result at normal room temperature. Extreme hot and cold tempera-
tures can aect the sewn result.
1. Switch the main switch o. After switching o, residual power may still remain in the machine. This may cause the light to stay
on for a few seconds while the power is consumed. This is normal behavior for an energy ecient appliance.
2. Unplug the cord from the wall socket and then from the machine.
3. Wind the cord around the foot control for easy storage.
4. Place all accessories in the accessory tray. Slide the tray on to the machine around the free arm.
5. Place the foot control and cord in the space above the free arm.
6. Place the soft cover on the machine to help protect it from dust and lint.
Among the accessories you will nd the power cord and the
foot control.
Note: Consult a qualied electrician if in doubt as how to con-
nect the machine to the power source. Unplug the power cord
when the machine is not in use.
On the bottom right side of the sewing machine, you nd the
connecting sockets and the ON/OFF button.
1. Connect the foot control cord to the front socket on the
bottom right side of the machine (A).
2. Connect the power cord to the rear socket on the bottom
right side of the machine (B). Plug the cord into the wall
socket.
3. Press the ON/OFF switch (C) to "I" to turn on power and
light.
Note: After turning o the machine, residual power may remain
in the machine. This could cause the light to stay on for a few
seconds while the power is consumed. This is normal for an
energy ecient appliance.
Unpacking the Machine
Packing Machine after Sewing
Connect to the Power Supply
For the USA and Canada
This sewing machine has a polarized plug (one blade wider
than the other). To reduce the risk of electric shock, this
plug is intended to t in a polarized outlet only one way. If
the plug does not t fully in the outlet, reverse the plug. If it
still does not t, contact a qualied electrician to install the
proper outlet. Do not modify the plug in any way.
B
C
A

8 – Preparations
English
8 – Preparations
English
Free Arm/Removable Accessory Tray
Presser Foot Lifter
Thread Knife
Store presser feet, bobbins, needles and other accessories in the
accessory tray so that they are easily accessible.
Keep the accessory tray on the machine to provide a larger, at
work surface.
Use the free arm to facilitate sewing trouser legs and sleeve
hems. To use the free arm, slide o the accessory tray. When
attached, a hook keeps the accessory tray securely attached to
the machine. Remove the tray by sliding it to the left.
The presser foot lifter is located at the right side of the sewing
machine head. The lever is used to raise and lower the presser
foot. Raise the lever up for machine threading, lower it for
sewing.
By raising the presser foot lifter and then pressing it farther up-
wards, the lift height of the presser foot is increased to an extra
height allowing you to place thick fabric layers under the foot.
To use the thread knife, pull the thread from back to front as
illustrated. Doing this will leave the thread ends long enough
so that the needle doesn't become unthreaded when you start to
sew again.
PUSH

Preparations – 9
English
Preparations – 9
English
Your machine has two spool pins, a main spool pin and an Auxiliary Spool Pin. The spool pins are designed for various types of
thread. The main spool pin is used in a horizontal position (the thread reels o the spool) and the Auxiliary Spool Pin in a vertical
position (the thread spool rotates). Use the horizontal position for normal threads and the vertical position for large spools or specialty
threads.
Main Spool Pin
Place the thread spool on the spool pin. Make sure that the
thread reels o the spool counter clockwise and slide on a
spool cap (A). The at side of the spool cap should be pressed
rmly against the spool. There should be no space between the
spool cap and the thread spool.
Note: Not all thread spools are manufactured in the same way.
If you experience problems with the thread, turn it in the oppo-
site way or use the vertical position.
Auxiliary Spool Pin
The Auxiliary Spool Pin is used when winding a bobbin thread
from a second spool of thread or when sewing with large
spools or with specialty threads. Insert the Auxiliary Spool Pin
into the designated hole at the top of the machine. Place a felt
pad under the thread spool. This is to prevent the thread from
reeling o too fast. Do not place a spool cap on top of the spool
pin as that would prevent the spool from rotating.
Spool Pin
A

10 – Preparations
English
10 – Preparations
English
1. Place the thread spool on the spool pin. Slide a spool cap
rmly against the spool.
2. Place the thread around the thread guide (A) from back to
front and around the bobbin winding tension disc (B), mak-
ing sure that the thread is pulled snuggly between the discs.
3. Thread through the hole in the bobbin (C) from the inside to
the outside.
4. Place the bobbin on the bobbin winding spindle. Make sure
the bobbin is pushed down rmly.
5. Push the bobbin winding spindle to the right. Hold the
thread end, and press the foot control to start winding.
After a few turns, take your foot o the foot control to
stop winding. Cut the excess thread tail above the bobbin,
making sure to trim it close to the bobbin. Step on the foot
control to resume winding. When the bobbin is full, the
bobbin winding will slow down and stop automatically.
Note: You can also start the winding by long pressing the
start/stop button.
6. Push the bobbin winding spindle to the left. Remove the
bobbin and cut the thread.
Wind the Bobbin
Note: When the bobbin winding spindle is pushed to the right, the machine will not sew. Make sure to push the bobbin spindle back to
the sewing position (left) before sewing.
Removing Bobbin Case from Shuttle
1. Raise the needle to its highest position by rotating the hand
wheel toward you (counter-clockwise).
2. Remove the extension table / accessory box. Open the
bobbin access cover by pulling it down. With your ngers,
pull open the bobbin case latch as shown, and take out the
bobbin case from the shuttle.
3. Release the latch, and bobbin will drop out of the case.
C
B
A

Preparations – 11
English
Preparations – 11
English
Inserting Bobbin Into Bobbin Case
Inserting Bobbin Case Into Shuttle
Picking Up Bobbin Thread
1. Hold the bobbin in your right hand with the thread running
clockwise, while holding the case in your left hand.
2. Insert the bobbin into the case with about 4” (10 cm) of
thread showing outside of the case.
3. While holding the bobbin securely down in the case, pull
the thread through the slit in the case and then underneath
the at tension spring. It will click when the thread is seat-
ed correctly in the tension.
4. Keep about 4 “ (10 cm) tail of thread trailing outside of the
case.
1. Hold the latch open, with locating pin straight up.
2. Slide the bobbin case onto the center spindle of the shuttle,
keeping the thread toward you.
3. Release the latch to lock the bobbin case in place.
NOTE: Be sure the locating pin ts into the locating groove at
the top of the shuttle.
1. Raise the presser foot lifter.
2. Holding needle thread loosely with your left hand, turn
hand wheel toward you (counter-clockwise) with your right
hand, rst lowering the needle and continuing until the
needle comes to its highest position.
3. Lightly pull up the top thread, and pick up bobbin thread,
which will appear through the needle plate slot.
4. Pull both top and bobbin threads together toward the back
of the machine under the presser foot, leaving about 6” (15
cm) clear.
NOTE: A quick way to pick up the bobbin thread is, with stra-
ight stitch selected, touch and release the reverse button.Your
machine will perform one down-up cycle and stop with the
needle up. Always stopping with the needle “fully up” is one
of the features of your computerized sewing machine.
1
2 3

12 – Preparations
English
12 – Preparations
English
Important! Make sure that the presser foot is raised and the
needle is in its highest position by turning the handwheel
toward you. This is very important to help ensure that the
machine is correctly threaded. Not doing so can result in poor
stitch quality when you start to sew.
1. Place the thread on the spool pin and t the appropriately
sized spool cap.
2. Pull the thread around the thread guide (A) from back to
front.
3. Continue bringing the thread down through the right
threading slot (B), around the U-turn, then back upwards
through the left threading slot.
4. Bring the thread from the right into the take-up lever (C)
and down in the left-hand threading slot and to the needle
thread guide (D).
5. Thread the needle from front to back.
Thread the Machine
Machine from above
Machine from front
A
B
C
D

Preparations – 13
English
Preparations – 13
English
Needle Threader
Needles
The built-in needle threader allows you to thread the needle
quickly and easily.
The needle must be in its highest position to use the built-in
needle threader. Turn the hand wheel towards you until the
needle is in its highest position. It is also recommended that
you lower the presser foot.
• Use the handle (A) to pull the needle threader all the way
down and push toward the back.. The metal anges cover
the needle. A small hook will pass through the needle eye
(B).
• Place the thread from the back over the thread guide (C)
and under the small hook (D).
• Let the needle threader gently swing back. The hook pulls
the thread through the needle eye and forms a loop behind
the needle. Pull the thread loop out behind the needle.
• Raise the presser foot and place the thread under it.
• Pull out about 6–8” (15–20cm) of thread beyond the needle
eye. This will prevent the machine from coming unthreaded
when you start to sew.
Note: The needle threader is designed to be used for size 70-
110 needles. You cannot use the needle threader for size 60
needles or smaller, wing needles or twin needles. There are
also some optional accessories that require manual threading
of the needle. When threading the needle manually, make sure
that the needle is threaded from front to back.
The sewing machine needle plays an important role in successful sewing. Use only quality needles. We recommend needles of system
130/705H. The needle package included with your machine contains needles of the most frequently used sizes.
Be sure to match the needle to the thread you are using. Heavier threads require a needle with a larger needle eye. If the
needle eye is too small for the thread the needle threader may not work properly.
Universal Needle
Universal needles have a slightly rounded point and come in a variety of sizes. For general sewing in a
variety of fabric types and weights.
Stretch Needle
Stretch needles have a ball point and a special scarf to eliminate skipped stitches when there is a ex in the
fabric. For knits, swimwear, eece, synthetic suedes and synthetic leathers.
Denim Needle
Denim needles have a sharp point to penetrate tightly woven fabrics without deecting the needle. For
canvas, denim, microbers.
Embroidery Needle
Embroidery needles have a special scarf, a slightly rounded point and a slightly larger eye to avoid dam-
age to thread and materials. Use with metallic and other specialty threads for free-motion embroidery and
decorative sewing.
Wing Needle
Wing needles have wide extensions on each side of the needle to poke holes in the fabric when sewing
entredeux and other hemstitches on natural ber fabrics.
To help prevent needle breakage, use only medium/low sewing speed and the recommended needle for sewing thick fabrics.
C
A
B
D
C
A
B
D

14 – Preparations
English
14 – Preparations
English
Change the needle often. As a general rule, needles
should be changed every 6-8 hours of actual stitch-
ing time.
Important Needle Information
Always use a straight needle with a sharp point and make sure
the point is not bent or damaged (A).
A damaged needle (B) can cause skipped stitches, breakage or
snapping of the thread. It can also damage the needle plate.
Do not use asymmetrical twin needles (C), they can damage
your sewing machine.
Note: Before you begin changing the needle, it can be help-
ful to place a small piece of paper or fabric underneath the
needle area, over the hole in the needle plate, so that the needle
doesn't accidentally fall down into the machine.
1. Loosen the needle clamp screw. If it feels tight, use the
screwdriver from your accessories to aid with loosening the
screw.
2. Remove the needle.
3. Push the new needle upwards into the needle clamp with
the at side of the needle away from you.
4. When the needle will go up no further, tighten the screw
securely.
Change the Needle
Selection Guide — Needle Size, Fabric, Thread
Needle Size Fabric Thread
70 (9)
80 (12)
Lightweight fabrics: Fine cotton, voile, silk, muslin,
interlock, tricot, jersey, crepe, polyester, chion, organza,
organdy
Light duty all purpose thread
80 (12)
90 (14)
Medium weight fabrics: Quilting cotton, satin, double
knit, lightweight wool, rayon, polyester, lightweight linen
Use polyester threads on synthetic fabrics and
all-purpose or cotton thread on natural fabrics for
best results.
90 (14) Medium weight fabrics: Firm woven, medium weight lin-
en, cotton/polyester blend, terrycloth, chambray, double
knit
100 (16) Heavy weight fabrics: Canvas, wool, denim, home decor,
eece, heavy knit
Polyester or all-purpose thread
110 (18) Heavy weight fabrics: Coat weight wool, upholstery
fabrics
Heavy duty thread for needle, with all-purpose
thread for the bobbin.
A
B
C
1 2
3 4

Preparations – 15
English
Preparations – 15
English
Thread Tension
To set the thread tension, turn the dial on the machine. Depend-
ing on the fabric, thread, etc, the tension may need to be adjust-
ed. For the best stitch appearance and durability, make sure the
needle thread tension is correctly adjusted. For general sewing,
the threads evenly meet between the two layers of fabric (A).
If the bobbin thread is visible on the top side of the fabric, the
needle thread tension is too tight (B). Reduce the needle thread
tension.
If top thread is visible on the underside of the fabric, the needle
thread tension is too loose (C). Increase the needle thread
tension.
For decorative stitches and buttonholes, the top thread should
be visible on the underside of the fabric.
Make a few tests on a scrap piece of the fabric you are going to
sew and check the tension.
1. Push presser foot release lever to remove the foot.
2. Place the desired foot on the needle plate aligning the press-
er foot pin with the foot holder.
3. Lower the presser foot lifter so that the foot holder snaps on
the foot.
Change the Presser Foot
A
B
C
1
2

16 – Operating Your Machine
English
16 – Operating Your Machine
English
OPERATING YOUR MACHINE
Machine Operation Controls
Reverse Button
Tie-O
The Reverse Button has two dierent functions, depending on what stitch has been selected.
Utility Stitches (stitch no. 00,03)
Press and hold the Reverse button to sew in reverse. Release it to resume sewing forward. The machine sews in
reverse only as long as the reverse button is pressed.
When pressed the machine immediately sews three tie-o stitches and stops automatically.
Utility Stitches (stitch no. 01, 02 and 04-73)
Press the Reverse button and the machine sews 3 tie-o stitches then stops automatically.
Functions of Control Panel
The Functions Control Panel are used to select and adjust stit-
ches. Each functionality is listed and described further below.
1. Display
2. Stitch number
3. Stitch width/needle position of straight stitch
4. Stitch length
5. Stitch selection buttons
6. Manual adjustment buttons for stitch width/ needle position
7. Manual adjustment buttons for stitch length
4
5 6
7
3
2
1
This manual suits for next models
3
Table of contents
Other Singer Sewing Machine manuals

Singer
Singer 17U241 User manual

Singer
Singer 1375A1 User manual

Singer
Singer WW500 User manual

Singer
Singer 68-35 Quick start guide

Singer
Singer 7-22 User manual

Singer
Singer 1371A1 User manual

Singer
Singer 5710 User manual

Singer
Singer 7934 User manual

Singer
Singer 51W51 Quick start guide

Singer
Singer 81-12 User manual

Singer
Singer C440 User manual

Singer
Singer Surjeteuse 46K26 Installation and operation manual

Singer
Singer SEW MATE 5400 User manual

Singer
Singer 17-1 User manual

Singer
Singer 990B3 User manual

Singer
Singer 831U User manual

Singer
Singer 758E User manual

Singer
Singer 281-30 User manual

Singer
Singer 111W155 User manual

Singer
Singer 290 User manual