Sinocare Safe AQ UG User manual

User Manual
For in vitro diagnostic use only
Safe AQ UG
Blood Glucose and Uric Acid Meter
Blood Glucose and Uric Acid Monitoring System
Benutzerhandbuch
Nur zur In-vitro-Diagnostik
Safe AQ UG
Blutzucker und Harnsäure
Blutzucker- und Harnsäuremonitoringsystem

Blood Glucose and Uric Acid Monitoring System User Manual
Safe AQ UG
Dear Owner:
Sinocare thanks you for choosing the Safe AQ UG blood glucose and uric acid monitoring system.
This user manual contains important information about the meter and how it works.
Please read this user manual carefully before using your new meter, or the protection
provided by the meter may be impaired.
If you have any questions, please feel free to contact our Customer Service at
+86-731-89935581/+86-731-89935582 or your local dealers.

Table of Contents
Introduction to the Your Blood Glucose and Uric Acid Monitoring System
Intended Use
Test Principle
Important Safety Information
Patient Cautions
Important Health-Related Information
About Your Safe AQ UG Meter
Button Functions
Setting Up Your Safe AQ UG Blood Glucose and Uric Acid meter
Control Solution Testing
Blood Glucose and Uric Acid Testing
Viewing test result
Memory
Information for Healthcare Professional Use
Comparing Meter with Laboratory Results
Cleaning and Disinfecting
Power Saving
Performance Characteristics
Specifications
Maintenance
Changing the batteries
Troubleshooting
Explanation of symbols
Warranty
Index
1
1
2
3
4
4
7
9
10
18
22
29
31
34
35
36
37
37
38
40
41
42
49
50
51

Introduction to the Your Blood Glucose and Uric Acid Monitoring System
Intended Use
The Safe AQ UG Blood Glucose and Uric Acid Monitoring System is designed for the
quantitative measurement of glucose and uric acid in fresh capillary whole blood samples
and in venous whole blood samples. The Safe AQ UG Blood Glucose and Uric Acid Monitor-
ing System is for use outside the body only (in vitro diagnostic use) for self-testing and
professional use as an aid in the management of diabetes and hyperuricemia (HUA).
The Safe AQ UG Blood Glucose and Uric Acid Monitoring System is intended for in vitro
diagnostic use and should not be used for the diagnosis of or screening of diabetes and
hyperuricemia (HUA).
The Safe AQ UG Blood Glucose and Uric Acid Monitoring System includes:
Safe AQ UG blood glucose and uric acid meter, Safe AQ UG blood glucose test strip, Safe AQ
UG uric acid test strip, blood glucose control solution, uric acid control solution
Unit type: Safe AQ UG Blood Glucose and Uric Acid meter displays blood glucose results in
mg/dL or mmol/L and uric acid results in mg/dL or μmol/L.
Test Principle
A blood glucose test or uric acid test is based on measurement of electrical current caused
by the reaction of glucose or uric acid with the reagents (special chemicals) on the
electrode of the strip. The blood or control solution sample is drawn into the tip of the test
strip through capillary action. Glucose or uric acid in the sample reacts with the special
chemicals and generates electrons, which produce electrical current. The meter measures
the electrical current and calculates the glucose or uric acid result. The blood glucose
results are displayed in mg/dL or mmol/L and uric acid results are displayed in mg/dL or μ
mol/L.
1 2
Safe AQ UG Blood Glucose and Uric Acid Monitoring System

3 4
Important Safety Information
▶ For self-testing customer, your Safe AQ UG meter and lancing device are for single person
use only. Do not share them with anyone else, even family members.
▶ For professional use, if the meter is being used on the second person, the meter and
lancing device should be disinfected first.
▶ Safe AQ UG test strip and lancet are for single use only. DO NOT REUSE.
▶ Do not use other test strips and control solutions with the Safe AQ UG meter.
▶ Do not use the meter if it is not working properly, or there is any damage.
▶ Keep the test strip vial away from children. The strip vial, test strips, and control solution
bottles can be choking hazards. DO NOT drink the control solution.
▶ Remove the batteries if the meter is not likely to be used for some time.
DO NOT CHANGE YOUR TREATMENT BASED ON A SINGLE RESULT THAT DOES NOT
MATCH HOW YOU FEEL OR IF YOU BELIEVE THAT YOUR TEST RESULT COULD BE
FALSE.
Patient Cautions
▶Not for neonatal (newborn or infant) use
▶Not for screening or diagnosis of diabetes mellitus.
▶Not for use on the critical patients.
▶For in vitro diagnostic use only.
Important Health-Related Information
The American Diabetes Association (ADA) suggests the following targets for normal
blood glucose range. More or less stringent goals may be appropriate for each
person. If your test result is out of the range or your test result is not in accordance
with your feeling, retest your blood glucose. If still out of the range, please contact
healthcare professional.
5 6
professional immediately.
4. If uric acid test results low than 181 μmol/L (3.0mg/dL), the meter will display “LO”.
Retest immediately with a new test strip. If your reading is still “LO”, contact healthcare
professional immediately.
Note: Do not change your treatment only based on test result and light indications. Please
consult healthcare professional for your treatment.
Expected Results for people without diabetes:
The Modern clinical laboratory diagnostics-test and clinical (May, 2009, version 2) suggests the reference value
range for uric acid are as follow:
Plasma Blood Glucose Result
<100 mg/dL (<5.55 mmol/L)Fasting Plasma Glucose
Male 202 μmol/L ~ 416 μmol/L
(3.4 mg/dL ~ 7.0 mg/dL)
142 μmol/L ~ 339 μmol/L
(2.4 mg/dL ~ 5.7 mg/dL)
Female
1. If blood glucose test results greater than 33.3mmol/L (600 mg/dL), the meter will display “
HI”. Retest immediately with a new test strip. If your reading is still “HI”, contact healthcare
professional immediately.
2. If blood glucose test results low than 1.1mmol/L(20mg/dL), the meter will display “LO”.
Retest immediately with a new test strip. If your reading is still “LO”, contact healthcare
professional immediately.
3. If uric acid test results greater than 1188 μmol/L (20.0mg/dL), the meter will display “HI”.
Retest immediately with a new test strip. If your reading is still “HI”, contact healthcare
7 8
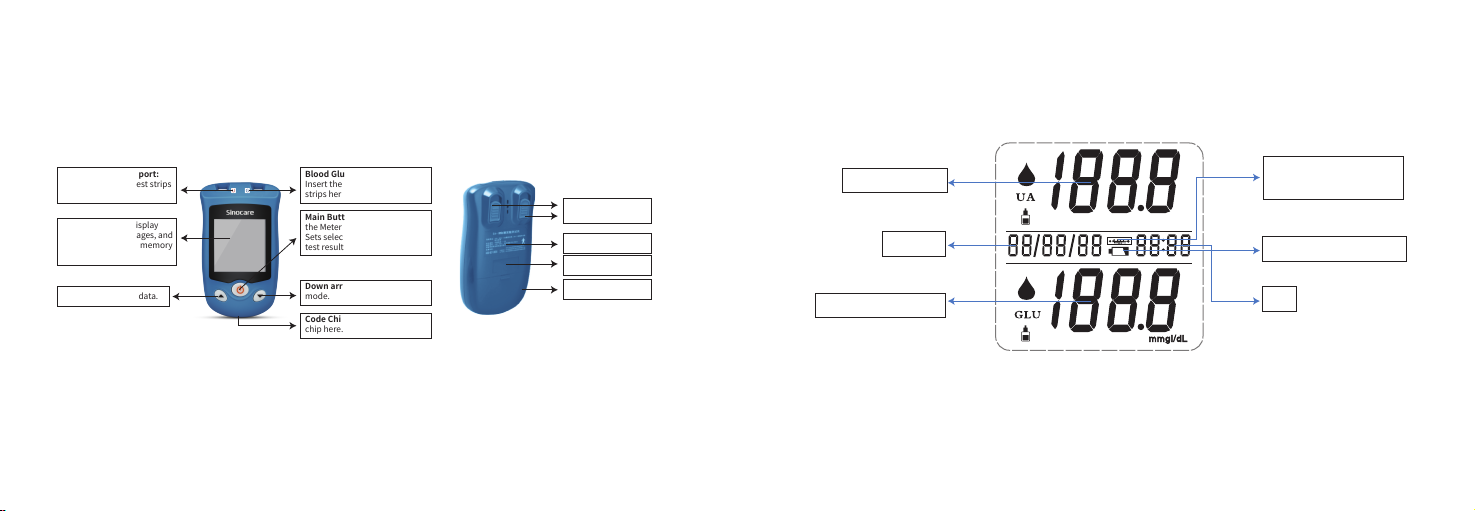
Uric Acid Test Strip port:
Insert the uric acid test strips
here
Down arrow - Enter time-date
mode.
Strip eject button
Label
Serial number
Battery cover
Code Chip port: Insert the code
chip here.
Blood Glucose Test Strip port:
Insert the blood glucose test
strips here
Main Button - Power/Set Turns
the Meter on/off.
Sets selected parameter Enter
test results memory mode.
Up arrow - Increase data.
LCD Display - The display
shows results, messages, and
test results stored in memory
and so on.
About Your Safe AQ UG Meter Full Screen Display
Uric acid test result
Low battery power symbol
time
DD/MM/YY
Blood glucose test result
Symbol for inappropriate
testing temperature
μmgl/dL
9 10
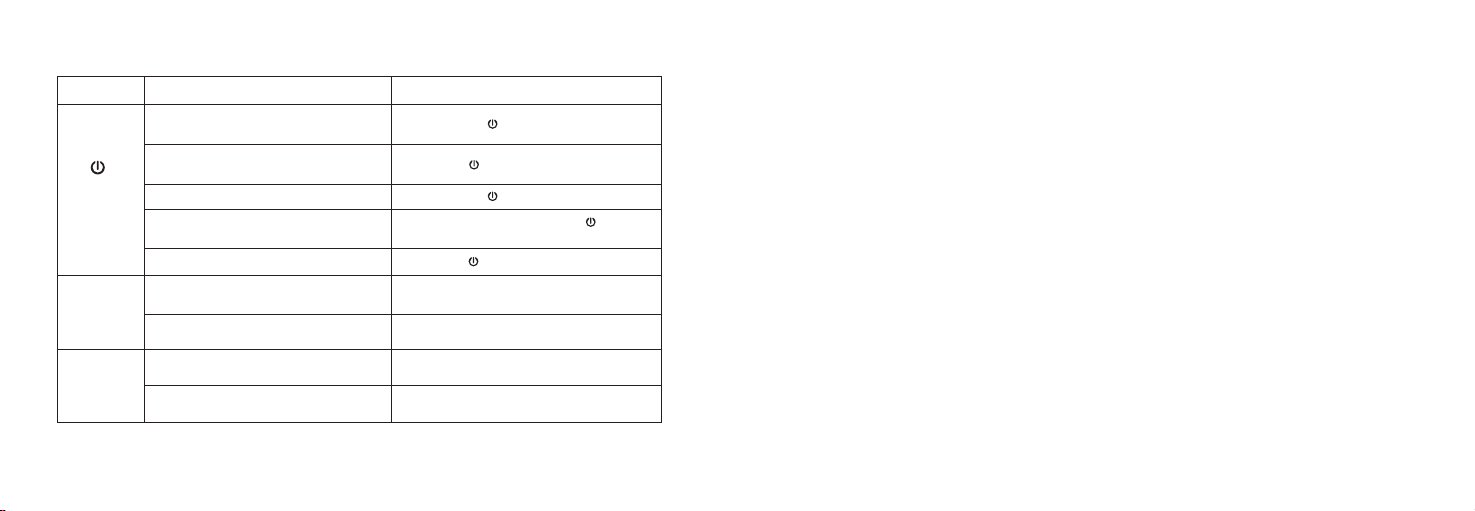
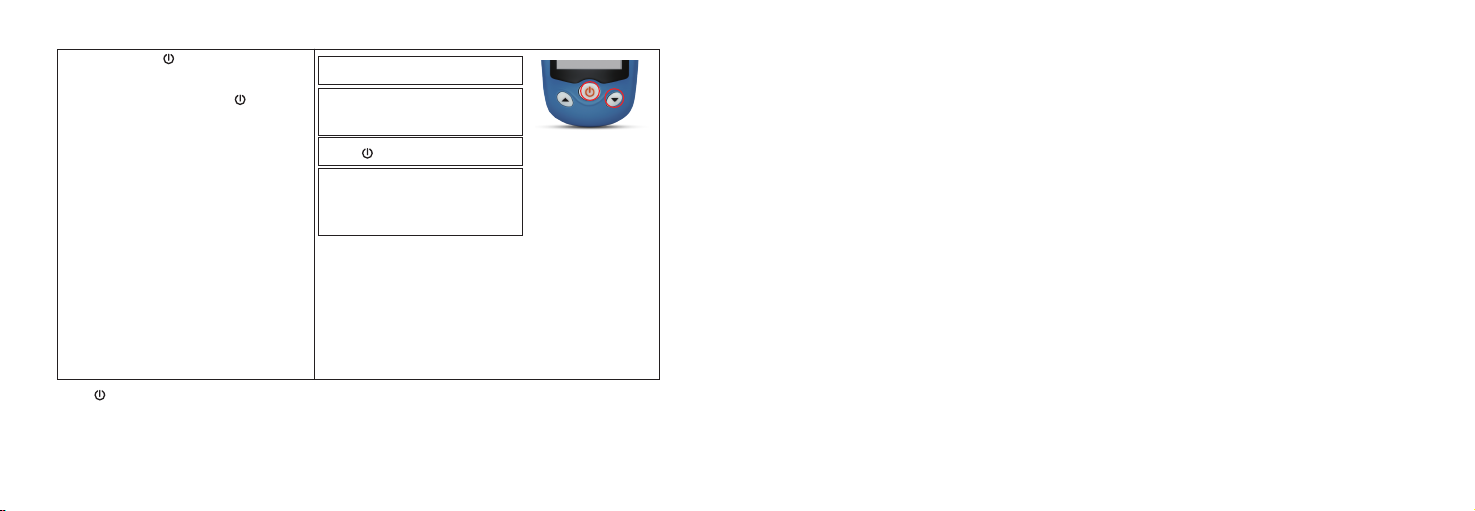
Button Functions
Button Function
To turn the meter on and enter the blood
glucose test result review mode.
To change sample type of test result
review
To turn the meter off.
To delete test results.
To confirm date/time settings.
To adjust settings for date-time/ scroll
through test results.
To decrease the number of memory when
review test result. Short press ▼.
To increase the number of memory when
review test result
Press and release ▼.
To adjust settings for date-time/ scroll
through test results. Press and release ▲.
Short press ▲.
▲
▼
Press and hold for 3 seconds.
Action
Short press
Press and hold for 3 seconds.
In test result review mode, press and ▼
together to delete all kinds of test result .
Short press
Setting Up Your Safe AQ UG Blood Glucose and Uric Acid meter
Setup steps for date/time
The Safe AQ UG blood glucose and uric acid meter is preset with the date and time. You may
need to adjust it to your local time zone. Check the date and time each time the batteries are
replaced. Reset the date and time if they are not correct.
STEP 1: Insert the Batteries
Open the Battery Cover on the back side of the Safe AQ UG blood glucose and uric acid
meter. Insert two AAA alkaline batteries as indicated by the “+” and “-” symbols.
STEP 2: Set Correcting Code of Uric Acid (use code chip)
Code chip matching with test strips shall be used when you use a new vial of uric acid test
strip. Find code chip in test strip package, check if the code number on code chip is in
accordance with code number on test strip package. If not, you will get inaccurate test
results, please call Customer Service at +86-731-89935581/+86-731-89935582. If there is
already a code chip in Safe AQ UG meter, please take it out and insert a new code chip.
Insert the code chip to code chip port, the meter will make a short beep sound and perform
self-inspection. The meter will display code number and meter will be off after a short beep
sound.
If there is an error, the meter will display E-4. Please pull out the code chip and insert again. If
still failed, please call Customer Service at +86-731-89935581/+86-731-89935582.
Every code chip only need to be inserted once, the meter will store the code number until
insert new code chip.

Setting Up Your Safe AQ UG Blood Glucose and Uric Acid meter
Setup steps for date/time
The Safe AQ UG blood glucose and uric acid meter is preset with the date and time. You may
need to adjust it to your local time zone. Check the date and time each time the batteries are
replaced. Reset the date and time if they are not correct.
STEP 1: Insert the Batteries
Open the Battery Cover on the back side of the Safe AQ UG blood glucose and uric acid
meter. Insert two AAA alkaline batteries as indicated by the “+” and “-” symbols.
STEP 2: Set Correcting Code of Uric Acid (use code chip)
Code chip matching with test strips shall be used when you use a new vial of uric acid test
strip. Find code chip in test strip package, check if the code number on code chip is in
accordance with code number on test strip package. If not, you will get inaccurate test
results, please call Customer Service at +86-731-89935581/+86-731-89935582. If there is
already a code chip in Safe AQ UG meter, please take it out and insert a new code chip.
Insert the code chip to code chip port, the meter will make a short beep sound and perform
self-inspection. The meter will display code number and meter will be off after a short beep
11 12
sound.
If there is an error, the meter will display E-4. Please pull out the code chip and insert again. If
still failed, please call Customer Service at +86-731-89935581/+86-731-89935582.
Every code chip only need to be inserted once, the meter will store the code number until
insert new code chip.
STEP 3: How to Set the Date and Time
1. With the meters off, press and hold ▼for 3
seconds and the meter will turn on. The meter
enters into the Date/Time mode.
2. It displays date and time, the segment of
year flashes.
Step 1:
With the meter turned off,
press and hold ▼ for 3
seconds to start Time and
Date setting mode.
Step 2:
Date/Time Mode
Flashing Year
STEP 4: Setting the Year
The year appears flashing at the left side of the
meter display.
1. Press and release ▼or▲ button to decrease
or increase the year.
2. Short press and release the main button
to confirm the year. Step 1:
Press and release ▼ or ▲
to decrease or increase the
year.
Step 2:
Short press and release the
main button to confirm
the year.

13 14
STEP 5: Setting the Month
The month appears flashing at the left side of
the meter display.
1. Setting the Month: Press and release ▼or▲
button to decrease or increase the month.
2. Short press and release the main button
to confirm the month. Step 1:
Press and release ▼ or ▲
to decrease or increase the
month.
Step 2:
Short press and release the
main button to confirm
the month.
STEP 6: Setting the Day
The day appears flashing at the left side of
the meter display.
1. Press and release ▼or▲ button to decrease
or increase the day.
2. Short press and release to confirm the day. Step 1:
Press and release ▼ or ▲
to decrease or increase the
day.
Step 2:
Short press and release
to confirm the day.

15 16
STEP 7: Setting the Hour
The hour appears flashing at the lower left side
of the meter display.
1. Press and release ▼ or ▲ to decrease or
increase the hour.
2. Short press and release to confirm the hour. Step 1:
Press and release ▼ or ▲
to decrease or increase the
hour.
Step 2:
Short press and release
to confirm the hour.
STEP 8: Setting the Minutes
The minutes appear flashing at the lower left
side of meter display.
1. Press and release ▼ or ▲ to decrease or
increase the minutes.
2. Short press and release to confirm the
minutes.
3.The meter will turn off automatically.
Step 1:
Press and release ▼ or ▲
to decrease or increase the
minutes.
Step 2:
Short press and release
to confirm the minutes.

17 18
Note
● 24 digital clock-hour time format can be displayed, year can be set from 2000-2099.
● The meter may be preset with time and date. If you need to adjust time and date setting or
replace the battery, you need to enter the Time- Date setting mode and reset the time and
date.
● Continuous decrease and Increase function: When set up Date and Time, press and hold ▼
for more than 1 second, the value will continuous decrease; press and hold ▲ for more than
1 second, the value will continuous increase.
● Press and hold button for more than 3 seconds to exit from Date and Time set -up mode.
Control Solution Testing
Why Perform a Control Solution Test
● Ensures that your meter and test strips are working properly.
● Allows you to practice testing without using blood.
When Should You Perform a Control Solution Test
● When you begin using a new vial of Test Strips.
● When the vial cap is opened for a long time.
● When Test Strips have been exposed to extreme environmental conditions.
● When you want to check whether meter or test strips are work properly.
● When you drop or broken the meter.
● When you want to check whether the test steps are correct.
Important Information
● Use only Sinocare control solution with your Meter.
● Check the expiration date on the control solution bottle. Do not use if expired.
● Use the blood glucose test strips within a period of 6 months from the date that you first
open the vial.
● Use the uric acid test strips within a period of 3 months from the date that you first open
the vial.
● Record the discard date on the blood glucose control solution bottle, which is 3 months
from when you first open it. Discard the bottle after 3 months.
● Record the discard date on the uric acid control solution bottle, which is 2 months from
when you first open it. Discard the bottle after 2 months.
● Discard any bottle that appears to be cracked or leaking.
● For in vitro diagnostic use only.
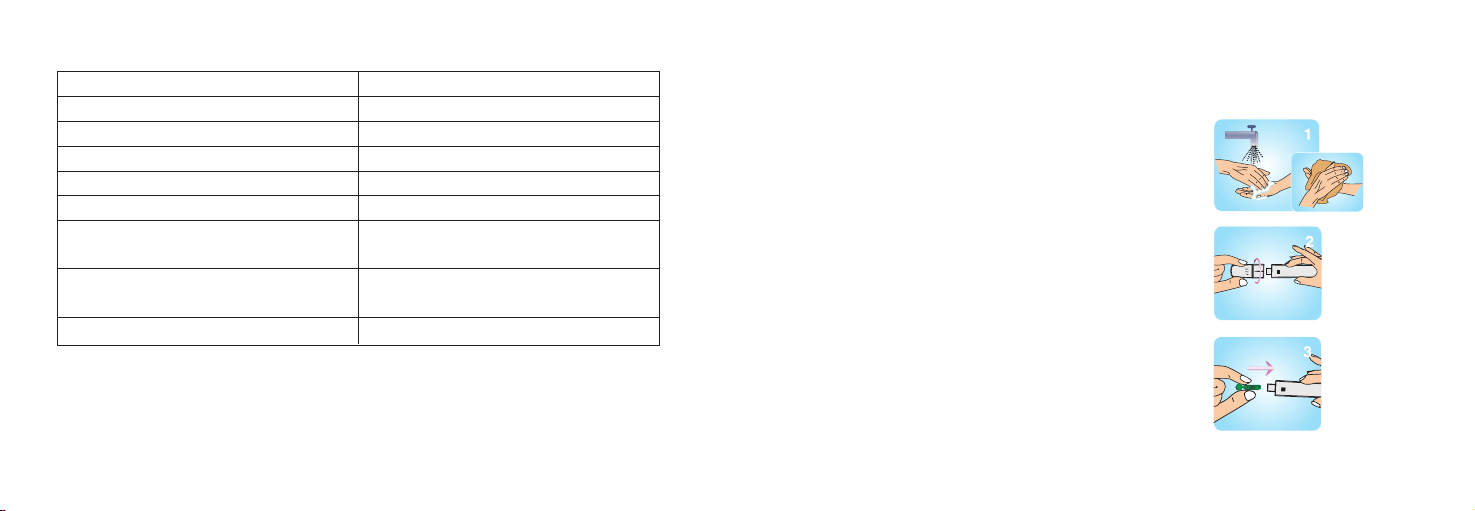
Performing a control solution test
Start with the meter off.
STEP 1: Wash your Hands
Wash your hands with mild soap and water. Be sure to dry your hands before performing a
test.
STEP 2: Insert a Safe AQ UG Test Strip
Insert a Safe AQ UG Test Strip with printing face up and the contact end into the test strip
port until it cannot go any further. The meter will turn on. If insert the blood glucose test
strip, the meter will display and symbol is flashing. If insert a Safe AQ UG uric acid test
strip, the meter will display the correcting code and symbol is flashing.
Attention: Only when meter display flashing blood drop symbol “ ” and control bottle
symbol, can you apply control solution. If there is no blood drop symbol or control bottle
symbol, restart the meter again or change the test mode.
STEP 3: Apply the Control Solution
1. Check the expiration date and discard dates on your control solution and Safe AQ UG test
strip vials. Do not use control solution or test strip which expired.
2. Shake the control solution bottle well, then remove
cap. Squeeze the bottle and discard the first drop.
Squeeze the bottle again to get a second drop and bring
the tip of the test strip to touch the drop of solution until
the meter beeps. After 5 seconds’ count-down, meter
will display blood glucose control solution test result.
After 25 seconds’ count-down, meter will display uric
acid control solution test result.
3. Control test results must be within range of the control solution level printed on test strip
box. If the result is out of range, test again. If still so, do not use test strips or meter for
testing. Call customer service at +86-731-89935581/+86-731-89935582 or contact local
dealers for help.
4. Eject the test strip
Attention: Discard used test strip and control solution according to local regulations.
Keep control solution away from children and pets.

Control Solution Testing
Why Perform a Control Solution Test
● Ensures that your meter and test strips are working properly.
● Allows you to practice testing without using blood.
When Should You Perform a Control Solution Test
● When you begin using a new vial of Test Strips.
● When the vial cap is opened for a long time.
● When Test Strips have been exposed to extreme environmental conditions.
● When you want to check whether meter or test strips are work properly.
● When you drop or broken the meter.
● When you want to check whether the test steps are correct.
Important Information
● Use only Sinocare control solution with your Meter.
● Check the expiration date on the control solution bottle. Do not use if expired.
● Use the blood glucose test strips within a period of 6 months from the date that you first
open the vial.
19 20
● Use the uric acid test strips within a period of 3 months from the date that you first open
the vial.
● Record the discard date on the blood glucose control solution bottle, which is 3 months
from when you first open it. Discard the bottle after 3 months.
● Record the discard date on the uric acid control solution bottle, which is 2 months from
when you first open it. Discard the bottle after 2 months.
● Discard any bottle that appears to be cracked or leaking.
● For in vitro diagnostic use only.
Performing a control solution test
Start with the meter off.
STEP 1: Wash your Hands
Wash your hands with mild soap and water. Be sure to dry your hands before performing a
test.
STEP 2: Insert a Safe AQ UG Test Strip
Insert a Safe AQ UG Test Strip with printing face up and the contact end into the test strip
port until it cannot go any further. The meter will turn on. If insert the blood glucose test
strip, the meter will display and symbol is flashing. If insert a Safe AQ UG uric acid test
strip, the meter will display the correcting code and symbol is flashing.
Attention: Only when meter display flashing blood drop symbol “ ” and control bottle
symbol, can you apply control solution. If there is no blood drop symbol or control bottle
symbol, restart the meter again or change the test mode.
STEP 3: Apply the Control Solution
1. Check the expiration date and discard dates on your control solution and Safe AQ UG test
strip vials. Do not use control solution or test strip which expired.
2. Shake the control solution bottle well, then remove
cap. Squeeze the bottle and discard the first drop.
Squeeze the bottle again to get a second drop and bring
the tip of the test strip to touch the drop of solution until
the meter beeps. After 5 seconds’ count-down, meter
will display blood glucose control solution test result.
After 25 seconds’ count-down, meter will display uric
acid control solution test result.
3. Control test results must be within range of the control solution level printed on test strip
box. If the result is out of range, test again. If still so, do not use test strips or meter for
testing. Call customer service at +86-731-89935581/+86-731-89935582 or contact local
dealers for help.
4. Eject the test strip
Attention: Discard used test strip and control solution according to local regulations.
Keep control solution away from children and pets.
μmol/L mg/dL
Uric acid control solution test result
21 22
Questionable Results:
Probable Cause
Operation mistake
Control solution not being shaken well
Retest according to correct steps
Shake control solution well and retest with a new test strip.
Use the first drop of control solution Retest with a new test strip
Expired or contaminated control solution Change a new vial control solution and retest.
Expired or contaminated test strip Change a new vial test strip and retest.
Temperature is too high or too low
Wrong correcting code
Equilibrate meter, test strip and control solution in room
temperature for 30 minutes and retest.
Set correcting code which accordance with test strip
package and retest.
Meter malfunction Contact customer service or local dealers
Action
Blood Glucose and Uric Acid Testing
Prepare meter, strip, lancing device and lancet before test.
STEP 1: Wash your hands or use an alcohol swab to
clean the fingertip. MAKE SURE YOUR HAND IS
DRY BEFORE TESTING.
STEP 2: Unscrew the lancing device cover.
STEP 3: Insert a lancet into the lancing device until
it comes to a full stop.
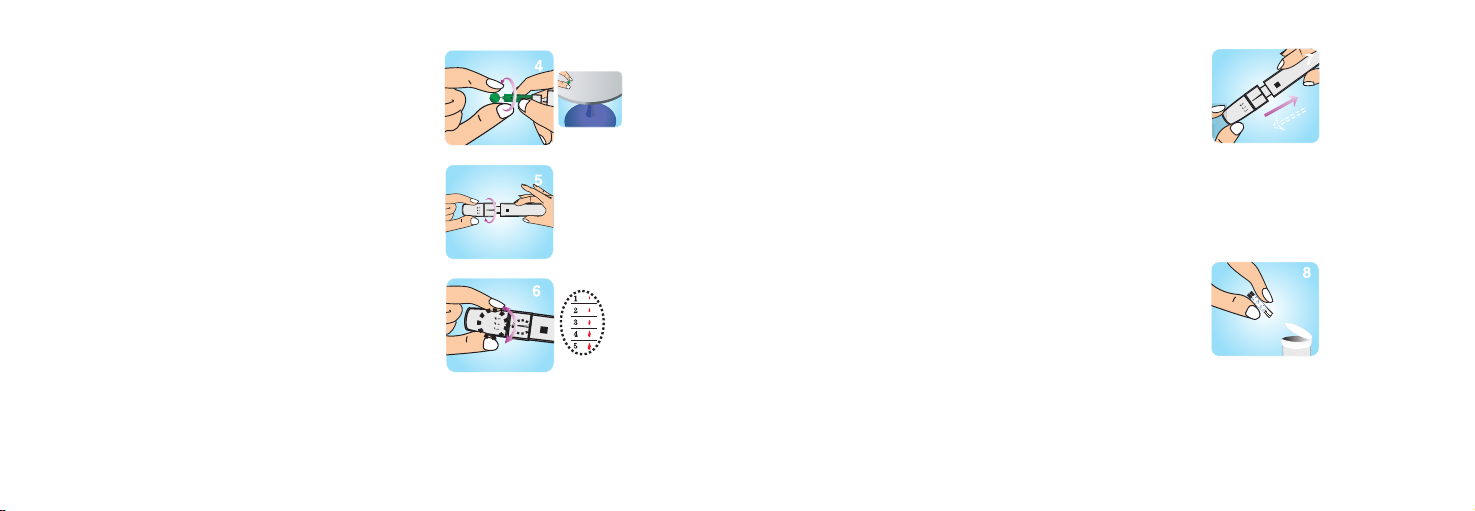
23 24
STEP 4: Twist and pull to remove the lancet
protector. Retain the lancet protector for safe
lancet disposal.
STEP 5: Screw the lancing device cover back on.
STEP 6: Twist the adjustable comfort tip to adjust
the puncture depth.
Tips:
1-2 (least depth) for soft or thin skin,
3-4 (average depth) for average skin,
5 (deepest depth) for thick or calloused skin.
The Sinocare lancing device is prepared and ready to lance your finger for a blood
sample.
The lancet is for single use only. To prevent the risk of blood borne pathogen
transmission, it shall not be shared with other people.
STEP 7: Pull the spring cover back to arm the
lancing
STEP 8: Take a strip out of the strip vial.
Immediately close the vial lid.
Attention: Finish test within 3 minutes after
take out strip. Otherwise test result may
be inaccurate.

25 26
STEP 9: Insert strip into the test strip port, The Safe
AQ UG meter will beep and turn on.
The port marked with “G” is for blood glucose strip and
the port marked with “U” is for uric acid strip. If
blood glucose strip inserted, “GLU” will be displayed
on the bottom-left of the screen, if uric acid strip inserted,
“UA” will be displayed on the top-left of the screen.
After test strip inserted, the meter will display flashing
blood drop symbol and you can apply blood sample.
Attention:
● If blood is not applied within 3 minutes, the meter will automatically turn off. Reinsert the
strip and begin test.
● If the meter display “E-2”, it means the environment temperature is beyond 40℃ or
below 5℃, Please put the meter, strip, control solution at appropriate place (10℃~35℃),
wait at least 30 minutes and test again.
● The test strip port must be match the inserted strip, or else the meter will not turn on.
● The meter can test blood glucose and uric acid together.
STEP 10:Take Blood Sample
Make sure the lancing device is pressed firmly to
your finger. Press the button to lance.
Attention: If you didn’t get enough blood sample,
please gently massage your finger. DO NOT
SQUEEZE YOUR FINGER. Refer to step 6 to
adjust puncture depth and lance again.
STEP 11: Apply blood sample
When the meter screen displays a flashing blood drop
symbol “ ”, apply the blood sample to the reaction
chamber.
Attention:
● Apply blood sample only the blood drop symbol “ ” flashing.
● Before applying blood sample, the disinfection ethanol in the puncture site should
completely volatilize.
● Hold the tip of the test strip to the blood drop until the meter beeps. Visually confirm that
the blood sample fills the entire reaction chamber at the end of the test strip.
● Do not move meter or strip and press main button when testing.
● If you didn’t apply enough blood sample to test strip, use a new test strip to test again.
● Do not use test strip press finger firmly, otherwise it may cause inaccurate test result.

27 28
Caution:
DO NOT smear or scrape the blood onto the Test Strip
DO NOT apply blood to the Test Strip when the Test Strip is not in the test strip port.
DO NOT put blood or foreign objects into the test strip port.
STEP 12: Read the result
Blood glucose testing: After a 5-second count down,
the meter displays the test result in mg/dL or mmol/L .
Uric acid testing: After a 25-second count down, the
meter displays the test result in mg/dL or μmol/L.
STEP 13: Eject the strip.
Used test strip and lancet may be biohazardous. Please discard them carefully
according to local regulation requirements.
If the meter is used by multiple people, use 75% alcohol to clean meter surface after
testing to avoid pathogen infection.
STEP 14: Remove the lancing device cover. With
the lancet protector on the table, stick the needle
of the lancet into the protector. Eject the lancet
and screw the lancet cover back on.

29 30
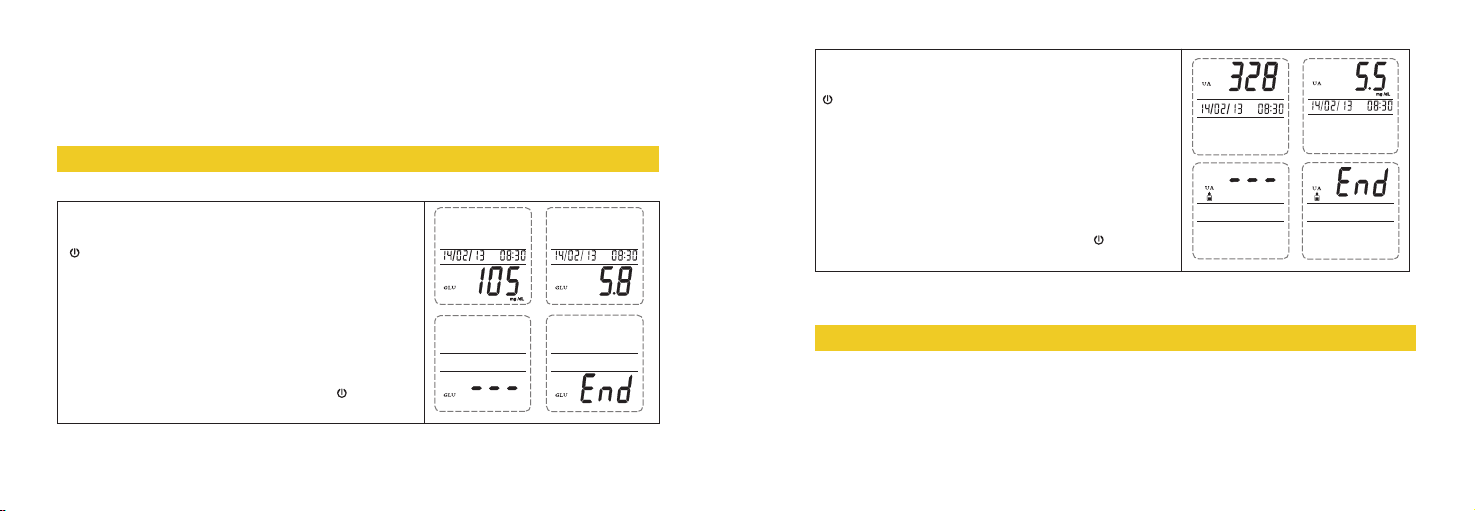
Viewing test result
After the meter counts down from 5, your blood glucose results appear along with the unit of
measure. After the meter counts down from 25, your uric acid results appear along with the unit
of measure. The result is stored in the meter memory. Turn the meter off by removing the test
strip. Discard the used test strip carefully to avoid contamination.
Test Countdown
Display uric acid and blood glucose test results
Display uric acid test results
Display blood glucose test results
mmol/L
mmol/L
μmol/L
μmol/L
If blood glucose test results greater than 33.3mmol/L
(600 mg/dL), the meter will display “HI”. Retest
immediately with a new test strip. If your reading is
still “HI”, contact healthcare professional immediately.
If blood glucose test results low than 1.1mmol/L
(20 mg/dL), the meter will display “LO”. Retest
immediately with a new test strip. If your reading is
still “LO”, contact healthcare professional immediately.
If uric acid test results greater than 1188 μmol/L
(20.0 mg/dL), the meter will display “HI”. Retest
immediately with a new test strip. If your reading is
still “HI”, contact healthcare professional immediately.
If uric acid test results low than 181 μmol/L
(3.0 mg/dL), the meter will display “LO”. Retest
immediately with a new test strip. If your reading is
still “LO”, contact healthcare professional immediately.
31 32
Memory
The Safe AQ UG meter stores the 200 most recent results (100 blood glucose test results
and 100 uric acid test results) with the date and time in its memory. You can review the
individual results by entering the memory mode.
Note: You cannot review your test results when the test strip is in the test strip port.
Step1: Screening Memory
Review blood glucose test result:
● While the Safe AQ UG meter is turned off, press the
button for 3 seconds to turn on the meter, the screen
shows your latest blood glucose test result. If there is no
test result saved, the display screen will show “---" with
beep, when the memory is full, the oldest result is
dropped and the newest is added.
● Press the ▼or▲ button to view all the blood glucose
results in memory. When you have viewed all test results,
meter will display “End”, press and hold the for 3
seconds to turn off meter.
mmol/L
Note: You cannot review your test results when the test strip is in the test strip port.
Step2: Delete Memory
Review uric acid test result:
● While the Safe AQ UG meter is turned off, press the
button for 3 seconds to turn on the meter, the screen
shows your latest uric acid test result. If there is no test
result saved, the display screen will show “---” with beep,
when the memory is full, the oldest result is dropped and
the newest is added.
● Press the ▼or▲ button to view all the uric acid
results in memory. When you have viewed all test results,
meter will display “End”, press and hold the for 3
seconds to turn off meter.
μmol/L
33 34
Press and hold for 3 seconds to
advance to the screen showing the last
test result, and then press and ▼ the
same time, “---” will appear on the
display screen and all the saved test
results would be deleted.
Press button 3 seconds to turn the meter off.
Press and hold ▼ for 3 seconds
press and ▼ the same time.
Show the latest blood glucose
teste result.
“---” will appear on the display
screen and all the saved test
results would be deleted.
Information for Healthcare Professional Use
● Only trained healthcare professional be allowed to use Safe AQ UG blood glucose and
uric acid monitoring system on multiple patients.
● Only trained healthcare professional be allowed to collect venous blood samples.
● Any patient who has infectious diseases must use his/her own meter.
● If the same meter be used on multiple patients, there is risk of infection between both
patients and healthcare professional.
● Water or other disinfection solution which remains on skin may dilute blood and cause
inaccurate test results.
● Please dispose used lancet, test strips and expired control solution as medical waste.
Perform test:
1. Wear disposable gloves.
2. Healthcare professional use an alcohol swab to clean lance site. Then be sure dry stick
site before testing.
3. Use qualified lancing device and choose suitable penetrate depth for patients.
4. Using lancing device to lance.
5. Hold the tip of the test strip to the blood sample until the test strip reaction zone is full
and the meter begin countdown.
Table of contents
Other Sinocare Blood Glucose Meter manuals


Popular Blood Glucose Meter manuals by other brands


Prodigy
Prodigy VOICE Quick reference guide

Bayer HealthCare
Bayer HealthCare CONTOUR NEXT LINK Quick reference guide

NURSE ROSIE
NURSE ROSIE Rosie RealTime Owner's manual/warranty document

Accu-Chek
Accu-Chek GO Instructions for use

Accu-Chek
Accu-Chek Performa Connect user manual

Dexcom
Dexcom G7 Instructions for use


