Sinocare Safe AQ Smart User manual

User Manual
For in vitro diagnostic use only
Safe AQ Smart、Safe AQ Voice、Safe AQ Air
Blood Glucose Meter
Blood Glucose Monitoring System
QI-QW-VPQ
Shanghai International Holding Corp. GmbH (Europe)
Eiffestraße 80, 20537 Hamburg, Germany.
Tel: +49-40-2513175 Fax: +49-40-255726
E-mail: [email protected]
No. 265, Guyuan Road, Hi-Tech Zone, Changsha,
Hunan Province, 410205,People’s Republic of China
TEL:+86-731-89935581/89935582
FAX:+86-731-89825189
Email:[email protected] Website:www.sinocare.com

Dear Owner:
Sinocare thanks you for choosing the Safe AQ Smart 、Safe AQ
Air 、Safe AQ Voice blood glucose monitoring system. This user manual
contains important information about the meter and how it works.
Please read this user manual carefully before using your new
meter, or the protection provided by the meter may be impaired.
If you have any questions, please feel free to contact our Customer
Service at +86 - 731 - 89935581 /+ 86 - 731 - 89935582 or your local
dealers .

Table of Contents Table of Contents
I. Introduction to the Your Blood Glucose Monitoring System …………………1
Intended Use ……………………………………………………………………1
Test Principle ……………………………………………………………………2
II.Important Safety Information ……………………………………………………4
III.Patient Cautions …………………………………………………………………5
IV.Important Health-Related Information …………………………………………6
V.About Your Safe AQ Smart、Safe AQ Air、Safe AQ Voice Meter……………8
VI.Full Screen Display ………………………………………………………………9
VII.Voice Function (For Safe AQ Voice only) …………………………………10
VIII.Pairing (Connecting) Meter with Smartphone (For Safe AQ Air only)……11
IX.Control Solution Testing…………………………………………………………12
X.Blood Glucose Testing……………………………………………………………16
XI.Viewing test result ………………………………………………………………23
XII.Memory………………………………………………………………………24
XIII.Information for Healthcare Professional Use ………………………………25
XIV.Comparing Meter with Laboratory Results …………………………………26
XV.Cleaning and Disinfecting………………………………………………………27
XVI.Power Saving …………………………………………………………………28
XVII.Performance Characteristics…………………………………………………28
XVIII.Specifications …………………………………………………………………29
XIX.Maintenance …………………………………………………………………31
XX.Changing the batteries…………………………………………………………32
XXI.Troubleshooting………………………………………………………………33
XXII.Explanation of symbols ………………………………………………………40
XXIII.Warranty………………………………………………………………………41
XXIV.References……………………………………………………………………41
XXV.Index…………………………………………………………………………42

12
I. Introduction to the Your Blood Glucose Monitoring System
Intended Use
The Safe AQ Smart、Safe AQ Air 、Safe AQ Voice Blood Glucose Monitoring
System is designed for the quantitative measurement of glucose in fresh capillary
whole blood samples taken from the fingertip and in venous whole blood samples.
The Blood Glucose Monitoring System is for use outside the body only (in vitro
diagnostic use) for self testing and professional use as an aid in the management
of diabetes.
The Safe AQ Smart、Safe AQ Air 、Safe AQ Voice Blood Glucose Monitoring
System is intended for in vitro diagnostic use and should not be used for the
diagnosis of or screening of diabetes.
The Safe AQ Smart Blood Glucose Monitoring System includes:
Safe AQ Smart blood glucose meter, Safe AQ blood glucose test strip, blood
glucose control solution
The Safe AQ Air Blood Glucose Monitoring System includes:
Safe AQ Air blood glucose meter, Safe AQ blood glucose test strip, blood glucose
control solution
The Safe AQ Voice Blood Glucose Monitoring System includes:
Safe AQ Voice blood glucose meter, Safe AQ blood glucose test strip, blood
glucose control solution
NOTE: The blood glucose control solution is optional.
The Safe AQ Smart、Safe AQ Air、Safe AQ Voice meter display blood glucose
results in mmol/L or mg/dL.
Each meter only displays one unit of measurement. The unit is preset and you
can’t change the setting. Please confirm the unit before testing.

34
Test Principle
A blood glucose test is based on measurement of electrical current caused by the
reaction of glucose with the reagents (special chemicals) on the electrode of the
strip. The blood or control solution sample is drawn into the tip of the test strip
through capillary action. Glucose in the sample reacts with the special chemicals
and generates electrons, which produce electrical current. The blood glucose
meter measures the electrical current and calculates the glucose result. The
glucose result is displayed by your meter as mg/dL or mmol/L.
II.Important Safety Information
▶ For self-testing customer, your Safe AQ Smart、Safe AQ Air、Safe AQ Voice
meter and lancing device are for single person use only. Do not share them with
anyone else, even family members.
▶ For professional use, if the meter is being used on the second person, the meter
and lancing device should be disinfected first.
▶ Safe AQ test strip and lancet are for single use only. DO NOT REUSE.
▶ Do not use other test strips and control solutions with the Safe AQ Smart、Safe
AQ Air、Safe AQ Voice meter.
▶ Do not use the meter if it is not working properly, or there is any damage.
▶ Keep the Safe AQ test strip vial away from children. The strip vial, test strips,
and control solution bottles can be choking hazards. DO NOT drink the control
solution.
▶ Remove the batteries if the meter is not likely to be used for some time.
DO NOT CHANGE YOUR TREATMENT BASED ON A SINGLE RESULT THAT
DOES NOT MATCH HOW YOU FEEL OR IF YOU BELIEVE THAT YOUR TEST
RESULT COULD BE FALSE.

56
III.Patient Cautions
▶Not for neonatal (newborn or infant) use
▶Not for screening or diagnosis of diabetes mellitus.
▶Not for use on the critical patients.
▶Not for alternative site testing (AST) use.
▶For in vitro diagnostic use only .
IV.Important Health-Related Information
The American Diabetes Association (ADA) suggests the following targets for
normal blood glucose range. More or less stringent goals may be appropriate for
each person. If your test result is out of the range or your test result is not in
accordance with your feeling, retest your blood glucose. If still out of the range,
please contact healthcare professional.
FOR Safe AQ Smart, Safe AQ Air meter:
1. If test results greater than 600 mg/dL or 33.3mmol/L, the meter will display “HI”.
Retest immediately with a new test strip. If your reading is still “HI”, contact
healthcare professional immediately.
2. If test results lower than 20 mg/dL or 1.1mmol/L, the meter will display “LO”.
Retest immediately with a new test strip. If your reading is still “LO”, contact
healthcare professional immediately.
Glycemic control
Time of Day
Preprandial plasma glucose
(before a meal)
Postprandial plasma glucose
(1-2 hours after starting a meal)
ADA suggested reading
70-100 mg/dl
<140mg/dl

78
FOR Safe AQ Voice meter:
1. If test results greater than 600 mg/dL(33.3mmol/L), the meter will display
“HI” and read“The result is beyond the range”with red light on. Retest your blood
glucose immediately with a new test strip. If your reading is still “HI”, contact
healthcare professional immediately.
2. If test results is lower than 20 mg/dL(1.1mmol/L), the meter will display “LO”
and read “The result is below the range”with red light on. Retest your blood
glucose immediately with a new test strip. If your reading is still “LO”, contact
healthcare professional immediately.
3. If test result is >70mg/dL(3.9 mmol/L)and <126 mg/dL(< 7.0 mmol/L),
the meter will display and read the test result with green light on.
4. If test result is ≥ 126 mg/dL(≥7.0 mmol/L)and ≤ 250 mg/dL(≤13.9 mmol/L),
the meter will display and read the test result with yellow light on.
5. If test result is ≤ 70mg/dL(≤ 3.9 mmol/L)or >250mg/dL(> 13.9 mmol/L),
the meter will display and read the test result with red light on.
Note: Do not change your treatment only based on test result and light indications.
Please consult healthcare professional for your treatment.
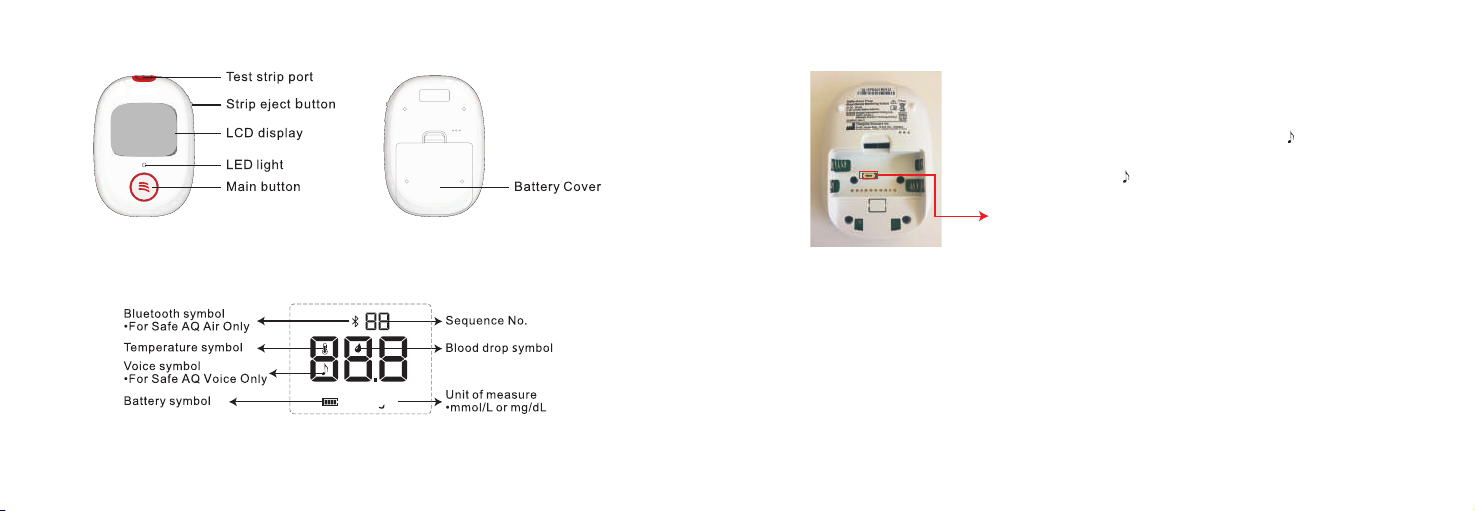
V.About Your Safe AQ Smart、Safe AQ Air、Safe AQ Voice Meter
Test strip port
Strip eject button
LCD display
Main button
Test strip port
Strip eject button
LCD display
Main button
Battery Cover
Battery Cover
Safe AQ Smart Meter:
Safe AQ Air Meter:
910
Safe AQ Voice Meter:
VI.Full Screen Display
VII.Voice Function (For Safe AQ Voice only)
mmol/dL
The Safe AQ Voice is preset as voice on. Slide the battery
cover out of the meter. Remove the batteries. Voice switch is
inside the battery chamber. Slide the voice switch to the “on”
side, voice turns on and screen will display “ ” symbol when
meter is on; while slide to the “off” side, voice turns off and
screen won’t display “ ” symbol.
Voice switch

11 12
VIII.Pairing (Connecting) Meter with Smartphone (For Safe AQ Air only)
Pairing enables meter to upload test results when requested by an App (applica-
tion) on smartphone. The smartphone must have the bluetooth function turned on
and have an App that is able to receive the results.
Take examples of Wechat App.
1. Make sure that the Bluetooth Smart feature is turned on in the smartphone.
2. Open APP.
3. Scan QR code which provided with Safe AQ Air blood glucose monitoring
system.
4. Click “Link device”.
5. Insert test strip, meter turn on.
6. If the bluetooth symbol displayed, it means connect successful. Perform test
and your test result will be uploaded to your smartphone. If the bluetooth symbol
is flash, please check if you have turned on bluetooth function on your smart-
phone and insert test strip again.
Note: Different App may be little different while pairing meter with smartphone.
IX.Control Solution Testing
Why Perform a Control Solution Test
• Ensures that your meter and test strips are working properly.
• Allows you to practice testing without using blood.
When Should You Perform a Control Solution Test
• When you begin using a new vial of Test Strips.
• When the vial cap is opened for a long time.
• When Test Strips have been exposed to extreme environmental conditions.
• When you want to check whether meter or test strips are work properly.
• When you drop or broken the meter.
• When you want to check whether the test steps are correct.
Important Information
• Use only Sinocare blood glucose control solution with your Meter.
• Check the expiration date on the control solution bottle. Do not use if expired.
• Use the test strips within a period of 6 months from the date that you first open
the vial.
• Record the opened date on the control solution bottle, which is 3 months from
when you first open it. Discard the bottle after 3 months.

13 14
• Discard any bottle that appears to be cracked or leaking.
• For in vitro diagnostic use only.
Performing a control solution test
Start with the blood glucose meter off. Prepare the following items before control
solution test:
a. blood glucose meter;
b. blood glucose test strip;
c. blood glucose control solution
STEP 1: Wash your Hands
Wash your hands with mild soap and water. Be sure to dry your hands before
performing a test.
STEP 2: Insert a Safe AQ Test Strip
Insert a Safe AQ Test Strip with printing face up and the contact end into the test
strip port until it cannot go any further. The blood glucose meter will turn on.
Attention: Only when meter display flashing blood drop symbol “ ”, can you apply
control solution. If there is no blood drop symbol, restart the meter again.
STEP 3: Apply the Control Solution
1. Check the expiration date and discard dates on your control solution and Safe
AQ test strip vials. Do not use control solution or test strip which expired.
2. Shake the control solution bottle well, then remove cap. Squeeze the bottle and
discard the first drop. Squeeze the bottle again to get a second drop and bring the
tip of the Safe AQ test strip to touch the drop of solution until the blood glucose
meter beeps. After 5 seconds’ count-down, meter will display control solution test
result.
3. Control test results must be within range of the control solution level printed on
test strip vial label. If the result is out of range, test again. If still so, do not use test
strips or meter for blood glucose testing. Call customer service at
+86-731-89935581/+86-731-89935582 or contact local dealers for help.
4. Eject the test strip
Attention: Discard used test strip and control solution according to local regulations.
Keep control solution away from children and pets.

15 16
Questionable Results: X.Blood Glucose Testing
Prepare meter, strip, lancing device and lancet before test.
Probable Cause
Operation mistake
Control solution not being shaken well
Use the first drop of control solution
Expired or contaminated control solution
Expired or contaminated test strip
Temperature is too high or too low
Retest according to correct steps
Shake control solution well and retest with
a new test strip.
Retest with a new test strip
Change a new vial control solution and retest.
Change a new vial test strip and retest.
Equilibrate meter, test strip and control
solution in testing condition for 30 minutes
and retest.
Meter malfunction Contact customer service or local dealers
Action
9
STEP 1: Wash your hands or use an alcohol
swab to clean the fingertip. MAKE SURE
YOUR HAND IS DRY BEFORE TESTING.
STEP 2: Unscrew the lancing device cover.
STEP 3: Insert a lancet into the lancing
device until it comes to a full stop.

9
9
4
17 18
STEP 4: Twist and pull to remove the lancet
protector. Retain the lancet protector for safe lancet
disposal.
STEP 5: Screw the lancing device cover back on.
STEP 6: Twist the adjustable comfort tip to adjust the
puncture depth.
Tips:
1-2 (least depth) for soft or thin skin,
3-4 (average depth) for average skin,
5 (deepest depth) for thick or calloused skin.
STEP 7: Pull the spring cover back to arm the
lancing
STEP 8: Take a strip out of the strip vial.
Immediately close the vial lid.
Attention: Finish test within 3 minutes after take out
strip. Otherwise test result may be inaccurate.
The Sinocare lancing device is prepared and ready to lance your finger for a blood
sample.
The lancet is for single use only. To prevent the risk of blood borne pathogen
transmission, it shall not be shared with other people.

4
19 20
STEP 9: Insert strip into the test strip port.
For Safe AQ Smart, Safe AQ Air, meter turn on.
For Safe AQ Voice, meter will turn on and play
“Please apply the blood sample”.
Tips: Insert the strip with the printed side facing up
and contact end into strip port.
Attention: If blood is not applied within 3 minutes,
the meter will automatically turn off. Reinsert the
strip and begin test.
For Safe AQ Smart, Safe AQ Air, if the meter display “E-2”; for Safe AQ Voice, if the meter
display “E-2” and play “ The temperature is beyond the range”, it means the environment
temperature is beyond the range. Please put the meter, strip, control solution at appropriate
place (10℃~35℃), wait at least 30 minutes and test again.
For Safe AQ Smart, Safe AQ Air, if the meter display “E-2”; for Safe AQ Voice, if the meter
display “E-2”and play “ The temperature is below the range”, it means the environment
temperature is below the range. Please put the meter, strip, control solution at appropriate
place (10℃~35℃), wait at least 30 minutes and test again.
STEP 10: Make sure the lancing device is pressed
firmly to your finger. Press the button to lance.
Attention: If you didn’t get enough blood sample,
please gently massage your finger. DO NOT
SQUEEZE YOUR FINGER. Refer to step 6 to
adjust puncture depth and lance again.
STEP 11: When the meter screen displays a flashing
blood symbol, apply the blood sample to the reaction
chamber.
Attention: Hold the tip of the test strip to the blood drop until the meter beeps. Visually confirm
that the blood sample fills the entire reaction chamber at the end of the test strip.
Do not move meter or strip and press main button when testing.
If you didn’t apply enough blood sample to test strip, use a new test strip to test again.
Do not use test strip press finger firmly, otherwise it may cause inaccurate test result.

21 22
STEP 14: Remove the lancing device cover.
With the lancet protector on the table, stick
the needle of the lancet into the protector.
Eject the lancet and screw the lancet cover
back on.
Used test strip and lancet may be biohazardous. Please discard them carefully
according to local regulation requirements.
STEP 12: After a 5-second count down, for Safe AQ
Smart, Safe AQ Air meter, the meter displays the test
result; for Safe AQ Voice meter, the meter displays
and read the test result “The result is xxx Milligram
per deciliter” or “The result is xx point xxx millimol
per liter”.
STEP 13: Eject the strip.
Caution::
DO NOT smear or scrape the blood onto the Test Strip
DO NOT apply blood to the Test Strip when the Test Strip is not in the test strip port.
DO NOT put blood or foreign objects into the test strip port.
For Safe AQ Smart, Safe AQ Air, if the meter displays “E-3”; for Safe AQ Voice, if the meter
displays “E-3” and plays “Test method error”, please read the blood glucose testing section
carefully and use a new test strip test again.

XI.Viewing test result XII.Memory
The Safe AQ Smart、Safe AQ Air、Safe AQ Voice meter stores 10 blood glucose
test results. You can review the individual results by entering the memory mode.
Once 10 results are in memory, adding a new result causes the oldest one to be
deleted.
23 24
After the blood glucose meter counts down from 5,
your blood glucose results appears along with the
unit of measure. This blood glucose result is stored
in the meter memory. Turn the meter off by removing
the Safe AQ test strip. Discard the used test strip
carefully to avoid contamination.
If test result is above 600mg/dL (33.3mmol/L), the screen displays
HI. Use a new test strip to test again. If still display HI, please
contact healthcare professional immediately.
If test result is below 20 mg/dL (1.1mmol/L), the screen displays
LO. Use a new test strip to test again. If still display LO, please
contact healthcare professional immediately.
Attention: The test result of “HI” or “LO” will not store in memory.
mg/dL mmol/L
mg/dL unit mmol/L unit
mg/dL mmol/L
mg/dL unit mmol/L unit
With the meter is off, press the button for 1.5
seconds to turn the meter on.
Meter will beep and display last blood glucose test
result.
If no test results in memory, the meter will display 3 dashes
with beep. Briefly press button to review test result.
Press button 3 seconds to turn the meter off.
Note: You cannot review your test results when the test strip is in the test strip port.

XIV.Comparing Meter with Laboratory Results
When comparing results between Safe AQ Smart、Safe AQ Air、Safe AQ Voice
blood glucose monitoring system and a laboratory system, Safe AQ Smart、Safe
AQ Air、Safe AQ Voice blood glucose monitoring system blood tests should be
performed within 30 minutes of a laboratory test.
XIII.Information for Healthcare Professional Use
• Only trained healthcare professional be allowed to use Safe AQ Smart、Safe AQ
Air、Safe AQ Voice blood glucose monitoring system on multiple patients.
• Only trained healthcare professional be allowed to collect venous blood samples.
• Any patient who has infectious diseases must use his/her own meter.
• If the same meter be used on multiple patients, there is risk of infection between
both patients and healthcare professional.
• Water or other disinfection solution which remains on skin may dilute blood and
cause inaccurate test results.
• Please dispose used lancet, test strips and expired control solution as medical
waste.
Perform test:
1. Wear disposable gloves.
2. Healthcare professional use an alcohol swab to clean lance site. Then be sure
dry stick site before testing.
3. Use qualified lancing device and choose suitable penetrate depth for patients.
4. Using lancing device to lance.
5. Hold the tip of the test strip to the blood sample until the test strip reaction zone
is full and the meter begin countdown.
6. Wash hands thoroughly with soap and water after handling the meter, lancing
device or test strips.
7. Cleaning and disinfecting meter and lancing device before use on next patient.
25 26

XV.Cleaning and Disinfecting
• Clean and disinfect meter immediately after getting any blood on the meter or if
meter is dirty.
• If the meter is being used on second person, the meter and lancing device
should be clean and disinfected first. Do not clean the meter during the test.
To clean the meter:
1. Wash hands thoroughly with soap and water.
2. Make sure meter is off and a test strip is not inserted. Use 75% alcohol to rub
the entire outside of the meter. Make sure no liquids enter the test strip port or
other opening in the meter.
3. Let meter air dry thoroughly before using to test.
4. Wash hands thoroughly again after handing meter.
5. Verify the meter is working properly by performing control solution test. If your
meter can’t work properly, please contact customer service at +86-731-89935581/
+86-731-89935582 or contact local dealers.
To disinfect the meter:
Please according to clinic institution disinfect method to disinfect the meter.
XVI.Power Saving
• If there is no blood applied to the test strip within 3 minutes, the meter will
automatically turn off.
• After test, the test results will be displayed on the screen with test strip in strip
port, If there no operation on the meter within 3 minutes, the meter will automati-
cally turn off.
Note: If test result display “LO” or “HI”, the test results will be displayed 1 minute.
If there is no other operation on the meter within 1 minute, the meter will automati-
cally turn off.
• If there is no other operation on the meter within 1 minute, such as enter into test
results review mode, the meter will automatically turn off.
XVII.Performance Characteristics
Accuracy: 95% test result of Safe AQ Smart, Safe AQ Air, Safe AQ Voice meet the requirement below:
27 28
Concentration Range
<5.55 mmol/L (100 mg/dL) Within±0.83 mmol/L(15 mg/dL)
Within ± 15%≥5.55 mmol/L (100 mg/dL)
Bias%

Precision: test result of Safe AQ Smart, Safe AQ Air, Safe AQ Voice meet the requirement below:
Details please read Safe AQ blood glucose test strip package insert.
XVIII.Specications
29 30
Concentration Range
<5.55 mmol/L (100 mg/dL) SD< 0.34 mmol/L (6.0 mg/dL)
CV<6.0%≥5.55 mmol/L (100 mg/dL)
Requirement
Blood volume 0.6μL
Sample type Capillary whole blood, Venous whole blood
Calibration Plasma equivalent
Measuring time
Meter storage/transportation conditions
Dimension
Weight
Power source
Software Version A
-20℃~55℃
84*60*26(mm)
73.5g with battery
3V DC, 50mA, 2 AAA alkaline batteries
5s
Memory 10 blood glucose test results
Testing condition 10℃~35℃ ≤80% RH
Construction Hand-held
Measurement units
Measurement range
Auto electrode inserting detection
Auto sample loading detection
Auto reaction time count-down
Temperature Warning
Battery power Warning
Used test strips Warning
20~600 mg/dL or 1.1~33.3 mmol/L
Shelf life
10 years(estimated by test 7 times per day).
During use, user should maintain the product
refer to this user manual’s requirements.
Additional features
mg/dL or mmol/L

XIX.Maintenance
• Use of this instrument in a dry environment, especially if synthetic materials are
present (synthetic clothing, carpets etc.) may cause damaging electrostatic
discharges that may cause erroneous results.
• Electromagnetic Compatibility (EMC): The meter complies with the electromag-
netic requirements IEC 61326-2-6: 2012 specified in ISO 15197-2013. Electro-
magnetic emissions are low and unlikely to interfere with other nearby electronic
equipment, nor are emissions from nearby electronic equipment likely to interfere
with the meter. Immunity to electrostatic is charge meets the requirements of IEC
61326-2-6: 2012. The meter has been tested for radio frequency interference at
the frequency range and test levels specified by IEC 61326-2-6: 2012.
• Do not use this instrument in close proximity to sources of strong electromagnet-
ic radiation, as these may interfere with the proper operation.
• Avoid dirt, dust, blood, control solution or liquids into the meter test port.
• Do not keep meter in an area where it may be crushed.
• Store blood glucose monitoring system (meter, test strip, control solution) in a
dry place.
• Do not freeze.
• Do not store in the kitchen or bathroom.
XX.Changing the batteries
Make sure your meter is off when you change the batteries.
Step 1: Slide the battery cover out of the meter.
Step 2: Remove the old batteries. Place the new ones in the drawer according to
the inner compartment directs of “+” and “–” side.
Step 3: Slide the battery cover back into position until it locks into place.
31 32
Caution: Keep batteries away from children. If the battery is swallowed call
healthcare professional immediately.
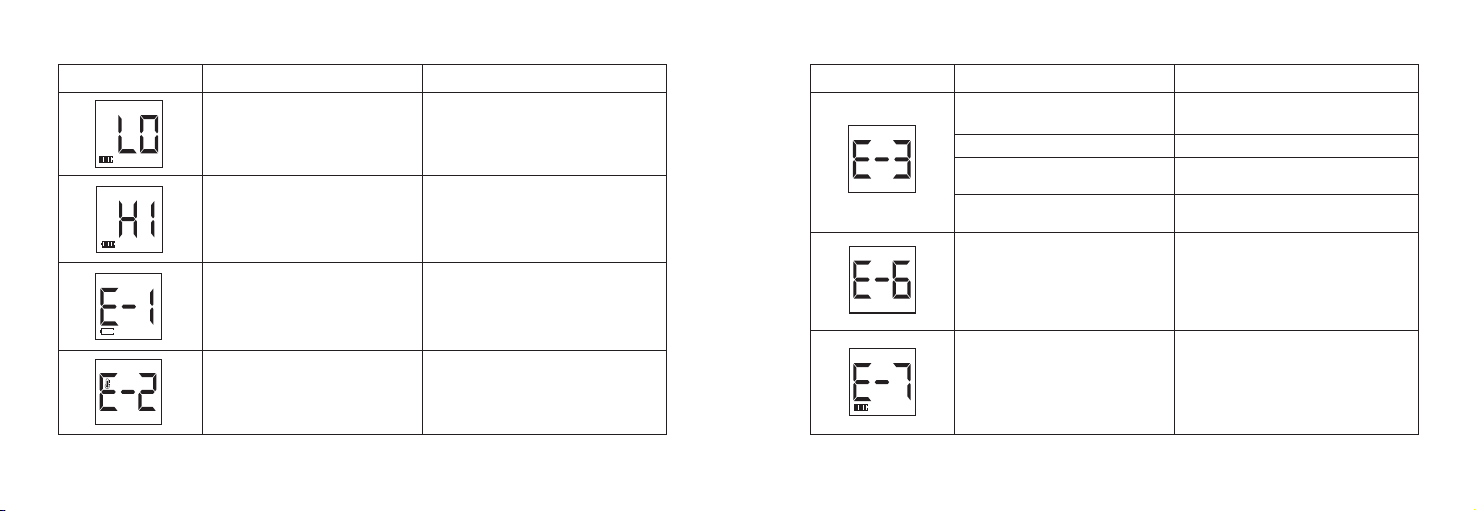
XXI.Troubleshooting
33 34
Display What it means What to do Display What it means What to do
Your result is below the
measurement limit, which is
less than 20 mg/dL or less
than 1.1 mmol/L.
Your result is above the
measurement limit, which is
higher than 600 mg/dL or
higher than 33.3 mmol/L.
Low battery power.
Test method error: insert strip into
meter after apply sample to strip.
Used test strip
Expired test strip or damped test
strip
Test strip exposed to air more than
3 minutes.
Parameter error.
Insufficient samples
Use a new test strip to test again.
Use a new test strip to test again.
Use a new test strip to test again.
Call Customer Service at
+86-731-89935581/
+86-731-89935582
or contact your local dealers.
Use a new test strip to test a gain.
Insert test strip into meter before
apply sample to strip.
Meter is out of the required
testing temperature range
Replace the batteries
immediately.
Move meter, strip and control
solution to appropriate place.
Wait at least 30 minutes and
test again.
Use a new test strip to test again,
if meter still display “HI”, call
healthcare professional
immediately.
Use a new test strip to test again,
if meter still display “LO”, call
healthcare professional
immediately.
This manual suits for next models
2
Table of contents
Other Sinocare Blood Glucose Meter manuals


Popular Blood Glucose Meter manuals by other brands


ApexBio
ApexBio MultiSure GK Link MTM309 user guide

Trividia Health
Trividia Health TRUEbalance user manual

2in1
2in1 SMART user guide

WellionVet
WellionVet Gluco Calea owner's guide

NIPRO Diagnostics
NIPRO Diagnostics True balance owner's booklet

PharmaTech Solutions
PharmaTech Solutions GenUltimate! 4Pets Avantage user guide