Sizewise Bari Shower Commode User manual
0
User
Manual
Rev. 1.0 #8058
SIZEWISE
04.26.2013
User Manual
Bari Sho er Commode™ Chair

1
Table of Contents
Definition of Symbols..................................................................................................................... 3
Manual Definitions ..................................................................................................................... 3
Warnings and Cautions............................................................................................................... 3
Important Safety Instructions...................................................................................................... 4
Device Information......................................................................................................................... 6
Description of the Bari Shower Commode™ Chair................................................................... 6
Specifications.................................................................................................................................. 7
Unpacking and Set-Up Instructions................................................................................................ 8
Unpacking/Parts Breakdown ...................................................................................................... 8
Bari Shower Commode™ Chair Set-Up..................................................................................... 9
Proper Use of the Commode......................................................................................................... 12
Operation of Commode............................................................................................................. 12
Transfers ................................................................................................................................... 12
Center of Balance...................................................................................................................... 13
Doorways and Obstacles........................................................................................................... 14
Reaching or Leaning................................................................................................................. 14
Motor Vehicle Safety................................................................................................................ 15
Features......................................................................................................................................... 16
Armrests.................................................................................................................................... 16
Backrest..................................................................................................................................... 16
Footrests.................................................................................................................................... 17
Positioning Belts....................................................................................................................... 17
Rear Wheel Locks..................................................................................................................... 18
Safety Tips.................................................................................................................................... 19
General Safety........................................................................................................................... 19
Transport................................................................................................................................... 19
Front Casters............................................................................................................................. 19
Cleaning Instructions.................................................................................................................... 20
Maintenance.................................................................................................................................. 23
Pneumatic Tires ........................................................................................................................ 23
Fasteners ................................................................................................................................... 23
Storage and Disposal................................................................................................................. 24
Parts and Assembly....................................................................................................................... 25
Warranty Information ................................................................................................................... 27

2
Sizewise Rentals™, LLC (Sizewise) Limited Warranty.......................................................... 27
Manufacturer Disclaimer.......................................................................................................... 28
User Assistance Information......................................................................................................... 29

3
Definition of Symbols
Manual Definitions
Throughout this manual different type fonts and icons are used to aid user readability and
understanding of the content. Below are some examples.
Standard Text Used for regular information.
Bold Face Text Emphasizes a word or phrase.
SETS APART SPECIAL INFORMATION OR IMPORTANT INSTRUCTION
CLARIFICATION.
Warnings and Cautions
Warnings/Cautions: This symbol is intended to alert the user to the presence of
important operating, maintenance or servicing instructions. Disregarding a
warning could result in patient and/or user injury as well as damage to equipment.
Manufacture label for Wheelchairs of Kansas (WOK):
WARNING: The commode is to be used in accordance with each facility’s
policies and procedures.

4
For user and patient safety, read and follow all warnings and instructions that apply to use of the
Bari Shower Commode™ Chair. Before using this commode, the user must know what to do to
ensure safety.
Put the patient at ease. The care provider should communicate with the patient by telling them
what they are planning to do.
Work with the patient’s doctor, nurse or therapist to learn safe methods best suited to the care
provider’s abilities and those of the patient.
Always use good posture and proper body mechanics. When possible use assistive safe patient
handling devices, if necessary to manually commode or support the patient, bend knees slightly
and keep back as upright and straight as possible.
Important Safety Instructions
•The commode is to be used in accordance with each facility’s policies and procedures.
Specifications
•Exceeding the weight capacity and/or safe working load listed in the specifications could
result in patient or user injury as well as damage to equipment or other property.
Unpacking and Set-Up Instructions
•Failure to follow the set-up instructions could result in patient or user injury as well as
damage to equipment or other property.
Operating Instructions
•Failure to heed the warnings pertaining to the operation of the commode could result in
patient and/or user injury as well as damage to equipment or other property.
•Keep fingers and arms away from rotating parts when mechanisms are moving.
•The commode is for indoor use only. Only operate the commode on a flat surface.
•DO NOT use the commode near an open flame or an extreme heat source.
•Use only parts, accessories and adapters authorized by the manufacturer.
•DO NOT use the commode with any unintentionally missing or abnormal parts.
•Never let fingers or other body parts come between moving parts when operating the
commode. Doing so may cause a pinch or crush type injury.
•Follow the instructions for the commode usage to avoid a fall or injury to the patient
and/or care provider.
Proper Use of the Commode
•Reaching or leaning affects the patient’s center of balance. Follow the instructions for
patients reaching or leaning from the commode to avoid a fall or injury to the patient
and/or care provider.
•Follow the instructions for transferring patients to avoid a fall or injury to the patient
and/or care provider.
Features
•Follow the instructions for the commode to avoid a fall or injury to the patient and/or care
provider.
Safety Tips
•The commode is to be used in accordance with each facility’s policies and procedures.

5
•During transport, use caution so the commode does not tip or overbalance. Failure to do
so could result in patient and/or user injury as well as damage to equipment or other
property.
•The commode needs to be stored, transported and operated in a temperature range of -
5°C to 45°C (23°F to 113°F).
Maintenance
•The Commode requires regular maintenance to uphold performance and avoid premature
wear, damage and injury.
•Many of the screws and bolts used in the commode are special high-strength fasteners.
Contact an authorized Sizewise technician to assist if finding the correct fasteners. If
improper fasteners are used, they could result in patient and/or user injury as well as
damage to equipment or other property.
•The commode needs to be stored, transported and operated in a temperature range of -
5°C to 45°C (23°F to 113°F).
Troubleshooting
•Only authorized personnel should engage in the troubleshooting process.
Troubleshooting by unauthorized persons could result in personal injury or equipment
damage.
6
Device Information
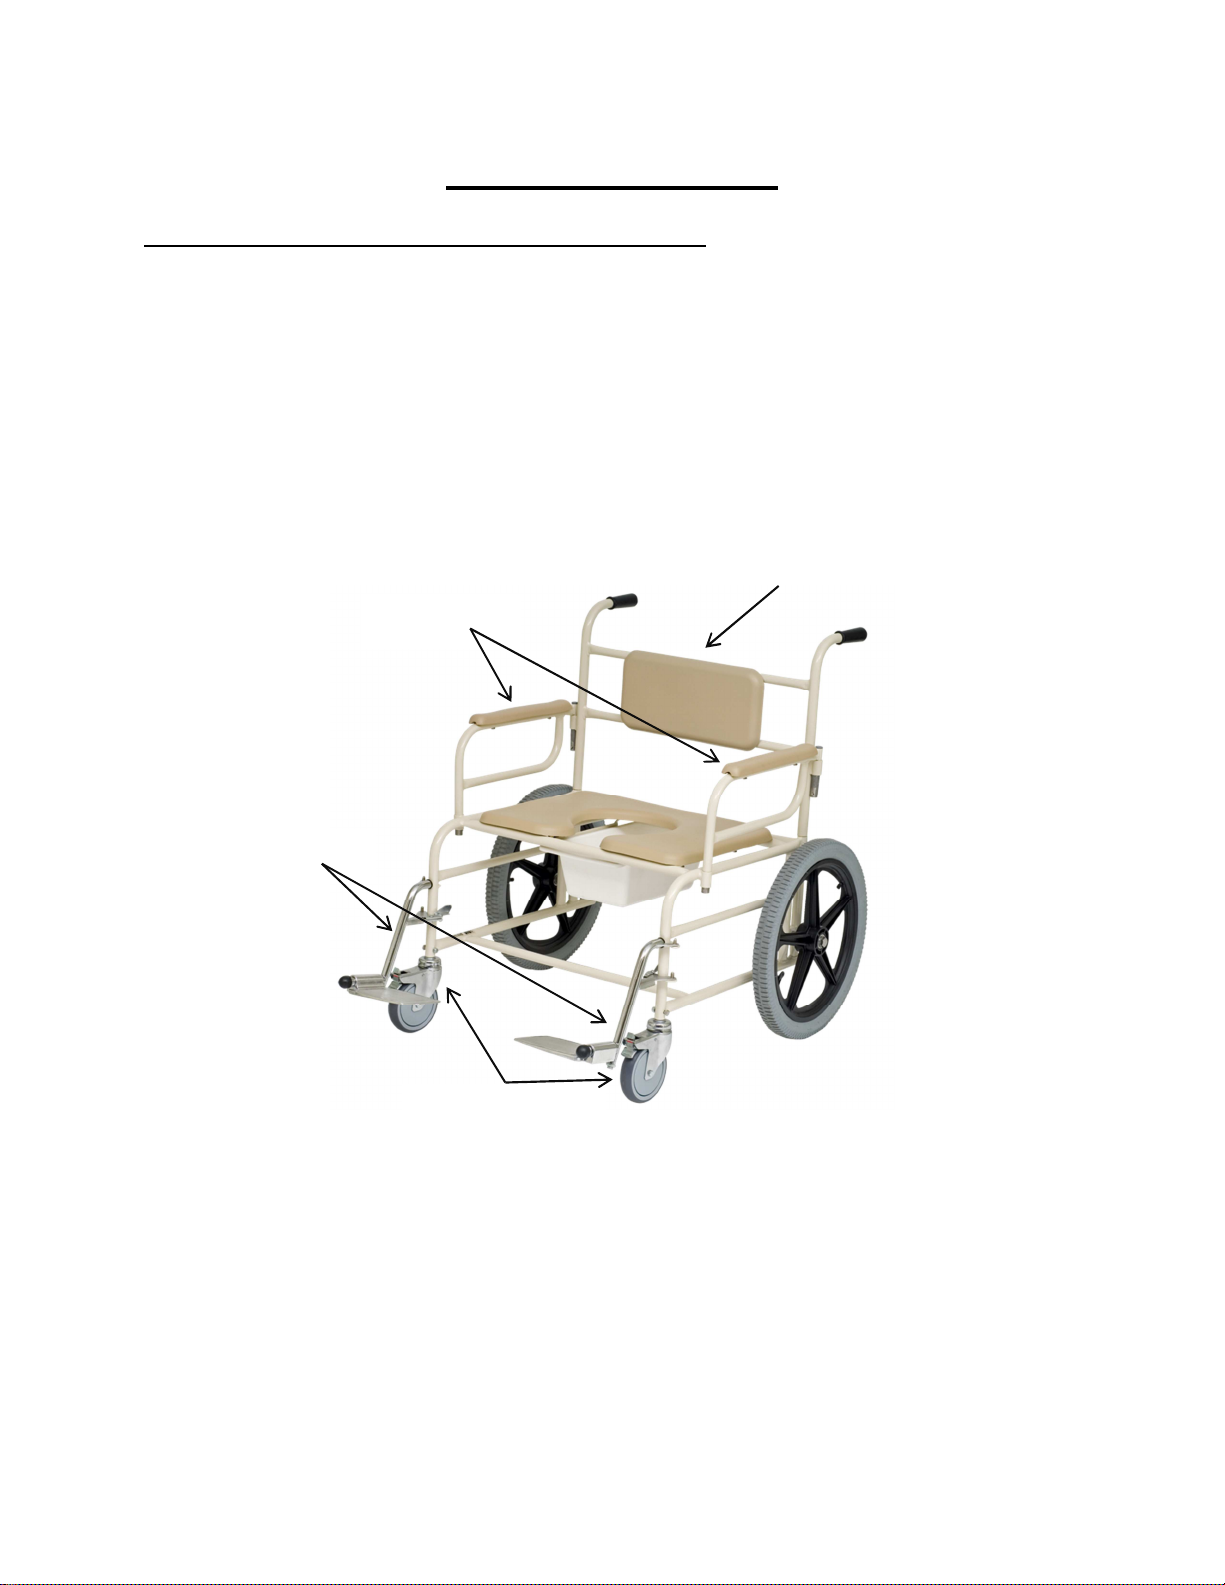
Description of the Bari Shower Commode™ Chair
The Bari Shower Commode™ Chair is designed to be used over the toilet, as a bedside
commode or to transport the individual into the shower. This chair has a durable stainless steel
frame, 20” Mag wheels on the rear, and 6” x 1” (15 cm x 2.5 cm) locking casters on the front
with a safe working load of up to 600 lbs. (750 lbs. on 30” model) Standard features on the Bari
Shower Commode™ Chair include swing-away footrests, removable back, water resistant
antibacterial padded seat and back. Seat widths available include 20”, 22”, 26”, and 30” (51 cm,
56 cm, 66 cm, and 76 cm).
Removable Back
Removable
Armrests
Swing-away
Footrests
Locking Casters

7
Specifications
Seat Width............................................ 20” / 51 cm, 22” / 56 cm, 26” / 66 cm, 30” / 76 cm
Seat Depth...........................................................................................................20” / 51 cm
Seat Height……...............................................................................................21” / 53.5 cm
Overall Width – 20” / 51 cm..............................................................................28” / 71 cm
22” / 56 cm .............................................................................30” / 76 cm
26” / 66 cm ..........................................................................34” / 86.5 cm
30” / 76 cm ..........................................................................38” / 96.5 cm
Overall Length ...............................................................................................45” / 114.5 cm
Overall Height…..............................................................................................34” / 86.5 cm
Clearance Height...........................................................................................19.5” / 49.5 cm
Commode Weight...........................................................................................77 lbs. / 35 kg
Weight Capacity..........................................................................................600 lbs. / 272 kg
..................................................................... 750 lbs. / 340 kg (30” model)
(Exceeding this limit will void the warranty)
Front Locking Casters....................................................................6” x 1” / 15 cm x 2.5 cm
Rear Wheels…........................................................................................... 20” / 51 cm Mag
WARNING: Exceeding the weight capacity and/or safe working load listed in
the specifications could result in patient or user injury as well as damage to
equipment or other property.

8
Unpacking and Set-Up Instructions
Unpacking/Parts Breakdown
Inspect for any signs of freight damage. If obvious damage is detected, contact the freight
company and file a damage complaint. It may be necessary to take pictures of the damage.
After visual inspection make sure all of the proper components have been received.
Determining whether assembly is required will depend on the method of shipping. The
commode is shipped two different ways: completed assembled or requiring the casters and
wheels to be bolted on.
1. Make sure the commode rolls easily and freely and that all parts work smoothly.
2. Check for excess noise, vibration or a change in ease of use. They may be signs of a
problem such as low tire pressure, loose fasteners or damage to the commode.
3. If a problem is detected, make sure to repair or adjust the commode before using it.
Contact an authorized Sizewise dealer to help find and correct the problem.
Items enclosed within the boxes:
Armrest (2)
Backrest
Base
Bolts and Nuts for Casters (2 bolts, 2 nylon locknuts)
Bolts and Nuts for Rear Wheels (2 bolts, 2 spacers, 2 nylon locknuts)
Commode Pail
Footrests (2)
Front Casters (2)
Rear Wheels (2)
Tools required for assembly:
2 - 1/2” Open End Wrench
2 - 15/16” Open End Wrench
DO NOT discard any packing material until all components are accounted for and are in good
condition.
WARNING: Failure to follow the set-up instructions could result in patient or
user injury as well as damage to equipment or other property.

9
Bari Shower Commode™ Chair Set-Up
1. Review the contents of the box to ensure all parts are accounted for. Remove all
packaging and inspect for damages.
2. To bolt on the back wheels, slide the
bolt through the wheels and then add
the spacer.
3. Attach wheel assembly through the
frame and secure the nut with a 15/16”
wrench.
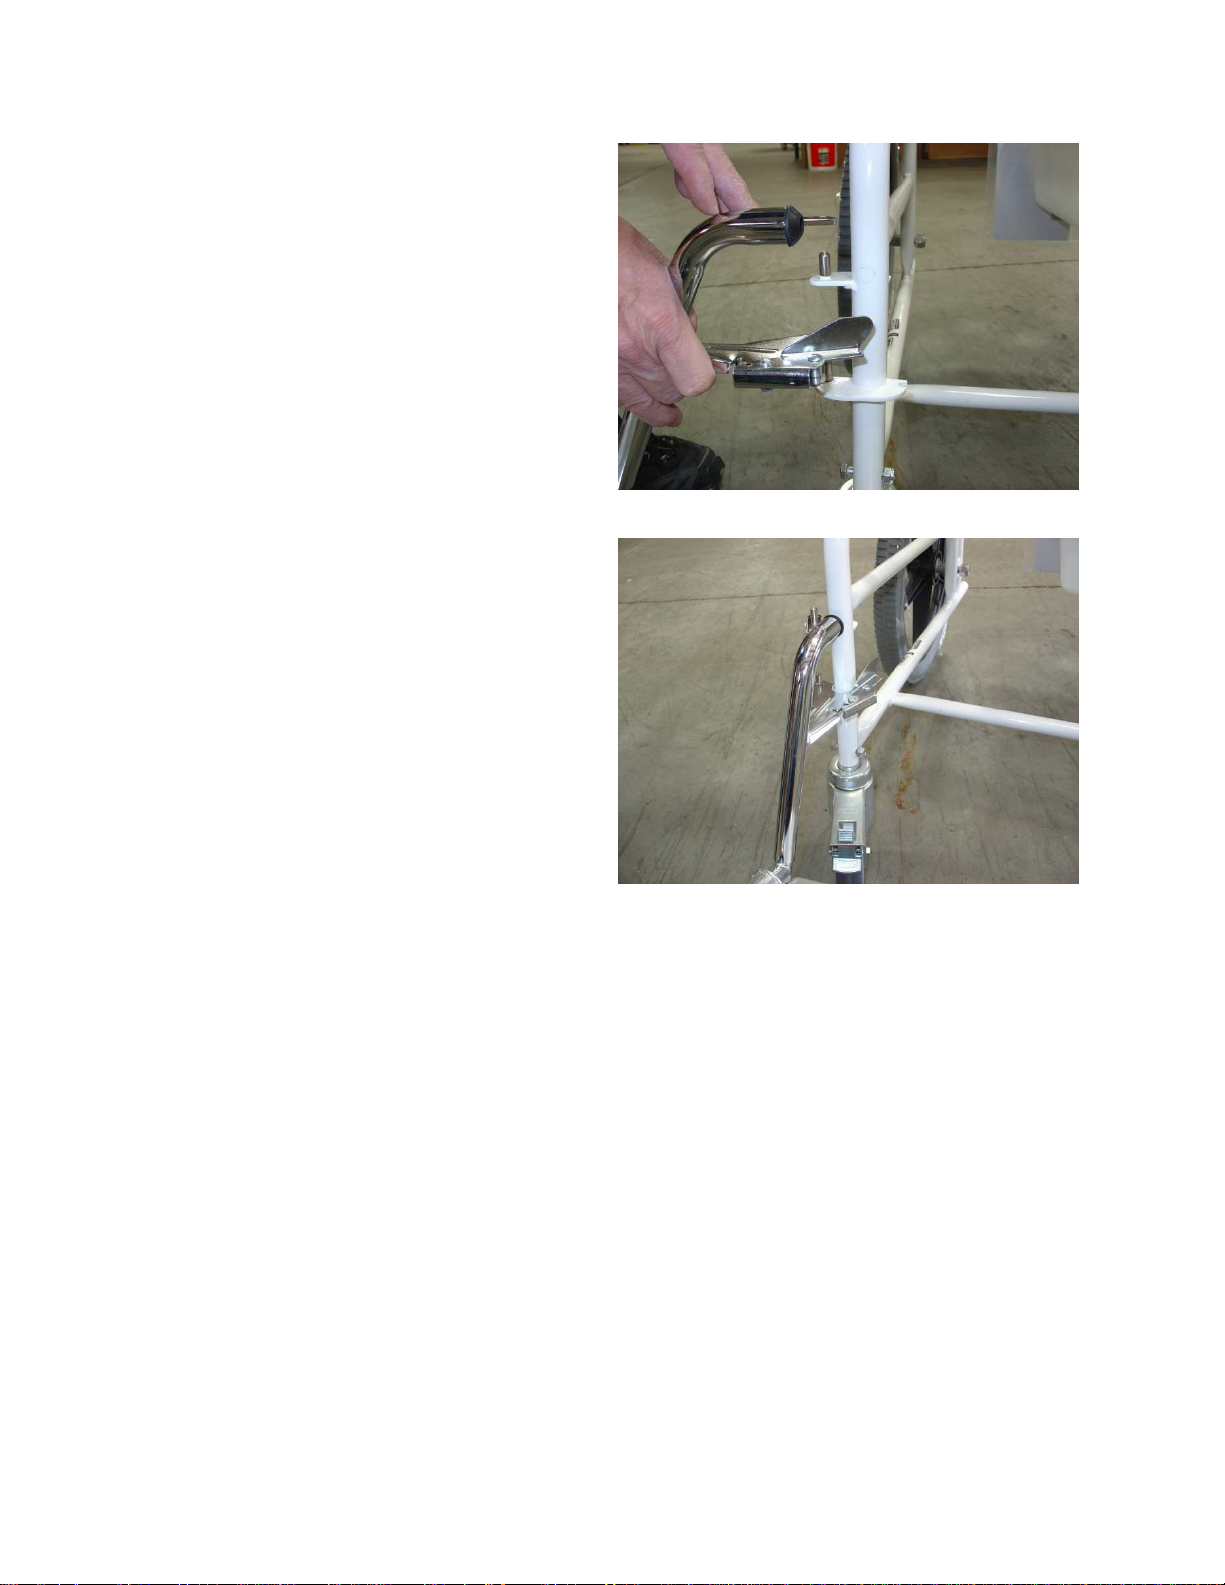
4. Slide the caster up into the frame of the
chair.

10
5. Slide bolt in through the pre-drilled
hole. Attach nut with a 1/2” wrench.
6. Slide the backrest through the channels
in the base.
7. Slide the armrests through the backrest
channel and base channels.
11
8. Attach the leg rests by hanging them on
the pins located on the frame.
9. Swing the leg rests inward until they
latch.

12
Proper Use of the Commode
Operation of Commode
WARNING: Keep fingers and arms away from rotating parts when mechanisms
are moving.
Operating this commode with any part of the body in the frame can result in
injury.
The commode is for indoor use only. Only operate the commode on a flat
surface.
DO NOT use the commode near an open flame or an extreme heat source.
Use only parts, accessories and adapters authorized by the manufacturer.
DO NOT use the commode with any unintentionally missing or abnormal parts.
Start slowly with an easy, fluid motion. If the patient is familiar with a different chair, he or she
may use too much force and tip over.
Have someone help the user until the user knows what can cause a tip over and how to avoid
doing so. The user should never try a new maneuver on their own until he or she is sure they can
do it safely.
The chair is most stable when it is moving forward. Be very careful when moving the chair
backwards. The user or care provider may lose control or tip over if one of the rear wheels hits
an object and stops rolling.
Transfers
WARNING: Follow the instructions for transferring patients to avoid a fall or
injury to the patient and/or care provider.
CAUTION: Avoid putting weight on the footrests as the chair may tip forwards.
Transfers require good balance and agility and are very dangerous. The care provider should
learn how to position the body and support himself or herself during a patient transfer.
The care provider should work with the patient’s doctor, nurse or therapist to learn safe transfer
methods. Provide help to the patient until he or she knows what can cause a slip or fall and how
to avoid doing so. Never let the patient maneuver into or out of the commode without assistance
until it is confirmed that the patient can do so safely.

13
Locking the front casters will help ensure that the commode is stable and will not roll away or
pivot during the transfer.
Make sure the equipment the patient is being transferred to is stable and will not slide away from
the patient and/or care provider during the transfer.
Be careful of the footrests. To avoid a trip or fall when transferring the patient on and off of the
commode, the patient should make sure their feet DO NOT “hang up” or get caught in the space
between the footrests.
If it there is an opportunity to remove or swing the footrests out of the way, then they should be
placed out of the user’s transfer path.
Center of Balance
To avoid a fall or tip over, you should have someone help you until you know the balance points
of your chair and how to avoid a tip over.
To help the patient maintain a proper center of balance of the commode as it travels over an
inclined obstacle the patient should lean their upper body forward slightly while the commode is
on an inclining plane.
To help the patient maintain a proper center of balance of the commode as it travels over a
declining obstacle the patient should lean their upper body backwards slightly while the
commode is on a declining plane.
WARNING: Going up or down a slope will change the center of balance of the
chair.
CAUTION: Be very careful if climbing a slope greater than 10%. (A 10% slope
means: One foot of elevation for every ten feet in length of the slope.) The
patient is advised to ask for help if the slope may be beyond patient ability.
Avoid turning on a slope, as a tip over is likely. Always go as straight up and straight down as
possible when travelling in the commode.
Always control the speed of the commode when going downhill to ensure the patient’s safety as
well as the safety of bystanders in the near vicinity. If the commode travels too fast, the patient
and care provider can lose control of the commode.
The patient or care provider can control the commode’s speed by keeping constant pressure on
the rear wheels.
If equipped with rear wheel locks, never use the rear wheel locks to try to slow or stop the
commode. Doing so is likely to cause the commode to veer out of control or tip over.

14
Front Casters in
Forward Position
Doorways and Obstacles
Make sure that the floor area where the commode will be used is level and free of obstacles. The
care provider or facility may need to remove or cover threshold strips between doors.
If there is a large permanent obstacle in the path of the commode the care provider may need to
install a ramp to safely transport the patient on the commode.
The patient should not propel the commode by pushing or pulling on an object. The patient
should never pull himself or herself though a doorway by grabbing the doorjambs with one or
both hands.
Reaching or Leaning
WARNING: Reaching or leaning affects the patient’s center of balance. Follow
the instructions for patients reaching or leaning from the commode to avoid a fall
or injury to the patient and/or care provider.
The patient should never try to reach an object if he or she must move forward in
his or her seat to do so. This may cause the chair to tip forward which could cause
injury to the patient and/or care provider.
The patient should never reach with both hands. If the patient does so, he or she
may not be able to catch themselves to prevent a fall if the chair tips.
Never lean backward to reach an object.
If the patient must reach or lean from your chair make sure to follow the proper procedure to
prevent injury to the patient and/or care provider as well as prevent
damaging the commode:
1. Rotate the front casters to the forward position. To do this,
the patient must move the commode past the object, and then
back up alongside it. Backing up will rotate the casters to
their forward position.
2. The patient should place the commode as close as they can to
the object they wish to reach.
3. The patient should steady himself/herself by firmly grasping
a rear wheel, or an armrest with one hand.
4. Make sure the patient avoids putting pressure on the footrest while reaching. This may
cause the chair to tip forward and cause injury to the patient or care provider.
5. For chairs equipped with optional rear wheel locks. DO NOT lock the rear wheels.
This creates a tipping point and makes a fall or tip over more likely.

15
Motor Vehicle Safety
WARNING: Sizewise chairs DO NOT meet federal standards for motor vehicle
seating. Make sure to follow all safety instructions to prevent injury to the patient
or care provider.
Sizewise does not endorse or recommend the use of this chair on streets or
roadways. Other means of transportation must be used under these conditions.
1. Never permit anyone to sit in this chair while he or she is in a moving vehicle. The rider
may be thrown from the chair in an accident or a sudden stop. Chair positioning belts
will not prevent this.
2. Always move the rider to an approved vehicle seat. Secure the rider with proper motor
vehicle restraints.
3. Never transport this chair in the front seat of a vehicle. It may shift and interfere with the
driver. Always secure this chair so that it cannot roll or shift.

16
Features
Armrests
WARNING: Never try to lift the commode by its armrest. They may come loose
or break. If this occurs, the commode may fall and cause injury to the patient or
others and could damage the commode. Lift the commode only by non-
detachable parts of the main frame. The armrests are not designed to bear the
weight of the commode.
The armrest can swing out or be completely removed.
Swing Out:
1. Push button (A) and pull up on arm rest.
2. Swing out to desired position.
Remove:
1. Push button (A) and pull up on armrest until it
stops.
2. Push button (B) and pull the rest of the way
out.
To Mount:
1. Push button (B) and slide the armrest in until it stops.
2. Push button (A) and slide the armrest in the rest of the way
You may have to push buttons (A) and (B) to allow the armrest to slide all the way into the
mounting tubes.
Backrest
WARNING: Never try to lift the chair by its backrest. It may come loose or
break. If this occurs, the commode may fall and cause injury to the patient or
others and could damage the commode. Lift the commode only by non-
detachable parts of the main frame. The backrest is not designed to bear the
weight of the commode.
The backrest is detachable.
To remove the backrest the care provider must first remove both the
armrests. Then pull the backrest up.
17
Footrests
WARNING: Never try to lift the commode by its footrest. They may come loose
or break. If this occurs, the commode may fall and cause injury to the patient or
others and could damage the commode. Lift the commode only by non-
detachable parts of the main frame. The footrests are not designed to bear the
weight of the chair or patients.
The footrests are detachable.
The lowest point of the footrest should be at least 2-1/2 inches above
the ground level on a flat surface.
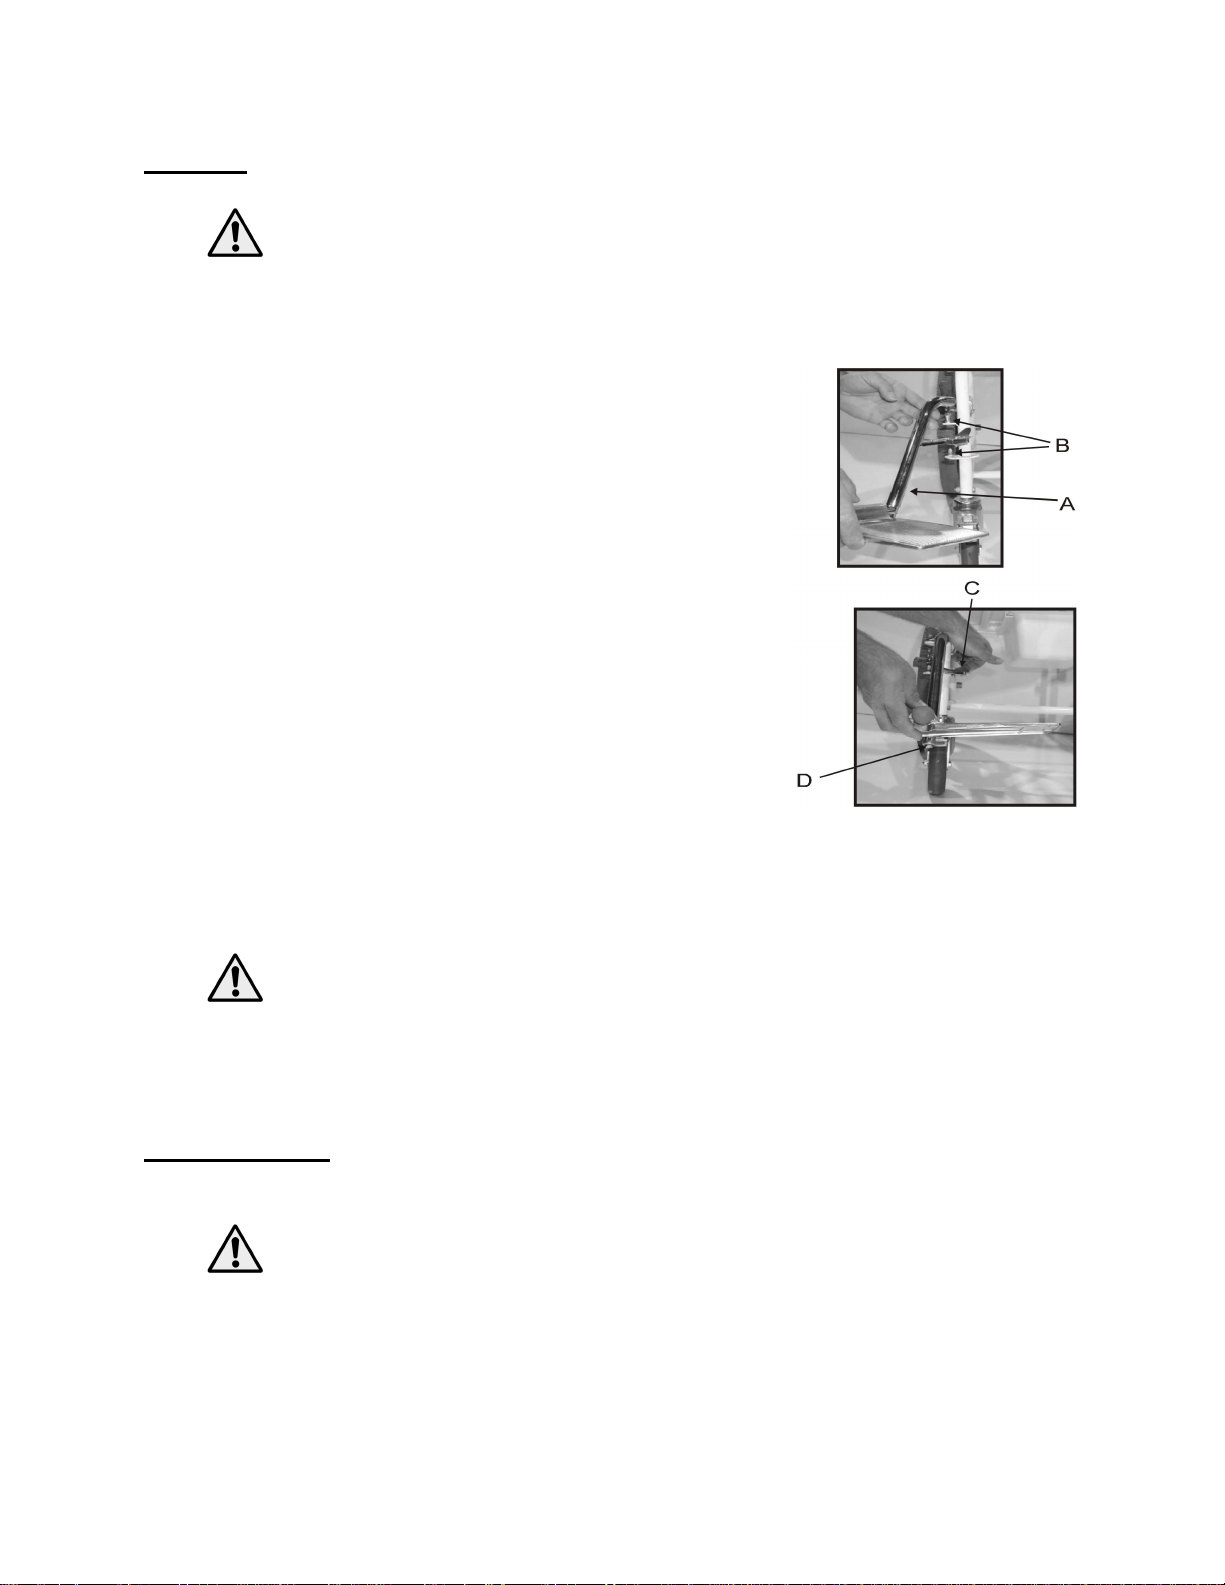
Mounting the footrest:
1. Place the footrest (A) on the hanger pins (B) at an angle to the
chair.
2. Swing the footrest into position and latch into place.
3. Repeat for the other footrest.
Removing the footrest:
1. Pull the footrest latch (C).
2. Swing the footrest out to an angle from the chair and lift off
the pins.
3. Repeat for the other footrest.
Adjusting the footrest height:
1. Loosen the bolt (D) at bottom of the footrest.
2. Slide the footrest to the desired height and tighten the bolt.
Caution: To avoid and reduce risk of a tripping injury to the patient and/or care
provider, ensure the footrests are mounted securely or completely out of the way.
If set too low, the footrests may “hang up” on the types of obstacles you can
expect to find in normal use. This may cause the chair to stop suddenly and tip
forward.
Positioning Belts
Use positioning belts only to help support the patient’s posture.
WARNING: Improper use of positioning belts may cause injury or death to the
patient and/or care provider.
Make sure the patient does not slide down in the chair seat. If this occurs, the patient may suffer
chest compression or suffocate due to pressure from the belts.
The belts must be snug, but must not be so tight that they interfere with breathing. The operator
should be able to slide his or her open hand, flat, between the belt and the patient.
18
A pelvic wedge or similar device can help the patient from sliding down in the seat. Consult
with the patient’s doctor, nurse or therapist to find out if the patient needs such a device.
Use positioning belts only with a cooperative patient. Make sure that the patient can easily
remove the belts in an emergency.
Never use positioning belts as a patient restraint or on a patient who is comatose or agitated.
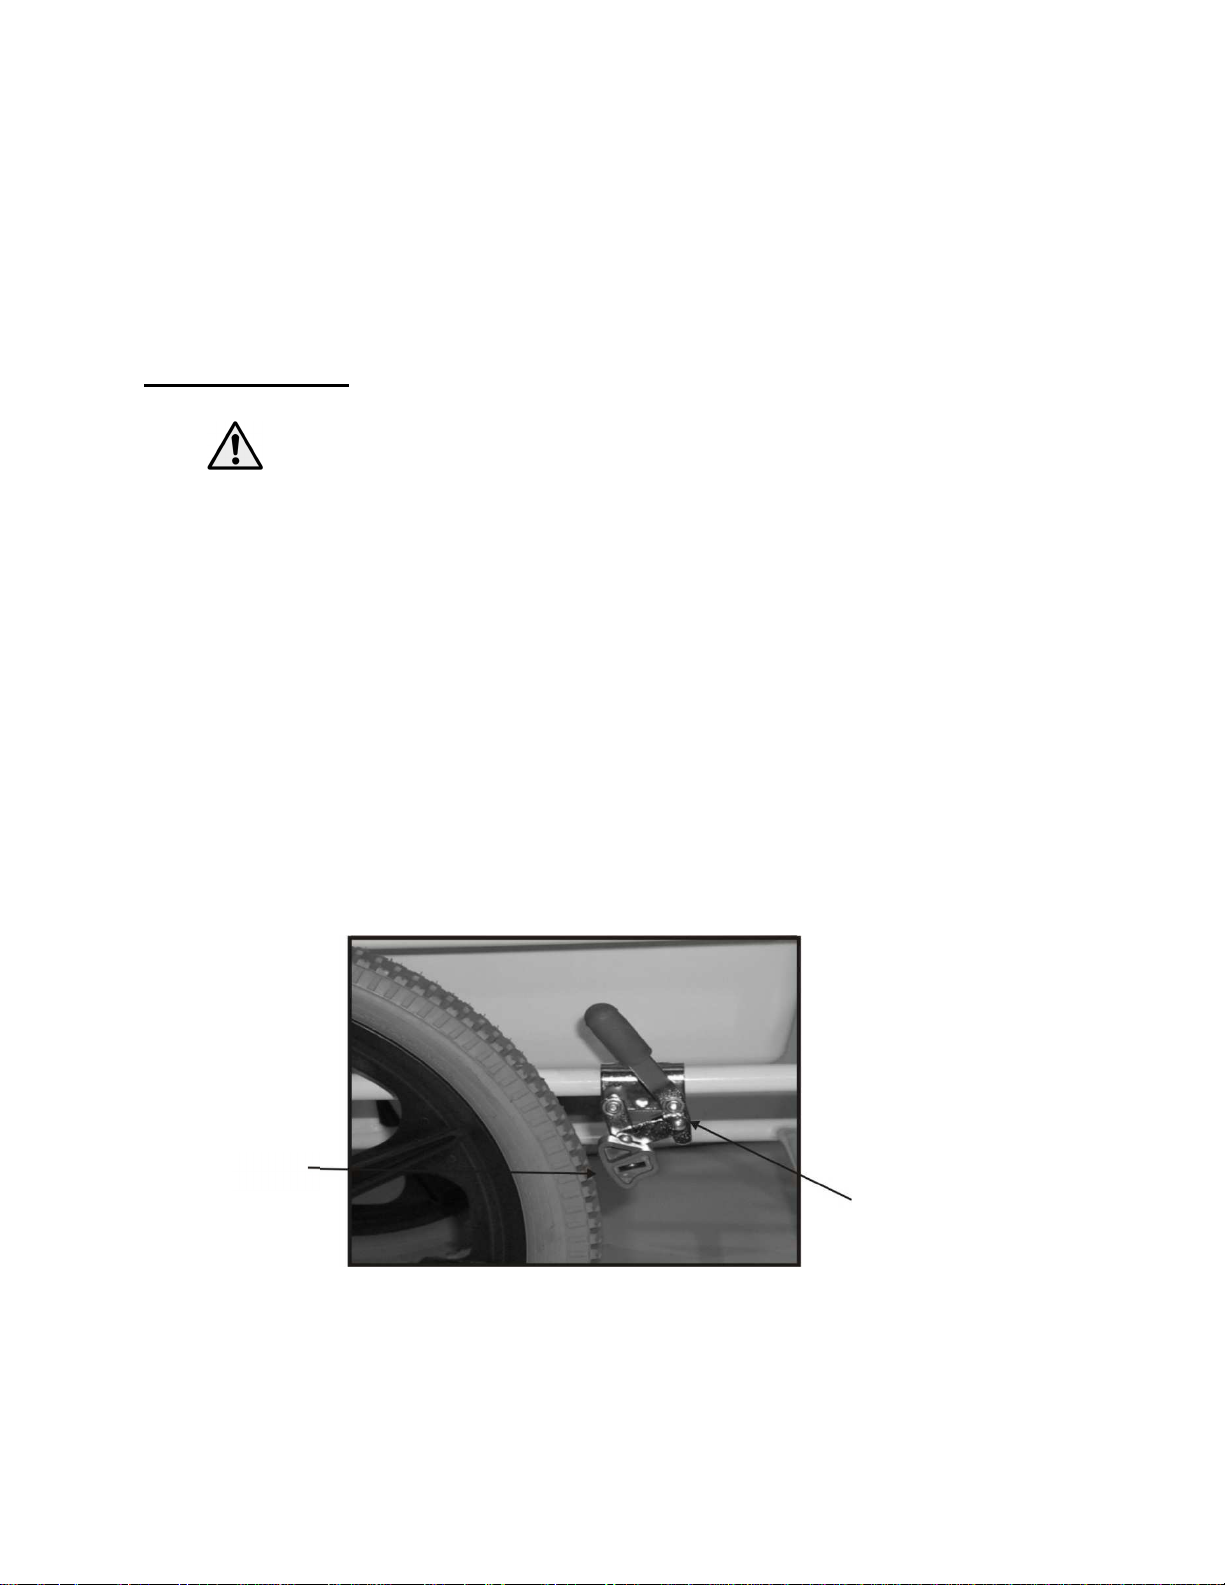
Rear Wheel Locks
WARNING: Rear wheel locks are not designed to slow or stop a moving chair.
They should only be used to keep the rear wheels from turning when the chair is
at a complete stop. The commode may veer out of control or tip over which could
result in user injury as well as damage to equipment or other property.
Low pressure in a rear tire may cause the wheel lock on that side to slip and may
allow the wheel to turn when it is not expected.
NOTE: Be sure the rear tires are inflated to the proper pressure before adjusting the parking
brake. The proper tire pressure setting is indicated on the side of the tire.
To adjust the rear wheel locks:
1. Be sure the rear tires are inflated to the proper pressure before adjusting the rear wheel
locks. The proper tire pressure setting is indicated on the side of the tire.
2. Loosen the two lock nuts on the back side of the brake assembly.
3. Adjust the brake assembly (tap with hammer) to leave approximately 1/2” between the
brake pad and the tire.
4. Tighten the lock nuts.
1/2” Lock Nuts

19
Safety Tips
General Safety
WARNING: The commode is to be used in accordance with each facility’s
policies and procedures.
Transport
WARNING: During transport, use caution so the commode does not tip or
overbalance. Failure to do so could result in patient and/or user injury as well as
damage to equipment or other property.
CAUTION: The commode needs to be stored, transported and operated in a
temperature range of -5°C to 45°C (23°F to 113°F).
Generally, as the load increases, the risk of instability goes up.
For inclines or thresholds, approach them moving forward or backwards, rather than sideways.
Front Casters
If items, such as string or hair, become entangled between the caster and the axle bolt the chair
may become hard to steer and roll. Check monthly and clean if needed.
Table of contents
Other Sizewise Indoor Furnishing manuals

Popular Indoor Furnishing manuals by other brands


Home affaire
Home affaire 41332 manual

Cattelan Italia
Cattelan Italia CHANTAL Assembling instructions

BLACK RED WHITE
BLACK RED WHITE capslocki c1d3s/10/5 Assembly manual

John Thomas
John Thomas BOMBAY MEDIA CENTER TV-59 Assembly instructions

Silverline
Silverline 666247 manual

Hesperide
Hesperide ALLURE 139072 Assembly instructions


