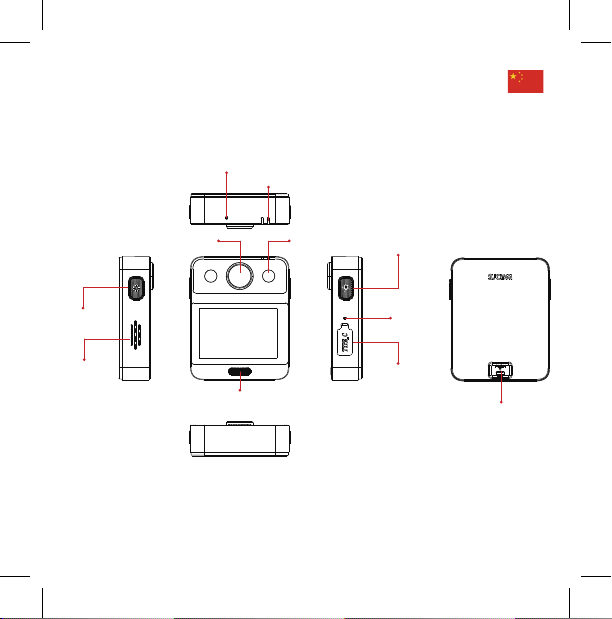
SJCAM A20 User manual

аремаКинимяаньланоицкнуфогонМ|aremaCesopruP-itluMelbaraeW
Tragbare Multifunktionskamera | SJCAM A20便攜式記錄儀

結構標注:
.1.
紅/藍爆閃燈
Type-C
電源開 / 關 / 確定鍵
麥克風
電池門鎖扣
麥克風
LED燈開/關
揚聲器
LED燈
攝像頭
指示燈

.2.
功能鍵概述:
電源鍵 短按
1. 拍照狀態下,短按後拍攝照片。
2. 錄像狀態下,短按後開啟 / 關閉錄像功能。
3. 菜單設置下,短按此按鈕為確定。
長按 長按 2 秒可以開/關機。
短按 待機狀態下,短按此按鈕打開 / 關閉LED燈。
短按第1次為強燈、第2次為正常燈、第3次為關閉。
長按 長按 2 秒紅藍燈爆閃。
LED燈鍵
Type-C 連接 數據傳輸接口,充電接口。

.3.
觸屏手勢:
點擊 左右滑動
待機狀態,打開 / 隱藏狀態欄。 待機狀態,切換拍攝模式。
菜單狀態,打開 / 選中相應的設置。 回放模式,翻頁。
向下滑動 向上滑動
待機狀態,打開 WIFI、
紅藍爆閃、遙控器、鎖屏。
待機狀態,打開模式。
菜單狀態,滑動選項框。

.4.
基本操作:
開關機/確定鍵(圖 1)
關機狀態長按電源鍵 2 秒開機進入待機界面。
開機中任何狀態下長按電源鍵 2 秒後關機。
(圖 1) (圖 2) (圖 3)
模式切換(圖 2)
待機狀態下向上滑動屏幕或者點擊“ ”圖標呼出模式菜單,上下滑動可以進行瀏覽,選
擇需要的拍攝模式圖標點擊後進入該模式。
LED燈開/關(圖 3)
待機狀態下,短按此按鈕打開 / 關閉LED燈。短按第1次為強燈、第2次為正常燈、第3次為
關閉。

.5.
包含配件:
аремаКинимяаньланоицкнуфогонМ|aremaCesopruP-itluMelbaraeW
TragbareMultifunktionskamera | SJCAM A20便攜式記錄儀

.6.
拍攝模式:
錄像
切換至錄像模式,短按開/關機鍵(拍攝鍵)(圖 4),屏幕上有紅色圓點在閃動,則機器
錄像正常,再次按下拍攝鍵關閉錄像。
拍照
切換至拍照模式,短按開/關機鍵(拍攝鍵)(圖 4),有“咔”的聲音即拍照並保存照片。
連拍
切換至連拍模式,短按開/關機鍵(拍攝鍵)(圖 4),有多次“咔”的聲音,按一次短按
開/關機鍵(拍攝鍵)器能夠連續拍攝多張照片。
(圖4)
間隔錄影
切換至間隔錄影模式,短按開/關機鍵(拍攝鍵)(圖 4),屏幕上有紅色圓點在閃動,則
機器錄像正常,再次短按下開/關機鍵(拍攝鍵)關閉錄像。
車載模式
切換至車載模式,開啟車載模式關機後,機器連接充電器 會自動開機並開始錄像。

.7.
菜單設置:
滑動界面選擇“ ”進入菜單界面。(不同拍攝模式下進入設置菜單可設置該項模式參
數)觸摸滑動選擇需要修改的參數選項,點擊進入該選項選擇合適的參數,設置完成後
點擊返回可返回待機界面。
1. 視頻分辨率
視頻分辨率有“2160P 24FPS 、1440P 30FPS 、1080P 60/30FPS 、720P 120/60/30FPS、
480P 240FPS”五種選項,數值越大,分辨率越大,文件也越大,同內存同電量錄製時間越短,
數值小者則相反。
2. 照片尺寸
照片尺寸有“16M、12M、10M、8M、5M、3M、VGA”七種選項,分別代表 1600 萬
到 VGA 640*480,數值越大,分辨率越大,文件也越大,數值小者則相反。
3. 連拍
連拍有“3 張、5 張、10 張”三種選項,開啟連拍後,在連拍模式按一次拍攝鍵機器能
夠連續拍攝多張照片。
4. 間隔錄影
間隔錄影有“1 秒、2秒、5秒、10秒、30秒、1 分鐘”六種選項,通過選項中的時間間
隔拍攝畫面來創建視頻。
5. 循環錄影
循環錄影有“關、3 分鐘、5 分鐘、10 分鐘”四種選項,選擇該選項,機器會分段持續錄
6. 慢速錄影
打開此功能後錄像的實拍均為慢動作,-2X是慢2倍,最高為8倍。
像到存儲卡滿,然後覆蓋前面錄的內容。
7. 日期標籤
可以選擇開啟或者關閉拍攝時間水印。
9. 間隔拍照時間
間隔拍照有“3 秒、5秒、10秒、20 秒”四種選項,開啟後按下一次拍攝鍵,機器在拍
照模式下間隔一定的時間會自動拍攝一張照片,再次按下拍攝鍵後停止。
8.LOGO 水印
可以選擇開啟或者關閉 LOGO 水印。

.8.
10. 圖像質量
圖像質量有“優質、標準、經濟”三種選項。
11. 影像视角
分爲 寬/中/窄三種視角,廣角越寬,拍攝出來的畫面就越寬闊。
12. 陀螺儀防抖
圖像穩定功能,打開之後防抖性能更好。
13. 碼流
分爲 高/中/低三種碼流。
14. 白平衡
有“自動、日光、陰天、鎢絲燈、熒光燈、水下模式”六種選項,不同的環境下選擇
不同模式,拍攝效果更佳。
15. 色彩
有“正常、黑白、復古、暖色調、冷色調”五種選項,可選擇不同的圖像色彩拍攝。
16. 人臉識別
拍照模式中,可通過菜單設置自動識別人臉并自動抓拍人臉。
17. 曝光補償
根據拍攝場景設置,太暗可以調高,太亮可以調低。
18. 語言設置
可以設置機器的語言。
19. 日期 / 時間
可以更改機器的時間,開啟 WIFI 連接 APP 機器會自動更新日期和時間。
20. 格式化
格式化會清除您所有的儲存內容,因此建議您先行導出攝錄文件。
21. 快速錄像
開啟該功能後相機從任何狀態下(包括開機)切換至錄像模式,機器都會自動開始錄像。
22. 自動關機
自動關機有“關、3 分鐘、5 分鐘、10 分鐘”四種選項。自動關機是指機器開機無任何操
作後機器自動關機。

.9.
23. 按鍵聲音
用於選擇當前機器的按鍵輸出的聲音,菜單可設置為“開、關”。
24. 屏保
屏保有“30 秒鐘、1 分鐘、3 分鐘、5 分鐘、關”五種選項,屏保是指機器開機無任何操
作後自動關閉屏幕進入休眠狀態。
25. 光源頻率
可以根據地區和需要進行選擇“50Hz、60Hz”兩種光源頻率。
26. 設備 ID
可以修改機器的 ID 號碼。
27.WIFI
可以修改機器的 WIFI 名稱和密碼。
28. 默認設置
選擇該選項會將機器的所有設置重置為默認設置。
29. 版本
可查看當前設備的版本信息。

.10 .
MICROSD 卡
要拍攝視頻和照片,您需要使用 microSD 卡,請使用符合規格的存儲卡。
在錄像過程中,如果存儲卡的容量全部用完,攝像機將停止錄像,觸屏上也將顯示存儲卡
已滿。
注意事項:拿取存儲卡時請務必小心。避免接觸液體、灰塵和小碎片。為謹慎起見,插入
或取出存儲卡前請關閉攝像機。查看存儲卡製造商有關在適宜溫度範圍內使用的指導信息。
插入 microSD 卡:
輕輕按下卡扣滑開護蓋(圖 5),將電池取出,把 microSD 卡插入卡槽(圖 6),然後放
入電池,關閉電池護蓋即可。
(圖 6)
(圖 5)

.11 .
重新格式化 microSD 卡
以獲得最佳性能。第一次使用 microSD 卡之前,請務必對其進行格式化。要保持存儲卡
完好無損,請定期重新格式化存儲卡。
注意:重新格式化會清除您的所有存儲內容,因此一定要先導出照片和視頻。
要重新格式化存儲卡,請向上輕掃,然後依次點擊“設置”>“格式化”>“確定”。
產品參數特性 :
產品名稱:SJCAM 便携記錄儀
產品型號:A20
主控芯片:Novatek 96660
鏡頭芯片:Sony IMX335
廣 角:110°
光 圈:F2.4
鏡 頭:6G 玻璃
屏幕尺寸:2.33英寸
輸入電壓:3.8V
輸入電流:1.3A
無線連接:Wi-Fi 802.11b/g/n 2.4GHz
設備要求:系統為 Android 4.1 或 iOS8.0 及以上版本支持 Wi-Fi 的智能手機
若有售後服務需求,請聯繫 SJCAM 客服
歡迎訪問 SJCAM 售後服務網頁 WWW.SJCAM.COM 或撥打 SJCAM 服務電話:
+086-18118714563
製造商:深圳市臻呈科技有限公司
地 址:深圳市龍崗區坂田街道上雪科技園科技一路2號C棟3 樓
*產品功能可能會隨著產品升級或更新而改變。請以實際產品的規格爲準。

.12 .
Structure labeling :
Red/Blue lights flashing
Type-C
Power/ Shuer / OK Buon
Microphone
Baery Door
Microphone
Status LED
LED ON/OFF
Speaker
LED Light
Lens

.13 .
Funcon key overview :
Power
Buon
Short press
1. In Photo mode, short-press once to take photos.
2. In Video mode, short-press once to Start or Stop the
recording.
3. In Sengs, short-press once for OK.
Long press Long press 2 second can turn on/off.
Short press
In standby mode, short press this buon to turn the LED
on/off. Short press the first me for the strong light, the
second me for the normal light, and the third me for
turn off.
Long press Press and hold for 2 seconds and the red and blue lights
will flash.
LED Light
Buon
Type-C Connect Data transmission interface, charging interface.

.14 .
Touchscreen gestures :
Click Le/Right Swipe
Standby mode, Acvate/hide status bar. Standby mode, Switch shoong mode.
Menu mode, acvate/select relevant seng. Playback mode, Slip Page.
Swipe down Swipe up
Standby mode, Open Wifi、
LED blue light burst, Remote control , lock screen.
Standby mode, Open mode.
Menu mode, swipe the Opon box.

.15 .
Basic Operaon :
ON/OFF/OK Buon (Figure 1)
Press and hold the power buon for 2 seconds to boot into the standby interface
during power-off.
Press and hold the power buon for 2 seconds in any state during power-on.
(Figure 1) (Figure 2) (Figure 3)
Mode switch (Figure 2)
Swipe up the screen or click the “ ” icon to call out the mode menu in standby mode , slide
up and down to browse, select the desired shoong mode icon and click to enter this mode.
LED Lights ON/OFF (Figure 3)
Short press this buon to turn the LED on/off in standby mode. Short press the first me for
the strong light, the second me for the normal light, the third me for the close.

.16 .
Includes accessories :
аремаКинимяаньланоицкнуфогонМ|aremaCesopruP-itluMelbaraeW
TragbareMultifunktionskamera | SJCAM A20便攜式記錄儀

.17 .
(Figure 4)
Shoong Modes :
VIDEO RECORDING MODE
Go to Video Recording Mode, press the Power/Shuer Buon (Fig. 4) once to start
recording. A red dot on the screen will flash indicang that the camera is recording.
Press the Power/Shuer Buon again to stop recording.
PHOTOS MODE
Go to Photo Mode, press the Power/Shuer Buon (Fig. 4) once to take a picture.
A shuer sound will be heard indicang that the photo has been taken and saved.
BURST MODE
Go to Burst Mode, press the Power/Shuer Buon (Fig. 4) once to automacally take
a series of pictures in fast succession. Mulple shuer sounds will be heard indicang
that the photos have been taken and saved.
VIDEOLAPSE MODE
Go to Videolapse Mode, short the Power/Shuer Buon (Fig. 4) once to automacally
take a series of pictures in set intervals then save it as a video. A red dot on the screen
will flash indicang that the camera is recording. Press the Power/Shuer Buon again
to stop recording.
CAR MODE
When in Car Mode, the camera will automacally power
up and start recording once external power from the car
or other power supply is detected.

.18 .
SETTINGS MENU :
Swipe to enter the Sengs menu. You can go into Sengs menu while in any mode
to configure camera sengs.
1. VIDEO RESOLUTION
Available resoluons: 2160P 24FPS, 1440P 30FPS , 1080P 60/30FPS, 720P 120/60/30FPS,
480P 240FPS. Higher resoluons result in beer image quality at the expense of filesize
and baery usage.
2. PHOTO RESOLUTIONS
Photo resoluons: 16M, 12M, 10M, 8M, 5M, 3M, and VGA. Higher resoluons result in
beer image quality at the expense of filesize and baery usage.
3. BURST MODE
Burst mode: 3picture ,5picture ,10 picture . Acvate burst mode, click “shoong”, and it
will take several pictures at one me.
4.VIDEOLAPSE
Videolapse: 1 second, 2 seconds, 5 seconds, 10 seconds, 30 seconds, and 1 minute. Select
an interval then start recording a video file.
5.LOOP RECORDING
Loop recording segment lengths: 3 minutes, 5 minutes, and 10 minutes. When Loop Recording
is selected, videos will be saved in short segments. It will also maximize the use of the memory
card by recording over the oldest file in the card to allow connuous recording.
6.DATE/TIME STAMP
Enabling Date/Time Stamp will put a mark on the video for the viewer to see the me, date,
and duraon of the recorded file.
7.SLOW VIDEO RECORDING
Aer this funcon is turned on, the real shots of the video are all in slow moon, -2X is 2 mes
slower, and the highest is 8 mes.
8. LOGO WATERMARK
You can choose to turn the LOGO watermark on or off.

.19 .
9. PHOTOLAPSE
Photolapse interval: 3 seconds, 5 seconds, 10 seconds, and20 seconds. Press the shuer
buon to start taking photos in the set interval. Press the shuer buon again to stop
the photo-taking process.
10. PHOTO QUALITY
Photo quality opons: High quality , Standard quality, and Economy.
18.LANGUAGE SETTINGS
Choose the desired language of the device.
11. VIEW ANGLE
It has Wide/Middle/Narrow view angles, The wider the wide-angle, the wider the view.
12. GYRO STABILIZATION
Image stabilizaon funcon, an-shake performances beer.
13. CODE STEAM
It has three streams, high/medium/low.
14.WHITE BALANCE
There are six opons, Automac,Daylight,Cloudy,Tungsten,Fluorescent, Underwater.
Selecng different mode in different environment will make a beer shoong effect.
15.COLOR
Five opons,normal, black and white, retro, warm tone, cool tone, you can choose different
image color when shoong.
16.FACE RECOGNITION
In the photo mode, you can automacally recognize the face and automacally capture the
face through the menu sengs.
17.EXPOSURE COMPENSATION
According to the shoong, too dark can be adjusted up, too bright can be adjusted down.
19. DATE/TIME
You can manually set the date and me on the device. Seng this is important so that
files can have the correct file stamp (EXIF Data). The device will automacally update
the date and me aer WIFI connecon to the APP is enabled.
Table of contents
Other SJCAM Digital Camera manuals

SJCAM
SJCAM SJ4000 Wifi User manual

SJCAM
SJCAM SJ8 Series User manual

SJCAM
SJCAM SJ5000 wifi User manual

SJCAM
SJCAM SJ360 Series User manual

SJCAM
SJCAM M10 Series User manual

SJCAM
SJCAM SJ6 LEGEND User manual

SJCAM
SJCAM FUNCAM User manual

SJCAM
SJCAM SJ6Legend User manual

SJCAM
SJCAM SJ4000 SERIES User manual

SJCAM
SJCAM SJ5000 Series User manual