SKD Rhone2 User manual

User manual
Generated 2015-07-06
1
Product name Rhone2
Function Power Control Switch
Article M3107-1221-B
EAN 3830062480017
Description
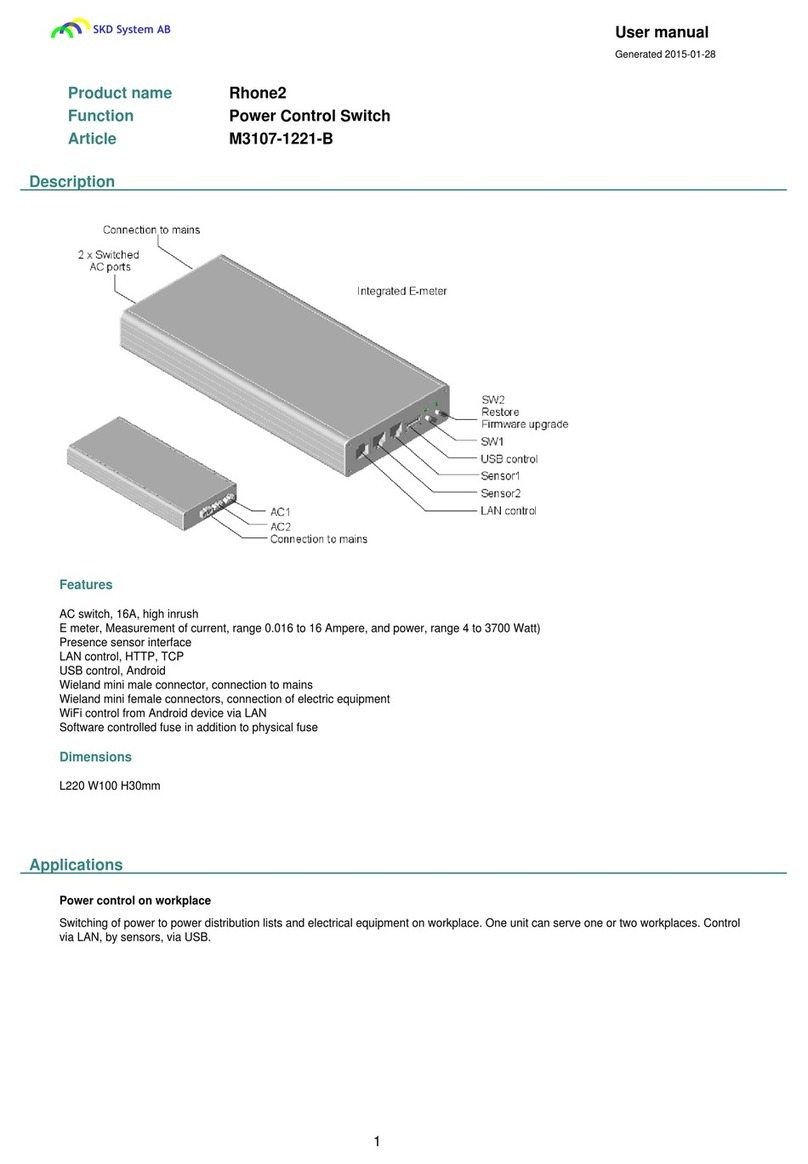
Features
AC switch, 16A, high inrush
E meter, Measurement of current, range 0.016 to 16 Ampere, and power, range 4 to 3700 Watt)
Presence sensor interface
LAN control, HTTP, TCP
USB control, Android
Wieland mini male connector, connection to mains
Wieland mini female connectors, connection of electric equipment
WiFi control from Android device via LAN
Software controlled fuse in addition to physical fuse
Dimensions
L220 W100 H30mm
Applications
Application
The product is designed for applications where there is a need for switched electric power distribution. Two primary applications: Power
distribution on workplace and Switching of power to electric equipment.
Power control on workplace
Switching of power to power distribution lists and electrical equipment on workplace. One unit can serve one or two workplaces. Control
via LAN, by sensors, via USB.

2
(C) Copyright 2010-2015 SKD System AB
Remote power control
Remote control of power switch. Power switch can also be controlled by local sensors.
Control modes
Manual control
Control over LAN by command interface over TCP and/or http
Control via product web page
Control from Android via USB
Control from Android indirectly via WiFi
Control by sensors
Control by current level on internal and/or external current sensor
Control by timers.
Sensors
Standard version of Rhone2 product is configured for connection of presence detection sensors.
Sensor interface, R45 connector, has the same types of connection pins as used by commercially available sensors. Sensors from other
vendors than SKD System AB can be used.
Rhone2 can be delivered with sensor interfaces configured for:
Presence detection sensors (standard)
Temperature sensors
External current sensor
Gas detection sensor.
Other features
Rhone2 can be configured to provide in addition to two 16A AC switches also with two 2A DC switches for signal switching.
Safety Precautions
The product must be connected to earthed AC outlet.
Do not use damaged AC connecting cables.
The product may get damaged by AC currents exceding power rating of the product.

3
(C) Copyright 2010-2015 SKD System AB
Do not expose the product for excessive cold or heat.
Do not spill liquids onto the product.
The product may not work properly after fall to the floor or after other types of mechanical distress.
Installation
Mounting Mount Rhone2 onto flat surface. For example: into the cabinet, onto backside of desk, underneath workdesk, onto the wall.
Use velcro closing, alternatively metal fixtures.
Velcro closing is included in delivery.
Connect power
cables Connect product to the mains with cable that has Wieland mini, GST15i3, female connector on the product end.
Connect product to equipment with cables that have Wieland mini, GST15i3, male connectors on the product side.
Note: Connecting Wieland cables need to be handled by trained service personnel.
E-meter Not action needed. E-meter starts measuring current and power automatically when power to Rhone2 is turned on.
Presence sensors Connect presence sensor to Rhone2 with patch cable.
Move hand in front of the sensor. Once connected to the product, sensor will turn red at detection of movement.
When suitable position of the sensor is determined, fix sensor to the surface using screws or Velcro closing.
On workplace, sensor will typically be fixed onto the underside of the workdesk, close to the edge.
If sensor is not reacting as intended, move sensor closer to the user or use sensor with wider coverage.
NOTE: At power on, sensor calibrates itself automatically to the evironment. This takes around half minute. For best
performance minimize movement around sensor during selfcalibration..
USB control Download app skdRhone2 from Google Play.
Connect Android device to Rhone2 using USB cable.
skdRhone2 starts automatically when USB cable is connected.
skdRhone2 is uppdated from Google Play automatically when new release is published.
Configure LAN
from Android app Setting Rhone2 LAN configuration from Android via USB
Install skdRhone2 app from Google Play.
Connect Android to Rhone2 with USB cable. App starts automatically.
Choose Network page and set New IP, New Gateway and/or New MASK.
Select "Activate" icon to activate new LAN configuration in the Rhone2.
Finally, reset Rhone2 by turning power to the product on/off.
skdRhone2 is designed for Android version 4.0 and later.
Configure LAN
from web page Configure Rhone2 LAN from PC via web
Connect Rhone2 directly to PC with patch cable.
Set gateway address in PC network card configuration to 192.168.1.1.
Start web browser, enter link: http://192.168.1.222.
Select Config page and set new ip, new gateway and/or new mask address.
Then activate the change by selecting "Activate" icon.
Only the ip, gateway and mask values which are not 0.0.0.0 are activated.
Finally, reset Rhone2 by turning power to the product on/off.
Configure LAN by activating DHCP client
Alternative method of configuring LAN parameters is by activating DHCP client in the Rhone2 via product web page.
The assigned IP address can be found from DHCP server or by connecting Android to Rhone2 via USB.

4
(C) Copyright 2010-2015 SKD System AB
Configure LAN via
TCP Configure Rhone2 LAN from PC via TCP
Connect Rhone2 directly to PC with patch cable.
Via Network configuration in PC, set gateway address in PC to 192.168.1.1.
Start TCP-terminal in the PC. Set connection parameters: ip 192.168.1.222, port 60000 and transfer method RAW.
When command window opens, use the following commands to change LAN configuration:
lanconf; Read current LAN settings.
lanip:; Set new ip. Example: lanip:192.168.7.44;
langw:; Set new gateway. Example: langw:192.168.7.1;
lanmask:; Set new ip. Example: lanmask:255.255.255.0;
lanactivate; Activate the changes.
Finally, reset Rhone2 by turning power to the product off/on.
LAN factory
settings Product is delivered with the following settings:
Gateway IP 192.168.1.1
IP address 192.168.1.222
Network MASK 255.255.255.0
TCP port 60000
DHCP client deactivated.
MAC address can be found on the product label.
WiFi control skdRhone2 app includes extension for communication via WiFi.
Connection via WiFi is established automatically at activation of the app provided that Android device is connected to LAN
via WiFi, product is connected to LAN and communication between Android and Rhone2 is connected to local LAN.
NOTE: When Android gets connected to Rhone2 via USB cable, communication over USB takes over. Connection over WiFi
gets disconnected. When USB cable is disconnected. WiFi connection will be reestablished after app has been closed and
started again.
Automatic fuse The product includes in addition to physical 16A fuse also software controlled fuse.
Automatic fuse is by default enabled. Default current limit 16Ampere. Default latency 3sec.
AutoFuse settings can be changed via Web, TCP or from app.
If current through AC-switch exceeds preset threshold, AutoFuse will turn off AC-switch and get into disabled state.
NOTE: AutoFuse does not block the AC-switch function. It only turns off AC-switch in case current level exceeds the preset
threshold.
NOTE: SKD System AB assumes no responsibility or liability for the consequences of using AutoFuse function. AutoFuse
function is software controlled.
Firmware upgrade Send request for the latest version of firmware by sending e-mail to [email protected], enter RHONE2 FIRMWARE UPGRADE
into e-mail title field.
Firmware upgrade procedure:
a) Copy file image.hex with the new firmware to USB memory.
b) Turn off power to the product and insert USB-memory into Rhone2 USB interface.
c) Hold SW2 and turn on power. SW2 will start blinking fast after a couple of seconds. Upgrade is complete when blinking
stops.
d) Reassign the last 3 digits in product MAC address to correspond to the MAC address on product label. This is done via
Android About page, via product web page or by command lanmaC[last three digits in MAC]; over TCP.
Restoring factory
defaults Alternative 1: Hold SW2 for 15sec, until LED2 stops blinking.
Alternative 2: From product web page, Config page, select icon "Restore".
Alternative 3: Via TCP send command restore;
User Operation

5
(C) Copyright 2010-2015 SKD System AB
Operation of AC
switch AC-switches AC1 and AC2, can be controlled by:
- Manual switch on front panel (Provided sensor control is not activated. LED not red or organge).
- By external sensors. (Provided sensor control is activated. LED red or orange).
- From control system, PC and Android by command via TCP. (Provided sensor control is not activated for the switch).
- From PC and Android via web.
- From Android device via USB or WiFi.
LEDs on front panel indicate if AC-switch is on or off.
- LED = dark: AC switch is off. Sensor is deactivated.
- LED = green: AC switch is on. Activated by command, via web or.by manual switch. Sensor is deactivated.
- LED = red: AC switch is off. Sensor is activated.
- LED = orange: AC switch is on, activated by sensor.
When sensor function for AC1 and/or AC2 is activated, manual control is deactivated and vice versa.
Use of USB control Connect Android device to Rhone2 with USB cable. skdRhone2 app starts automatically, provided it is installed on the
Android.
Use of LAN control Web access
Open web browser and enter Rhone2 ip as link into web browser. Example: http://192.168.1.222.
TCP access
Open Serial Terminal application in PC.
Connection parameters: TCP port 60000 communications mode RAW.
Alternatively open communication interface using script in control system or PC.
HTTP access
Send http request to Rhone2. http request getdata.htm reads data from the product. http request setdata.htm updates data
in the product. Example of http request: http://192.168.1.222/getdata.htm.
Use of presence
sensors Activate sensor function in the product and configure sensor timers via web, app or by command via LAN.
When sensor detects presence, it turns on AC switch. AC switch is turned off after preset timer period of no presence
expires. Timer countdown value is shown on product web, via app and can also be read from the product by command.
NOTE: At activation of sensor control, manual control is deactivated.
NOTE: When power to the unit is turned on, sensor will calibrate itself to the environment. This takes around 30 seconds.
For best result, minimize movement around sensor during calibration period.
Use of AutoFuse AutoFuse turns off AC switch when current level exceeds preset current limit for duration set by latency.
Make sure that AutoFuse is set to Enabled and that current limit and latency settings correspond to the intended values.
NOTE: AutoFuse does not block the AC-switch. This implies that if AutoFuse is not enabled, AC switch can be turned on or
off.
Use of E-meter E-meter measures continously TRMS value of the current. Power and energy values are calculated.
E-meter values can be read via LAN, Web or Android.
.
Web Interface
To access product web page, open web browser and use ip address as link to the product web page. Default link: http://192.168.1.222

6
(C) Copyright 2010-2015 SKD System AB
Command Interface Over TCP
To access command interface start TCP port 60000. This can be done by starting Serial Terminal application in PC, by starting
communications script or from application program in the control system.
Example of communication with the product from PC via TCP by using Python script:
import sys,os.socket
TCP_PORT = 60000; BUFFER_SIZE = 5000; TCP_IP = "192.168.1.222";
s = socket.socket(socket.AF_INET, socket.SOCK_STREAM)
s.connect((TCP_IP, TCP_PORT))
s.send("acsw:1-1;")
s.close()
Example of command session:
TCP Serial Interface Commands
Common nodename; Read node name
nodename:[name]; Set node name. Up to 12 alphanumerics Example: nodename:First; Set node name to First
who; Read node id and name
help; Help, lists commands and command groups
productdata; Read product data.
states; Read device states

7
(C) Copyright 2010-2015 SKD System AB
defaults; Read default settings. Default settings are parameters reinstated after Restore command.
reset; Reset dynamic data. Reset is equivalent to turn off power and turn on power again. Permanent data are not changed
by reset.
restore; Restore permanent node data to factory defaults. This includes: ip address, gateway address, node name, sensor
timers, autofuse settings.
LAN-configuration h-lan; Help LAN configuration commands
lanconf; Read LAN control interface data.
lanip; Read ip address
lanip:[ip]; Set ip address. To activate, enter command lanactivate; To return to factory defaults, use restore; command,
alternatively: restore can be done in some product models by pushing manual switch for 10sec (See User Manual) Example:
lanip:192.168.1.222; New ip address
langw; Read gateway ip address
langw:[ip]; Set gateway ip address. To activate, enter command lanactivate; Example: langw:192.168.1.1; New gateway
address
lanmask; Read ip mask
lanmask:[ip]; Set ip mask. To activate, enter command lanactivate; Example: lanmask:255.255.255.0; New MASK address
lanactivate; Activate new ip address, new gateway address and/or new ip mask. The command activates only ip, gw and/or
mask which do no have value 0.0.0.0
landhcp; Read DHCP client status, 0 = not active, 1 = active
landhcp:[dhcp]; Activate/deactivate DHCP client. After this command, reset the node, to activate the change. Example:
landhcp:1; Activate DHCP client
AC-switch h-acsw; Help AC-switch commands
acsw; Read AC outlet states
acsw:[id]-[state]; Set AC outlet/outport id = 1 to off (0) or on (1) Example: acsw:1-1; Turn on AC1. acsw:1-0
E-meter h-emeter; Help E-meter commands
emeter; Read E-meter status and measurement results
emeter:[id]-[activate]; Start/Stop KWH meter Example: emeter:1-1; Start KWH meter. emeter:1-0
AutoFuse h-autofuse; Help AutoFuse configuration commands
autofuselimit:[id]-[Ampere]; Set autofuse threshold, in Ampere. Range 0 ... 16A Example: autofuselimit:1-12; Set Autofuse
threshold to 12 Ampere
autofuselatency:[id]-[Ampere]; Set autofuse current latency, in Ampere. Range 0 ... 16A Example: autofuselatency:1-12;
Set Autofuse current latency to 12 Ampere
autofuse; Read autofuse status
autofuse:[id]-[activate]; Enable/Disable fuse Example: autofuse:1-1; Enable autofuse1. autofuse:1-0
Presence sensor h-psensor; Help presence sensor commands
psensortimer:[id]-[sec]; Set time limit, in seconds, for presence sensor. Range 0 ... 9999sec. Timer value is preserved at
reset Example: psensortimer:1-1800; Set timer to 1800 sec
psensor; Read presence sensor data
psensor:[id]-[status]; id = [1,2] status = [0,1] 0=OFF, 1=ON. Activate/deactivate presence sensor. Presence: 0=Absent
1=Present 2=Sensor deactivated. Example: psensor:1-1; Activate Sensor1, psensor:1-0
Manual switch SW1 Turns AC1 on/off when AC1 is not controlled by Sensor1.
\n\nIf LED1 is Red, AC1 is controlled by Sensor1.

8
(C) Copyright 2010-2015 SKD System AB
SW2 Turns AC2 on/off when AC2 is not controlled by Sensor2.
\n\nIf LED2 is Red, AC2 is controlled by Sensor2.
\n\nOther functions of SW2:\nTo initiate firmware upgrade, insert USB memory with new firmware into USB interface, hold
SW2 while turning on power to the product.
\nTo restore factory defaultsm hold SW2 for around 15 seconds until fast blinking stops.
LED function LED1 If off: AC1 is disconnected.
\n\nIf Green: AC1 is turned on activated by SW1, command or via Android.
\n\nIf Red: Sensor1 is activated and controls AC1.
\n\nIf Orange: AC1 is on, activated by Sensor1.
LED2 If off: AC2 is disconnected.
\n\nIf Green: AC2 is turned on activated by SW2, command or via Android.
\n\nIf Red: Sensor2 is activated and controls AC2.
\n\nIf Orange: AC2 is on, activated by Sensor2.
\nFast blinking: When holding SW2 for 15 seconds to initiate factory defaults restore.
Command Interface Over HTTP
HTTP interface can be accessed from web browser or via script.
Command getdata.htm is used to read data from Rhone2. Command setdata.htm is used to update variables in Rhone2. getdata.htm
and setdata.htm specifications are not available publicly at this time. Send request to [email protected] for specifications.
Android Connection Over USB Cable
Product acts as host for Android devices.
skdRhone2 app is implemented for Android devices version 4.0 or later (Android 16 or later).
App skdRhone2 is installed from Google play.
Connect USB cable between Android and Rhone2. App start automatically.
Android Indirect Connection Over WiFi
Connection between Android and the product can be set upp by selecting product IP address in Network page.
If WiFi IP matches current product ip address, connection over WiFi will be set up automatically when app is activated.
If current IP of the product is not in the Selection list, add it to the selection list.
After each change of WiFi connection settings, Close app and start it again.

9
(C) Copyright 2010-2015 SKD System AB
Technical Specification
AC fuse
Type Physical fuse. F2 250Vac T16AH.
Function Overcurrent protection. Max load on connection to mains 16A.
Characteristics Rated current for the physical fuse 0.5A to 16A, 250VAC, Time-lag T, Dimensions 5x20mm, Non-resettable
Handling In case AC-fuse needs to be replaced, replace with Schurter article 0001.2516 or equivalent. Replacement of
fuse only by service personnel.
DC fuse
Function Overcurrent protection on USB and Sensor interfaces
Characteristics Hold current 2A, Trip-current 4.4A, Time to trip at 4.4A is 4sec
Handling The fuse is a resettable fuse (PTC). Fuse increases its internal resistance at overcurrent on internal DC
source. The fuse resumes normal operation after fault is removed, unless device was exposed to conditions
outside of its normal operating area.
AC switch
Function Switching of AC ports.
Connectors Wieland mini connectors, 3pins, GST15i3, white.
Male connector for connection to mains.
Female connector for connection of other AC devices.
Characteristics 16A 250V High-inrush switched ports. Pulse controlled switches. No power consumption except during switch
state change.
Modes of operation Manual control and remote control:
AC switch is turned on and off by manual switches or by commands.
Sensor control:
AC switch is turned on when movement sensor detects presence. AC switch is turned off after expiration of
timer if no presence was detected during timer countdown.
Defaults If sensor is not activated, AC switch is set to off at power on.
E meter
Function AC-meter. Measures TrueRMS values of current.
Calculated values of Power and Energy.
Measurement range 16mA to 16A, 4Watt to 4000Wat.
Control Display of results via LAN (TCP, HTTP).
Display of results on Android (via USB or WiFi).
Presence sensor interface
Function RJ-45 interface. Use patch cable to connect sensor.
Pinout Pin 4 = Sensor signal.
Pin 5 = 5V power supply to sensor.
Pin 6 = Ground.

10
(C) Copyright 2010-2015 SKD System AB
LAN control
Function Command interface over TCP, port 60000.
HTTP server, port 80
Interface Ethernet, RJ-45 connector
MAC address SKD System AB MAC address space 00-50-C2C59XXX.
MAC address is printed on the product label.
MAC address can be read via Web interface or via app.
Defaults Factory settings:
IP=192.168.1.222
GW=192.168.1.1
MASK=255.255.255.0
Command interface Serial interface commands are listed in User Manual, product app and product web page.
USB control
Function USB-host interface.
Charging of connected USB-devices.
Communication Android Open Accessory Protocol 2.0 with extensions
Application Control of the product by app in Android device.
Upgrade of firmware from USB-memory
Supported-devices Android smart phones and tablets version 4.1 or higher
Interface USB-A connector
Characteristics Max charging current on USB interface 0.5A.
USB DC-supply leads are protected from overload by internal fuse of 2A DC.
Wieland mini male
Function AC-connector for connection to mains
Type Wieland, Gesis-mini, GST15i3, male
Characteristics Rated 16A, color white
Wieland mini female
Function AC-connector for connection of user equipment.
Type Wieland, Gesis mini, GST15i3, female
Characteristics Rated 16A, color white
Indirect WiFi control
Function Communication via WiFi from Android device indirectly via LAN
Characteristics Communication between the Android app and the product over WiFi starts automatically when app is
activated.
AutoFuse
Function Software controlled fuse.
Complement to the 16A physical fuse integrated into the product.
AutoFuse disconnects power on both L and N lines, when current to the product exceeds a preset threshold
level (in Ampere) for the time period (in seconds) set by the fuse latency parameter.
AutoFuse is activated by command, via app or via product web page.
Mode of operation When activated, AutoFuse turns AC switches off when current exceeds preset limit for the time set by
latency. AutoFuse get deactivated.
AC switch is not blocked when AutoFuse is inactive.
Control Threshold level and latency of the AutoFuse can be set by command via LAN, via Android app or via product
Web page.
Defaults Default current threshold level for automatic fuse is 16 Ampere and latency 3 seconds.
Product Approvals
Product safety EN 60950-1:2006 +A1+A2+A11+A12

11
(C) Copyright 2010-2015 SKD System AB
EMC EN 55022 class A, EN 55024, EN 61000-6-2, EN 61000-6-4
Environmental Specification
Power
consumption 2Watt
Operating
temperature 0 degrees C to 40 degrees C
Humidity 5% to 95% RH, non-condensing
RoHS Compliant
Disposal Dispose for recycling
Troubleshooting
Nothing works Check that product is connected to the mains and that power is turned on.
If it is suspected that physical fuse could have burned out, check and if necessary replace the physical fuse
with T16AH 250Vac 5x20mm fuse.
Replacement of the physical fuse can only be done by service personnel. To replace physical fuse, unscrew
the AC side plate and the Control side plate, slide the cover plate towards control plate side until fuse is
uncovered. Then remove carefully the fuse and replace with new.
LAN control not
working Verify LAN connection by opening web browser and entering product ip address as link. Example:
http://192.168.1.222.
Check that power is on and that LAN cable is connected.
Check that the ip assigned to the product is not a duplicate ip, i.e. used allready by another LAN device.
Check that correct IP is beeing used. IP can be checked by connecting Android device to the product with
USB cable. Alternatively restore factory defaults by holding SW2 until LED stops blinking. This takes around
15sec. Default ip 192.168.1.222. Default gateway 192.168.1.1.
Reset the product by power off/on after LAN configuration changes.
Make sure that new IP and GW address are activated. Use Activate icon on Android app or product web
page.
If the last 3 digits in product MAC address are 000, reassign these 3 digits so that they correspond to MAC
address on product label. Reassignment of MAC address is done from Android, About page, or product web
Config page or by TCP command lanmac; Reassignment of last 3 MAC digits needs to be done after
firmware upgrade.
Presence
detection sensor
not working
Check that sensor is connected to the product and that the power is on.
Verify that sensor turns red by moving hand across sensor opening.
Replace sensor cable.
Manual control not
working If LED is red or orange then AC switch is controlled by the Sensor. To enable manual control, deactivate
sensor control.
Command acsw;
does not work Check with command psensor; that sensor function is deactivated. If not, deactivate sensor by command
psensor to enable.
Command acsw is blocked when AC switch is controlled by sensor.
Example: psensor:1-0; deactivates Sensor1. psensor:2-0; deactivates Sensor2.
Sensor not
sensitive enough Make sure that sensor opening is oriented towards the area where movement is to be detected.
Try sensor with larger opening.
No USB
connection Check USB cable.
Reconnect USB cable.
Check that app for the product is installed.
Try by closing app and opening it again.
Check that app is not running after Close. Do this via App manager. Select Overview icon or hold Home
button for a second to display active applications. Stop skdRhone2 if it is running.

12
(C) Copyright 2010-2015 SKD System AB
No connection
over WiFi from
Android
Check that the product is connected to LAN and that Android is connected to LAN via WiFi.
Connection of the product to LAN can be verified via web browser. Default link to product web page:
http://192.168.1.222.
Check that Network page -> WiFi IP address in app is correct or select the correct WiFi IP. After selection
Close app and start it again.
IP address of the product can be verified by connecting Android to the product with USB cable.
See also "LAN-control not working".
IP of the product
not known Read node IP address by connecting Android device via USB. Network page displays current LAN
configuration of the product.
Alternatively: Restore product to factory defaults by holding SW2 until LED stops blinking. Default: ip
192.168.1.222, gateway 192.168.1.1.
IP and Gateway address can be changed from Android, via product web page or by command.
Other manuals for Rhone2
1
This manual suits for next models
1
Table of contents
Other SKD Switch manuals
Popular Switch manuals by other brands

Brocade Communications Systems
Brocade Communications Systems SilkWorm 2400 Hardware reference manual
Elko
Elko RFSA-62B quick start guide

ZyXEL Communications
ZyXEL Communications GS1100 Series brochure

Longshine
Longshine GS9120 manual
F&F
F&F WB-2 quick start guide

ZyXEL Communications
ZyXEL Communications ZyXEL Dimension GS-1008 user guide
Comnet
Comnet CNGE28FX4TX24MS Series Installation and operation manual

Integra
Integra Xmart STA-16A user manual

ISON
ISON IS-DG306P Series Quick installation guide

TRENDnet
TRENDnet NWay user manual
Jaeger
Jaeger 9645 user manual

Accton Technology
Accton Technology CheetahSwitch Workgroup-3627 installation guide
