Skechers SR5008 User manual

2
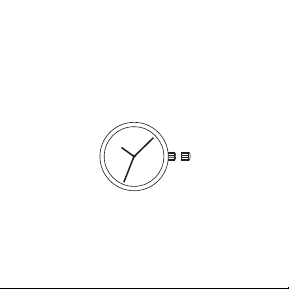
Analog 3-Hand - SR5008(A), SR5010(A), SR5040(A),
SR5042(A), SR5043(A), SR5048(A), SR5105(A), SR5106(A),
SR5110(A), SR5113(A), SR5114(A), SR5120(A), SR5122(A),
SR5123(A), SR6022(A), SR6023(A), SR6024(A), SR6026(A),
SR6027(A), SR6028(A), SR6029(A), SR6032(A), SR6034(A),
SR6035(A), SR6071(A), SR6073(A), SR6075(A), SR6079(A),
SR6080(A), SR6091(A), SR6092(A), SR6122(A), SR6123(A),
SR6144(A), SR6145(A), SR6147(A), SR6148(A), SR6151(A),
SR6152(A), SR6153(A), SR6154(A), SR6164(A), SR6165(A),
SR6172(A), SR9020(A), SR9021(A), SR9022(A), SR9023(A)
1 2
Time Setting
1. Pull the crown out to position 2.
2. Turn the crown to set the correct time.
3. Push the crown back to position 1.
3
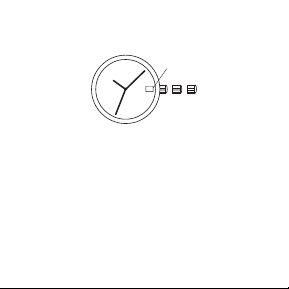
Analog 3-Hand Date - SR5021(A), SR5022(A), SR5076(A),
SR6049(A), SR6050(A), SR6052(A), SR6053(A),
SR6101(A), SR6169(A), SR6170(A), SR6171(A)
DATE
123
Date Setting
1. Pull the crown out to position 2.
2. Turn the crown either clockwise or counter-clockwise and set the
date for the previous day. The direction that moves the date varies on
different watch models.
Time Setting
1. Pull the crown out to position 3.
2. Turn the crown counter-clockwise to advance the time and continue
until the day changes to the present day.
3. Set the correct time.
4. Push the crown back to position 1.
4
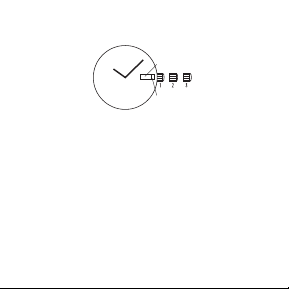
VJ53A Day/Date Watch - SR5000(A), SR5002(A),
SR5003(A),
DAY
DATE
Date Setting
1. Pull the crown out to position 2.
2. Turn counter-clockwise and set the date for the previous day.
Day Setting
With crown still in position 2, turn clockwise and set the day for the
previous day.
Time Setting
1. Pull the crown out to position 3.
2. Turn counter-clockwise to advance the time and continue until the
day/date changes to the present day.
3. Set the correct time.
4. Push the crown back to position 1.

5
HFT-183 Analog Digital - SR6001(A), SR6002(A),
SR6004(A), SR6166(A), SR6167(A),
EL Backlight
Mode
Alarm
Calendar
A
B
D
C
12/24H Format
• In Time mode, press “B” to toggle between 12 and 24H time formats.
EL Backlight
• Press “C” to make display light up for 3 seconds
Alarm and Chime On/Off
1. In Time mode, press and hold “C”, and also press “D” to turn
Alarm ON/OFF.
2. To test Alarm sound, press “C” then hold “D”. Alarm will beep.
3. Press “C” to turn Alarm sound OFF.
4. To activate/deactivate Chime, press and hold “C”, and also press
“B” too
5. Release “C” to return to Normal Time mode.

6
Setting the Time
1. In Time mode, press “B” three times, day and seconds will ash.
2. Press “D” to reset seconds to “00”.
3. Press “C” once to select minutes, then press “D” to advance the
minutes.
4. Press “C” twice to select hour, then press “D” to advance the hour.
5. Press “C” three times to select month or date, then press “D” to
advance.
6. Press “C” four times to select month or date, then press “D” to
advance.
7. Press “C” ve times to select day, then press “D” to advance.
8. Press “C” once to exit Time Setting mode.
12/24H Time
1. Press “B” three times, then press “C” to select AM/PM and 12/24H
format. Press “D” to advance.
2. Press “B” to exit 12/24H Setting mode.
Setting the Alarm
1. In Time mode, press “B” twice to select day and hour, then press
“D” to advance.
2. Press “C” to switch to minute setting, then press “D” to advance
minutes.
3. Press “B” to exit Alarm Setting mode.

7
Stopwatch
1. In Time mode, press “B” to enter Stopwatch mode.
2. Press “D” to start/stop Stopwatch.
3. For Split Time, press “C” while Stopwatch is counting. To exit Split
Time, press “C” again.
4. Press “D” to stop Stopwatch counting, then “C” to reset.
HFT-2344 DIGITAL - SR1032(A), SR1033(A)
EL BACKLIGHT
MODE
STOPWATCH
START/STOP
STOPWATCH
RESET
A
B
D
C
MON 12-1 8
1o:28
42
A
P
Switching Between Modes
• Press “B” to toggle through modes in the following order: Time,
Alarm, Stopwatch, Countdown Timer
EL Backlight
• To make the display glow for 3 seconds, press “A”.
Setting the Time
1. In Time mode, press and hold “C” for 3 seconds to select seconds.
Press “D” to reset seconds to “00”.

8
2. Press “B” to select minutes, press “D” to advance minutes.
3. Press “B” to select hour, press “D” to advance hour.
4. Press “B” to select 12/24H, press “D” to toggle to 12 or 24H format.
5. Press “B” to select month, press “D” to advance month.
6. Press “B” to select date, press “D” to advance date.
7. Press “B” to select day, press “D” to advance day.
8. Press “C” to exit Time Setting mode.
Alarm/Chime Setting Mode
1. Press “D” to toggle Alarm and or Chime ON/OFF.
2. Press and hold “C” for 3 seconds to enter Alarm setting mode, hour
will be ashing. Press “D” to advance hour.
3. Press “B” to select minutes, then press “D” to advance minutes.
4. Press “C” to exit Alarm Setting mode
Stopwatch
1. Press “D” to start/stop Stopwatch.
2. With Stopwatch running, press “C” to enter/exit Split Time mode.
3. Press “D” to stop Stopwatch.
4. Press “C” to reset Stopwatch.
Countdown Timer
1. In Countdown Timer mode, Press and hold “C” for 3 seconds
to enter Timer Setting mode. Hours will ash, then press “D” to
advance hours.
2. Press “B” to select minutes, then press “D” to advance.

9
3. Press “C” to exit Timer Setting mode and return to Countdown
Timer readout.
4. Press “D” to start/stop the Timer.
5. With Timer stopped, press “C” to reset.
Dual Time Mode (Setting Secondary Time, T2)
1. In Time mode, press “D” to toggle between primary time and
secondary time (T2) readouts.
2. To enter T2 Setting mode, toggle to T2, then press and hold “C”
for 3 seconds. Minutes will ash, then press “D” to advance minutes.
3. Press “B” to select hour, then press “D” to advance hour.
4. Press “C” to exit T2 Setting Mode.
MD11258T(R) Y121E4 ANALOG DIGITAL - SR1040(A),
SR1042(A)
A
B
D
C
1o:28
42
Pm
STOPWATCH
RESET
MODE EL BACKLIGHT
STOPWATCH
START/STOP

10
Setting Analog Time
• Pull out crown and turn to adjust hour and minute hands.
• Push crown back to normal position once time is set.
Switching Between Modes
• Press “B” to toggle through modes in the following order: Time,
Alarm, Stopwatch, Dual Time
EL Backlight
• To make display glow for 3 seconds, press “C”
Setting the Time
1. In Time mode, press and hold “A” until seconds ash, then press “D”
to reset seconds to “00”.
2. Press “B” select hour, then press “D” to advance. Holding “D” will
advance hour at a faster speed.
3. Repeat step 2 to set Minutes, Month, Date, Day, 12/24H Format.
4. Press “A” to exit Time Setting mode.
Alarm and Chime ON/OFF
• In Alarm mode, press “D” to turn on/off the Alarm and Chime sound
in the following sequence: Alarm and Chime OFF, Alarm ON, Chime
ON, Alarm and Chime ON.
• Alarm sounds at the preset time for 60 seconds
if sound is set to ON. Pressing any button will silence it.

11
Setting the Alarm
1. In Alarm mode, press “A” to select hour, then press “D” to advance
the hour. Holding “D” will advance hour at a faster speed.
2. Repeat step 2 to set minutes
3. Press “A” to exit Alarm Setting mode.
Stopwatch
1. In Stopwatch mode, press “D” to start/stop counting.
2. Press “A” to reset Stopwatch.
3. In Stopwatch counting mode, press “A” to enter/exit Split Time.
4. Press “D” to stop Stopwatch, and “A” to exit Stopwatch mode.
Setting Dual Time
1. In Dual Time mode, press “A” to select hour, then press “D” to
advance hour. Holding “D” will advance the hour at a faster speed.
2. Press “B” to select minutes, then press “D” to advance minutes.
Holding “D” will advance the hour at a faster speed.
3. Press “A” to exit Dual Time Setting Mode.

12
MD08181N DIGITAL - SR1006(A), SR1008(A)
A
B
D
C
1o:28
42
WE 18
P
STOPWATCH
RESET
MODE EL BACKLIGHT
STOPWATCH
START/STOP
Switching Between Modes
• Press “B” to toggle through modes in the following order: Time,
Alarm, Stopwatch, Dual Time
EL Backlight
• To make display glow for 3 seconds, press “C”
Switching Between 12/24H Formats
• Press “A” to toggle between 12H or 24H readout formats
View Calendar
• Press and hold “D” to display Year, Month, Date

13
Setting the Time
1. In Time mode, press and hold “A” until seconds ash, then press
“D” to reset to “00”.
2. Press “B” to select hour, then press “D” to advance hour. Holding
“D” will advance hour at a faster speed.
3. Repeat step 2 to set remaining features in the following order:
Minutes, Year, Month, Date. Day of week will automatically set.
4. Press “A” to exit Time Setting.
Alarm and Chime ON/OFF
• In Alarm mode, press “D” to turn ON/OFF Alarm and Chime in the
following order: Alarm and Chime OFF, Alarm ON, Chime ON, Alarm
and Chime ON.
• Alarm sounds at preset time each day for 60 seconds. Pressing any
button will silence it.
Setting the Alarm
1. In Alarm mode, press “A” to select hour, then press “D” to advance
hour. Holding “D” will advance hour at a faster speed.
2. Press “B” to select minutes, then press “D” to advance minutes.
Holding “D” will advance hour at a faster speed.
3. Press “A” to exit Alarm Setting mode.
Stopwatch
1. In Stopwatch mode, press “D” to start/stop the Stopwatch.
2. Press “A” to reset the Stopwatch.

14
3. In Stopwatch counting mode, press “A” to enter/exit Split Time.
4. Press “D” to stop Stopwatch, and “A” to reset.
Setting Dual Time
1. In Dual Time mode, press “A” to select hour, then press “D” to
advance hour. Holding “D” will advance hour at a faster speed.
2. Press “B” to select minutes, then press “D” to advance minutes.
3. Press “A” to exit Dual Time Setting mode.
MD7133 DIGITAL - SR2011(A)
STOPWATCH
RESET
MODE EL BACKLIGHT
STOPWATCH
START/STOP
A
B
D
C
WE 18
PM
1o:28
42
Switching Between Modes
• Press “B” to advance through the different modes: Time, Alarm,
Stopwatch, Dual Time 12/24H Format
• In Time mode, press “A” to toggle between 12 and 24H time formats.

15
Calendar
• In Time mode, press and hold “D” to display Year, Month and Date.
EL Backlight
• Press “C” to make display light up for 3 seconds
Setting the Time
1. In Time mode, press and hold “A” to select seconds (seconds
will ash).
2. Press “D” to reset seconds to “00”.
3. Press “B” to select hour, then press “D” to advance the hour.
Holding “D” will advance the hour at a faster speed.
4. Repeat step 3 to nish setting time in the following order: Seconds,
Hour, Minute, Year, Month, Date
Setting the Alarm
1. In Alarm mode, press “A” to select hour, then press “D” to advance
the hour. Holding “D” will advance the hour at a faster speed.
2. Press “B” to select minutes, then press “D” to advance the minutes.
Holding “D” will advance the minutes at a faster speed.
3. Press “A” to exit Alarm Setting mode.
Alarm and Chime On/Off
• In Alarm mode, press “D” to turn on/off the alarm and chime in the
following order: Alarm/Chime Off, Alarm On, Chime On, Alarm/
Chime On

16
Stopwatch
1. In Stopwatch mode, press “D” to start elapsed time, press “D” again
to stop elapsed time.
2. Press “A” to reset stopwatch.
3. For Split Time, press “D” to start Stopwatch, then press “A” to
display Split Time (Stopwatch timing continues internally).
4. Press “A” to clear the Split Time and to continue Stopwatch.
5. Press “D” to stop the Stopwatch.
Dual Time
1. In Dual Time mode, press “A” to select hour., then press “D” to ad-
vance the hour. Holding “D” will advance the hour at a faster speed.
2. Press “B” to select minutes, then press “D” to advance the minutes.
Pressing once advances minutes by “30”.
3. Exit Dual Time Setting by pressing “A”.
ED0368 DIGITAL - SR2021(A), SR2022(A), SR2027(A)
DATE
HOUR MINUTES
EL BACKLIGHT
A
B
D
C
18
1o:28
42

17
Setting the Time
1. Press “A” to advance the Date. Holding “A” advances Date at a
faster speed.
2. Press “B” to advance the Hour. Holding “B” advances Hour at a
faster speed.
3. Press “C” to advance the Minutes. Holding “C” advances Minutes
at a faster speed.
EL Backlight
• Press “D” to make display glow for 3 seconds.
J8279 DIGITAL - SR1019(A), SR1022(A), SR1117(A)
EL BACKLIGHT
MODE STOPWATCH RESET
STOPWATCH
START/STOP
A
B
D
C
42
WE
12-1 8
1o:28
Switching Between Modes
• Press “B” to toggle through modes in the following order: Time,
Stopwatch, Alarm, Time Setting

18
EL Backlight
• To make display glow for 3 seconds, press “A”
Setting the Time
1. In Time Setting mode, press “C” to select seconds, then press “D”
to reset to “00”.
2. Press “C” to select hour, then press “D” to advance the hour. (“H”
displayed represents 24H format, “A” and “P” represent 12H format.)
3. Repeat step 2 to set Minutes, Month, Day, and Date.
4. Press “B” to exit Time Setting mode.
Alarm and Chime ON/OFF
1. In Alarm mode, press “D” to toggle through settings to turn Alarm
and Chime
• Alarm sounds at the preset time for 60 seconds. Press any button
to silence it.
2. When Snooze function is on, Alarm will sound again 5 minutes later
for 20 seconds.
Setting the Alarm
1. In Alarm mode, press “C” to select hour or minute, then press “D” to
advance the selected item
2. Press “C” to exit Alarm Setting mode.
Stopwatch
1. In Stopwatch mode, press “D” to start/stop Stopwatch.

19
2. Press “C” to reset Stopwatch.
3. In Stopwatch counting mode, press “C” to enter/clear Split Time.
4. Press “D” to exit Split Time.
5. Press “B” to exit Stopwatch mode. If Stopwatch is not stopped
before doing this, it will keep counting in the background.
MS057 - SR2016(A), SR2017(A), SR2019(A), SR2020(A),
SR2063(A), SR2099(A)
STOPWATCH RESET
MODE EL BACKLIGHT
STOPWATCH
START/STOP
A
B
D
C
WE 18
PM
1o:28
42
Switching Between Modes
• Press “B” to advance through the different modes: Time, Alarm,
Stopwatch, Dual Time
12/24H Format
• In Time mode, press “A” to toggle between 12 and 24H time formats.

20
Calendar
• In Time mode, press and hold “D” to display Year, Month and Date.
EL Backlight
• Press “C” to make display light up for 3 seconds
Setting the Time
1. In Time mode, press and hold “A” to select seconds (seconds
will ash).
2. Press “D” to reset seconds to “00”.
3. Press “B” to select hour, then press “D” to advance the hour.
Holding “D” will advance the hour at a faster speed.
4. Repeat step 3 to nish setting time in the following order: Seconds,
Hour, Minute, Year, Month, Date
5. Press “A” to exit time setting mode.
Setting the Alarm
1. In Alarm mode, press “A” to select hour, then press “D” to advance
the hour. Holding “D” will advance the hour at a faster speed.
2. Press “B” to select minutes, then press “D” to advance the minutes.
Holding “D” will advance the minutes at a faster speed.
3. Press “A” to exit Alarm Setting mode.
This manual suits for next models
95
Table of contents
Languages:
Popular Watch manuals by other brands


iwc
iwc Pilot's Watch Timezoner Spitfire operating instructions

Motus
Motus Trainer MT38 user manual

Rodania
Rodania Manfred Cracco user manual

Citizen
Citizen Eco-Drive EP6051-14L instruction manual

Christopher Ward
Christopher Ward C60 Lympstone Owner's handbook

Clip Sonic
Clip Sonic TEC583 instruction manual


