Skid Pro QA62 User manual

1
www.skidpro.com
QA62 And QA82 Mulcher
Operators Manual
Skid Pro Attachments
PO Box 982
Alexandria, MN 56308
www.skidpro.com
May 2023

2 www.skidpro.com
Following is a list of videos and documents available to help and enhance maintaining the brush mulcher.
Contact Product Guru to access correct link.
The list below was current at the time this manual was issued. Additional content may be available.
Activity Name Description
Hose Support Adjusting Hose Support And Length
Rotor Bearing Replacing Rotor Bearing.
Chain Couplers Replacing Chain On Chain Couplers.
Adding Zero Leak Relief Valve Zero Leak Valve Upgrade.
Zero-Leak Relief Valve Demonstrating And Troubleshooting Zero-Leak.
Hose Support Hose Support And Coupler Clearance Demo.
Motor Seal Motor Seal Replacement.
Belt Maintenance Installing Belt Assembly.
Belt Maintenance Testing And Adjusting Belt Tensioner.

3
www.skidpro.com
........................................................................................4
1.1 Introduction................................................................................................................4
.....................................................................................................................4
.............................................................................................5
...............................................................................................................................6
...................................................................6
3.2 Operational Hazards..................................................................................................6
..............................................................................7
.....................................................................................7
......................................................................................7
..................................................................................7
................................................................................................7
..............................................7
..................................................................................8
............................................................................................8
..........................................................................................8
.........................................................................8
................................................................................................8
.......................................................................9
............................................................................................10
....................................................................................................................12
4.1 Hydraulics .................................................................................................................12
.......................................................................................................................13
5.1 Pre-Operation Check List .......................................................................................13
5.2 Attaching And Detaching........................................................................................13
5.3 Operation..................................................................................................................13
..................................................................................................15
6.1 Inspections................................................................................................................15
6.2 Check Belt Tension ...............................................................................................15
6.3 Replace Cutting Teeth.............................................................................................16
6.4 Replace Coupler Chain ............................................................................................16
6.5 Lubricate Rotor Bearings ........................................................................................17
..........................................................................................................18

4 www.skidpro.com
Congratulations on your purchase of a Skid Pro Skid
Steer Mulcher. This equipment has been designed and
manufactured to meet the needs of a discriminating
buyer for ecient mulching of brush in land clearing
applications.
Safe, ecient and trouble free operation of your
mulcher requires that you and anyone else who will
be operating or maintaining the mulcher, read and
understand this Operator’s Manual.
This manual covers the Skid Pro Skid Steer Mulcher.
Keep this manual with the equipment for frequent
reference and to pass on to new operators or owners.
Call your Skid Pro dealer, distributor or the factory if
you need assistance, information or additional copies
of the manuals.
OPERATOR ORIENTATION - The directions left, right,
front and rear, as mentioned throughout this manual,
are as seen from the skid steer driver’s seat and facing
in the direction of travel.
Skid Pro warrants products purchased from Skid Pro
to the Original Purchaser to be free from defects in
material and workmanship for a period of twelve (12)
months from the warranty start date.
Skid Pro’s requirement for any issue with respect to
attachments shall be limited to repairing or replacing
the defective part, as this is a parts-only warranty and
does not include any labor to replace or install the
part or downtime from resulting issue. Skid Pro has
full technical support & assistance to assure customer
replaces the part properly for optimal performance
on attachment. Skid Pro warranty service does not
include:
1. Transportation to selling dealer’s business location
or, at the option of the original retail purchaser, the
cost of a service call.
2. Used equipment.
3. Components covered by their own non-Skid Pro
warranties
4. Normal maintenance service and expendable wear
out items.
5. Repairs or adjustments caused by improper use;
failure to follow recommended maintenance
procedures; accidents or other casualty.
6. Liability for incidental or consequential damages of
any type, including but not limited to lost prots of
expenses of acquiring replacement equipment.
No agent, employee or representative of Skid Pro has
authority to bind Skid Pro to any warranty except as
specically set fourth herein. Any of these limitations
excluded by local law shall be deemed deleted from
this warranty; all other terms will continue to apply.
Skid Pro, Inc.
Toll Free: 877.378.4642
E-mail: [email protected]
5
www.skidpro.com
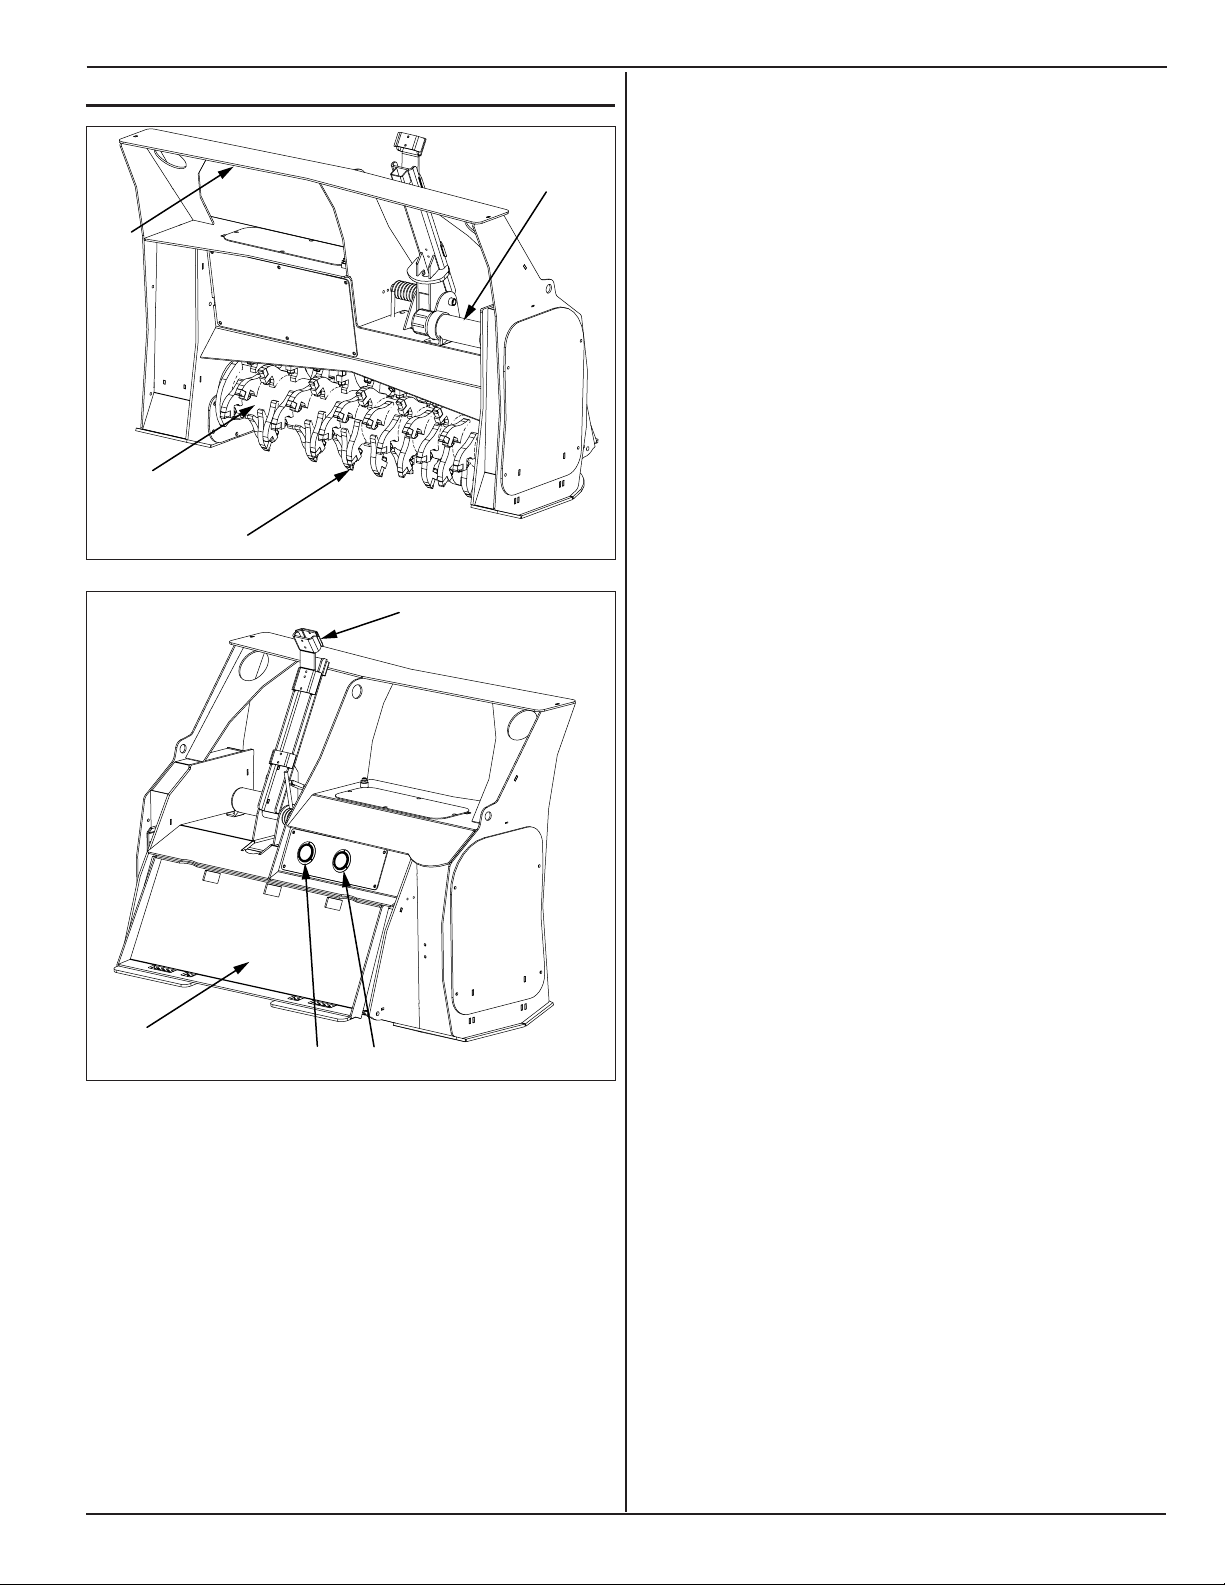
1
2
3
4
5
6
7
8
1. Operators Manual Holding Tube
2. Cutting Teeth
3. Rotor
4. Safety Push Bar
5. Case Pressure Gauge
6. Hydraulic Pressure Gauge
7. Quick Attach
8. Hydraulic Hose Holder

6 www.skidpro.com
You must read, understand and follow the instructions
given by the operating unit manufacturers, as well as
the instructions in this manual.
The safety information in this manual is denoted by the
safety alert symbol:
^
This symbol means ATTENTION! BECOME ALERT!
YOUR SAFETY IS INVOLVED!
The level of risk is indicated by the following signal
words:
^^
or serious injury.
^
result in death or serious injury.
^
or moderate injury.
NOTICE - Indicates a situation that could
result in damage to the equipment or other
property.
^
Prevent serious injury or death.
Read and understand this manual before
operating mulcher.
leaving operators seat.
operation.
Travel at a safe speed.
^
Prevent serious injury or death from
moving parts.
in place.
before adjusting or performing
maintenance.
^
applications.
Any other use may result in personal
^
Prevent serious injury or death.
hitch before operation or transport.

7
www.skidpro.com
^
^
Carefully read all safety messages in this manual and
on equipment safety signs. Keep safety signs in good
condition and replace missing or damaged safety
signs.
New equipment components and repair parts must
include the current safety decal.
Learn how to properly operate equipment. NEVER
operate or work around this equipment without proper
instruction, while fatigued or under the inuence of
alcohol, prescription or non-prescription medication or
if feeling ill.
Keep your equipment in proper working condition.
Know the regulations and laws that apply to you and your
industry. This manual is not to replace any regulations
or laws. Additional information may be found at:
www.asae.org or www.osha.gov.
If you do not understand any part of this manual,
contact Skid Pro at 866-232-8224.
Be prepared in case of emergencies. Keep a re
extinguisher and rst aid kit close to the machine.
Keep emergency phone numbers close to your phone.
Know your address so emergency services can locate
you if an emergency arises.
Replace missing or damaged safety signs.
Safety sign location are identied in Section 4.5 of this
manual.
Replacement safety signs are available from your
dealer.
NEVER lift or carry anyone on mulcher.
NEVER use mulcher as a work platform.
NEVER allow passengers on mulcher.
Keep mulcher low and move at slow speeds on rough
or uneven terrain.
The equipment may rollover, resulting in death or
serious injury. To help prevent rollover:
• Travel at a slow speed.
• Avoid sharp turns & sudden movement on slopes.
• Carry mulcher close to the ground.
• Avoid holes, ditches and other obstructions which
may cause equipment to rollover.
• Use caution when operating on slopes and do not
operate on excessively steep slopes.
• Do not exceed load capacity of equipment.
^^
Prevent electrocution.
Death or serious injury can result if
lines.
contact.
Check clearance before raising equipment.
Have local utilities locate and mark under ground wires,
cables, pipelines and other hazards before digging.

8 www.skidpro.com
DO NOT leave the operator’s seat if any part of the
equipment contacts electric lines or cables.
Detach mulcher on a rm and level surface. Mulcher
may fall over if detached on unlevel or soft surface.
Carry mulcher low.
Travel slow and avoid slopes.
^
Crushing hazard.
Raised, unsupported mulcher can fall,
resulting in death or serious injury.
Never enter the area under a raised
mulcher.
A raised mulcher can lower unexpectedly, resulting in
death or serious injury.
NEVER enter area under a raised mulcher.
Lower mulcher to ground, engage parking brake, shut
o engine and remove key before servicing.
^
Hydraulic hoses can fail from age, damage
and exposure.
searching for leaks. A tiny, almost invisible
leak can penetrate the skin, thereby
leaks, never use your hands.
Escaping uid under pressure can penetrate the skin
causing serious injury.
Prevent the hazard by relieving pressure before
connecting or disconnecting hydraulic lines. Verify all
connections are tight before applying pressure. Search
for leaks with a piece of cardboard or wood.
Protect hands and body from high pressure uids. If
an accident occurs, see a doctor immediately. Any uid
injected into the skin must be surgically removed within
a few hours or serious infection may result.
Doctors unfamiliar with this type of injury should
reference a knowledgeable medical source.
Before servicing, park machine on a rm and level
surface, set parking brake, chock wheels, and place
a “Do Not Operate” tag on control panel. Read and
understand this manual. If you do not understand any
part of the manual, contact Skid Pro at 866-232-8224.
Always wear face and/or eye protection, safety shoes,
and other protective equipment appropriate for the job.
Always use Skid Pro replacement parts.
^
Crushing hazard.
Before performing inspections, service or
•
•
•
• Place “Do Not Operate” tag on control
panel.
^
Keep clear of moving components.
performing maintenance.

9
www.skidpro.com
^
Keep clear of moving components.
appropriate for the job.
^
Burn hazard.
Hot and high pressure hydraulic oil.
Do not make any alterations to your mulcher. Altering
may cause your equipment to be unsafe and may void
the manufacturers’ warranty.

10 www.skidpro.com
^
To protect you and others against death or
mulcher and must be legible.
If any of these labels are missing or
cannot be read, contact your dealer for
replacement labels.
4
3
2
1
5
7
6
7
6
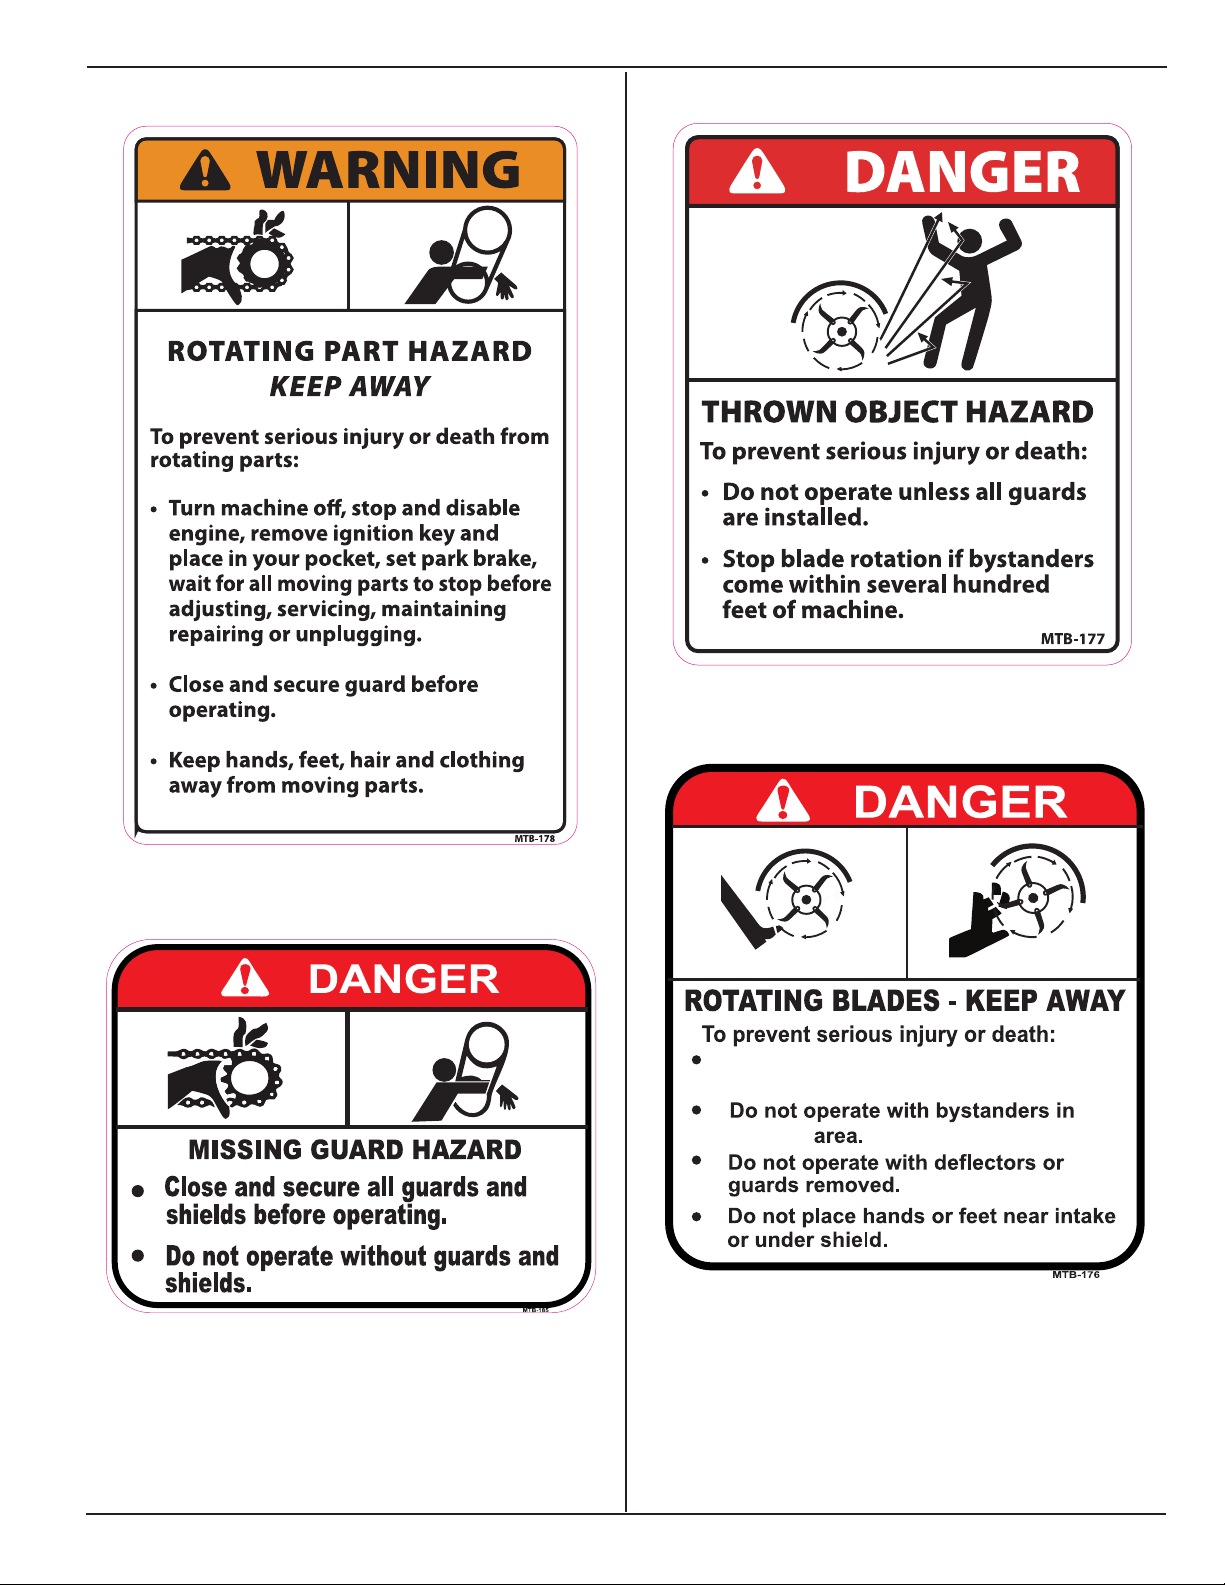
Decal 1 - D005262
WARNING: This product can expose you to chemicals
including 1,3-Butadiene and lead, which are known to the state of
California to cause cancer and birth defects or other reproductive
harm. For more information go to www.P65Warnings.ca.gov.
D005262
Decal 2 - MTB-182
Decal 3 - MTB-175
11
www.skidpro.com
Decal 4 - MTB-178
Decal 5 - MTB-185
Decal 6 - MTB-177
Decal 7 - MTB-176
Never allow riders; especially children
on carrier or cutter.
cutting

12 www.skidpro.com
^^
before disconnecting and/or connecting
hydraulic hoses.
The mulcher is equipped with short hoses that are
connected to the hydraulic motor. You must connect
your skid steer hoses to these hoses.
Skid steer hoses must be the same size as the mulcher
hoses. Using smaller diameter hoses will decrease
hydraulic ow.
The mulcher will have a pressure, return and case
drain connections. Pressure hose on mulcher will have
a red tie band (1) on it.
The hose end size is 3/4 in. female JIC for the pressure
and return hoses, and 1/2 in. female JIC for the case
drain hose.
Connect skid steer hoses to the mulcher hoses. Be
sure mulcher pressure hose with red tie band (A) is
connect to skid steer pressure hose.
The mulcher is equipped with a bearing support housing
vent (2). If oil emerges from vent, safety seal in motor
has been activated. This is caused by an undersized,
disconnected or blocked case drain hose.
2

13
www.skidpro.com
^ Quick-Attach must always be fully engaged and
in the locked position.
^ Keep bystanders away from equipment while in
use.
^ Always wear face or eye protection, safety shoes,
and other protective equipment appropriate for
the job.
^ Do not operate, work on or around this machine
while under the inuence of alcohol, drugs or if
feeling ill.
^ Keep clear of moving machinery at all times.
^ Turn o machine before exiting operator station.
^ It is your responsibility to operate this equipment
safely. You must be familiar with the equipment
and all safety practices before use.
^ Do not allow untrained or unqualied people to
operate this equipment.
It is operators responsibility to perform the following
checks prior to operation of equipment.
Review and understand this manual and operating unit
manual.
Verify safety decals are installed and legible. Replace
if damaged or missing.
Verify that all hardware is tight.
Inspect hoses and ttings for wear, damage and leaks.
Replace damaged or leaking hoses before use.
Verify that local utilities have marked all underground
wires, cables and pipelines.
Refer to operating unit operator’s manual for prestarting
instructions.
1. Read and follow all safety instructions.
2. Attach skid steer to mulcher. See skid steer
Operator’s Manual.
3. Verify pins are secure in the correct position.
4. Connect hydraulic hoses. Verify hydraulic hoses
are clear of pinch areas and moving parts.
5. Move to a clear open area to test functions.
Operate all functions in an open area with skid steer in
idle to get a good feel for the controls.
^
Prevent serious injury or death.
leaving operator’s seat.
A hydraulic pressure gauge on mulcher is visible
from operator’s seat and indicates hydraulic system
pressure.
If gauge approaches maximum pressure, slow
ground speed or raise mulcher slightly so mulcher is
not operating at maximum operating pressure for an
extended period of time.
Operating at maximum pressure can shorten the life
of hydraulic components. Operating at slightly below
maximum pressure will allow for better productivity and
more ecient operation.
The push bar is used for pushing over brush and small
trees when mulching, not for pushing over standing
trees.

14 www.skidpro.com
1. Attach skid steer to mulcher. See Attaching And
Detaching in this section.
^
Prevent serious injury or death.
forestry guard to protect the operator.
2. Lower mulcher so skid plates are on ground.
3. Set engine speed to low idle and engage mulcher.
4. Slow increase engine speed to high idle. Verify
mulcher is operating smoothly and start forward
travel.
General Operation
Monitor hydraulic pressure gauge. Hydraulic pressure
will increase if ground speed is too fast.
If mulcher stalls, stop forward movement, slightly raise
mulcher and allow rotor to regain speed. Slow ground
speed to prevent further stalling.
^
Keep clear of moving components.
Lockout operating unit before performing
maintenance.
If mulcher jams, disengage hydraulics, lower mulcher
to ground and stop engine. Remove key and lockout
operaing unit to prevent accidental starting. Remove
debris from rotor.
The mulcher can mulch up to 1 in. (25 mm) below
ground level. Excessive ground contact will result in
rapid wear of the cutting teeth. Keep ground contact to
a minimum.
1. Set engine speed to low idle.
^
Prevent serious injury or death.
hydraulics are disengaged.
stopped and operating unit has been
locked out.
2. Lower mulcher so skid plates are on ground.
3. Disengage mulcher and allow rotor to stop.
4. Set parking brake, stop engine and remove key.
15
www.skidpro.com
Check hydraulic hoses and ttings daily for leaks.
Replace hose if worn or damaged.
Inspect the unit for any buildup of contamination (dirt,
stones, etc.).
Check cutting teeth every 2 hours of use. Keep cutting
teeth in good condition. Unit will cut faster and remaining
teeth will last longer if broken teeth are replaced.
1. Lower mulcher to ground.
2. Set parking brake, stop engine and remove key.
^
Keep clear of moving components.
Lockout operating unit before performing
maintenance.
3. Inspect cutting teeth for damage. Replace individual
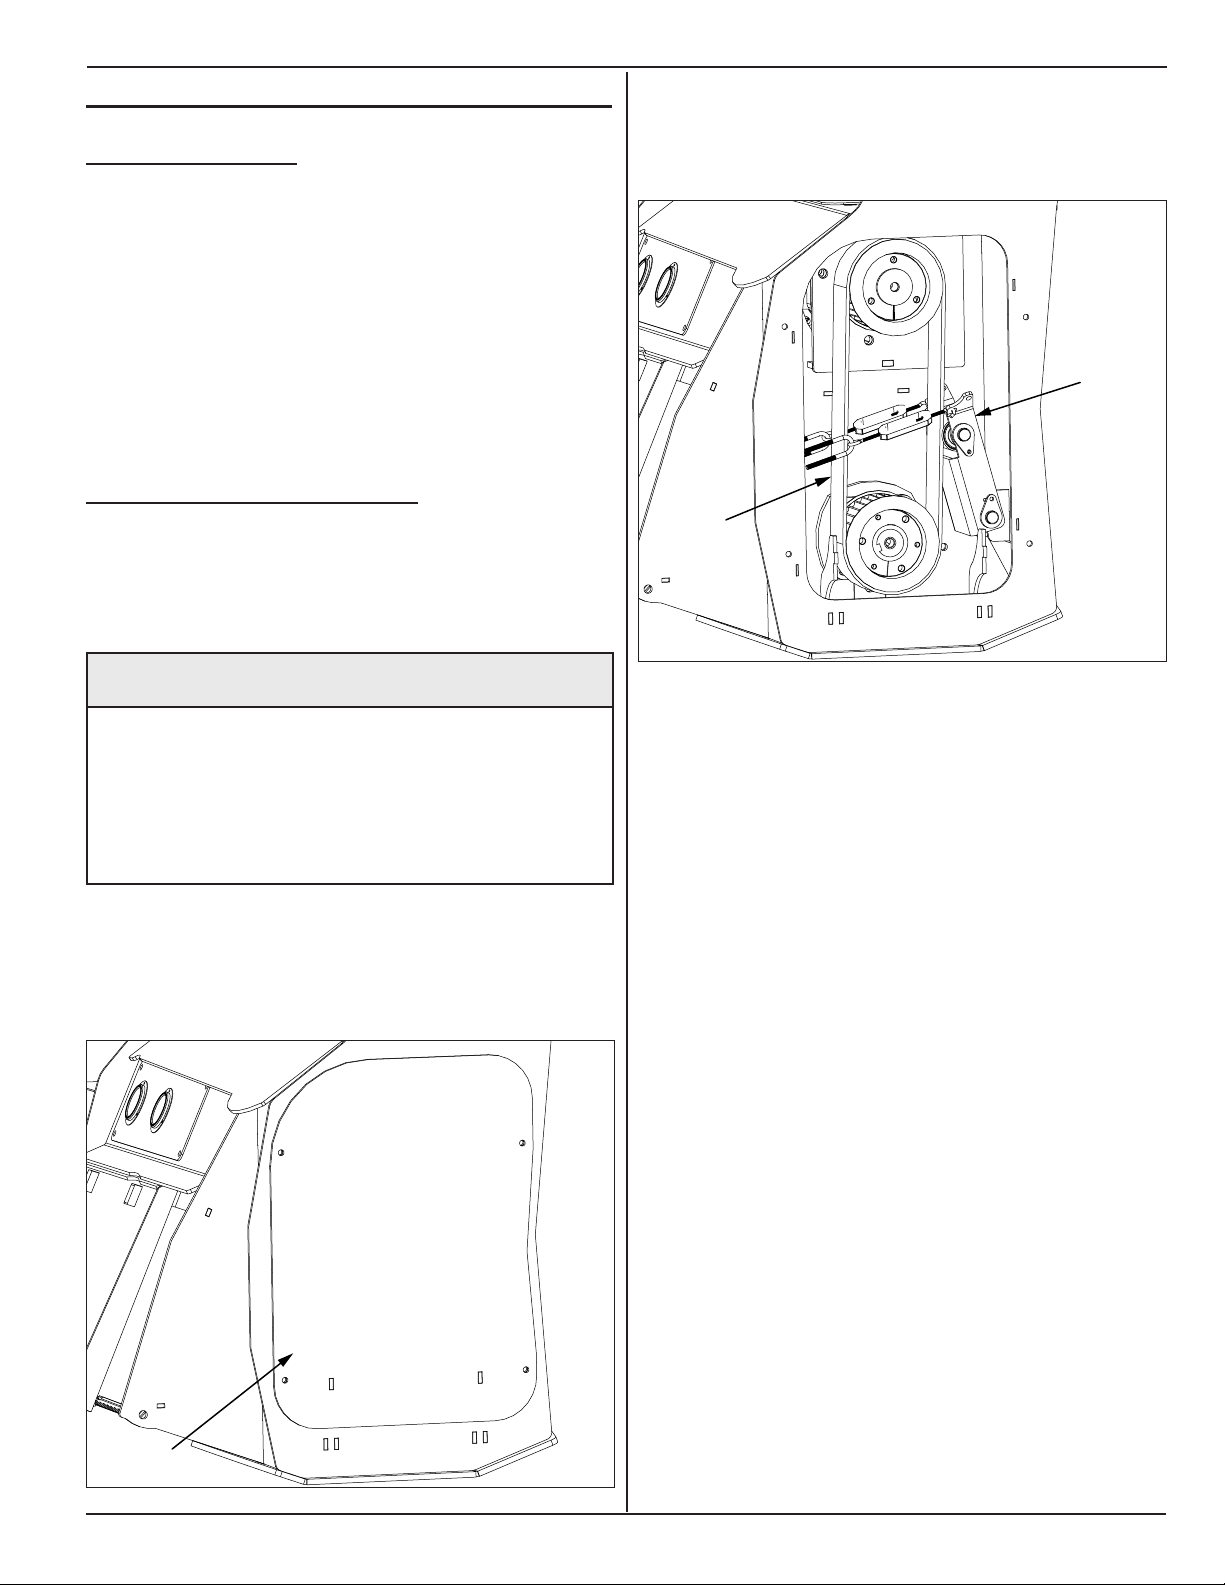
teeth as needed.
4. Remove inspection cover (1).
1
5. Inspect belt (2) for wear, damage and proper
tension.
6. Adjust idler (3) to set belt tension.
2
3
7. Install inspection cover (1). Do not operate mulcher
with inspection cover (1) removed.

16 www.skidpro.com
^
Crushing hazard.
Raised, unsupported mulcher can fall,
resulting in death or serious injury.
Never enter the area under a raised
mulcher.
NEVER enter area under a raised mulcher.
1. Lower mulcher to ground or properly support to
prevent falling.
2. Stop skid steer engine and remove key.
^
Keep clear of moving components.
Lockout operating unit before performing
maintenance.
3. Inspect cutting teeth for damage. Replace individual
teeth as needed.
4. Remove lock nut (1) and cutting tooth (2).
1
2
5. Install replacement tooth and lock nut. Tighten
locknut (1) to 95 lb/ft (129 Nm) of torque.
1. Lower mulcher to ground.
2. Stop skid steer engine and remove key.
^
Keep clear of moving components.
Lockout operating unit before performing
maintenance.
3. Remove cover (1).
1
4. Remove master link from coupler chain (2).
5. Remove coupler chain (2).
2

17
www.skidpro.com
Note: Coupler hub on rotor shaft and motor shaft do
not have setscrews. Setscrews are not needed in this
application.
6. Install coupler chain (2) and chain master link.
7. Install cover (1).
The bearings are factory lubricated with a general
purpose grease which is suitable for most applications.
The bearings should contain as much grease as
speed will permit. A full bearing with consequent slight
leakage through the seal is the best protection against
contaminant entry.
Extreme situations may require a change in lubricating
periods as dictated by experience.
Generally, a lower quantity of grease at frequent
intervals is more eective than a greater quantity at
extended lubrication intervals.
Typical lubrication quantity is 1 pump from a standard
grease gun every 250 hours.
In the higher speed ranges too much grease will cause
overheating. The amount of grease that the bearing
will take for a particular high speed application can be
determined only by experience. If excess grease in
the bearing caused overheating, it will be necessary
to remove grease tting to permit excess grease to
escape.

18 www.skidpro.com
Problem Probable Cause Solution
Rotor does not spin. Rotor jammed. Remove material from rotor.
Low oil. Check oil level in skid steer. Add if
necessary.
Not enough oil ow. Check ow control on skid steer.
See your dealer.
Rotor rotates slow or sluggish. Low oil. Check oil level in skid steer. Add if
necessary.
Oil lter plugged. Replace skid steer oil lter.
Relief valve not set properly. Set relief valve. Pressure should be
between 2,500 and 3,500 psi.
Not enough oil ow. Check ow control on skid steer.
See your dealer.
Drive belt loose. Tighten drive belt.
Excessive vibration. Cutting teeth worn or missing. Replace worn, broken or missing
teeth.
Debris lodged in rotor. Remove debris.

19
www.skidpro.com

20 www.skidpro.com
Skid Pro Attachments
PO Box 982
Alexandria, MN 56308
www.skidpro.com
May 2023
This manual suits for next models
1
Table of contents
Other Skid Pro Lawn And Garden Equipment manuals

Popular Lawn And Garden Equipment manuals by other brands

Sunforce
Sunforce SOLAR user manual

GARDEN OF EDEN
GARDEN OF EDEN 55627 user manual

Goizper Group
Goizper Group MATABI POLMINOR instruction manual

Rain Bird
Rain Bird 11000 Series Operation & maintenance manual

Cub Cadet
Cub Cadet BB 230 brochure

EXTOL PREMIUM
EXTOL PREMIUM 8891590 Translation of the original user manual


Vertex
Vertex 1/3 HP Maintenance instructions

GHE
GHE AeroFlo 80 manual

Land Pride
Land Pride Post Hole Diggers HD25 Operator's manual

Yazoo/Kees
Yazoo/Kees Z9 Commercial Collection System Z9A Operator's & parts manual

Premier designs
Premier designs WindGarden 26829 Assembly instructions

Snapper
Snapper 1691351 installation instructions