SKP Pro Audio DMP-4010 User manual

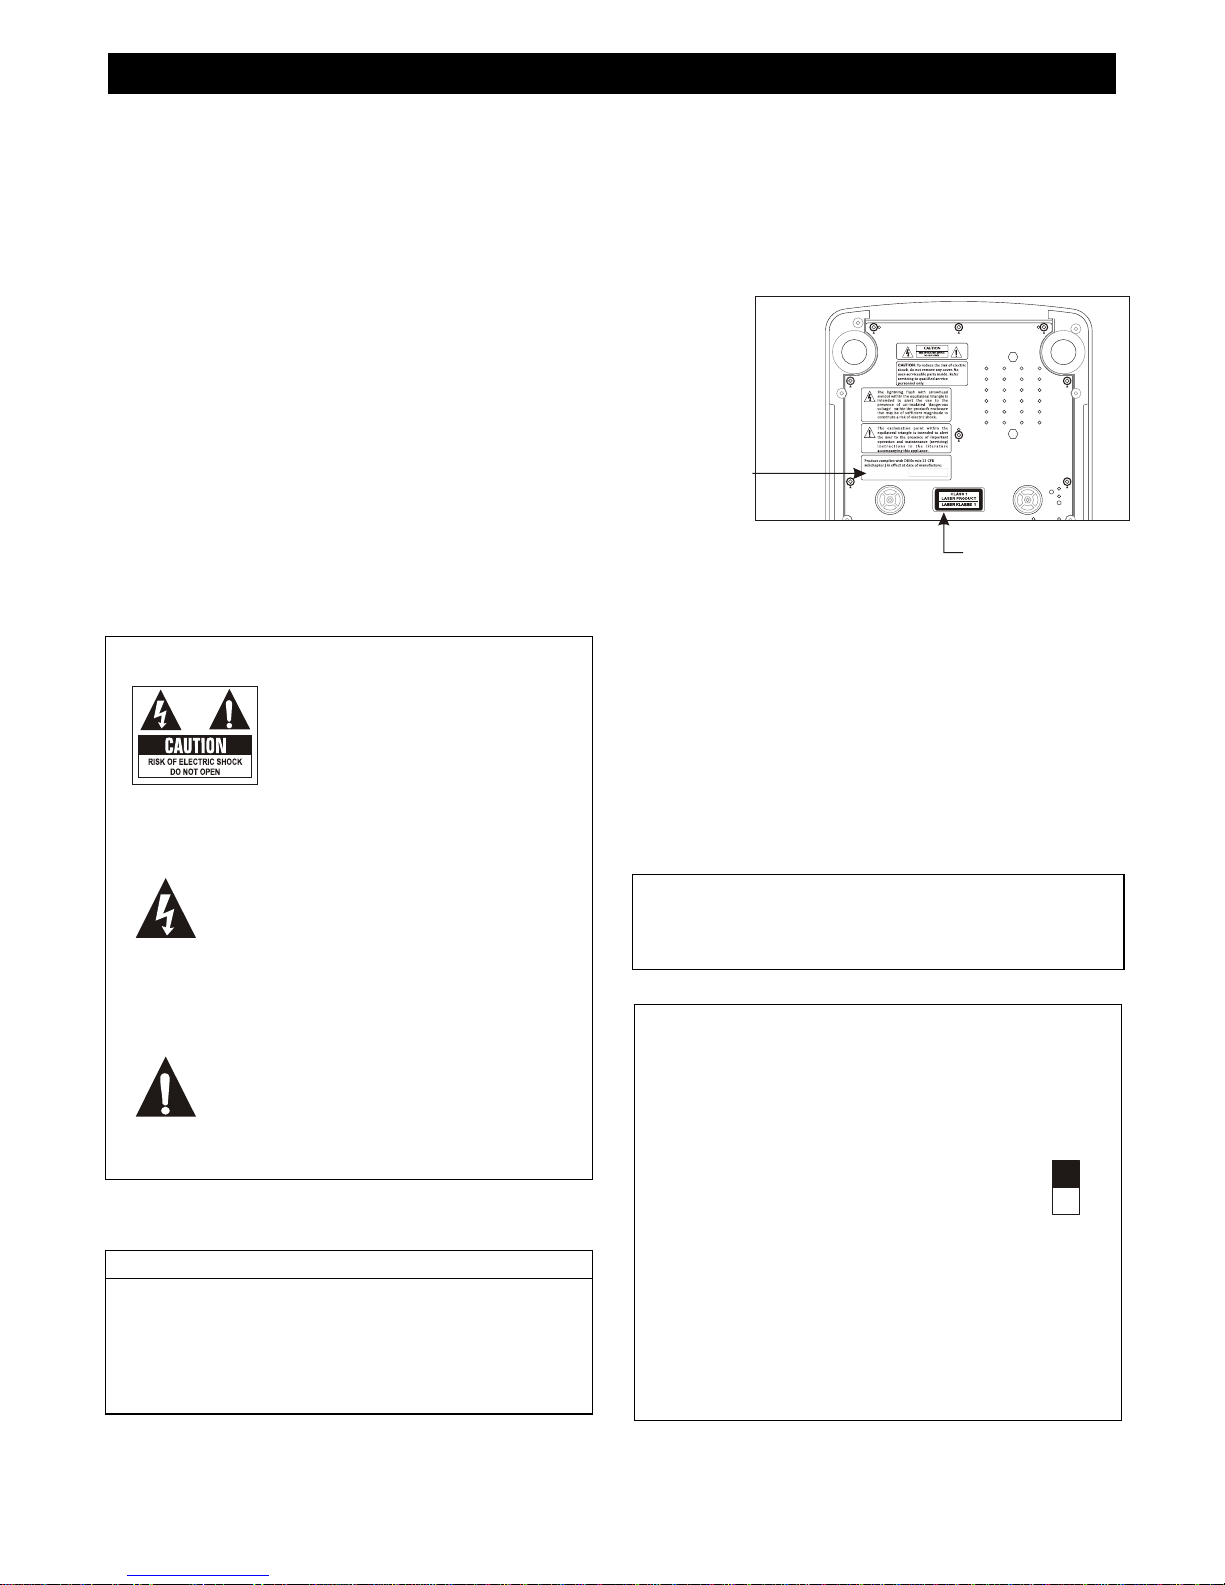
Important To Safety
WARNING:
TO PREVENT FIRE OR SHOCK HAZARD, DO NOT
EXPOSE THIS APPLIANCE TO RAIN OR MOISTURE.
CAUTION:
1. Handle the power supply cord carefully
Do not damage or deform the power supply cord. If it is
damaged or deformed, it may cause electric shock or
malfunction when used. When removing from wall
outlet, be sure to remove by holding the plug
attachment and not by pulling the cord.
2. In order to prevent electric shock, do not open the top
cover. If a problem occurs, contact your dealer.
3. Do not place metal objects or spill liquid inside the CD
player. Electric shock or malfunction may result.
Please, record and retain the Model name and serial
number of your set shown on the rating label.
Model No. ___________ Serial No. ___________
CAUTION: TO REDUCE THE
RISK OF ELECTRIC SHOCK, DO
NOT REMOVE THE COVER (OR
BACK). THERE ARE NO
SERVICEABLE PARTS INSIDE.
REFER SERVICING TO QUALIFIED SERVICE
PERSONNEL.
The lightning flash with arrowhead symbol,
within an equilateral triangle, is intended to
alert the user to the presence of un insulated
"dangerous voltage" within the product's
enclosure that may be of sufficient magnitude
to constitute a risk of electric shock to
persons.
The exclamation point within an equilateral
triangle is intended to alert the user to the
presence of important operating and
maintenance (servicing) instructions in the
literature accompanying the appliance.
‧FOR U.S.A. & CANADA MODEL ONLY
CAUTION
TO PREVENT ELECTRIC SHOCK DO NOT USE THIS
(POLARIZED) PLUG WITH AN EXTENSION CORD,
RECEPTACLE OR OTHER OUTLET UNLESS THE
BLADES CAN BE FULLY INSERTED TO PREVENT
BLADE EXPOSURE.
NOTE:
This CD player uses the semiconductor laser. To allow
you to enjoy music at a stable operation, it is
recommended to use this in a room of 5℃41℉- 35℃
95℉.
CLASS 1LABEL
DATE LABEL
CAUTION:
USE OF CONTROLS OR ADJUSTMENTS OR
REFORMANCE OF PROCEDURES OTHER THAN
THOSE SPECIFIED HEREIN MAY RESULT IN
HAZARDOUS RADIATION EXPOSURE.
THE COMPACT DISC PLAYER SHOULD NOT BE
ADJUSTED OR REPAIRED BY ANYONE EXCEPT
PROPERLY QUALIFIED SERVICE PERSONNEL.
DOUBLE INSULATED - WHEN SERVICING, USE ONLY
IDENTICAL REPLACEMENT PARTS.
NOTE:
This unit may cause interference to radio and television
reception.
‧Line Voltage Selection (for multiple voltage
model only)
The desired voltage may be set with the
VOLTAGE SELECTOR switch on the
rear panel, using a screwdriver.
Do not twist the VOLTAGE SELECTOR
switch with excessive force as this may
cause damage.
If the VOLTAGE SELECTOR switch does not
move smoothly, please contact a qualified
serviceman.
115V
230V

Features
10 seconds of anti-shock memory
Instant start
Seamless loop
Pitch range: +/-100% +/-0.1% (+/-16% for
MP3)
4 hot cues for Sampler and Cue memory,
<5 sec. Each bank
Auto cue function (-48dB)
500 *4 sampler (cues) can be memorized
Selectable elapsed, remain and total
remaining time (audio only) display
Single/continuous play
Relay play allows consecutive playback
during two players
S/PDIF digital audio RCA coaxial
LCD display
Music Master Tempo
Mp3 playback
Controls and Functions
1. DISPLAY PANEL LCD-display for displaying
the different modes and functions.
2. SEARCH WHEEL −This wheel has 4 forward
and 4 reverse speed positions allowing you to
quickly scan through tracks. The more you turn
the wheel in either direction the faster you
search.
3. TRACK BUTTON −These buttons are used
the select a track. Tapping the button will
forward/back skip to the next track, holding down
the button will rapidly forward/back skip through
the tracks.
4. IN BUTTON −This function allows you to set a
cue point without music interrupt. This button
also sets the starting point of a seamless loop.
OUT BUTTON −This button is used to set the
ending point of a loop. A loop is started by
pressing the IN button, pressing the OUT button
set the loop ending point. The loop will continue
to play until the OUT button is pressed once

again.
5. RELOOP BUTTON -If a seamless loop has
been made, but the CD player is not actively in
seamless loop mode (a loop is not playing),
pressing the RELOOP button will instantly
reactivate the seamless loop mode. To exit loop,
press the OUT button. LOOP and RELOOP will
appear in the LCD display when the reloop
function is available. During play mode, pressing
the RELOOP button will instantly return play the
last set point without interrupt of music.
6. CUE BUTTON -Pressing the CUE button
during playback immediately pauses playback
and returns the track to the last set cue point. In
pause mode and the CD is at the cue point,
press the CUE button to provide cue monitor.
The red CUE LED will lit when the CD is at the
cue point.
7. PLAY/PAUSE BUTTON -Each press of the
button to change from play to pause or from
pause to play. In skid mode, press this button to
break or slow start.
8. SAMPLER BUTTON -Press this button, then
press the desired BANK button to set the
sampler mode. When sampler mode is set, then
sampler will mix the CD music together. The
sampler can play even no disc inside. The
sampler will play only once or continuous
depends on pressing sampler button once for
continuous play and LED is lit; press button
again to single play and LED is flash. And press
again to cancel sampler function.
9. MEMORY BUTTON -Press this button to set
the memory mode, then press the desired BANK
button to memorized the music from the cue
point. The music length to be memorized is
determined by the length of BANK. When the
memory mode is set, the MEMORY LED is lit.
You can also memorize the BANKs and the last
play mode (i.e. time, single/continuous, pitch
select) by pressing the memory for 1 sec. To
recall the BANKs, just make the memory mode
set before put the disc on the tray.
10. EJECT BUTTON -Press this button to eject
disc. The disc will not eject unless the player is
in cue or pause, this prevent accidentally
ejecting the disc when in play mode.
11. TEMPO LOCK BUTTON -This button is used
to choose the tempo lock mode and the pitch
control mode. Tempo lock mode allows tempo
change while maintaining the original key. When
the tempo lock mode is selected, the LED above
the TEMOP LOCK button glows red.
12. PITCH ON/OFF BUTTON – This button is used
to turn the PITCH SLIDER function on and off.
13. 4%,8%,16%,100% PITCH SELECT BUTTON -
Press the button in order to change pitch
percentage of 4%,8%,16%,100%.
14. 4 HOT CUE BUTTONS -Press the desired
BANK button when the MEMORY LED is lit will
set the memory mode. The music from the cue
point will be memorized to the flash. Press the
desired BANK button when the SAMPLER LED
is lit will set the sampler mode. The sampler
length is determined by the smaller one of out
point and bank length. Press the desired BANK
button will return to the start point instantly. The
LED of the BANK button actived will be flashing.
15. PITCH SLIDER -This slider is used to adjust
the playback pitch percentage. The slider is a set
adjustment and will remain set until the pitch
slider is move or the pitch function has been
turned off.
16. TIME BUTTON -The TIME button will switch
the time value described in the time meter
between elapsed play time, track remaining time,
and total remaining time.
17. SGL/CTN BUTTON -This function allows you
to choose between single track play or
continuous track play (all tracks in order).
18. PITCH -/+ BUTTONS -The desired pitch of
CD decrease or increase when button is
pressing and returns to the original pitch when
the button is released.
19. JOG WHEEL -The wheel is used for pitch
bend while playing, or frame search during
pause.
20. CD LED -This will indicate that a CD is
loaded in the drive.
21. TRACKKNOB -Pushing the track knob
into “normal mode” and turn this button to
choose the desired track on the disc and show
the track name is playing in the LCD
22. FOLDER KNOB-Turning this knob enter “folder
mode” to choose the desired folder then turn the
track knob to choose the desired track within the
folder; the folder and track name that is playing
showed in the LCD. (Pushing the folder knob
enter “folder mode” to see the folder name when
in normal mode)

23. AUDIO OUT-SOCKETS -The music-signal of
these sockets is analogue. Connect the output to the
respective input of your mixer.
24. DIGITAL OUT-SOCKET -The music-signal of this
socket is digital. Connect the output to the respective
input of a digital amplifier for example.
25. RELAY SOCKET -Via the RELAY SOCKET,
two CD players can relay play. If you connect
with a mixer which supporting fader start, you
can also relay play via mixer’s cross-fader.
26. POWER SWITCH -Press this button to start
operation.
27. AC CONNECTION -Plug the power supply
cable in here.
28. VOLTAGE SELECTOR -115V AC and 230V
AC switch.
Control unit
LCD Display
1. AUTO CUE -This will indicate if the Auto Cue is on
or off. Press and hold the SGL/CTN for 1 sec. to turn
the Auto Cue function on and off.
2. SINGLE -Shows when the unit is set to play just
one track at a time. When this is not lit the CD will
play continuously through all tracks. The function is
controlled by the SGL/CTN button.
3. LOOP -shows when the CD is repeating a
particular area with the music on the CD.
4. RELOOP -shows when the CD has had a loop set
previously and can go back to loop again.
5. ELAPSED, TOTAL REMAIN -These indicate that
the time shown on the display is the ELAPSED,
TOTAL REMAINING or single song remaining time.
6. ~ 8.MINUTE, SECOND, FRAME -These displays
indicate information on the current track and time
9. TIME BAR -shows either time remaining or
elapsed depending on the setting of the TIME button.
10. FOLDER / TRACK -Shows the folder / track that
unit is playing with.
11. PITCH -Shows the pitch percentage of the song.
12. ANTI SHOCK AND BUFFER INDICATOR -The
memory status is represented on the display by a
bucket being filled or emptied. The bucket itself
represents the instant start function works by buffer
memory. If the bucket is flashing, the instant start is
not available. Each bar within the bucket represents 2
seconds of anti shock protection. There is up to 10
seconds of anti shock available.
13. CUE -Lit when the unit is at a cue point.
14. PAUSE -The PAUSE indicators light during pause
or cue mode.
15. PLAY -lit while the unit is playing a CD.
16. CD INDICATOR -This will indicate that a CD is
loaded in the drive.
17. MP3 INDICATOR -This will indicate that a MP3
disc is loaded in the drive.
18. CHARACTER DISPLAY -This will display the
name of the track and album when a MP3 disc is
loaded.
19. TEMPO LOCK -This will indicate the Tempo Lock
function is active.
20. TRACK -Track within folder.
2
10
3
19
12
20
1
4
5
6 7 8 9
11 13
14
15
16
17
18
23 24 25 26 27 28

Set-up
1.Checking the Contents
Check that the carton contains the following items:
1. Main unit
2. Operating instructions
3. A RCA pin cord.
4. A AC power cord.
2. Installing the Unit
1. Place your unit on a flat surface.
2. Be sure the player is mounted in a well-ventilated area where it will not be exposed to direct sunlight, high
temperatures, or high humidity.
3. Try to place the unit as far as possible from TVs and tuners, as the unit may cause undesirable interference.
CAUTION:
The player will work normally when the unit is mounted with the front panel at within 15 degrees of the vertical plane.
If the unit is tilted excessively, discs may not be loaded or unloaded properly.
The unit panel's LCD’s are designed to be clearly visible within the angles shown in Figure 1. Mount the unit panel so
that the visual angle is within this range.
10 45
Sight point
Figure 1
3.Connections
1 Turn off the POWER switch.
2 Connect the RCA pin cord to the input on your mixer.
CAUTION:
•Be sure to use the supplied cables. Using other types of cable may result in unit damage.
•To avoid sever damage to the unit, be sure the power is off when connections to the unit.
Specifications
Power Supply: AC 115/230V, 50/60Hz
Power Consumption: 14.5W
Dimensions: 348(W) x 106(H) x 246(D) mm
Weight: 3.06Kgs
Operating instructions
1.Opening and Closing
This operation only works when the power is on.
Press the OPEN/CLOSE button to open or close the disc
tray, or press PLAY button, the disc tray automatically
closes.
If tray is not closed after 60 seconds it will close
automatically and pause.
The disc tray cannot be opened during playback to
prevent playback from being interrupted if the
OPEN/CLOSE button is pressed accidentally. Stop
playback, then press the OPEN/CLOSE button.
2. Loading Disc
Hold the disc by the edges and place it on the disc tray.
Do not touch the single surface (the glossy side).
CAUTION:
Do not play foreign objects on the disc tray, and do not
place more than one disc on the disc tray at a time.
Doing so may result in malfunction.
Do not push the disc tray in manually when the power is
off, as this may result in malfunction and damage the
player.
3. Selecting Tracks
Select desired track by pressing the TRACK SEARCH
Buttons once to move to one higher or lower track or hold
the TRACK buttons down to change tracks continuously
at a higher speed.
When a new track is selected during playback, playback
begins as soon as the search operation is completed.
4. Starting Playback
Press the PLAY/PAUSE button during the pause or cue
to start playback.
The PLAY indicator lights when playback starts.
5. Stopping Playback
There are two ways to stop playback.
1) Press the PLAY/PAUSE button during playback to
pause at that point
2) Press the CUE button during playback to return to the
position at which playback started (Back Cue).
6. Pausing
Press the PLAY/PAUSE button to switch between play
and pause.
The PAUSE indicator lights when the pause mode is set.
7. Cueing
"Cueing" is the action of preparing for playback; when the
Cue button is pressed, playback return to the cue point
and enters pause mode. When the PLAY/PAUSE button
is pressed during the cue mode, playback starts.
Cue point setting:
A. Playback starts from pause (using the jog wheel to set
the start point) or skips to a new track during play or
pause.
The beginning play point will be set to the cue point.
Or
B. Press the IN/R.CUE button during playback to set the
new cue point (“CUE on the fly”).
To return to Cue point press Cue Button. This will return
to point A or B above.
The player has completed the cue or pause operation
and is waiting for the play start command.
When the PLAY/PAUSE button is pressed, playback
starts.
C. To memory cues.
8. Auto Cue
When disk is loaded, the cue point is set to the first
source of music.
If track is changed before pressing play, the cue point is
changed to the new starting point.
If you pause during playback this also sets the new cue
point.
9. Frame Search
This is done by first pausing then using the jog wheel to
set the starting point. (When you use the jog wheel the
monitor function allows you to hear what is playing.)
Once you reach your desired starting point, you can set a
cue (starting) point by pressing PLAY/PAUSE button.
10. Scanning (fast forward/fast reverse)
To turn the search wheel forward or reverse will give you
a fast search through a disc or track. You will scan
forward or reverse at 4 different speeds depending on
how much you turn the wheel.
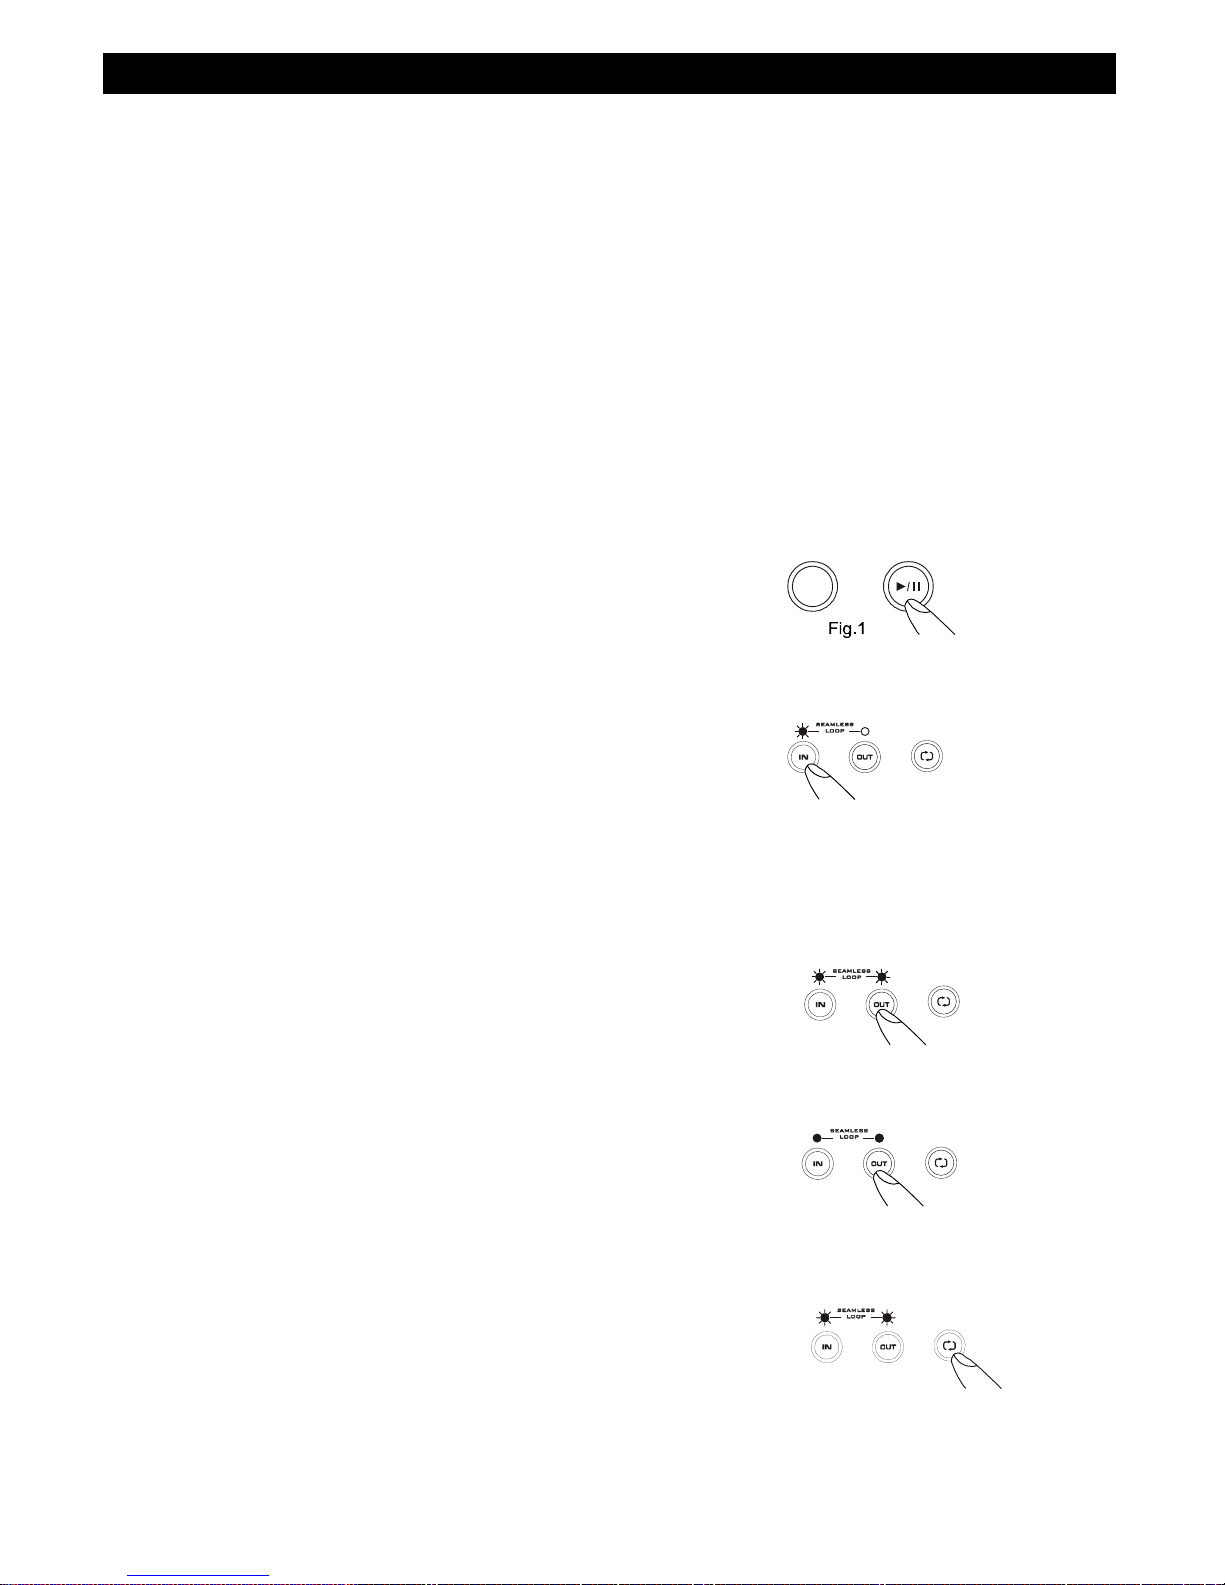
11. Loop Play
You can create a seamless loop between two points
continuously.
a- Press PLAY/PAUSE button so a CD is playing.
The PLAY/PAUSE button’s LED lights (figure 1).
CUE
b- Press IN button . This sets the starting point of the
SEAMLESS LOOP. The IN/R.CUE button LED will light
(figure 2).
fig.2
c- Press OUT button to set desired ending point of the
SEAMLESS LOOP. You will know you are in
SEAMLESS LOOP mode because IN and OUT LED will
light and flash. LOOP INDICATOR in LCD DISPLAY will
also flash. Sound will continue with no interruption
(SEAMLESS LOOP)(figure 3).
fig.3
d- To exit SEAMLESS LOOP, press OUT/EXIT button .
LED will stay on but not flash. Music will resume normal
play (figure 4).
fig.4
e- To replay loop, press the RELOOP button. IN and OUT
LED and LOOP INDICATOR in LCD DISPLAY will all
begin flashing again (figure 5).
fig.5
Operating instructions
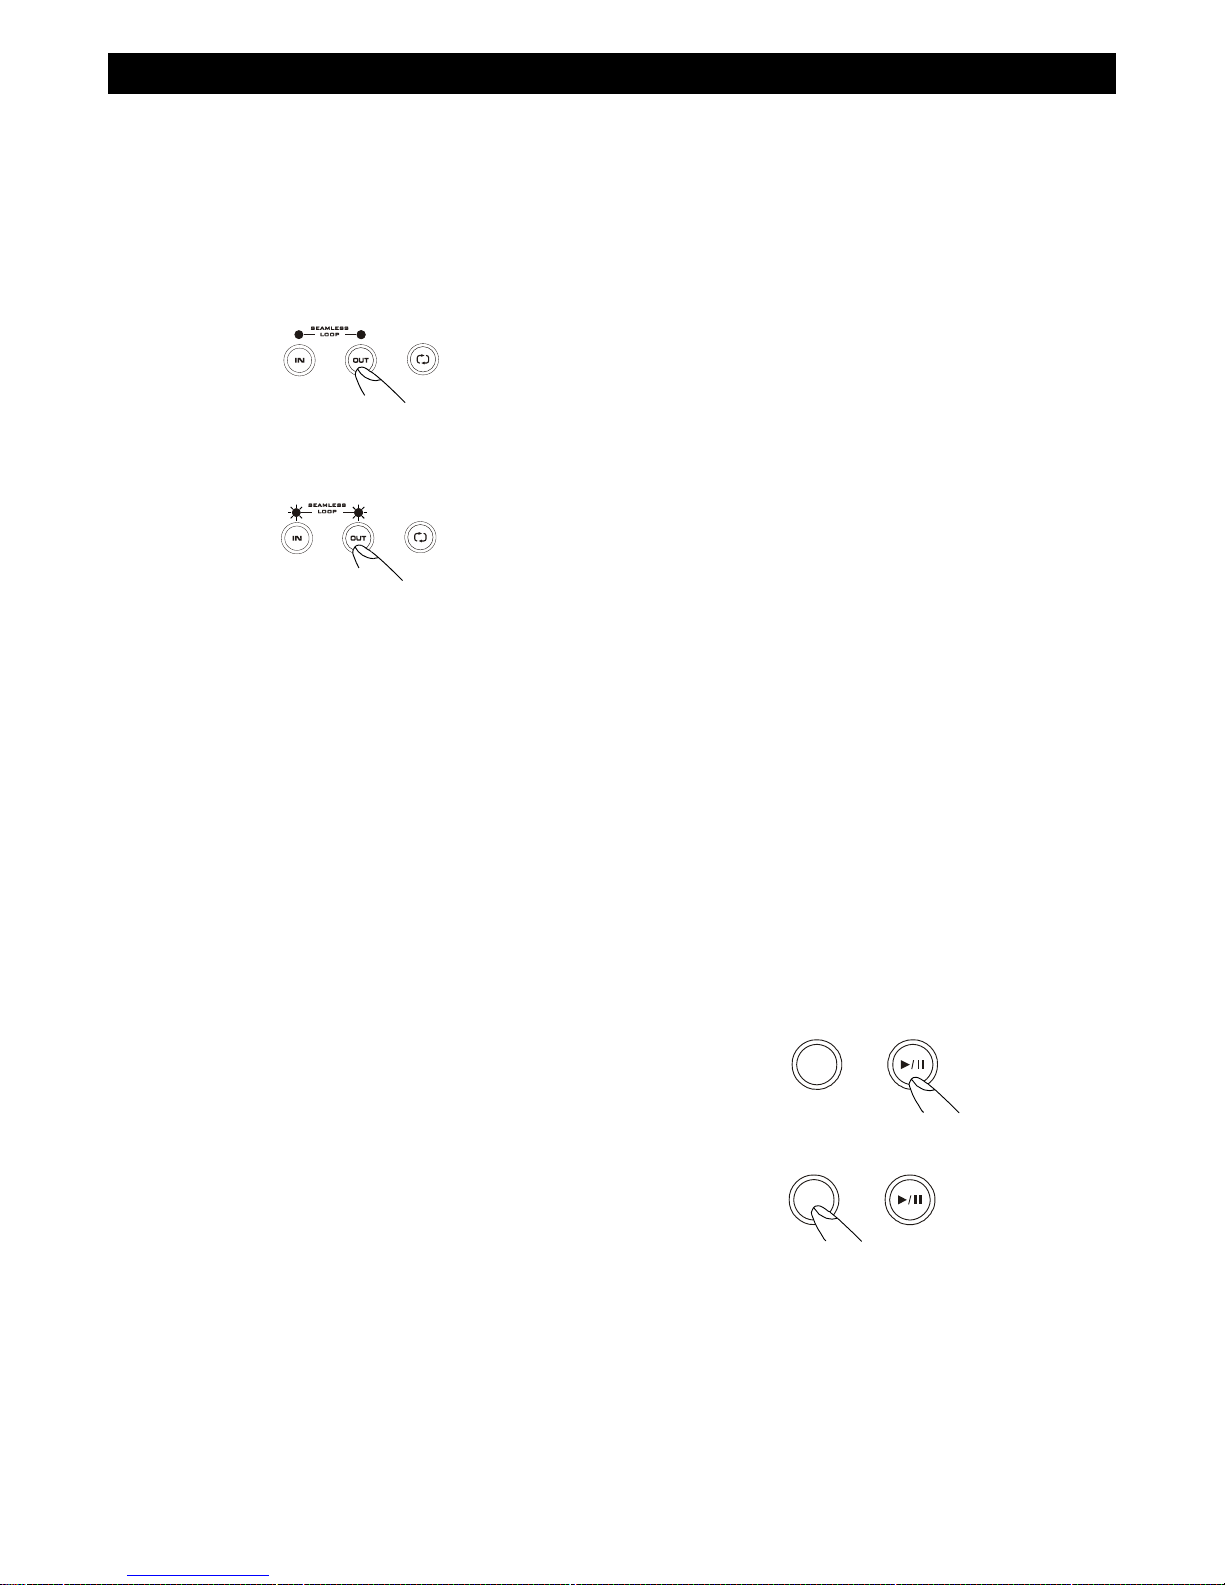
12. Seamless Loop Play (Cont.)
a- (Must be in SEAMLESS LOOP mode). If a SEAMLESS
LOOP has not been created, follow instructions on this
page for creating a SEAMLESS LOOP. If a
SEAMLESS LOOP has already been created, press
RELOOP BUTTON to reenter the SEMALESS LOOP
mode.
b- Next, press OUT BUTTON to return to normal play
(figure 6). This disengages the SEAMLESS LOOP
mode.
fig.6
c- Press OUT button again for new desired ending point of
the loop (figure 7).
fig.7
d- To press and hold the RELOOP button until the end
time of the loop is displayed to edit a loop and the OUT
button LED will light and flash turn the JOG WHEEL to
edit loop shooter or longer.
13. Time Display
During normal play, each time you press TIME button,
the display changes as following information of elapsed,
remain and total remaining time.
14. Pitch Bending
The speed increases or decreases respectively while
the PITCH BEND+ or PITCH BEND- button is pressed.
The extent to which the speed change is proportionate
to the amount of time the button is pressed. For
example, if the PITCH BEND+ button is held in
continuously, the speed increases continuously.
The pitch changes within the range of +/- pitch select.
The jog wheel will temporarily bend the pitch of the
music if the song is already playing by rotating the
wheel clockwise to speed up or counterclockwise to
slowdown. The speed that you rotate the JOG Wheel
determines the percent of pitch bend.
15. Memory Cueing (setting a cue point)
Press the MEMORY button to make the unit enter cue
memory mode (LED on), then press the desired BANK
button at the desired cue point to memorize. A new
cue point will be set. The numeral on the display will
flash twice then lit steadily to indicate the cue memory
has been set.
16. Recall Cue Point
Press the MEMORY button to make the unit enter cue
recall mode (LED off), then press the desired BANK
button to recall the desired cue memory point, during
playback or pause mode accessing a stored cue point
will cue to that point and instantly start without any
music interruption. The last cue that was stored or
recalled will flash in the LCD screen to let you know it
was last cued
17. Memory Backup
This will automatically keep your last setting (SGL,
CTN) even if you unplug AC current.
18. Fader Start Playback
Both player’s CONTROL jack are connected to Mixer’s
CROSS FADER signal output CH1 or CH2; when the
jack are connected, the operation for both player as
following:
Left player will return to standby mode at CUE point
automatically when move CROSS FADER from left to
right to start playback on right player.
Right player will return to standby mode at CUE point
automatically when move CROSS FADER from right to
left to start playback on left player.
19. Relay Play Using Two Players
How to set the Relay function:
When the both players’ CONTROL jacks are
connected to each other, the relay-play FX can be
produced. The relay play is explained as below.
Set both players to single play mode (the SINGLE
indicators will lit in the displays).
Begin playback on the first player.
When the currently playing track ends, playback
will begin automatically on the standby player.
The first player will enter standby mode at the
beginning of the next track on its disc.
By repeating this operation, the two players can
be used to perform continuous relay play.
By loading new discs on the standby player, you
can construct a continuous program of whatever
tracks you wish.
By setting a cue point on the standby player, you
can perform relay to any desired cue point on the
selected track.
NOTE:
Relay play may not work properly if the
audio out jacks on the two players are not
connected to the same audio amplifier.
20. Stutter Effect
It can create a sound similar to a CD skipping. The
STUTTER Effect can be created in 2 ways.
(1) By rapidly pressing the CUE button
a.Press PLAY/PAUSE button so that music is playing.
PLAY/PAUSE LED will light (figure 8).
Fig.8
CUE
b.Next, rapidly press the CUE button in sync with the
music (figure 9).
Fig.9
CUE
(2) By rapidly pressing the BANK1 or BANK 2 or BANK 3
or BANK 4 buttons
21. Sleep Mode
The CD player automatically shuts off the transport
and laser after 15 minutes (when in pause or cue
mode). This will lengthen the life of your motor drive
and laser. To restart player, just press cue,
PLAY/PAUSE buttons.

Before Switching off the power
CAUTION:
Do not forcibly close the disc holder when the power is off.
Donot switchoffthepower whenthe disc
holderisopen. To avoid damage, pls don switch off the power until
odisc?or imecode?isshowedontheLCD
after the disc holder has been closed with the
OPEN/CLOSEbutton.
Compact Discs
1. Precautions on handling compact discs
Do not allow fingerprints, oil or dust to get on the
surface of the disc.
If the disc is dirty, wipe it off with a soft dry cloth.
Do not use benzene, thinner, water, record spray,
electrostatic-proof chemicals, or silicone-treated cloths
to clean discs.
Always handle discs carefully to prevent damaging the
surface; in particular when removing a disc from its
case or returning it.
Do not bend the disc.
Do not apply heat.
Do not enlarge the hole in the center of the disc.
Do not write on the label (printed side) with a hard-
tipped implement such as a pencil or ball point pen.
Condensation will form if a disc is brought into a warm
area from a colder one, such as outdoors in winter. Do
not attempt to dry the disc with a hair dryer, etc..
2. Precaution on storage
After playing a disc, always unload it from the player.
Always store the disc in the jewel case to protect
from dirt or damage.
Do not place discs in the following areas:
Areas exposed to directs sunlight for a
considerable time.
Areas subject to accumulation of dust or high
humidity.
Areas are affected by heat from indoor heaters,
etc..
Table of contents
Other SKP Pro Audio Dj Equipment manuals


 manual")


