Sky Master 9400 User manual

Digital
Harddisk
Receiver
S
SKY
KYM
MA
AS
ST
TE
ER
R
D
DV
VR
R
9400
9400
INSTRUCTION MANUAL

General Information .................................... 41
Main Feature of Receiver 41
For your Safety 42
Unpacking 42
General Operation of Receiver 42
RCU 43
Front Panel 44
Rear Panel 44
Installation of Receiver .............................. 45
Connecting to Antenna & TV 4
Connecting to TV & VCR using SCART 4
Connecting to TV using RCA support 46
Connecting to TV using S-VHS support 46
Connecting to another SVR 47
Connection to Digital Amplifier 48
Menu Information ...................................... 49
User Installation .......................................... 50
Antenna setup - 1) DiSEqC 1.2 0
Antenna setup - 2) Fixed 1
Channel search -1) DiSEqC 1.2 2
Channel search - 2) Fixed 3
System setting 4
Parant Lock
Factory Default 6
Common Interface ...................................... 57
General Viewing Function .......................... 58
Select Channel 8
Pause the Frame 9
Previous Channel Recall 9
TV & Radio mode 9
TV & VCR mode 9
Channel Information 60
Volume & Audio Control 60
Position 61
Sat 61
Channel Manager ........................................ 62
Channel Manager 62
Favorite Channel 63
Move Channel 63
Lock Channel 64
Rename Channel 64
Delete Channel 6
Sort Channel 6
Fast Edit mode 66
Go to Function ............................................ 66
Hard Disk Recorder .................................... 67
Time-Shift mode 67
Playback mode 69
Timer Recording 69
EPG Recording 70
HDD Manager 70
7-Segment Display 70
PG ( lectronic Program Guide) ................ 71
Timer ............................................................ 72
Antenna Positioning Help .......................... 73
Front Panel Display .................................... 74
Trouble Shooting ........................................ 74
Safety Information
Keep the DVR 9400 away any water like flower vases, tubes, sinks, etc. Never open the unit. Touching internal parts
of this unit is dangerous. Do not attempt to disassemble the DVR 9400 or repair the AC power cord in any way.
Avoid placing the unit in areas of direct sunlight or heating radiators.
Trade Mark of the DVB Digital Video Broadcasting Project
40
Content

41
Main Feature of Receiver
General Information
• High quality Digital Video & Audio
• Fully MPEG2, DVB co pliant
• 2 Slots Co on Interface for Viaccess, Irdeto, CryptoWorks, Nagravision, Conax, SECA and
ore
• DiSEqC 1.2 Positioner for ulti-satellites (63 satellites)
• C/Ku band control for each antenna
• Provide friendly and easy-to-use enu syste
• Various channel editing function (favorite, oving, locking, rena ing, deleting and sorting)
• User progra able various Satellite & Transponder infor ation
• Auto atically search for newly added transponder (Network Auto Search)
• Stores up to 2000 channels
• OSD four color changeable (Night, Wine, Ocean, Grass)
• Easy and speedy software upgrade through RS-232 port
• Plug-and-play data transfer syste (DSR to DSR)
• Auto atically each channel volu e saving function
• Ti er function, auto atically turns On/Off by setting function (daily, onthly, yearly)
• Auto atic reserved channel oving syste
• Provide Electronic Progra Guide (EPG)
• Teletext function support
• Antenna Positioning Help feature
• Selectable Video output – CVBS, RGB
• Provide various switch types, LNB types and NTSC/PAL onitor type
• SCPC/MCPC Receivable fro C/Ku Band Satellite
• Multi LNB controlled by DiSEqC 1.2 and 22KHz, 0/12 volt switching
• 256 colors On-Screen-Display
• PAL/NTSC auto atically conversion
• Last channel auto atically saving
• Recording reservation function by Ti er and EPG
• Recording and playback with Ti e-Shift function
• 3 Step Fastforward function(X4, X8, X16)
• 3 Step Rewind function(X4, X8, X16)
• Pause and Step playback function
• 30 hours recording available with 40 GByte HDD in 4Mbps strea
• Recording progra anage ent function (Play, Move, Lock, Rena e, Delete)
• Ju p playback function
• Record a progra and play another recorded progra at the sa e ti e
• Repeat playback function
• Shuffle playback function
Technical alterations reserved
A Digital Satellite Receiver is a convenient product that allows you to view a variety of progra s
provided through satellite. This user’s guide covers the installation of the DSR and the necessary
steps to i ple ent various features. This also explains special features available only in this DSR
in detail, which will allow you to ake full of these feature.

For Your Safety
42
• Allow clear space around the Receiver for sufficient ventilation
• Do not cover the Receiver or place it on a unit that e its heat
• Use a soft cloth and a ild solution of washing-up liquid to clean the casing
• Do not connect or odify cables when the Receiver is plugged in.
• Do not re ove the cover
• Do not allow the unit to be exposed to hot, cold or hu id conditions
•
Never allow liquids, spray or other aterials to co e into contact with the inside of the
DVR 9400
Unpacking
After purchasing the DSR, unpack it and check to ake sure that all of the following ite s are
included in the packaging.
1 x Re ote Control Unit (RCU)
1 x User’s Guide
2 x AAA batteries
1 x DSR
General Operation of Receiver
Throughout this anual you will notice that the everyday operation of your Receiver is based on
a series of user friendly on screen display and enus. These enus will help you get the ost
fro your Receiver, guiding you through installation, channel organizing, viewing and any other
functions.
All function can be carried out using the buttons on the RCU, and so e of the function can also
be carried out using the buttons on the front panel.
If at any ti e when you using the enus you want to return to the nor al TV ode, press the
TV/AV button.
The Receiver is easy to use, always at your co and and adaptable for future advances.
Please be aware that new software ay change the functionality of the Receiver
Should you experience and difficulties with the operation of your Receiver, please consult the
relevant section of this anual, including the Proble Shooting, or alternatively call your dealer
or a custo er service adviser.

Key Function
Turns power ON/OFF of the DSR
When watching a channel, mutes the sound
0 ~ 9 Enter number of the required menu item or
select a channel number to watch.
TV/RADIO Switches between TV and Radio mode
PR Switches back to previous channel
FAV Display the favorite channel list
INFO Shows information of the current channel
M NU Press this key one time to run menu on
screen, and call command box
Moves up / down a page in the channel list
OK, LIST Executes the selected item in the menu
screen, or enters the desired value in any
input mode.
SAT Display the satellite list of searched chan-
nels
PR+, PR- When watching a channel, change chan-
nels, or moves to the next higher or lower
item in the menu.
When watching a channel, adjust the volu-
me, or move to the left or right item in
menu
XIT Returns to the previous menu on the menu
screen or escape from the menu
ALT-AUDIO When watching a channel, switches the
audio languages
PG Calls up the EPG (Electronic Program Guide)
Selects the different audio modes.
TV/AV Switches between TV or AV mode.
Position Display position bar on the screen to adjust
the antenna or for manual search.
Switches to teletext or subtitle mode.
UHF No Funktion
R W Rewind program with 3 step speed
PLAY/SLOWDisplay file list in Live mode. Playback
program by normal or slow speed
STOP Stop recording or playback.
F.F Fast forward program with 3 step speed
PAUS
Pause screen and audio. Start recording in
Live mode.
R C Record program.
RCU
43

44
Front Panel
Rear Panel
Turns on and off the power of the receiver.
CH When watching, changing to the previous and next channel, or moves to the next higher
or lower item in the menu.
1. Power ON/OFF
2. Connect to 12V to an External 0/12V Switch
3. Connect to the S-VHS Jack of TV or VCR
4. Connect VIDEO to TV using RCA Jack
5. Connect to AUDIO R/L to TV or AUDIO Tuner
6. Connect to TV using a SCART Cable
7. Connect to VCR using a SCART Cable
8. Connect to a PC for S/W upgrade
9. LNB IN : Connect to SATELLITE ANTENNA
10. LNB OUT : Connect to the other Receiver (DVR 9400 ust be switched off)
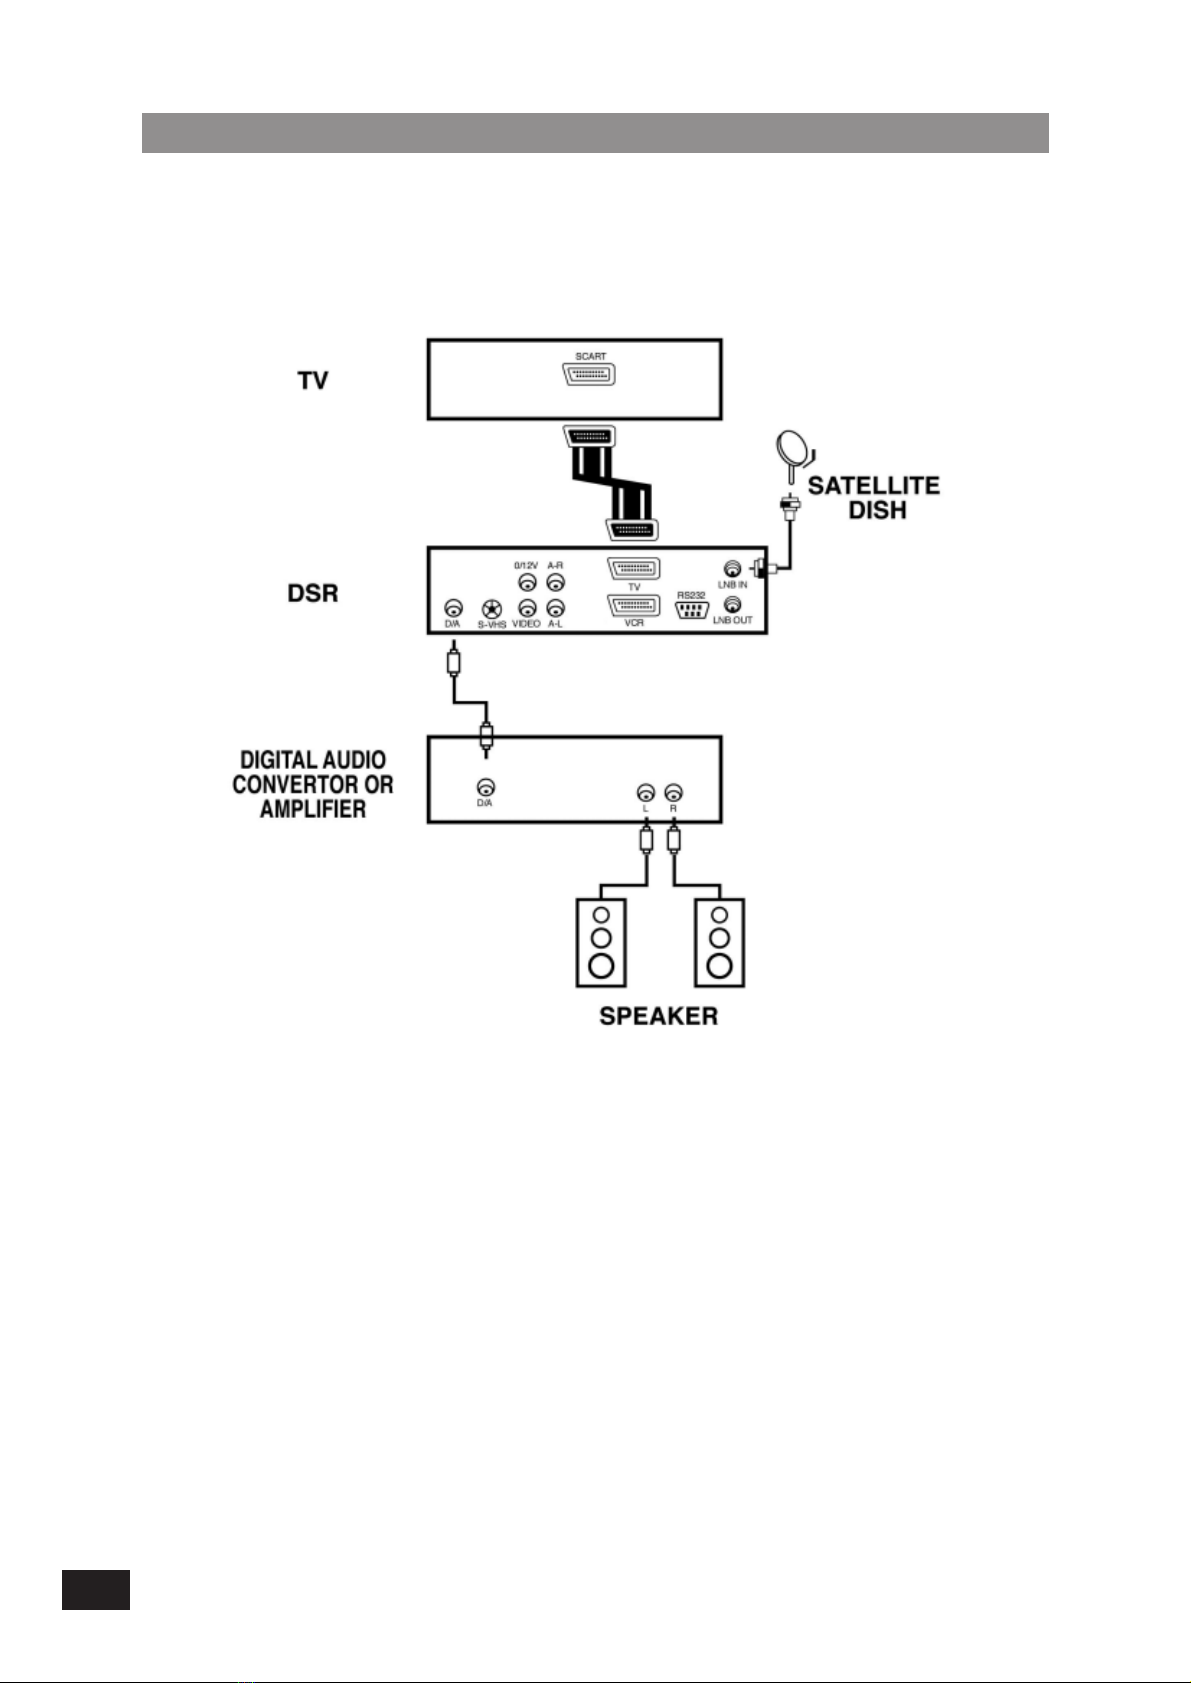
11. Connect to Digital A plifier
1 2 6 9
3 4 5 87
10
11

45
Installation of Receiver
Connecting to ANTENNA & TV
This section explains the installation of Receiver. Refer to the anuals supplied with the equip-
ent for the installation of outdoor equip ent such as the dish antenna. When adding new
equip ent, be sure to refer to the related parts of the anual for the installation.
Connecting to TV & VCR using SCART support
46
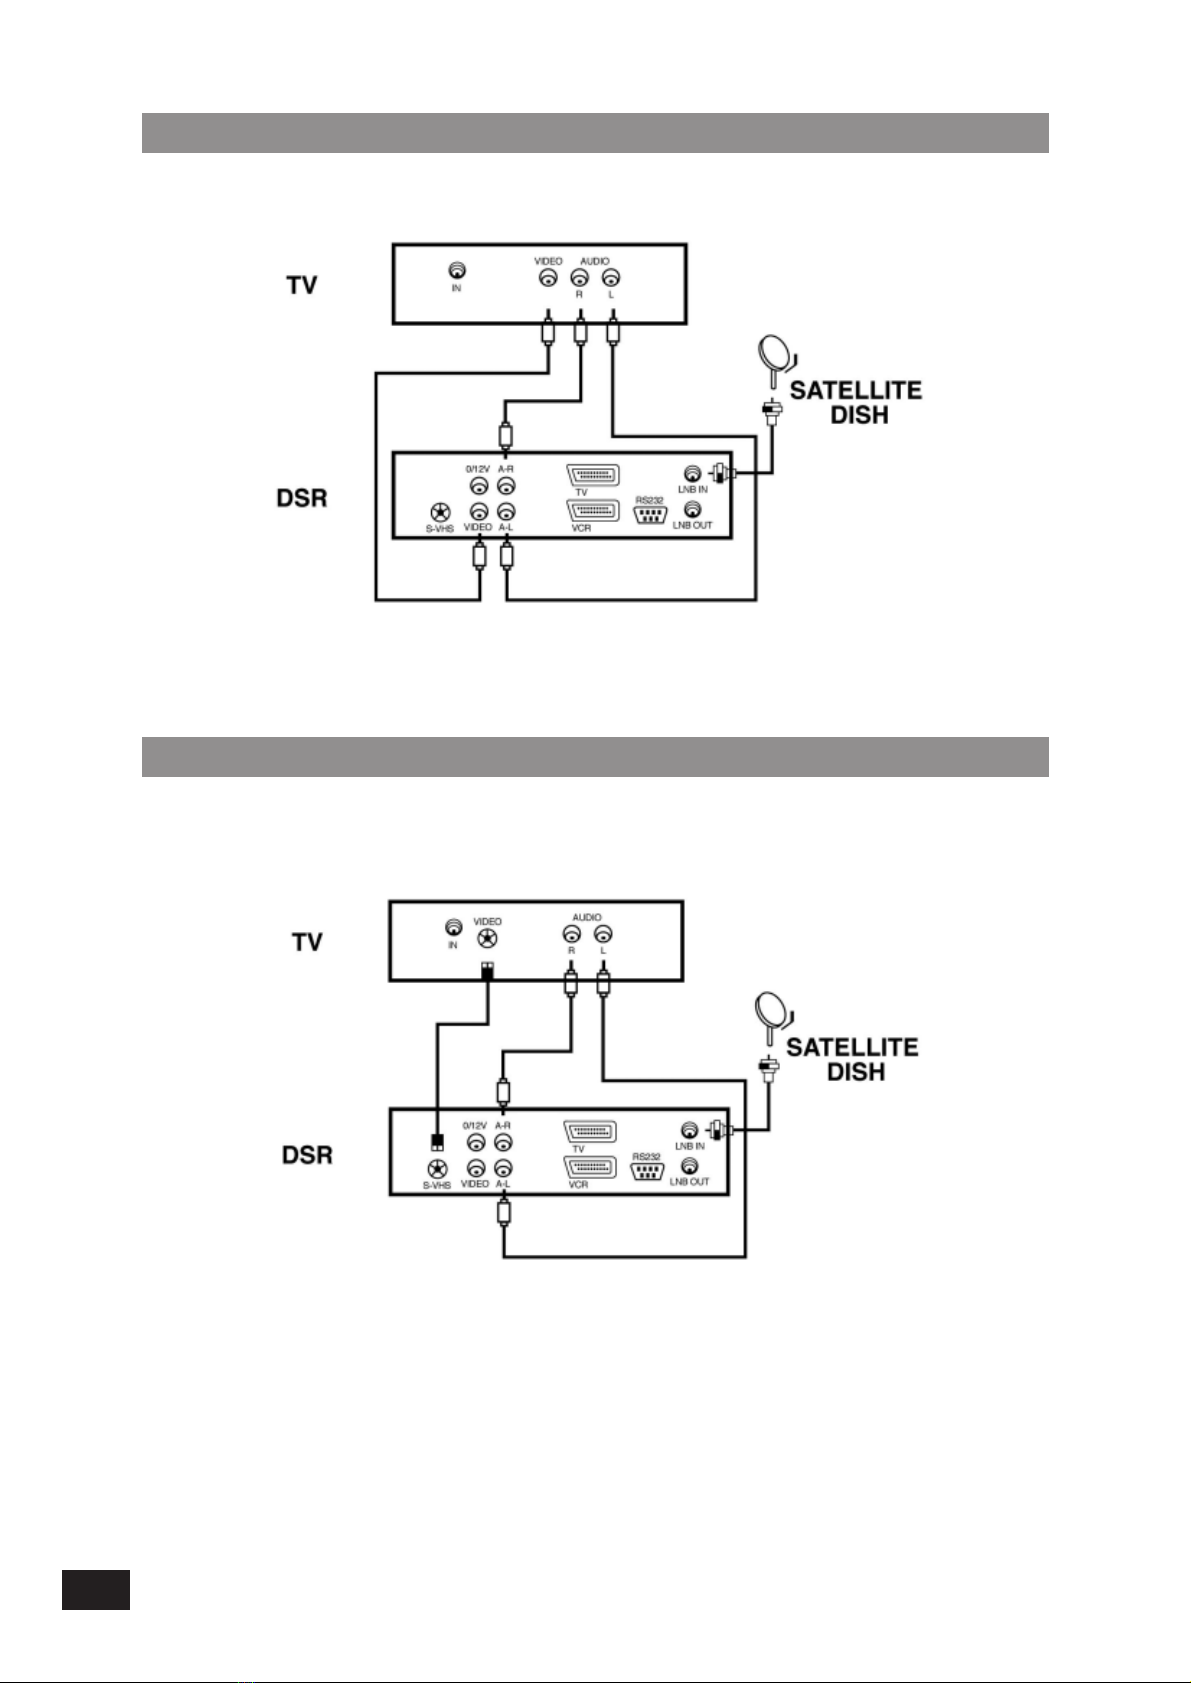
Connecting to TV using RCA support
Connecting to TV using S-VHS support

47
Connecting to another SVR
48
Connecting to Digital Amplifier

111149
Once you have correctly connected the Receiver, the enu will be displayed
This menu consists of 7 major main menus as below.
- Channel Manager
- Program Guide
- Timer
- User Installation
- Common Interface
- Receiver Information
- HDD Manager
During the installation the OK key confir s a selection and IST key shows Down List Box if the
colu n has “+” ark. You can also use the nu eric keys on the RCU Unit (RCU) to enter nu eric
value.
Use the PR+,PR- key to ove upwards and downwards fro one line to another line and use
key to ove fro ain enu to sub enu and ove fro left side to right side or versa.
Meanti e, you want to escape the enu syste , please press EXIT key on the RCU.
Menu Information

50
User Installation
This menu consists of 5 major sub-menus as below.
- Antenna Setup
- Channel Search
- System Setting
- Parental Lock
- Factory Default
Antenna Setup (1) DiS qC 1.2
1) Antenna: You can select axi u 16 anten-
nas with the co bination switches.
2) Type: Select your antenna type as
DiSEqC 1.2
3) Univ. NB: Select your LNB type. If you have
universal LNB, select YES
otherwise select NO.
4) NB Freq.: Enter the proper LNB frequency
referring to your LNB using nu eric key on the RCU or use KEY PAD displayed
by pressing OK key.
If you have a dual LNB, enter the proper value in the both of value box.
5) Switches (0/12 Volt, 14/18 Volt, DiSEqC):
You can select the switches with which you want to configure the antenna.
6) C/Ku band control:
You can select C/Ku band control by switches types.
7) East, West imit:
Press Ekey on the RCU until your
antenna will be reach to be
eastern ost and then press OK
key on the RCU. The essage of
“Would you like to set East li it of
DiSEqC otor?” will be displayed
for your confir ation, please sel-
ect OK button by pressing OK key
on the RCU and then East li it
value will be changed as SET.
The usage of West li it is sa e
as East li it.

51
8) Reset DiSEqC limit:
If you want to reset the East li it
or West li it, place a cursor on
Reset DiSEqC Li it button and
then press OK key on the RCU. The
essage of “Would you like to
reset li it for DiSEqC positioner?”
will be displayed for your confir-
ation, please select OK button by
pressing OK key on the RCU.
The cursor will ove to the East
li it button so that you can reset
the li it. After that, please reset West li it sa e as before.
After setting all necessaries, please EXIT to finish antenna setup enu. The essage of “Are you
sure to change the configuration of Antenna setup?” will be displayed. Please select OK button
on the screen and then wait for saving a data.
1) Antenna: You can select axi u 16 an-
tennas with the co bination
switches.
2) Type: Select your antenna type as Fixed
3) Univ. NB: Select your LNB type. If you have
universal LNB, select YES
otherwise select NO.
4) NB Freq.: Enter the proper LNB frequency
referring to your LNB using nu eric key on the RCU or use KEY PAD displayed
by pressing OK key.
If you have a dual LNB, enter the proper value in the both of value box.
5) Switches (0/12 Volt, 14/18 Volt, DiSEqC):
You can select the switches with
which you want to configure the
antenna.
6) C/Ku band control:
You can select C/Ku band control
by switches types.
After setting all necessaries, please EXIT to finish
antenna setup enu. The essage of “Are you sure
to change the configuration of Antenna setup?” will
be displayed. Please select OK button on the screen and then wait for saving a data.
Antenna Setup (2) Fixed
52
1) Antenna: Select your antenna nu ber.
2) Satellite: Select desired a satellite using
56kk keys or if you press OK key
the Down List Box will be display-
ed so that you can choose easily.
You can see the infor ation of
selected satellite in the right side.
Edit Mode: If you want to edit
those preprogra ed data such
like a Transponder, Frequency,
Sy bol Rate, Polarization, Skew
and 22 KHz, please press MENU
key on the RCU to display the
co and box. Check edit ode
by pressing OK key on the RCU
and then you can ove into those
colu ns to change the value.
3) Position: After selecting a satellite, please
select Position button and then
keep pressing E or W key on the
RCU until selected satellite is
locked. If the satellite is locked
correctly, the color of signal label
bar will be changed to yellow.
Then press OK key on the RCU, the essage of
“Would you like to set the value of current positio-
ner?” will be displayed for your confir ation.
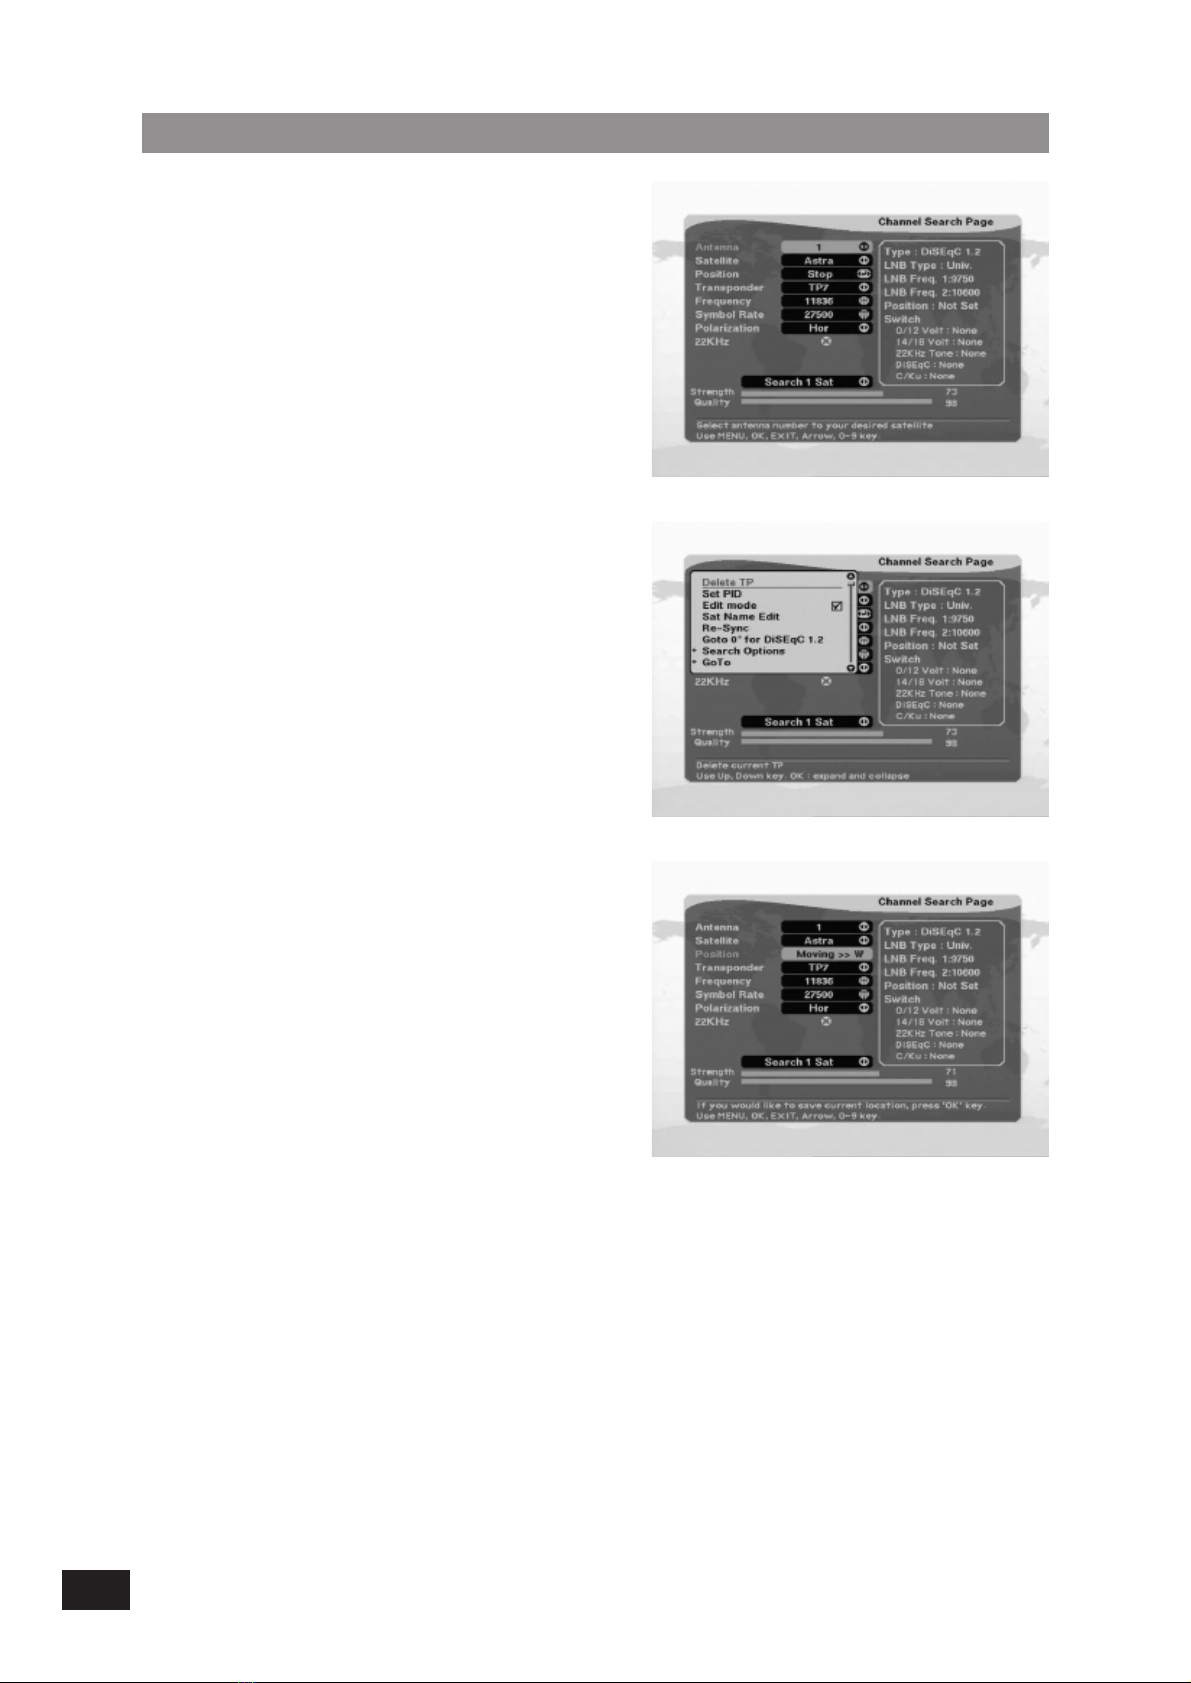
Channel Search (1) DiS qC 1.2

53
1) Antenna: Select your antenna nu ber.
2) Satellite: Select desired a satellite using
keys or if you press OK
key the Down List Box will be
displayed so that you can choose
easily.
You can see the infor ation of
selected satellite in the right side.
3) Edit Mode: If you want to edit those prepro-
gra ed data such like a Trans-
ponder, Frequency, Sy bol Rate,
Polarization, Skew and 22 KHz,
please press MENU key on the
RCU to display the co and box.
Check edit ode by pressing OK
key on the RCU and then you can
ove into those colu ns to chan-
ge the value.
Channel Search (2) Fixed

54
Syste Setting enu allows you to change the the
principal option and to set other ite s proper to your
environ ent by pressing OK key on the RCU.
OSD Color: Select your favorite color
OSD anguage:
Select your desired language
NB power: If your Receiver is connected to
LNB, select YES. But if your
Receiver is connected to other
receiver through Loop Through
support, you should check which
receiver is connected directly to
LNB. In case if that other receiver
is directly connected to LNB, sel-
ect OFF.
Screen Format: If your TV supports 16:9 screen
for at and selected channel pro-
vides 16:9 for at progra , select
16:9.
Video output: If your SCART supports RGB con-
trol, select RGB. Otherwise select
CVBS.
TV type: Select the type according to your
TV type.
Volume save: If you select ON, you can save
auto atically last volu e level for
each channel.
Start On Channel: If you press OK key, then the channel list is displayed. You can select one
channel of the list, the selected channel starts whenever you turn on LT
3000D.
UHF Standard: Select UHF type.
UHF Channel: Select your desired UHF channel for satellite ode.
Note: Receiver for the country, in which it is not used UHF, 11) and 12) option will be deleted.
System Setting

55
This function allows you to lock the channel with
your password in order to prevent fro accessing the
channel by your children or any other person.
And also you can protect your installed data and
infor ation using Install Lock.
How to change Password
1) Enter the current password.
2) Select ON of Parent Lock.
3) Enter new password.
4) Confir your new password entering new password again.
Note: Default password is 0000.
Warning: Do not forget your password in order not to fail to view the channel.
How to use Parent ock
1) If you activate parent lock function, go to the
TV channel Manager Page.
2) Press Open co and box and select Lock
3) Select channel the which you want to Lock
4) Press OK then sy bol is arked.
5) Exit this enu and Turn off the Receiver
Note: To activate Parent Lock, you have to turn off
Receiver once.
And turn on the Receiver and select channel which
is locked. Then enter your password.
Parental Lock

56
How to use Install ock
1) Enter the current password.
2) Select ON of Install Lock
3) Enter new password
4) Confir your new password entering new
password again
5) Exit this enu and Turn off the Receiver
6) Turn on Receiver and press MENU key on the RCU
7) Select any enu and press OK on the RCU.
8) Then Enter Password Box will be displayed.
9) Unless enter correct password, you can not run any enu.
Note: Default password is 0000
Warning: Do not forget your password in order not to fail to operate Receiver
Factory Default
If you want to bring Receiver back to the factory
default condition, select Factory Default and press
OK key.
Then Warning essage will be displayed. To confir
select OK and press OK.
Warning: You will lose all of data and infor ation
which was installed.

57
Common Interface
Receiver akes you enjoy various scra bled channels encrypted by Viaccess, Nagravision,
Irdeto, Conax, Cryptoworks and SECA.
Preparing
To be able to receive scra bled digital satellite chan-
nels you will need a S artcard and a Co on
Interface CA (Conditional Access) odule for the
Service Provider of your choice.
The S artcard and the CA odule ay also provide
access to special enus not described in this
anual. If so, please follow the instructions fro the
Service provider.
Only free to air channels are available without the
S artcard and CA Module.
Input the CA Module in the slot of Receiver. And insert
S artcard to the CA odule entirely. If it is done, you
can enjoy scra bled channels relating with your CA
Module and S arcard.
Note: Receiver has 2 slot for CA Module
Check Manager
Select Co on Interface enu in the Main Menu
page. Then Receiver detects and shows the CA
Module na es, which you insert. Then select slot
1 or slot 2, which you want.
Then you can see the infor ation, which Progra
provider presents.
Note: This infor ation ay be different according to
the Progra Provider.

58
General Viewing Funtion
The following describes the basic functions of your Receiver while watching satellite TV or
listening to satellite radio.
If you select a channel to which you do not have access, you will get a essage on the screen.
This essage ay vary, depending on type of progra and Service Provider. In the case of
“Scra bled Channel essage”, you can not view with Receiver and you are requested to
purchase our Receiver which ake you view the several scra bled progra s.
While viewing, the current channel infor ation will be shown on the botto of the screen if you
press INFO button on the RCU
In addition to the nor al function, there are so e other useful functions which will be explained
in this part of anual.
Select Channel
If you want to change channel, use CH key on the
front panel or PR+,PR- key on the RCU. Or using the
nu eric key on the RCU, referring to the LED on the
front panel.
In addition to the above nor al function, Receiver
provide ore convenient channel change function.
While viewing, press OK key on the RCU or front
panel. Then channel list will be displayed on the right
side of the screen. If press EXIT key, the channel list
will be disappeared.
Using PR+,PR- or CH key, place the cursor on your desired channel, which will be changed to
yellow color. Then press OK key go to the selected channel.
If there are a lot of channels listed, use or key on the RCU, then you can ove fro page to
page.
Note: Receiver is designed to search all of free channels in the selected Satellite. So if you install
in the first ti e, Receiver show only free channel list.
Table of contents


