SkyArtec Butterfly S User manual
BUTTERFLY ULTRA-QUAD MODEL ‘S’
1
Butterfly
Ultra-Quad Model ‘S’
Quick-Start Guide
This Quick-Start Guide will help you become familiar with your new Skyartec Butterfly
Utlra-Quad Model ‘S’. It is to be used in conjunction with the separate Introduction
and User’s Manual also included with your Butterfly Utlra-Quad Model ‘S’. Please read
through this Quick-Start Guide in its entirety before attempting to fly your new model.
The Skyartec Butterfly Utlra-Quad Model ‘S’ is not a toy! If misused, it can cause
serious bodily harm and/or injury. This product is not intended for those under 14
years of age! Please read and understand the safety warnings included prior to operation.

BUTTERFLY ULTRA-QUAD MODEL ‘S’
2
The following parts should be included in your kit. If you find a part missing or damaged,
please contact the retailer you purchased the product from. Contents may differ and are
subject to change at any time without notice.
• Butterfly Ultra-Quad Model ‘S’
• NASA701 7-Channel 2.4GHz Transmitter
• 2S 7.4V 1300mAh 25C Li-Po Battery
The Butterfly Ultra-Quad Model ‘S’ features upgraded brushless motors that allow
you use a 3-Cell Li-Po battery for even better performance. If you’re interested in
this, we recommend using a 3S 800mAh 30C Li-Po. We don’t suggest using a higher
capacity battery pack because the increased weight will be too much. You will need
to replace the power connector on the Butterfly to match the power connector on your
new battery.
KIT CONTENTS
TABLE OF CONTENTS
The following items will be required to fly your new Butterfly Ultra-Quad Model ‘S’.
• 8 ‘AA’ Alkaline Batteries for Transmitter
ITEMS REQUIRED
These warnings and safety notes are important and must be followed closely. Please
abide by this information and follow the instructions in this Quick-Start Guide closely for
maximum safety.
WARNINGS AND SAFETY NOTES
• Just because the Butterfly is powered by electric motors doesn’t mean that you
shouldn’t exercise caution when flying and operating it. The Butterfly can be
dangerous if you do not fly it in a safe manner or do not pay close attention while
flying it. You alone are responsible for its actions during flight.
• We strongly suggest that when you first begin flying the Butterfly that you perform
only basic maneuvers, such as hovering, until you are more familiar with its flight
characteristics.
• The Butterfly features an adjustable gain dial that can increase its control sensitivity.
Turning the gain setting too high can cause the Butterfly to become extremely difficult
to control. We don’t suggest making adjustments to this setting.
• Always unplug the Li-Po battery from the Butterfly after use.
GENERAL WARNINGS
Kit Contents...............................................................2
Items Required ........................................................2
Warnings and Safety Notes .............................2
Charging the Li-Po Battery ................................4
Transmitter and Butterfly Overview ..............5
Preparing to Fly the Butterfly ...........................7
Compass Function ...............................................9
Maintenance ............................................................9
Replacement Parts ............................................ 14
Notes ........................................................................14
• 2 to 3 Cell AC Li-Po Balance Charger
• 110V AC Power Adapter
• Replacement Propellers

BUTTERFLY ULTRA-QUAD MODEL ‘S’
3
• Always fly the Butterfly in a suitably large area free of obstructions. The Butterfly can
be flown in a large indoor area or outdoors. Make sure any spectators are behind you.
• Always be conscious of the spinning propeller blades. Be careful not to allow loose
clothing to be drawn into the spinning propeller blades or accidentally put your
fingers in them.
• Do not use any solvents to clean the Butterfly. Solvents may damage the plastic and
composite parts. Rubbing alcohol is safe to remove stubborn stains.
WARNINGS AND SAFETY NOTES
GENERAL WARNINGS, CONTINUED....
RADIO CONTROL SYSTEM WARNINGS
• The radio system operates on the 2.4GHz frequency band. The 2.4GHz connection
is determined by the transmitter and receiver pair. Unlike ordinary crystal-based
systems, the Butterfly can be flown without frequency control.
• Always turn the transmitter ON before turning the Butterfly ON and always turn the
Butterfly OFF before turning the transmitter OFF.
• The operational range of the Butterfly is beyond sight, so be careful when flying the
Butterfly to keep it within sight at all times or your Butterfly could fly away.
• Because the Butterfly is operated by radio control, it’s important to make sure you are
always using fresh transmitter batteries. Never allow the transmitter batteries to run
low or you might experience loss of control.
• Never touch the transmitter antenna during use. Doing so may cause loss of control
of the Butterfly.
• Do not expose the transmitter or the Butterfly to moisture or excessive heat, or electrical
damage may occur.
• Never attempt to disassemble or modify any of the radio control system components.
• If the transmitter becomes dirty, it can be cleaned with a soft dry cloth. If the outer
case becomes soiled, it can be cleaned with a damp cloth and liquid detergent. Do
not use any solvents to clean the outer case. Solvents will damage the finish.
• Never attempt to charge the Li-Po battery with a charger that isn’t designed to balance
charge Li-Po batteries. We recommend using only the charger included with your
Butterfly. It is designed to safely charge the Li-Po battery included with your Butterfly.
• Do not charge or use the Li-Po battery if it is hot to the touch.
• Do not leave the Li-Po battery in direct sunlight or in a hot car or storage area, or allow
Li-Po battery to be exposed to moisture.
• Always unplug the Li-Po battery from the Butterfly when not in use. The Li-Po battery
should be stored in a fire-proof container.
• Inspect the Li-Po battery before each use for swelling or other malformation. If
damaged, it should not be used.
• Do not poke, bend or otherwise damage the Li-Po battery. Do not short-circuit.
• Do not allow the Li-Po battery to ever exceed 160ºF (71ºC) for any reason.
LI-PO BATTERY WARNINGS
BUTTERFLY ULTRA-QUAD MODEL ‘S’
4
Your Butterfly Ultra-Quad Model ‘S’ includes a 2S 7.4 volt 1300mAh Li-Po battery that is
charged using the included balance charger and AC power adapter.
CHARGING THE LI-PO BATTERY
CHARGING PRECAUTIONS
• Do not use the included charger to charge any other type of battery.
• The charger and the Li-Po battery should be placed on a heat-resistant, non-flammable
and non-conductive surface. Never place them on carpet or similar.
• Do not attempt to charge the Li-Po battery through the battery connector. The Li-Po
battery should always be charged through the white balance connector.
• Always allow the Li-Po battery to cool down after use prior to recharging it.
• Keep flammable and volatile materials well away from the operating area during use.
• Never charge the Li-Po battery if it appears swollen or damaged in any way.
• Never leave the Li-Po battery unattended during the charging process. If any malfunction
is observed, unplug the charger from its power source immediately.
• If the Li-Po battery becomes hot to the touch during the charging process, unplug the
charger from its power source immediately.
• Keep the charger away from moisture, dust, dirt, heat, direct sunlight and vibration.
Do not drop it.
• After the charging process completes, unplug the Li-Po battery from the charger, then
unplug the charger from its power source.
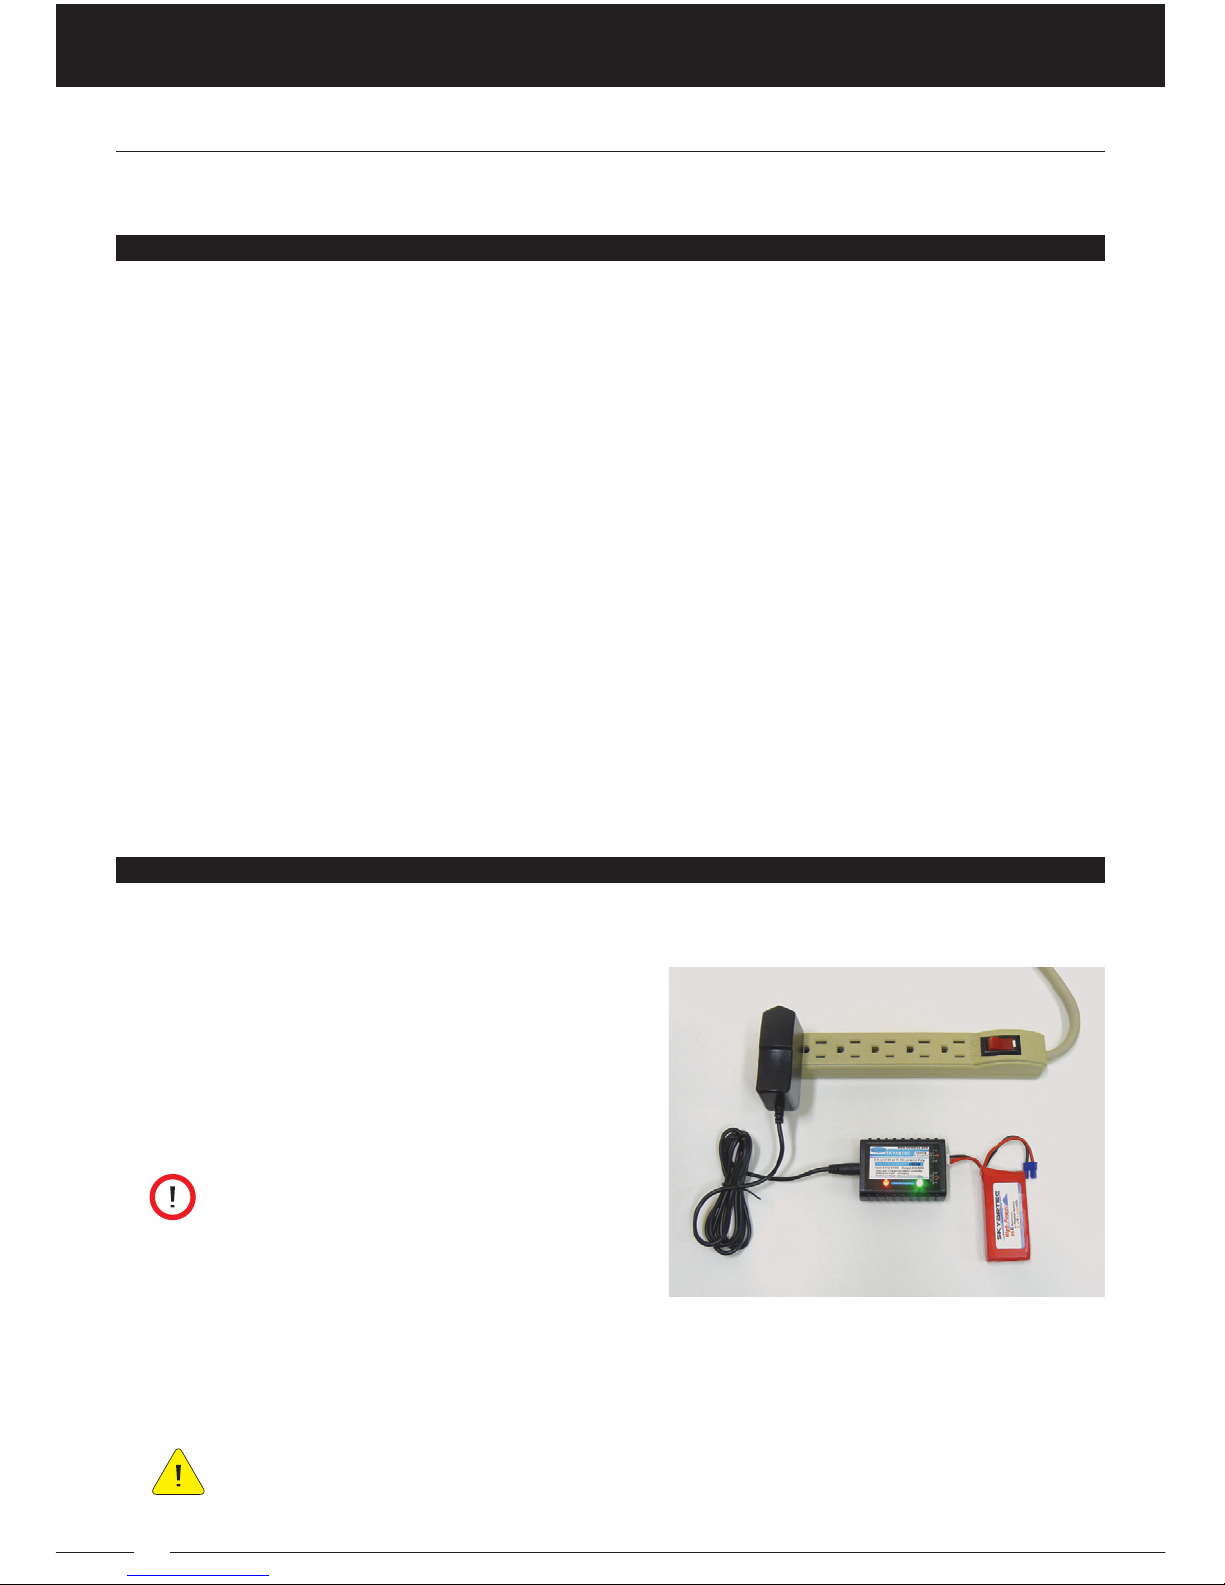
CHARGING THE LI-PO BATTERY
1) Plug the round connector from the AC power adapter into the charger, then plug the
adapter into a 110v AC wall socket or power strip. The Power LED will illuminate Red.
2) Plug the white balance connector on the
Li-Po battery into the 7.4V balance port in
the charger. The Charge LED will illuminate
Green, indicating the Li-Po battery is charging.
Always remove the Li-Po battery from the
Butterfly for the charging process.
3) Allow the Li-Po battery to charge. After some time, the Charge LED will flash Green
to indicate the Li-Po battery is in the final phase of balance charging. When the Li-Po
battery is fully charged, the Charge LED will go out. Unplug the Li-Po battery from the
charger, then unplug the charger from its power source.
The charger’s output is 0.6A (600mAh), therefore, it can take up to 1.5 hours or
more to fully charge the Li-Po battery, depending on its discharge level. Never
allow the charger to charge more than 2 hours!
BUTTERFLY ULTRA-QUAD MODEL ‘S’
5
This section provides a basic overview of the layout of the Butterfly Ultra-Quad Model ‘S’,
including propeller orientation and motor direction, and the functions of the NASA701
7-Channel 2.4GHz transmitter that are specific to flying the Butterfly.
TRANSMITTER AND BUTTERFLY OVERVIEW
Antenna shown in the collapsed
position. Antenna should be in the
vertical position for flight.
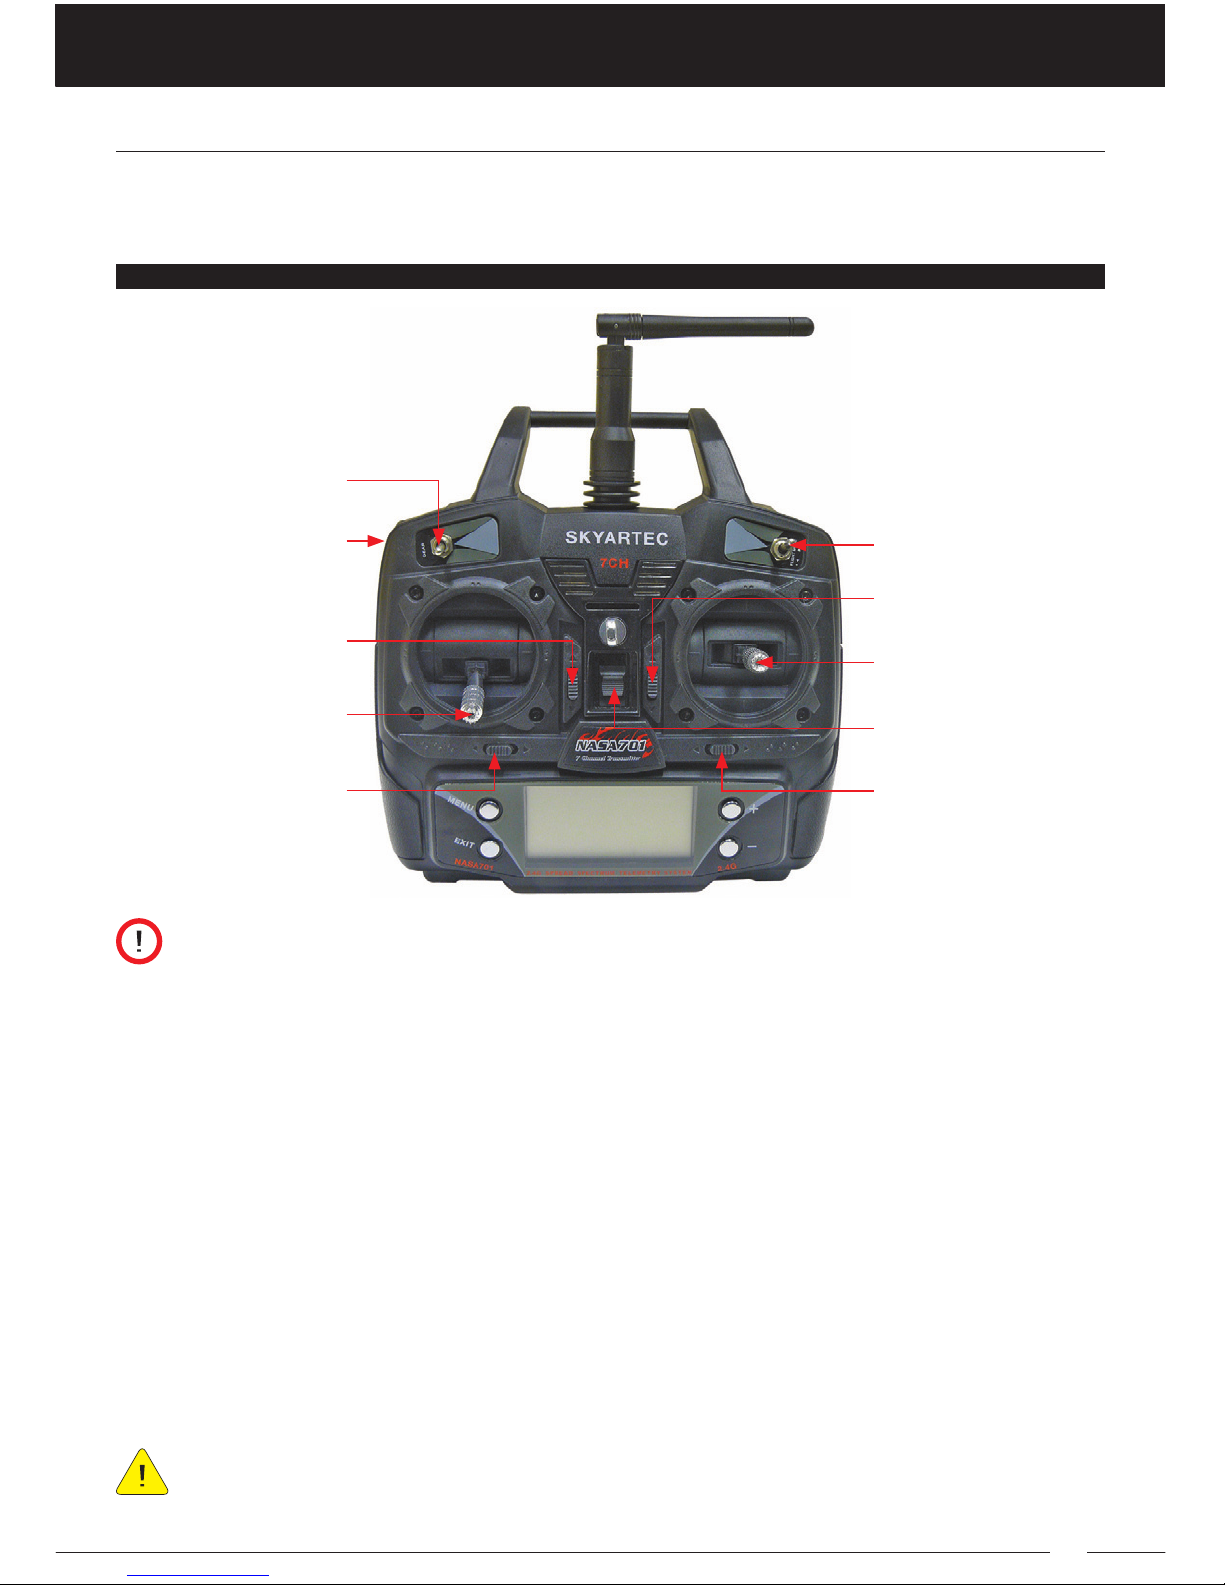
TRANSMITTER OVERVIEW
The transmitter is designed for use
with multiple products. Only functions
specific to the Butterfly are described.
Auxiliary Lever Flight Mode Switch
Pitch/Roll
Control Stick
Gear Switch
Throttle/Yaw
Control Stick On/Off Switch
Yaw Trim Switch
The transmitter comes paired and pre-programmed from the factory to work with
the Butterfly. We do not suggest making programming changes unless the transmitter
does not operate the Butterfly correctly.
Auxiliary Lever - Turns the Compass function ON (UP) and OFF (DOWN).
Flight Mode Switch - Used in the arming process of the Butterfly’s power system. The
Flight Mode Switch should always be left in the ‘N’ position.
Gear Switch - Used in the arming process of the Butterfly’s power system. Before arming
the Butterfly, the Gear Switch should be in the DOWN position. During the arming process,
the Gear Switch will be moved to the UP position.
On/Off Switch - Turns the transmitter ON and OFF.
Pitch/Roll Control Stick - Controls the Butterfly’s Forward/Backward (Pitch) and Right/
Left (Roll) flight axes.
Throttle/Yaw Control Stick - Controls the Butterfly’s Throttle (Power Up/Down) and Yaw
(Spin Right/Left) flight axes.
Trim Switches - Allows you to make fine-tuned adjustments to the four flight axes.
If it’s ever necessary to pair the transmitter and receiver again or reset the transmitter
programming, see the Binding the Transmitter and Receiver section on page 10
and the Resetting Transmitter Programming section on page 12.
Throttle Trim Switch
Pitch Trim Switch
Roll Trim Switch
BUTTERFLY ULTRA-QUAD MODEL ‘S’
6
The Butterfly has a front and back, and right and left, so you should familiarize yourself
with this first, before attempting to fly. The On/Off switch denotes the back of the Butterfly.
When you power up the Butterfly, the propeller blades should spin in the directions
indicated. In addition, the text printed on each of the four propellers (EP5030’R’ and
EP5030) should face up when the propellers are installed. If the propellers aren’t installed
in the correct orientation and in the correct positions, the Butterfly won’t fly correctly.
TRANSMITTER AND BUTTERFLY OVERVIEW
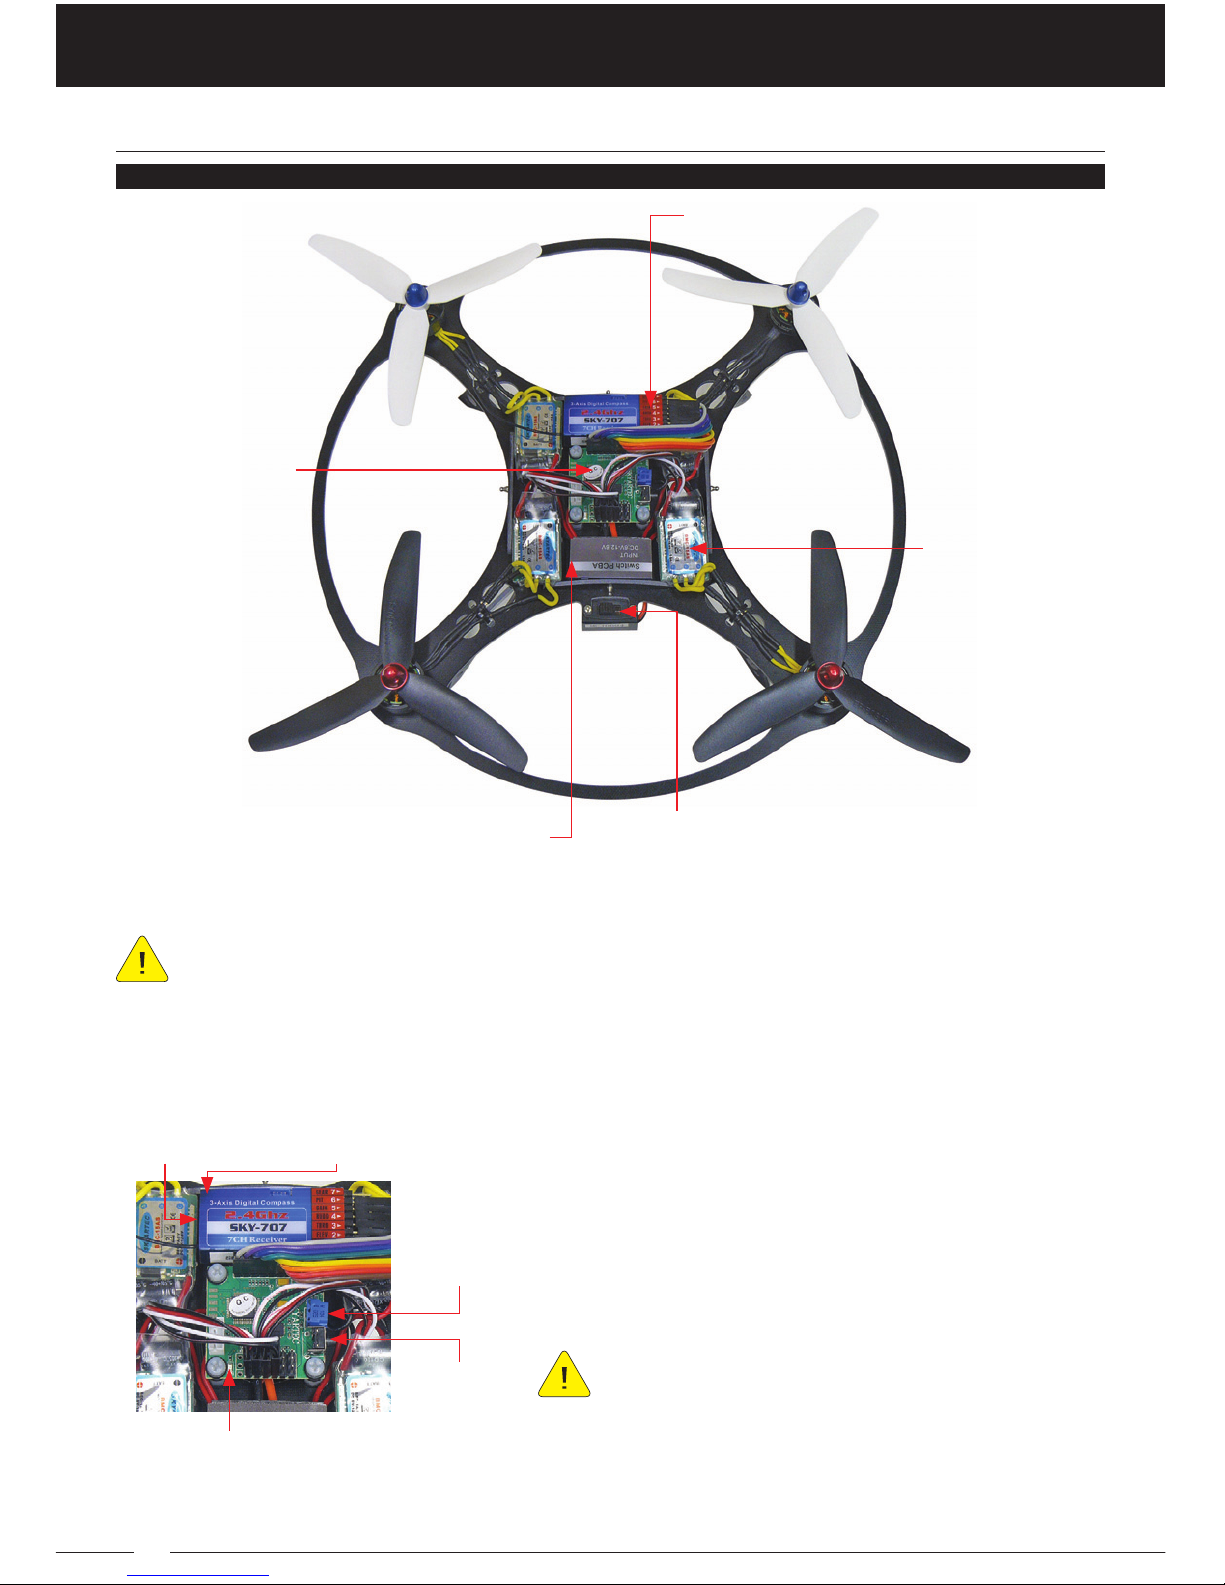
BUTTERFLY OVERVIEW
Front
Back
RightLeft
White (EP5030’R’)
Clockwise
Black (EP5030’R’)
Counter-Clockwise
Black (EP5030)
Clockwise
White (EP5030)
Counter-Clockwise
ESC
On/Off SwitchPower Adapter
Receiver
PC Board
Bind Button - Used to bind the transmitter and receiver pair. The transmitter and receiver
have been paired at the factory and are ready for flight. For more information, see the Binding
the Transmitter and Receiver section on page 10.
Gain Dial - Used to adjust the sensitivity of the
Butterfly’s flight controls. Turning the gain up
(turn clockwise) increases the Butterfly’s control
sensitivity and turning the gain down (turn
counter-clockwise) decreases the Butterfly’s
control sensitivity.
The gain setting is preset from the factory.
We don’t suggest making adjustments to this
setting. Turning the gain setting too high can cause
the Butterfly to become extremely difficult to control.
Calibration Button - Used to calibrate the Butterfly’s gyro stabilization system. For more
information, see the Calibrating the Gyro System on page 11.
Bind Button
Gain Dial
Calibration
Button
Red Bind LED
Blue Status LED
For a complete wiring
diagram, see the ESC,
Receiver and PC Board
Wiring Diagram section
on page 13.

BUTTERFLY ULTRA-QUAD MODEL ‘S’
7
PREPARING TO FLY THE BUTTERFLY
Follow the steps in this section to prepare your Butterfly Ultra-Quad Model ‘S’ for flight.
INSTALLING THE TRANSMITTER BATTERIES
INSTALLING THE LI-PO BATTERY
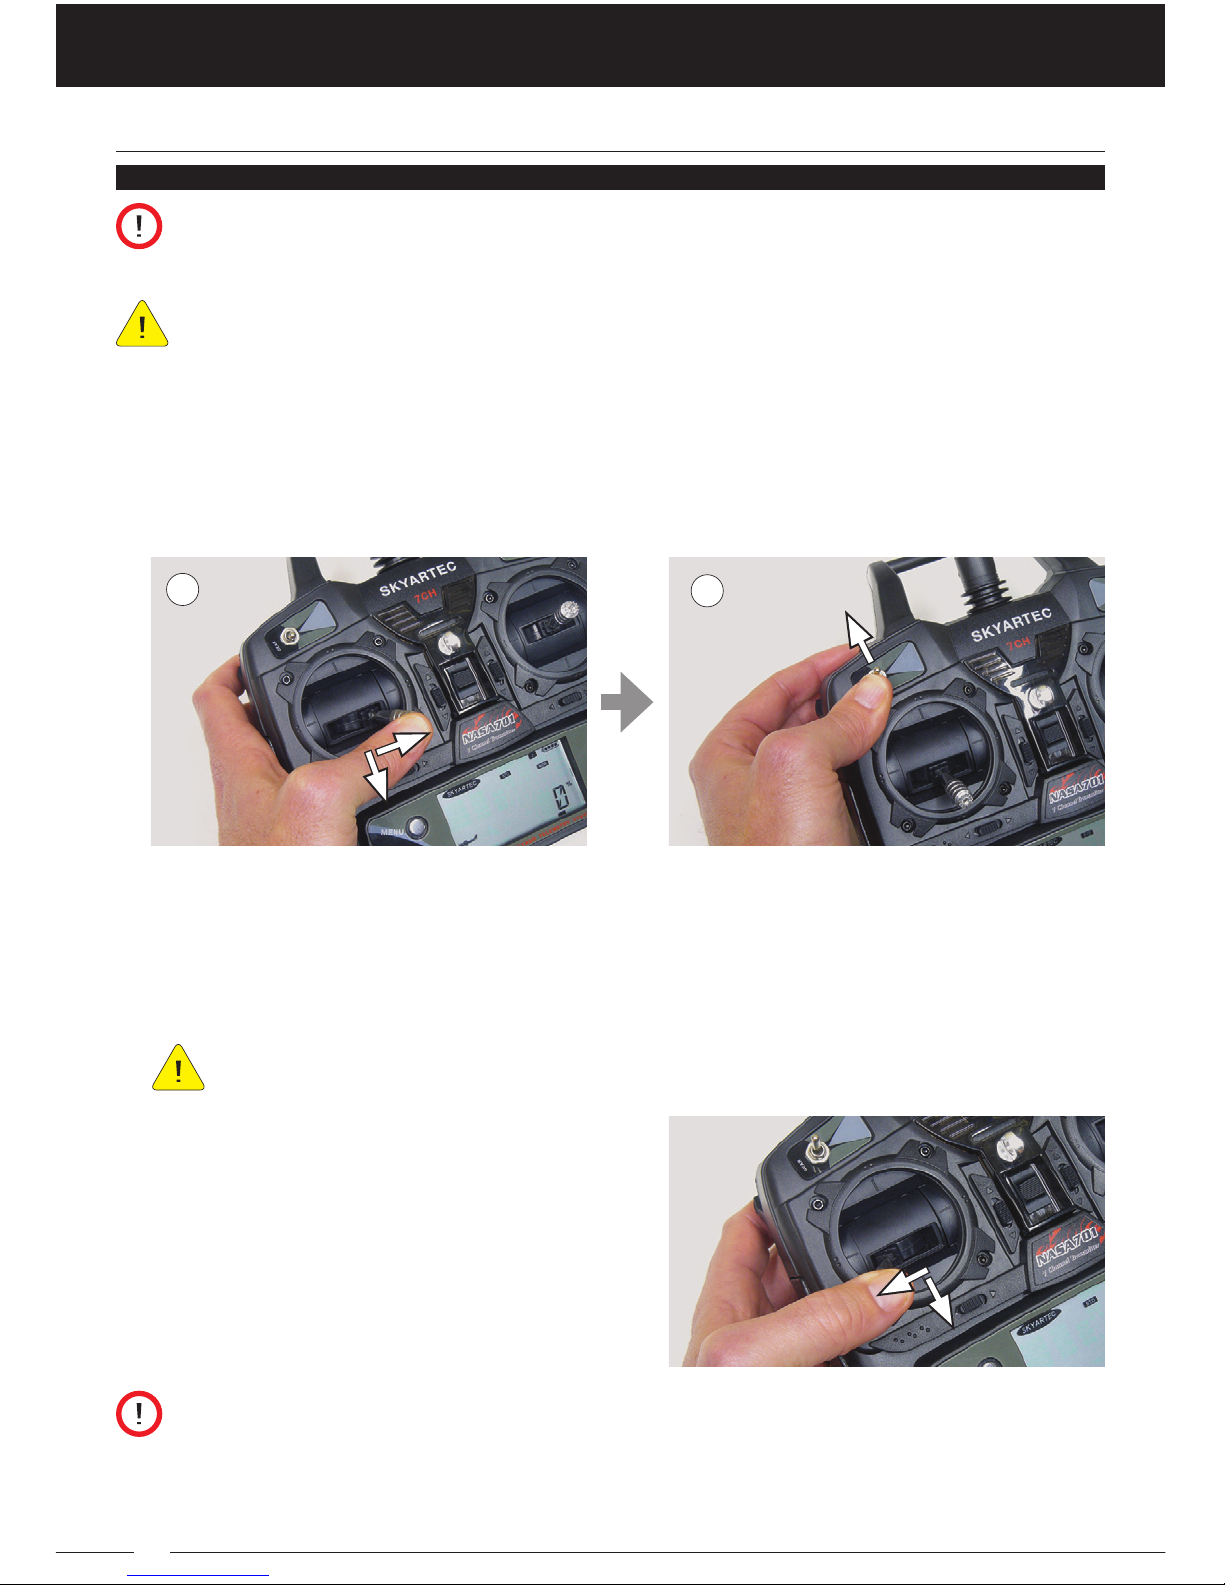
1) Remove the battery cover, then remove the
battery holder and install 8 new ‘AA’ alkaline
batteries into it, double-checking to make sure
that the polarity is correct.
2) Carefully plug the white connector from the
battery holder into the matching connector in
the transmitter, then install the battery holder
and reinstall the battery cover.
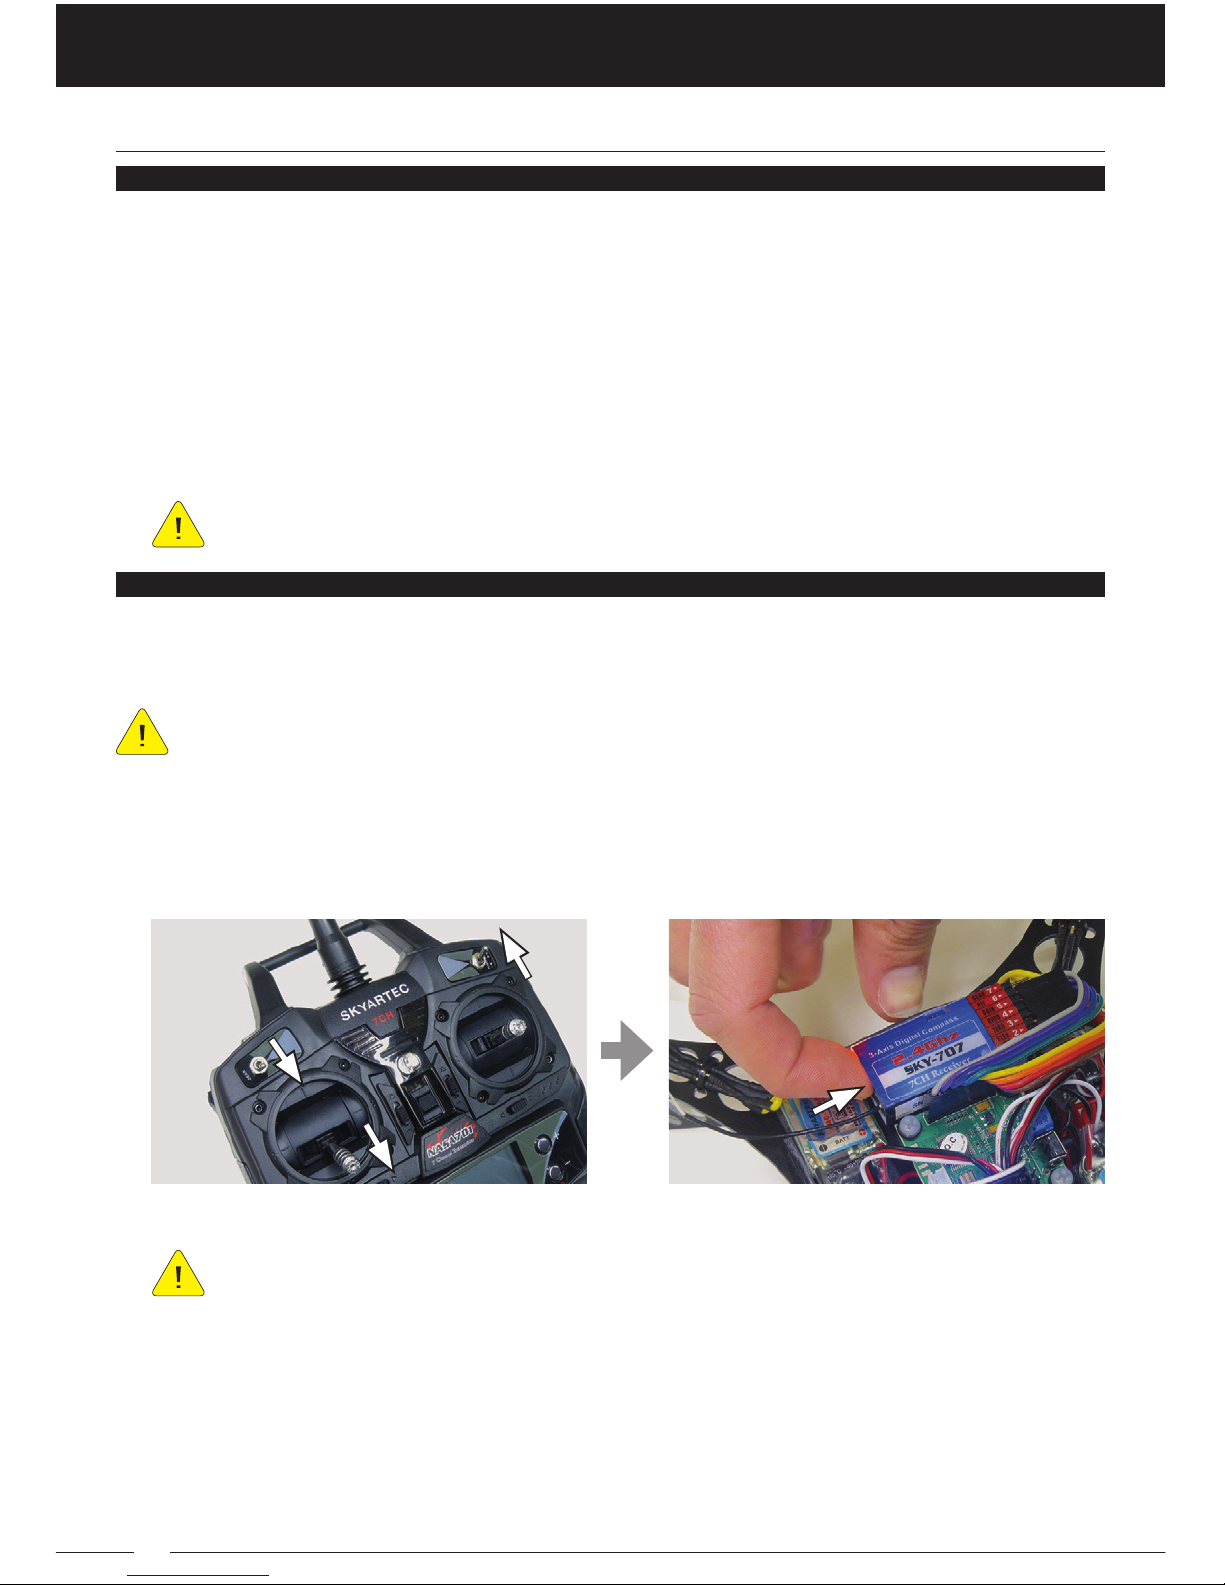
1) Verify that the transmitter and the Butterfly
are both turned OFF.
2) Mount the Li-Po battery on top of the battery
mounting plate (matching pieces of Velcro®
have been installed on both parts), making
sure that the Li-Po battery is centered. The
battery’s orientation does not matter.
3) Plug the two power connectors together
firmly. They can be plugged in only one way.
1) Place the Gear switch in the DOWN position,
the Flight Mode switch in the ‘N’ position and
the Auxiliary Lever in the DOWN position.
2) Pull the throttle control stick all the way back
to its lowest position.
ARMING THE BUTTERFLY
Red Bind LED - Indicates the current status of the receiver. Under normal use, when solid
Red, indicates the transmitter and receiver are paired. When flashing Red, indicates the
Li-Po battery is depleted and should be recharged.
Blue Status LED - Indicates the current status of the Butterfly’s systems. Under normal
use, when solid Blue, indicates the system is OK and ready to be armed. When flashing
Blue, indicates the motors are armed and ready for flight.
TRANSMITTER AND BUTTERFLY OVERVIEW
BUTTERFLY OVERVIEW, CONTINUED....
BUTTERFLY ULTRA-QUAD MODEL ‘S’
8
When you arm the Butterfly, the motors will spin up at low speed to stabilize the
Butterfly in preparation for flight. This is normal. Be very careful to keep your hands
and fingers away from the propellers during this process.
If the transmitter makes a continuous beeping sound when you turn it ON in the
next step, make sure the Gear switch is in the DOWN position and the Flight Mode
switch is in the ‘N’ position.
3) Turn the transmitter ON, then set the Butterfly on a flat, level surface and turn it ON.
The Blue Status LED will illuminate solid and an audible jingle will sound, indicating
the gyro system is initializing. Initialization will take about 15 seconds. Do not move the
Butterfly during this time. After the audible jingle sounds, you will hear short audible
tones at equal intervals. This is normal and indicates the Butterfly is ready to be armed.
As long as the Gear switch is in the UP position, the motors will be armed, even
though they’re not running. The Gear switch must be moved to the DOWN position
to disarm the motors. When the Gear switch is in the UP position, the motors can spin
up and shut down by moving the throttle control stick to the right and left as described
in steps 4 and 6, respectively.
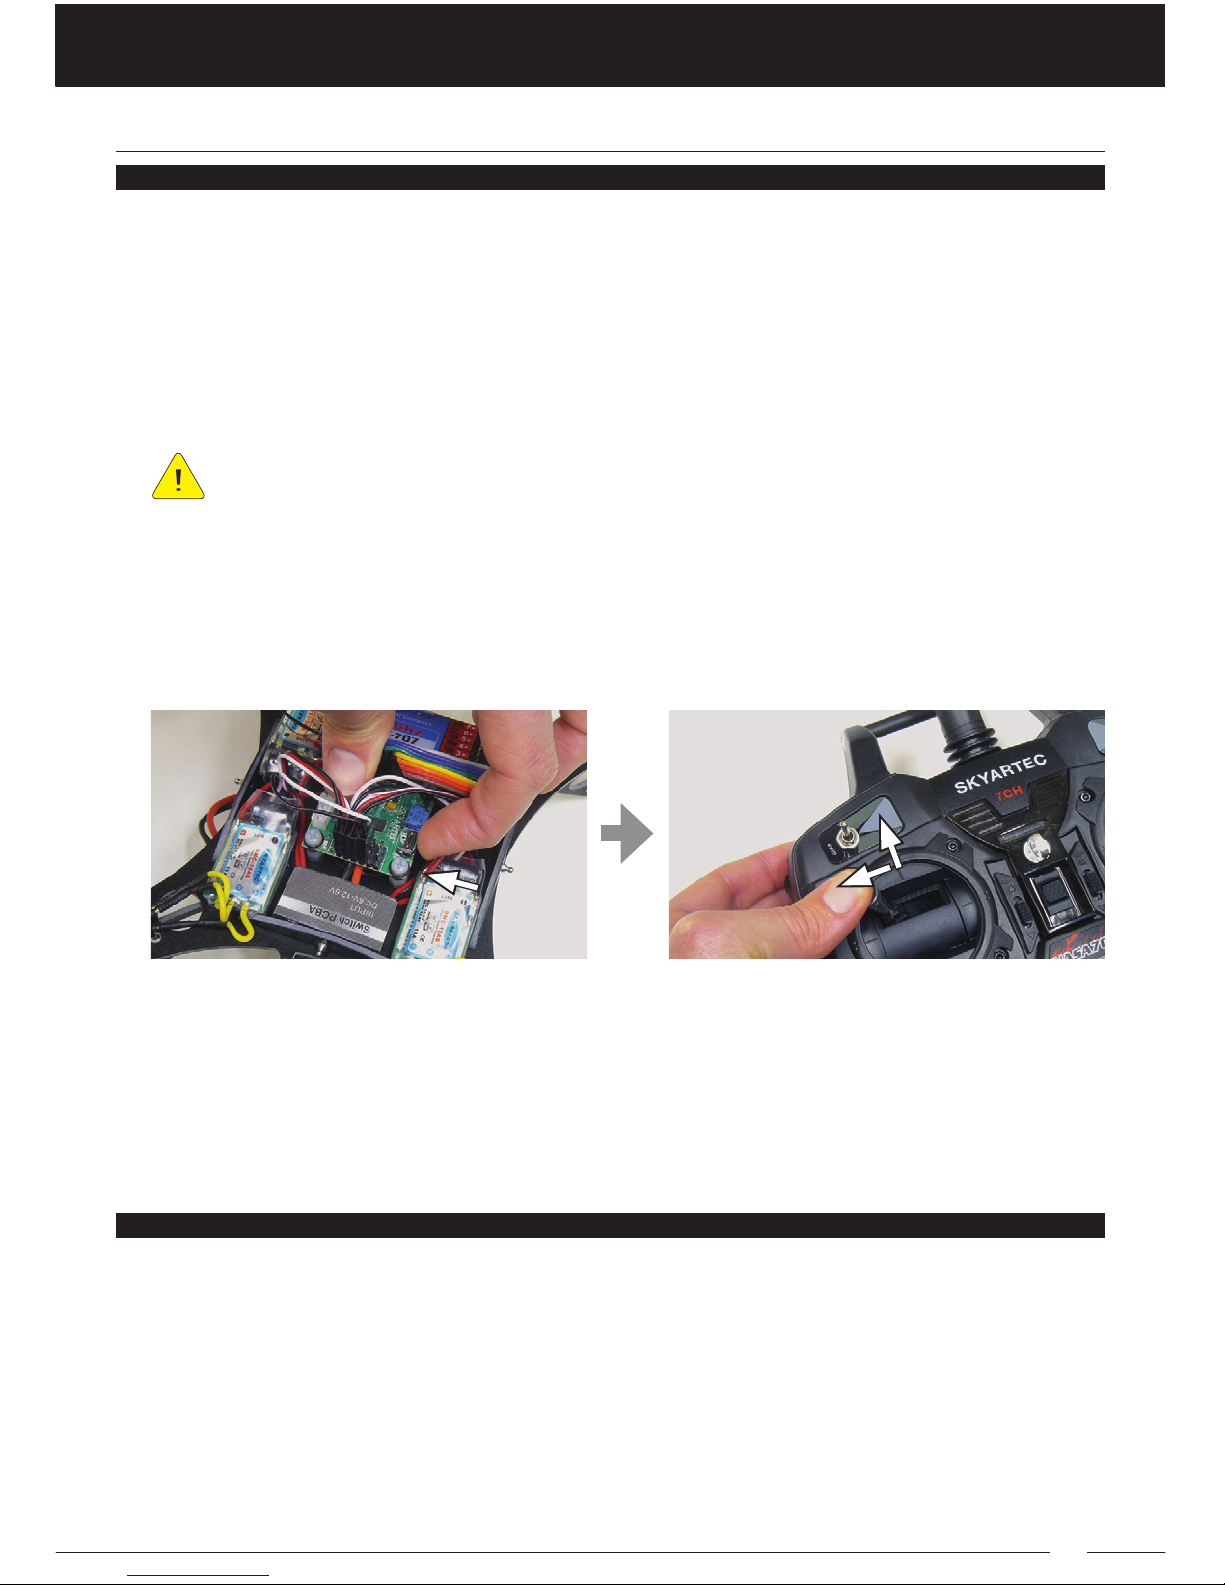
4) With the throttle control stick pulled all the way back, push the throttle control stick all
the way to the right (A). Hold it in this position until the motors spin up at low speed
and the Blue Status LED flashes. Release the throttle control stick, making sure it’s still
pulled all the way back.
5) Move the Gear switch to the UP position (B). The Butterfly is now armed and ready to fly.
Even with motors spinning at low speed, you will not be able to control the throttle
when the Gear switch is in the DOWN position. The Gear switch must be in the
UP position to control the throttle.
PREPARING TO FLY THE BUTTERFLY
ARMING THE BUTTERFLY, CONTINUED....
6) To shut the motors down, either after flying
or after a crash, etc., pull the throttle control
stick all the way back and all the way to the
left. Hold it in this position until the motors
shut down.
AB
BUTTERFLY ULTRA-QUAD MODEL ‘S’
9
Butterfly Arming Quick-Steps:
Follow the procedures below to quickly arm your Butterfly flight and shut it down.
• Gear switch DOWN, Flight Mode Switch ‘N’, Auxiliary Lever DOWN, throttle BACK.
• Turn transmitter ON, then turn Butterfly ON. Wait for audible jingle to complete.
• Throttle DOWN and hold all the way right. Motors spin up in preparation for flight.
• Gear switch UP. Butterfly is armed and ready for flight.
• After landing, throttle BACK and hold all the way left. Motors shut down.
• To take off again, throttle BACK and hold all the way right. Motors spin up.
• To shut down, throttle BACK and hold all the way left. Motors shut down. Gear switch
DOWN. Turn Butterfly OFF, then turn transmitter OFF.
PREPARING TO FLY THE BUTTERFLY
ARMING THE BUTTERFLY, CONTINUED....
COMPASS FUNCTION
The Butterfly Ultra-Quad Model ‘S’ features a Compass function, that when turned ON, will
reorientate the Butterfly in the direction it was pointing in when it was armed. This helps
you regain control orientation should you lose it during flight.
USING THE COMPASS FUNCTION
1) Set the Butterfly on the ground with the front of it pointing in the direction you want
the Butterfly to reorientate itself to.
2) Place the Auxiliary Lever in the UP position (Compass ON), then arm the Butterfly as
described in the Arming the Butterfly section. Do not move the Auxiliary Lever into the
DOWN Position as described in step 1 of that section.
3) As long as the Compass function is ON, when you’re flying the Butterfly and you center
the Yaw control stick, the Butterfly will automatically slowly spin back and the front will
point the same direction it was in when you turned the Butterfly ON.
The Compass function can be turned OFF and ON during flight by moving the
Auxiliary Lever DOWN (Compass OFF) and UP (Compass ON).
The Auxiliary Lever must be in the UP position (Compass ON) prior to turning
on the transmitter and arming the Butterfly for the Compass function to work. If
you turn the transmitter ON and arm the Butterfly with the Auxiliary Lever in the DOWN
position (Compass OFF), the Compass function will not work, even if you move the
Auxiliary Lever to the Compass ON position during flight.
Compass function precision is plus or minus 5º to 10º. If the deviation is larger
than 10º, the Compass function should be calibrated as described in the
Calibrating the Compass Function section on pages 12 and 13.
MAINTENANCE
This section describes some of the more common things you might need to do to keep
your Butterfly Ultra-Quad Model ‘S’ in great flying condition.
BUTTERFLY ULTRA-QUAD MODEL ‘S’
10
3) Remove the canopy from the Butterfly by carefully pulling it off the four mounting posts.
If the transmitter makes a continuous beeping sound when you turn it ON in
the next step, make sure the Gear switch is in the DOWN position and the Flight
Mode switch is in the ‘N’ position.
4) Turn the transmitter ON, then turn the Butterfly ON. The Red Bind LED on the receiver
will flash slowly.
5) Press and HOLD the Bind Button on the receiver for 4 to 6 seconds until the Red Bind
LED begins to flash rapidly. Release the Bind Button. The Red Bind LED will continue
to flash rapidly (up to 15 to 30 seconds) and then turn solid Red, indicating the
transmitter and receiver are paired and ready for use.
MAINTENANCE
BINDING THE TRANSMITTER AND RECEIVER
The transmitter and receiver are paired at the factory and are ready for flight, but if you
purchase a new transmitter or a new receiver, they must be paired. Follow the steps in
this section to bind the transmitter and receiver.
If you’ve purchased a new transmitter, make sure the transmitter programming
matches the default programming described in the Resetting Transmitter Programming
section on page 12.
1) Place the Gear switch in the DOWN position and the Flight Mode switch in the ‘N’
position.
2) Pull the throttle control stick all the way back to its lowest position.
REPLACING PROPELLERS
A propeller should be replaced if any of the three blades becomes nicked, broken or
appears to have any other type of damage. Follow the steps in this section to replace
the propellers.
1) Insert a thin hex wrench (or similar) into the hole in the prop nut to unscrew the prop
nut and remove it. The front right and back left prop nuts have standard threads (turn
counter-clockwise to loosen) and the front left and back left prop nuts have reverse
threads (turn clockwise to loosen).
2) Remove the propeller and replace it with a new one, then reinstall and tighten the
prop nut gently. Do not overtighten it.
Please pay careful attention to which propeller mounts on each motor and its
orientation. See the Butterfly Overview section on pages 6 and 7.
BUTTERFLY ULTRA-QUAD MODEL ‘S’
11
MAINTENANCE
CALIBRATING THE GYRO SYSTEM
The Butterfly’s gyro system is calibrated at the factory, but if the Butterfly seems unusually
difficult to control or unstable, the gyro system should be calibrated. Follow the steps in
this section to calibrate the gyro system.
1) Place the Gear switch in the DOWN position and the Flight Mode switch in the ‘N’
position.
2) Pull the throttle control stick all the way back to its lowest position.
3) Remove the canopy from the Butterfly by carefully pulling it off the four mounting posts.
If the transmitter makes a continuous beeping sound when you turn it ON in
the next step, make sure the Gear switch is in the DOWN position and the Flight
Mode switch is in the ‘N’ position.
4) Turn the transmitter ON, then set the Butterfly on a flat, level surface and turn it ON.
The Blue Status LED will illuminate solid and an audible jingle will sound, indicating
the gyro system is initializing. Initialization will take about 15 seconds. Do not move the
Butterfly during this time. After the audible jingle sounds, you will hear short audible
tones at equal intervals.
5) Move the Gear switch to the UP position.
6) Press and HOLD the Calibration Button. The Blue Status LED will go out. While holding
the Calibration Button, move and HOLD the throttle control stick all the way forward
and all the way left. Continue holding the stick in this position while still holding the
Calibration Button until the Blue Status LED illuminates again. After the Blue Status
LED illuminates again, return the throttle control to its lowest position, then release
the Calibration Button.
RESETTING THE GAIN
The Gain Dial is used to adjust the sensitivity of the Butterfly’s flight controls. The gain
setting is preset from the factory. We don’t suggest making adjustments to this setting.
Turning the gain setting too high can cause the Butterfly to become extremely difficult to
control. Follow the steps in this section to reset the gain to the default setting.
1) Remove the canopy from the Butterfly by carefully pulling it off the four mounting posts.
2) Using a small flat blade or Phillips head screwdriver, gently turn the Gain Dial counter-
clockwise until it stops, then turn the Gain Dial clockwise 1/8th of a full turn or slightly
more. Do NOT turn more than 1/4 of a full turn! If after resetting the Gain Dial the
Butterfly seems too sensitive or “jittery” turn the Gain Dial down.

BUTTERFLY ULTRA-QUAD MODEL ‘S’
12
MAINTENANCE
RESETTING TRANSMITTER PROGRAMMING
The NASA701 7-Channel 2.4GHz transmitter is designed to control several different types
of models and comes from the factory programmed to work specifically with the Butterfly.
We do not recommend attempting to make any changes to the transmitter’s programming,
however if you disregard this and make programming changes, or if the transmitter is
not controlling the Butterfly as you expect, or if it’s a new replacement, please follow the
steps in this section to reset the transmitter’s programming to the default settings.
1) Place the Gear switch in the DOWN position, the Flight Mode switch in the ‘N’ position
and the Auxiliary Lever in the DOWN position.
2) Pull the throttle control stick all the way back to its lowest position.
If the transmitter makes a continuous beeping sound when you turn it ON in
the next step, make sure the Gear switch is in the DOWN position and the Flight
Mode switch is in the ‘N’ position.
3) While holding both the ‘+’ and ‘-’ keys down at the same time, turn the transmitter ON.
4) Release the ‘+’ and ‘-’ keys, then press the MENU key three times. You will see on the
LCD screen that the % value will rapidly change from 0% to 100%, then show OK.
5) Turn the transmitter OFF, then turn it back ON. The programming values should be
reset to the Programming Defaults shown below.
Transmitter Programming Defaults:
The following are the transmitter Programming Defaults for use with the Butterfly.
• Model - 1
• Name - 8
• Gain - This can be any % value. It has no effect on the Butterfly.
• D/R Dual Rate - 1 (100%), 2 (100%) and 4 (100%)
• EXP Exponential - 1 (0%), 2 (0%) and 4 (0%)
• TH Throttle Curve - 1 (0%), 2 (30%), 3 (70%), 4 (85%) and 5 (100%)
• CH Servo Reversing - 1 (R), 2 (N), 4 (R), 6 (N) and 7 (R)
CALIBRATING THE COMPASS FUNCTION
The Compass function is calibrated at the factory. It’s precision is plus or minus 5º to 10º.
If the deviation is larger than 10º, the Compass function should be calibrated. Follow the
steps in this section to calibrate the Compass function.
1) Place the Gear switch in the DOWN position and the Flight Mode switch in the ‘N’
position.
2) Pull the throttle control stick all the way back to its lowest position.
3) Remove the canopy from the Butterfly by carefully pulling it off the four mounting posts.
If the transmitter makes a continuous beeping sound when you turn it ON in
the next step, make sure the Gear switch is in the DOWN position and the Flight
Mode switch is in the ‘N’ position.
BUTTERFLY ULTRA-QUAD MODEL ‘S’
13
4) Turn the transmitter ON, then set the Butterfly on a flat, level surface and turn it ON.
The Blue Status LED will illuminate solid and an audible jingle will sound, indicating
the gyro system is initializing. Initialization will take about 15 seconds. Do not move the
Butterfly during this time. After the audible jingle sounds, you will hear short audible
tones at equal intervals.
MAINTENANCE
CALIBRATING THE COMPASS FUNCTION
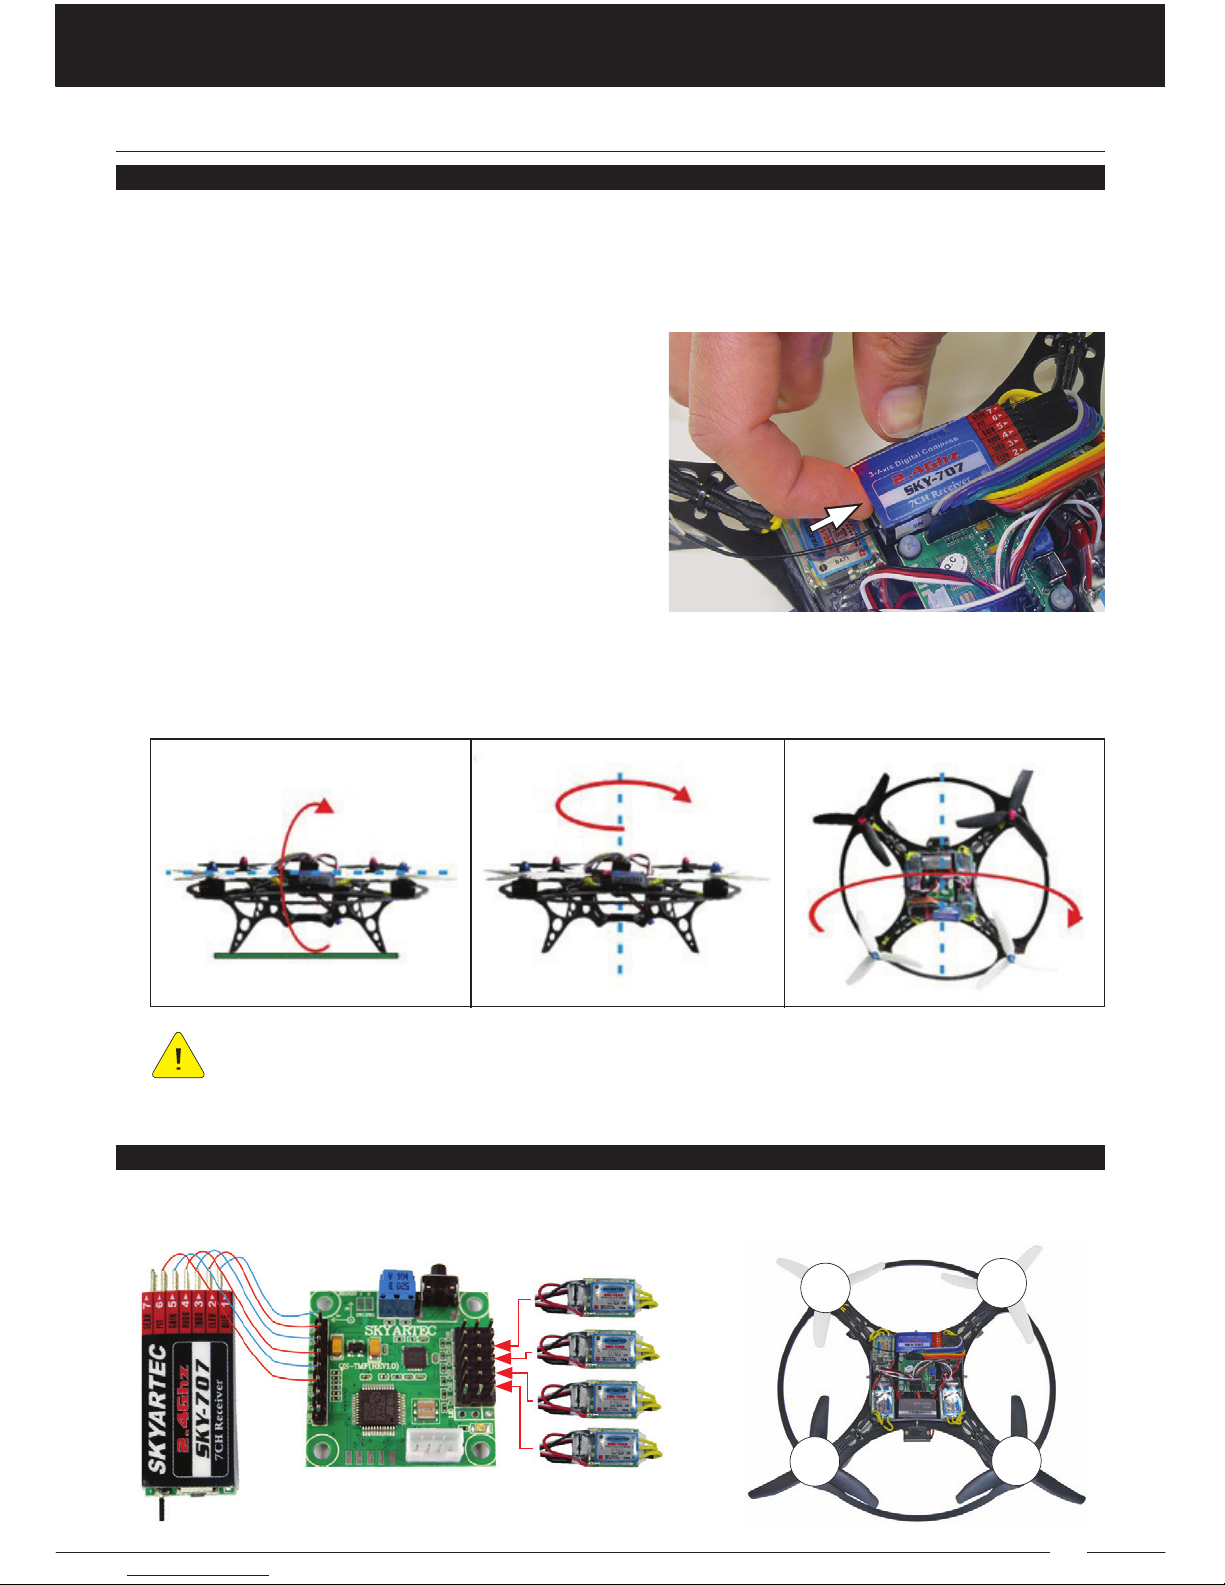
6) Carefully rotate the Butterfly by hand 360º in the directions shown in the photos below,
then set the Butterfly back down on a level surface. The Red Bind LED will illuminate
solid, indicating the calibration is complete.
5) Press the HOLD the receiver Bind Button.
When the Red Bind LED begins to flash,
release the Bind Button.
All three rotations must be finished within 30 seconds before the Red Bind LED
stops flashing, otherwise you need to turn both the Butterfly and transmitter OFF,
then restart the calibration process from the beginning.
ESC, RECEIVER AND PC BOARD WIRING DIAGRAM
Use this wiring diagram, should you ever need to replace your Butterfly’s PC Board, ESC’s
or receiver. This will help to ensure you make all the necessary connections correctly.
CH4
CH1
CH2
CH3
CH1
CH2
CH3
CH4

BUTTERFLY ULTRA-QUAD MODEL ‘S’
14
174973 (MCB-001) Main Frame (Unassembled)
174974 (MCB-002A) Propeller Set ‘A’ Black (5030 3-Blade)
174975 (MCB-002B) Propeller Set ‘B’ White (5030 3-Blade)
174976 (MCB-003) Canopy (Polycarbonate - Printed)
174977 (MCB-004) Battery Connector Set
174978 (MCB-005) Rubber Vibration Isolators
174979 (MCB-006) Canopy Mounts (Stainless Steel)
174980 (MCB-007) M2 x 4mm Hex Screw Set
174981 (MCB-008) Nylon Screw and Nut Set
174982 (MCB-009) Heat Insulator Set (PC Board Mounting Posts)
174983 (MCB-010) Flight Controller Wiring Harness
174985 (BL013C) Motor (CW 1804-2200kV Brushless)
174986 (BL013D) Motor (CCW 1804-2200kV Brushless)
174987 (ESC006C) ESC (3S 15 Amp Brushless)
174988 (LP015) Li-Po Battery (2S 7.4V 1300mAh 25C)
174989 (FCB001) Flight Control Board w/Wiring Harness
174990 (HS009) Balance Charger w/Power Adapter (2 to 3S 110V)
174991 (HS046-2) Multi-Copter PC USB Programming Stick
174992 (HS049) Receiver (SKY-707 7-Channel 2.4GHz 3-Axis)
174994 (NM003) 9.6V 1000mAh Ni-MH Battery (Optional for Transmitter)
174995 (CHR002) AC Charger for Optional Ni-MH Transmitter Battery
174996 (MCB-011) Power Adapter (PCBA Switch)
174997 (HS047) Transmitter (NASA701 7-Channel 2.4GHz)
REPLACEMENT PARTS
The following replacement parts are available. To purchase replacement parts, contact
the retailer you purchased the Butterfly Ultra-Quad Model ‘S’.
If your retailer does not stock replacement parts, replacement parts can be purchased
online at www.hobbypeople.net.
NOTES
ORDER NUMBER PART NUMBER DESCRIPTION

BUTTERFLY ULTRA-QUAD MODEL ‘S’
15
NOTES

BUTTERFLY ULTRA-QUAD MODEL ‘S’
16
R/C Model Fun Co., LTD - Skyartec
Room 910,9/F, Jin Fulai Building No.49-1 Dabao Rd Baocheng 28 District Bao’an District, Shenzen, China
TEL: 0086-755-86224311 or 0086-755-86224211
FAX: 0086-755-61658455
www.skyartec.om
Features and Specifications are Subject to Change Without Notice
Revision 1 03.14.2014
Table of contents
Other SkyArtec Quadcopter manuals


