Nine Eagles Galaxy Visitor 7 User manual
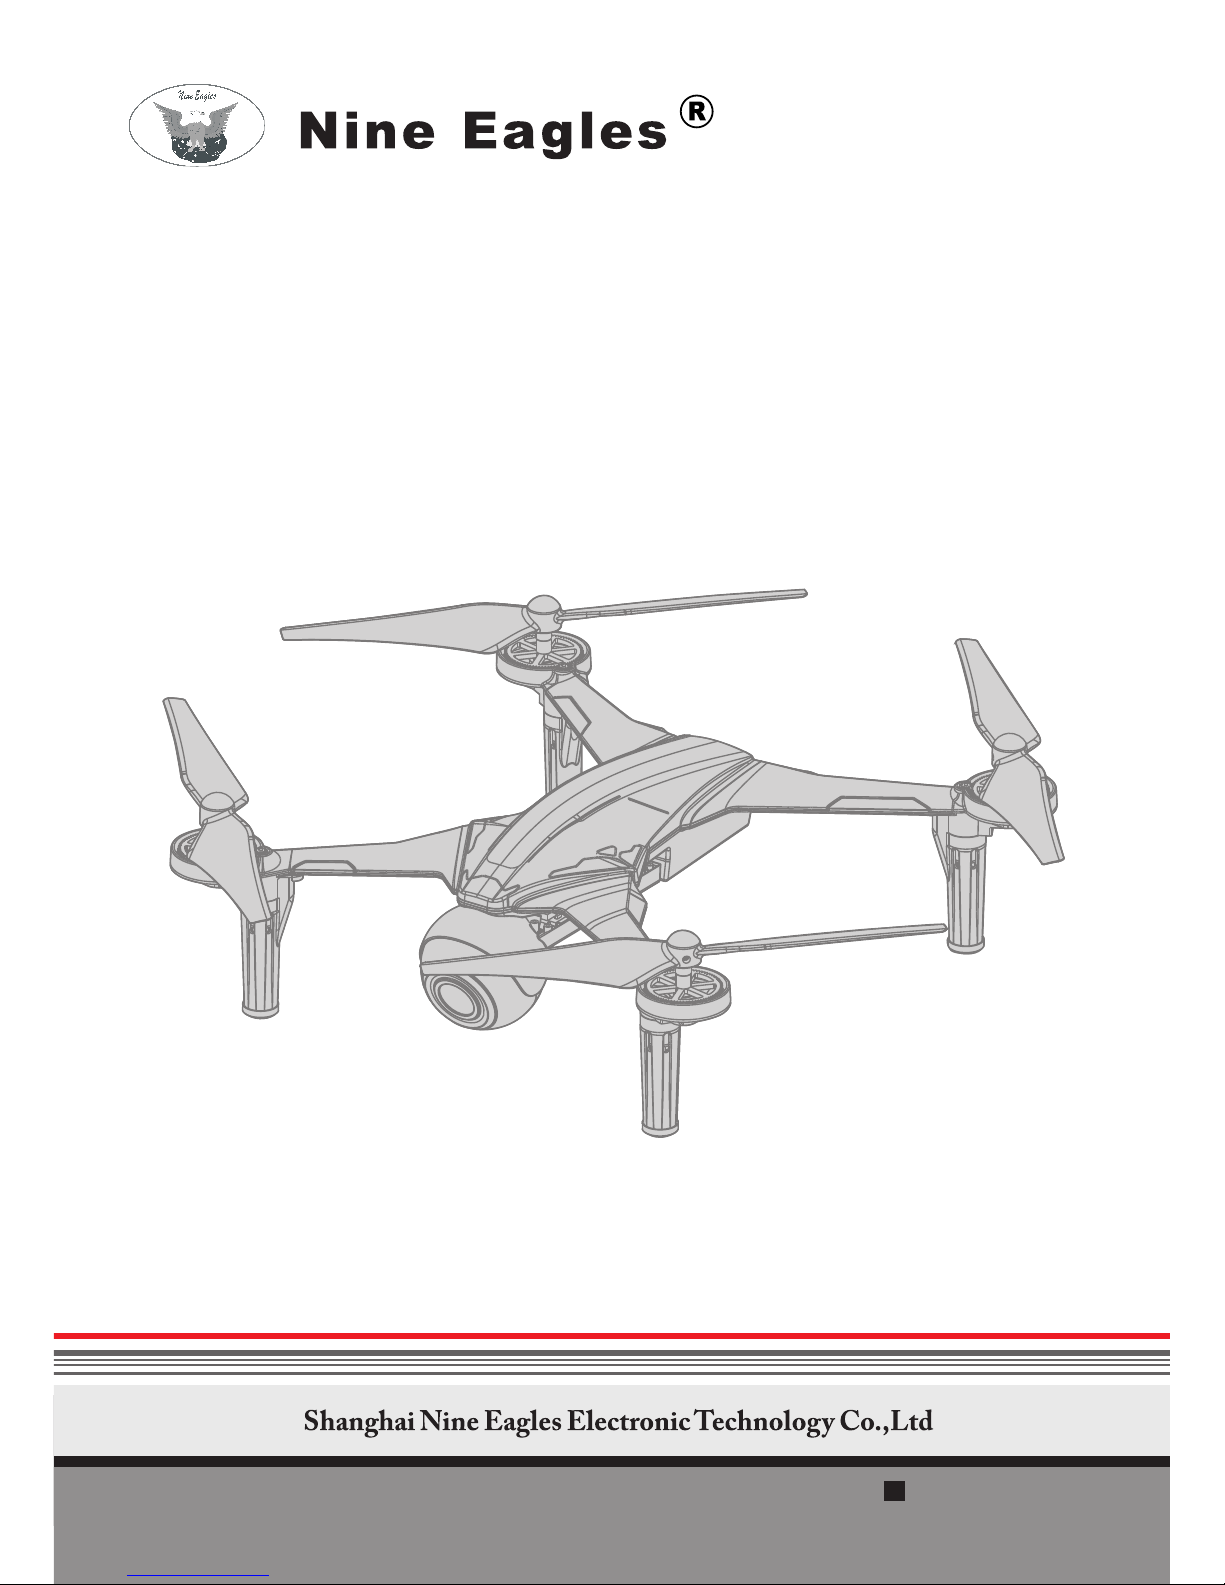
GALAXY
VISITOR
NE-MASF25 20150414
7
INSTRUCTION MANUAL
NE-MASF25 4CH QUADCOPTER
Main Features
HD 1080P FPV Camera compatible with 2.4G & 5.8G mobile devices (smart phone/tablet)
Two controlling ways : by transmitter or by app on mobile devices (smart phone/tablet)
Altitude sensor helps hovering for video/photo more stably and easily
One button to take off and one button to land
Motor electricity overload protection function
Emergency landing function


Ⅱ Brief introduction
1. ................................................................................................................................. P2RTF Kit contents
2. .............................................................................................................. P2Specification and parameter
3. .....................................................................................Main parts model number and specification
4. ................................................................................. WIFI camera's specifications and parameters
Ⅲ Operation Manual
3.Transmitter Controls
1) ......................................................................Transmitter Functions (take MODE2 as example)
2) ...........................................................................................................High rate/Low rate switch
3) ..............................................................................................................................Gains setting
4) .............................................................................................................Transmitter calibration
5) .........................................................................Acceleration sensor calibration by transmitter
.. .......................................................................................................................
P5
P6
P6
P7
P7
P7
ⅠIntroduction
1. ........................................................................................................................... P1
2. ....................................................................................................................... P1
3. ............................................................................................................................. P1
Technology support
Intellectual property
Safety precautions
1...............................................................................................................
2. .........................................................................................................
Charging the Li-po battery
Install the Transmitter Battery P5
P6
4. .............................................................................................................
1) ..........................................................................................................
2) ........................................................................................................................
3) ..........................................................................................................................
Download and Install APP
Download and install APP
Find APP manual
Teaching Video
P8
P8
P8
P8
5. ..................................................... P3Quadcopter's main parts and indicator lights status instruction
5.Smart phone holder installation and usage ................................................................................... P8
6. ...............................................................................................................Preparation before flying P9
1) .................................................................................................................Power on transmitter
2) ...................................................................................................................Prepare quadcopter
3) .............................................................................................................Prepare mobile devices
4) ...............................................................................................................................Ready to Fly
P9
P9
P9
P9
7. .........................................................................................................Transmitter controlled flying
1) .....................................................................................................................................Take off
2) ....................................................................................................................................Hovering
3) ....................................................................................Transmitter controls(take MODE2 as example)
4) ............................................................................................................................................................Land
P10
P10
P10
P10
P10
8. ...................................................................................................Mobile devices controlled flying P11
5) ..................................................................................................................................Emergency Landing P10
P3
P3
Catalog

Ⅳ Exploded drawing and part list
1. ......................................................................................................................... Exploded drawing P16
2. ........................................................................................................................................ Part list
Ⅴ Safety and environment protection
P17
P18
3) Land ......................................................................................................................................... P13
4) ................................................................................................................Emergency Landing
9. ......................................................................................................................... Basic maneuvers
10. ....................................................................................Acceleration sensor calibration by APP
11. ...................................................................................................................Hovering trim by APP
P13
P13
P13
P13
12. ...........................................................................................................................Video Shooting
13. ...........................................................................................................................Photo Shooting
14. .................................................................................................................Take out Li-po battery
16. ..........................................................................................Instructions for some APP functions
P14
P14
P14
P14
1) ....................................................................................................................................Take off ..
2) ........................................................................................................Quadcopter flying control
P11
P11
15. ............................................................................................................................Reading data P14
1.Safety and environment protection

GALAXY VISITOR 7 NE-MASF25
Ⅰ. Introduction
1.Technology support:
“Shanghai Nine Eagles Electronic Technology Co., Ltd” guarantees that all the products have
been strictly inspected and tested before export from factory.
For technology update or operation modification, please visit www.nineeagle.com and click links
to related remarks.
Any new technology alteration will be informed at relative website.
Any question or inquiry, please contact:sales@nineeagle.com
You can also call:0086-21-52919366.
You can also contact with local agent to get technology support and necessary parts.
The intellectual property of product and manual belongs to Shanghai Nine Eagle Electronic Co.,
Ltd., any organization and individual are forbidden to copy in any form.
Follow these safety precautions when operating this or any model quadcopter.
● Keep your face and body as well as spectators away from the plane of rotation of the rotors
whenever the battery is connected.
● Keep these items away from the rotors: loosing clothing, shirt sleeves, ties, scarf, long hair or
loose objects such as pencils or screwdrivers that may fall out shirt or jacket into the rotors.
● The spinning blades of model quadcopter can cause serious injury.
● When choosing a flying site, stay clear of buildings, tress and power lines.
● Avoid flying in or near crowed areas.
● Do not fly close to people, children or pets.
● Maintain a safe pilot-to-quadcopter distance while flying
● GALAXY VISITOR 7 should not be considered a toy, but rather a sophisticated, working model
that functions very much like a full-size quadcopter. Because of its performance capabilities, if not
operated correctly, could cause injury to yourself or spectators.
● Do not alter or modify the model, as doing so may result in an unsafe or unflyable model.
●You must check the operation of the model before every flight to insure that all equipment is
operating and the models has remained structurally sound. Be sure to check the linkage and or
other connectors often and replace them if they show any signs of wear or fatigue.
2.Intellectual property:
3.Safety precaution:
1
7
1
2
7
JFS
NE-TXOS216-G
Ⅱ.Brief introduction
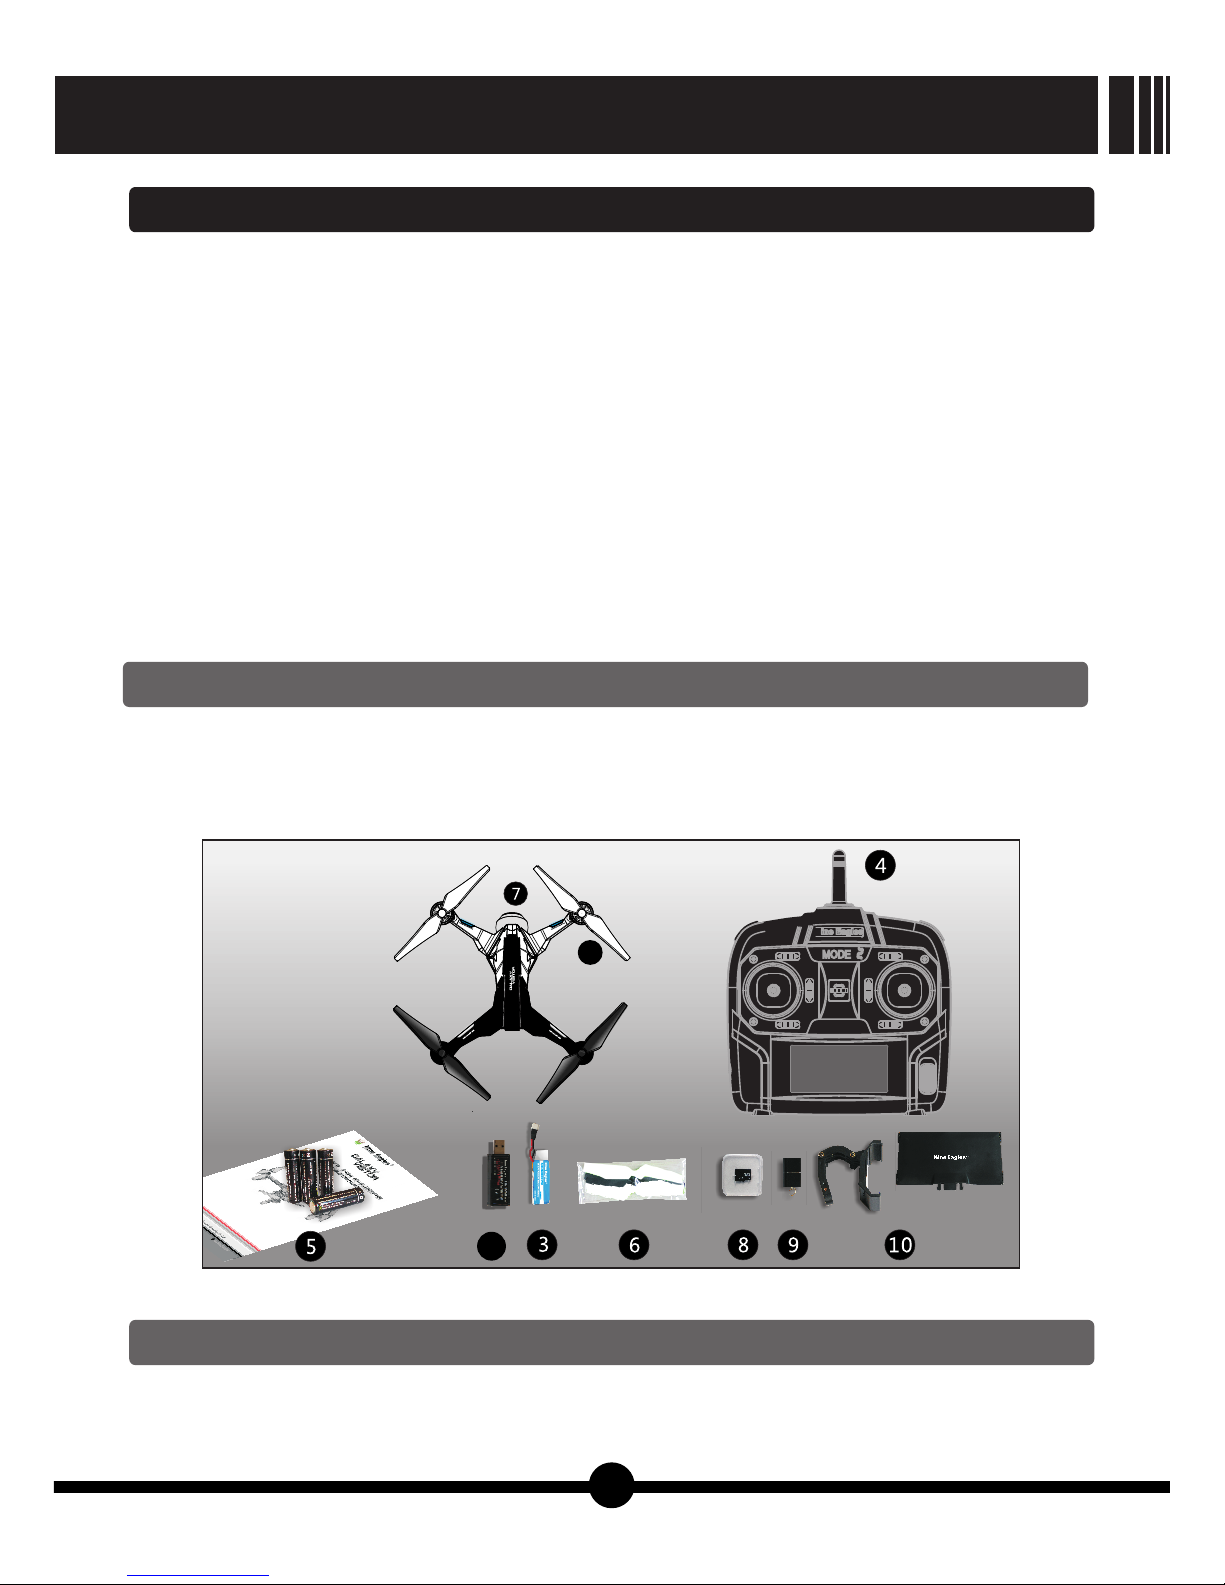
1.RTF kit contents:
1)
Quadcopter 4)Transmitter (Only for RTF version) 7)WIFI Camera
2)USB charger 5)4pcs AA batteries 8)2GB Micro SD card
3)Li-po battery 6)Accessory kit 9)SD card reader 10)Mobile phone holder
Note: Part 7) ,8),9),10) is only for GALAXY VISITOR 7 with camera version.
2.Specification and parameter:
Thanks you for purchasing GALAXY VISITOR 7 quadcopter produced by Shanghai Nine Eagle
Electronic Technology Co., Ltd (hereinafter referred to Nine Eagle Technology).
GALAXY VISITOR 7 quadcopter is 2.4GHz 4 channel model quadcopter, whose controller
internally installed three-axis gyro and three-axis accelerating sensor with excellent control function.
GALAXY VISITOR 7 quadcopter are easy to operate, steady in flight, easy to control. It can fly
indoors also can fly outdoor, which are the best choice for aerial photo fan.
GALAXY VISITOR 7 is equipped with 2.4G&5.8G WIFI camera, which can take photo and make
video by buttons in the transmitter or by APP in your mobile devices, such as smart phone, tablet, etc.
The photo & video can be easily shared to your social networks by APP. You can use the transmitter
to control the quadcopter flying and at the same time use your mobile devices as your FPV screen.
You can also use the mobile devices to control the quadcopter flying directly, and at the same time
monitor what's camera viewing by your screen of mobile devices.
We are certain you will get enjoyment out of this model.
Please read this instruction carefully before your flight in order to guarantee the safety of you and
the others.
GALAXY VISITOR 7
NE-MASF25
2
【Picture1】
Main blade diameter: 150 mm Overall length: 199 mm Diagonal length: 241 mm
Overall height: 66 mm Flying weight: about 130g

3.Main parts model number and specification:
Transmitter:NE-TXOS216-G,2.4GHz 4CH Receiver:NE-MASF25
Charger: NE-CH1020M USB Charger, output connection type: JST
Motor:8520 DC motor Battery:3.7V 700mAh Li-po battery
4.WIFI camera's specifications and parameters:
Memory: Accepts up to 32G Micro SD card
Camera Size: 91.5mm L x 39.4mm W x 38.5mm H
Codec Video: Motion JPEG, 1920X1080, 30fps, file extension . flv
Codec Audio: Mono
Still Image Capture: 1920 x 1080, file extension .jpg
WIFI Control Distance: About 80 meters @2.4G (No Interference and No obstacles)
About 100 meters @5.8G (No Interference and No obstacles)
GALAXY VISITOR 7 NE-MASF25
3
5.Quadcopter's main parts and indicator lights status instruction:
01 Front clockwise 04 Back 07 Front indicator light 12 Micro SD card socket
blade anticlockwise blade 08 Back indicator light 13 Camera indicator light
02 Front anticlockwise 05 Clockwise motor 09 Tail indicator light
blade 06 Anticlockwise 10 Battery compartment
03 Back clockwise motor 11 Camera
blade
01
04 05
06
10
08
07
12
13
08
07
05
02
03 09
06
11
【Picture2】
Front left
indicator
Front right
indicator
Back left
indicator
Back right
indicator
Tail
indicator
Camera
indicator Status
Solid on Solid on
Orange light
Solid on
No connection
with mobile
devices. Stand
/ / /
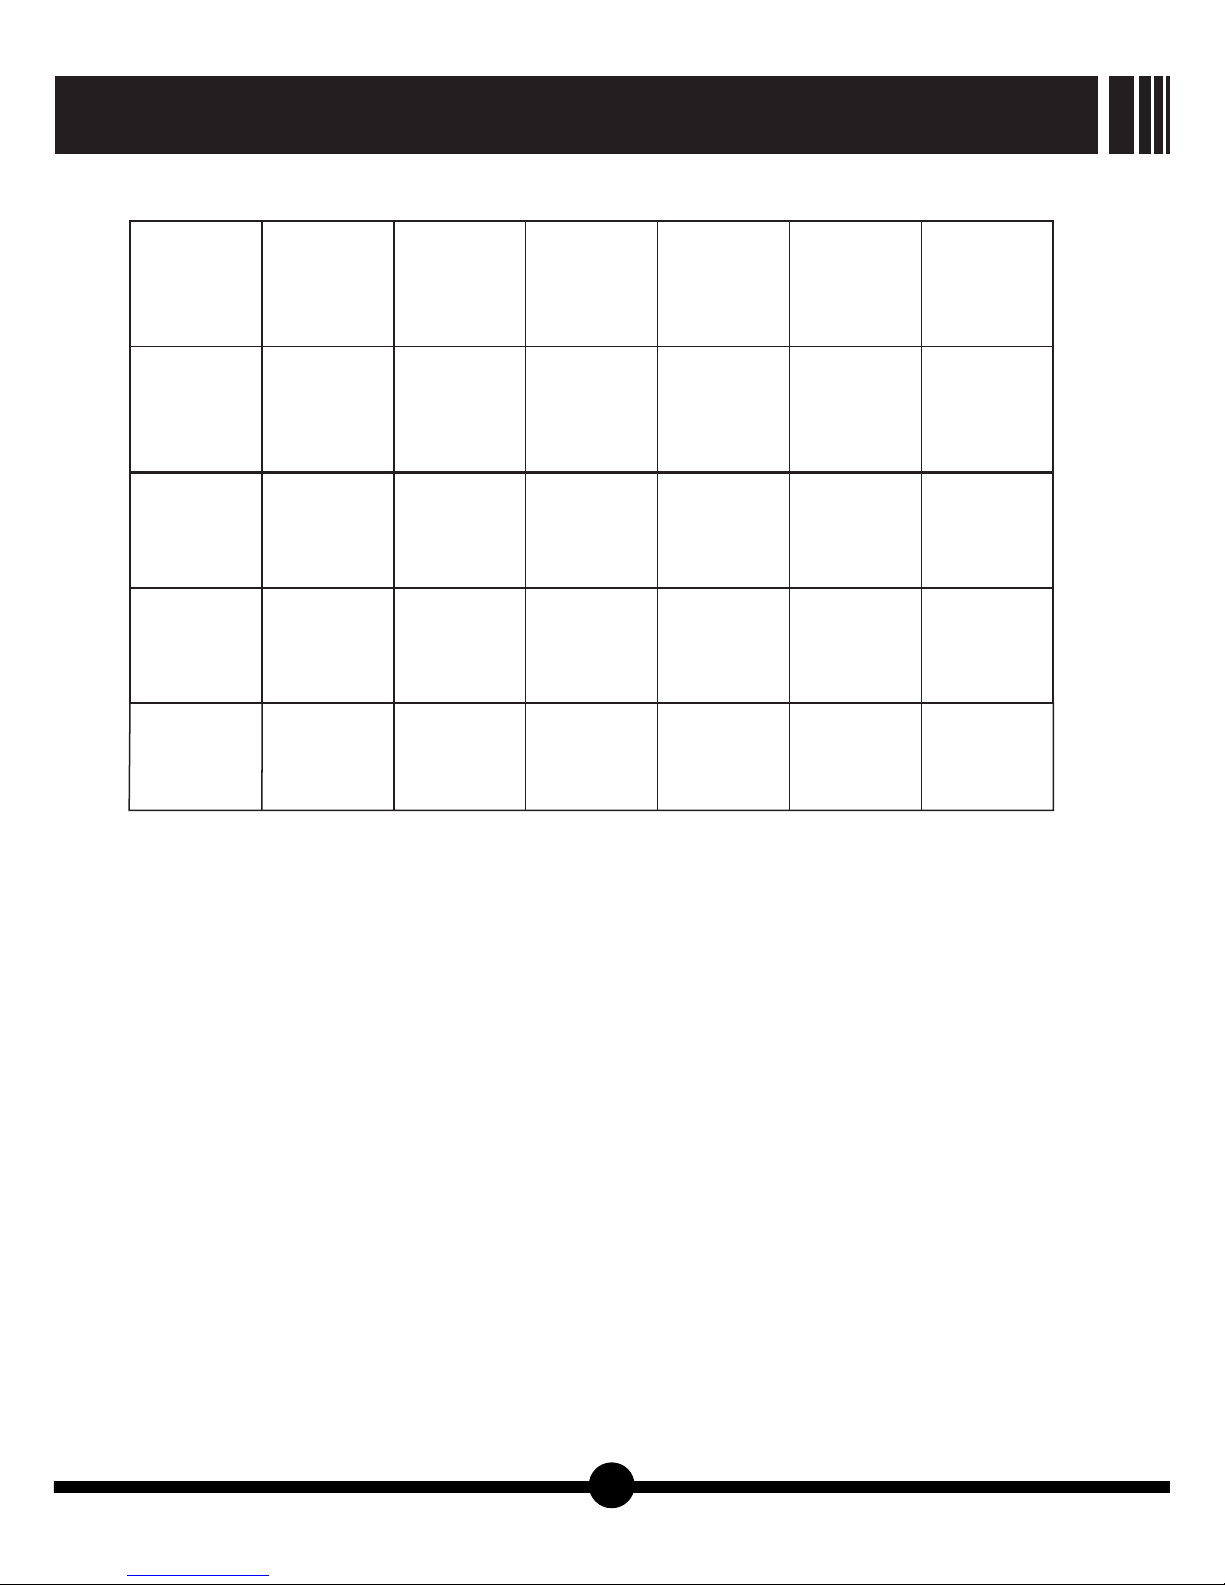
flash rapidly // Back right
indicator
light
/ Orange light
Solid on
No connection
with mobile
devices.
Quadcopter is
moving.
Solid on Solid on
blue light
Solid on
Successful
connection with
mobile devices.
Camera working
under 2.4G.
Solid on Solid on Solid on
Solid on Solid on Solid on
Solid on
Solid on Orange light
Solid on
Successful
connection with
mobile devices.
Camera working
under 2.4G.
flash slowly flash slowly flash slowly flash slowly flash rapidly flash
Low voltage in li-
po battery.
Calibration
mode.
flash
flash
Solid onSolid on
Solid on
Solid on
GALAXY VISITOR 7
NE-MASF25
4

5
Ⅲ. Operation Manual
【Picture3】
【Picture5】
【Picture4】
【Picture6】 【Picture7】
1.Charging the Li-po battery:
Warning! The charger contains protective circuitry. If you experience any difficulties while
charging the battery, please disconnect the battery from the charger and unplug the charger
from the power source. Allow the battery and the charger to rest for two hours as this will allow
the charger protection circuit to rest. If this issue re-occurs during normal use, please contact
technical support for further assistance.
1) Plug the USB charger into your USB port.
2) Plug the Li-po battery into the USB charger. The power indicator light on the charger turns to
solid on. It means charging. Once charging is finished, the power indicator light will flash slowly.
Please pull them out.
Below table shows different status in charging:
Charger status
To be charged
Charging
Full charge
Charging error
Charger indicator status
off
Solid on
Slow flash
Quick flash
This USB charger can recognize different charger power supply sources. When using computer
as the power supply source, the charging current is about 500mA and the rough charging time will be
70 minutes. When using charge power bank as the power supply source, the charging current is
about 1000mA and the rough charging time will be 45 minutes.
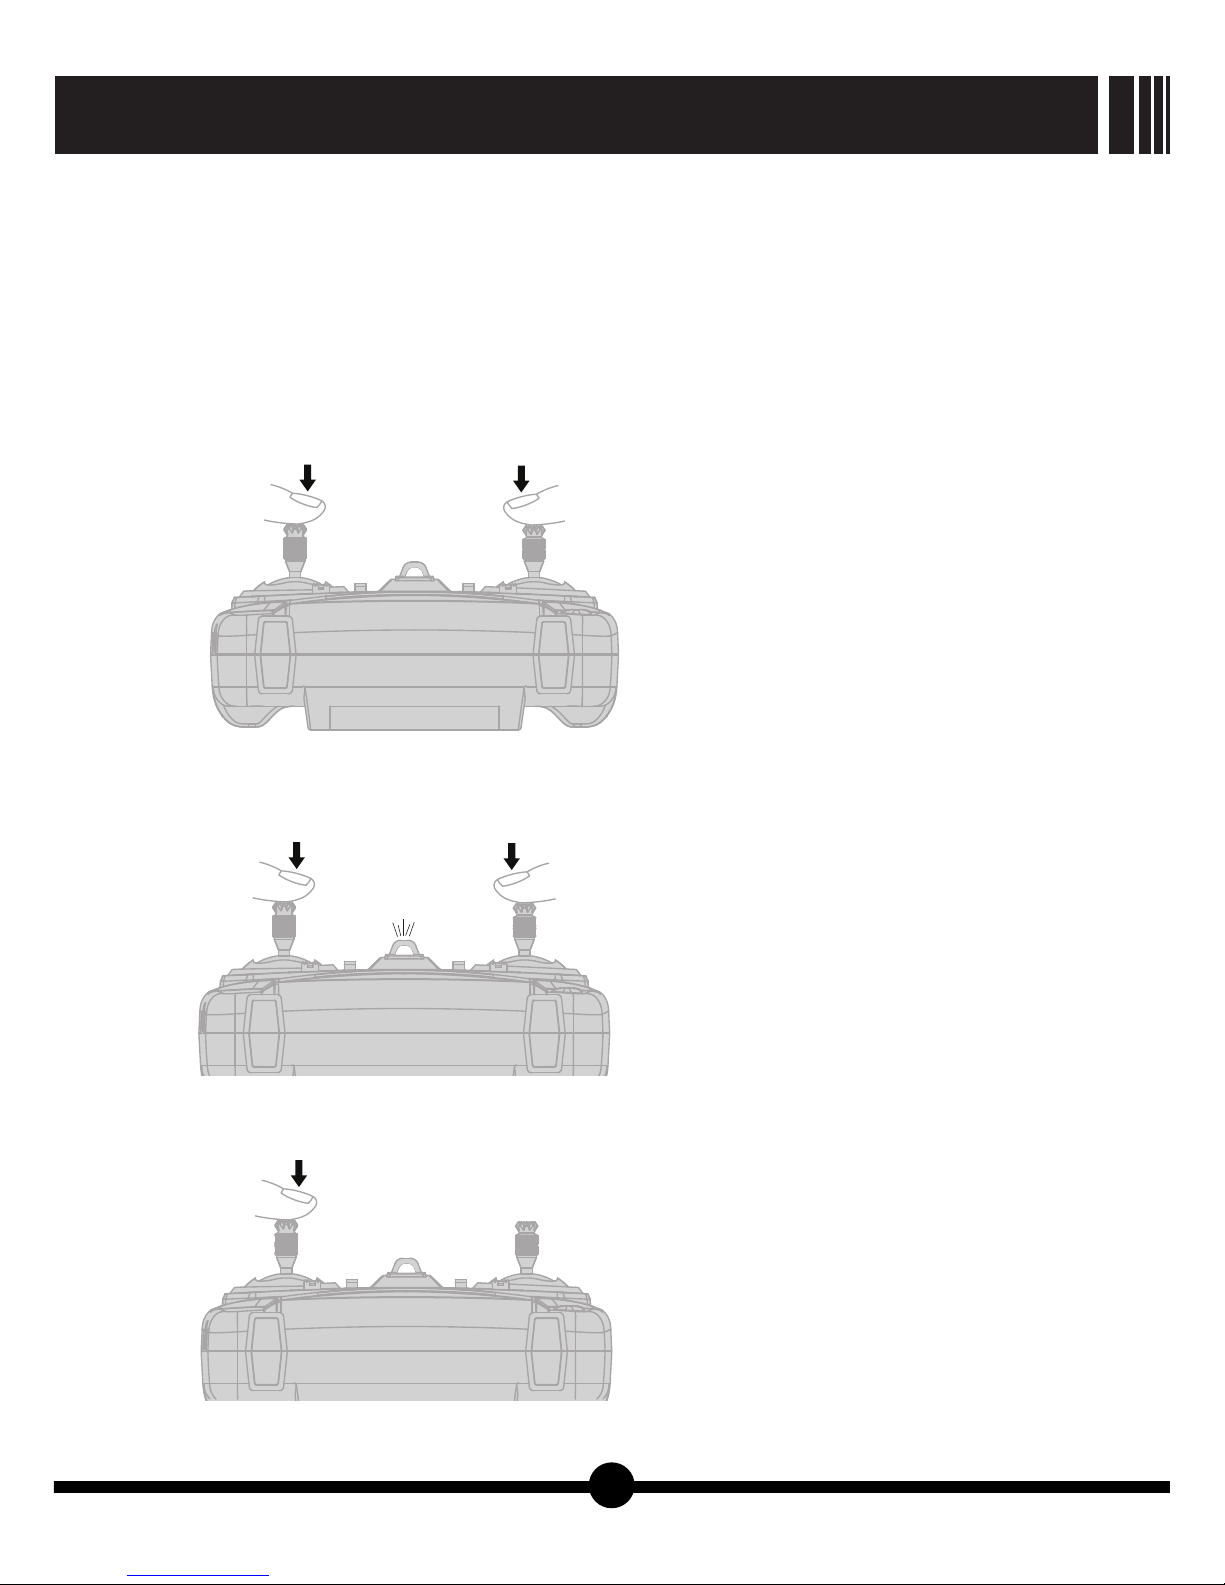
2.Install the Transmitter Battery
1) Remove the battery cover. (pic.5)
2) Install 4pcs AAA batteries and check the polarity of each battery. Transmitter won't power on if
battery wrongly installed. (pic. 6)
3) Slide the battery cover back into place (pic.7)
GALAXY VISITOR 7 NE-MASF25

3.Transmitter Controls:
1)Transmitter Functions (take MODE2 as example)
VIDEO OFF: Stop recording video.
VIDEO ON/PICTURE: Start recording
video and take a photo.
TAKEOFF: Press this button to take off.
LAND: Press this button to land.
Emergency Landing: Move the throttle
stick to the bottom and press the land
button.
Picture 9 : All controls are described
with the tail pointing directly toward
you. This is the best way to fly in the
beginning since it keeps the control
inputs oriented the same direction.
Once you start getting comfortable you
can work on side hovering and nose-in.
Attention: The throttle stick always
goes back to its middle position when
you release it.
Power indicator
TAKE OFF LAND
ON
VIDEO/
PICTURE
VIDEO OFF
6
2)High rate/Low rate switch
【Picture8】
【Picture9】
【Picture10】
Trim Tabs
On/off
Throttle
Stick
Climb
Descend
Rotage
Right
Rotate
Left
Cyclic
Stick
Forward
After
Right
Left
High rate/Low
rate switch
On/off
Stop
recording
video
Start recording
video and take
a photo
Press
this button
to take off
Press this
button to
land
The transmitter has dual rate switch
function. It provides two different control
rates, please use low rate until you
become accustomed to your GALAXY
VISITOR 7.
Quickly press right stick one time and
transmitter will sound “Bi” between high
rate and low rate. The voice “Bi” sounds
loud and clear when low rate turns to high
rate. The voice “Bi” sounds not loud when
high rate turns to low rate.
Quadcopter flight performance is more
flexible under the high rate mode.
GALAXY VISITOR 7
NE-MASF25
3)Gain setting
4)Transmitter calibration
Press the left stick and right
stick at the same time
5)Acceleration sensor calibration by transmitter
Bi--
1.Press the right stick and
keep pressing it
2.Press the throttle stick (the
left stick) quickly for three times
7
press the throttle stick (the
left stick) one time to save
【Picture11】
【Picture12】
【Picture13】
GALAXY VISITOR 7
NE-MASF25
Power on the transmitter and connect li-po battery to the quadcopter.
After successfully bound, lower the throttle stick to its lowest position.
Press the right stick and keep pressing. The constant voice “Bi” will appear. Now the transmitter
enters into gain setting mode.
Push throttle stick upper to the value you need. The voice will turn to incontinuous “Bi, Bi, Bi”.
Then release the right stick and then the transmitter will save the value.
A.Power on transmitter.
B.Press the left stick and the right stick at the
same time, wait until the transmitter sounds “Bi,
Bi, Bi, Bi”. Now the transmitter enters into
calibration mode.
C.Move the right stick to its maximum position in
four direction: up, down, left and right. Then
move the right stick to its middle position.
Repeat the above operation to the left stick.
D.Push the rudder trim button to the right for one
time, then the transmitter will quit calibration.
If quadcopter nose-rotating is not normal, we need
to do acceleration sensor calibration.
A.Please follow the instructions Power on
transmitter and Connect quadcopter and Li-po
battery on Section 6. Flying.
Make sure the throttle stick (the left stick) at its
lowest position and hold it. Then power on
transmitter. After that, release the throttle stick
(the left stick) free.
B.Connect li-po battery to quadcopter and make
sure to keep the quadcopter stay still and quite
on flat surface, now the tail indicator light will be
solid on.
C.Press the right stick and keep pressing it. Then
press the throttle stick (the left stick) quickly for
three times in a very short time. When the
transmitter makes a “Bi” sound, the transmitter
is in calibration mode, then loosen both the left
and right stick.
D.Then move the throttle stick at its lowest
position and hold it.
E.Push the throttle trim button upwards and then
the tail indicator light turns to quickly flashing.
F.During its flashing, press the throttle stick (the
left stick) one time to save. Finally the tail
indicator light will be solid on. Acceleration
sensor calibration is done.
When quadcopter can not do hovering and fly to one side, we need to do calibration by following
the below steps.

4.Download and Install APP:
5.Smart phone holder installation and usage
1) Download and install APP:
Attention: Please check the latest APP version on www.nineeagle.com or you may update the APP
inside About page.
Optional ways to download
Use your mobile devices (Android operating system) to visit :
http://www.nineeagle.com/product/product_download.aspx?id=50
Visit Apple Store or Google Play by searching “nineeagle” to download.
Scan two-dimension code.
After download APP, please install it.
2) Find APP manual:
Please find the manual in “manual” section of User Center or visit www.nineeagle.com
3) Teaching Video
Please find the “video” section of User Center or visit www.nineeagle.com
Our product contains the smart phone holder, please follow the instruction to install.
a.Fix smart phone holder to the
transmitter and tighten the screws.
b.Put smart phone in the middle of holder
and ensure mobile phone firmly fixed.
c.Fix the screen hood to the holder slot
and unfold the hood.
d.Adjust the holder to get the best visual
direction.
【Picture14】
【Picture16】
【Picture15】
【Picture17】
8
GALAXY VISITOR 7
NE-MASF25
6.Preparation before flying
Attention: It is suggested to have your mobile devices set as No-disturbing mode before flight as
the application of APP will be severely affected by coming in phone calls.
1) Power on transmitter
Move the throttle stick to the lowest position, and turn on transmitter. Then release the throttle stick.
2) Prepare quadcopter
a.Plug Micro SD card into card slot of the camera.
b.Remove the battery cover off the quadcopter, pull out the power connection line.
c.Put the quadcopter horizontally, connect the quadcopter with the li-po battery.
d.Put the battery inside the battery compartment and close the cover.
e.Make sure to keep the quadcopter horizontally still and quite.
3) Prepare mobile devices
a.During flight, the APP performance will be greatly affected if phone call comes or other
interruption come across, so it is suggested to have your mobile set as No-disturbing mode.
b.Enter the setting menu-wireless and network-WLAN, check the WIFI signal connection status.
And it takes about 30-60 seconds from WIFI signal searching to connection.
c.Choose WIFI signal of the quadcopter(FPV_X231), enter with the password(1234567890).All the
indicator lights will be solid on after successful connection.
d. Enter the main interface of APP.
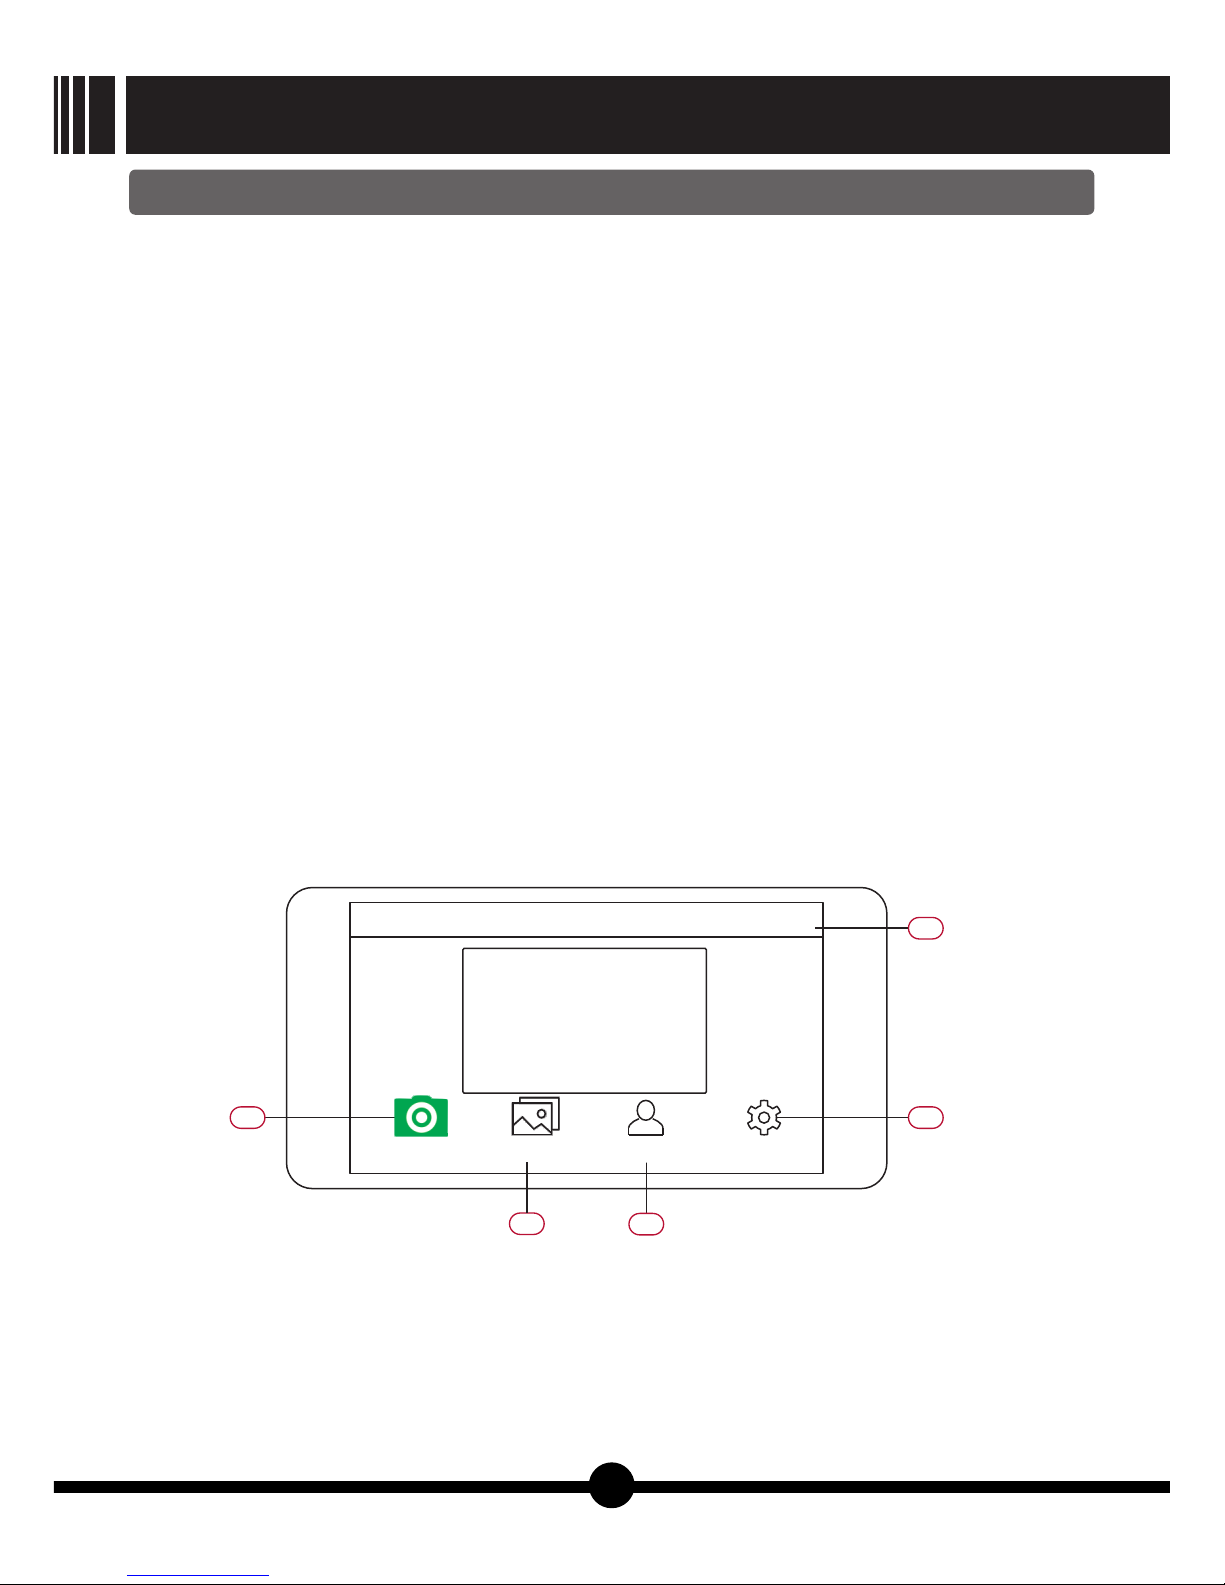
e.Add the camera by clicking icon(01). Then mobile device will show the preview in the screen.
After about 2 seconds, APP enters into "connection interface".
〖01〗 Add camera: connect the mobile device share photos & videos.
with the quadcopter. 〖04〗 Users center: download manual or teaching
videos
〖02〗 Camera: operation interface.
〖05〗 Setting: camera, flight parameter and APP
〖03〗 Photo album: download, delete and setting.
● APP connection interface:
【Picture18】
Camera
02
03 04
05
01
Photo album Users center Setting
Nineeagle +
9
GALAXY VISITOR 7 NE-MASF25

4)Ready to Fly
Place the quadcopter in empty place and let its tail face to pilot.
Attention:
Motor electricity overload protection function:
7.Transmitter controlled flying
It is suggested that GALAXY VISITOR 7 should be suitable for flying indoor or outdoor where the
wind should be no more than 5mph. The flying area should be more than 15 squire meters without
obstacles.
If quadcopter works in the following situation, the motor electricity overload protection function
starts to work.
During flying, quadcopter blades touch obstacles. The motor will stop rotating at once.
During flying, inclining angle of quadcopter's body is larger than 45°. The motor will stop rotating at
once.
10
1) Take off
Press the TAKE OFF button on the transmitter. The quadcopter will take off automatically and
hover at the height 1 meter.
Moving the throttle stick upwards, quadcopter will climb.
Moving the throttle stick downwards, quadcopter will descend.
2) Hovering
Since altitude sensor is quipped in this quadcopter, once throttle stick is released, quadcopter will
try to keep the current flight height. Just need to control aileron and elevator to hover. If it is the first
time for flying such quadcopter, some practice should be needed.
During flying, please pay attention to wind or air stream, which will disturb its hovering. It is easy
to hover even you release both two sticks and quadcopter will only move in a small range.
3) Transmitter controls
Take MODE2 as example.
Left or Right: Moving aileron stick left or right will cause the quadcopter tilt and start moving that
direction.
Forward or Backward: Moving elevator stick forward or backward will cause the quadcopter to tilt
and start moving that direction.
Climb or Descend: Moving the throttle stick up or down will cause the quadcopter to climb or
descend
Nose Rotates: Moving the rudder stick left or right will cause the quadcopter nose to rotate that
direction
4) Land
Before landing, try to keep quadcopter hovering stably. Then press LAND button on transmitter.
Quadcopter will land slowly to the ground.
5) Emergency Landing
In case of emergency, move the throttle stick to the bottom and press the land button. Motor will
stop rotating at once and quadcopter will fall down immediately.
Attention: This function is only for emergency use. Please think carefully before using it because it
may damage the quadcopter.
GALAXY VISITOR 7
NE-MASF25

8.Mobile devices controlled flying
After successful connection between mobile device and quadcopter, the screen of mobile
device will show control interface automatically.
control interface instruction:●
【Picture19】
this button, motors will stop rotating and
〖06〗back to main interface quadcopter will fall down at once.
〖07〗control mode switch:〖11〗 Video shooting
stick mode
〖12〗 Photo taking
gravity mode
〖13〗 Left operating stick
〖08〗flight mode switch:
Primary mode: easy to operate for beginners 〖14〗 Right operating stick
Senior mode: quick and agile reaction. Gain 〖15〗 Take off or Land switch
setting can be adjusted in setting 〖16〗 Wifi signal strength indicator
menu.
〖17〗 Current battery capacity indicator: Green:
〖09〗Calibration: calibrate acceleration sensor enough for flying. Yellow: low battery and need to
calibration by this button before flying. fly home. Red: battery runs out and need to land
Trim: trim hovering during flying. immediately.
〖10〗 Emergency Landing: During flying, after touching
Before flying, please choose suitable mode by clicking 07 control mode switch and 08 flight mode
switch.
1) Take off
Click 15 Take off switch and motors on quadcopter start to rotate. Then quadcopter will take off
automatically and hover at the height 1 meters in the air.
2) Quadcopter flying control
Using stick mode for flying control:
Throttle stick is the Left operating stick in mode 2.
Throttle stick is the Right operating stick in mode 1.
Left or Right: Keep pressing aileron stick left or right. Then moving it left or right will cause the
quadcopter tilt and start moving that direction.
Forward or Backward: Keep pressing elevator stick. Then moving it forward or backward will cause
the quadcopter to tilt and start moving that direction.
Climb or Descend: Keep pressing the throttle stick. Then moving it up or down will cause the
gravity
mode
06 07 08 09 10 11 12
13 14
171615
Senior
mode Trim
stick
mode
Primary
mode Calibration
11
GALAXY VISITOR 7 NE-MASF25

mode 1
Rotate to
left
Right Stick
Climb
Rotate to
right
Descend
Slide to
left
Left Stick
Forward
Slide to
right
Backward
Rotate to
left
Left Stick
Climb
Rotate to
right
Descend
Slide to
left
Right Stick
Forward
Slide to
right
Backward
mode 2
【Picture20】
【Picture21】
12
●Using gravity mode for flying control:
When switching to gravity mode, the control interface only shows throttle stick and rudder stick.
Left or Right: Tilting the mobile device left or right will cause the quadcopter tilt and start moving
that direction.
Forward or Backward: Tilting the mobile device forward or backward will cause the quadcopter to
tilt and start moving that direction.
Climb or Descend: Keep pressing the throttle stick. Then moving it up or down will cause the
quadcopter to climb or descend.
Nose Rotates: Keep pressing rudder stick. Then moving it left or right will cause the quadcopter
nose to rotate that direction.
quadcopter to climb or descend.
Nose Rotates: Keep pressing rudder stick. Then moving it left or right will cause the quadcopter
nose to rotate that direction.
GALAXY VISITOR 7
NE-MASF25
gravity
mode Trim
Primary
mode

3) Land:
Before landing, try to keep quadcopter hovering stably. Then click 15 Land switch. Quadcopter will
land slowly to the ground.
4) Emergency Land:
In case of emergency, click 10 Emergency Landing. Motor will stop rotating at once and
quadcopter will fall down immediately.
This function is only for emergency use. Please think carefully before using it because it
may damage the quadcopter.
Attention:
9.Basic maneuvers
Tail towards pilot:
Slowly Rotation:
Firstly turn the quadcopter tail towards to you without deflection.
Then moving elevator stick forwards slowly and quadcopter will fly forwards at slow speed.
And moving elevator stick backwards slowly and quadcopter will fly backwards at slow speed.
Practicing again and again till you feel comfortable on it.
After that, moving the aileron stick left, the quadcopter will move left. And moving the aileron stick
right, the quadcopter will move right. Practicing again and again till you feel comfortable on it.
Add a small amount of rudder stick (left or right) and try rotating the quadcopter slightly sideways
and see if you can hold it there.
If you feel uncomfortable, then bring the tail back towards you. Practicing again and again until you
feel comfortable on rotation.
The quadcopter will probably drift during these practicing, so make sure you have plenty of room
After above practicing, if you feel comfortable, moving aileron stick left that will cause quadcopter
to move left, then rotate quadcopter 90 degrees clockwise, and then moving aileron stick right that will
cause quadcopter to move right. Then rotate quadcopter 180 degrees and fly to left side.
You also can move elevator stick forward that will cause quadcopter to move forward, then rotate
quadcopter 180 degrees clockwise, then make quadcopter fly backwards to you. Then rotate
quadcopter 180 degrees clockwise and make quadcopter fly forward to you.
After practicing as above, you will get to know the basic flight knowledge. But it needs time to
practice, the more time you spend practicing the easier things will be on. Every practice is a different
challenge that brings you a lot of fun!
Good luck and enjoy your flying!
13
Before calibration, put the quadcopter on a horizontal surface. Connect mobile device to quadcopter and
enter into control interface. Then click the 09 Calibration. After that the quadcopter tail indicator LED light
begin to flash. When LED light turns to solid on, calibration ends.
After taking off, if there is no external interference(for example wind blows ), the quadcopter
should hover stably in small range without too much moving. If quadcopter moves to some direction
in big range, hovering trim is necessary
Firstly, fly the quadcopter at the height about 1 meter in the air. Then release both Left operating
stick and Right operating stick and observe quadcopter's moving direction. Click 09 Trim to enter into
trim mode. If quadcopter moves forward, move the elevator stick backward a little and quadcopter will
slow the moving forward. Keep moving the elevator stick until quadcopter hovers stably in small
range. At last, click 09 Trim to save.
10.Acceleration sensor calibration by APP
11.Hovering trim by APP
GALAXY VISITOR 7 NE-MASF25

14
12.Video Shooting
13.Photo Shooting
14.Take out Li-po battery
15.Reading data
16.Instructions for some APP functions
There are two ways for video shooting.
● By transmitter - Press button “VIDEO /PICTURE ON” one time on the top right corner of transmitter
backside, and WIFI camera will start camera shooting. Press button “VIDEO OFF” one time on the
top left corner of transmitter backside to stop shooting and save video.
● By APP- Click 11 Video shooting to start (the icon 11 Video shooting on the screen will flash), and
click 11 Video shooting again to stop video shooting.
Attention: Before removing the li-po battery, please make sure to stop the video shooting to save
video. Otherwise, the video can not be saved.
Please disconnect the battery from the quadcopter as soon as flight is over and take the battery
out of its compartment for separate storage.
Please read data as following steps after video/photo shooting:
1) Disconnect quadcopter LI-PO battery.
2) Take out SD card.
3) Insert SD card into the USB card reader.
4) Connect USB card reader to USB interface of the computer.
5) Find video/photo in “portable storage” in your computer.
There are two ways for photo shooting.
● By transmitter - Under above video shooting mode, press the button “VIDEO /PICTURE ON” one
time on the top right corner of transmitter backside, WIFI camera will take one picture.
● By APP - Click 12 Photo taking to take one photo. Keep pressing the icon 12 Photo taking, camera
will take photos continuously
Note: Time interval for continuous photo shooting can be adjusted in APP Setting.
【Picture22】
Camera
02
03 04
05
Photo album Users center Setting
Nineeagle +
GALAXY VISITOR 7
NE-MASF25
●
●
●
〖03〗Photo album
When the mobile device is connected with the quadcopter, in the photo album interface, you can
view, download, delete or share photos & videos.
When photos & videos are downloaded to your mobile device, you can view, delete or share photos
& videos.
〖04〗User Center
You can acquire the latest manuals, teaching videos through related internet links in the menu of
User Center.
〖05〗Setting
You can personalize the setting of APP and camera, and acquire the latest information.
1) Aircraft settings: Mobile device must connects Quadcopter:
① Senior parameter Settings: Adjust settings in stick/gravity mode and primary/senior mode, for
example:
Maximum angle of roll: Settings for quadcopter rolling angle for Left or Right & Forward or
Backward direction.
Maximum rotation Angle: Settings for quadcopter rotating angle for Left or Right & Forward or
Backward direction.
②Network Settings: Choose 2.4GHz or 5GHz in this setting by manual or automatic way. After
changing setting, camera will restart.
Attention: Before choosing 5G, please make sure your mobile device support this 5GHz.
Otherwise, connection is impossible.
③”Stick mode:
Mode 1- Throttle stick is the Right operating stick.
Mode 2- Throttle stick is the Left operating stick.
④Aircraft alarm prompt: Warning invoice can be turned on or off.
⑤Aircraft alarm volume: Warning volume is adjustable.
⑥Recording: Turn it on or off to record voice into video.
Camera storage management : Information of current SD card, like storage capacity.
Camera information: Camera and quadcopter hardware version information /Model number
2) Storage management: Information of current mobile device, like storage capacity.
3) Language: Simplified Chinese and English are supported.
4) Parameter Unit: Choose meter or inch.
5) About: Latest APP version can be checked here. Nine Eagles contact information is available.
15
GALAXY VISITOR 7 NE-MASF25
01
02
03
04
03
05
06
08
07
09
10
01
02
03
03
05
06
08
11
10
10
10
01
06
13
12
13
07
14
15
【Picture23】
16
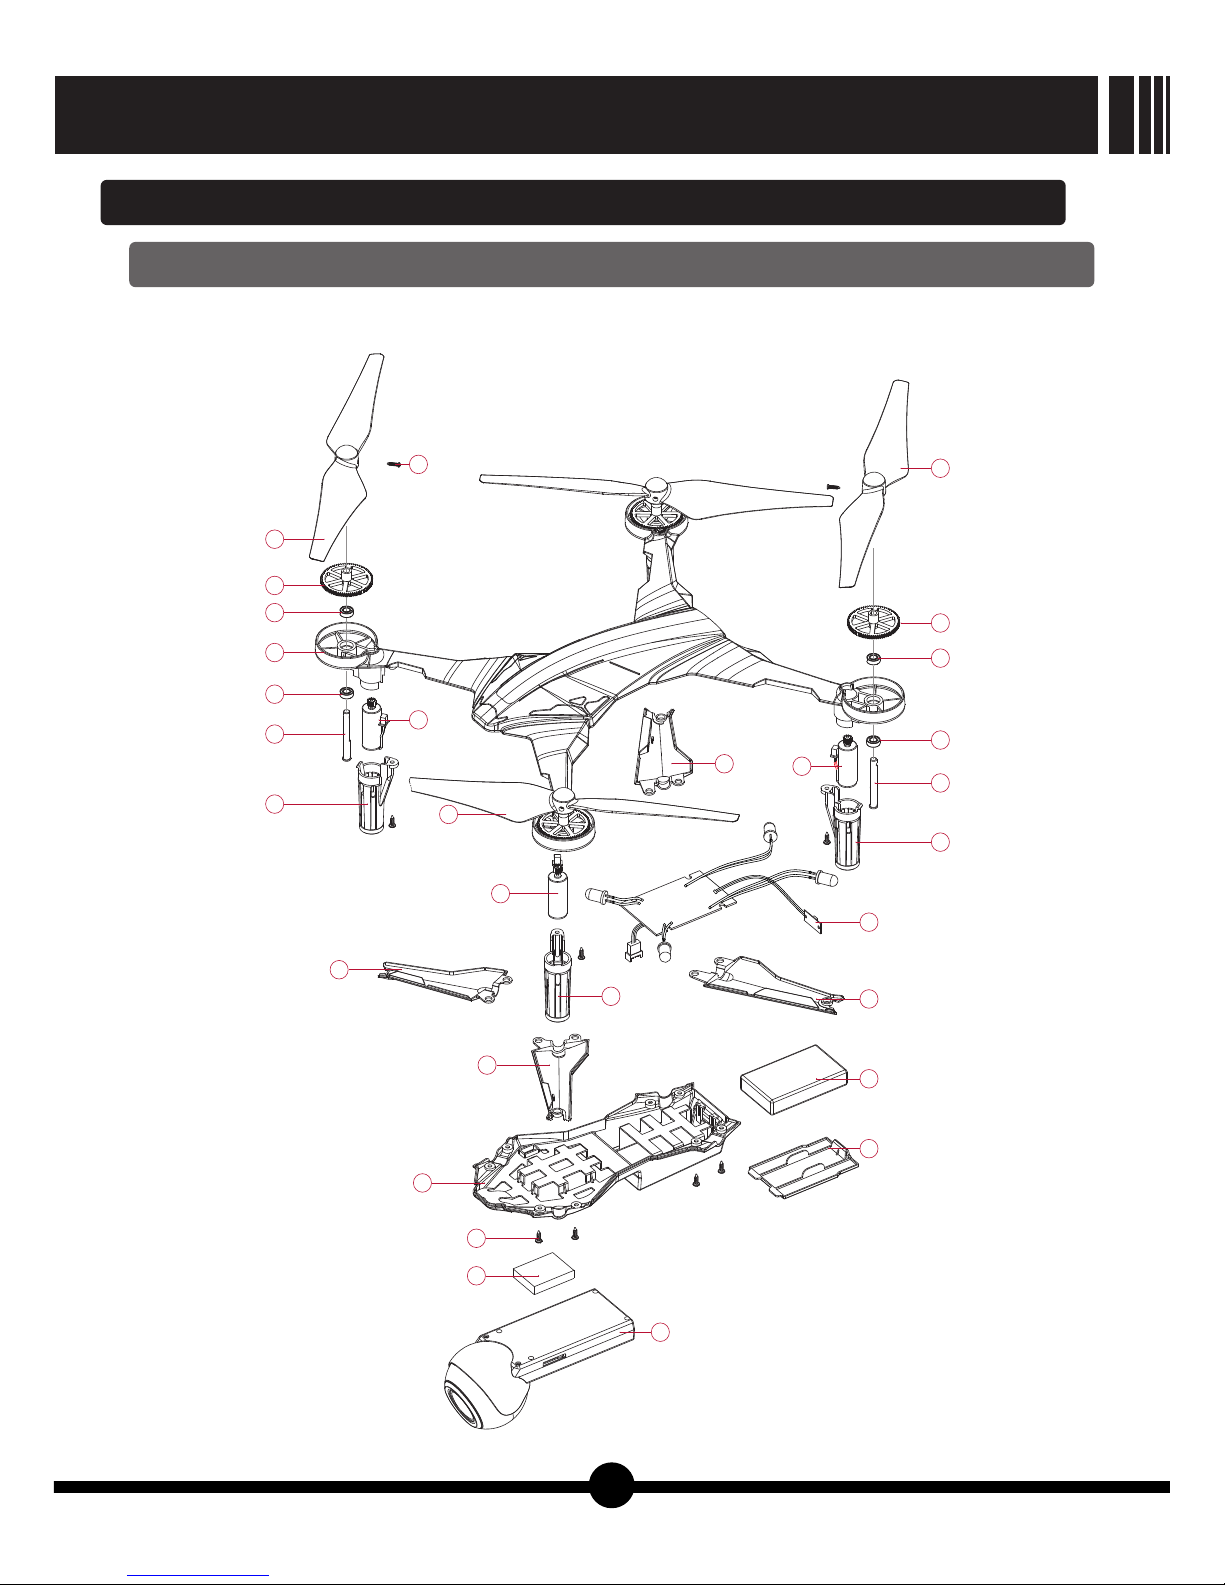
Ⅳ. Explosive View and Spare Parts List
1.Explosive View
GALAXY VISITOR 7
NE-MASF25
Table of contents
Other Nine Eagles Quadcopter manuals

Nine Eagles
Nine Eagles Galaxy Visitor 2 NE-MASF11 User manual

Nine Eagles
Nine Eagles galaxy visitor7 User manual

Nine Eagles
Nine Eagles NE-MASF33 User manual

Nine Eagles
Nine Eagles GALAXY VISITOR 3 User manual

Nine Eagles
Nine Eagles Galaxy Visitor 2 User manual

Nine Eagles
Nine Eagles Galaxy Visitor 3 NE2529M1 User manual


